1
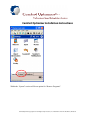
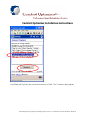
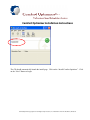
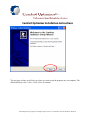
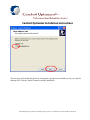
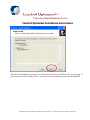
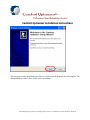
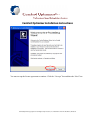
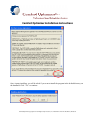
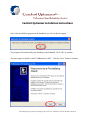
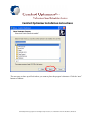
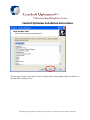
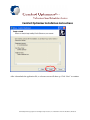
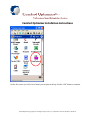
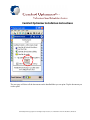
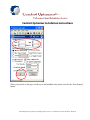
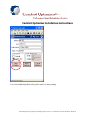
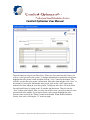
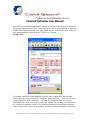
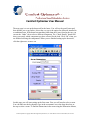
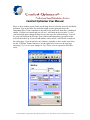
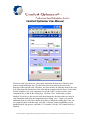
Comfort Optimizer Installation Instructions
Congratulations on choosing the best all around load calculation program available. Along with this
instruction manual should be the installation CD. Before we can install the Comfort Optimizer, we have
to get the handheld device setup first. Follow the instructions included with it for directions.
You must have the following done prior to installing the Comfort Optimizer.
1. Handheld device must be turned on and connected to your PC (preferably sitting in the cradle)
2. Microsoft Active Sync must be installed and the hand held unit connected to your PC. This can be
connected as a partnership or as a guest, refer to the Quick Start Guide instruction that came with your
handheld to accomplish this. If you wish to have your email and contacts synced with the hand held
unit, than you must setup the partnership and you must have Microsoft Outlook installed as well on your
computer.
3. Make sure that the older version of the Comfort Optimizer is uninstalled before continuing.
To uninstall the older version of Comfort Optimizer, click the “Start” button on your handheld and go to
the “Settings” section.
Comfort Optimizer Copyright 2002-2004 Opportunity Interactive, Inc. 22525 Marine View Dr S Des Moines, WA 98198
Comfort Optimizer Installation Instructions
At the bottom of the “Settings” section, you will need to click on the “System” section.
Comfort Optimizer Copyright 2002-2004 Opportunity Interactive, Inc. 22525 Marine View Dr S Des Moines, WA 98198
Comfort Optimizer Installation Instructions
Within the “System” section will be an option for “Remove Programs”.
Comfort Optimizer Copyright 2002-2004 Opportunity Interactive, Inc. 22525 Marine View Dr S Des Moines, WA 98198
Comfort Optimizer Installation Instructions
The highlight the program labeled “OpActive Comfort Optimizer” and click the “Remove” button below
that.
Comfort Optimizer Copyright 2002-2004 Opportunity Interactive, Inc. 22525 Marine View Dr S Des Moines, WA 98198
Comfort Optimizer Installation Instructions
It will then ask if you are sure you want to remove it. Click “Yes” to remove the program.
Comfort Optimizer Copyright 2002-2004 Opportunity Interactive, Inc. 22525 Marine View Dr S Des Moines, WA 98198
Comfort Optimizer Installation Instructions
The Comfort Optimizer is a great tool but you need to understand the concepts and procedures of
performing load calculations. For example, you need to know the difference between a Slab on Grade
and an exposed Floor over Crawl space or when a ceiling is exposed or not. To learn the basics of load
calculations, contact ACCA @ 1-888-290-2220. We recommend understanding the concepts within
Manual J seventh edition, Manual D and Manual RS.
Once you are ready, place the Comfort Optimizer CD into the CD drive of your computer. Make sure
the handheld is connected and recognized by the Active Sync software.
Comfort Optimizer Copyright 2002-2004 Opportunity Interactive, Inc. 22525 Marine View Dr S Des Moines, WA 98198
Comfort Optimizer Installation Instructions
The CD should automatically launch the install page. Click on the “Install Comfort Optimizer”. Click
on the “Next” Button to begin.
Comfort Optimizer Copyright 2002-2004 Opportunity Interactive, Inc. 22525 Marine View Dr S Des Moines, WA 98198
Comfort Optimizer Installation Instructions
The next page to show up will ask you where you want to put the program on your computer. The
default directory is the c: drive. Click “Next” to continue.
Comfort Optimizer Copyright 2002-2004 Opportunity Interactive, Inc. 22525 Marine View Dr S Des Moines, WA 98198
Comfort Optimizer Installation Instructions
The next page will ask if you want to create a desktop icon for the program. Make sure the box is
checked before clicking “Next”.
Comfort Optimizer Copyright 2002-2004 Opportunity Interactive, Inc. 22525 Marine View Dr S Des Moines, WA 98198
Comfort Optimizer Installation Instructions
The next page will confirm the directory the program is going into and whether or not you wanted a
desktop icon. Click the “Install” button to start the installation.
Comfort Optimizer Copyright 2002-2004 Opportunity Interactive, Inc. 22525 Marine View Dr S Des Moines, WA 98198
Comfort Optimizer Installation Instructions
After the CD downloads the program, you will be asked which version of Pocket PC you are using. If
you are not sure which version you have, consult the owner’s manual that came with the handheld.
Comfort Optimizer Copyright 2002-2004 Opportunity Interactive, Inc. 22525 Marine View Dr S Des Moines, WA 98198
Comfort Optimizer Installation Instructions
For those using Pocket PC 2003:
After checking the Pocket PC 2003 box, click the “OK” button.
Comfort Optimizer Copyright 2002-2004 Opportunity Interactive, Inc. 22525 Marine View Dr S Des Moines, WA 98198
Comfort Optimizer Installation Instructions
The next screen will confirm that you are installing the Comfort Optimizer program on a Pocket PC
2003 unit. Click “Next” to continue.
Comfort Optimizer Copyright 2002-2004 Opportunity Interactive, Inc. 22525 Marine View Dr S Des Moines, WA 98198
Comfort Optimizer Installation Instructions
The next page to show up will ask you where you want to put the program on your computer. The
default directory is the c: drive. Click “Next” to continue.
Comfort Optimizer Copyright 2002-2004 Opportunity Interactive, Inc. 22525 Marine View Dr S Des Moines, WA 98198
Comfort Optimizer Installation Instructions
The next page to show up will ask where you want to place the program’s shortcuts. Click the “next”
button to continue.
Comfort Optimizer Copyright 2002-2004 Opportunity Interactive, Inc. 22525 Marine View Dr S Des Moines, WA 98198
Comfort Optimizer Installation Instructions
The next page will ask if you want to create a desktop icon for the program. Make sure the box is
checked before clicking “Next”.
Comfort Optimizer Copyright 2002-2004 Opportunity Interactive, Inc. 22525 Marine View Dr S Des Moines, WA 98198
Comfort Optimizer Installation Instructions
The next page will confirm the directory the program is going into and whether or not you wanted a
desktop icon. Click the “Install” button to start the installation.
Comfort Optimizer Copyright 2002-2004 Opportunity Interactive, Inc. 22525 Marine View Dr S Des Moines, WA 98198
Comfort Optimizer Installation Instructions
After it downloads the application file, a welcome screen will show up. Click “Next” to continue.
Comfort Optimizer Copyright 2002-2004 Opportunity Interactive, Inc. 22525 Marine View Dr S Des Moines, WA 98198
Comfort Optimizer Installation Instructions
You must accept the license agreement to continue. Click the “I Accept” box and then the “Next” box.
Comfort Optimizer Copyright 2002-2004 Opportunity Interactive, Inc. 22525 Marine View Dr S Des Moines, WA 98198
Comfort Optimizer Installation Instructions
The next page will start the installation of the software after you click the “Install” button. Make
sure that your handheld is in the cradle and turned on.
Comfort Optimizer Copyright 2002-2004 Opportunity Interactive, Inc. 22525 Marine View Dr S Des Moines, WA 98198
Comfort Optimizer Installation Instructions
Once it starts installing, you will be asked if you want to install the program in the default directory on
the handheld. Click “Yes” to continue.
Once it has installed the program on the handheld, you will see this box appear:
Comfort Optimizer Copyright 2002-2004 Opportunity Interactive, Inc. 22525 Marine View Dr S Des Moines, WA 98198
Comfort Optimizer Installation Instructions
The program will automatically start installing on the handheld. Click “OK” to continue.
To finish the installation, click the “Finish” button on the next screen.
The next program to install is the Print Pocket program. This program will allow you to print
From the handheld to a printer that has BlueTooth capabilities. Click “Next” to continue.
Comfort Optimizer Copyright 2002-2004 Opportunity Interactive, Inc. 22525 Marine View Dr S Des Moines, WA 98198
Comfort Optimizer Installation Instructions
The next screen, you will be asked to accept the license agreement. Click “Yes” to continue.
Comfort Optimizer Copyright 2002-2004 Opportunity Interactive, Inc. 22525 Marine View Dr S Des Moines, WA 98198
Comfort Optimizer Installation Instructions
Once it starts installing, you will be asked if you want to install the program in the default directory on
the handheld. Click “Yes” to continue.
Comfort Optimizer Copyright 2002-2004 Opportunity Interactive, Inc. 22525 Marine View Dr S Des Moines, WA 98198
Comfort Optimizer Installation Instructions
Once it has installed the program on the handheld, you will see this box appear:
The program will automatically start installing on the handheld. Click “OK” to continue.
The last program to install is called “VBRuntime for PPC”. Click the “Next” button to continue.
Comfort Optimizer Copyright 2002-2004 Opportunity Interactive, Inc. 22525 Marine View Dr S Des Moines, WA 98198
Comfort Optimizer Installation Instructions
The next page will start the installation of the software after you click the “Install” button.
Once it starts installing, you will be asked if you want to install the program in the default directory on
the handheld. Click “Yes” to continue.
Comfort Optimizer Copyright 2002-2004 Opportunity Interactive, Inc. 22525 Marine View Dr S Des Moines, WA 98198
Comfort Optimizer Installation Instructions
Once it has installed the program on the handheld, you will see this box appear:
The program will automatically start installing on the handheld. Click “OK” to continue.
The last page will let you know that the entire program has been installed. Click the “Finish” button to
finish.
Comfort Optimizer Copyright 2002-2004 Opportunity Interactive, Inc. 22525 Marine View Dr S Des Moines, WA 98198
Comfort Optimizer Installation Instructions
Congratulations, the installation is now complete.
Once you have the Comfort Optimizer installed, the first thing to do is go through the tutorials.
For those using Pocket PC 2002:
After checking the Pocket PC 2003 box, click the “OK” button.
The next screen will confirm that you are installing the Comfort Optimizer program on a Pocket PC
2002 unit. Click “Next” to continue.
Comfort Optimizer Copyright 2002-2004 Opportunity Interactive, Inc. 22525 Marine View Dr S Des Moines, WA 98198
Comfort Optimizer Installation Instructions
The next page to show up will ask you where you want to put the program on your computer. The
default directory is the c: drive. Click “Next” to continue.
Comfort Optimizer Copyright 2002-2004 Opportunity Interactive, Inc. 22525 Marine View Dr S Des Moines, WA 98198
Comfort Optimizer Installation Instructions
The next page to show up will ask where you want to place the program’s shortcuts. Click the “next”
button to continue.
Comfort Optimizer Copyright 2002-2004 Opportunity Interactive, Inc. 22525 Marine View Dr S Des Moines, WA 98198
Comfort Optimizer Installation Instructions
The next page will ask if you want to create a desktop icon for the program. Make sure the box is
checked before clicking “Next”.
Comfort Optimizer Copyright 2002-2004 Opportunity Interactive, Inc. 22525 Marine View Dr S Des Moines, WA 98198
Comfort Optimizer Installation Instructions
The next page will confirm the directory the program is going into and whether or not you wanted a
desktop icon. Click the “Install” button to start the installation.
Comfort Optimizer Copyright 2002-2004 Opportunity Interactive, Inc. 22525 Marine View Dr S Des Moines, WA 98198
Comfort Optimizer Installation Instructions
After it downloads the application file, a welcome screen will show up. Click “Next” to continue.
Comfort Optimizer Copyright 2002-2004 Opportunity Interactive, Inc. 22525 Marine View Dr S Des Moines, WA 98198
Comfort Optimizer Installation Instructions
You must accept the license agreement to continue. Click the “I Accept” box and then the “Next” box.
Comfort Optimizer Copyright 2002-2004 Opportunity Interactive, Inc. 22525 Marine View Dr S Des Moines, WA 98198
Comfort Optimizer Installation Instructions
The next page will start the installation of the software after you click the “Install” button. Make
sure that your handheld is in the cradle and turned on.
Comfort Optimizer Copyright 2002-2004 Opportunity Interactive, Inc. 22525 Marine View Dr S Des Moines, WA 98198
Comfort Optimizer Installation Instructions
Once it starts installing, you will be asked if you want to install the program in the default directory on
the handheld. Click “Yes” to continue.
Once it has installed the program on the handheld, you will see this box appear:
Comfort Optimizer Copyright 2002-2004 Opportunity Interactive, Inc. 22525 Marine View Dr S Des Moines, WA 98198
Comfort Optimizer Installation Instructions
The program will automatically start installing on the handheld. Click “OK” to continue.
To finish the installation, click the “Finish” button on the next screen.
The next program to install is the Print Pocket program. This program will allow you to print
From the handheld to a printer that has BlueTooth capabilities. Click “Next” to continue.
Comfort Optimizer Copyright 2002-2004 Opportunity Interactive, Inc. 22525 Marine View Dr S Des Moines, WA 98198
Comfort Optimizer Installation Instructions
The next screen, you will be asked to accept the license agreement. Click “Yes” to continue.
Comfort Optimizer Copyright 2002-2004 Opportunity Interactive, Inc. 22525 Marine View Dr S Des Moines, WA 98198
Comfort Optimizer Installation Instructions
Once it starts installing, you will be asked if you want to install the program in the default directory on
the handheld. Click “Yes” to continue.
Comfort Optimizer Copyright 2002-2004 Opportunity Interactive, Inc. 22525 Marine View Dr S Des Moines, WA 98198
Comfort Optimizer Installation Instructions
Once it has installed the program on the handheld, you will see this box appear:
The program will automatically start installing on the handheld. Click “OK” to continue.
The program will automatically start installing on the handheld. Click “OK” to continue.
Congratulations, the installation is now complete.
Once you have the Comfort Optimizer installed, the first thing to do is go through the tutorials.
Setting up the PrintPocketCE program:
To setup the program to be able to print directly from your handheld to a printer, you must first have a
printer that has infrared or BlueTooth capabilities. On the handheld, click the “Start” button and then the
“Programs” button.
Comfort Optimizer Copyright 2002-2004 Opportunity Interactive, Inc. 22525 Marine View Dr S Des Moines, WA 98198
Comfort Optimizer Installation Instructions
On this page will be the Print Pocket program.
Comfort Optimizer Copyright 2002-2004 Opportunity Interactive, Inc. 22525 Marine View Dr S Des Moines, WA 98198
Comfort Optimizer Installation Instructions
On the first screen you will a list of items you can print at the top. Hit the “OK” button to continue.
Comfort Optimizer Copyright 2002-2004 Opportunity Interactive, Inc. 22525 Marine View Dr S Des Moines, WA 98198
Comfort Optimizer Installation Instructions
The next page will show all the documents on the handheld that you can print. Tap the document you
wish to print.
Comfort Optimizer Copyright 2002-2004 Opportunity Interactive, Inc. 22525 Marine View Dr S Des Moines, WA 98198
Comfort Optimizer Installation Instructions
The first time you use this program, you will need a registration code to use the program. If you do not
have a registration code, contact Opportunity Interactive. Type in the code and click “Register”.
Comfort Optimizer Copyright 2002-2004 Opportunity Interactive, Inc. 22525 Marine View Dr S Des Moines, WA 98198
Comfort Optimizer Installation Instructions
On the next page, you will need to set up a few areas. At the top, it should be checked for “Full
Spreadsheet”. On the right the “Fit To Page” should be check. At the bottom only the 3 items shown
below should be checked. Then click the “Continue” button.
Comfort Optimizer Copyright 2002-2004 Opportunity Interactive, Inc. 22525 Marine View Dr S Des Moines, WA 98198
Comfort Optimizer Installation Instructions
On the next page, there are 2 areas to set up. The first area is the port you are using. If you are using
infrared, then change the drop down box to that. If you are using BlueTooth, there is an option under the
drop down for that as well. In the bottom left, you will want to set the “Orientation” to landscape. Then
click the “More Settings” button.
Comfort Optimizer Copyright 2002-2004 Opportunity Interactive, Inc. 22525 Marine View Dr S Des Moines, WA 98198
Comfort Optimizer Installation Instructions
The only thing you will need to set up on this page, is the margins. Set all of the margins to 0 inches.
Then click the “OK” button.
Comfort Optimizer Copyright 2002-2004 Opportunity Interactive, Inc. 22525 Marine View Dr S Des Moines, WA 98198
Comfort Optimizer Installation Instructions
When you get back to this page, aim the top of the handheld at the printer and click the “Start Printing”
button.
Comfort Optimizer Copyright 2002-2004 Opportunity Interactive, Inc. 22525 Marine View Dr S Des Moines, WA 98198
Comfort Optimizer Installation Instructions
Leave the handheld pointed at the printer until it is done printing.
Comfort Optimizer Copyright 2002-2004 Opportunity Interactive, Inc. 22525 Marine View Dr S Des Moines, WA 98198
Comfort Optimizer Installation Instructions
Instructions for Equipping the Heavy Armour Case:
First, Remove the large foam inserts and paper.
Comfort Optimizer Copyright 2002-2004 Opportunity Interactive, Inc. 22525 Marine View Dr S Des Moines, WA 98198
Comfort Optimizer Installation Instructions
Next, Place the handheld unit on the silicon screen. Make sure that is centered properly on the gasket.
Also remove the stylus from the unit
Comfort Optimizer Copyright 2002-2004 Opportunity Interactive, Inc. 22525 Marine View Dr S Des Moines, WA 98198
Comfort Optimizer Installation Instructions
Now, Close the back cover and secure the latches
Comfort Optimizer Copyright 2002-2004 Opportunity Interactive, Inc. 22525 Marine View Dr S Des Moines, WA 98198
Comfort Optimizer Installation Instructions
That’s it your handheld is now protected and ready to work.
Comfort Optimizer Copyright 2002-2004 Opportunity Interactive, Inc. 22525 Marine View Dr S Des Moines, WA 98198
Comfort Optimizer Installation Instructions
Attach the belt clip to your waist. Place the Armour case in the clip with the silicon screen facing
forward. Place the stylus in the slot to the right of the silicon screen.
Comfort Optimizer Copyright 2002-2004 Opportunity Interactive, Inc. 22525 Marine View Dr S Des Moines, WA 98198
Comfort Optimizer User Manual
Comfort Optimizer Copyright 2002-2004 Opportunity Interactive, Inc. 22525 Marine View Dr S Des Moines, WA 98198
Comfort Optimizer User Manual
After starting up management for the Comfort Optimizer, you will see 5 buttons. The first
place to go, is the “Company Info” section. Fill in the fields starting with your company
name and continue through the fax number. This information will print out on the reports.
After filling in the information, click on the “Save” button at the bottom. To close out,
click on the “X” in the top right corner of this screen. It will always ask if you have saved
any changed you have made. Click “Yes” if you have or “No” if you still need to.
Comfort Optimizer Copyright 2002-2004 Opportunity Interactive, Inc. 22525 Marine View Dr S Des Moines, WA 98198
Comfort Optimizer User Manual
The next button to setup is your Sales Force. When you first come into this section, you
will see 1 sales person in your system. To change information in a particular sales person,
highlight the sales person’s name and then click the “View” button at the bottom. This
will take you into the sales person’s information. Edit either item and then click “Save” at
the bottom. If you need to add another sales person, click on the “Add” button at the
bottom left to start adding in your sales people. To add your sales force, fill in the Sales
Person Details below by typing in an I.D. number and their name. Then click on the
“Save” button at the bottom. After you close out of this screen, you will see the new sales
person listed in the middle. If you need to delete a sales person, highlight the sales
person’s name and click the “Delete” button at the bottom. When finished with this
section, close out by clicking the “X” at the top right.
Comfort Optimizer Copyright 2002-2004 Opportunity Interactive, Inc. 22525 Marine View Dr S Des Moines, WA 98198
Comfort Optimizer User Manual
The next section to set up, is the “Settings” button. We will set up the good, better and
best default components for each sales person in here. First, use the drop down box to
select a sales person. Next, choose the state and city that is closest to the area the sales
person works in. This will set up the design temperatures and grains of water for that
area. Then click the “Save” button to the right of the city drop down box. Next, use the
drop down under the “Select Components Ratings” to pick the default good, better or best
components. The first category is for ceilings. After selecting “Ceiling” under the drop
down, use the drop downs under “Good” to select the most common building material in
your area. Select a “Class”, then a “Type” (if necessary) and then a “Model”. Repeat the
same procedure for the “Better” and the “Best” components. After selecting the 3
components, click the “Save” button at the bottom before continuing. Next, use the drop
down to select the “Floors”. Repeat the same procedure for selecting the components for
good, better and best. Then click the “Save” button. Repeat the same procedure for the
wall section. When you get to the “Window” and “Skylight” section, you will notice that
Comfort Optimizer Copyright 2002-2004 Opportunity Interactive, Inc. 22525 Marine View Dr S Des Moines, WA 98198
Comfort Optimizer User Manual
there are a few more categories to select from under the good, better and best. After
selecting each component, remember to click “Save” at the bottom. Once you have
finished going through all the categories, including the door and duct sections, close out
the “Settings” section. You will be asked if you saved any changes. Answer “Yes” if you
have saved everything or “No” if you need to save items.
After setting up the information in the Sales Force and Settings section, you can transfer
it into the handheld. Plug the cradle into the back of your computer using the USB Cable.
Place the handheld unit into the cradle. After you place the handheld into the cradle, the
Active Sync program on your computer will show up. Once it says it is “connected”,
close out of Active Sync. Go back into the “Sales Force” section. Highlight the sales
person who you are transferring the information to and click on the “Synchronize” button
at the bottom right. Check the box labeled “Transfer Data To Handheld” and click the
“Download” button. Depending on your handheld speed, this could take a while. The
program will let you know when the transfer is complete. Sometimes, when you are
transferring the load, you may get this message: “Device Not Connected”. At this point,
Comfort Optimizer Copyright 2002-2004 Opportunity Interactive, Inc. 22525 Marine View Dr S Des Moines, WA 98198
Comfort Optimizer User Manual
you will need to reset the handheld unit. Pull the unit off the cradle and turn it around. At
the bottom of the backside will be a small tab. Use the stylus to push this tab in. After the
handheld has finished resetting itself, plug it back into the cradle and try again. When you
have finished syncing, close out of the “Sales Force” section.
LOAD CALC
To perform a load calc on the handheld, click the “Start” button in the top left hand
corner. Move the cursor down to the “Programs” button and click it. You will see on this
screen a program called ComfortOp… Click the icon to start the load calc. To start
performing a new load, click on the “Load Calc” button. The first thing you will need to
do, is enter in a customer’s name. Click on the keyboard icon in the bottom right hand
corner to type in the name of your customer. Click the keyboard icon again to make the
Comfort Optimizer Copyright 2002-2004 Opportunity Interactive, Inc. 22525 Marine View Dr S Des Moines, WA 98198
Comfort Optimizer User Manual
keyboard disappear. Next you will see the design temperature for the state and city you
have chosen for this salesperson. If you want to change the design temperatures for this
load, click in the box of the item you wish to change and use the keyboard to backspace
and type in the new numbers. Next, we will setup the infiltration for the fireplaces and the
home. First, use the drop down to select how many fireplaces there are in the home. Then
select the fireplace rating. Next, set the rating for the home and then the approximate
square footage of the home if you know it. This is not a required action. The program will
calculate this as you enter in your rooms. (Note: The rating for the fireplaces and the
home can be found in a Manual J). The last thing to set up on this page is the grains you
wish to use by checking the desired box. If you need to change the number of grains, then
click in the box and use the keyboard to change the number. Then click the right arrow in
the bottom left hand corner to go to the next page.
Comfort Optimizer Copyright 2002-2004 Opportunity Interactive, Inc. 22525 Marine View Dr S Des Moines, WA 98198
Comfort Optimizer User Manual
The next page is to set up the ductwork for the home. You will see the good, better and
best defaults you set up earlier. Also at the very top is the option for ductwork installed in
a conditioned area. If the home has something other than the 4 items listed at the top, you
can use the “Other” tab to select a different component. The “Check Details” button will
show you exactly which component you have selected for the load. Click “Ok” when you
are finished selecting the components. When you are finished setting up the ductwork,
click the right arrow to move on.
On this page you will start setting up the first room. First you will need to select a room.
You can either use the keyboard to type in the room name or use the drop down box at
the top to select a room. To find the dimensions in the room using the Dimension Master,
Comfort Optimizer Copyright 2002-2004 Opportunity Interactive, Inc. 22525 Marine View Dr S Des Moines, WA 98198
Comfort Optimizer User Manual
place it up against the wall and click the “On” button. Wait until it double beeps to see
the dimension. You can also bend the top of the Dimension Master to use on windows.
Next, enter in the dimensions of the room. You will notice that after you put in the length
and width, it will calculate the total square footage for you. Then, if you have taken a
measurement of the room’s existing CFM, type the amount in here. This is not a required
field, but will be used for a comparison later. The ceiling height of the room would be
next. Only input the height of the ceiling that is located above the ground. Then type in
the amount of people you want to use for this room. And last, check the appliance box if
this room has major appliances. The default cfm’s for appliances is 1200. If you need to
change that number, click in the box and use the keyboard to change it. Click the right
arrow after you are finished with the page. It will ask, “Do you want to save these
values?” Click yes if you want to save the information above.
Comfort Optimizer Copyright 2002-2004 Opportunity Interactive, Inc. 22525 Marine View Dr S Des Moines, WA 98198
Comfort Optimizer User Manual
The next page you will come to is for the ceiling. You will notice that the dimensions of
the room, show up for the ceiling dimensions. If you need to change the dimensions, use
the keyboard to adjust them. Below that will be the good, better, best and other tabs.
Select the component that applies. You can always use the “Check Details” button to
look at the component that is checked. Click the “ok” button when you are finished
looking at it. To use the “other” tab, check the box and click “go”. You will see drop
down boxes on the page. Click on the top drop down and select the first part of the
component, then click “Go”. Repeat this procedure for the 2nd drop down. Repeat the
same procedure for the final drop down. If you decide you don’t want to use this
component, click the “Back” button. Once again, you can check the details of the
component. Once you are finished, click the “OK” button. This will bring you back to the
ceiling page. Click the “Save” button once you have selected your component. You will
notice in the top left that now there is 1 ceiling component listed. If you have a ceiling
that has more than 1 component, you can add in another ceiling. Click the “Add” button
next to the drop down box. Type in your new dimensions and select the building
component. Again, you can always use the “Check Details” box to see the component
you selected. Click the “Save” button at the bottom. You will now see that there are 2
different ceilings for this room. If you need to delete one of these ceilings, use the drop
down box to select which ceiling to delete. Then click the “Delete” button. It will ask you
“Do you want to delete this component?”. Click the “Yes” button to delete it. You will
now see only 1 ceiling component listed. You will also notice the “Calculate” button at
the bottom. Only use this button when you are finished with this room. When you click
the right arrow, it will always ask if you want to save your values. If your ceiling in this
room leads to a conditioned space, you would just click the right arrow and answer no to
this question, otherwise, click ”Yes” to save the values above.
Comfort Optimizer Copyright 2002-2004 Opportunity Interactive, Inc. 22525 Marine View Dr S Des Moines, WA 98198
Comfort Optimizer User Manual
The next page is for the floors in the home. The floor section works just like the ceiling.
The only difference is what type of floor is in this room. Use the drop down to see the 3
options. You will also see the dimensions from the room appear here as well. If the
dimension of the floor is different, use the keyboard the change them. Then select the
component down below. Use the “Other” section if the building component you need to
use is not listed above. Remember, you can always use the “Check Details” button to
view your component. Then click the “Save” button. You will see the number of floors
listed at the top. You can always add in another floor or delete one you’ve already put in
like we did on the ceiling page. Again you will see the “calculate” button. Unless you do
not have any walls, windows, skylights or doors to enter, do not click this button. Click
the right arrow and answer yes to save your changes or “No” if this floor leads to a
conditioned space.
Comfort Optimizer Copyright 2002-2004 Opportunity Interactive, Inc. 22525 Marine View Dr S Des Moines, WA 98198
Comfort Optimizer User Manual
The wall section will be done a little different. First, determine if there are any walls in
this room that lead to an unconditioned area. If there are, then determine if it is an above
or below grade wall. Next, figure out which direction the exposed walls faces. Use the
drop down to select the direction. You will see the ceiling height of the room already
appear. You can change the ceiling height by clicking in the box and using the keyboard
if you need to. For this example, the house has a wall on the north and a wall on the west
that leads to an unconditioned area. In the length section type in the linear feet of the
exposed wall that faces north. After you put in the linear feet, you will see the total
dimension appear. Then select the wall component down below. Remember, you can use
the “Other” section and the “Check Details” box like we did on the ceiling page. Then
click the save button to save the north wall. You will see 1 wall on the north side listed.
Comfort Optimizer Copyright 2002-2004 Opportunity Interactive, Inc. 22525 Marine View Dr S Des Moines, WA 98198
Comfort Optimizer User Manual
Since we have another exposed wall, use the drop down to select the west side and hit the
go button. Type in the linear feet under the length section again and choose the
component below. If the component is the same as the north wall, then there is nothing to
change. Click the save button and you will see 1 wall listed on the west side. To view
your north wall again, change the drop down at the top to the north and hit go. You will
see your wall listed on the left side. Your numbers and components you input for this
wall will then show up. If can still add another wall or delete a wall like the example on
the ceiling page. If you do not have any windows, skylights or doors in this room, then
use the “Calculate” button. Otherwise, use the right arrow to move to the next page,
answering “Yes” to save your changes or “No” if they were no exposed walls in this
room.
Comfort Optimizer Copyright 2002-2004 Opportunity Interactive, Inc. 22525 Marine View Dr S Des Moines, WA 98198
Comfort Optimizer User Manual
The next section is for your windows. Once again you need to determine which direction
the window faces. For this example I only put a north and a west wall, which means I can
only have windows that face the north and the west. Use the drop down to select the
direction. Type in the length and width of the window. Or if you already know the total
square foot of the window, you can type in that total in the area box. Also, you may have
more than 1 window that faces the north. If all the windows have the same building
component, then add the total square foot of all the windows and put that number in the
area box. If there are 2 windows with different building components, then use the “Add”
button like we did on the ceiling page. Then select the component down below.
Remember to use the “Check Details” button to view your component. Also, like the
ceiling page, you can use the “Other” section to choose a new component. You will
notice that the “other” section for windows and skylights have a few more drop down to
select. Go through each one, hitting “go” after you choose each option. Hit the “ok”
button when you have finished or the “back” button if you don’t want to use this
component. Then click the “Save” button. If you also have a west window, then use the
drop down at the top to change the direction and click the go button. Input the dimensions
and component for the west side. Remember, if the component for the west window is the
same as the north, then there is nothing to change. Then click the “Save” button” again. If
you do not have any skylights or doors to enter, then click the “Calculate” button.
Otherwise, use the right arrow to move on. Answer “yes” to save your changes or “no” if
there were no windows in this room.
Comfort Optimizer Copyright 2002-2004 Opportunity Interactive, Inc. 22525 Marine View Dr S Des Moines, WA 98198
Comfort Optimizer User Manual
The skylight section works exactly like the windows. You must have a ceiling dimension
to input skylights. Determine the direction the skylight faces and use the drop down to
select it. Enter the dimension of the skylight and the component and click “Save”. If you
do not have a skylight in the room, just click the right arrow and answer no to saving
your values.
Comfort Optimizer Copyright 2002-2004 Opportunity Interactive, Inc. 22525 Marine View Dr S Des Moines, WA 98198
Comfort Optimizer User Manual
The last section is for the doors. Once again, determine the direction of the door that
leads to an unconditioned area. The direction of the door must be the same as the
direction of the exposed walls. Therefore, our door must be on either the north or the west
wall. Then input the dimensions of the door and the component below that. Use the check
Details” button to view your component. Or use the “other” section to select a new
component like we did on the ceiling page. Click the “Save” button after you have
finished. If you have a door on each wall, then change the direction at the top, enter in
your dimensions and select the component before hitting “save”. Again, you can add
additional doors on each side or delete doors like we did on the ceiling page. Once you
are completely done with this room, click the “Calculate” button. Depending on your
handheld speed, this process could take 5-25 seconds. Click the “Ok” button when it is
finished.
Comfort Optimizer Copyright 2002-2004 Opportunity Interactive, Inc. 22525 Marine View Dr S Des Moines, WA 98198
Comfort Optimizer User Manual
After the room has calculated, you will come to the room summary page. It lets you know
the customer’s name, room name and the values at the bottom. When you are ready to
add another room, click the “Add Room” button and follow the same procedures as the
first room. When the load for the home is completely finished, use the drop down box at
the bottom and switch it to “System Summary” and click on “Go”. This screen will show
the total load for the house. You can also go back and edit a room from this page. Use the
drop down at the top to select which room you wish to edit. Then click “go”. This will
take you into the load for that particular room. At the bottom of the page, use the drop
down to go back to a section in this room and click “go”. When it asks you if you want to
save your values, answer yes. Change the necessary items in this room and click “Save”
again. Then click the “Calculate” button. This will show you a new summary for this
Comfort Optimizer Copyright 2002-2004 Opportunity Interactive, Inc. 22525 Marine View Dr S Des Moines, WA 98198
Comfort Optimizer User Manual
room. Use the drop down box at the bottom again and switch it to “System Summary”.
Then click the “go” button. You can also choose to delete an entire room from this page.
Use the drop down at the top to select your room. Then click the delete room button at
the bottom. It will always ask if you are sure you want to delete this room. If at some
point during the load, you need to go back and change the setup page, use the drop down
at the bottom and choose “setup”. Then click the “go” button. Change any of the
information here and click the “Re-Calculate” button. This will change the new
information for all the rooms you have already entered. If you want to change the
ductwork page, use the drop down at the bottom and go to the setup page. Click the right
arrow and this will take you to the ductwork page. Change your ductwork component
here. Then, use the drop down at the bottom and change it to “System Summary” and
click “go”. On this page, click the “Re-Calculate” button and it will change the ductwork
for all the rooms you have entered. The last button on this page is the “Excel Report”
button. This will generate a detailed report of the load, including dimensions of each
room, infiltration and the numbers used by Manual J for each building component. After
you click on the “Excel Report” button, it will let you know when it is finished. You can
find that report in the “My Documents” folder on the handheld.
Comfort Optimizer Copyright 2002-2004 Opportunity Interactive, Inc. 22525 Marine View Dr S Des Moines, WA 98198
Comfort Optimizer User Manual
At some point, you will need to go back and review or delete your customers from the
handheld. Use the drop down box and at the bottom and switch it to “Customer” and then
click “go”. You will see 4 buttons on this page. The first is to review the load summary.
Select a customer from the drop down at the top and then click “View Summary”. This
will take you into the load you performed for this customer. From here you can edit or
delete rooms. The 2nd button is to generate the detailed report. When you click on this
button, it will let you know when it is done and that you can find the report in the My
Documents folder on the handheld. The 3rd is to delete the customer. If you delete the
customer, it will ask if you are sure you want to. The fourth button will return you to the
main page of the program. When you are finished with the load calc program, click the
“OK” in the top right corner to exit.
Comfort Optimizer Copyright 2002-2004 Opportunity Interactive, Inc. 22525 Marine View Dr S Des Moines, WA 98198
Comfort Optimizer User Manual
BASEMENT LOAD
a. Doing a load on a Conditioned basement is usually performed a little different
than a room that is strictly above grade. For this example, we will use a typical
basement to perform a load on. Instead of doing a room by room on the basement
rooms, I will treat it as one big room.
b. Setup – The set up page of the load is performed exactly the same as any other
room. Set up the customer’s name, design temperatures, infiltration and grains
you wish to use for the house. Then click the right arrow.
c. Ductwork – In most cases, when you are doing a load on a basement, the
ductwork for the home is in the basement. Therefore, we would set the ductwork
rating up to be “Duct in Conditioned Area”. Otherwise, use the good, better, best
or other buttons to select you ductwork rating. Then click the right arrow.
d. Room Dims – On the Room Dimension page, use the drop down at the top to
select “basement”. Put in the length and width of the basement to get the area of
the basement. Again, if you know, type in the basement’s existing cfm to compare
what the basement actually needs. When you are putting in a dimension for the
ceiling height, remember to only put the feet of the above grade section. So, in
this example, I have a basement with 2 feet above grade and 6 ft below grade. In
the program I will only put in 2 feet of above grade ceiling. Again, put in the
number of people to use for the basement and if the basement has major
appliances. Then click the right arrow answering “yes” to save your values.
e. Ceiling – In most cases, when you are working with a basement, there is no
ceiling dimensions to use. Because the ceiling in the basement leads to a
conditioned space, you would just move to the next page. Of course, the basement
may be bigger than the 1st floor of the home. Then you would have a section of
the basement’s ceiling that you would input here and select the component below.
Remember that the area of the basement that you entered on the room dimension
page comes over to the ceiling page. Either change the values to the correct ones
and choose you component or if you do not have a ceiling to enter, click the right
arrow and answer “no” to saving your values.
f. Floor – When you are working with the floors in the basement, the first thing you
will need to do is to change the drop down at the top to “Below Grade Basement”
and click the “go” button to the right. You will see the floor dimensions are the
same as the room dimensions, so there is no need to change this. When we select
our component down below, we will probably have to use the “Other” button.
Click the button and then click “go”. In the first drop down, change it to
Basement Floors and hit “go”. In the 2nd drop down, change it to “None” and hit
Comfort Optimizer Copyright 2002-2004 Opportunity Interactive, Inc. 22525 Marine View Dr S Des Moines, WA 98198
Comfort Optimizer User Manual
“go”. Under the 3rd option, there will only be 1 option, “2 or more feet below
grade”. Click the “ok” button to select the new component. Click the right arrow
and answer “yes” to save your values.
g. Walls – Since 2 ft of the walls are above ground and 6 ft are below ground, we
will need to separate these sections of the walls in the program. I will first start
with the Above Grade walls since it is already listed under the “type” section at
the top. We know that all the walls in the basement lead to an unconditioned area.
First, I put in my linear feet for the north side. You see that the ceiling height that
we entered in earlier of 2 ft is already listed. Now that we have are area of the
north wall, we need to choose a building component. Use the “Other” button and
click “go”. Under the first drop down, choose the 4th option and click “go”. In the
2nd drop down, the only option should be for “Above Grade”. If it is not, then go
back to the 1st drop down and select another of the masonry walls. Under the 3rd
drop down will be the options for what type of wall and insulation is in the wall.
You always use the “Check Details” to make sure you have the right component.
After select these, click “ok” at the bottom. Then click the “Save” button. Use the
drop down at the top to go to the south wall. Input the linear feet again and click
“Save” at the bottom. Since the component for the walls for the above grade
section are probably the same all around, there is no need to select a component.
It will default to the last one you selected. Repeat the same procedure for the east
and west walls, clicking “Save” after each wall. Next, we need to do the Below
Grade sections of the wall. Change the drop down to Below Grade and hit “go”.
Again, pick a direction and click “go”. Type in the linear feet of the north wall.
The ceiling height will have defaulted to 2 ft because this is what we put in at the
beginning. Change the ceiling height to 6, because that is the height for the below
grade section. Then use the “Other” tab again to select your building component
for the below grade walls. Under the 1st drop down, the below grade masonry
walls will be the 2nd and 3rd options. Depending on how far down the walls go
will determine which masonry wall you use. The first masonry option is for walls
that are 2 to 5 feet below grade. If the wall of the basement is only 4 feet below
the ground, then this is the option we would use. Since our wall is 6 ft below the
ground, we are going to use the 3rd option, for below grade walls 5 ft or below.
Under the 2nd drop down, the only choice is for below grade. In the last drop
down, choose the amount of insulation that is in the walls. Remember to use the
“Check Details” button to make sure you have the correct component. Click the
“ok” button to select the new component. Click the “Save” button to save the
north wall. Use the drop down at the top and change it to the south side and click
“go”. Input the dimensions for the south side. Remember to change the ceiling
dimension to 6 ft. Since the component for the walls for the below grade section
Comfort Optimizer Copyright 2002-2004 Opportunity Interactive, Inc. 22525 Marine View Dr S Des Moines, WA 98198
Comfort Optimizer User Manual
are probably the same all around, there is no need to select a component. Then
click “Save”. Repeat the same procedure for the east and the west walls. Click the
right arrow and answer “yes” to save your values when you have finished.
h. Windows – There is no difference in the input of windows. Use the drop down at
the top to choose a direction. If the windows on the north side have the same
building component, then add the total square footage of the windows on the
north side and input them into the area box. Otherwise, use the “add” button to
put in a second window that has a different component. Remember to click
“Save” after you finish. Repeat the same procedure for each direction of the
home. If you do not have any skylights or doors in the basement, then click the
“Calculate” button to finish the basement. Otherwise, click the right arrow at the
bottom and click “yes” to save your values.
i. Skylights – When you are working in a basement, you will most likely not have
any skylights. If you do, you also must have a ceiling dimension that you would
have put in earlier. Choose the direction of the skylight, the dimension of it and
the component to use before Clicking “Save”. Otherwise, click the right arrow
and answer “no” to save your values.
j. Doors – Like the skylights, you will probably not have any doors that lead to an
unconditioned area. If you do, choose the direction, type in the dimensions, select
the component to use and click “Save”. Otherwise, click the “Calculate” button to
see the room summary.
POST MANAGEMENT FOR HANDHELD
Comfort Optimizer Copyright 2002-2004 Opportunity Interactive, Inc. 22525 Marine View Dr S Des Moines, WA 98198
Comfort Optimizer User Manual
After performing your load calc on the handheld, you can transfer the load calc back to
your computer. Plug the cradle into the back of your computer using the USB Cable.
Place the handheld unit into the cradle. After you place the handheld into the cradle, the
Active Sync program on your computer will show up. Once it says it is “connected”,
close out of Active Sync. Go back into the “Sales Force” section in the management
program. Highlight the sales person who performed the load and click on the
“Synchronize” button on the bottom right. Check the box labeled “Transfer Data from
Handheld” and click the “Import” button. When it asks you if you want to replace the
relationship with the load calc file, always choose “Cancel”. Once again, depending on
your handheld speed, this could take a while. The program will let you know when the
transfer is complete. Sometimes, when you are transferring the load, you may get this
message: “Device Not Connected”. At this point, you will need to reset the handheld unit.
Pull the unit off the cradle and turn it around. At the bottom of the backside will be a
small tab. Use the stylus to push this tab in. After the handheld has finished resetting
itself, plug it back into the cradle and try again. When you have finished syncing the load
in, close out of the “Sales Force” section.
Comfort Optimizer Copyright 2002-2004 Opportunity Interactive, Inc. 22525 Marine View Dr S Des Moines, WA 98198
Comfort Optimizer User Manual
Next, go into the “Load Calc” section. You should see the loads you have performed in
the middle section of the page. The customer name and the sales person’s name should be
listed. You also have the option of searching for a particular customer by typing in their
name and clicking “Search” right below that. Once you have found your load calc,
highlight the load and click on the “View Summary” button on the bottom right. You will
see each room performed, as well as the total at the bottom. If you know the equipment’s
matching cfm, then type it the amount on the right hand side of the page. Click the “ReCalculate Values” button and the CFM values needed for each room in your load will
change. You can then compare the cfm’s that were in the room to the actual value needed
to see if each room is getting the necessary cfm’s. Now, to print out your load, the way it
looks on this screen, click the “Short Report” button and it will open up to this screen. To
print this page, click on the print icon in the top left hand corner. Choose your printer, the
number of copies you would like and click the “Print” button at the bottom. Close out
Comfort Optimizer Copyright 2002-2004 Opportunity Interactive, Inc. 22525 Marine View Dr S Des Moines, WA 98198
Comfort Optimizer User Manual
when you are finished. The other report you can print is the “Detailed Summary”. To use
this report you must have Microsoft Excel on your computer. Click on the button in the
bottom right that says “Detailed Summary”. There will be 2 boxes that come up in which
you will click ok. The first one lets you know that the report may take a while. The 2nd
one lets you know it is done. To view the report, find the shortcut on your desktop
labeled “ComOpt_ExcelReports” and open it. You will see the excel sheets in here listed
by the customer’s name followed by the date and time the report was generated. Double
click the report to view the contents and print it out. If your load for this house contained
multiple rooms, use the tabs at the bottom to see the other rooms not shown on this page.
To print the report, click on “file” at the top left and then “print” below that. Select which
printer to use and the number of copies. Then, under the “Print Range” section, check the
“All” box. Under the “Print What” section, check the “Active Sheets” to only print out
the page that you are on. Use the “Entire Worksheet” box to print out all of the pages.
Then click “OK”. To print another page, use the tabs at the bottom to select a page. Then
use the “File” option at the top again to print out the page. Close out when you are
finished.
Comfort Optimizer Copyright 2002-2004 Opportunity Interactive, Inc. 22525 Marine View Dr S Des Moines, WA 98198
Comfort Optimizer User Manual
Once you are finished with the load, you may either delete or archive it. Deleting the load
permanently removes it from the system. Archiving the load moves the load to the
section called “Archived Loads” and keeps it saved in the system. Go into the “Load
Calc” section and highlight the load to delete or archive. Click the “Delete” button and
choose whether or not you want to delete the load. If you want to archive the load,
highlight the load and click the “Archive” button. Once the load has been moved, go into
the “Archived Loads” section and the load you moved will be in here. From here you can
either delete the load or view the reports again. Once the loads have been archived, you
can remove them from your handheld. Go back into the “Sales Force” section, highlight
the salesperson and click “Synchronize”. Check the button that says, “Transfer Data to
Handheld” and click the “Download” button. Once the transfer is complete, the archived
or deleted loads will no longer be on the handheld.
Comfort Optimizer Copyright 2002-2004 Opportunity Interactive, Inc. 22525 Marine View Dr S Des Moines, WA 98198