1
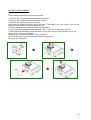
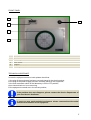
...........................................................................................................................................................
Astor 20
Colony Counter
User’s Manual
...........................................................................................................................................................
rev. 09/2014
...........................................................................................................................................................
Astor 20
Colony Counter
User’s Manual
...........................................................................................................................................................
WARNINGS ........................................................................................................................... 3
SYMBOLS USED IN THIS MANUAL ..................................................................................... 3
FEATURES............................................................................................................................ 4
MECHANICAL FEATURES ........................................................................................ 4
ELECTRICAL FEATURES ......................................................................................... 4
CLIMATIC FEATURES, STORAGE,
PACKAGING AND USE ............................................................................................. 4
ELECTRICAL CONNECTION ................................................................................................ 5
MATERIAL SUPPLIED .......................................................................................................... 5
INSTALLATION ..................................................................................................................... 5
USAGE .................................................................................................................................. 5
BATTERY REPLACEMENT ................................................................................................... 6
FRONT PANEL ...................................................................................................................... 7
TECHNICAL ASSISTANCE ................................................................................................... 7
CLEANING ............................................................................................................................ 8
ACCESSORIES ..................................................................................................................... 8
WARRANTY .......................................................................................................................... 8
DOCUMENT VALIDITY ......................................................................................................... 9
DISPOSAL ............................................................................................................................. 9
2
WARNINGS
Carefully read this User Guide before using the equipment.
This manual is an integral part of the product and must be conserved for future
consultation.
In it you can find important information regarding safety of use and maintenance.
Read the instructions contained in this manual carefully before installation, use and
before processing any operation of adjustment or maintenance.
This equipment has been realized for the counting of bacteria and mould
colonies grown in Petri dishes.
Every use which differs from the description above, will be considered as
“improper use” and will invalidate the warranty.
Even if this device is provided with protections, its use without following the
described procedures could produce a wrong working and damages on the
equipment.
The manufacturer is not liable for damages to people or things caused by
improper use of the equipment and / or not respect of the laws, regulations
and instructions described below.
SYMBOLS USED IN THIS MANUAL
Carefully read the instructions contained in the manual before using the
equipment.
Every action performed on the equipment must comply with the indications
described in the manual.
3
Suggestions and clarifications for a better functioning and a correct
interpretation of the information contained in the manual.
Presence of danger: injuries may occur. Please follow the instructions
contained in the related paragraph.
Presence of danger: electrical shock may occur. Please follow the
instructions contained in the related paragraph.
FEATURES
MECHANICAL FEATURES
Features
Dimensions of Petri dishes
Dimensions (l x p x h)
Weight
Description
Up to 90 mm diameter (adapter included)
110 mm
225 x 215 x 88 mm
1,2 Kg
ELECTRICAL FEATURES
Features
Power supply
Power adapter
Max. variability of the tension
Transitory overload
Absorption
Display
Light source
Battery
Description
12 VDC
INPUT: 110 VAC – 240 VAC, 1,6 A Max
OUTPUT: +12 VDC, 3 A
±10% of the nominal tension
II
2W
Digital with 8 digits
LED
CR2477 type
CLIMATIC FEATURES, STORAGE, PACKAGING AND USE
Features
Working temperature range
Relative humidity
Pollution degree
IP protection grade
Description
from 5° to 36°C
max. 80% for temperatures up to 31°C, with a linear
decrease up to 50% at a temperature of 40°C.
2
20
4
ELECTRICAL CONNECTION
Avoid placing the equipment near heating sources or windows hit by sunlight.
According to European laws, the equipment must be connected to a
grounded plug. The manufacturer will not be responsible for possible
damages to people or things, if caused by a lack of compliance with this rule.
In case your electric socket is not compatible with the plug of the equipment,
make it replaced with an adequate one by competent technicians. Avoid the
use of multiple adapters or additional cables.
MATERIAL SUPPLIED
The equipment always comes with the following material:
Code
PLXRDT.67175
---
Description
Colony counter adapter
Power adapter
Power cable
Quantity
1
1
1
INSTALLATION
1. Connect the power supply to the colony counter.
2. Connect the power supply to the electrical socket.
3. Press the main switch located on the upper right side of the equipment. The translucent
backlit plate holder will light up automatically.
4. The display is always on, as it is battery operated (the battery lasts about 3 years).
USAGE
1. Verify that the value on the display corresponds to “0” and reset it if necessary by pressing
the Reset key.
2. Place an upturned Petri dish on the backlit plate holder; if needed, use the plate adapter to fix
the plate steadily.
3. Count the colonies by marking them on the Petri dish with any marking pen.
4. The equipment bases its enumeration ability on pressure sensors located under the backlit
plate holder, so that Astor 20 automatically increases the counting after every single pressure of
the marking pen on the Petri dish. Every count is confirmed by an acoustic signal.
5. After counting, read the result on the display.
6. Reset the display before starting a new count.
5
BATTERY REPLACEMENT
For the battery replacement proceed as follows:
1. Remove the fixing screws underneath the equipment.
2. Remove the screws that fix the electronic counter.
3. Remove the battery cover from the case.
4. Remove the battery from the side of the case. The battery will come loose if you put the
battery side face down and gently shake the unit.
5. Before inserting, wipe clean the surface of the battery.
6. Insert the battery paying attention that the + and – sides are in the proper position.
7. After replacing the battery return the battery cover to the case. Check that the hook of the
battery cover is properly engaged.
8. Before any use press the “Reset” key on the front.
9. Fix the electronic counter to the case verifying its tightness.
10. Close the equipment.
6
FRONT PANEL
1
3
2
4
5
N.
1
2
3
4
5
Description
Counter
Reset key
Main switch
Adapter
Backlit plate holder
TECHNICAL ASSISTANCE
In case the equipment does not work please check that:
1. the plug of the equipment has been correctly placed in the electric socket;
2. the plug of the power supply has been correctly placed in the equipment;
3. the main automatic switch of the laboratory is not in OFF position;
4. an electric black-out is not occurring;
5. the equipment controls are in the correct position;
If the problem does not disappear, please contact the Service Department of
your local Astori distributor.
In case you may need technical assistance, please communicate the model
and the serial number of the equipment.
7
CLEANING
Turn the equipment off and always unplug it before starting any cleaning
operation.
Do not use water but use a dump cloth instead.
Use a neutral all-purpose cleaner.
Do not clean the equipment using aggressive detergents or alcohol.
ACCESSORIES
Code
66131
Description
Accessory benchtop lens with lamp on an adjustable arm
Quantity
1
WARRANTY
The warranty period lasts 12 months starting from the date stated on the
Packing List and it covers manufacturing faults only.
It does not cover: malfunctionings, damages or faults appeared after the
warranty terms or resulting from an improper use of the equipment; from
neglicence or carelessness; from wrong installation or wrong maintenance;
from technical assistance carried out by unauthorized personnel; from
transport or corrosion damages; from the use of not original replacement
parts.
Warranty will be instantly invalidated in the event that the serial number of
the product is found to be modified or cancelled.
Warranty does not cover damages originated by overvoltages caused by the
electrical net which the equipment is connected to.
Should you send the equipment, the use of the original Astori package or a
strong box filled with styrofoam is mandatory.
8
DOCUMENT VALIDITY
ASTORI TECNICA reserves the right to review and modify this document
without any notice.
Note: any variation will not affect the respect of the directives.
These images have an explicative purpose only and they may differ from
reality.
DISPOSAL
The symbol of the crossed garbage collector indicates that the product at the end of
its useful life should be collected separately from normal garbage.
The user will give the equipment, at the end of its usage, to centers for collection of
electronic and electrotechnical garbages according to rules and laws.
The proper collection of the disused equipment, the recycling, treatment and disposal
contribute to avoid possible negative effects on the environment and human health and
encourage the recycling of the materials that compose the equipment.
9