1
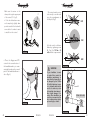
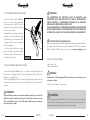
ERGOPOWER™
CONTROL LEVERS
WARNING!
Carefully read, follow and understand the instructions given in this manual. It is an essential part of the product, and you should keep it in a
safe place for future reference.
MECHANIC QUALIFICATION - Please be advised that many bicycle service and repair tasks require specialized knowledge, tools and experience.
General mechanical aptitude may not be sufficient to properly service or repair your bicycle. If you have any doubt whatsoever regarding your service/
repair ability, please take your bicycle to a qualified repair shop.
"AN ACCIDENT" - Please note that throughout this manual, reference is
made that "an accident" could occur. Any accident could result in damage
to your bicycle, its components and, more importantly, could cause you or
a bystander to sustain severe personal injury or even death.
INTENDED USE - This Campagnolo® product is designed and manufactured for use only on road racing style bicycles that are ridden only on smooth
road or track surfaces. Any other use of this product, such as off-road or on
trails is forbidden.
LIFESPAN - WEAR - INSPECTION REQUIREMENT - The lifespan of
Campagnolo® components depends on many factors, such as rider size
and riding conditions. Impacts, falls, improper use or harsh use in general
may compromise the structural integrity of the components and significantly reduce their lifespan. Some components are also subject to wear
over time. Please have your bicycle regularly inspected by a qualified
mechanic for any cracks, deformation, signs of fatigue or wear. If the
inspection reveals any deformation, cracks, impact marks or stress marks,
no matter how slight, immediately replace the component; components
that have experienced excessive wear also need immediate replacement.
The frequency of inspection depends on many factors; check with your
authorized Campagnolo® representative to select a schedule that is best
for you. If you weigh 82 kg/180 lbs or more, you must be especially vigilant
and have your bicycle inspected more frequently (than someone weighting
less than 82 kg/180 lbs) for any evidence of cracks, deformation, or other
signs of fatigue or stress. Check with your mechanic to discuss whether the
components you selected are suitable for your use, and to determine the
frequency of inspections.
16
ENGLISH
Important PERFORMANCE, SAFETY and WARRANTY Notice
- Dear customer, please remember that to maximise the performance of your EPS drivetrain and to prevent jeopardising its
safety, performance, long-life and functionality, it is absolutely
necessary to use the 6 components of EPS drivetrain with components of the Campagnolo 11 speed mechanical drivetrain; it is
not possible to use EPS components that are not manufactured
by Campagnolo.
Note: Tools supplied by other manufacturers for components similar to Campagnolo® components, may not be compatible with Campagnolo® components. Likewise, tools supplied by Campagnolo s.r.l. may not be compatible
with components supplied by other manufacturers. Always check with your
mechanic or the tool manufacturer to insure compatibility before using tools
supplied by one manufacturer on components supplied by another.
The user of this Campagnolo® product expressly recognizes that there are
risks inherent in bicycle riding, including but not limited to the risk that a
component of the bicycle can fail, resulting in an accident, personal injury
or death. By his purchase and use of this Campagnolo® product, the user
expressly, voluntarily and knowingly accepts and/or assumes these risks, including but not limited to the risk of passive or active neglicence of Campagnolo s.r.l. or hidden, latent or obvious defects in the product, and agrees
to hold Campagnolo s.r.l. harmless to the fullest extent permitted by law
against any resulting damages.
ENGLISH
17
• Raise the support cover
(A - Fig. 3) to expose the
securing screw (B - Fig. 3).
• Loosen the screw (B - Fig.
3) located on the upper
part of the body, so that
the retaining band (C - Fig.
3) can be slid over the nontaped handlebar without
removing the band from
the Ergopower™ EPS control lever unit.
1. POSITIONING ON THE HANDLEBAR
When installing/removing or servicing components, switch off the
EPS drivetrain as indicated in the
instruction sheet of the EPS Power
Unit.
NO!
• Do not place the upper part of
the control on the straight section
of the handlebar (Fig. 1).
CC
AA
BB
10Nm
N.m (89
- 7,4in.lbs)
lb.ft
10
• Make sure that the part of the
handlebar onto which you are
fitting the control has a surface
rough enough to guarantee maximum adherence.
WARNING!
Min. øø 23,8
Min.
23,8 mm
mm
Max. øø 24,2
24,2 mm
Max.
mm
3
The ergonomics of the new
ErgopowerTM EPS controls
can be adapted for cyclists
with very large hands by
applying an insert (D - Fig.
4).
• Fit the “big hands” insert
into the rear bottom part of
the control (Fig. 4) before
installing it on the handlebar.
1
If the controls are not fitted correctly they may cause accidents
or physical injury.
α
• Ensure that the angle ∂ is sufficiently large to guarantee correct
assembly of the sheath and the associated smoothness of the cable
(Fig. 2).
D
4
2
18
ENGLISH
ENGLISH
19
Make sure the arrow on the
clamp is facing the upper part
of the control (C - Fig. 5).
C
• If the hood has been removed completely, slightly dampen the inside of the hood with
some alcohol to make it easier
to install it on the control.
- The control must be oriented correctly to avoid reducing the aerodynamics of
the bicycle (Fig. 7)
NO!
NO!
OK!
SÌ!
• Fix the control on the handlebar by tightening screw
(B - Fig. 8) to 10 Nm - 89
in.lbs with a torque wrench.
5
NO!
NO!
• Place the Ergopower EPS
control in the curved section of
the handlebar and try to create
a straight line where the curved
part of the handlebar allows to
do so (Fig. 6).
WARNING!
7
If your handlebar is made
of carbon fiber, contact the
handlebar manufacturer to
insure that the frame will not
be damaged by this 10 Nm
(89 in.lbs) tightening torque,
or to determine what actions
need to be taken to protect
the handlebar from damage.
Even slight damage to a
carbon fiber handlebar can
result in an unexpected failure, resulting in an accident,
personal injury or death.
6
Min. ø 23,8 mm
Max. ø 24,2 mm
B
10 Nm
N.m (89
- 7,4in.lbs)
lb.ft
10
8
20
ENGLISH
ENGLISH
21
WARNING!
1.1 - REAR BRAKE CABLE AND CASING
THE ERGOPOWER EPS CONTROLS MUST BE MOUNTED AND
CONNECTED ONLY AND EXCLUSIVELY BY ONE OF CAMPAGNOLO'S
SERVICE CENTERS, A CAMPAGNOLO PRO-SHOP OR A MECHANIC
SPECIALISED IN MOUNTING EPS GROUPSETS.
PLEASE REMEMBER THAT TAMPERING OR INCORRECT OR INCOMPLETE
INSTALLATION OF EVEN JUST ONE COMPONENT OF THE EPS GROUPSET
AUTOMATICALLY RESULTS IN THE INVALIDATION OF ANY WARRANTY.
• Insert the brake cable (1.600 mm
long - ø 1.6 mm) in the ball bushing
on the brake lever of the EPS control,
making sure that the cable stop head
fits into its seat (Fig. 9).
• Depending on your frame, it may be
necessary to cut the rear brake casing
(1.250 mm long - ø 4.9 mm) and install
a casing end (ø 6 mm, not supplied
with the package).
• Fit the casing (without the casing
end) in the brake casing retainer and
secure the cable to the brake (refer to
the brake user manual).
NOTE FOR SPECIALISED MECHANICS!
Please remember that all assembly, disassembly, adjustment and maintenance
procedures for the EPS drivetrain are described in the EPS technical manual,
which is available in PDF format on our internet site www.campagnolo.com.
9
1.3 - TAPING THE HANDLEBAR
1.2 - FRONT BRAKE CABLE AND CASING
• Raise the hood.
• Tape the handlebar.
• Insert the brake cable (800 mm long - ø 1.6 mm) in the ball bushing on the
brake lever of the Ergopower EPS control, making sure that the cable stop
head fits into its seat (Fig. 9).
• Fit the casing (580 mm long - ø 4.9 mm) in the brake casing retainer (without
the casing end) and secure the cable to the brake (refer to the brake user
manual).
A malfunction of the Ergopower EPS control may cause accidents, personal injury or death.
WARNING!
After installation, make sure the wires and brake cables do not interfere
with the headset or with any other part of the bicycle. Interference may
affect your ability to turn or control the bicycle and may cause accidents,
personal injury or death.
22
ENGLISH
WARNING!
• Place the hood back into its position.
WARNING!
Before using your Ergopower EPS control on the road, use it in a quiet area
with no traffic to familiarize yourself with its operation. No knowing how it is
operated may cause accidents, personal injury or death.
ENGLISH
23
2 . O P E R AT I O N
• Levers (B - Fig. 10/11) and (C - Fig. 10/11) can be operated with the hands in
a high or low position on the handlebar.
• The lever (A - Fig. 10) controls the
operation of the brake.
• The left control lever (B - Fig. 10) operates the derailleur by moving up the
chain on the upper chainring.
• The left control lever (C - Fig. 10) operates the derailleur by moving down the
chain on the lower chainring.
• The derailleur automatically centres
the fork in the best position depending
on the position of the chain on the
chainrings and pinions.
Moreover, the EPS controls allow to shift gears also when braking.
2.1 - RIDING SETTING and ZERO SETTING
• The right control lever (B - Fig. 11)
operates the rear derailleur by moving
up the chain on the upper pinion.
• The right control lever (C - Fig. 11)
operates the rear derailleur by moving
down the chain on the lower pinion.
• By pressing and holding the right
control lever (B - Fig. 11) you enable
multiple shifting upwards.
• By pressing and holding the right
control lever (C - Fig. 11) you enable
multiple shifting downwards.
10
• By briefly pressing one of the two
MODE buttons (Fig. 10/11) it is possible
to view the battery charge level on the
LED of the interface.
A
24
D C
• Pressing the MODE button (D - Fig. 10/11) located on the control of the
rear derailleur or derailleur for about 6 seconds allows to adjust the reference
position of the rear derailleur and derailleur (refer to the directions contained
in the instructions leaflet of the EPS rear derailleur and EPS derailleur).
B
• Pressing both MODE buttons together (D - Fig. 10/11) for about 6 seconds
allows you to reset the reference position of the rear derailleur and derailleur
to zero
A
WARNING!
Setting the rear derailleur and derailleur when the bicycle is in motion
may result in dangerous situations and cause accidents. Therefore please
be very careful if you decide to do it.
WARNING!
C D
B
Resetting the rear derailleur and derailleur to zero is a particularly delicate operation and must be carried out when the bicycle is stationary and
placed on a stand. This is why it should be conducted only and exclusively
by a Campagnolo Service Center, a Campagnolo Pro-shop or a mechanic
specialised in mounting EPS groupsets.
11
ENGLISH
ENGLISH
25
NOTE
The Ergopower EPS controls are
fitted with a release pin positioned
on the brake lever (E - Fig. 12) that
allows to open up the brake directly
from the control and conduct maintenance work on the wheels.
4. MAINTENANCE
• The Ergopower EPS controls must be checked by a specialised mechanic
every 3 years or at least every 30,000 Km. The brake cables and casings must
be replaced every 2 years or at least every 20,000 Km.
• If used at a professional level, the EPS controls must be checked by a specialised mechanic and the brake cables and casings must be replaced every
year or at least every 15,000 Km.
E
• The time indications reported herein are purely indicative and may vary
considerably in relation to the conditions of use and intensity of your
activity (significant factors include for instance: professional training, rain,
mud, salt on streets in winter, the weight of the cyclist, etc). Contact your
mechanic to identify the best-suited schedules for your features.
12
• Do not immerse your Ergopower EPS controls in water. Never wash your
bicycle with pressurised water. Pressurised water, even from the nozzle of a
garden hose, can pass the seals and enter inside your Campagnolo® components, causing irreparable damage. Wash your bicycle and Campagnolo®
components by gently cleaning them with water and neutral soap. Dry carefully with a soft cloth: Never use abrasive or metallic sponges.
3 . R E M O VA L
When installing/removing or servicing components, switch off the EPS drivetrain as indicated in the instruction sheet of the EPS Power Unit.
WARNING!
THE ERGOPOWER EPS CONTROLS MUST BE DISASSEMBLED ONLY
AND EXCLUSIVELY BY ONE OF CAMPAGNOLO'S SERVICE CENTERS, A
CAMPAGNOLO PRO-SHOP OR A MECHANIC SPECIALISED IN MOUNTING
EPS GROUPSETS.
26
ENGLISH
WARNING!
Salty environments (such as roads in winter or in areas near the sea)
may cause galvanic corrosion on most of the bicycle's components.
To prevent damage, malfunction and accidents, carefully rinse, clean,
dry and lubricate all the components subjected to this phenomenon.
ENGLISH
27