1
PMIS User Manual
iGATE
User Manual
EEP/PR06/TMP
Project Name
Project Management Information System (PMIS)
Prepared/Modified by
Role
Date of Preparation
Delivery Team, iGATE
01 October 2013
Reviewed by
Development
Role
Approved by
Role
Date of Approval
Circulation List
Version Number
OMC stakeholders, MoPNG team
Date of Review
Version Number of the
template:1.0
1.0
Confidential
Page 1 of 48
PMIS User Manual
iGATE
Table of Contents
1
GENERAL INFORMATION ................................................................................................................................ 3
1.1 Product Overview ............................................................................................................................................3
1.2 Purpose of the Document ...............................................................................................................................3
1.3 Who Should Use This Guide ............................................................................................................................3
1.4 Authorized User Permission ............................................................................................................................3
1.5 Acronyms And Abbreviations .........................................................................................................................4
2
SYSTEM SUMMARY ........................................................................................................................................ 5
3
GETTING STARTED .......................................................................................................................................... 6
3.1 Back-end configuration for the System ..........................................................................................................6
3.1.1
Mapping Task with Specific Designation ..............................................................................................6
3.1.2
Designation Task ...................................................................................................................................7
3.1.3
State Master Table Description ............................................................................................................7
3.1.4
District Master Table Description .........................................................................................................8
3.1.5
Distributor Master Table Description ...................................................................................................8
3.1.6
Task-Target Description Table Description ..........................................................................................9
3.2 Step By Step Instructions for Using the Application ....................................................................................10
3.2.1
Admin Menu ........................................................................................................................................11
3.2.1.1
Target Configuration .......................................................................................................................12
3.2.1.2
User Registration .............................................................................................................................13
3.2.2
PMIS Input Menu.................................................................................................................................18
3.2.2.1
Distributor Banner (Accessible to Distributor) ................................................................................19
3.2.2.2
Telephonic Information (Accessible to Distributor) .........................................................................20
3.2.2.3
Advertisement Input (Advertisement FM, Cable etc.) (Accessible to District Co-ordinator) ..........26
3.2.2.4
Distributor Holiday Input Form (Accessible to Distributor) .............................................................28
3.2.2.5
Leaflets Input Form (Accessible to Distributor) ...............................................................................30
3.2.2.6
Drop Box Input Form (Accessible to Distributor) .............................................................................32
3.2.2.7
Aadhaar Enrollment Centre Details Display (Accessible to District Co-ordinator) .........................35
3.2.2.8
Advertisements Newspaper Input Form (Accessible to OMC National user) .................................38
3.2.2.9
Mic Announcement (Accessible to District Co-ordinator)................................................................42
3.2.3
PMIS Reports Menu.............................................................................................................................45
3.2.3.1
Aadhaar Seed Report ......................................................................................................................45
3.2.3.2
Advance Subsidy Report ..................................................................................................................46
3.2.3.3
Advt. Newspaper Report .................................................................................................................46
3.2.3.4
Leaflets Report ................................................................................................................................46
3.2.3.5
Distributor Holiday Report ..............................................................................................................46
3.2.3.6
Drop Box Report ..............................................................................................................................46
3.2.3.7
Enrollment Center Report ...............................................................................................................46
3.2.3.8
Telephonic Report ...........................................................................................................................46
3.2.3.9
Banners Report ................................................................................................................................46
3.2.3.10 Mic Announcement Report .............................................................................................................46
3.2.3.11 Advertisement FM Report ...............................................................................................................46
3.3 Web service integration with OMCs .............................................................................................................46
3.3.1
Aadhaar/Bank Seeding and Advance Subsidy Process ......................................................................46
Confidential
Page 2 of 48
PMIS User Manual
iGATE
1 General Information
1.1 Product Overview
Project Management Information System (PMIS) is a web based solution for monitoring progress of
DBTL. This application will be accessible to MoPNG, OMCs, LDMs, Distributors and other identified
agencies to view/update their respective information.
This document covers the scope of PMIS application that has been developed to achieve the above
goals and lists down the relevant references for that purpose.
The audience for this document is the MoPNG team, OMC team, Support team, project managers
and QA/UAT.
1.2 Purpose of the Document
The PMIS application has the following significant benefits:
i.
Provides a platform to enter DBTL related data.
ii.
Provides a platform to collate data from different OMCs for Aadhaar/Bank Seeding and
Subsidy/Advance payment.
iii.
Provides a platform for MoPNG/OMC officials to view reports related to DBTL data.
iv.
Provides platform to track progress against the set target.
v.
Provides a platform to create users who can access the above information.
The document will primarily throw light on how to use the application for meeting the above
business purposes.
1.3 Who Should Use This Guide
Support Personnel, QA/UAT, OMC stakeholders (authorized users), MoPNG team.
1.4 Authorized User Permission
Following Hierarchy positions are specified in the application. Only users belonging to these would
have access to the application:
Position
MOPNGOFC
OMCOFC
Description
Level
National
National
Confidential
Page 3 of 48
MoPNG Officials
OMC Officials National
PMIS User Manual
NPMU
OMCOF
SPMU
FACSSEC
OMCDC
DDT
DC
FLT
DISTRB
iGATE
National Project Management Unit
OMC Officials State
State Project Management Unit
Secy.(Food and Civil Supplies)
OMC District Coordinator
District Delivery Team
District Collector
Field Level Team
Distributor
National
State
State
State
District
District
District
Field
Field
1.5 Acronyms And Abbreviations
List all the abbreviations and acronyms used in the document
Term
Meaning
MoPNG
Ministry of Petroleum and Natural gas
OMC
Oil manufacturing companies viz. IOCL, BPCL, HPCL
Browsers
IE 7.0 and above
DBTL
Direct Benefit Transfer of LPG Subsidy
JAR
Java archive
Linux
Environment where application will be hosted
MySQL
Database Server
QA
Quality Analysis
UAT
User acceptance testing
SOA
Service Oriented Architecture
UID
Aadhaar Number (for Unique Identification)
Confidential
Page 4 of 48
PMIS User Manual
iGATE
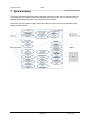
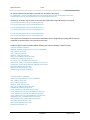
2 System Summary
The system would allow authorized users to enter data manually for certain forms. The system would also
invoke web services of OMCs to fetch Seeding/Subsidy data on daily basis. The manually entered data
and data fetched through web services can be seen via reports section.
Below is the use case diagram covering various use cases and actors in scope of the application along
with the external interface:
Confidential
Page 5 of 48
PMIS User Manual
iGATE
3 Getting Started
3.1 Back-end configuration for the System
Please note that this section is strictly meant for support and Admin personnel:
3.1.1
Mapping Task with Specific Designation
Following are the designations specified in the application (refer „designation‟ table):
Designation
Description
MOPNGOFC MoPNG Officials
OMCOFC
OMC Officials National
NPMU
National Project Management Unit
OMCOF
OMC Officials State
SPMU
State Project Management Unit
FACSSEC
Secy.(Food and Civil Supplies)
OMCDC
OMC District Coordinator
DDT
District Delivery Team
DC
District Collector
FLT
Field Level Team
DISTRB
Distributor
Level
National
National
National
State
State
State
District
District
District
Field
Field
Every Designation is mapped with a particular department (refer „dept‟ table). And every department has
certain sub-department (refer „sub_dept‟) table. Hence, whenever a new user has been created with a
designation mentioned above, it gets associated to a department and hence to sub-departments.
Also, every task in the application has been mapped with different Designation. First, we have to check
for the availability of that task (in „task‟ table) and then that task can be mapped with a particular
Designation (in „designation_task‟ table). Also we have to map that task with particular role (in „role_task‟
table).
Sample insert statements for the same are as follows:
INSERT INTO task
(`TASKID`, `APPROVALVIEW`, `APPROVALREQD`, `TASKNAME`, `TASKPAGE`, `TASKORDER`, `PARENTTASKID`,
`MENUFLAG`)
VALUES
(
{TASKID: VARCHAR}, {APPROVALVIEW: VARCHAR}, {APPROVALREQD: VARCHAR},
{TASKNAME: VARCHAR}, {TASKPAGE: VARCHAR}, {TASKORDER: DOUBLE},
{PARENTTASKID: VARCHAR}, {MENUFLAG: VARCHAR}
);
INSERT INTO role_task
(`ROLEID`, `TASKID`)
VALUES
(
{ROLEID: VARCHAR}, {TASKID: VARCHAR} );
INSERT INTO designation_task
(`id`, `TASKID`, `DESIGNATION`, `ENTERBY`, `ENTRYDATE`)
VALUES (
{id: BIGINT}, {TASKID: VARCHAR}, {DESIGNATION: VARCHAR},
Confidential
Page 6 of 48
PMIS User Manual
iGATE
{ENTERBY: VARCHAR}, {ENTRYDATE: DATETIME}
);
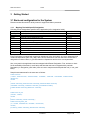
3.1.2
Designation Task
This module is used to map available Designation with available Tasks. It should be ideally accessible
to Admin only.
Step to Assign Task to a Designation:
1. Login as Admin.
2. Click on Designation Task link under Admin menu.
3. Select the appropriate Designation.
4. Select suitable task.
5. Click on Add.
Key Point:
Whenever user selects the designation from the available list, different tasks assign to that Designation
will get displayed. The user can now use this list to delete any existing tasks from selected Designation, if
required.
The Sample would look like this:
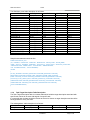
3.1.3
State Master Table Description
The State Master table is a master table which holds the records for all the state-data available.
It is expected that, the data should be updated regularly with the latest records.
The „State‟ table description is as follows:
Field
Type
STATECODE
varchar(4)
STATENAME
varchar(45)
Confidential
Null
NO
NO
Key
PRI
Default
NULL
NULL
Page 7 of 48
PMIS User Manual
MODIFYBY
MODIFYDATE
ENTERBY
ENTRYDATE
countryCode_COUNTRYCODE
iGATE
varchar(11)
datetime
varchar(11)
datetime
varchar(2)
YES
YES
YES
YES
YES
MUL
NULL
NULL
NULL
NULL
NULL
Sample insert statement would be like:
INSERT INTO state
(`STATECODE`, `STATENAME`, `MODIFYBY`, `MODIFYDATE`, `ENTERBY`, `ENTRYDATE`, `countryCode_COUNTRYCODE`)
VALUES
({STATECODE: VARCHAR}, {STATENAME: VARCHAR}, {MODIFYBY: VARCHAR}, {MODIFYDATE: DATETIME}, {ENTERBY:
VARCHAR}, {ENTRYDATE: DATETIME}, {countryCode_COUNTRYCODE: VARCHAR}
);
3.1.4
District Master Table Description
The District Master table is a master table which holds the records for all the district-data available.
It is expected that, the data should be updated regularly with the latest records.
The „District‟ table description is as follows:
Field
Type
DISTRICT
varchar(50)
stateCode_STATECODE varchar(4)
PPAC
varchar(4)
UIDAICODE
varchar(5)
PHASE
varchar(255)
MODIFYBY
varchar(11)
MODIFYDATE
datetime
ENTERBY
varchar(11)
ENTRYDATE
datetime
Null
NO
YES
YES
YES
YES
YES
YES
YES
YES
Key
PRI
MUL
Default
NULL
NULL
NULL
NULL
NULL
NULL
NULL
NULL
NULL
Sample insert statement would be like:
INSERT INTO district
(`DISTRICT`, `MODIFYBY`, `MODIFYDATE`, `ENTERBY`, `ENTRYDATE`, `stateCode_STATECODE`,
`PPAC`, `UIDAICODE`, `PHASE`)
VALUES
(
{DISTRICT: VARCHAR}, {MODIFYBY: VARCHAR}, {MODIFYDATE: DATETIME}, {ENTERBY: VARCHAR},
{ENTRYDATE: DATETIME}, {stateCode_STATECODE: VARCHAR}, {PPAC: VARCHAR},
{UIDAICODE: VARCHAR}, {PHASE: VARCHAR}
);
3.1.5
Distributor Master Table Description
The Distributor Master table is a master table which holds the records for all the distributor-data available.
It is expected that, the data should be updated regularly with the latest records.
Confidential
Page 8 of 48
PMIS User Manual
iGATE
The „Distributor_mstr‟ table description is as follows:
Field
Type
Null
ID
int(11)
NO
ENTERBY
varchar(11)
YES
ENTRYDATE
datetime
YES
MODIFYBY
varchar(11)
YES
MODIFYDATE
datetime
YES
DISTRB_CODE
varchar(10)
YES
DISTRB_NAME
varchar(100)
YES
EMAIL
varchar(100)
YES
STATUS
varchar(255)
YES
PHONENO
varchar(255)
YES
MOBILENO
varchar(255)
YES
aOmcCode_ID
int(11)
YES
adistrict_district
varchar(50)
YES
aStateCode_STATECODE varchar(4)
YES
AREAOFFICECODE
varchar(6)
YES
MARKETCODE
varchar(4)
YES
VILLAGECODE
varchar(6)
YES
SUBDISTRBCODE
varchar(6)
YES
PIN
varchar(6)
YES
DISTRIBUTORTYPE
varchar(10)
YES
TOTALCONSUMER
bigint(20)
YES
Key
PRI
MUL
MUL
MUL
Default
NULL
NULL
NULL
NULL
NULL
NULL
NULL
NULL
NULL
NULL
NULL
NULL
NULL
NULL
NULL
NULL
NULL
NULL
NULL
NULL
NULL
Sample insert statement would be like:
INSERT INTO distributor_mstr
(`ID`, `ENTERBY`, `ENTRYDATE`, `MODIFYBY`, `MODIFYDATE`, `DISTRB_CODE`, `DISTRB_NAME`,
`EMAIL`, `STATUS`, `PHONENO`, `MOBILENO`, `aOmcCode_ID`, `adistrict_district`, `aStateCode_STATECODE`,
`AREAOFFICECODE`, `MARKETCODE`, `VILLAGECODE`, `SUBDISTRBCODE`,
`PIN`, `DISTRIBUTORTYPE`, `TOTALCONSUMER`)
VALUES
(
{ID: INT}, {ENTERBY: VARCHAR}, {ENTRYDATE: DATETIME}, {MODIFYBY: VARCHAR},
{MODIFYDATE: DATETIME}, {DISTRB_CODE: VARCHAR}, {DISTRB_NAME: VARCHAR},
{EMAIL: VARCHAR}, {STATUS: VARCHAR}, {PHONENO: VARCHAR}, {MOBILENO: VARCHAR},
{aOmcCode_ID: INT}, {adistrict_district: VARCHAR}, {aStateCode_STATECODE: VARCHAR},
{AREAOFFICECODE: VARCHAR}, {MARKETCODE: VARCHAR}, {VILLAGECODE: VARCHAR},
{SUBDISTRBCODE: VARCHAR}, {PIN: VARCHAR}, {DISTRIBUTORTYPE: VARCHAR},
{TOTALCONSUMER: BIGINT}
);
3.1.6
Task-Target Description Table Description
The Task-Target Description table is a master table which holds the target description associated with
specific task, which will be seen with targets of a specific task.
It is expected that, the data should be relevant to what to be shown on target description and should be
ideally updated for every new task.
The „tasktargetdesc‟ table description is as follows:
Field
Type
Null
TASK_ID
varchar(12)
NO
Confidential
Key
Default
NULL
Page 9 of 48
PMIS User Manual
TARGET_DESC
ID
iGATE
varchar(40)
int(11)
NO
NO
PRI
NULL
NULL
Sample insert statement would be like:
INSERT INTO tasktargetdesc
(`TASK_ID`,
`TARGET_DESC`,
`ID`)
VALUES
(
{TASK_ID: VARCHAR},
{TARGET_DESC: VARCHAR},
{ID: INT}
);
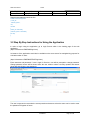
3.2 Step By Step Instructions for Using the Application
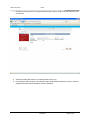
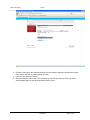
In order to begin using the application, go to Login Screen which is the landing page of the web
application:
(https://<hostname>/PNGPMIS/login.htm).
An instance of the application would also be available on the same server for testing/training purpose for
a limited number of users:
(https://<hostname>/PNGPMISSTAGE/login.htm).
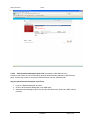
Enter username and password; if user is login for first time, user will be prompted to change password.
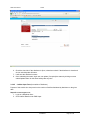
Change password screen will be shown where the user needs to select a security question and answer
along with specifying the new password.
The user is expected to remember the secret question and answer so that the same can be used to reset
the password if forgotten in future.
Confidential
Page 10 of 48
PMIS User Manual
iGATE
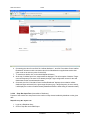
Otherwise, if user has had already logged in once, the user would be redirected to Home page.
3.2.1
Admin Menu
Confidential
Page 11 of 48
PMIS User Manual
iGATE
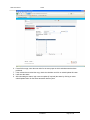
Visibility Level (District level and above)
The first available menu is „Admin‟. Inside Admin, the available sub menu(s) based on user role is/are
„User Registration‟ and/or „Target Configuration‟.
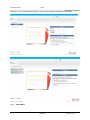
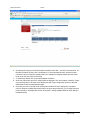
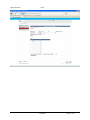
3.2.1.1
Target Configuration
This module is used to set the target-frequency and target-count for different available tasks. It should be
ideally accessible to National and State Level users only.
Save/Update:
The target and frequency of a task can be set and saved using this module by supplying task-name,
frequency, state-name, district (optional), frequency date, target description and target count. If district is
not selected, it will be applied to all district of selected state for which target and frequency has not been
configured. If the record already exists for the supplied values, it will update the same.
Following are the boundary mapping as per frequency:
Frequency
Description (Boundary mapping)
Daily
It will set the supplied date as both start date and end date
Weekly
It will take the first and last date of the supplied date‟s week and set these as the
start and end date respectively.
Monthly
It will take the first and last date of the supplied date‟s month and set these as the
start and end date respectively.
Search:
Existing target/frequency can be searched by supplying „Task‟, „State Name‟ and „Frequency Start Date‟.
The search result will display the existing data, if any, for the provided date taking boundary date as per
frequency. The search result can be used for editing and updating the same.
One sample search result:
Confidential
Page 12 of 48
PMIS User Manual
iGATE
Carry Forward:
A search result can be carry forwarded as per its frequency. If the frequency is „Daily‟, it can be carry
forwarded to next date. If the frequency is „Week‟, it can be carry forwarded to next week and so on for all
the options of frequencies. It can be achieved by searching the required target and clicking on „Carry
Forward‟ button.
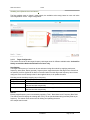
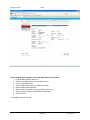
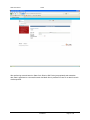
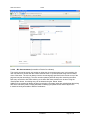
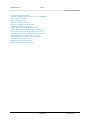
3.2.1.2
User Registration
This module is used to register a user for the system. A user with designation below in the hierarchy can
be registered by a user with designation higher in hierarchy. It should be ideally accessible to all users
above Field level. The level of hierarchy is:
A user can be registered by providing all the mandatory fields data. These data can be saved and
searched to be submitted further with changes, if required. The system will generate a unique
„Transaction ID‟ for every registration request submitted. The same registration request should be
approved by the manager to complete the user registration process.
One sample user-registration page:
Confidential
Page 13 of 48
PMIS User Manual
iGATE
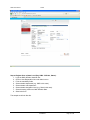
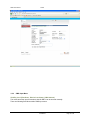
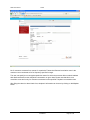
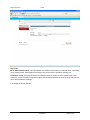
Please note that Manager ID is a mandatory field. It could be set to the logged in user‟s id (userid of user
registering the user).
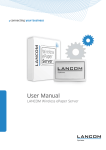
Step to Register User at National Level (Say, OMC -Officials):
1. Login as Super-Admin user.
2. Click on User-Registration link under Admin menu.
3. Fill in the mandatory fields.
4. Select suitable department (e.g. OMC in this case).
5. Select suitable sub-department.
6. Select suitable designation level (e.g. National in this case).
7. Select hierarchy position as OMC Officials National.
8. Submit the form.
The sample would look like this:
Confidential
Page 14 of 48
PMIS User Manual
iGATE
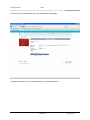
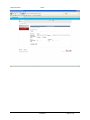
Step to Register User at State Level (Say, OMC –Officials, States):
1. Login as OMC-Officials, National user.
2. Click on User-Registration link under Admin menu.
3. Fill in the mandatory fields.
4. Select suitable department (e.g. OMC in this case).
5. Select suitable sub-department.
6. Select suitable designation level (e.g. State in this case).
7. Select hierarchy position as OMC Officials State.
8. Submit the form.
The sample would look like this:
Confidential
Page 15 of 48
PMIS User Manual
iGATE
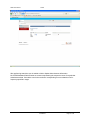
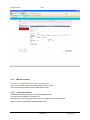
Step to Register User at District Level (Say, OMC District Coordinator):
1. Login as OMC-Officials, State user.
2. Click on User-Registration link under Admin menu.
3. Fill in the mandatory fields.
4. Select suitable department (e.g. OMC in this case).
5. Select suitable sub-department.
6. Select suitable designation level (e.g. District in this case).
7. Select hierarchy position as OMC District Coordinator.
8. Submit the form.
The sample would look like this:
Confidential
Page 16 of 48
PMIS User Manual
iGATE
Step to Register User at Field Level (Say, Distributor):
1. Login as District Coordinator user.
2. Click on User-Registration link under Admin menu.
3. Fill in the mandatory fields.
4. Select suitable department (e.g. OMC in this case).
5. Select suitable sub-department.
6. Select suitable designation level (e.g. Field in this case).
7. Select hierarchy position as Distributor.
8. Enter the distributor code (Mandatory to create distributor).
9. Submit the form.
The sample would look like this:
Confidential
Page 17 of 48
PMIS User Manual
3.2.2
iGATE
PMIS Input Menu
Visibility Level (Distributor, District Coordinator, OMC National)
The menu has all the input forms where data for DBTL can be entered manually.
There are following Sub Menus within PMIS Input menu:
Confidential
Page 18 of 48
PMIS User Manual
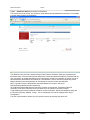
3.2.2.1
iGATE
Distributor Banner (Accessible to Distributor)
This module is used to search, add, update or delete banners/posters/standees information. It is available
to all the users logged in as Distributors.
The distributor user performs a search based on State, District, Distributor Code (pre populated) and
transaction date. On a successful search all Banners, Posters and Standees fields are populated and the
user can perform an update depending on the requirements. If Data is not available on search, the No of
banners/posters and standees are marked as 0, and allows the user to add the corresponding values.
Multiple locations (comma separated) can be entered for banners, posters and standees.
Note: Cumulative Count is automatically calculated based on the input in the No Of
Banners/Posters/Standees fields respectively.
No of Banners/Posters/Standees are respective counters for a particular Transaction Date and
cumulative count is the maximum count cumulated so far for frequency specified in target.
Target displays the maximum allowed cumulative counts for banners, posters and standees along with
the frequency (Weekly, Monthly, Yearly). This is configurable and can be managed from Target
Configuration.
The user is also entitled to delete any of his previous entries by selecting the delete link.
Confidential
Page 19 of 48
PMIS User Manual
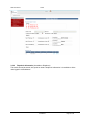
3.2.2.2
iGATE
Telephonic Information (Accessible to Distributor)
This module is used to search, add, update or delete Telephonic Information. It is available to all the
users logged in as Distributors.
Confidential
Page 20 of 48
PMIS User Manual
iGATE
After performing a search based on State Code, District, OMC Code (pre-populated) and transaction
date, data is populated on a successful search and blank form is presented in case of no data for search
criteria specified.
Confidential
Page 21 of 48
PMIS User Manual
iGATE
No of consumers contacted is a counter for a particular Transaction Date and cumulative count is the
maximum count cumulated so far for frequency specified in target.
The user can specify the count against particular reason for which the consumer did not submit Aadhaar
with distributor based on their telephonic conversation on given date. Please note that this is not a
cumulative count and is only for consumers contacted on the specified Telephonic conversation date.
After filling the values in above blank form, telephonic information can be save by clicking on Add/Update
button.
Confidential
Page 22 of 48
PMIS User Manual
iGATE
Confidential
Page 23 of 48
PMIS User Manual
iGATE
If data is present for the specified date, then following form will populate.
Telephonic information can be updated/deleted on clicking Edit/Delete link
Confidential
Page 24 of 48
PMIS User Manual
iGATE
Confidential
Page 25 of 48
PMIS User Manual
3.2.2.3
iGATE
Advertisement Input (Advertisement FM, Cable etc.) (Accessible to District Co-ordinator)
This module is used to search, add, update or delete Advertisement in FM, Aakashwani Cable, Cinema
Houses Information. It is available to all the users logged in as District Coordinators.
Confidential
Page 26 of 48
PMIS User Manual
iGATE
After performing search the user is entitled to Add or Update Advertisement Information.
No Of FM/Akashwani/Cable/Cinema are counters representing the respective counts for a particular
Advertisement date. Cumulative count is the maximum corresponding count cumulated so far for
frequency specified in target.
Confidential
Page 27 of 48
PMIS User Manual
3.2.2.4
iGATE
Distributor Holiday Input Form (Accessible to Distributor)
Purpose of this module is to keep track of distributor‟s holiday status whether it is closed/opened on a
specific holiday.
Steps for Distributor Holiday Input Form:
1. Login as a Distributor user.
2. Click on DistributorHolidayDtls under PMIS Input.
Confidential
Page 28 of 48
PMIS User Manual
iGATE
3. Distributor Holiday Input form will open with State name, District, OMC code and Distributor code
as read-only.
4. Select the holiday date (which is Transaction Date in the form).
5. On clicking the search button, if data already exists, detail whether distributor is open or closed is
displayed otherwise just the distributor name is displayed.
Confidential
Page 29 of 48
PMIS User Manual
iGATE
6. Check the check box if the distributor is Open, otherwise uncheck if the distributor is closed and
click on submit/update All button.
7. It will save the distributor‟s status.
8. Once submitting the status, login user can update (if required) the status by clicking on same
submit/update button for the same holiday date any time.
3.2.2.5
Leaflets Input Form (Accessible to Distributor)
Purpose of this module is to keep track on the number of leaflets distributed by distributor on the given
date.
Steps for Leaflets Input Form:
1. Login as a Distributor User.
2. Click Leaflets Details under PMIS Input.
Confidential
Page 30 of 48
PMIS User Manual
iGATE
3. Leaflets Input form will open with State name, District, OMC code and Distributor code as readonly.
4. Select the transaction date for which leaflets has been distributed.
5. On clicking the search button, it will display the details at the bottom of the form with Distributor
name, OMC code, No. Of Leaflets Distributed and cumulative count for the leaflets distributed for
the supplied transaction date.
Confidential
Page 31 of 48
PMIS User Manual
iGATE
6. On entering the value for text field “No. leaflets distributed “, text field “Cumulative Count Leaflets
Distributed” will auto set with cumulative value for leaf distributed on supplied transaction date
(User need not to enter any value for this field).
7. To save these details, click on the submit/Update All button.
8. At the top of Leaflets input form, target would be displayed. This will comprise of both the Target
count and frequency if the same is set already through Target configuration screen for the said
district/state for the current/transaction date.
9. On search, the field “Cumulative Count Leaflets Distributed” displays the cumulative leaflets
distributed figure achieved for the given target frequency(e.g. if target frequency is set to weekly,
it will display the number of leaflets already distributed within the week falling in transaction date).
3.2.2.6
Drop Box Input Form (Accessible to Distributor)
Purpose of this module is to keep track on the number of drop boxes installed by distributor on the given
date.
Steps for Drop Box Input Form:
1. Login as a Distributor User.
2. Click on Drop Box under PMIS Input.
Confidential
Page 32 of 48
PMIS User Manual
iGATE
3. Drop Box Input form will open with State name, District, OMC code and Distributor code as readonly.
4. Select the transaction date for which Drop Box has been distributed.
5. On clicking the search button, it will display the details at the bottom of the form with Distributor
name, OMC code, No. Of Drop boxes installed, submitted DropBox/Form and cumulative count
for the Drop boxes distributed for the supplied transaction date.
Confidential
Page 33 of 48
PMIS User Manual
iGATE
6. On entering the value for text field “Drop Box installed for txn date “, text field “Cumulative No. Of
Drop Box Installed Till Date” and “Cumulative No. of form submitted till date” will auto set with
cumulative value for Drop Box Installed and Form submitted on supplied transaction date (User
need not to enter any value for this field).
7. To save these details, click on the submit/Update All button.
8. At the top of Drop Box input form, target would be displayed. This will comprise of both the Target
count and frequency if the same is set already through Target configuration screen for the said
district/state for the current/transaction date.
9. On search, the field “Cumulative No. Of Drop Box Installed Till Date” displays the cumulative
count for Drop box installed figure achieved for the given target frequency (e.g. if target frequency
is set to weekly, it will display the number of Drop box already installed within the week falling in
transaction date).
Confidential
Page 34 of 48
PMIS User Manual
3.2.2.7
iGATE
Aadhaar Enrollment Centre Details Display (Accessible to District Co-ordinator)
Purpose of this module is to keep track of distributors displaying the Aadhaar enrollment centre details.
Steps for Aadhaar Enrollment Centre Details Display Input Form:
1. Login as a Distributor User.
2. Click on Aadhaar Enrollment Centre under PMIS Input.
3. Aadhaar Enrollment Centre Details Display Input Form will open with State name, District and
OMC code as read-only.
Confidential
Page 35 of 48
PMIS User Manual
iGATE
4. Select the transaction date for which Aadhaar Enrollment Centre Details has been displayed.
5. On clicking the search button, it will display the details of distributor at the bottom of the form with
Distributor name, OMC code for that transaction date.
Confidential
Page 36 of 48
PMIS User Manual
iGATE
6. Check the check box if the Aadhaar Enrollment Centre Details is displayed at Distributor location
else uncheck and click on submit/update All button.
7. It will save the distributor‟s status.
8. After submitting the status, login user can update (if required) the status by clicking on same
submit/update button for the same transaction date any time.
Confidential
Page 37 of 48
PMIS User Manual
3.2.2.8
iGATE
Advertisements Newspaper Input Form (Accessible to OMC National user)
Purpose of this module is to enter information about the advertisements published in different news
paper. It‟s also keep record for the previous advertised date and next advertised date.
Step for Advertisements Newspaper Input Form:
1. Login as a Marketing/National level User.
2. Click on Advertisements Newspaper under PMIS Input.
3. Advertisements Newspaper Input Form will open with State name, District and OMC code as
read-only.
Confidential
Page 38 of 48
PMIS User Manual
iGATE
4. Select the Adv. Date for which the Advertisements have been published in different news paper.
5. On clicking the search button, it will display the details at the bottom of the form with field for
News paper name for the supplied transaction date or “No Records Found” at top.
Confidential
Page 39 of 48
PMIS User Manual
iGATE
6. If text field is empty, enter the new value for the news paper in which advertisement has been
published.
7. If the collector has received the copy, check the checkbox and click on submit/update All button.
8. It will save the status.
9. After submitting the status, login user can update (if required) the status by clicking on same
submit/update button for the same transaction date any time.
Confidential
Page 40 of 48
PMIS User Manual
iGATE
Confidential
Page 41 of 48
PMIS User Manual
3.2.2.9
iGATE
Mic Announcement (Accessible to District Co-ordinator)
This module is used to search, add, update or delete the mic announcement count. In this module, the
user can search for records with „No of Auto-rickshaw used‟ on a particular date along with cumulative
count of the same. The user can always view the current target(s) specified for this module on top of the
page and can plan accordingly. The user can also update a particular entry after searching the same.
New entry can also be done after selecting a new date. Both these activities can be done using the
„Save/Update‟ button. An existing entry can be deleted using the „Delete‟ button.
Addition of new records can always be done by selecting a new date (other than existing date data) along
with all the mandatory fields. Existing date data will always get updated unless deleted by the user.
It should be ideally accessible to District Coordinators.
Confidential
Page 42 of 48
PMIS User Manual
iGATE
Key Fields:
No of Auto-rickshaw used: This field indicates the number of auto used on a particular date, if searched
for an existing record. Same field can be used to save a new count or update an existing one.
Cumulative Count: This field indicates the cumulative count for number of auto-rickshaw used in that
frequency. A user can always compare the same with the target specified on top of the page and plan the
use of auto-rickshaw accordingly.
The sample would look like this:
Confidential
Page 43 of 48
PMIS User Manual
iGATE
Confidential
Page 44 of 48
PMIS User Manual
3.2.3
iGATE
PMIS Reports Menu
Visibility Level (OMC National or others as configured)
The menu has all the reports where data for DBTL can be viewed.
There are following Sub Menus within PMIS Reports menu:
3.2.3.1
Aadhaar Seed Report
Aadhaar/Bank Seeding report can be viewed through this menu.
This report is also available for External user.
External user can view this report without login to the application using following link:
https://<hostname>/PNGPMIS/AadhaarSeedingExt.htm.
Confidential
Page 45 of 48
PMIS User Manual
3.2.3.2
iGATE
Advance Subsidy Report
Subsidy/Advance Payment report can be viewed through this menu.
Following drilled down reports can be viewed through this menu:
Dashboard report
District wise cumulative report
District wise Advance payment report
District wise subsidy transfer report.
3.2.3.3
Advt. Newspaper Report
Advertisement Newspaper data report can be viewed through this menu.
3.2.3.4
Leaflets Report
Leaflet data report can be viewed through this menu.
3.2.3.5
Distributor Holiday Report
Distributors open/closed on holiday data report can be viewed through this menu.
3.2.3.6
Drop Box Report
Drop Box data entered by distributor can be viewed through this report.
3.2.3.7
Enrollment Center Report
Distributor displaying enrollment center details can be viewed here.
3.2.3.8
Telephonic Report
Telephonic Information data report can be viewed here.
3.2.3.9
Banners Report
Through this report, banner data entered by distributor can be viewed.
3.2.3.10 Mic Announcement Report
Through this report, Mic. Announcement data as entered by district coordinator can be viewed.
3.2.3.11 Advertisement FM Report
Advertisement Input (FM, Cable, Aakaashwani, Cinema House Advt.) data can be viewed here.
3.3 Web service integration with OMCs
Please note that this section is strictly meant for support and Admin personnel:
3.3.1
Aadhaar/Bank Seeding and Advance Subsidy Process
Wsdl files are provided by OMC‟s to generate stubs for Aadhaar seeding and Advance Subsidy.
Steps to Import Wsdl file:
Create new java standalone project
In the command prompt go the project location
Execute the command
e.g. wsimport -s src -d bin” http://ebiz.bpc.co.in/UIDAI/PMISDataService.wsdl”
location of the wsdl file to be mentioned in “ ” (can be present locally or at remote location)
The project created above will now have generated stubs and services.
Write a client that call the service and insert the data in our application database
Note: The specification of the web services is already defined in the specifications document.
Confidential
Page 46 of 48
PMIS User Manual
iGATE
Jar can be created using the below command from bin folder of the project
jar cvf PMIS_WSDL_Client.jar PmisSeedingBPCClient.class PmisSeedingHPCClient.class PmisSeedingIOCClient.class
PmisSubsidyBPCClient.class PmisSubsidyHPCClient.class PmisSubsidyIOCClient.class
Once the jar is created, export same to Linux box and create shell script with following commands
java -classpath PMIS_WSDL_Client.jar PmisSeedingBPCClient
java -classpath PMIS_WSDL_Client.jar PmisSeedingHPCClient
java -classpath PMIS_WSDL_Client.jar PmisSeedingIOCClient
java -classpath PMIS_WSDL_Client.jar PmisSubsidyBPCClient
java -classpath PMIS_WSDL_Client.jar PmisSubsidyHPCClient
java -classpath PMIS_WSDL_Client.jar PmisSubsidyIOCClient
The scripts can be scheduled to run and email notification can be configured by providing SMTP Host and
credentials to intimate failure of the process at any stage.
Scripts for tables involved in Aadhaar/Bank Seeding and Advance Subsidy Transfer Process.
create table AADHAAR_SEEDING (
AADHAAR_SEEDING_ID bigint(20) NOT NULL AUTO_INCREMENT ,
OMC_CODE int(1) NOT NULL,
PPAC_CODE int(4) NOT NULL,
PRODUCT_CODE int(2) NOT NULL,
DATE_OF_ACCUMULATION date NOT NULL,
DISTRIBUTOR_CODE int(10) NOT NULL,
NO_ACTIVE_LPG_CONSUMERS int(7) NOT NULL,
CUMULATIVE_COUNT_LPG_AADHAAR_SEEDING int(7) NOT NULL,
CUMULATIVE_COUNT_BANK_AADHAAR_SEEDING int(7) NOT NULL,
ENTRYDATE datetime DEFAULT NULL,
MODIFYDATE datetime DEFAULT NULL,
PRIMARY KEY (AADHAAR_SEEDING_ID)
)
create table SUBSIDY_TRANSFER(
SUBSIDY_ID bigint(20) NOT NULL AUTO_INCREMENT ,
OMC_CODE int(1) NOT NULL,
PPAC_CODE int(4) NOT NULL,
PRODUCT_CODE int(2) NOT NULL,
DATE_OF_ACCUMULATION date NOT NULL,
DISTRIBUTOR_CODE int(10) NOT NULL,
TOTAL_CUMULATIVE_RECORDS int(7) NOT NULL,
TOTAL_CUMULATIVE_SUCCESS_RECORDS int(7) NOT NULL,
TOTAL_CUMULATIVE_FAILURE_RECORDS int(7) NOT NULL,
TOTAL_CUMULATIVE_NOT_RETURNEDFILES int(7) NOT NULL,
SUBSIDIZED_RATE_CYLINDER double(7,2) NOT NULL,
BANK_TRANSACTION_CHARGE double(7,2) NOT NULL,
ENTRYDATE datetime DEFAULT NULL,
MODIFYDATE datetime DEFAULT NULL,
PRIMARY KEY (SUBSIDY_ID)
)
Confidential
Page 47 of 48
PMIS User Manual
iGATE
create table ADVANCE_PAYMENT(
ADVANCE_PAYMENT_ID bigint(20) NOT NULL AUTO_INCREMENT ,
OMC_CODE int(1) NOT NULL,
PPAC_CODE int(4) NOT NULL,
PRODUCT_CODE int(2) NOT NULL,
DATE_OF_ACCUMULATION date NOT NULL,
DISTRIBUTOR_CODE int(10) NOT NULL,
TOTAL_CUMULATIVE_RECORDS int(7) NOT NULL,
TOTAL_CUMULATIVE_SUCCESS_RECORDS int(7) NOT NULL,
TOTAL_CUMULATIVE_FAILURE_RECORDS int(7) NOT NULL,
TOTAL_CUMULATIVE_NOT_RETURNEDFILES int(7) NOT NULL,
SUBSIDIZED_RATE_CYLINDER double(7,2) NOT NULL,
BANK_TRANSACTION_CHARGE double(7,2) NOT NULL,
ENTRYDATE datetime DEFAULT NULL,
MODIFYDATE datetime DEFAULT NULL,
PRIMARY KEY (ADVANCE_PAYMENT_ID)
)
Confidential
Page 48 of 48