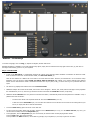
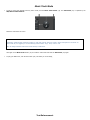
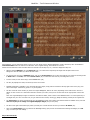
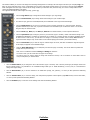
1
Guided Tour, v. 1.9
© 1997-2014 Exponent Software SàRL - All Rights Reserved
Publisher : Exponent Software SàRL
79-81, ave. Louis-Casai
1216 Cointrin (Geneva)
Switzerland
Ph.:
+4122 788 24 40
Fax:
+4122 788 24 49
[email protected]
www.exponentsoftware.com
MediaGun v.1.9 for Windows – Guided Tour
Hello and a big thank you for your interest in MediaGun!
This mini user manual should help you master the software quickly. For more information, particularly about how MediaGun handles file
formats, installation procedures, FAQs, etc., we recommend the ReadMe file (Start Menu/All Programs/Exponent Software/MediaGun 1.9/Doc),
or our website www.exponentsoftware.com.
MediaGun’s Architecture
MediaGun is organised in four screens:
•
•
•
•
the Splash Screen
The Backstage
the Stage, with the Control Bar and the Marketing Window
the Text Enhancement Window
the Splash Screen
MediaGun – Splash Screen
The Deactivate button temporarily disables your use of MediaGun on any given machine. This enables you to use it on another PC without
having to purchase a second license. Deactivation is also necessary before big changes to your computer, for ex. a change of operating system,
a hard drive reformatting, etc.
To deactivate MediaGun, you will need an internet connection prior to clicking the Deactivate button. Please note that activating MediaGun on
another machine may require up to 30 minutes.
BEFORE YOU START THE DEACTIVATION PROCESS, WE STRONGLY ADVISE YOU TO ENSURE YOU HAVE BOTH YOUR USER NAME AND
ACTIVATION KEY AVAILABLE. These were sent to you by email following your initial purchase, and will be required when you next activate
MediaGun. (But in case you can't find them, do not panic. We’re here to help!)
The Backstage
After the Splash Screen, you land on the Backstage, which is where you build your Master Lists.
This is a 3-step operation:
1. GET: Choose the folder which contains the media you need
2. ADD: Assemble those media into a Master List
3. RUN: Play the Master List
That’s all! It’s really as easy as that. With MediaGun you can assemble more than 50 types of multimedia files (PowerPoint, PDF,
DVD, video clips, html, images, sounds, texts, Flash, apps, Quicktime, YouTube, etc.), and play your new Master List in a few
seconds.
Read on to find out how…
MediaGun – the Backstage
To choose a language, click on a Flag (4). Options are English, German and French.
Detailed information is available. If you need help about any object, simply click the ? button at the top-right of the screen (6), then click on
that object. Alternatively, press F1 on your keyboard.
Step 1: Load the media
•
A click on the Get button (1) automatically analyses the content of the Resource Folder. MediaGun ‘remembers’ the Resource Folder
from one session to the next. To select another folder, click the Folder button (2).
Note: All the elements of a Master List must reside in the same Resource Folder. However, the workaround is to use shortcuts. Many
MediaGun users use Resource Folders which are entirely made of shortcuts! This enables you to gather elements from different
folders into the same Resource Folder. And because shortcuts are very tiny files (1 KB), you don’t have to give up valuable hard drive
space.
•
The text box (3) displays the location of the current Resource Folder
•
MediaGun analyses the content of this folder, then sorts it into 5 categories – Movies, Text, Audio, Pictures and Apps. It then populates
the 5 Media Boxes (10 to 14). This box (8) shows the amount of elements each Media Box contains, respectively.
•
MediaGun handles shortcuts. For every shortcut in the Resource Folder, it automatically checks that the parent file is available. If not, it
publishes the result as follows:
-
It removes the names of all ‘orphaned shortcuts’ from the 5 Media Boxes (10 to 14)
-
It lists them in the Preview Box (30). You can either save this list as a text file and use it to look for the missing files at your
leisure, or simply click OK to close this information.
•
To set the audio level (5) place the mouse cursor and click.
•
To view or hear any media, double-click its name, whether in the 5 Media boxes (10 to 14), or in the Master List box (16). Here, you
can also select a media, and click the Play button (25)
To stop playback, click the Stop button (26). It’s not necessary to click this button to start playing another media.
To stop a Text media, click on the text itself.
To stop a .exe in the APPS media box, use the ESC key (Escape) of your keyboard, or, if found, a Quit menu or button.
•
•
Click the + button (9) to go to the Text Enhancement window. (see below)
• ALT-double-click on the name of a text (.txt) file in the TEXT Media box (11) opens that file in its editing program (usually the
Windows Notepad). This allows for quick last minute corrections, directly from MediaGun.
Step 2: ADDing the media. Build your Master List
•
To build a sequence – a Master List -, select the files you need in the 5 Media boxes (10 to 14). Don’t worry about the order for now.
Hold down the CTRL (Control) key of your keyboard to (de)select files across the 5 Media boxes.
•
To select the entire content of a Media box, double-click its name (7) (for ex. : MOVIES)
•
To put any selected media into the Master List, click the ADD button (27), or press the Return key of your keyboard.
•
The order of the media in the Master List box (16) can be modified at any time. To do so:
- Select the element(s) you need to move. Remember to use the CTRL (Control) key of your keyboard to make multiple
(de)selections.
- Release the Control key
- Drag and drop the selection to the desired spot while pressing down the right button of your mouse. A horizontal line shows the
point of insertion.
•
The box (15) shows the name of the current Master List.
•
To deselect (23) or delete (24) any element in the Master List (16), select them and click the respective button. You can make
multiple selections by holding down the CTRL (Control) keyboard key.
•
To create a New (19), Save (20), Save as (21) or Print (22) a Master List, click the corresponding button.
•
To save the contents of the Master List box (16) into a text file (.txt), click the Print button (22) while pressing the keyboard CTRL
(Control) key.
•
That’s it! You can start playing your Master List: clicking the Run button (28) takes you to the Stage. You can also save it for a future
use. To do so, click the Save button (19) and name it. Its name appears in the Preview box (30). To load any list, double-click on its
name, or select it, then click on the Load button (31).
•
The names of all your saved Master Lists are displayed in the Preview box (30) when no media is playing.
•
The box (29) shows the address of the Resource Folder relative to the selected Master List in the Preview box (30).
•
To Rename or Delete a Master List, select its name in the Preview box (30), then click the corresponding button (respectively 32 or
34). To delete all the Master Lists, press the CTRL keyboard key, then click on the Delete button (34).
Note: When you load a Master List, MediaGun does more than displaying its content in the Master List box (16). It actually checks that
every media is actually present and warns you of any missing file. It gives you a few options to choose from and does not allow you to
click on the Run button until you do. This guarantees you won’t have a nasty surprise during your presentation!
Note: Deleting a Master List or an element in a Master List cannot be undone. However, these are only references to your media files.
Deleting them has no effect on the files themselves.
•
To sort your Master Lists in alphabetical order, click the Sort button (33)
Music Track Mode
•
To play a music track together with any other media, click the Music Track button (18). The Add button (27) is replaced by the
Add/Remove Music buttons.
Follow the instructions on screen.
About micro-cuts in the audio:
Sometimes, combining high resolution images or video with a music track can result in short interruptions in the audio. To
reduce that risk, we suggest you use the following audio formats: .mp3, .wma, .m4a or .mid.
Also, the image resolution should not exceed 96 DPI, in RGB mode.
Click again on the Music Track button (18) to exit Music Track mode and show the Add button (27) again.
•
To play your Master List, click the Run button (28). This takes you to the Stage,
Text Enhancement
MediaGun – Text Enhancement Window
With MediaGun, you can change the aspect of a text (.txt) file. Simply use the Windows Notepad to create a document, then use MediaGun’s
Text Enhancement feature to make it more attractive. This is a global setting, which affects ALL .txt files.
Please note that this feature does not affect other text formats such as PDF, Doc, etc., which are displayed as they are.
•
With the buttons Wallpaper (35) and Plain Color (36), you choose from respectively 48 images and 168 plain colors for the
background. The Ink button (37) offers 168 text colors.
•
You can also use your own. In Wallpaper mode, click on the Custom button (42) to select the image of your choice for the background.
In Plain Color or Ink mode, click on the Custom button (42) to choose the exact color of your background or text.
•
To select a Font, its size and its style, click the Font button (38).
•
The box (39) displays the name, size and style of the current Font.
•
Detailed information is available. If you need help about any object, simply click the ? button at the top-right of the screen (40), then
click on that object. Alternatively, press F1 on your keyboard.
•
The box on the left of the window (41) shows our original Wallpapers, Plain or Ink colors, depending on the mode chosen. Click on a
pattern or color to select it. A white frame around it confirms your choice, and you can see the result on the right portion of the screen
(44).
Note: Our original Wallpaper images are located in the ‘Patterns’ folder, which is found in the MediaGun folder. You could replace any or
all images with your own. Just make sure you give them the same names, format (jpg, RGB) and density (72 DPI) as the original ones.
•
The Custom box (43) shows a thumbnail of your own Wallpaper or Plain color. Please note that this feature is available in any case and
does not require you to change our original Wallpaper images (see previous point)
•
The box on the right of the window (44) shows you what your .txt files will look like once you click the OK button (46).
•
Click on the Cancel button (45) to go back to the Backstage leaving your previous Text Enhancement settings unchanged, or on OK
(46), to confirm your new settings.
Step 3: Run the show!
THE STAGE
The Stage is where your Master Lists are played. The first time you enter the Stage, you see the Exponent Software logo. Clicking on it shows
the Contact image. You will be able to replace these two images with your own. (See below ‘Marketing Window’)
Detailed information is available. If you need help about any object, simply click the ? button at the top-right of the screen, then click on that
object. Alternatively, press F1 on your keyboard.
MediaGun – the Control Bar
At the bottom of the screen, you see the Control Bar. Use the keyboard Space Bar to show/hide it.
This is how it works:
Five Navigation buttons
• The Play button (47) plays the current event of the Master List, whose name is displayed in the Current Event box (53).
You can also use the keyboard Up arrow.
•
The Stop button (48) stops the current event. You can also use the keyboard Down arrow.
Note: To Stop an event of type App, use the keyboard ESC (Escape) key, or, if found, a Quit menu or button.
•
The Left Arrow button (49) takes you to the previous event. You can also use the keyboard Left arrow.
Option: You can also click on the bottom-left corner of the screen. This is handy when using a beamer and a cordless mouse which you
point at the screen. The Control Bar can then be hidden by pressing the keyboard Space bar, to reduce onscreen clutter.
•
The Right Arrow button (50) takes you to the next event. You can also use the keyboard Right arrow.
Option: You can also click on the bottom-right corner of the screen. This is handy when using a beamer and a cordless mouse which
you point at the screen. The Control Bar can then be hidden by pressing the keyboard Space bar, to reduce onscreen clutter.
•
The Back to Start button (51) takes you to the first event of the Master List. You can also use the keyboard ALT+Left arrow keys.
Thanks to the keyboard alternative techniques described here, the Control Bar can be hidden most of the time, resulting in a clearerlooking screen.
Note: If you select event B of your Master List while event A is playing, event B will start playing without further action on your part. In
contrast, if you stop Event A by a Stop command, then select event B, you will have to send a Play command to play event B. This logic is
similar to that of a CD-Player remote control.
More options are found to the right of the navigation buttons. You can:
•
Know the current event’s number / the total number of events in the Master List (52)
•
Set the audio level (55): place the mouse cursor and click.
•
Choose the resolution of videos (56) between Original and Full screen. This only applies to videos, not to still images.
•
Know the name/Start playback of the current (53) or next (54) event by clicking their name. Knowing the next event’s name
can be useful. It saves the presenter from getting sidetracked.
Note: Click and hold down the left mouse button on the Current event box (53) to display your entire Master List. Select the element
you need to play. This is very practical to quickly respond to a question or remark by the audience.
•
Start any event in your Master List. Click the List button (59), then double-click on the event name to start playback.
•
Insert your Logo / your Contact Card. Click the Logo button (58) to open the Marketing Window (see below). This window
enables you to insert, to resize, to center, to accurately position your Logo and your Contact Card
•
Go back to the Backstage (57).
•
Create and export a Portfolio (60) - see below
•
Quit MediaGun (61)
Marketing Window
This window enables you to insert two images onto the Stage background. For example, the first image could show your company Logo, the
date, the venue and name of the event. It will appear when no other visual media is being played. You can insert a second image (Contact),
which will appear when the Logo is clicked. This 2nd image could be your business card, an access map, etc. This is a handy feature in the
context of Standard Portfolios (see below)
The supported formats for these images are .bmp, .gif and .jpg.
•
Click the Logo button (62) to assign all the other settings to your Logo image.
•
Click the Contact button (63) to assign all the other settings to your Contact image.
•
This text box (64) gives the Horizontal/Vertical pixel coordinates of the Logo and Contact images.
•
Click the North button (65) to move your selection (Logo or Contact) upwards, by 1 pixel increments. Press the
keyboard Control key to move it by 10 pixels increments. Press the Shift key for a continuous motion. You can also
drag and drop the selection itself.
•
Click the South (66), West (67) and East (68) buttons for a similar behavior, in their respective directions.
•
Click the Open button (69) to assign a picture to your selection (Logo or Contact). Please note that this image is not
embedded into MediaGun: it remains an external file. If you delete it, or change its name or location, MediaGun will not
be able to find it. If this occurs, you will have to re-assign it. In contrast, a Portfolio, when created, does embed the
Logo and Contact images. They will be visible on the machine playing the Portfolio. (See Portfolios below)
•
Click the Close button (70) to close the Logo or Contact image. Of course, this does not affect the original image file.
It will simply not appear on the MediaGun Stage.
•
Click the Show-Hide button (71) to show/hide your selection (Logo or Contact). This can be useful to position the
image with one pixel accuracy.
Note: There is a difference between Closing and Hiding the selection:
You close it when you don’t wish them to appear on the Stage.
You hide it when you need to place the image with maximum accuracy. Use a succession of “Show-Hide” clicks to
verify a transparency or shadow effect.
•
Click the Resize button (72) to change the size of the selection (Logo or Contact). This is done by entering a percentage. Please note
that for optimal results, it is preferable to use a dedicated image editor (for ex. Adobe Photoshop). In every case, it is not advised to
enlarge the original image.
•
Click the Reset button (74) to set the selection to its initial state (image, size, position), i.e. when you last opened the Marketing
Window.
•
Click the Cancel button (75) to reset the image, size and position properties of both objects (Logo and Contact) to their initial state,
i.e. when you last opened the Marketing Window.
•
Click the OK button (76) to save the current settings and close the Marketing Window.
Portfolios
A MediaGun Master List can be exported and played on any Windows based PC, whether MediaGun is present or not. We call such a list a
Portfolio. The creation of a Portfolio by MediaGun is 100% automatic.
There are two sorts of Portfolios.
•
Standard – Choose this option to create an interactive Portfolio where the end user uses a Control Bar to navigate in the Master List.
However, they will not be able to change the content of the Portfolio.
•
Solo – Choose this option to create an automatic, self-running Portfolio. This can be very useful in the context of exhibitions, events,
company lobbies, digital signage, internal communication, etc. You can set the Portfolio to play in a continuous loop until the ESCape key
is pressed, or once only, before it quits automatically.
A MediaGun Portfolio is SECURED. In the event that any media is modified or replaced by human intervention after the Portfolio is created,
MediaGun would simply not play it. The integrity of your original message would be preserved.
To create a Portfolio from any MediaGun Master List:
1. Click on the Portfolio button (60) of the Control Bar.
2. Select the Portfolio mode (Standard or Solo)
3. Name the Portfolio and specify its location
4. Click OK. The Portfolio is generated automatically.
We recommend you read the ReadMe file and the Help in MediaGun itself to find out more about Portfolios.
Technical Support
Do you need help? Don’t hesitate to contact us!
Exponent Software Sarl
Ph.:+41 22 788 24 40 - Fax: +41 22 788 24 49
Address: 79-81 Avenue Louis-Casai, CH-1216 Cointrin (Geneva) - Switzerland
e-mail:[email protected] - Web : www.exponentsoftware.com
_____________________________________________Copyright Exponent Software SàRL 2014____________________________________