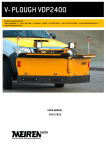
1
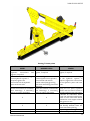
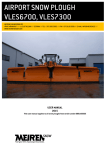
UNDERBODY SCRAPER AS2505 MEIREN ENGINEERING OÜ VÄIKE MÄNNIKU 7/// TALLINN 11216 /// ESTONIA /// PHONE: +372 682 5002 /// FAX: +372 610 0589 /// E-MAIL: [email protected] /// WWW.MEIRENSNOW.COM USER MANUAL 2015-2016 This user manual applies to snow ploughs from serial number 0891XXXXXX SNOW PLOUGH AS2505 CONTENT CE DECLARATION OF CONFORMITY ..................................................................................................................... 3 FOREWORD ........................................................................................................................................................ 4 GENERAL SAFETY REQUIREMENTS ..................................................................................................................... 4 PERSONNEL ....................................................................................................................................................... 4 1. PRODUCT DESCRIPTION ............................................................................................................................. 4 1.1 1.2 STANDARD EQUIPMENT OF THE SCRAPER ................................................................................................................. 4 ACCESSORIES ..................................................................................................................................................... 5 2. SAFETY REGULATIONS FOR WORKING WITH THE PLOUGH ......................................................................... 5 3. USAGE OF THE PLOUGH ............................................................................................................................. 7 3.1. 3.2. 3.3. INSTALLING BLADES............................................................................................................................................. 8 ADJUSTING THE SCRAPER'S TILT ............................................................................................................................. 8 CONSOLE ........................................................................................................................................................... 9 4. SNOW PLOUGH MAINTENANCE ................................................................................................................. 11 5. WARRANTY CONDITIONS OF THE PRODUCT .............................................................................................. 13 TABLES Table 1. Specification of the snow plough / scraper as2505 .................................................................................... 5 Table 2. Hydraulics of the scarper ................................................................................................................................ 5 DRAWINGS Drawing 1. Safety marking: risk of accident! .............................................................................................................. 7 Drawing 2. Blade angle ................................................................................................................................................... 7 Drawing 3. Right hand cylinder for tilt adjustment .................................................................................................... 8 Drawing 4. Console .......................................................................................................................................................... 9 Drawing 5. Description of joystick functions ............................................................................................................ 10 Drawing 6. Grease points ............................................................................................................................................. 11 Drawing 7. Grease points ............................................................................................................................................. 12 2 WWW.MEIRENSNOW.COM SNOW PLOUGH AS2505 CE DECLARATION OF CONFORMITY Manufacturer: Meiren Engineering OÜ Väike Männiku 7 11216 Tallinn Phone +372 6825 002 www.meirensnow.com We hereby declare that the following product: AS2505 Model: ............................................ Serial number: ............................................ Manufacturing date: ............................................ Meets the following directives and standards: 2006/42/EC EN 349:1993+A1:2008 3 WWW.MEIRENSNOW.COM SNOW PLOUGH AS2505 FOREWORD Thank you for choosing the Meiren Snow product. This operator manual consists of technical specifications, user and maintenance instructions and warranty terms and conditions for AS series snow plough. AS series snow ploughs are designed for ploughing, scraping ice, dispersing filling weight and levelling. Using the plough contrary to its intended purpose may cause economic losses and bodily injuries. It is therefore of the utmost importance that the person operating the plough read through the manual and use the product pursuant to the requirements. Any misuse of the product releases the manufacturer from the liability for occurred damages and for reimbursing losses. GENERAL SAFETY REQUIREMENTS As the construction of the product is complex and it contains moving parts, it is of the utmost importance that the person working with the equipment be aware of all safety risks. To reduce the risks it is important that the operator have read through the operator manual; the operator have been given an appropriate training, which gives him the permit to use a product of this type in his work; the operator have been provided with all necessary tools and is wearing suitable working clothes. PERSONNEL This product may only be used and maintained by properly trained personnel. The operator’s employer is obliged to ensure fulfilment of all user instructions and safety requirements stipulated by the manufacturer. Before starting working with the plough, please be sure to read carefully through the operator’s manual. 1. PRODUCT DESCRIPTION The AS2505 snow plough/ underbody scraper is a steel mouldboard durable construction snow plough/ underbody scraper, designed for attachment to the bottom of the vehicle. The plough can be used throughout the year. In summer the plough can be used in road construction and maintenance as you can use it to distribute fillers and level soil and new road surfaces. In the cold season you can use the plough for various winter road maintenance jobs: shifting snow and sleet, removing ice, snow compression. The scraper is made to order: either non-rotated or hydraulically rotated. It is equipped with right and left-hand telescopic extensions with hydraulic operation for improved working width. You can adjust the plough height in relation to the treated surface either hydraulically or mechanically. 1.1 Standard equipment of the scraper Mouldboard with a vehicle mounting frame (without installation); Cylinder for scraper raising / lowering; Left-sided manual scraper height and angle adjustment (with air ratchet wrench); Right-sided hydraulic tilt adjustment; Hydraulic accumulator for impact reduction and operating pressure maintenance; Safety markings (reflective film in front and back side). 4 WWW.MEIRENSNOW.COM SNOW PLOUGH AS2505 1.2 Accessories Right and/or left-sided telescopic extension with cylinder(s); Scraper rotation in range of 25° to the left to 25° to the right with cylinder; Left-sided hydraulic adjustment of height and tilting angle with cylinder(s); Blades made to client's order; Additional hydraulic valves for operating scraper and control unit (for a vehicle); Console; Automatics for reverse. General specification for the AS2505 snow plough / underbody scraper is listed in Table 1. Rotation angle of scraper (both to the right and to the left) Total max. width with telescopic extensions, mm Max. working width with telescopic extensions (rotated by 25°), mm Max width with retracted telescopic extensions, mm Working width with retracted telescopic extensions (rotated by 25°), mm Height of mouldboard with stinger boards, mm Hydraulically or mechanically adjusted scraper's mouldboard tilting angle Weight of scraper in standard equipment (non-rotatable, manual height adjustment, without telescopic extensions), kg 25° 3550 3140 2530 2200 420 ± 7°- 9° Weight of scraper (rotatable, hydraulic pivot control, with telescopic extensions), kg 860 Blades L=1220 (blades of telescopic extensions L=610) 490 3 pcs. Table 1. Specification of the snow plough /underbody scraper AS2505 Data of hydraulics of the AS2505 snow plough / underbody scraper is given in Table 2. Raising, bilateral action cylinder 1 pc. Telescopic extensions, bilateral action cylinder 2 pcs. Height and tilting angle adjustment of the scraper, bilateral action cylinder 2 pcs. Rotation of the scraper, bilateral action cylinder 1 pc. Oil usage 25-35 l/min Pressure up to 120bar Table 2. Hydraulics of the scarper 2. SAFETY REGULATIONS FOR WORKING WITH THE PLOUGH Before operating the plough Check the integrity and the technical condition of the plough. It is not permitted to begin work with a device that is not in technically good condition. 5 WWW.MEIRENSNOW.COM SNOW PLOUGH AS2505 Check that there are no people or objects in the vicinity that the plough may harm. The safety of people must also be ensured during maintenance and repair works and while moving the plough with the help of hydraulics or some other lifting device. In the event of failure to adhere to the safety regulations, the plough may cause injuries. It is prohibited to work under a lifted plough if the plough is not supported. Check that the plough is firmly attached to the wheel loader and that the fastenings are not damaged. Check that the safety marking, position lamps (if applicable) and reflex reflectors are in order and visible. Check the operational order of blades and support legs (skid shoe). The cutting edges must be adjusted, reversed or replaced latest when the distance between the cutting edge and the fastening openings is less than 25 mm. Check the fastening wedges of the blades. Check the fastening pins of the levers and cylinders. Check that the hydraulic hoses are sound and fastened correctly. Check that the plough has been thoroughly lubricated. Check that the plough is not damaged. Operating the snow plough The plough may be operated by a person who is at least 18 years old, has a driver’s license for the relevant category and has familiarized oneself with the user manual for the snow plough. Always be aware of your surroundings and other traffic, including vehicles approaching from side roads and behind you. Be mindful of pedestrians and cyclists so that you do not put them in danger while operating the snow plough. All warning lights must be switched on while operating the snow plough! Observe the general traffic regulations. The maximum permitted working speed for the plough under normal road conditions is 40 km/h in summer and 60 km/h in winter. Be mindful of the road conditions: reduce speed during thaw, observe the wind direction in case of powder snow and reduce speed if necessary. Reduce working speed when treated surface is soft; should the blades penetrate into the surface, the vehicle (tractor) can spin out of control and swerve off a road. It is forbidden to plough through wall of snow at maximum allowed working velocity as it can damage the snow plough. It is forbidden to plough snow outside the boundaries of a road. Ploughing snow with the snow plough / scraper in cities and on uneven roads is at the user's responsibility, since there is a risk of damaging the vehicle and road surface. The manufacturer does not compensate for the resulting damage. It is not permitted to mount accessories that do not have the approval of the manufacturer on the moving parts of the plough. It is prohibited to use hydraulically operated devices as levers. The plough may only be raised from the lifting eyes. ATTENTION! Pay extra attention when cleaning crossings. Avoid unnecessary backing. If possible, avoid snow ploughing in heavily loaded crossings and roads during peak hours. During working the safety signs shall always be switched on! Do not forget to check that no-one is near or under the snow plough before lowering it on the ground! Every time something happens during working with the plough that could damage the device, a device inspection shall be organized to establish and assess potential impairments. Damages (cracks in the structure or welding, deformed details) may danger property and people’s health. It is prohibited to continue operating the device, unless the damages have been repaired. 6 WWW.MEIRENSNOW.COM SNOW PLOUGH AS2505 Drawing 1. Safety marking: RISK OF ACCIDENT! 3. USAGE OF THE PLOUGH The snow plough / scraper is intended for snow shifting, removing ice, distribution and levelling of filler. You must not run into obstacles with the plough! When using the scrape, the blades should be at an angle of 90° to road surface (at right angles), making both the mouldboard and telescopic extensions stay at the same height. In this case the stingers stay at an angle of 45° to road surface (see Figure 2) when using a stinger board. Drawing 2. Blade angle Following are the suggested ploughing speeds: In summer, 20-40km/h In winter, 30-60km/h, depending on the properties of snow. When driving with the scraper in transport position, it should be lifted up by at least 200mm from ground level. 7 WWW.MEIRENSNOW.COM SNOW PLOUGH AS2505 3.1. Installing blades Both regular (attached by nut) bolts and special wedge bolts can be used to install steel blades. To adjust the height of steel blades you must knock out the wedges (unfasten the nut in case of a regular bolt) and lower the steel blades by one step. After that replace the wedges (fasten the nut in case of a regular bolt). 3.2. Adjusting the scraper's tilt Raising/lowering and tilt adjustment of the scraper is done by means of hydraulic cylinders. The right-hand cylinder (1, Figure 3) is contained between maintenance-free plastic bearings (2). The bearings can be lubricated if needed. Drawing 3. Right hand cylinder for tilt adjustment 8 WWW.MEIRENSNOW.COM SNOW PLOUGH AS2505 3.3. Console Console for underbody scraper is given in Drawing 4. Description of joystick functions is given in Drawing 5. Drawing 4. Console 9 WWW.MEIRENSNOW.COM SNOW PLOUGH AS2505 Drawing 5. Description of joystick functions 10 WWW.MEIRENSNOW.COM SNOW PLOUGH AS2505 4. SNOW PLOUGH MAINTENANCE DAILY MAINTENANCE: Choose blades according to intended use: Even blades for shifting snow and sleet; Ice blades for removal of compressed snow and ice. Check condition of the blades. The blades must be rotated or replaced if distance between cutting edge and mounting hole has been worn down to less than 25mm; Stinger boards for distribution and levelling of fillers. Adjust working angle of the blades always according to the nature of work. Set the scraper down, drive for a few meters, and check the result. Readjust if needed. Check wedge clamps and for possible leaks from hydraulic hoses and attachment points; Check the scraper's extremity light (supplied to order), vehicle lights, strobe lights and reflectors. Ensure that the lights are clean and undamaged. Always have backup wedges with you! The assemblies that need lubrication are equipped with grease nipples and have to be lubricated regularly (at least once a month). The grease nipples are shown on figures 6 and 7 (indicated as M). The places that need lubrication have to be greased at the beginning of new season and at the end of season no matter how often the scraper was put to use during the previous season. Drawing 6. Grease points 11 WWW.MEIRENSNOW.COM SNOW PLOUGH AS2505 Drawing 7. Grease points MAINTENANCE EVERY 8 WORKING HOURS Check all bolt connections and hydraulic connections and tighten, if required. Check that there are no leakages in the hydraulic system. If required, tighten the connections of the hydraulic parts and hose ends MAINTENANCE EVERY 150 MAINTENANCE AT THE END OF THE WORKING HOURS SEASON Check all bolt connections and Check all bolt connections and tighten, if required. tighten, if required. Lubricate all grease areas: grease nipples are on cylinders, on horizontal and vertical rotation axle of plough raising lever, back hand fixing frame and slide shoe. Check the condition of the blades Check the condition of the blades and fastenings. If necessary, and fastenings. If necessary, adjust or replace the blades. adjust or replace the blades. X X X X X X X X WWW.MEIRENSNOW.COM Check that there are no leakages in the hydraulic system. If required, tighten the connections of the hydraulic parts and hose ends. Spray the zinc parts, hydraulic valves and the ends of hoses of the plough with preservative wax. Lubricate all lubrication areas. Cover the protruding adjustment areas of the inner tube wheel mechanism and support wheels with grease or wax. Check the snow plough visually and identify whether there are parts that need replacing. Repair any paint damage. Pull in the cylinder piston rod or 12 SNOW PLOUGH AS2505 X X preserve it with appropriate grease. Let the plough be open to winds, but protect it from rain and sun. 5. WARRANTY CONDITIONS OF THE PRODUCT The Seller gives the Product a guarantee for a term of 12 (twelve) months. The guarantee term starts upon delivery of the Product to the Buyer and the time of delivery is the date indicated in the deed of delivery and receipt or CMR. The guarantee covers the elimination by the Seller of any production, material or construction defects detected in the Product or details thereof during the guarantee period. The Seller is obligated to replace the defective Product with a new one only if the repairing of the Product or a detail or replacing of a detail is not possible. The Buyer undertakes to inform the Seller in writing of any defects detected during the guarantee term within seven (7) calendar days as of learning of the defect, describing the defect in sufficient detail. The Seller is obligated to carry out an expert assessment to identify the causes of the defect within fourteen (14) working days after the receipt of the written notice. In the event of a defect covered by the guarantee the Seller eliminates it within twenty (20) working days after the expert assessment. The performance of repair work under the guarantee takes place at the delivery address specified in the Order Confirmation. Major repairs are made in the territory of the Seller. The cost of transportation of the Product to the place of guarantee repairs is borne by the Buyer. The Buyer bears the costs of repairs exceeding the terms and conditions of guarantee repairs and the transportation costs. The following defects are not covered by the guarantee: – defects arising from the natural wear and tear of the Product; – defects arising from the characteristics or damages of the road cover; – defects arising from the use of the Product in conflict with its technical conditions, security rules and purpose; – defects arising from disregarding the rules of maintenance of the Product; – defects arising from a traffic accident; – defects of which the Buyer has not informed the Seller in writing within seven (7) days as of the emergence of the defect and/or whereby the Buyer has not given the Seller the chance to identify the cause of the defect in accordance with the Agreement. – to the extent whose expansion the Buyer could have reasonably prevented. The Product guarantee term terminates before the prescribed time as of the time when: – the Product has been independently repaired, without coordinating it with the Seller in writing beforehand; – the constructions of the Product have been changed, additional equipment has and/or spare parts have been installed without coordinating it with the Seller in writing in advance. If the Seller, in spite of repeated written inquiries by the Buyer, fails to perform its guarantee obligations arising from the Agreement, the Buyer shall have the right to eliminate the Product's defect at the Seller's expense. The Buyer must inform the Seller in writing at least five (5) working days before the replacement or repairing of a defective Product and submit to the Seller a calculation of the presumable reasonable costs. The Buyer may withdraw from the Agreement and demand that the Product be taken back and the Purchase Price refunded only if the defect cannot be eliminate or the part cannot be replaced and if replacement of the defective Product with a new Product would not produce the results that would allow for the purposeful use of the Product. The Product or a part thereof replaced during the guarantee term is covered by the guarantee until the expiry of the overall guarantee term of the Product. 13 WWW.MEIRENSNOW.COM