1
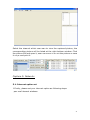
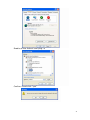
DNVR(Digital Network Video
Recorder)
USER MANUAL
DVR-104M9/DVR-416M9
DVR-816M9/DVR-832M9
Before using this system, please read the user manual
carefully.
1
Attention:
*Don’t use the system at place with high humility or dust or dirty
*Avoid direct sunshine or being heated
*Leave the system away from magnetism objects.
*Avoid high or low temperature (recommended temperature range:
5°C-35°C)
*Close the system before installing the hardware and software
*Don’t place the system at the place where will cause shaking
*Please use it at the aeration place.
*Radio, television or wireless communicate device could cause damage
to the system.
*Don’t dismantle the system by yourself freely.
*Don’t put heavy object on the system.
Table of Content
Attention
2
Capture 1. Product overview
3
3
4
4
1. Products features
2. Hardware requirement
3. Software requirement
Capture 2. Install the system
4
4
5
5
1.Install driver
2.Install software
2.21Apply the domain name
Capture 3. Operation Main system
5
5
5
7
7
8
9
9
10
12
13
14
15
17
18
3.1.Log on system
3.2.Main screen of server
3.3 Setup
3.3.1.Set local user manager
3.3.2. Setup record with voice
3.3.3. Preview
3.3.4. Record
3.3.5 Alarm
3.3.6 Schedule
3.3.7. PTZ
3.3.8. Authorization(network user)
3.3.9. Others
3.3.10.Color Scheme
3.3.11.TVout
2
Capture 5. Network
19
19
23
23
5.1.Internet option set
5.2 Client software
5.3 IE connecting
Capture 1. Product overview
z
z
z
z
z
z
z
z
z
z
z
z
z
z
z
z
z
z
z
1. Products features
Run under Windows xp OS;
6805 chipset 10-bit ADCs image quality
Lightning-Proof design;
6805 chipset Could display in real time or not real time,if you choose
one channel each channel then the display will be real time and if you
choose two or four channels each chipset then the display will be not real
time.
Adjust the resolution for any channel, and can be applied for others
channels;
Snapshot the dynamic picture or static picture while playback;
Display, record, playback, control, backup can be done simultaneously;
Snapshot picture for single frame or snapshot picture for all frames while
live displaying;
Motion detection, alarm function;
Support different types of high speed camera, PTZ controller and alarm
decoder
High quality network transmitting function;
Remote view, playback, PTZ control, through Wan or LAN
Search by the date, time, location, alarm period, snapshot pictures.
Complete automatically operation: user can set record schedule for each
camera within all the periods of each week; and the system will record
according to the schedule.
User can set alarm activation schedule for each alarm sensor within all
the periods of each week, the alarm sensor will activate according to the
schedule.
User can set motion detection for each camera within all the periods of
each week, and the motion detection will activate according to the
schedule.
Circularly switch function; Can set single channel or multi channels to
switch circularly
User-friendly interface, it is easy for user to operate it
The system will show hard disk is full if the hard disk will up to the
capability
3
2. Hardware requirement
z
z
z
z
z
z
RAM:256MB or above
Display card: ATI128MB or above,Geforce2 MX400 128MB or
above
CPU:Celeron D2.8 G or above or Intel P4 2.4 G or above
Resolution of monitor: 1024*768(32bits color)
HDD: IDE, SATA,SCSI, 80GB or above
Motherboard: Intel Chipset 865/915/945
3. Software requirement
z
z
z
Professional Windows 2000/Windows XP SP2
Directx 9.0
The latest driver for display card
Attention: before installing the driver of display card, please install the
driver of motherboard; otherwise it will affect the function of display
card and video surveillance system
Capture 2. Install the system
2.1 Install driver
2.1.1. Copy all files of CD to your pc, find the file named” driver
helper”, click it, you will get following icon:
2.1.2. Press “install” button, you will get following icon:
4
2.13. Wait for about 10s, the icon of “installing the drivers, please
waiting….” will disappear automatically. It indicates driver installation is
finished.
2.2 Install Software
For this system, user can save time to install the software.
From the files which user copy from CD to pc, find the “dvr.exe” under
server folder, double click it, the system will start to run
2.2.1You could choose to delete DDNS ,the picture as follow
Enter the domain name in the picture as follow,
5
Click [Apply] and domain name will be effect.
Capture 3. Operation Main system
3.1 log on system
Click “dvr.exe” under sever folder, user will get following icon:
User ID: admin
Password: 1234
Press “OK” and finish the log on process
3.2 Main screen of server
After typing the correct user name and password, user will get the main
screen of server:
6
1
: Screen split
System setup
Playback
Capture picture
Circular
Run schedule
Monitor
Other
i
2. System setup: click it, user can get following icon to set the preview,
record, alarm, schedule, PTZ, authorization, others as below picture
3. Run schedule: click it, the system will run according to the schedule
4. Playback: playback the recorded files
5. Monitor: Recorder with voice
6. Capture picture: it allows the function of snapshot
7. Circular preview: Auto scan for different channels, the interval
time is five seconds.
8. Other: PTZ, disk status, client information, local user manager
7
9. Preview: choose the channel that you want to preview, click the
number ,it will start to preview when the number color change from
grey to green
10. Record, alarm: choose the channel that you want to record or
start alarm function, click the channel number, it will start to record or
start alarm function when the number color change from grey to green
11. Color: adjust black/white, brightness, saturation according the
actual situation
12. PTZ: click the PTZ, user could adjust the PTZ setup
3.3 Setup
3.3.1 Set local user manager
Click “other” button
, and get tool list, click “local user
manager”, ”user manager” window will pops-up. ”user manager” is
only for setting authority of server user, it is different from the
“Network user authorization “ (If user want to remote view through
IE , user need to set “Network user authorization “)
8
Click “add”, and type the new user name, password as what you want,
enter to choose the authority for the new user. Press “ok” to save the
set.
3.3.2 Setup record with voice
Click “record options” under “system setup”, get following icon. Tick
“record audio”, and copy to all cameras, then save the set.
9
3.3.3 Preview
Record channel: Tick it, while recording, it will show the channel
number
Record time: Tick it, while recording, it will show the system time
Time Auto Invert Color:the color will change if record
Channel name: show the channel name you want to change
Font : the font of the channel name will be changed if you choose font
Position: the position of the channel name could choose from”left top,
right top ,left bottom ,right bottom”
3.3.4 Record
From this part, user can set the video quality for recorded files.
10
Constant bitrate: tick it, the bitrate will not change
Variable bitrate: tick it, the bitrate will change according to actual
situation
Record quality: “best” is recommended
Frame rates: more than 6 frames is recommended
Self define video quality: user can define the video quality by himself
Length of record time: Set the time for packing the recorded file
User Disk: appoint the hard disk for recorded file
3.3.5 Alarm
Basic setup
Video Signal lost: tick it, if any video signal lost, the system will start
to record
Motion detection: tick it, if any movement detected, the system will
start to record
Detection level and sensitivity: to adjust the sensitivity of motion
detection ( the default level ”super” is the best)
11
Alarm relay: Tick it, if alarm trigger, you will hear the sound you
selected Length of alarm output: set the time of alarm last
Detection area
The default area is the whole picture. User could clear the sense area of
current channel, and set the different area according to request
Record Relay: It will be take effect when choose some channels to
link-act recording. For example: set 5 channel to test, link-act recorder
channel is 3,4,5.Once some moving objects in choose area of 5
channel ,then 3,4,5 channels will start to recorder simultaneously .
12
3.3.6 Schedule
If nobody watch the system, user hope the system work according to
demand, and then set the schedule to make the whole system work.
Basic working mode
S/N
Basically work model
1
Record
Remark
Continual record
13
2
Motion Signal detect
If any motion detected, the alarm will be
triggered
3
Record&Motion signal If any motion detected, the alarm will be
detection
triggered, and system start to record
How to set: choose channel (for example: channel 2) and date (for
example: Monday), click “add” , user will get following icon:
Enter the start time, end time, and select record type, then click “copy
to..”, press “ok” to finish setup.
After finishing the setup, go back to the main interface, and
Click “work on schedule” button, the button color will change from
grey to green, it indicates the schedule is working. Then, lock the
system.
Work on Schedule
System
lock
3.3.7 PTZ
Set PTZ protocol (please confirm with your PTZ camera supplier about
the correct protocol of your camera) , the suitable baud rate, the
address of the PTZ decode.
14
3.3.8 Authorization
This option is for network user authorization and trusted IP address
Click “add” user will get following icon, type the requested user name
and password, and tick the authority for this user..
15
Network user: user could setup accessing IP address, limit accessing
IP address by [add network user][amend IP ] [delete IP] ,tick the IP
address if user don’t want to limit the IP
Trust IP : tick it, this IP will be secure.
3.3.9 Others
This option includes tools which do not list on the toolbar of system
setup
Lock system key: tick it, while running the system, if click any
button of system, it can not work
Must logon when startup: tick it, while click the” dvr.exe”, use has
to type user name and password to logon
Run software automatically when starting computer: tick it, if
user turn on the pc, the software will run automatically
Shut down auto: tick it, and type the interval day and time, the
system and computer will shut down according to the requested time
and date
Restart computer: tick it, and type the interval day and time, the
system and computer will restart according to the requested time and
date
16
Run schedule when start: the system will run according to set
schedule if tick it.
Web browser user: tick it, and select the user name. The selected
user can web browser on phone automatically
Mouse beyond: tick it , and select the time, after the selected time,
the mouse will auto lock
Net trans port: if user allows other user to remote access this server,
must tick it, the default port is 5191.
Web Server port: if user allows other user to remote access this
server, must tick it, the default port is 80.
(Remark: If user the default port, while other user remote
access the server, just type the IP address of server, for
example: http://192.168.5.2
Once user change the default Web Sever port from 80 to 81,
then has to type http://192.168.5.2:81/)
FTP server port: if user allows other user to remote access this
server, must tick it, the default port is 21
How to change the network port:
17
Find SHXInside.ini from the server file, open it and change the port
according to user’s request.
TCP Port: the default is 5191, user could change this port enable
many user to connect with sever through internet;
MaxDelay is MSEL: when the server communicates with the client
and IE, if there is not date to receive ,the network will be interrupted.
3.3.10 Color Scheme
In some area, because of the big change of the lights, the video quality
from camera will change accordingly. To get the better video quality,
color scheme is useful.
Start time: choose the beginning time for the adjusted color
End time: choose the finish time for the adjusted color
Edit time: make change for above set time
Delete time: delete above start or end time
Clear time: clear above start, end time
18
Start all: start all the time selected
Close all: close all the time selected
3.3.11 TVout
This function only for 6805 chipset ,if you only use M9
card,then the software could have this function.
1.if you choose channels/device is one ,means one chipset could have
one channel ,but if you choose two or four ,there will have two or four
channels for every chipset.
2.We choose two,so the DVR-416M9 could have eight channels
TVout.we could choose any channel to TVout .
19
Capture 4 Playback
Recorded file search and playback is important for surveillance system.
This system adopts video and audio synchronization
Press the playback button from the main interface of software, user will
get following icon:
20
Calendar system: The different color of date indicate different
situation
The number of date is white: No date
The number of date is yellow: has recorded file for video and audio,
or pictures information
The number of date is yellow color and with an ellipse: Current date
: To adjust the playback time. Left button is for minute;
right button is for hour.
: Snapshot picture when playback
: To adjust volume
(Attention:
this controls could not work now,
maybe it will work after software upgrading, please pay attention to
updated software)
Playback the captured picture: click
pops up
, following window will
21
Select the channel which user wan to view the captured picture, the
corresponding picture will be listed at the right bottom window. Click
the picture file and open it, user can zoom in or out the picture or save
it on pc and print it.
Capture 5: Network:
5.1. Internet option set
1.Firstly, please set your internet option as following steps:
pen one Internet windows
22
2. Select“tools”----“internet option”
3. Select “security”—“Custom level”
23
Enable all the ActiveX and plug- in
Confirm it and click “yes”
24
5.2 Client software
With this program, use can remote live view the picture from server,
playback the recorded file from server or local pc.
and ,
Step 1: from the software folder” TSM1.0E”, there is a file named “Setup”
under “client” folder, double click “Setup”, use will get following icon:
Step 2: Click “install” button, and it will start to install the client
software, till get following icon:
Step 3: Type the IP address of server, the default user name is: admin,
password is: 1234. Click “ok”, get following icon
25
(The button function for above interface is similar as server
interface, user can refer to it)
5.3 IE connecting
26
Step 1: Type the IP address of server, download and install the ActiveX
files, system will pop-up a window(if this icon does not pop up, please
close the IE windows and open another one to have a try)
Step 3: Type the IP address or domain name of server, the correct user
name and password, the default user name is: admin; the default
password is: 1234. Then click “ok”, you will get following icon to show
you the connecting are successful.
(The button on above interface is similar as server interface,
user can refer to it)
Remark: above information will be changed timely without any
notice. If user has any questions and problem, please come
back to us timely. We will offer the best service .We will
appreciate if you could give us some good suggestions!
27
28