1
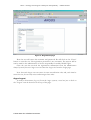
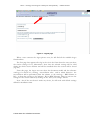
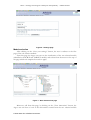
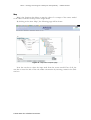
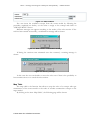
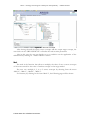
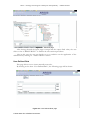
ONT2 – Ontology based support to Enterprise Interoperability – ARGOS manual
ANNEX 3:
ARGOS
USER MANUAL
Activity B6 - Training
© 2005-2006 The ATHENA Consortium.
ONT2 – Ontology based support to Enterprise Interoperability – ARGOS manual
Argos User Manual
Argos Login
The Argos system
http://services.txt.it/argos.
is
accessible
via
the
Internet
at
the
URL:
When the user connects to the Argos installation, the home page appears:
Figure 1 - Home page
This is the public page of the site where also not registered users can gather
information about the project and the tool.
To enter the private zone of the site, a registered user clicks on the “Login” item and
goes to the login page:
© 2005-2006 The ATHENA Consortium.
ONT2 – Ontology based support to Enterprise Interoperability – ARGOS manual
Figure 2 - Login page
Here the user has to fill in the following fields:
•
the User Name field: with the user ID selected at registration time;
• the Password field: the related password selected at registration time;
By clicking on the “Enter” button the user submit the inserted data and, if correctly
identified, he enters the private zone of the site.
If user name and/or password are wrong, the following message appears:
Figure 3 - Login error message
If the user is not yet registered inside the Argos system, he can click on the “New
User” link. He will be redirect to the registration page where he will insert all required
data:
© 2005-2006 The ATHENA Consortium.
ONT2 – Ontology based support to Enterprise Interoperability – ARGOS manual
Figure 4 - Registration page
Here the user will create his username and password. He will click on the “Enter”
button to enter the site. The registration procedure is not automatic. The request will be
sent by email to the administrator of the site responsible for enable/disable logins.
Once the user has received the registration confirmation from the administrator
always by email, the new Argos user can enter the Argos site from the Login page.
Note that each Argos user can create its own reconciliation rules and, each time he
enters the site, he can only access and manages these rules.
Argos Logout
In order to disconnect (log out) from the Argos system, a user has just to click on
the ”Logout” item in the menu at the top of the page.
© 2005-2006 The ATHENA Consortium.
ONT2 – Ontology based support to Enterprise Interoperability – ARGOS manual
Figure 5 - Logout page
When a user connects the Argos private zone, he will find all the available Argos
functionalities.
The first page that appears after log in the site is the form where the user can select
the session settings for its elaborations. Note that the selected settings will be valid
during the whole session lifetime and will be cancelled when the session will be closed
(log-out).
From this page, the Argos user can select the document model and the reference
ontology for which he’s creating reconciliation rules and in which direction the
reconciliation will be performed (from the schema to the ontology – RDF-Schema to
RO – or from the ontology to the schema – RO to RDF-Schema). Then, he can save the
settings for the current session by clicking on the “Save your settings” button.
Note that if the user doesn’t make any choice, he will work with default settings
defined at installation time.
© 2005-2006 The ATHENA Consortium.
ONT2 – Ontology based support to Enterprise Interoperability – ARGOS manual
Figure 6 - Settings page
Models selection
After clicking on the “Save your settings” button, the user is redirect to the first
page of the rule creation module.
From this page the Argos user can see the visualization of the two selected models
(identified as SOURCE and TARGET models) and selects from the menu on the top of
the page which rule template he needs to apply.
Figure 7 - Rule Creation first page
Moreover, still from this page, by clicking on the “View Annotation” button, the
Argos user can have a look at the annotations created from the two selected models
© 2005-2006 The ATHENA Consortium.
ONT2 – Ontology based support to Enterprise Interoperability – ARGOS manual
through the A* tool:
Figure 8 - Example of annotations page
Rules Creation
Each Argos user can create and manage only its own rules. To create new rules, he
can select a rule template from the menu at the top of the page.
This menu contains links to use the entire rule templates provided by the Argos
system.
Figure 9 - Rule Creation menu
For instance, the user selects from the Rule Creation menu the “map” rule template.
© 2005-2006 The ATHENA Consortium.
ONT2 – Ontology based support to Enterprise Interoperability – ARGOS manual
Map
Map is the function that allows to map the value of a concept of the source model
to the value of another concept on the target model.
By clicking on the item “Map”, the following page will be shown:
Figure 10 - Map Rule Template page
Now the user has to select the input node from the source model. First of all, the
user has to insert the title of the rule under construction by inserting a name in the Title
text box.
© 2005-2006 The ATHENA Consortium.
ONT2 – Ontology based support to Enterprise Interoperability – ARGOS manual
Figure 11 - Select path from source model
Then the Argos user has to select a path of a concept on the source model (source
concept). To do that, he will perform the following steps:
- click on the “Pick Path” button on the source model
- select the first node (the root of the graph)
- select all relations between the root and the source concept
- select the leaf that represents the source concept
Then, he will click on the “Set” button on the left side of the input text box. The
selected path will be shown in the input text area.
© 2005-2006 The ATHENA Consortium.
ONT2 – Ontology based support to Enterprise Interoperability – ARGOS manual
Figure 12 - Set input node
The Reference Ontology that in this case represents the target model of the
reconciliation procedure is realized as an HTML object. To select a concept in the target
model, the user can go through the Ontology structure and click with the right button of
the mouse on the leaf representing the concept. Note that the whole path from the root
to the concept is now highlighted in red color.
Figure 13 - Select path from target model
After have completed the paths selection, the user can decide to set a condition on
application of the defined rule by clicking on “Add Condition” button. The following
new items will be shown on the map page:
© 2005-2006 The ATHENA Consortium.
ONT2 – Ontology based support to Enterprise Interoperability – ARGOS manual
Figure 14 - Add condition
The user insert the condition concept from the source model by following the
procedure explained just before, set the value to assign to the concept and clicks on
“CREATE RULE” button.
Different messages can appear according to the results of the rule creation. If the
rule has been created successfully, a confirmation message will be shown:
Figure 15 - Rule creation confirmation message
If during the creation some mismatch error has occurred, a warning message is
shown:
Figure 16 - Warning message
In this case the user can decide to create the rule even if there’s the possibility to
have runtime errors or to cancel the rule creation.
Map Table
The map table is the function that allows to map the value of a concept with type
enumeration of the source model to the value of another enumeration concept on the
target model.
By clicking on the item “Map Table”, the following page will be shown:
© 2005-2006 The ATHENA Consortium.
ONT2 – Ontology based support to Enterprise Interoperability – ARGOS manual
Figure 17 - Map table source concept selection
To apply this template the user has to select the source concept by following the
already explained procedure. The concepts selected must have enumeration type,
otherwise the following message will appear:
Figure 18 - Rule creation confirmation message
When the user click on “Set” button to select the input concept, the elements that
compose the enumeration will fill the input table.
© 2005-2006 The ATHENA Consortium.
ONT2 – Ontology based support to Enterprise Interoperability – ARGOS manual
Figure 19 - Rule creation confirmation message
Now the user has to assign to each enumeration value a concept in the target model.
By following the same selection procedure, the user select a concept that will be a value
of a node enumeration and will click on the “Set” button corresponding to the source
concept that must be mapped to the selected value.
Figure 20 - Map table selection concepts
This operation has to be done for each value of the source concept.
© 2005-2006 The ATHENA Consortium.
ONT2 – Ontology based support to Enterprise Interoperability – ARGOS manual
Figure 21 - Completed map table selection
Also in this case the user can decide to set a condition on application of the defined
rule by clicking on “Add Condition” button. Then he clicks on the “CREATE RULE”
button to finalize the procedure.
Convert
The convert is the function that allows to convert the value of a concept of the
source model to the value of another concept on the target model by using a convention
value.
By clicking on the item “Convert”, the following page will be shown:
© 2005-2006 The ATHENA Consortium.
ONT2 – Ontology based support to Enterprise Interoperability – ARGOS manual
Figure 22 - Convert page
The Argos user will fill all required fields by selecting the source concept and the
target concept as usual and by set the conversion value. Finally he clicks in “CREATE
RULE” to create the conversion rule.
Also in this case the user can decide to set a condition on application of the defined
rule by clicking on “Add Condition” button
Sum
The sum is the function that allows to sum the value of two or more concepts of the
source model to the value of another concept on the target model.
The user can sum 2, 3, 4 or 5 source concepts by selecting from the menu “Sum 2”,
“Sum 3”, “Sum 4”, “Sum 5”.
For instance, by clicking on the item “Sum 2”, the following page will be shown:
© 2005-2006 The ATHENA Consortium.
ONT2 – Ontology based support to Enterprise Interoperability – ARGOS manual
Figure 23 - Sum two concepts
After having selected the input source concepts and the output target concept, the
user clicks on the “CREATE RULE” to finalize the rule creation procedure.
Also in this case the user can decide to set a condition on the application of the
defined rule by clicking on “Add Condition” button
Mult
The mult is the function that allows to multiply the value of two or more concepts
of the source model to the value of another concept on the target model.
The user can multiply 2, 3, 4 or 5 source concepts by selecting from the menu
“Mult 2”, “Mult 3”, “Mult 4”, “Mult 5”.
For instance, by clicking on the item “Mult 2”, the following page will be shown:
© 2005-2006 The ATHENA Consortium.
ONT2 – Ontology based support to Enterprise Interoperability – ARGOS manual
Figure 24 - Multiply two concepts
After having selected the input source concepts and the output target concept, the
user clicks on the “CREATE RULE” to finalize the rule creation procedure.
Also in this case the user can decide to set a condition on the application of the
defined rule by clicking on “Add Condition” button.
Split
The Split is the function that allows to split the value of a concept of the source
model into the values of two or more concepts on the target model.
The user can split the source concept in 2, 3, 4 or 5 target concepts by selecting
from the menu “Split 2”, “Split 3”, “Split 4”, “Split 5”.
For instance, by clicking on the item “Split 2”, the following page will be shown:
© 2005-2006 The ATHENA Consortium.
ONT2 – Ontology based support to Enterprise Interoperability – ARGOS manual
Figure 25 - Split one concept in two
After having selected the input source concept and the output target concepts, the
user clicks on the “CREATE RULE” to finalize the rule creation procedure.
Also in this case the user can decide to set a condition on the application of the
defined rule by clicking on “Add Condition” button
Merge
The merge is the function that allows to merge the values of two or more concepts
of the source model to the value of another concept on the target model.
The user can merge 2, 3, 4 or 5 source concepts by selecting from the menu “Merge
2”, “Merge 3”, “Merge 4”, “Merge 5”.
For instance, by clicking on the item “Merge 2”, the following page will be shown:
© 2005-2006 The ATHENA Consortium.
ONT2 – Ontology based support to Enterprise Interoperability – ARGOS manual
Figure 26 - Merge two concepts in one
After having selected the input source concept and the output target concepts, the
user clicks on the “CREATE RULE” to finalize the rule creation procedure.
Also in this case the user can decide to set a condition on the application of the
defined rule by clicking on “Add Condition” button
Auxiliary Functions
Auxiliary Functions allows for defining rules that do not require a correlation
between concepts of source and target models.
Set Value
The set value is the function that allows to set the value of a concept of the target
model to a fixed value. Each time this rule will be applied to instance of the target
document, the fixed value will be assigned as value of selected target concept.
By clicking on the item “Set Value”, the following page will be shown:
© 2005-2006 The ATHENA Consortium.
ONT2 – Ontology based support to Enterprise Interoperability – ARGOS manual
Figure 27 - SetValue page
After having selected the input target concept and the output fixed value, the user
clicks on the “CREATE RULE” to finalize the rule creation procedure.
Also in this case the user can decide to set a condition on the application of the
defined rule by clicking on “Add Condition” button
User Defined Rule
This page allows user to insert manually new rules.
By clicking on the item “User Defined Rule”, the following page will be shown:
Figure 28 - User Defined Rule page
© 2005-2006 The ATHENA Consortium.
ONT2 – Ontology based support to Enterprise Interoperability – ARGOS manual
This form must be filled manually by the user. The first field is the Title, while the
second field represents the preconditions of the rule under construction. Then the user
has to select a functor that will be applied from the Functor combo box. The selected
functor will be displayed inside the third field of the form that represents the
postconditions of the rule.
When the user has filled the whole form, he can click on the “CREATE RULE”
button and , if it is well formed, the rule will be stored in the system.
Note that Argos gives the possibility to an expert user to insert and register new
functors inside the system. To do that, the user has to click on the “REGISTER
FUNCTOR” button.
Figure 29 - Register functor page
This page contains a pre-inserted template of functor code. The user has only to
complete this code, assign a name to the functor (that must be the same name of the
class inside the code) and register it by clicking on the “REGISTER” button. A batch
module will take the code, will create a new java file, will compile it and will register the
new functor by inserting the new class file inside the Argos library. If this operation will
be completed successfully, the user will find its own functor in the combo box of the
User Defined Rule page.
Note that still from this page, a user can delete its own functors by clicking on the
“DELETE FUNCTOR” button. The following page will be shown:
© 2005-2006 The ATHENA Consortium.
ONT2 – Ontology based support to Enterprise Interoperability – ARGOS manual
Figure 30 - Delete functor page
In this page the user can select what functor he needs to delete, check them and
click on the “DELETE” button.
1.1
Rules Management
The rules management module allows user to see and manage its own rules.
By clicking on the “Rules Management” item, the following page will be shown:
© 2005-2006 The ATHENA Consortium.
ONT2 – Ontology based support to Enterprise Interoperability – ARGOS manual
Figure 31 - Rules Management Page
By clicking on the “View” button, the user will have a user friendly view of the
selected rule.
To delete some rules, the user can check them and delete by clicking on “DELETE”
button.
Apply Rules
This functionality allows the user to test the correctness of the rules created by
himself, generated on actual RDF model.
© 2005-2006 The ATHENA Consortium.
ONT2 – Ontology based support to Enterprise Interoperability – ARGOS manual
Figure 32 - Apply Rules page
User selects the resource (file RDF) on which test the rules; it is visualized on the
left frame. The result (the inferred knowledge) is visualized on the right frame.
© 2005-2006 The ATHENA Consortium.
ONT2 – Ontology based support to Enterprise Interoperability – ARGOS manual
Acknowledgement
The editors of this book acknowledge the following organizations for providing and
revising the contents of this book: UNINOVA, SAP, ESI, TROUX, DFKI, TXT,
Formula, AIDIMA, SINTEF, INTRACOM, CRF FIAT and EADS.
This course has been developed under the funding of
the EC with the support of the EC ATHENA-IP Project.
Disclaimer and Copyright Notice
Permission is granted without fee for personal or educational (non-profit) use,
previous notification is needed. For notification purposes, please, address to the
ATHENA Training Programme Chair at [email protected]. In other cases please, contact
at the same e_mail address for use conditions. Some of the figures presented in this
course are freely inspired by others reported in referenced works/sources. For such
figures copyright and all rights therein are maintained by the original authors or by
other copyright holders. It is understood that all persons copying these figures will
adhere to the terms and constraints invoked by each copyright holder.
© 2005-2006 The ATHENA Consortium.