1
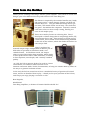
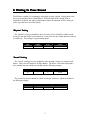
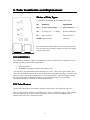
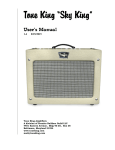
Tone King “Falcon”
User’s Manual
1.2
8/25/2015
Tone King Amplifiers
A division of Premier Builders Guild LLC
4401 Eastern Avenue, Bldg 45-2A, Box 38
Baltimore, Maryland 21224
www.toneking.com
[email protected]
Note from the Builder
Thank you for choosing Tone King’s “Falcon” guitar amplifier. The Falcon is a fresh new
design, quite a bit different than its predecessors in the Tone King line.
The Falcon is inspired by the sound of smaller size, funky
old vintage amps – tweed champs, Supros, old field coil
Gibson amps, etc. The goal with this design was to get
the loose, raw sound of that sort of amp – the clank and
the grind - but without the raspiness. Instead, I wanted
each note to have a sweet candy coating, floating in a
river of rich maple syrup.
There were two key factors to achieving this. First, I
developed a cabinet design that is surprisingly warm, full,
and resonant for its size. This required a certain type of
construction, and resulted in the chassis being mounted
to the side of the cabinet, which also lends the Falcon its
own unique look.
Next, I employed an
unusual output stage configuration in which a pair of
6V6 tubes is operated in Ultralinear mode, and
cathode biased. In Ultralinear mode, the output
tubes act more like triodes than pentodes, which tends
to favor production of lower order harmonics, resulting
in less raspiness, more depth, and a sweetly rounded
quality.
At 12W, the Falcon was too loud to be used in a home
environment, so I added a limited version of our
Ironman attenuator with 6 levels of attenuation, to bring the volume down by 35db, all
the way to a genuine bedroom volume.
In the end, the Falcon turned out to have a wonderful variety of genuine old-school
tones, and be an absolute blast to play. I thank you for your purchase of the Falcon,
and I hope you enjoy playing it as much as I do.
Best Regards,
Mark Bartel
Tone King Amplifiers, a division of Premier Builders Guild LLC
1
Safety Instructions (Important !)
1. Please read these instructions, and keep them for reference.
2. Please follow all instructions described here.
3. Do not use this apparatus near water.
4. Clean only with a dry cloth.
5. Do not block any ventilation openings.
6. Do not operate near any heat sources such as radiators or heat registers.
7. Protect the power cord from being walked on or pinched, particularly at the plugs
and at the point where they exit from the apparatus.
8. Only use attachments/accessories specified by the manufacturer.
9. Unplug this apparatus during lightning storms or when unused for long periods of
time.
10. Refer all servicing to qualified service personnel. Servicing is required when the
apparatus has been damaged in any way. For example, if the power supply cord or
plug is damaged, liquid has been spilled or objects have fallen into the apparatus, the
apparatus has been exposed to rain or moisture, does not operate normally, or has
been dropped.
11. CAUTION: To disconnect the unit completely from the MAINS, unplug the unit.
Turning the power switch off does not disconnect the unit completely from the MAINS.
2
Contents
1. Front Panel Controls
4
HI and LO Inputs
4
Volume and Tone Controls
4
Voicing Switch
4
2. Dialing In Your Sound
5
Rhythm Voicing
5
Tweed Voicing
5
Lead Voicing
6
3. Back Panel Controls
7
AC Power
7
Fuse
7
Power Switch, Standby Switch
7
Speaker Jack
7
Attenuation Controls
8
Notes on Using the Attenuator
8
4. Tube Installation and Replacement
9
Choice of Tube Types and Brands
9
Important Note Regarding V2
9
12AX7 Tubes
10
6V6 Tubes
10
Alternate Tube Choices
10
Installing Tubes
11
Replacing Output Tubes
11
Tube Quality
11
5. Warranty
12
3
1. Front Panel Controls
HI and LO Inputs
Two input jacks are provided, each with a different level of
gain. The HI input has a higher level of gain than the LO
input. You may find it useful to use the HI input with
guitars that have single coil or otherwise lower output
pickups, and the LO input for guitars with humbuckers or
high output single coil pickups. Regardless, these guidelines
are not intended as set rules. There are many cases where
they would be used otherwise.
Volume & Tone Controls
The first stage of the Falcon’s preamplifier is very similar to a
vintage tweed deluxe amplifier. Because of this, the volume
and tone controls are highly interactive. This means that
changing the volume control will have some effect on the tone
(balance of treble-to-midrange-to-bass), and changing the
tone control will have some effect on the volume of the amp.
Although this seems like an inconvenient setup, it actually
provides a much wider range of available tones. If you are not
familiar with using interactive Volume and Tone controls, it
may take some experimenting to become familiar with how
best to use it.
Voicing Control
The Voicing control allows you to select between three distinct
“voicings”, each with its own unique level of gain and tonal
characteristics. Note that the ability to switch between
voicings does not mean that the Falcon is a three channel
amplifier – it is a single channel design, with a variety of tonal
options provided by the Voicing control.
4
2. Dialing In Your Sound
The Falcon is capable of a surprisingly wide range of tones, and the Voicing knob is the
key to accessing the Falcon’s tonal palette. Each selection of the voicing knob is
intended for a specific use, and it’s important to know the intention of each voicing in
order to get the most out of the Falcon.
“Rhythm” Voicing
The "rhythm" voicing is intended to give you more or less a blackface Fender sound.
In order to get this kind of sound, however, you need to set the volume and tone controls
a certain way. This setting is a good starting point:
Input
Volume
Tone
Voicing
LO
3
3
Rhythm
“Tweed” Voicing
The "tweed" voicing gives you roughly the same preamp voicing as a vintage tweed
deluxe. There are two main uses for this channel. The first is a fat clean sound with a
nice rounded top end, which you can find with the following settings:
Input
Volume
Tone
Voicing
LO
3
8
Tweed
The second use for this channel is a thick tweed style overdrive, which can be had at
the following settings:
Input
Volume
Tone
Voicing
HI
9
7
Tweed
5
“Lead” Voicing
The "lead" voicing is intended exclusively for overdriven and distorted tones. It is not
intended for clean tones. This is why it has more gain than the other settings, and why it
begins to break up at low volume control settings. It may take some experimenting to
find the sweet spots that give you the best tones with a particular guitar. Here are a few
sample settings to get you started. First a nice chunky grind –
Input
Volume
Tone
Voicing
HI
3
6
Lead
Input
Volume
Tone
Voicing
HI
7
7
Lead
Next, a more saturated distortion:
The Falcon gets almost all of its overdrive and distortion from the output tubes (6V6s).
When you are pushing it hard in the lead setting, it reaches maximum output early on,
and simply becomes more saturated as you turn up the volume control. This is how any
non-master design works - tweed amps, etc. The Falcon is designed for rootsy, oldschool vintage tone, and this kind of tone is all about power tubes being driven hard and
generating their own kind of distortion and compression.
6
3. Back Panel Controls
AC Power
Always use a grounded AC cord, and make sure
that a proper ground connection is supplied to
the amp. Never attempt to lift or defeat the
ground connection to the amp.
Fuse
A standard 2A slo-blo fuse (style 3AG) should be
used.
Power Switch, Standby Switch
When powering up the amp, you should start
with the Power switch OFF, and the Standby
switch in the "STANDBY" position.
First, turn on the Power switch. This will apply
power only to the tube filaments only.
After turning on the Power switch, allow the
tubes to warm up for about 1 minute, then
toggle the Standby switch to the “OPERATE”
position.
The power-down sequence is not as important
as the power-up sequence. When turning the
amp off, you may turn Power off before
Standby, or turn Standby off before Power, or
turn them both off at the same time.
Speaker Jack
The speaker jack is located on the side of the
chassis, and is not labeled. It is a standard ¼”
mono jack. The output impedance of the
amplifier is 8 Ohms. If you wish to use the
Falcon with an extension cabinet, it’s best to
use an 8-ohm cabinet. You can connect it with
a standard ¼” mono speaker cable by pulling
out the plug from the internal speaker, and
plugging the cable into the speaker jack.
7
Attenuation Control
The Falcon contains a built-in Ironman precision attenuator. The attenuator allows you
to reduce the volume level of the amplifier while allowing its output tubes to operate at
full output power, for natural power tube overdrive and distortion. This attenuator
uses transformer coupling and a precision tuned reactive load to best preserve the
natural tone and feel of the amp, even at very low volume. This is the same general
approach used in the highly regarded Ironman standalone attenuator.
There are many different approaches that can be used to generate overdriven and
distorted tones as a low volume. For example, master volume circuits, or a power
reduction scheme such as London Power Scaling have both been used successfully on
various amp models of other brands. However, for the more vintage sounding tones
that the Falcon is designed to achieve, a good quality attenuator such as the built-in
Ironman is the best way to preserve tone and feel at very low volume, because it allows
the output stage to operate the same way at any level of attenuation.
The attenuation control determines the amount of power sent to the speaker, but does
not affect the operation of the output stage of the amplifier itself. The attenuator
absorbs and dissipates any excess power generated by the output tubes that is not sent
to the speaker.
The attenuator is internally connected between the amplifier output and the speaker
jack – the same way an external attenuator would be connected. However, the input of
the attenuator is not accessible, so you cannot use the built-in Ironman attenuator to
attenuate the output of some other amplifier.
Notes on using the attenuator
In the 0db position, the attenuator is completely bypassed, and the speaker is
connected directly to the output transformer secondary, with no additional circuitry
touching the signal path.
Although the Ironman attenuator does an excellent job of reducing output power
without changing the tone of the amp’s circuitry, there are other variables in play at
lower volume which do result in some apparent tone change. Here are a few factors
that you should be aware of Speaker breakup and compression is a big part of the tone and feel of the amp when
played at high volume. At low power settings, the speaker responds differently, and
does not break up and compress as it does at high power.
The ear’s natural response curve varies at different volume levels, which changes the
way you perceive sounds at different volume levels. Quieter sounds tend to give the
impression of having less bass content.
At lower volume, there is a tendency to hit the guitar strings harder and play more
aggressively than you would if the amp were tuned up very loud. It may take some time
to get used to maintaining your playing style at reduced volume.
8
4. Tube Installation
Installation and Replacement
Choice of Tube Types
I currently recommend the following tube types:
No.
Function
Type/Brand
V1
1st & 2nd Gain Stages
TAD 12AX7A-C
V2
2nd Stage C.F. + 3rd Stage
Sovtek 12AX7WA
V3
Phase Inverter
TAD 12AX7A-C
V4,V5 Output Tubes
TAD 6V6
The tube brands shown above are my own preferences.
You may want to use other brands, to tailor the sound
to your own tastes.
6V6 WARNING !
The following brands are NOT recommended, as we’ve experienced a high rate of redplating and short circuit faults with these:
•
•
Tung Sol 6V6GT
EH 6V6GT manufactured after December 2014
We had been recommending EH brand 6V6s for years. These were great tubes, but
some time around December 2014, the manufacturer changed the design, and they now
appear to share the same construction as the Tung Sol 6V6. After the design change,
we noticed the same reliability problems as the Tung Sol 6V6, so we no longer
recommend using the EH 6V6 of current manufacture.
6V6 Tube Choices:
Choices
I prefer the TAD 6V6 for its warmth, smooth compression, and balanced top end.
The JJ brand 6V6 is another acceptable choice. The JJ 6V6 has a bigger, fatter sound
than the TAD, but is a bit less lively sounding, and has a more muted top end. It
sounds a bit more like a 6L6 than a 6V6.
9
Important Note Regarding Tube V2
V2 is configured as a cathode follower. It’s not important to understand what this
means, but it is important to know that some 12AX7 brands available today will fail
when used as a cathode follower. We have noted failures with the Tung Sol 12AX7,
and advise against using the EH 12AX7 and Sovtek 12AX7LPS as well. One brands
that has proven reliable for the V2 tube is the Sovtek 12AX7WA. This restriction only
pertains to the V2 tube – not V1 or V3.
Here are a few notes on the various brands available today:
12AX7 Tubes:
Tubes
Both the TAD 12AX7A-C, and the Tung Sol 12AX7A are a great match for the Falcon.
Both have a nice balance of detail and warmth, with the Tung Sol having perhaps a bit
more transparency in the top end, and the TAD having a bit less glassiness but still a
nice presence in the upper mids.
EH 12AX7s are very similar to Tung Sol 12AX7s – both are very quiet with very low
microphonics and are a bit on the bright side, with an extended top end. Tung Sols
seem a bit warmer than EHs.
The Svetlana 12AX7, a short-plate tube, has nearly the clarity of the 12AX7EH, and
slightly more bottom end, but is a bit congested in the midrange. Years ago, I had
selected this brand as the brand of choice for the Meteor/II amp, but later changed to a
combination of the 12AX7EH and the 12AX7LPS.
Sovtek 12AX7LPS – this long-plate 12AX7 has a big, warm sound that comes close to a
good NOS long-plate 12AX7. However, this tube can tend to be microphonic.
Alternate Tube Choices You May Want to Try
Reducing Gain: If you find the preamp too gainy, and you find that you’re setting the
volume controls down quite low to get sufficient clean headroom, you may want to try
swapping in a 12AU7 in the V1 position.
10
Installing Tubes
When installing tubes, you may find it helpful to lay the amp on its side on a table, and
shine a light directly into the back of the amp, to aid in locating the position of each
tube. Tubes must be installed in the correct orientation. The smaller, all-glass tubes
have a blank space in the ring of pins which must line up with the blank space in the
ring of tube pins in the tube socket, located on the chassis. The larger, bakelite-base
tubes have a small cylinder with an indexing key in the center of the ring of tube pins,
and this indexing key must match up with the corresponding slot in the socket on the
chassis.
Replacing Output Tubes
The output stage of the Falcon is fully cathode biased, and no bias adjustment is
necessary when changing output tubes. The design of the Falcon’s output stage allows
a fair amount of margin for variation in tube characteristics, so any known brand of
6V6 can be installed, and will work properly and be appropriately self-biased.
Tube Quality
Currently manufactured tubes are built in China, Russia, or the Czech Republic, and
are not built to the same quality standards as tubes manufactures by the U.S.
manufacturers in the “glory days” of tube manufacturing.
We musicians choose to use to vacuum tubes because of their tone, but we need to
accept that the tubes available to us these days can be imperfect devices, and are most
certainly the least reliable component in the entire amplifier.
It would seem that the obvious solution would be to use new-old-stock tubes that were
made back in the “glory days”, when tubes were properly made. However, I’ve lately
been finding that much of the available stocks of such “new old stock” tubes are either
gassy, noisy, or unreliable – I do believe that we’ve reached the bottom of the barrel of
NOS tubes.
Tube problems generally reveal themselves as a crackling noise which can occur
continuously, sporadically, in response to mechanical vibration, or in response to your
playing (e.g. a crackling or other type of noise which occurs only when you hit a note).
We subject all tubes to a thorough burn-in and test procedure to ensure that they are
fully up to spec and operating perfectly. However, you must be aware that the majority
of tube failures occur early in their life, and may come about as a result of the jostling
and jarring that an amp can receive in shipping. In spite of the exhaustive testing we
perform at the shop, early-life tube problems cannot always be found in such testing.
The first two months or so are the most tenuous period for any set of tubes. Most
manufacturing defects will be revealed in the first two months of their life, but many are
not detectable in initial testing, even after a burn-in period.
If you notice any noises, cracking, or any other odd behavior of your amplifier in this
period, note that it is most likely to be the result of a defective tube, and should be
debugged as such.
11
Premier Builders Guild LLC
Limited Warranty
Premier Builders Guild LLC
201 S. Highland Avenue, Suite 204
Pittsburgh, PA 15206
This warranty gives you specific legal rights; you may also have other rights which vary from state to state. There are
no express warranties except those listed below.
Length of Warranty
This warranty shall remain in effect for five years from the date of sale of the product as shown on the original bill of
sale.
What is Covered
This warranty covers all defects in material and workmanship in this product, with the following exceptions:
1. Damage or deterioration of the cabinet, or any other cosmetic damage which occurs after delivery is not
covered by this warranty.
2. Damage after initial delivery resulting from accident, unreasonable use, or neglect, is not covered by this
warranty.
3. Damage resulting from the performance of repairs by someone other than the Tone King Amplifier
Company is not covered by this warranty.
4. Damage occurring during shipment or delivery of this product to the Tone King Amplifier Company
after initial delivery of the product is not covered by this warranty.
5. Vacuum tubes are considered a user-replaceable item, as they are expected to wear out and require
replacement over a reasonable period of time. Tubes are warranted to be serviceable for a period of 90
days from the date of sale.
6. The speaker(s) in this amplifier has(have) been selected for use only with this amplifier. If the
speaker(s) of this amplifier is(are) connected to an amplifier other than the intended amplifier, any
warranty of this speaker shall be deemed void.
What We Will Pay For
The Tone King Amplifier Company will pay for all labor and material expenses to fix or replace all items covered
under this warranty. The customer will pay shipping charges to return the product to the Tone King Amplifier
Company. If the necessary repairs are covered under this warranty, the Tone King Amplifier Company will pay any
shipping charges required to return the product to the customer.
Limitation of Implied Warranties
All express or implied warranties of merchantability and fitness for a particular purpose are limited in duration to the
length of this warranty, unless otherwise provided by state law.
Exclusion of Certain Damages
The Tone King Amplifier Company’s liability is limited to the repair or replacement, at our option, of any defective
product, and shall in no event include incidental or consequential damages of any kind. Some states do not allow
limitations on the length of an implied warranty and/or do not allow the exclusion of incidental or consequential
damages, so the above limitations and exclusions may not apply to you.
Obtaining Warranty Service
If your unit requires service, it should be returned to the Tone King Amplifier Company at the address listed above.
Before returning the unit, you must contact the Tone King Amplifier Company and obtain return authorization.
12
CE Declaration
13