1
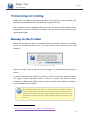
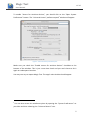
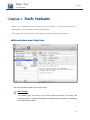
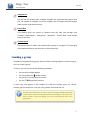
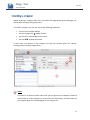
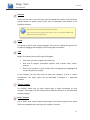
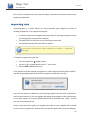
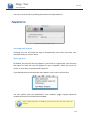
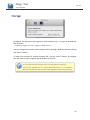
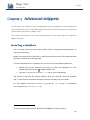
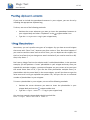
Magic Text User Manual Learn how to get the most out of Magic Text for Mac OS X with this guide. From install to advanced usage, be prepared to learn a lot. Version 1.3.0 © witiz 2012 -‐ All rights reserved. Magic Text User Manual v1.3.0 Table of contents Chapter 1 Getting started .............................................................................................. 3 Introducing Magic Text ......................................................................................................... 3 About this book .................................................................................................................... 3 Downloading and installing .................................................................................................. 4 Running for the first time ..................................................................................................... 4 Chapter 2 Basic features ................................................................................................ 6 Main window user interface ................................................................................................. 6 Creating a group ................................................................................................................... 7 Creating a snippet ................................................................................................................. 8 Expanding snippets ............................................................................................................. 10 Duplicating a group / snippet ............................................................................................. 10 Ordering the snippets list ................................................................................................... 10 Deleting a group / snippet .................................................................................................. 11 Snippets backups ................................................................................................................ 11 Importing data .................................................................................................................... 12 Chapter 3 Preferences .................................................................................................. 13 Expansion ............................................................................................................................ 13 Appearance ......................................................................................................................... 14 Storage ................................................................................................................................ 15 Chapter 4 Advanced snippets .................................................................................... 16 Inserting a date/time .......................................................................................................... 16 Nesting snippets ................................................................................................................. 17 Simulating key strokes ........................................................................................................ 17 Positioning the cursor ......................................................................................................... 18 Pasting clipboard contents ................................................................................................. 19 Using Placeholders .............................................................................................................. 19 Rich text snippets ............................................................................................................... 20 Shell script snippets ............................................................................................................ 21 2 Magic Text User Manual v1.3.0 Are you tired of typing the same pieces of text over and over all day long? Are you tired of looking after this email just to copy/paste it to another email? We have the perfect solution, and it’s called Magic Text! Magic Text is the easiest way to type long and repetitive pieces of text (called “snippets”) with just a few keystrokes (called “shortcuts”) on your Mac. Snippets may be plain text or even rich formatted text with colors, images, custom fonts and alignments… Imagine how you can increase your productivity by letting Magic Text handle these for you: • Standard email responses • Current date / time • Commonly misspelled words and typos • Signatures (email addresses, phone numbers…) • … The actual limit is your imagination, and we hope this user manual will help you discover the infinite possibilities offered by the software. Magic Text will expand your snippets in any open app on your Mac (your browser, mail client, word processor, text editor…). This book has been written to help you master the full power of Magic Text. If you think some parts are unclear or need to be updated, or if you can’t find the information you need, please visit our support site at http://witiz.com/support and leave a support request there. 3 Magic Text v1.3.0 User Manual Magic Text is available on the Mac App Store1 and will work on any computer with Mac OSX 10.6 and above (this includes Snow Leopard and Lion). The installation is quite straightforward as no action is required after purchase. Once download and install is finished, the Magic Text app icon will be located in your Applications folder. When first starting the app, a warning window may appear, telling you to enable access for Assistive Devices (if not, you may skip this and move on to the next chapter). Figure 1 -‐ Assistive Devices disabled Before we explain how to get rid of this message, you must understand what the issue is. In order to properly work, Magic Text needs to “listen” to your key presses so that it can trigger snippet expansion when a shortcut is typed. For obvious security purposes, by default, Mac OSX prevents an app to do that. Nevertheless, this feature can be enabled on your system. We understand that at this point, you may be worried to enable a sensitive feature on your system. We want to reassure you: Magic Text only listens for a few consecutive key presses (just enough to match a shortcut), never stores this information on your computer and, most important, never ever connects to the Internet. 1 http://itunes.apple.com/app/magic-‐text/id498239115 4 Magic Text v1.3.0 User Manual To enable “Access for Assistive devices”, you should click on the “Open System Preferences” button. The “Universal Access” preference pane2 window will appear. Figure 2 -‐ Universal Access preference pane Make sure you check the “Enable access for assistive devices” checkbox at the bottom of the window. This is just a one-‐time check and you won’t have to do it again on subsequent launches. You may now try to reopen Magic Text. The app’s main window should appear. 2 You can also access this window anytime by opening the “System Preferences” on your Mac and then selecting the “Universal Access” icon. 5 Magic Text v1.3.0 User Manual Magic Text is designed to be as simple to use as possible. To keep things simple, all major features are available from the main window. This chapter will show the basics of snippets management and text expansion. 1 4 2 3 Figure 3 -‐ Main window The main window is made up of 4 main parts: 1 Main toolbar This toolbar gives you access to the most common features of the app, like creating a group, a snippet, deleting the selected group or snippet, and opening the Preferences window. 6 Magic Text v1.3.0 User Manual 2 Snippets list The list lets you browse your snippets. Snippets are organized into groups that you can expand or collapse. For every snippet, the list shows both the snippet label and the associated shortcut. 3 List toolbar This toolbar gives you access to features that will help you manage your snippets (“Add snippet”, “Add group”, “Duplicate”, “Import data”) and reorder them as you like. 4 Content pane The content pane is where you actually edit a group or a snippet. This pane gets refreshed according to the selection in the Snippets list. Snippets are organized into groups. Hence, before creating snippets, the first thing to do is to create a group. To do so, you can use one of the following methods: • Use the main toolbar button • Use the snippet list toolbar button • Use the File > New Group menu item • Use the ñ⌘N keyboard shortcut A new entry will appear in the snippets list and the content pane will refresh showing you an empty box. Just give your group a name and that’s it. You may notice that there is no need to save your changes explicitly by pressing a “Save” button. Indeed, the app automatically saves changes as you type. If you need to cancel or undo some typing, you can do so by using the Edit > Undo Typing menu. 7 Magic Text v1.3.0 User Manual Before creating a snippet, make sure you select the appropriate group (though you will be able to change the group later). To create a snippet, you can use one of the following methods: • Use the main toolbar button • Use the snippet list toolbar button • Use the File > New Snippet menu item • Use the ⌘N keyboard shortcut A new entry will appear in the snippets list and the content pane will refresh showing you the empty snippet form: 1 2 3 4 5 6 Figure 4 -‐ Creating a snippet 1 Label The label is an optional short name that you can give to your snippet in order to easily locate it in the snippets list. If you leave this field empty, the first letters of the snippet body will instead appear in the snippets list. 8 Magic Text v1.3.0 User Manual 2 Shortcut These are the letters you will later type to expand the snippet. Your shortcuts should contain no space, remain short, easy to remember, and unlikely to be typed by accident. Shortcuts are case insensitive and m ust be unique. If you use the same shortcut more than once, the shortcut bubble will appear in red in the snippets list. 3 Group The group to which your snippet belongs. You can also change the group of a snippet by dragging and dropping it from one group to another. 4 Type Magic Text allows you to use 3 types of snippets: • Plain text: the basic snippets with text only • Rich text & images: formatted snippets with custom fonts, colors, pictures, ... Shell script: execute a script written with a programming language and use the output as a snippet • In this chapter, we will only focus on plain text snippets, as this is a basic introduction. The other types will be described in Chapter 4 -‐ Advanced snippets. 5 Snippet Toolbar The toolbar allows you to insert special tags or apply formatting to your snippets. Once again, we will discuss these advances features in the Advanced snippets chapter. 6 Body / Content This is where your actual snippet content goes. Feel free to type any text you’d like to be expanded when you type the snippet’s shortcut. 9 Magic Text User Manual v1.3.0 Now that you have created your snippets, you can close the Magic Text window (but make sure the app is still running). Now to expand your snippets, simply open any app (a web browser, a text editor, a word processor...). Place your cursor in a text field, type an existing shortcut and voilà! Your snippet content will appear in place of the shortcut. To duplicate a group or a snippet, just select it in the list, and select the duplicate option: • Use the snippet list toolbar button • Use the File > Duplicate menu item • Use the ⌘D keyboard shortcut If you duplicate a group, a new group with the same label will be added to your list, containing duplicates for all snippets in the original group. When duplicating an individual snippet, a new snippet will be added to your list with the same label, type and content as the original. The shortcut will be left blank to avoid duplicates and it will be up to you to provide one before using the new snippet. The groups are always ordered in ascending alphabetical order. If you need to have control over their order, you can modify their names to start with numbers. On the other hand, you have total control on the snippets’ order in each group. You can select an order using one of these methods: • Use the snippet list toolbar button • Use the View > Order by ... menu items • Use the ⌘1 to ⌘6 keyboard shortcut 10 Magic Text v1.3.0 User Manual The sorting options available are: • Order by creation date ⌘1 • Order by modification date ⌘2 • • Order by last used Order by most used ⌘3 ⌘4 • Order by label ⌘5 • Order by shortcut ⌘6 To delete a group or snippet, select it and: • Use the main toolbar “Delete” button • Use the ⌫ keyboard shortcut A confirmation message will appear in order to make sure you know what you’re doing, since a deleted item can’t be restored. If you realize that you have deleted some data by mistake, there’s still a chance to get your data back thanks to the built-‐in backup system, described in the following section. Magic Text comes with a built-‐in backup system to make sure you never lose some valuable data. The backup files are stored on your computer in this directory: ~/Library/Application Support/MagicText The app maintains 4 types of backups in 4 different files with the snippets extension: • Hourly: magic_hourly_backup.snippets • Daily: magic_daily_backup.snippets • Weekly: magic_weekly_backup.snippets • Monthly: magic_monthly_backup.snippets 11 Magic Text v1.3.0 User Manual Once you’ve located the file you want to import, read the next section to learn how to get your data back. Importing data is a useful feature to easily populate your snippets list with an existing snippets file. The snippets file may be: • A manual copy of your snippets that you made for archiving purposes (in case you change your computer for example) • • A snippets file a friend sent to you to save you some time An automatic backup that you’d like to restore You will learn to locate your current snippets file in Chapter 3 -‐ Preferences (Storage). To import a snippets file, you can: • Use the snippet list toolbar button • Use the “File > Import data from file...” menu item • Use the ⌘O keyboard shortcut A file chooser will then appear. Navigate to a valid snippets file and choose “Open”. You will be prompted what to do with the snippets contained in this file: Figure 5 -‐ Import data from file You have the choice to replace all your existing snippets with the ones contained in the file you selected, or you can append the groups and snippets to the existing one. In the latter option, the newly added groups will be prefixed with _COPY_ so that you can easily identify them. Keep in mind that after import, all changes you make to your snippets will be saved to your current snippets file, and the file you used for import will remain unchanged. 12 Magic Text v1.3.0 User Manual The Preferences window will let you customize the app behavior to really suit your needs. You can open this window with: • • The main toolbar “Preferences...” button Use the Magic Text > Preferences... menu item • Use the ⌘, keyboard shortcut Figure 6 -‐ Expansion preferences Activate snippet expansion This option (enabled by default) will allow you to temporarily turn off snippet expansion without having to close the app. Trigger expansion with key If set, the snippets will only expand after you type your shortcut followed by the key of your choice (Space, Tab, Return or Escape). The default is None, meaning that your snippets will expand right after you type the last letter of your shortcut. Play sound after expansion Magic Text can play a sound after a snippet has been expanded. Two sounds are bundled with the app, the default being called Pop. 13 Magic Text v1.3.0 User Manual You can turn off sound by selecting No sound in the drop down list. Figure 7 -‐ Appearance preferences Start app with session Checking this box will allow the app to automatically start when you boot your computer and your session starts. Show app icon By default, the app icon will only appear in your Dock as a regular app. You also have the option to have the icon only appear on your computer’s Status bar (near the clock), or even both in the Dock and Status bar. If you decide to have the status bar icon appear, here’s how it will look like: Figure 8 -‐ The status bar icon and menu You can quickly open the application’s main window, toggle snippet expansion enabled and access the Preferences window. When snippet expansion is disabled, you will notice that the status bar icon changes. 14 Magic Text v1.3.0 User Manual Figure 9 -‐ Storage preferences By default, the app stores the snippets in a file named magic.snippets located into this directory: ~/Library/Application Support/MagicText/ You can change the location of the snippets file by picking a different directory (using the “Save” button). To open the contents of another snippets file, use the “Open” button. All changes you will make to your snippets will be written to this file. You can easily share your snippets if you are using different computers. Just put your snippets file in a shared network directory or in a Dropbox™ directory and m ake sure every instance of the app points to that same directory. 15 Magic Text User Manual v1.3.0 At this point, you should be quite comfortable with using Magic Text and already feel like the app saves you a lot of typing hassle. But did you know that you are still far from mastering the full power of Magic Text? This chapter will show you the most advanced features of the app make you a genuine Magic Text Jedi! You can easily insert the current date and/or time in a snippet during expansion, in any format you want. Magic Text comes with a few built-‐in useful formats but you can fully customize how you want a date/time to be displayed. To insert the date/time in a snippet, you can use one of the following methods: • Position the cursor wherever you want to insert the date/time in your snippet body and use the snippet toolbar icon • Type the <<DateTime format="…">> tag in your snippet body The format string uses the format patterns from the Unicode Technical Standard #353, so feel free to customize the built-‐in formats to really suit your needs. Ex.: The snippet <<DateTime format="yyyy-MM-dd 'at' HH:mm">> will expand in a string like 2001-01-02 at 13:00 3 http://unicode.org/reports/tr35/tr35-‐10.html#Date_Format_Patterns 16 Magic Text User Manual v1.3.0 Sometimes, you will want to reuse some text in multiple snippets. Sure, you could copy/paste it, but that’s both painful and hard to maintain if you ever want to change that text later. Magic Text has a clean solution and allows nesting snippets. To insert a reference to another snippet, you can use one of the following methods: • Position the cursor wherever you want to insert the reference in your snippet • body and use the snippet toolbar icon Type the <<Snippet shortcut="…">> tag in your snippet body For example, say you have an email signature snippet (with a esign shortcut). Now you want to create an email snippet, and include your signature at the end of this snippet. Your email snippet would look like this. Dear Friend, Thank you so much for your present. <<Snippet shortcut="esign">> Magic Text has the ability to simulate keystrokes during snippets expansion. The currently supported keys are: • Tab • Return • Space • Escape • Up arrow • Down arrow • Left arrow • Right arrow 17 Magic Text User Manual v1.3.0 To insert a keystroke in your snippet, use one of the following methods: • Position the cursor wherever you want to insert the keystroke in your snippet • body and select the appropriate key in the snippet toolbar icon Type the <<Tap key="…">> tag in your snippet body This feature is particularly useful if you want to automatically fill some forms. Think of a simple form with two text fields. To move from Text field 1 to Text field 2, you usually just have to press the tab key. Now imagine a snippet with the following body: This text goes in field 1<<Tap key="tab">>this one in field 2 Now, if you expand the snippet in text field one, you will get the two text fields filled with the appropriate text. This seems a lot of work to just fill 2 fields form, but you will love this feature if you spend a lot of time filling the same long forms over and over! After expanding a snippet, the input cursor will be positioned after the text that just got expanded. Even though this is a perfect behavior for most situations, you will sometimes want to immediately reposition the cursor somewhere in the body of you snippet. To specify the cursor position in your snippet, use one of the following methods: • Position the cursor wherever you want to insert the cursor position in your snippet body and select “Cursor” in the snippet toolbar icon • Type the <<Cursor>> tag in your snippet body For example, imagine you want to create a sample email snippet, starting with a greeting and ending with a signature. Obviously, you will want your cursor to reposition between those in order to start typing your actual email content right after the snippet expanded. You snippet will look like this: Hello, <<Cursor>> John Doe [email protected] 18 Magic Text User Manual v1.3.0 If you need to include the pasteboard contents in your snippet, you can do so by including the appropriate clipboard tag. To do so, use one of the following methods: • Position the cursor wherever you want to insert the pasteboard contents in your snippet body and select “Clipboard” in the snippet toolbar icon • Type the <<Clipboard>> tag in your snippet body Sometimes, you can’t predict every part of a snippet. Say you have an email snippet that starts with “Dear Tom”, because you often write to Tom. But what happens if you need to send the same mail to Annie? Sure, you can duplicate the snippet, but that’s a lot of work to just change one word. And what if you need to send it to Bill, Alex, Julie, Steve...? Don’t worry, Magic Text has the solution and it’s called placeholders. In the previous example, you will position a “name” placeholder in your snippet and every time you expand this particular snippet, a prompt will appear on your screen to let you input the actual name. Best of all, if you use the same placeholder multiple times (i.e. placeholders with the same label) in the same snippet, you will just have to type the value once and it will get replaced everywhere. Oh, and you can use an unlimited number of placeholders in your snippets. To insert a placeholder in your snippet, use one of the following methods: • Position the cursor wherever you want to insert the placeholder in your snippet body and use the snippet toolbar icon • Type the <<Input label="…">> tag in your snippet body Our previous example snippet body should now look like: Dear <<Input label="Friend’s name">> 19 Magic Text v1.3.0 User Manual When expanding this snippet, a window like this one will appear: 1 2 3 4 Figure 10 -‐ Placeholder input window 1 2 Snippet label Placeholder name This is the label you have typed for your <<Input label="…">> tag 3 Current placeholder / Total placeholders If you have multiple placeholders in a snippet, this will help you know which placeholder you are currently filling and how many you have to fill. 4 Text input This is where you enter the actual value for the placeholder. You can validate/move to the next placeholder with the enter key, or cancel/move to the previous placeholder with the escape key. Once you have provided a value for the last placeholder, the window will close and your snippet get expanded with the correct values in place of the input tags. Remember when we were discussing about snippets type? Now it’s time to talk about the “Rich text & images” type. When switching to this type, a new icon will appear in your snippet toolbar to let you format your snippet. To apply formatting, select the text you want to format and select the formatting feature in the snippet toolbar. 20 Magic Text v1.3.0 User Manual Formatting includes pictures and text alignment, font, size, color, bold / italic / underline styling... Of course, when expanding a rich snippet, the destination app must support styling. If not, a “plain text” equivalent will be expanded instead (the text will remain the same, minus the styling). Shell script is another type of snippets that you can select in the “type” dropdown list. When switching to Shell script type, the content text area will change its background color to a dark gray so that you don’t accidentally think it’s a plain text snippet. A shell script snippet is a snippet that you write using a programming language. Unlike other types of snippets, upon expansion, a shell script snippet will first execute itself and consider its output as a snippet that will be processed like other snippets. This implies that a shell script snippet can return an output containing tags such as a DateTime tag, a Snippet tag, an Input tag, a Tap tag... We will not cover here how to program a shell script as this could be the subject of a book on its own, but you can use any shell programming language you are comfortable with: Bash, Python, Perl, etc... Just to give you a taste of cool things you can do with shell script snippets, here is a simple Python snippet that will randomly expand one snippet among three snippets of your choice: #!/usr/bin/env python import random, sys # define our list of candidate snippet shortcuts shortcuts = ["snippet1", "snippet2", "snippet3"] # randomly choose a snippet shortcut and write a Snippet tag to output sys.stdout.write('<<Snippet shortcut="' + random.choice(shortcuts) + '">>') 21