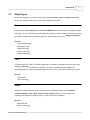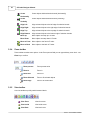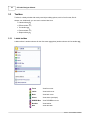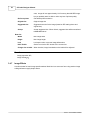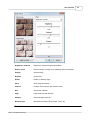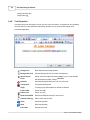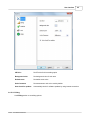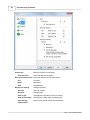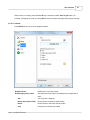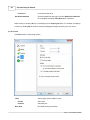
1
CD Label Designer Manual
© 2001 - 2015 Dataland Software
CD Label Designer
User Manual
by Dataland Software
Thank you for choosing CD Label Designer. We are certain
that you won't be dissapointed with its abilities to make
proffesional looking labels.
We hope that this manual will serve you well as an additional
guide.
Contents
I
Table of Contents
Part I Introduction
2
1 Main screen ................................................................................................................................... 4
2 Label types
................................................................................................................................... 6
3 Object types ................................................................................................................................... 7
4 Print layouts ................................................................................................................................... 8
Part II Getting started
10
1 Basic usage ................................................................................................................................... 10
Start new design
..........................................................................................................................................................
Open saved label
..........................................................................................................................................................
Quickly make..........................................................................................................................................................
label
Change label ..........................................................................................................................................................
view
Insert picture..........................................................................................................................................................
Insert scanned
..........................................................................................................................................................
picture
Insert text
..........................................................................................................................................................
Insert circled ..........................................................................................................................................................
text
Insert shape ..........................................................................................................................................................
Edit spines ..........................................................................................................................................................
Edit object properties
..........................................................................................................................................................
Arrange objects
..........................................................................................................................................................
Rotate objects
..........................................................................................................................................................
Change background
..........................................................................................................................................................
color
Set/Clear background
..........................................................................................................................................................
picture
Save design ..........................................................................................................................................................
Print label ..........................................................................................................................................................
10
10
10
11
11
11
12
12
13
13
13
14
14
14
15
15
15
2 Advanced usage
................................................................................................................................... 17
Design templates
..........................................................................................................................................................
Use a template
..........................................................................................................................................................
Export label ..........................................................................................................................................................
Make print layout
..........................................................................................................................................................
Read drive or..........................................................................................................................................................
CDDB
Format file list
..........................................................................................................................................................
Change label ..........................................................................................................................................................
dimensions
Configure application
..........................................................................................................................................................
Clipboard operations
..........................................................................................................................................................
Part III User interface
17
17
18
18
18
19
19
20
20
22
1 Main menu ................................................................................................................................... 23
File menu
..........................................................................................................................................................
Edit menu ..........................................................................................................................................................
Label menu ..........................................................................................................................................................
Insert menu ..........................................................................................................................................................
Object menu ..........................................................................................................................................................
Booklet menu..........................................................................................................................................................
View menu ..........................................................................................................................................................
23
23
24
24
25
26
27
© 2001 - 2015 Dataland Software
I
II
CD Label Designer Manual
Tools menu ..........................................................................................................................................................
2 Toolbars
................................................................................................................................... 28
Main toolbar ..........................................................................................................................................................
Edit toolbar ..........................................................................................................................................................
Object toolbar..........................................................................................................................................................
Zoom toolbar..........................................................................................................................................................
View toolbar ..........................................................................................................................................................
Size toolbar ..........................................................................................................................................................
Booklet toolbar
..........................................................................................................................................................
3 Toolbox
28
28
29
30
30
31
31
................................................................................................................................... 32
Labels toolbox
..........................................................................................................................................................
Effects toolbox
..........................................................................................................................................................
Text toolbox ..........................................................................................................................................................
Picture toolbox
..........................................................................................................................................................
Shape toolbox
..........................................................................................................................................................
4 Dialogs
27
32
33
33
34
35
................................................................................................................................... 38
Configuration..........................................................................................................................................................
Wizard
New Label Wizard
..........................................................................................................................................................
Image Browser
..........................................................................................................................................................
Print dialog and
..........................................................................................................................................................
print layouts
Picture Properties
..........................................................................................................................................................
Image Resize..........................................................................................................................................................
Image Effects..........................................................................................................................................................
Text Properties
..........................................................................................................................................................
Shape Edit ..........................................................................................................................................................
Spine Text Properties
..........................................................................................................................................................
Circled Text Properties
..........................................................................................................................................................
Custom Fields
..........................................................................................................................................................
Label Properties
..........................................................................................................................................................
File List
..........................................................................................................................................................
Options
..........................................................................................................................................................
General .........................................................................................................................................................
Editing .........................................................................................................................................................
Defaults .........................................................................................................................................................
Print
.........................................................................................................................................................
CDDB .........................................................................................................................................................
Part IV Other information
38
40
44
47
49
51
52
54
55
57
59
60
61
62
64
64
65
67
68
69
72
1 Purchase
................................................................................................................................... 72
2 Credits
................................................................................................................................... 73
3 Contact
................................................................................................................................... 74
Index
75
© 2001 - 2015 Dataland Software
Introduction
Part
I
2
1
CD Label Designer Manual
Introduction
CD Label Designer is an application that will help you design and print CD/DVD
covers, labels and booklets. It features a powerful set of design capabilities and highly configurable
output options. You can enter RTF formatted text, insert pictures from number of popular formats, and
draw shapes with customizable fill and borders. One of main strengths of this software is possibility to
place labels anywhere on the paper or to change label size. By allowing size change, it becomes utility
for printing any kind of labels or stickers, not just CD/DVD covers and labels.
From the first version of software, our users categorized CD Label Designer as extremely easy to
use, while giving you necessary tools for designing professional looking labels. Its simplicity combined
with powerful design features makes it suitable for both, home and professional use.
Features overview
§ Designing CD covers, DVD/BD boxes, booklets, disc round and business card labels
§ Compatible with any printer type
§ LightScribe compatible
§ Support for images
49
, texts
§ Configurable label size
54
, circled texts
59
and shapes
35
61
§ Defining unlimited number of print layouts
8
(number of which are already included in the
installation)
§ RTF (Rich Text Format) support
§ Spreadsheet-like custom fields editor
§ Scanner support
§ Choosing transparent color for images
§ Image effects and transformations
52
§ Tiled images and backgrounds
§ Gradient style
§ Spine
57
35
for shapes
editing
§ Reading disc files/folders
18
and placing on labels
§ Reading song titles from MP3 and WMA
§ Access to CDDB
18
18
files
audio discs database
© 2001 - 2015 Dataland Software
Introduction
3
§ Multi-level undo/redo
§ Export labels
18
to high quality image files
§ Object locking to prevent accidental moving
§ Rotating images and texts by any angle
§ Wizards to help fast and easy label creation
Manual content
Manual is divided into several chapters.
1. Introduction
Chapter Introduction (you are reading it right now) contains general
information about software and about this manual. It shows basic
information about main screen and explains few most important points.
2. Getting started
Second chapter helps you start using CD Label Designer by explaining
basic and advanced operations.
3. User interface
Third chapter is a detailed reference of user interface elements such are
menus, toolbars and windows.
4. Other information
© 2001 - 2015 Dataland Software
Last, fourth chapter contains other non-technical information.
4
1.1
CD Label Designer Manual
Main screen
On the picture you can see elements of main screen.
Main menu
23
Use the main menu to access options of the software. Menu is divided into
categories (submenus): click on any horizontal word to drop down the list of
underlaying options, and then click one of options.
Toolbars
28
Main menu options that are often used are also accessible through toolbars. The
visibility of each toolbar can be adjusted independently.
Toolbox
32
Toolbox is a handy window with mostly used object editing options, such is font for
texts, fills for shapes, etc. Additionally, you can use it to select label view.
Image
Browser
Use this window to easily access images located on the local disk or on the web. To
44
place image to design, just drag it from here.
Work area
This is a main screen area for design drawing.
Status bar
Status bar contains information about current cursor position on the label and short
description of option under the cursor.
Rulers
Use rulers as a guide while you design.
© 2001 - 2015 Dataland Software
Introduction
© 2001 - 2015 Dataland Software
5
6
1.2
CD Label Designer Manual
Label types
These are label types mentioned in the user interface, but please note that their usage is not limited by
label names. CD Label Designer is initially designed for creating CD and DVD covers and labels,
therefore its user interface and option names are named accordingly. Despite of that, thanks to Label
Properties
61
and Print Layout
Front
47
options, you can design any kind of labels or stickers.
Represents design of front CD box cover. It's a rectangular surface that easily can
be resized to fit any other type of labels or stickers.
Inside
Inside cover represents inner surface that is visible when CD box is opened.
Technically it's a same as Front cover and its size can't be changed
independently.
Back
Back cover is a rectangular CD box tray insert with two spines.
Sleeve
This is a template to create sleeve (envelope). You can design front and back side
and they will be properly sliced and arranged so you can easily assemble the
sleeve after printing.
DVD/BD Box This is a rectangular insert for DVD/BD boxes with one spine in the middle of
surface.
Booklet
Booklet is a design that can contain more than one page. All pages are sized
equally, and all have same background picture. When printed, pages are
rearranged for easy assembly.
Disc Label
This is a round label with a hole in the middle. Size of outer and inner diameter
depends on the paper stock you have. When printed, because of simplicity, the
content of the hole in the middle will not be removed. Thus, only inner diameter's
purpose is to guide a design, but it's not necessary to be extremely precisely
measured.
Business
Card
This is label that behaves similarly as Disc Label. You can use it to print labels for
business card sized discs.
See also
Explaining Print Layouts
Label Properties
8
61
Print Layout window
47
© 2001 - 2015 Dataland Software
Introduction
1.3
7
Object types
On the label designs you can place three types of objects: pictures, texts and shapes. Additionally,
there is a file (song) list that can be placed on the background of labels.
Picture
Pictures can be loaded from disk, acquired from TWAIN device such is scanner or dragged from the
Web page. You can resize them (internally
51
or just visually) or apply a number of transformations
52
like rotation, brightness and contrast adjusting, etc. Special case of picture is a Background picture.
See also
Image Properties
Image Resize
51
Image Effects
52
Image Toolbox
34
Image Browser
44
49
Text
Text objects are RTF (Rich Text Format) enabled and, in addition to standard text object, they can be
circled or spine text with similar set of options. Text can be formatted with any standard text
formatting options (font styles, paragraph alignments, colors, etc). It also can be rotated by any angle.
See also
Text Edit
54
Text Toolbox
33
Shape
Shapes are meant to fulfill your design and make it more appealing. Shape can be rectangle,
rounded rectangle, circle, ellipse, diamond, star, polygon or line. You can change frame
properties and fill patterns (including number of types of two-color gradients).
See also
Shape Edit
55
Shape Toolbox
© 2001 - 2015 Dataland Software
35
8
1.4
CD Label Designer Manual
Print layouts
Print layouts are predefined paper sizes and label positions used for printing. If you use commercial
paper stocks, you should create layouts for each of them.
Print layout definition files are located in Layouts subfolder of program folder (usually \Program
Files\CD Label Designer\Layouts). Each layout is placed in own XML file and you can easily
exchange them by using provided options - you can export them to a file or import them from files or
from the web.
CD Label Designer is deployed with number of popular print layouts, and hopefully you won't need to
edit them. Still, if you have a different paper stock than initially supported, you can easily make
47
your
own layout for printing.
See also
Print Layout
47
window
© 2001 - 2015 Dataland Software
Getting started
Part
II
10
CD Label Designer Manual
2
Getting started
2.1
Basic usage
2.1.1
Start new design
Method 1: From the main menu choose File | New.
Method 2: Click
(New) in the Main toolbar
28
.
Method 3: Press Ctrl+N on keyboard.
See also:
Quickly make label
10
Use an earlier prepared template
Open saved label
2.1.2
17
10
Open saved label
Method 1: From the main menu choose File | Open.
Method 2: Click
(Open) in the Main toolbar
28
.
Method 3: Press Ctrl+O on keyboard.
See also:
Start new design
10
Use an earlier prepared template
2.1.3
17
Quickly make label
Method 1: From the main menu choose File | New Label Wizard.
Method 2: Click
in the Main toolbar
28
.
Method 3: Press Ctrl+W on keyboard.
See also:
Start new design
10
Use an earlier prepared template
New Label Wizard
17
40
© 2001 - 2015 Dataland Software
Getting started
2.1.4
Change label view
Method 1: From the main menu choose:
§ View | View Front
§ View | View Inside
§ View | View Back
§ View | View DVD/BD box
§ View | View Booklet or
§ View | View Disc
§ View | View Business Card
Method 2: Click on one of buttons in a View toolbar
30
.
Method 3: Press Ctrl+1, Ctrl+2, Ctrl+3, Ctrl+4, Ctrl+5, Ctrl+6 or Ctrl+7 on keyboard.
Method 4: Use Labels toolbox
2.1.5
32
actions.
Insert picture
Method 1: From the main menu choose Insert | Picture.
Method 2: Click on
in the Edit toolbar
28
.
Method 3: Right-click on label and choose Insert | Picture.
Method 4: Drag image file from Windows Explorer and drop it to a label.
Method 5: Paste it from the clipboard
20
.
See also:
Insert scanned picture
Insert text
11
12
Insert circled text
Insert shape
12
13
Picture Properties Window
Picture Toolbox
2.1.6
49
34
Insert scanned picture
Method 1: From the main menu choose Insert | Acquire.
Method 2: Right-click on label and choose Insert | Acquire.
See also:
Insert picture
Insert text
12
© 2001 - 2015 Dataland Software
11
11
12
CD Label Designer Manual
Insert circled text
Insert shape
12
13
Picture Properties Window
Picture Toolbox
2.1.7
49
34
Insert text
Method 1: From the main menu choose Insert | Text.
Method 2: Click
in the Edit toolbar
28
.
Method 3: Right-click on a label and choose Insert | Text.
Method 4: Paste it from the clipboard
20
.
See also:
Insert picture
11
Insert scanned picture
Insert circled text
Insert shape
11
12
13
Text Properties Window
Text Toolbox
2.1.8
54
33
Insert circled text
Method 1: From the main menu choose Insert | Circled Text.
Method 2: Click
in the Edit toolbar
28
.
Method 3: Right-click on a label and choose Insert | Circled Text.
See also:
Insert picture
11
Insert scanned picture
Insert text
11
12
Insert shape
13
Circled Text Properties Window
Text Toolbox
59
33
© 2001 - 2015 Dataland Software
Getting started
2.1.9
Insert shape
Method 1: From the main menu choose Insert | Shape.
Method 2: Click
in the Edit toolbar
28
.
Method 3: Right-click on a label and choose Insert | Shape.
See also:
Insert picture
11
Insert scanned picture
Insert text
12
Insert circled text
Shape Edit
11
12
55
Shape Toolbox
35
2.1.10 Edit spines
Method 1: From the main menu choose Label | Edit Spines.
Method 2: Right-click on a spine and choose Properties.
Method 3: Double click on a spine.
Note: Back label or DVD/BD Box view should be selected.
See also:
Insert text
12
Change label view
11
Spine Text Properties Window
57
2.1.11 Edit object properties
Method 1: Select object and from the main menu choose Object | Properties.
Method 2: Select object and click on
in the Edit toolbar
Method 3: Right-click on a object and choose Properties.
Method 4: Select object and press Alt+Enter.
Method 5: Double-click on object.
See also
Picture Properties Window
© 2001 - 2015 Dataland Software
49
28
.
13
14
CD Label Designer Manual
Text Properties Window
54
Circled Text Properties Window
Spine Text Properties Window
Shape Properties Window
Label Properties Window
59
57
55
61
2.1.12 Arrange objects
Method 1: Select object and from the main menu choose Object | Arrange submenu.
Method 2: Right-click on a object and choose Arrange submenu.
Method 3: Select object and use Object toolbar
29
.
2.1.13 Rotate objects
Method 1: Select object and from the main menu choose Object | Rotate submenu.
Method 2: Right-click on object and choose Rotate submenu.
Pictures (any angle)
Method 3: Click
in the Picture toolbox
34
to open Image effects
52
window, and then choose
Rotate option.
Method 4: Use Picture Properties
49
dialog, click
to open Image effects
52
window, and
choose Rotate option.
Texts (any angle)
Method 3: Adjust Angle slider in the Text toolbox
Method 4: Use Text Properties
54
33
.
dialog to enter the angle.
See also
Picture Properties Window
Text Properties Window
Image effects
54
52
Picture toolbox
Text toolbox
49
34
33
2.1.14 Change background color
Method 1: From the main menu choose Label | Background Color.
Method 2: Right-click anywhere on working area and choose Side Background | Background Color.
© 2001 - 2015 Dataland Software
Getting started
15
See also
Set/Clear background picture
15
2.1.15 Set/Clear background picture
Set
Method 1: From the main menu choose Label | Set Background Picture.
Method 2: Right-click anywhere on working area and choose Side | Set Background Picture.
Method 3: Right-click on a picture object and choose Picture | Set As Background.
Method 4: Click
in the Picture toolbox
34
.
Clear
Method 1: From the main menu choose Label | Clear Background Picture.
Method 2: Right-click anywhere on working area and choose Side Background | Clear
Background Picture.
See also:
Change background color
Picture properties
14
49
2.1.16 Save design
Method 1: From the main menu choose File | Save.
Method 2: Click
in the Main toolbar
28
.
Method 3: Press Ctrl+S on keyboard.
Change name and save: From the main menu choose File | Save As…
See also
Start new design
Open saved label
10
10
2.1.17 Print label
Step 1
Method 1: From the main menu choose File | Print.
Method 2: Click
in the Main toolbar
Method 3: Press Ctrl+P on keyboard.
© 2001 - 2015 Dataland Software
28
.
16
CD Label Designer Manual
Step 2
Select appropriate layout and click Print or LightScribe button.
See also:
Print layouts overview
Print Layout Window
8
47
© 2001 - 2015 Dataland Software
Getting started
2.2
Advanced usage
2.2.1
Design templates
17
Step 1
Design your template in a same way you design regular label. You can set sizes, place initial
pictures and texts, choose colors, etc.
Step 2
Choose File | Save As…, change File Type to "CD Label Designer Template Files (*.clt)" and
choose name.
After this, your label template is ready and you can use it by choosing File | New From Template and
File | New Label Wizard options. You can also make it a default template in Options dialog
67
.
Default template (Default.clt) is loaded when you choose File | New option.
See also:
Use earlier prepared template
2.2.2
17
Use a template
First you must prepare one or more template designs as described in previous topic
17
.
Directly
Method 1: From main menu choose File | New From Template.
Method 2: Press Ctrl+T on keyboard.
From the New Label Wizard
Start New Label Wizard
40
and on Page 1 (General) choose desired template file.
Note: By choosing File | New option, CD Label Designer loads default template file (Default.clt). To
change default template, either edit it directly by opening it by File | Open menu option or use
Options | Defaults
67
.
See also:
Design templates
17
Quickly make label
New Label Wizard
© 2001 - 2015 Dataland Software
10
40
18
CD Label Designer Manual
Options | Defaults
2.2.3
67
Export label
From the main menu choose File | Export to save label picture to a disk. You can print this picture
with some other software or send it to the printing office. After selecting file name you should choose
export resolution for the best results. If you are not sure what resolution to use, it's best to ask your
printing service company, but generally you probably don't want to go below 300 DPI or 600 DPI. In
addition, you can also choose to include a so-called "bleed" around label edges, which is often
required by printing companies. The bleed should contain a background extended by 1/8 inch (3 mm)
on each side and it shouldn't contain any texts or important parts of design. While desiging, in the main
screen bleed area is indicated by dashed border around label.
Exporting booklets
Booklets usually have more than one page. Some image formats support multiple pages in one
file, like TIFF. If you choose TIFF for your export format, pages will be saved to a single file with
separate pages. If any other format is used, CD Label Designer will export each page in the
separate file and add page number to the file name.
2.2.4
Make print layout
For the reference about print layouts see:
Print layouts overview
Print Layout window
2.2.5
8
47
Read drive or CDDB
CDDB (CD DataBase) is free web service that collects large number of audio CD titles. It is supported
by CD Label Designer - if you insert audio CD in your drive and start this option, application will
connect to this database and retrieve album and songs titles if they exist. If more than one match is
found you will be able to choose the one you prefer.
© 2001 - 2015 Dataland Software
Getting started
19
Method 1: From the main menu choose Label | Read Drive/CDDB.
Method 2: Click
in the Edit toolbar
28
.
Method 3: Press Ctrl+F12 on keyboard.
Method 4: In the File List dialog
62
click on
in the toolbar.
If data CD is in drive, software will read file/folder structure and place it on the label.
If it's an audio CD (CDA), software will contact CDDB over internet.
If it's a data CD and it contains MP3 or WMA files, software will automatically read file tags and search
for song titles.
See also:
Options | CDDB
Format file list
2.2.6
69
19
Format file list
Method 1: From the main menu choose Label | File/Songs List.
Method 2: Right-click on label and choose File/Song List.
Formatting options can be set In File List dialog
62
.
See also:
File List dialog
62
Read drive or CDDB
2.2.7
18
Change label dimensions
Method 1: From the main menu choose Label | Properties.
Method 2: Deselect all objects and click
on the Edit toolbar
28
.
Method 3: Right-click on label (NOT at objects and NOT at background if it exists) and choose
Properties.
Method 4: Deselect all objects and press Alt+Enter on keyboard.
Method 5: Double-click somewhere on work area (NOT at object and NOT at background if it exists).
Get label dimensions from an existing Print Layout
Method 6: From the main menu choose Label | Get From Print Layout option.
© 2001 - 2015 Dataland Software
20
CD Label Designer Manual
Method 7: Click
on the Edit toolbar
Method 8: Click
Get From Print Layout action in the Label toolbox
28
.
32
.
See also:
Label Properties dialog
Label toolbox
2.2.8
61
32
Configure application
Method 1: From the main menu choose Tools | Configuration Wizard.
Method 2: From the main menu choose Tools | Options.
Method 3: Click
(Options) on the Main toolbar
28
.
Method 4: Press Ctrl+F on keyboard.
See also:
Configuration Wizard
Options dialog
2.2.9
38
64
Clipboard operations
CD Label Designer uses clipboard to transfer objects from one label to another. In addition, you can
exchange information between CD Label Designer and other applications, too. Texts are copied to the
clipboard in RTF (Rich Text Format) format so you can copy text object to word processing
application. And vice versa - you can copy part of text from word processing application and paste it to
the label. Pictures are also copied in its native format, which means that you can exchange them
between different application in a similar way.
© 2001 - 2015 Dataland Software
User interface
Part
III
22
3
CD Label Designer Manual
User interface
This is a detailed reference of user interface elements such are menus, toolbars and windows.
§ Main menu
§ Toolbars
§ Toolbox
§ Dialogs
23
28
32
38
© 2001 - 2015 Dataland Software
User interface
3.1
23
Main menu
Use the main menu to access options of the software. Menu is divided into categories (submenus):
click on any horizontal word to drop down the list of underlaying options, and then click one of options.
§ File menu
23
§ Edit menu
23
§ Label menu
24
§ Insert menu
24
§ Object menu
25
§ Booklet menu
§ View menu
27
§ Tools menu
3.1.1
26
27
File menu
This menu contains basic file operations for creating, saving and printing designs.
New
New Wizard
40
Ctrl+N
Open new design from the default template
Ctrl+W
Answer a series of questions to quickly make a
67
design
New From Template
Ctrl+T
Open new design from the selected template
Open
Ctrl+O
Open previously saved design
Save
Ctrl+S
Save current design
Save As...
Save current design while choosing new file name
Close
Close current design
Export
Export submenu: export labels to a picture files
18
Printer Setup
Print
3.1.2
47
Choose printer and set its options
Ctrl+P
Print current design
Recent Files
Submenu of recently opened files
Exit
Close application
Edit menu
This menu contains options for clipboard operations
© 2001 - 2015 Dataland Software
20
and undo/redo options.
24
CD Label Designer Manual
Undo
Ctrl+Z
Undo last operation
Redo
Ctrl+Y
Redo last operation
Cut
Ctrl+X
Cut selection to the clipboard
Copy
Ctrl+C
Copy selection to the clipboard
Paste
Ctrl+V
Paste clipboard
Select All
Ctrl+A
Select all objects on the label
20
20
20
content
See also
Clipboard operations
3.1.3
20
Label menu
This menu contains general label options, such are background and file/song list options.
Background Color
Change label background color
Set Background Picture
Choose label background picture
49
Clear Background
Clear label background picture
Picture
Background Properties
Set label background picture properties
49
File/Song List
Edit file or song list and set its options
62
Increase Columns
Ctrl+=
Increase number of file/song list columns
Decrease Columns
Ctrl+-
Decrease number of file/song list columns
Read Drive/CDDB
Custom Fields
Edit Spines
3.1.4
18
Ctrl+F12
Read content of drive
Edit custom fields
60
Edit Back cover or DVD/BD box spines
57
Get From Print Layout
Get label dimensions from an existing print layout
Label Properties
Label properties (label sizes)
61
Insert menu
This menu contains options for inserting new objects.
© 2001 - 2015 Dataland Software
User interface
Picture
Insert picture from scanner or other TWAIN device
Shape
Insert shape
35
Insert text object
54
Circled Text
3.1.5
Insert picture from disk
49
Acquire
Text
25
Insert circled text object
59
Object menu
This menu contains options that are applied to the object or group of objects.
Delete
Del
Delete selected objects
Group
Ctrl+G
Group selected objects
Ungroup
Ctrl+U
Ungroup selected groups
Lock Object
Ctrl+L
Lock selected objects
Arrange
Arrange submenu
Center to Page
Center objects to page (horizontally)
Horizontally
Center to Page
Center objects to page (vertically)
Vertically
Center
Ctrl+E
Center objects inside selection bounds (horizontally)
Ctrl+R
Center objects inside selection bounds (vertically)
Horizontally
Center
Vertically
Align Left
Align selected objects to the left edge of selection
bounds
Align Right
Align selected objects to the right edge of selection
bounds
Align Top
Align selected objects to the top edge of selection
bounds
Align Bottom
Align selected objects to the bottom edge of selection
bounds
Move Up
Ctrl+PgUp Move object one step up in Z-order
Move Down
Ctrl+PgDn Move object one step down in Z-order
Move to Front
Ctrl+Alt
Move object to the front in Z-order
+PgUp
Move to Back
© 2001 - 2015 Dataland Software
Ctrl+Alt
Move object to the back in Z-order
26
CD Label Designer Manual
+PgDn
Rotate
Rotate submenu
Rotate right for
Rotate object to the right for 90s
90º
Rotate for 180º
Rotate object for 180s
Rotate left for
Rotate object to the left for 90s
90º
Picture
Picture submenu
Set As
Set selected picture as a background picture
Background
Reset size
Reset size of the selected picture (revert to the actual
size)
Reset Ratio
Changes picture's height so its aspect ratio becomes
Keep Width
equal to original
Reset Ratio
Changes picture's weight so its aspect ratio becomes
Keep Height
equal to original
Object Background
Choose background color of the object
Color
Transparent Color
Properties
Choose transparent color of the selected picture
Alt+Enter
Selected object properties. If no object is selected, it
opens label properties
3.1.6
61
Booklet menu
Booklet menu contains options to manage booklet pages.
Previous page
Select previous page
Next page
Select next page
Add page
Add new page to the end
Delete page
Delete selected page
Move page left
Move selected page one step to left
Move page right
Move selected page one step to right
© 2001 - 2015 Dataland Software
User interface
3.1.7
27
View menu
This menu contains view options, like zoom, label selection and styles.
3.1.8
Style
User interface style submenu
Toolbars
Toolbar
28
visibility submenu
View Front
Ctrl+1
View front cover
View Inside
Ctrl+2
View inside cover
View Back
Ctrl+3
View back cover
View Sleeve
Ctrl+4
View sleeve
View DVD/BD Box
Ctrl+5
View DVD/BD box cover
View Booklet
Ctrl+6
View booklet
View Disc
Ctrl+7
View disc label
Business Card
Ctrl+8
View business card
Zoom In
Ctrl+I
Zoom in
Zoom Out
Ctrl+U
Zoom out
Zoom Selected
Zoom to fit selected objects
Zoom Page
Zoom to fit current label
Tools menu
This menu contains options for configuration.
Configuration
Wizard
38
Options
64
Language
© 2001 - 2015 Dataland Software
Configure most important options through this wizard
Ctrl+F
Configure application options
Change user interface language
28
3.2
CD Label Designer Manual
Toolbars
Main menu options that are often used are also accessible through toolbars. The visibility of each
toolbar can be adjusted independently.
§ Main toolbar
§ Edit toolbar
28
28
§ Object toolbar
§ Zoom toolbar
§ View toolbar
§ Size toolbar
29
30
30
31
§ Booklet toolbar
3.2.1
31
Main toolbar
This toolbar contains several most important options of the software.
New
Open new design from the default template
New Wizard
Answer a series of questions to quickly make a design
67
40
Open
Open previously saved design
Save
Save current design
Print
Print current design
47
Export
18
Options
3.2.2
64
Export submenu: export labels to a picture files
Configure application options
Style
Change user interface style
Help
Open help file
Exit
Close application
Edit toolbar
Edit toolbar contains several editing options from the Object, Edit and Label submenu.
© 2001 - 2015 Dataland Software
User interface
Insert picture
Insert text
Insert picture from disk
49
Insert text object
54
Insert shape
Insert shape
35
Insert circled text
59
Insert circled text object
Delete
Delete selected objects
Properties
Selected object properties. If no object is selected, it opens
label properties
Get From Print
61
Get label dimensions from an existing print layout
Layout
Undo
Undo last operation
Redo
Redo last operation
Cut
Cut selection to the clipboard
Copy
Copy selection to the clipboard
Paste
Paste clipboard
Select All
Select all objects on the label
Group
Group selected objects
Ungroup
Ungroup selected groups
Lock Object
Lock selected objects
File/Song List
20
content
Edit file or song list and set its options
62
Increase Columns
Increase number of file/song list columns
Decrease Columns
Decrease number of file/song list columns
Read Drive/CDDB
Read content of drive
Custom Fields
3.2.3
20
20
60
18
Edit custom fields
Object toolbar
Object toolbar contains object arrange options.
Center to Page Center objects to page (horizontally)
Horizontally
Center to Page Center objects to page (vertically)
Vertically
© 2001 - 2015 Dataland Software
29
30
CD Label Designer Manual
Center
Center objects inside selection bounds (horizontally)
Horizontally
Center
Center objects inside selection bounds (vertically)
Vertically
3.2.4
Align Left
Align selected objects to the left edge of selection bounds
Align Right
Align selected objects to the right edge of selection bounds
Align Top
Align selected objects to the top edge of selection bounds
Align Bottom
Align selected objects to the bottom edge of selection bounds
Move Up
Move object one step up in Z-order
Move Down
Move object one step down in Z-order
Move to Front
Move object to the front in Z-order
Move to Back
Move object to the back in Z-order
Zoom toolbar
Zoom toolbar contains zoom options. In the Zoom percent field you can type arbitrary zoom level - use
Enter key to confirm.
3.2.5
Zoom percent
Zoom percent value
Zoom In
Zoom in
Zoom Out
Zoom out
Zoom Selected
Zoom to fit selected objects
Zoom Page
Zoom to fit current label
View toolbar
Use view toolbar to quickly switch between labels.
View Front
View front cover
View Inside
View inside cover
View Back
View back cover
© 2001 - 2015 Dataland Software
User interface
3.2.6
View Sleeve
View sleeve
View DVD/BD Box
View DVD/BD box cover
View Booklet
View booklet
View Disc
View disc label
Business Card
View business card
Label Properties
Label properties (label sizes)
31
Size toolbar
Size toolbar can be used to change size and position of selected object.
3.2.7
X position
Distance from the left edge of label
Y position
Distance from the top edge of label
Width
Width of object
Height
Height of object
Lock ratio
Lock object ratio
Booklet toolbar
Booklet toolbar contains options to manage booklet pages.
Booklet pages
Current page number, total number of pages and Previous and Next
page buttons
Add page
Add new page to the end
Delete page
Delete selected page
Move page left
Move selected page one step to left
Move page right
Move selected page one step to right
© 2001 - 2015 Dataland Software
32
3.3
CD Label Designer Manual
Toolbox
Toolbox is a handy window with mostly used object editing options, such is font for texts, fills for
shapes, etc. Additionally, you can use it to select label view.
§ Labels toolbox
32
§ Effects toolbox
33
§ Text toolbox
33
§ Picture toolbox
§ Shape toolbox
3.3.1
34
35
Labels toolbox
Labels toolbox is another shortcut for the View menu
27
options (another shortcut is View toolbar
Front
View front cover
Inside
View inside cover
Back
View back cover
Sleeve
View sleeve (envelope)
DVD/BD Box
View DVD/BD box cover
Booklet
View booklet
Disc
View disc label
30
).
© 2001 - 2015 Dataland Software
User interface
Business
Card
View business card
Layout name
Quickly select printing template for the current label
Get From
Get label dimensions from an existing print layout
33
Print Layout
Label
Label properties (label sizes)
Properties
3.3.2
Effects toolbox
Effects toolbox contains several special effects options applicable to all types of objects (texts, images,
shapes).
Transparency
The level of global transparency of selected objects (0 - 100%)
Shadow
Draw drop-shadow
Offset X, Y
Shadow offset relative to object position
Shadow
The level of shadow transparency (0 - 100%)
transparency
3.3.3
Text toolbox
Text toolbox is a set of shortcuts for more important text editing options. Full set of options is
accessible through Text Edit
formatting through Text Edit
© 2001 - 2015 Dataland Software
54
54
window. Text formatting options apply to whole text in the object, while
window allows different styles in the same text object.
34
CD Label Designer Manual
Font name
Choose font for text
Font size
Choose font size
Font color
Choose font color
Background
color
Background
transparent
Choose background color
Turn on/off background transparency
Bold
Font bold
Italic
Font italic
Underline
Font underline
Align left
Align paragraphs to left
Centered
Center paragraphs
Align right
Align paragraphs to right
Justify
Justify paragraphs to both, left and right
Angle
Change text angle
More options
Open Text Properties window
54
3.3.4
Picture toolbox
Text toolbox is a set of shortcuts for more important picture editing options. Full set of options is
accessible through Picture Edit
49
window.
© 2001 - 2015 Dataland Software
User interface
Set As
35
Set selected picture as a background picture
Background
Resize picture
51
Reset size
Resize picture internally
Reset size of the selected picture (revert to the actual size)
Reset Ratio Keep Changes picture's height so its aspect ratio becomes equal to original
Width
Reset Ratio Keep Changes picture's width so its aspect ratio becomes equal to original
Height
Flip horizontally
Flip picture horizontally
Flip vertically
Flip picture vertically
Tile
Turn on/off picture tiling
Picture effects
Open Picture Effects window
52
More options
3.3.5
49
Open Picture Properties window
Shape toolbox
Shape toolbox is a set of shape editing options.
© 2001 - 2015 Dataland Software
36
CD Label Designer Manual
Shape type
Change shape type. Available options:
§ Rectangle
§ Rounded Rectangle
§ Circle
§ Ellipse
§ Diamond
§ Star
§ Polygon
§ Line Top
§ Line Center Horiz.
§ Line Bottom
§ Line Left
§ Line Center Vert.
§ Line Right
§ Line Forward Diagonal
§ Line Backward Diagonal
Frame width
Width of shape frame
No frame
Turn on/off shape frame
Frame color
Color of shape frame
Fill style
Change fill style. Available options:
§ Solid
§ Clear
§ Horizontal lines
§ Vertical lines
§ Backward diagonal lines
§ Forward diagonal lines
§ Cross
§ Diagonal cross
§ Gradient
Fill color
Color of shape fill (first color for gradient)
Gradient style
Gradient style (available only if Fill style is Gradient)
Second
Second gradient color (available only if Fill style is
gradient color
Gradient)
Round
Percent rounded (available only if Shape type is
Rounded Rectangle)
Sides
If shape type is Star or Polygon, the Round slider
becomes Sides slider, used to select number of
© 2001 - 2015 Dataland Software
User interface
sides that star or polygon has
© 2001 - 2015 Dataland Software
37
38
3.4
CD Label Designer Manual
Dialogs
This is a reference of program windows.
§ Configuration Wizard
§ New Label Wizard
38
40
§ Print dialog and print layouts
§ Picture Properties
§ Image Resize
51
§ Image Effects
52
§ Text Properties
49
54
§ Spine Text Properties
57
§ Circled Text Properties
§ Shape Properties
§ Custom Fields
3.4.1
62
§ Options
64
59
55
60
§ Label Properties
§ File List
47
61
Configuration Wizard
At the first start of CD Label Designer, Configuration Wizard will appear to let you set vital options
for proper application working. You can also run this wizard later by selecting Options | Configuration
Wizard option in the main menu.
The wizard will guide you through configuration pages. When you set or check all options on one page,
click Next button to go to next step.
Page 1 – Introduction
Introduction page.
Page 2 – General
© 2001 - 2015 Dataland Software
User interface
Check and set CD drive option in order to Read drive option works the way you wish.
Page 3 – CDDB
© 2001 - 2015 Dataland Software
39
40
CD Label Designer Manual
Enable or disable CDDB option, input server and your proxy settings.
Page 4 – Default label template
Set some of default options for new labels. Other options you can set if you load Default.clt file into
application and saving it afterwards. For other information about creating templates see Design
templates
17
topic.
Page 5 – Finish page
Finish page.
See also
Options
3.4.2
64
New Label Wizard
When you need fast creating of labels, use this option. Wizard will ask you very few questions before
label is being created. When you set or check all options on one page, click Next button to go to next
step. Your settings will be remembered so you don't need to set them again when you run this option
next time.
Page 1 – General
© 2001 - 2015 Dataland Software
User interface
41
Select template file (if you want to) and enable/disable drive reading (or CDDB). Replace title for
audio CDs means that after successful retrieving of album data from CDDB, title defined on next page
will be replaced with Author/Album name.
Page 2 – Title
© 2001 - 2015 Dataland Software
42
CD Label Designer Manual
Set title of disc, choose font and select labels where it will be placed.
Page 3 – Background
© 2001 - 2015 Dataland Software
User interface
43
Choose image for design background, set Tiled option and select labels where background will be
placed.
Page 4 - Finish
© 2001 - 2015 Dataland Software
44
CD Label Designer Manual
If you want to open Save or Print dialog right away, check these options on. When you finish, click on
Finish button. You can abandon creating any time by clicking at Cancel button.
3.4.3
Image Browser
Use Image Browse panel to find and place images more easily. To place image on the label, simply
drag it from the Image Browser.
Local disk
© 2001 - 2015 Dataland Software
User interface
45
This is a window similar to Windows Explorer. You can browse through folders of local, portable or
network disk, change view type (list, icons, thumbnails, ...) and save most visited folders to Favorites
section.
Internet
© 2001 - 2015 Dataland Software
46
CD Label Designer Manual
CD Label Designer embeds Internet Explorer window to allow you to browse World Wide Web. You
can type web address directly or type keywords to search for images via Google Images search
engine. You can define home page and save websites to Favorites list.
Note that images that can be found on Internet might be copyrighted, in which case you are not
allowed to use them without paying a royalty fee or meet usage terms in some other way.
Important: Because of the Internet Explorer limitation, it's not possible to directly drag and drop
images that link to other pages (for example, Google Images results list). Often, you will be able to
follow this link to view larger image and then drag it to the label. However, sometimes this won't be the
case and you'll need to:
1. Right-click on image in embedded browser
2. Select Copy option
3. Right-click on label
4. Select Paste option
See also
© 2001 - 2015 Dataland Software
User interface
Image properties
Image resize
Image effects
3.4.4
49
51
52
Print dialog and print layouts
Note: You can view general information about print layouts in the introductory topic
8
.
When you choose Print option, window similar to this will appear.
Toolbar
Compact
Turn on and off compact dialog. Compact dialog doesn't contain
editing options, just print layout list and simple preview.
Exchange
Exchange layouts with others
Import from file Import XML file from the disk
Import from
Import XML file from the WWW (note: proxy settings
URL
configured)
© 2001 - 2015 Dataland Software
69
must be
47
48
CD Label Designer Manual
Export to file
Export layout to XML file
New
Create new print layout
Copy layout
Create a copy of selected layout for further editing
Delete
Delete currently selected print layout
Save
Save currently selected print layout
Printer Setup
Choose printer and its options
Tray
Select paper source tray (bin) to use
Copies
Number of copies to print
Print layouts
This is a list of installed print layouts. Create, delete and edit layouts and choose the layout you want to
be printed.
Print layout properties
Edit layout properties.
§ Name
§ Units
§ Orientation
§ Media Type (select disc or type of paper)
§ Printer page size (if this option is on, page setup will be retrieved from the selected printer)
§ Custom page size (if Printer page size is off, here you can edit custom paper size)
Labels
In this area you can add (+) or delete (-) individual labels and define their positions. Position can be
Absolute (Top-Left), Aligned to other label or Absolute (Center). If you choose absolute (top-left)
position, you should enter distance of label from left and top edges of paper. Similarly, if you choose
absolute (center) position, you should enter position of center of label. This is particularly useful when
label size is set to From design. In that case, center of label will remain same regardless of size.
If you select aligned position, you will be able to select other label to align with. In this case, if you
change position of one label, the other will be moved automatically.
Additionally, you can use a
button to easily create a grid-like layout. Just define number of rows
and columns, distances from paper edges and from each other, and software will automatically create
a complete layout for you.
© 2001 - 2015 Dataland Software
User interface
49
Before printing, use check boxes next to label names to turn off labels that you don't want to be printed
this time.
Simple preview
Here you can see rough sample of printout. To see high quality preview click on Preview button.
LightScribe
By clicking on the LightScribe button, instead to the printer, your design will be sent to a LightScribe
compatible device (if present on the system).
See also
Print layouts overview
3.4.5
8
Picture Properties
Edit pictures with this dialog.
© 2001 - 2015 Dataland Software
50
CD Label Designer Manual
Pan mode
When selected, use mouse to pan images that are too large for the
window size
Select mode
When selected, use mouse to mark part of image
Load image
Load image from the disk
Acquire
Acquire image from the scanner or other TWAIN device
Zoom
Zoom level
Resize image
51
Change internal image size
Crop
Crop selection
Transparent
Transparency on/off
Transparent color
Choose transparent color. Click on button and then at image to get
color from the screen
Tiled
Image tiled in the placeholder. Otherwise it will be stretched
Flip horizontally
Flip image horizontally
Flip vertically
Flip image vertically
Rotate left
Rotate image left for 90º
Rotate right
Rotate image right for 90º
Image effects
52
Open image effects dialog
© 2001 - 2015 Dataland Software
User interface
51
See also
Image resize
Image effects
3.4.6
51
52
Image Resize
Although it's possible to resize pictures directly on label (by dragging black square handles), internally,
software still keeps original image. This way it ensures that best possible quality will be used while
printing label. If you put extremely large picture to the label (for example, scanned high resolution
image), sometimes it will use too much computer memory and reduce performance. In this case it
would be advisable to internally resize image to improve memory usage while keeping same quality
of printouts.
Another possible use of this option is to change size of one tile in case when Tiled option is used.
Suggest size
Output resolution
Choose desired DPI resolution (Dots Per Inch). Note that you can (and
it's usually recommended) set smaller resolution than maximum printer
resolution. While printing, images are resized by using optimized
algorithm that assures maximum quality. For example, if your printer's
resolution is 600 DPI, you can safely set this value to 300 DPI. In this
© 2001 - 2015 Dataland Software
52
CD Label Designer Manual
case, image will use approximately 1/4 of memory than 600 DPI image,
but you probably won't be able to notice any loss of printout quality.
Get from printer
Get default printer resolution
Original size
Original image size
Suggested size
Suggested new size for the image (based on DPI setting above and
original size)
Accept
Accept suggested size. When clicked, suggested size will be transferred
to New size values.
New size
Width
New image width
Height
New image height
Lock
Lock aspect ratio, to prevent image deformation
Half / Double
Set the new size to half / double of the current size
Change size on label
When checked, image boundaries on the label will be adjusted
See also
Image properties
Image effects
3.4.7
49
52
Image Effects
Use this window for basic image transformations. Main idea is to save user from using another image
editing software to apply simple effects.
© 2001 - 2015 Dataland Software
User interface
Brightness / Contrast
Brightness, contrast and gamma transform
Reduce colors
Reduce number of image colors (dithering option is available)
Smooth
Smooth image
Negative
Invert colors
Rotate
Rotate for arbitrary angle
Skew
Skew image horizontally
Emboss
Emboss effect (colored, light, medium, dark)
Blur
Several blur methods
Edge
Edge enhancing and detection
Sharpen
Several sharpen methods
Miscellaneous
Miscellaneous effects (Glow, Prewitt, Trace, etc)
See also
© 2001 - 2015 Dataland Software
53
54
CD Label Designer Manual
Image properties
Image resize
3.4.8
49
51
Text Properties
Use this dialog to edit text objects. As you can see in the screenshot, it is possible to mix formatting,
fonts and colors for each word/letter individually, similarly as you would do with regular word
processing application.
Change font
Open standard font change window
Background color
Choose background color (not used if transparent)
Stretch text to
Stretch text to text object boundaries. Note: if you are not satisfied
frame
with stretched text quality, enlarge Font size
Autosize
Automatically adjust frame size to fit size of the text
Transparent
Transparent background
Angle
Text angle (any value between 0 and 360 is allowed)
Frame width
Frame line width
Frame color
Frame line color
Read drive/CDDB
Read drive/CDDB list and put it into text box
Custom Fields
Edit or insert custom fields
60
Undo
Undo last operation
Redo
Redo last operation
Font name
Change font name
© 2001 - 2015 Dataland Software
User interface
Font size
Change font size
Text color
Change text color
Bold
Font bold
Italic
Font italic
Underline
Font underline
Align left
Align paragraph to the left
Centered
Center paragraph
Align right
Align paragraph to the right
Justified
Justify paragraph to both sides
Align top
Align text to the top
Centered vertically Center text vertically
Align bottom
Align text to the bottom
See also
Spine Text Properties
57
Circled Text Properties
Custom Fields
3.4.9
59
60
Shape Edit
Here you can edit shape properties, like shape type, colors, etc.
© 2001 - 2015 Dataland Software
55
56
CD Label Designer Manual
Shape type
Change shape type. Available options:
§ Rectangle
§ Rounded Rectangle
§ Circle
§ Ellipse
§ Diamond
§ Star
§ Polygon
§ Line Top
§ Line Center Horiz.
§ Line Bottom
§ Line Left
§ Line Center Vert.
§ Line Right
§ Line Forward Diagonal
§ Line Backward Diagonal
Frame width
Width of shape frame
No frame
Turn on/off shape frame
© 2001 - 2015 Dataland Software
User interface
Frame color
Color of shape frame
Fill style
Change fill style. Available options:
57
§ Solid
§ Clear
§ Horizontal lines
§ Vertical lines
§ Backward diagonal lines
§ Forward diagonal lines
§ Cross
§ Diagonal cross
§ Gradient
Fill color
Color of shape fill (first color for gradient)
Gradient style
Gradient style (available only if Fill style is Gradient)
Second gradient
Second gradient color (available only if Fill style is Gradient)
color
Round
Percent rounded (available only if Shape type is Rounded
Rectangle)
Sides
If shape type is Star or Polygon, the Round slider becomes
Sides slider, used to select number of sides that star or polygon
has
3.4.10 Spine Text Properties
Use this dialog to edit case cover spine text. As you can see in the screenshot, it is possible to mix
formatting, fonts and colors for each word/letter individually, similarly as you would do with regular
word processing application.
© 2001 - 2015 Dataland Software
58
CD Label Designer Manual
Change font
Custom Fields
Open standard font change window
60
Edit or insert custom fields
Undo
Undo last operation
Redo
Redo last operation
Font name
Change font name
Font size
Change font size
Text color
Change text color
Bold
Font bold
Italic
Font italic
Underline
Font underline
Align left
Align paragraph to the left
Centered
Center paragraph
Align right
Align paragraph to the right
Justified
Justify paragraph to both sides
See also
Text Properties
54
© 2001 - 2015 Dataland Software
User interface
Circled Text Properties
Custom Fields
59
59
60
3.4.11 Circled Text Properties
Use this dialog to edit circled text objects. As you can see in the screenshot, it is possible to mix
formatting, fonts and colors for each word/letter individually, similarly as you would do with regular
word processing application.
Change font
Open standard font change window
Angle
Text angle (any value between 0 and 360 is allowed)
Direction
Circled text direction
Read drive/CDDB
Read drive/CDDB list and put it into text box
Custom Fields
Edit or insert custom fields
60
Undo
Undo last operation
Redo
Redo last operation
Font name
Change font name
Font size
Change font size
Text color
Change text color
Bold
Font bold
Italic
Font italic
© 2001 - 2015 Dataland Software
60
CD Label Designer Manual
Underline
Font underline
See also
Text Properties
54
Spine Text Properties
Custom Fields
57
60
3.4.12 Custom Fields
With CD Label Designer you can maintain list of custom dynamic texts that you can place on the
labels. Once when record (row) is printed, software will mark it and the next one will be used in the
future (in this case you'll need to save design file after printing).
Custom fields editor window is similar to spreadsheet applications such is MS Excel. You can define
number of fields, give them a name and type values. You can also change Used column to control
which record will be printed next.
Using custom fields
To use custom fields, simply type %%<FIELD_NAME>%% somewhere in the text. You can also use
Custom Fields drop-down
button to insert fields more easily. As with regular text, format each field
according to your preference.
© 2001 - 2015 Dataland Software
User interface
61
In this screenshot you can see how the text object and its output looks like. Note that output contains
data from the first unused record.
See also
Text Properties
54
Spine Text Properties
57
Circled Text Properties
59
3.4.13 Label Properties
Use Label Properties window to change label dimensions.
It's important to understand that, in general, label dimensions changing is not mandatory, although it
does help the design process. Different manufacturers produce differently sized pre-made labels, and
that sizes should be entered in the print layout
8
. When printing, CD Label Designer automatically
resizes label to the correct size defined in the print layout. As long as size difference is not too large,
you will still get high quality outputs.
© 2001 - 2015 Dataland Software
62
CD Label Designer Manual
Presets
Choose item from the list to get dimensions from the pre-defined
preset.
Delete preset
Delete selected preset
Save preset
Save current dimensions to the preset
Get from Print Layout
Get dimensions from the print layout. After you choose print
layout from the list, only labels that are contained in the layout
will be changed, while other labels will remain unchanged. Thus,
you can consecutively choose more than one layout. For
example: select Avery disc layout, and then select Neato cover
layout.
Units
Units of measure
See also
Print layouts overview
Print Layout dialog
8
47
3.4.14 File List
Here you can edit list of files (or make your own groups/items tree) for including on case label printout.
© 2001 - 2015 Dataland Software
User interface
63
List editing
New
New item
Rename
Rename selected item
Delete
Delete selected item
Move Up
Move selected items up
Move Down
Move selected items down
Read Drive/CDDB
Get list from the drive
You can drag and drop items from one parent node to another by using your mouse, or right click on
nodes to call pop-up menu. By using node type radio group, you can change type of selected node(s).
Note that you cannot change folder/group type to file/item type if node has children.
© 2001 - 2015 Dataland Software
64
CD Label Designer Manual
Settings
§ Only directories (read only directories when choosing Read drive option)
§ Max. levels (maximum number of directory levels to read – level 0 corresponds to reading root
only)
§ Columns (number of columns list will be formatted in)
§ Column separator (draw/print column separator lines)
§ Draw on front / inside / sleeve / back / DVD/BD box / Booklet (select on which side(s) list will
be placed)
§ Folder/Group font and File/Item font (choose fonts for those two categories)
§ Use Create Text button to place the list content into regular text object, so you can move and
format it freely, like any other text
See also
Read drive or CDDB
18
3.4.15 Options
Use Options dialog to change program settings. Settings are separated into five sections:
§ General
§ Editing
65
§ Defaults
§ Print
64
67
68
§ CDDB
69
3.4.15.1 General
Use General section to set general application options.
© 2001 - 2015 Dataland Software
User interface
65
CD Drive
Set CD drive for drive reading option
Background color
Set background color of work area
Default zoom
Set default zoom value
Unit of measure
Set measurement units to be used by default
Auto check for updates
Automatically check for software updates by using internet connection
3.4.15.2 Editing
Use Editing section to set editing options.
© 2001 - 2015 Dataland Software
66
CD Label Designer Manual
Undo levels
Clear after save
Maximum number of undo steps
Clear undo after saving design
Back spine text direction Select text direction for back label spines
Left
Left spine
Right
Right spine
DVD
DVD/BD spine
Moving and resizing
Editing grid options
Grid size
Grid size in pixels
Grid dots
Draw grid dots
Snap to grid
Snap objects to grid when moving or resizing
Snap to label edges
Snap objects to label edges and folding lines
Allow moving
Allow moving objects outside label boundaries
outside labels
© 2001 - 2015 Dataland Software
User interface
67
While moving or resizing, press and hold Alt key to temporary modify Snap to grid option. For
example, if snapping is turned on, holding Alt will result in smooth (unsnapped) moving and resizing.
3.4.15.3 Defaults
Use Defaults section to set some program defaults.
Default text font
Default font for new text objects
Default large picture action
Set what action will be taken if inserted picture is larger than a
label
Ask
Ask every time it happens
Resize (keep aspect ratio)
Resize picture but preserve aspect ration
Resize
Resize picture to the exact bounds of label
Crop
Crop picture to the bounds of label
© 2001 - 2015 Dataland Software
68
CD Label Designer Manual
Leave as is
Set default template
Leave picture size as is
Choose template file and copy it over the Default.clt. Default.clt
file is template used when File | New option is selected.
While moving or resizing, Alt key is a modifying key for Snap to grid option. For example, if snapping
is turned on, holding Alt will result in smooth (unsnapped) moving and resizing, and vice versa.
3.4.15.4 Print
Use Print section to set printing options.
Lines
Set line types (solid / dashed / clear)
Cut line
Set cut line
Fold line
Set folding line
Disc label
Disc label printing (see below)
© 2001 - 2015 Dataland Software
User interface
Print over edge
Print slightly larger area
Print exact edge
Print exactly same size
Booklet
Print on both sides
69
Booklet printing options
Print booklet on both sides of paper. Software will pause after half
of pages to allow feeding them to the printer tray again.
Print second batch in
Select this option to print second batch in reverse order. Set this
reverse order
option according to your printer and its settings.
Print page numbers under
Print page numbers under the label.
label
Show warning when size don't Show warning if size of label on print layout and design don't
match
match
When printing disc labels you have two solutions: you can print them on special CD label paper with
already cut edges or print them on plain paper and cut them with the scissors for example (if you are
patient enough).
In the first case (Print over edge), printing of only visible part of label would be inappropriate – a small
mistake caused by imprecise determining of positions or way printer takes paper, would result with
ugly whiteness on edges of label. Because of that, there is possible to print somewhat larger label –
with visible belt beyond edges. In this case cut lines are not printed.
In the second case (Print exact edge), you will probably want to print only visible part of label with cut
lines visible.
3.4.15.5 CDDB
Use CDDB section to set CDDB and internet options.
© 2001 - 2015 Dataland Software
70
CD Label Designer Manual
CDDB
CDDB options
Enabled
CDDB enabled
Server
CDDB server (leave empty if you want to use default server)
Place title on spine
Place album title on spine if CDDB entry is found on the server
Numerate songs
Numerate songs in the list if CDDB entry is found on the server
Proxy
Internet (HTTP) proxy settings
Use proxy server
Use proxy or not
Server
Server name
Port
Server port
© 2001 - 2015 Dataland Software
Other information
Part
IV
72
CD Label Designer Manual
4
Other information
4.1
Purchase
We offer a free trial for CD Label Designer so you can investigate its benefits in detail before your
final decision. For any further assistance, please contact us
74
.
q
Fully functional and unlimited version
q
30-day money back guarantee
q
Free minor updates, a discount for major updates
q
Maximum priority technical support
q
Order via secure servers
q
Various payment options (including credit card, PayPal, wire transfer, purchase orders,
etc)
q
Instant key delivering (in some cases within 24 hours at most)
Buy now: http://www.cd-label-designer.com/purchase.html
© 2001 - 2015 Dataland Software
Other information
4.2
73
Credits
We would like to use this page to thank to developers who made their products and
libraries available.
CodeGear Delphi
Main development environment
http://www.codegear.com/
TMS Component Pack
Various components
http://www.tmssoftware.com/
Interval Software Envision Components
Graphic routines and components
http://www.intervalsoftware.com/
SpTBXLib
Menus, toolbars and custom themes (skins)
http://www.silverpointdevelopment.com/sptbxlib/
JEDI components
Various components
http://www.delphi-jedi.org/
MaxComponents
Auto-update component
http://www.maxcomponents.net/
Icons
http://www.icons-icons.com/, http://www.famfamfam.com/, http://www.dsbglobal.com/
, ...
© 2001 - 2015 Dataland Software
74
4.3
CD Label Designer Manual
Contact
WWW
Company page:
http://www.datalandsoftware.com/
Product website:
http://www.cd-label-designer.com/
E-mail
Tech. support:
[email protected]
General:
[email protected]
© 2001 - 2015 Dataland Software
Index
Index
-D-
-Aaddress 74
align objects 14
arrange 14
auto check for updates
64
-Bback 6
back spine text direction
background color 14
background picture 15
booklet 6
booklet export 18
booklet printing 68
booklet toolbar 31
browse internet 44
browse local disk 44
business card 6
buy 72
65
-CCD drive setting 64
CDDB 18, 69
change label dimensions 61
check for updates 64
circle 35, 55
circled text 12
circled text properties 59
clear undo after save 65
clipboard 20
configuration 20, 64
configuration wizard 38
configure 38
contact information 74
copy 20
Credits 73
custom fields 60
cut 20
cut line 68
© 2001 - 2015 Dataland Software
default text font 67
default zoom level 64
defaults options 67
design templates 17
dialogs 38
diamond 35, 55
disc label 6
disc label printing 68
drop shadow 33
DVD/BD box 6
-Eedit circled text 59
edit file/song list 62
edit menu 23
edit spine text 57
edit spines 13
edit text 54
edit toolbar 28
editing options 65
effects 52
effects toolbox 33
export booklets 18
export resolution 18
export to image file 18
-Ffeatures 2
fields editor 60
file list 18, 19, 62
file menu 23
fill 35, 55
fold line 68
font default 67
format file list 19, 62
front 6
-Ggeneral options 64
gradient 35, 55
grid settings 65
75
76
CD Label Designer Manual
-I-
-O-
image browser 44
image effects 52
image properties 49
image resize 51
image toolbox 34
insert circled text 12
insert menu 23, 24
insert picture 11
insert scanned picture
insert shape 13
insert text 12
inside 6
internet 44
introduction 2
object menu 25
object properties 13
object toolbar 29
object types 7
objects 7
open design 10
optinios defaults 67
options 20, 27, 38, 64
options editing 65
options general 64
options print 68
overview 2
11
-Llabel dimensions 19, 61
label format 19
label formats 61
label menu 24, 26
label properties 19, 61
label stocks 8
label toolbox 32
label types 6
labels 6
large picture action 67
lightscribe 47
line 35, 55
local disk 44
-Mmain menu reference 23
main screen 4
main toolbar 28
main window 4
make print layout 18, 47
measurement units 64
paste 20
pay 72
picture 11
picture effects 52
picture properties 49
picture resize 51
picture toolbox 34
place circled text 12
place picture 11
place scanned picture 11
place shape 13
place text 12
polygon 35, 55
print 47
print over edge 68
print booklet 68
print design 15
print disk label 68
print exact edge 68
print layouts 8, 18, 47
print options 68
printing 8
proxy settings 69
purchase 72
-Q-
-Nnew design 10
new label wizard
-P-
quickly make label
10
10, 40
© 2001 - 2015 Dataland Software
Index
update check
use template
-Rread drive 18, 19
register 72
resize image 51
resize picture automatically
rotate objects 14
64
17
-V67
view change 11
view menu 27
view toolbar 30
-S-
-W-
save design 15
scanner 11
settings 20, 64
shadow 33
shape 13
shape toolbox 35, 55
size toolbar 31
snap to grid 65
song list 62
spine text direction 65
spine text properties 57
spines 13
star 35, 55
stocks 8
support 74
switch label 11
web 44
windows 38
wizards 38, 40
work area 4
work area background color
world wide web 44
www 44
-Ttemplates 17
text 12
text font 67
text on spines 13
text properties 54
text toolbox 33
toolbars 28
toolbox 32
tools menu 27
transformations 52
transparency 33
TWAIN 11
-Uundo levels 65
units of measure
64
© 2001 - 2015 Dataland Software
-Zzoom toolbar
30
64
77