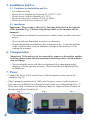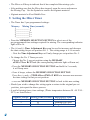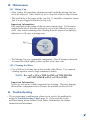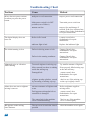
1
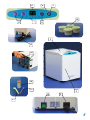
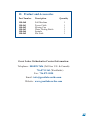
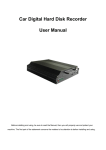
AM100
Centrifugal Auto-Mixer
User Manual
Table of Contents
1.
User Notice
3
2.
Warranty/Liability Information
3
3.
Indications for Use
4
4.
Product Introduction
4.1 Parts and Accessories
4
4.2 Product Specifications
4
Installation and Use
6
5.1 Conditions for Installation and Use
6
5.2. Installation
6
6.
Transportation
6
7.
Power
6
8.
Mixing of Alginate Powder
9.
Setting the Mixer Timer
8
10.
Maintenance
9
10.1 Mixing Cup
9
10.2 Cleaning the Mixer
9
5.
2
4-5
11.
Troubleshooting
12.
Product and Accessories
7-8
9-10
11
1. User Notice
• Thank you for ordering the AM100 Centrifugal Auto-Mixer.
• Prior to using this product, please read this User Manual carefully for
set-up, usage and maintenance instructions.
• Please keep this User Manual handy as a reference for your AM100
Centrifugal Auto-Mixer.
• Please use this machine according to the instructions described in this Userr
Manual. Failure to do so may result in operator injury or machine malfunction.
• If the purchaser does not file a written complaint to Great Lakes Orthodontics
within seven (7) days of receiving the product, we will assume the purchaser has
completely understood the contents of this User Manual and accepted the product
as shipped.
• Please contact Great Lakes Orthodontics if you have any problem with the
machine.
• The manufacturer reserves the right to make changes and improvements to any
of the products described in this manual without prior notice.
2. Warranty/Liability Information
• The AM100 Centrifugal Auto-Mixer is warranted for one (1) year from date of
purchase.
• Great Lakes Orthodontics shall not assume any responsibility for any malfunction,
damage, or accident of personal bodily injury due to the improper removal, modification, maintenance, or repair of the AM100 Auto-Mixer by parties other than us.
• Great Lakes Orthodontics shall not assume any responsibility for any malfunction,
damage, or accident of personal bodily injury due to using a product not provided
by us.
• Great Lakes Orthodontics shall not assume any responsibility for any malfunction,
damage, or accident of personal bodily injury due to the improper removal, modification, maintenance, or repair of the AM100 Auto-Mixer that did not include parts
provided by us.
• Great Lakes Orthodontics shall not assume any responsibility for any malfunction,
damage, or accident of personal bodily injury due to the improper operation of the
AM100 Auto-Mixer not in compliance with this User Manual.
• Great Lakes Orthodontics shall not assume any responsibility for any malfunction,
damage, or accident of personal bodily injury caused due to the usage environment
not being in compliance with the power, installation environment and conditions
specified in this User Manual.
3
3. Indications for Use
• Use of this product is restricted to medical/dental professional use only.
• This product is suitable for mixing 25-100g of alginate powder in a
short time period.
• This product should not be used to mix caustic material.
4. Product Introduction
4.1 Parts and Accessories
1.
2.
3.
4.
5.
6.
7.
8.
9.
10.
11.
12.
13.
14.
15.
16.
Machine body
Cover
Start/Stop button
Time memory selection button
Time adjustment buttons
Time display
Time memory number position indicator
Indicator light
Power cable receptacle
Main power switch
Power cable
Stir stick
Spatula
Water dosing bottle
Mixing cups (4 ea.)
Fixed bolts for transportation
4.2 Product Specification
Power Supply:
Power:
Revolution:
Timer:
Memory:
Net Weight:
External dimension:
4
110v @ 60Hz
400W
3,600 rpm @ 60Hz
4-16 sec. (adjustable by second)
5 (initial settings - 6, 8, 10, 12, 15 sec.)
19kgs. (41.9 lbs.)
215mm (w) x 310mm (h) x 275mm (d)
6
8
3
15
7
5
4
2
11
16
14
12
1
10
9
13
5
5. Installation and Use
5.1 Conditions for Installation and Use
•
•
•
•
•
For indoor use only.
Please use at temperatures between 41˚-104˚F/5˚-40˚C.
Please use at a relative humidity of ≤ 85%.
Please use the power voltage of 110v @ 60Hz.
Please use at an electric current of 10A.
5.2 Installation
Important: Please remove the two (2) fastening bolts fixed at the bottom
of the machine (Fig. 1) before using this product, or the machine will be
damaged.
• The machine should then be installed on a stable counter or table with a flat
surface.
• Never install near flammable or explosive substances.
• Should the machine malfunction, do not attempt to use. Using the machine
in this condition may result in additional damage to the mixer as well as
voiding the warranty.
6. Transportation
Important: If the mixer is to be returned for repairs or brought to another
location, please fasten the aforementioned fastening bolts to avoid malfunction or damage.
• Not securing the motor with the two fastening bolts when transporting/
shipping voids the product warranty. Please store the two fastening bolts
for future use.
7. Power
• Connect the Power Cable to the Power Cable Receptacle on the rear of the
machine (Fig. 2).
• Plug 3-prong, grounded end of Cable into the power source (wall receptacle).
• Turn mixer on at Main Power Switch located on the rear of the machine (Fig. 3).
When the switch is turned on, the Memory Indicator Light and Time Display on
the Operation Panel should be lit.
Fig. 1
6
Fig. 3
Fig. 2
8. Mixing of Alginate Powder
• Prepare the alginate powder and cool water (50˚-68˚F/10˚-20˚C) in the Mixing
Cup as described in the next step.
Important Information:
The hardening times of the alginate can be controlled by water temperature. If
cool water is not used, the hardening time will be shortened.
• Measurement of the alginate powder should be done according to the alginate
manufacturer’s instructions. Add the corresponding amount of water to the
alginate powder already in the Mixing Cup.
• The dosage to be mixed should be between 25-100g. In order to prevent
malfunction of the machine, do not exceed 100g.
• Cap the Mixing Cup by covering the cup, then pressing down on it while turning
it to lock it in place.
Important Information:
The Mixing Cup must be completely tightened or the alginate powder will splash
during mixing and cause the machine to malfunction. The Mixing Cup and Mixing
Cup Cap are considered accessory products and not included in the machine warranty. If the cap cannot be secured tightly, please use a new mixing cup and cap.
• Place the Mixing Cup inside the mixing well (Fig. 4).
Fig. 4
• Close the Mixer Cover.
- The Mixer will not start if the cover is not secured properly.
- Do not Start/Run the machine when the Mixing Cup is empty.
• Based upon the amount of alginate powder added to the mixing bowl, set the
timer. Please refer to Setting the Mixer Timer (section 9).
• Once the timer is set, press the Start Button. The digital display will count
second-by-second, and will display the time of completion. Do not force open
the cover while the machine is running as this may cause injury to the operator
or damage the machine.
Important Information:
Should you need to stop the Mixer during mixing, press the Stop Button and
the Mixer will immediately stop. During mixing, should the Mixer detect any
abnormal condition, it will stop automatically.
7
• The Mixer will beep to indicate that it has completed the mixing cycle.
• After making sure that the Mixer has stopped, open the cover and remove
the Mixing Cup. Use the Spatula to remove the alginate material.
• Alginate material will set Bubble Free.
9. Setting the Mixer Timer
• The Timer has 5 pre-programmed settings:
Memory Mixing Time (seconds)
1____________ 6
2____________ 8
3____________10
4____________12
5____________15
• Press the MEMORY SELECTION BUTTON to select one of the
pre-programmed time settings required for mixing. The corresponding indicator
light will be lit.
• The (+) and (-) Time Adjustment Keys can be used to increase and decrease
the time setting for pre-set position No. 5. The setting range is 4-16 seconds.
– Note the Time Adjustment Keys will only change pre-set position No. 5.
• To change the No. 5 Timer pre-sets:
- Choose the No. 5 pre-set position using the MEMORY
SELECTION BUTTON (the corresponding indicator light will turn on).
- Press the MEMORY SELECTION BUTTON and hold for 5 seconds;
it will beep once.
- Once it beeps, release the MEMORY SELECTION BUTTON.
- Press the (+) and (-) TIME ADJUSTMENT KEYS to increase and decrease
the time setting for that pre-set position.
- Press the MEMORY SELECTION BUTTON to lock in this new setting.
• Should you wish to change this setting again or return to the original pre-set
position, just repeat the above process.
• A grid of mixing times, time settings, (Water temperature between 50˚-68˚F/10˚20˚C) are listed below:
Alginate Scoops Mixing Time (seconds) Impressions Made
1
8
Small Full Arch
2
10
Medium Full Arch
3
12
Large Full Arch
8
10. Maintenance
10.1 Mixing Cup
• After setting, the remaining alginate material inside the mixing cup can
easily be removed. Once removed, use a clean soft cloth to wipe it down.
• The small hole at the center of the cap (Fig. 5) should be cleaned to ensure
that it is not clogged or blocked in any way.
Important Information:
The small hole at the center of the cap must remain clear. If it becomes
clogged or blocked, then the mixing cup cap will be difficult to open or
close. Any water remaining after cleaning must be removed completely,
otherwise it will cause a mixing error.
Fig. 5
• The Mixing Cup is a consumable component. Once it becomes distorted
or cannot be sealed tightly, please replace with a new one.
10.2 Cleaning the Mixer
• Use a cloth to clean any dirt on the outside of the Mixer. Use a neutral
cleaning agent to remove large amounts of debris.
NOTE: DO NOT CLEAN THE INSIDE OF THE MIXER
OR THE MIXER WELL WITH WATER.
Important Information:
Never use solvent or volatile chemicals for cleaning. This may damage
the machine components and will cause the machine surface to fade.
11. Troubleshooting
• If you experience a malfunction, please try to resolve the problem by
using the Troubleshooting Chart (page 9). If the machine is still
malfunctioning, please contact Great Lakes Orthodontics for further
instruction and assistance.
9
Troubleshooting Chart
Problem
Cause
Method
Mixer does not power on/turn
on when you press the power
button
Bad power cord connection
Inspect power cord connection
Main power switch is in OFF
position (rear of Mixer)
Turn main power switch on
Burned out fuse
Inspect fuse and change if
needed. If the fuse is burned out,
contact Great Lakes Orthodontics
for repair instructions
Defect in PC board
Contact Great Lakes
Orthodontics for repair
instructions
Indicator light is bad
Replace the indicator light
Defect in driving motor or belt
Contact Great Lakes
Orthodontics for repair
instructions
Defect in the starting condenser
Contact Great Lakes
Orthodontics for repair
instructions
Too much alginate in mixing cup
Try smaller amount of alginate
Mixer started, but there is nothing
inside the mixing cup
Place properly filled mixing cup
in the unit and retry
Damaged belt
Contact Great Lakes
Orthodontics for repair
instructions
Alginate powder splashes, caused
by loosening of mixing cup cap
Check to see if the mixing cup
on the cap is tightly closed
Incorrect amounts of alginate and
water
Refer to alginate suppliers
mixing ratios
Driving motor/triangular belt or
round belt is damaged
Contact Great Lakes
Orthodontics for repair
instructions
The sensor lock in the machine
cover is malfunctioning
Check to see if the machine
cover is closed tightly
The top cover is not in the closed
position
Close the machine cover again
The digital display does not
come on
The initial running is slow
Abnormal noise or vibration
while running
Motor does not start or alginate
mixing is uneven
E1 appears on the mixing
time indicator
10
12. Product and Accessories
Part Number
Description
100-060
100-061
100-062
100-063
100-064
100-065
Full Machine
Power Cable
Mixing Cup
Water Dosing Bottle
Spatula
Stir Stick
Quantity
1
1
1
1
1
1
Great Lakes Orthodontics Contact Information:
Telephone: 800.828.7626 (Toll free U.S. & Canada)
716.871.1161 (Worldwide)
Fax: 716.871.0550
Email: [email protected]
Website: www.greatlakesortho.com
11
Great Lakes Orthodontics, Ltd.
200 Cooper Avenue
Tonawanda, New York 14150
SMPI65Rev110509
S-330