1
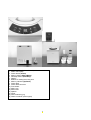
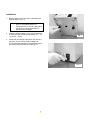
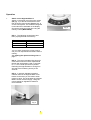
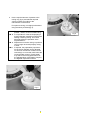
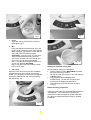
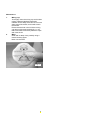
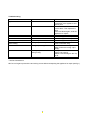
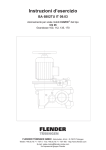
Cavex Alginate Mixer II
Automatic mixer for Alginate impression material
User manual
Installation – Operation – Troubleshooting
1
Contents
Page 2
General information for the user
Page 3
Description of the Alginate
Mixer, with accessories
Page 4
Installation
Page 5
Operation
Page 8
Setting the optimum mixing time
Page 8
Maintenance
Page 9
Troubleshooting
Page 11
Specifications
General information for the user
Congratulations on the purchase of your Cavex
Alginate Mixer II: an automatic mixer for alginate
impression material!
Please read this user manual carefully before using
the Alginate Mixer II. Its proper use will improve the
quality of the mixed alginate impression material and
also increase the mixer's working life. You should
therefore keep the user manual in a safe place and
ensure that employees who will be using the Alginate
Mixer II receive proper training.
Important
Cavex Holland BV cannot accept responsibility for
any inadequate performance, damage or accidents
resulting from a failure to connect the Alginate Mixer
II in the manner specified below; using the Alginate
Mixer II for materials other than alginate impression
material, or in a manner other than that described
below; using parts other than those supplied for the
intended purpose by Cavex, or repairs or
modifications other than those made by experts
appointed by Cavex for that purpose.
2
Description of the Alginate Mixer II, with accessories
1) Mains switch (I/0)
2) Power button (Power)
3) Memory button (Memo/Mode)
4) Start/stop button (Start/Stop)
5) Display
6) Buttons for setting the mixing time
7) Memory indicator (Up/Down)
8) Power lead
9) Power lead connector
10) Fuse holder
11) Mixing cup
12) Mixer case
13) Spatula
14) Stirrer
15) Dose-measuring jug
16) Plastic container (with magnet)
3
Installation
1. Remove the two locking screws underneath the
Alginate Mixer II (fig. 1).
N.B.
Keep the locking screws in a safe
place. If the Alginate Mixer II is
transported (e.g. if sent for repair) they
will have to be screwed in again to
prevent further damage.
2. Place the Alginate Mixer II on a solid surface that
is stable and flat. Ambient temperature: 2°C – 40
°C (35.6°F - 104°F).
Fig. 1
3. Check that the voltage indicated on the device is
the same as your mains supply voltage and
connect the Alginate Mixer II to an earthed power
point using the power lead provided (fig. 2).
Fig. 2
4
Operation
1.
Switch on the Alginate Mixer II
Switch on the power using the mains switch
(I/O) (fig. 3) on the back of the device and
then press the power button (Power) (fig. 4)
on the control panel. The entered mixing time
in seconds will be indicated on the display.
Choose the required mixing time using the
memory button (Memo/Mode).
N.B. 1. The following mixing times have
been preprogrammed at the factory:
Memory location
1
2
3
Mixing time, sec.
8
10
12
You can easily change the mixing times to
suit your own requirements and store them in
memory.
See: Setting the optimum mixing time on
page 7.
N.B. 2. The recommended mixing times for
CA37 Normal Set and Cavex Impressional
Normal Set are between 8 and 12 seconds
for 1, 2 and 3 small spoonfuls of powder.
Extending the Alginate Mixer II mixing time
will reduce the hardening time by a few
seconds.
N.B. 3. In general, alginate impression
material mixed in the Alginate Mixer II will
harden sooner than you are used to when
mixing by hand. This is because the Alginate
Mixer II mixes more thoroughly. Using the
normal setting for alginates is therefore
recommended.
Fig. 3
5
Fig. 4
2. Put the required amount of powder to the
mixing cup (fig. 5) and add the required
volume of water, according to the
manufacturer's instructions.
For optimum mixing, mix slightly beforehand
using the stirrer provided (fig. 6).
N.B. 1. The total contents of the mixing cup,
powder + water, must not exceed 100 g.
N.B. 2. It is important to close the lid properly to
prevent alginate impression material from
leaking out during mixing. This could
adversely affect the operation of the
Alginate Mixer II.
N.B. 3. Replace the lid and/or mixing cup when it
can no longer be closed properly owing
to wear.
N.B.4. If required, the preparation proportions
for the Cavex alginate can be adjusted.
To this end, the volume of water can be
reduced (by no more than 30% below the
recommended volume). Excess water
may reduce the mixing performance of
the Alginate Mixer II and lead to lumps in
the alginate impression material.
Fig. 5
6
Fig. 6
Fig. 9
Fig. 7
3. Close
Close the mixing cup with the lid. Press to
close tightly (fig 7).
4. Mix
Place the filled and closed mixing cup in the
holder (fig. 8). Close the cover of the Alginate
Mixer II properly (otherwise the mixer will not
start) and press the start/stop button
(Start/Stop), as shown in (fig. 9). The mixer
starts and the displayed mixing time will
count down until the end of the mixing time,
when the mixer will stop automatically.
N.B.1. You can stop the Alginate Mixer II at
any time by pressing Start/Stop.
N.B.2. Only open the cover when the mixer
has come to a halt.
5. The result
Open the cover when the mixer has completely
stopped and remove the mixing cup from the
holder. You can easily remove the mixed alginate
impression material from the mixing cup using
the spatula (fig. 10).
Fig. 10
Setting the optimum mixing time
Set the optimum mixing time as follows:
• Use the memory button (Memo/Mode) to select
the required memory location.
• Set the required mixing time (in sec) with the Up
or Down button.
• Now press the Up and Down buttons
simultaneously: you will hear 2 high-pitched
sounds and the display will flash twice.
• The selected mixing time has been saved to
memory.
Different mixing proportions
Using 30% less water than recommended produces a
“stiff alginate”. This is the ideal consistency for
making the functional impression (initial impression
for making a suitable individual mould) for a stable
prosthesis.
Fig. 8
7
Maintenance
1.
2.
Mixing cup
Thoroughly clean the mixing cup and lid after
mixing. Hardened alginate impression
material can be easily removed. Do not use a
sharp object like a knife, as this will scratch
the surface.
Ensure that the hole in the lid of the mixing
cup does not become blocked (fig. 11), as
that would make it extremely difficult to open
and close the lid.
Mixer
Clean with a damp cloth, possibly using a
neutral cleaning agent.
Never use solvents!
Fig. 11
8
Troubleshooting
Problem
Appliance will not switch on.
Cause
Power lead is not connected.
Fuse has blown
Display does not light.
Speed of rotation too low.
Abnormal noise or vibration
while rotating.
Printed circuit board defective.
Motor or drive defective.
Motor or drive defective.
Starter capacitor defective.
Mixing cup to heavily laden.
Mixing cup is empty.
Leakage of powder and/or water
during mixing.
Drive defective.
What to do
Check the power lead
connection to the appliance and
power point.
Check for external causes and
correct them. Then replace the
fuse.
If the fuse blows again, send the
appliance for repair*.
Send the appliance for repair*.
Send the appliance for repair*.
Send the appliance for repair*.
Send the appliance for repair*.
Total weight of powder + water
must not exceed 100 g.
Never switch on the Alginate
Mixer II when the mixing cup is
empty.
Always close the lid of the
mixing cup properly.
Watch out for damage to the cup
or lid.
Send the appliance for repair*.
* see list of distributors
NB: Do not forget to put back the two locking screws before transporting the appliance for repair (see fig.1).
9
Specifications
Voltage
Power consumption
Speed of rotation
Timer
Memory locations
Dimensions
Weight
AC 220 – 230 V, 50/60 Hz
220 W
3400 rpm (60Hz), 2900 rpm (50Hz)
Adjustable in seconds from 1 – 16 sec
Three: factory default settings 8, 10 and 12 sec
wxdxh: 205x250x285 mm
16 kg (35.2 lb)
10