1
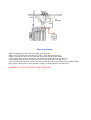
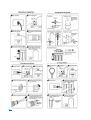
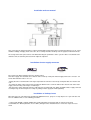
Installation and user manual
This system may be mounted in either a vertical or horizontal position and must be positioned to allow access for service
and filter cartridge changing. At the same time, the assembly should be relatively near the spigot to maximize flow rate.
The storage tank can be placed on its side without affecting the performance of the system. If there is insufficient room
under the sink, the tank may be located in an adjacent cupboard.
Installation of water supply connector
Easy Connector (Water Supply Connector + Deliver-Valve)
This water supply connector that comes with the unit is made up of two parts: Water Supply Connector 1/2" male x 1/2"
female NPT & Deliver-valve 1/4" x 1/4".
- Simply disconnect cold water line from angle stop bottom or from faucet stud on top. Complete with cone-washer and
seal.
- Assemble the water supply connector by inserting the Deliver-valve. Screw the deliver-valve into the side of the water
supply connector using 3 to 4 wraps of Teflon tape.
- Disconnect the water supply line from the cold water faucet underneath sink. Attach and tighten water supply connector
assembly being careful not to pinch or crimp any tubing or water supply line while tightening
Installation of sink-top faucet
Most sinks have an extra hole for the mounting of additional faucets, sprayers or soap dispensers. If your sink does not
have an additional hole, use the following procedure.
- Using a VSR drill with a carbide grinding burr, gently grind away enough porcelain or enamel to more than
accommodate the drill bit (about the size of a dime). Enough surface material must be removed to expose the base
metal.
- Using the 1/4" drill bit, drill a 1/4" hole through the base metal. Operate the drill slowly and carefully, especially when
the drill is about to penetrate the metal. If necessary use a drop of two of oil in the hole.
- Repeat step 2. Using the 1/2" drill bit.
Mount the sink top faucet in the hole and using an adjustable wrench (or hand) to hold the faucet, tighten the 9/16" nut..
Installation of drain saddle
- Position as far away from the garbage disposal as possible.
- The drain saddle should be installed above the p-trap on the vertical or horizontal tailpiece.
- Drill a 1/4" hole into the drain pipe observing the above position.
- Mount drain saddle aligning holes. (Drill bit may be left in saddle hole for alignment)
- Carefully tighten both screws on drain saddle till snug. Do not over tighten.
Installation of storage tank
- Wrap 4 to 5 winds of Teflon tape around metal tank threads.
- Hand tighten plastic shut-off valve to tank. (Firm but not over tight.)
- Tank should come from the factory with 8 to 14 lbs. PSI of air when measured empty
Order of the filters
1.
2.
3.
Rechts Wassereingang - Sedimentfilter ( weiss, hartes Papier)
Mitte- Gac Kohlefilter (weiss, blau, Dichtungsring nach oben! )
Links- CB Kohlefilter ( weiss, Plastiknetz )
Electronic controller
The LCD-display shows the water quality. The reading will be between 000-100 PPM. If the
reading is 100 PPM you can let the water flow for approx. 20 seconds and the reading will go back
towards 000 PPM.
LCD-Display shows 777 PPM:
a) The water pressure dropped and for safety reasons the unit shuts off. Unplug and plug the power cord , the unit
should go back to normal working mode.
b) The LCD-display continuously shows 777 PPM; it´s time for a filter change.
The button (strong flush) on the control box can be pressed manually. For that purpose open the faucet, then press the
button and then close the faucet. The RO-unit will automatically flush the filters for a few seconds. This is recommended
after not using the unit for some time.
Modus P000 unit is in normal working modus!!
Modus E000 Error !!
By pushing the button on the display the modus can be changed from E to P.
If the TDS level is to high the display will show the E modus and at the same time a alarm tone will appear. It is
necessary to strong flush the membrane with the button . This might has to be repeated several times.
Model RO-EASY 5BA has a manual flush valve. The valve should be opened every 2-3 weeks for aprox. 15 seconds.
Only open to flush membrane.
Start up procedure
- With everything connected, turn on the water check for leaks.
- Make sure the storage tank shut-off valve is 'OFF' . Open the sink top faucet.
- Within a few minutes (up to 15) the water will start to run from the faucet slowly.
- Let the water run for at least 30 minutes. This flushes the carbon filters on first time use.
- After initial flushing, open the shut-off valve on the tank and close the sink top faucet.
- Tank will now fill (Usually 2 to 3 hours) After the tank has filled, open the sink top faucet and drain all the
water until the storage tank is empty and there is only a small flow from the sink top faucet.
-WARNING - DO NOT USE FIRST TANK OF WATER!
atràs