1
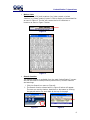
PocketCitation™ User Manual Revision 1.04 Copyright 2007 © Advanced Public Safety, Inc. Table of Contents Table of Contents I. II. III. IV. V. INTRODUCTION POCKETCITATION™ OPERATIONS 4 A. Starting PocketCitation™ 4 B. How to Enter Data 5 POCKETCITATION™ GENERAL SETUP 7 A. General Setup Option 7 B. Officer Signature 8 C. Printer Setup 8 D. Storage 8 POCKETCITATION™ CITATION SETUP 9 A. Citation Numbers 9 B. Court Holidays 10 C. Default Settings 10 D. Defendant Signature 11 E. Dropdown Menus 13 F. Printing 13 POCKETCITATION COLOR SETTINGS SETUP A. Changing the Colors VI. 4 CREATING A CITATION 14 14 19 A. Driver tab (Driv) 19 B. Vehicle (Veh) tab 20 C. Location (Loc) tab 20 D. Violator (Viol) tab 21 2 Table of Contents VII. VIII. IX. X. E. Court (Court) tab 21 F. Miscellaneous (Misc) tab 22 G. Printing Officer Notes 22 CONFIGURING POCKETCITATION™ 24 A. Using the Dropdown Editor 24 B. Deleting a Selection 24 C. Adding a selection 25 D. Editing a Selection 25 E. Moving Selections Up and Down 25 POPULATING DRIVER’S LICENSE INFORMATION 26 A. Using the Swipe 26 B. Scanning Licenses with Barcode 27 UNINSTALLING POCKETCITATION™ 28 A. Keeping Track of Citation Numbers 28 B. Removing the Program 28 TROUBLESHOOTING 31 3 PocketCitation™ Operations I. Introduction PocketCitation™ is a complete electronic ticketing solution that enables officers to create and issue citations, parking tickets, and warnings, quickly and efficiently. Scanned license information auto-populates fields, drop-down lists, check-boxes, and defaulted information reducing the risk of error. Wireless technology provides seamless printing to a state-of-the art thermal printer. PocketCitation™ is so user-friendly that, within minutes, an officer will be able to complete and print a citation or parking ticket. II. PocketCitation™ Operations A. Starting PocketCitation™ 1. Click Start in the left hand corner of the screen. 2. Select PocketCitation™, as shown in Figure 1 below. Figure 1 3. Click the Traffic Citation icon shown in Figure 2 below. Figure 2 4 PocketCitation™ Operations Please Note: If your agency has multiple forms, the icon representing each form will appear as seen in Figure 3 below. Click the appropriate icon to access the form desired. Figure 3 B. How to Enter Data PocketCitation™ contains a variety of ways to enter information. Below are examples of available data entry: • Type in a text field Some fields are blank and ready for data entry. • Pre-Populated fields You can create default information that will automatically populate the fields. However, you can always overwrite default data, unless fields are flagged read-only. • Drop-Down Lists Fields with a down arrow will display a list when clicked as seen below in Figure 4. The field can also be overwritten, by clicking in the field and typing the desired text, as seen in Figure 5 below. Figure 4 Figure 5 5 PocketCitation™ Operations • Button Lists The Violations (Viol) and Locations (Loc) tabs contain a (select violation) or (select location) button. Click to display the associated list as seen in Figure 6. The list will contain the list of violations or locations as seen in Figure 7 below. Figure 6 Figure 7 • Search function The Search function is available from the main PocketCitation™ screen and can be used to locate previously saved forms, such as citations and warnings. i. Click the Search icon seen on Figure 8. ii. The Search function shown below in Figure 9 below will appear. The user can sort by citation, date/time or last name by clicking the grayed section for each label at the top of the page Figure 8 Figure 9 6 PocketCitation™ General Setup III. PocketCitation™ General Setup The default settings and other configurable functions can be accessed through the Setup icon on the main PocketCitation™ screen, as shown in Figure 10 below. Figure 10 Warning! If changes have been made to your build that your agency wants to incorporate into subsequent updates, please call us at 954-354-3000. Before uninstalling or reinstalling PocketCitation™, you must provide APS with the changes or the changes will be overwritten with any subsequent builds. A. General Setup Option The General setup section includes the options to manage the officer’s signature, the printer setup and to allow for the number of days each form will be stored in the unit. The options are displayed below in Figure 11. Figure 11 7 PocketCitation™ General Setup B. Officer Signature An officer signature can be captured in PocketCitation™. The officer can sign the appropriate screen and the signature will remain in effect until the next officer enters a signature. Before entering a new signature, the current signature must be cleared, by clicking the Clear button. Please Note: This is an optional field. Uncheck the Enable Officer Signature checkbox on the top of the screen, as shown below in Figure 12, if not desired. Figure 12 C. Printer Setup The printer setup selection allows the user to manage the printer settings. Included in the available settings is the ability to: • Select the printer. • Check the IP address of the printer paired with the PDA. • Verify fonts. • Enable the swipe on a Zebra RW420 printer. • Set the elapsed minutes for printer power down. The printer setup is covered in detail in the Quick Start Guide for the printer selected with your purchase. Please refer to the accompanying Printer Quick Start Guide. D. Storage In the Storage setup, the user can specify the number of days tickets will be stored before being permanently removed from the handheld device. Please Note: Suggested storage time is 180 days. 8 PocketCitation™ Citation Setup IV. PocketCitation™ Citation Setup The Citation Setup Menu, shown below in Figure 13, includes selections for citation numbers, court holidays, courts, default settings, defendant signature, dropdown menus, export and printing settings. Figure 13 A. Citation Numbers To assign a batch of citation numbers to the handheld device, enter the start value in the From field and the ending value in the To field, as seen in Figure 14 below. For the easiest ticket number tracking, assign each handheld device a unique Device ID. Doing so will enable you to assign the same range of numbers to each device, which prevents duplication of tickets. Figure 14 9 PocketCitation™ Citation Setup B. Court Holidays Court holidays can easily be sorted, added, changed or removed. When the user selects Court Holidays from the Citation Setup screen, the screen shown in Figure 15 will appear. The user can then use the Up, Down, Add, Edit and Delete buttons to manipulate the court holidays list. Figure 15 C. Default Settings When Default Settings is selected from the Citation Setup screen, the screen shown below in Figure 16 will appear. All areas in yellow allow defaults to be set, which the user can change at any time. For example, in Figure 16 below, Florida was selected as the default state, so each time a new form is created Florida will auto-populate the DL State Field. Figure 16 10 PocketCitation™ Citation Setup D. Defendant Signature For the defendant signature to be required on the citation, the Enable Defendant Signature Collection checkbox must be checked. To warn for a missing signature before printing, check the Warn If Signature Is Missing checkbox to elicit a warning before printing. The Signature Text displaying on the screen, as seen in Figure 17, can be modified, but is normally included in the build provided by APS and is agency specific. The defendant’s view of the signature screen can be seen below in Figure 18. Please Note: When displayed the text may appear to cut off, however when editing, the full text will be accessible. Figure 17 Figure 18 Defendant’s view of signature screen 11 PocketCitation™ Citation Setup A new feature that has been added available in v.454 and later versions allows for the programming of a background color of the Defendant’s signature box illustrated in figure 19. There are 15 pre-defined colors to choose from listed below. Figure 19 Defendant’s view of signature screen 12 PocketCitation™ Citation Setup E. Dropdown Menus The Dropdown Menus option enables the user to modify selections to the dropdown menus. In Figure 19a below, the drop down editor highlights the fields where drop down are present and editable. In Figure 19b, the violations dropdown list is selected. The user can Add, Edit or Delete any entry, as well as sort the selections using Up and Down. Figure 19a F. Figure 19b Printing The total number of citations to print can be entered in the Print Copies field, shown below in Figure 20. The # of Copies with Footer will be the number of copies printed with the footer which is normally on the back of the citation (e.g., court information, disclaimers, and instructions to violators). Figure 20 13 PocketCitation™ Color Setting Setup V. PocketCitation Color Settings Setup A user can dynamically change the colors of forms, input (enabled) fields, disabled (read-only) fields, invalid (required) fields, default fields, edit fields that are in edit mode, dropdown background color, as well as the text color within those fields. In addition, the user can configure the signature box’s background color. Please keep in mind the following when changing colors: 1. Background color of the fields and its associated text color cannot be the same. 2. The color BLACK cannot be selected as a field background color. The reason being that the Checkbox icon has a black check mark and would not be seen on a black background. A. Changing the Colors To change the colors: 1. Access the feature the Setup button as shown in Figure 21 below: Figure 21 14 PocketCitation™ Color Setting Setup 2. When invoked, the color definitions dialog displays as in Figure 22 shown below. Figure 22 3. The first time the dialog box displays, the default PocketCitation colors (i.e. Color Template 1) are displayed as shown above. Thereafter, it uses the colors defined by the last Color Template used (i.e. color values are stored/retrieved from the Defaults.txt File). 4. Three Color Templates are provided and can be changed by selecting the appropriate one from the Color Templates menu item as in Figure 23 shown below: Figure 23 5. All pre-defined color templates can be modified and stored. To restore a template to its original default Colors, click on the Reset menu item. 15 PocketCitation™ Color Setting Setup 6. The three pre-defined color templates are shown in Figure 24 below. Figure 24 Please Note: Color Template 2 was created for bright sun light conditions. 7. There are three areas of a PocketCitation form that can be affected by the color scheme selected from the Color Settings screen: ⇒ Form ⇒ Fields ⇒ Signature Box The Form section affects the PocketCitation form’s Background and Label colors. The Fields section affects all fields on a PocketCitation form (including checkboxes, radio buttons, and Dropdowns) as described below: 16 PocketCitation™ Color Setting Setup The Signature Box section affects the background color of a citation’s Signature box as shown in Figure 25 below. Figure 25 8. To change a particular form item the user should select the appropriate item’s radio button, click on the Color Palette Icon (on the command bar), select a color, and click on the OK button in the Color Palette dialog. As item colors are changed, the screen updates the particular item to provide a visual representation of the color scheme being built. As an example, one can pick Color Template 2 and modify its Form Background color to a lighter shade of blue as shown in Figure 26 below. Figure 26 17 PocketCitation™ Color Setting Setup 9. When the color scheme has been completed, the user can click on the Exit menu item to commit the changes to the Defaults.txt file. Once changes are committed they become the active color template. 10. Using the Color Template 2, PocketCitation forms would display as follows: Figure 27 18 Creating a Citation VI. Creating a Citation Along the top of the screen are tabs. Each tab allows access to a screen containing fields for data entry. Each tab will be used when creating a complete citation. The tabs can be agency specific; therefore the tabs on the screen may vary. A. Driver tab (Driv) The scanned driver’s license information typically populates the fields on the Driver tab, as seen below in Figure 28. In addition, the officer can manually enter information or overwrite pre-populated data about the driver and license. The keyboard function can be toggled on and off the screen by clicking the keyboard picture in the bottom right corner of the screen. Figure 20 19 Creating a Citation B. Vehicle (Veh) tab The information about the vehicle is entered on the Vehicle tab, an example of the screen is shown below in Figure 29. Figure 21 C. Location (Loc) tab The location and other pertinent information, such as weather and lighting conditions are collected on the Location tab seen below in Figure 30. Figure 22 20 Creating a Citation D. Violator (Viol) tab The specifics of the violation(s) are entered on this screen, as seen below in Figure 31. Please Note: The number of violations available per citation and other information on this screen will vary by agency. Figure 23 E. Court (Court) tab The court tab contains the court related data. To select the court associated with the offense, click the radio button as seen in Figure 32 below. The date and time of the court date maybe automatically populated based on the agency’s practices. Figure 24 21 Creating a Citation F. Miscellaneous (Misc) tab Other relevant information is entered on the Miscellaneous tab as seen below in Figure 33. The information on the screen will vary depending on specific agency requirements. Figure 25 G. Printing Officer Notes An officer can write notes relating to a ticket and save them at any time. 1. To access the Notes screen, click Notes on the bottom of the screen as shown in Figure 34 below. Figure 26 2. Type the notes as shown below in Figure 35. Figure 27 22 Creating a Citation 3. When finished, click Exit illustrated in Figure 35 on the previous page. 4. When ready to print notes, click File/Print Special as seen in Figure 36 below. Figure 28 5. Click the Yes button to print the notes as seen in Figure 37 below. . Figure 29 23 Configuring PocketCitation™ VII. Configuring PocketCitation™ Many elements of PocketCitation™ are configurable, such as dropdowns and defaults. The Dropdown Editor allows for items in a drop-down menu to be added, edited, deleted or sorted as desired. A. Using the Dropdown Editor Using the Dropdown editor allows the user to create, delete and sort dropdown information. An example of adjusting the City dropdown list can be seen below in Figure 38. After clicking on a dropdown arrow for a list, the list will display. The editor allows the user to move the position of an item up or down, add, edit and delete list items. Clicking the desired button enables the requested function in the menu. The keyboard function can be toggled on and off the screen by clicking the keyboard picture in the bottom right corner of the screen. Figure 30 B. Deleting a Selection To delete a specific entry, follow the steps below. 1. Click to select the item to remove, as seen below in Figure 39. 2. Click the Delete button. The item no longer displays in the list as seen below in Figure 40. Figure 31 Figure 32 24 Configuring PocketCitation™ C. Adding a selection 1. Click the Add button or, if displayed (New Item). The keyboard displays. 2. Type the new entry as shown in Figure 41. Figure 33 3. Click the OK button if you want to add additional selections. 4. Or Click Exit to save and return to the previous screen. D. Editing a Selection 1. Select the item to edit. 2. Either click in the edit box or click the Edit button. 3. Type the new information. 4. Click the OK button if you want to edit additional selections. 5. Or Click Exit to save and return to the previous screen. E. Moving Selections Up and Down 1. Click to select the item to move. 2. Click the Up or Down button to change its position in the list. Warning! If changes have been made to your build that your agency wants to incorporate into subsequent updates, please call us at 954-354-3000. Before uninstalling or reinstalling PocketCitation™, you must provide APS with the changes or the changes will be overwritten with any subsequent builds. 25 Populating Driver’s License Information VIII.Populating Driver’s License Information Most handheld devices offer an attachment to provide the ability to swipe licenses with magnetic stripe readers and/or scan bar codes to automatically populate electronic tickets with all relevant drivers’ license information, such as driver license number, name, address, etc. For product specific information, please reference the Quick Start Manual provided with the specific handheld device purchased. A. Using the Swipe 1. Insert the driver’s license or identification card with a magnetic stripe (magstripe) into the device. 2. When looking at the illustration above, swipe the license with the magstripe facing the reader. 3. Firmly and steadily slide the license from either the left or right. Ensure that the bottom of the license makes contact with the swipe. 4. When successful, a beep will be heard, and all information contained on the stripe will populate the relevant fields in the citation (e.g., name, address). 26 Populating Driver’s License Information B. Scanning Licenses with Barcode As with the swipe, scanning licenses with barcodes is quick and easy. 1. To scan the barcode, point the barcode reader, typically at the top of the handheld, at the barcode on the license, as shown in Figure 42. 2. Press the button(s) to activate the reader. On the handheld device in Figure 42, the user activated the reader by holding the buttons located on the sides and near the top of the device, seen in Figure 43. The light turns red when the scanner is activated. Please refer to your handheld device user guide or quick start guide for product specific information. Figure 34 Figure 35 3. Make sure the license barcode is centered in the reader’s line of site, as shown below in Figure 44. Figure 36 4. When finished, release the buttons. The citation will be populated with relevant license information. 27 Uninstalling PocketCitation™ IX. Uninstalling PocketCitation™ To upgrade the PocketCitation™ program, it may be required to uninstall or remove the previous version of the program from your handheld. In general, a best practice is to always remove the current version prior to reinstalling the new version. A. Keeping Track of Citation Numbers Keeping track of the citation numbers is imperative. When APS makes changes to the default settings in a new version, the citation number range in the handheld will be reset when the new version is loaded. After reinstalling the program, the citation numbers can be restored by simply going into Settings/Citation Numbers and entering the next available number as the start of the range. Please Note: If the next number is unknown, the next citation number can be viewed in the Citation Setup. Please refer to Citation Numbers Setup on page 9 of this manual. B. Removing the Program Warning! If you have made any changes to your defaults or dropdowns, please send APS the files containing the changes or the new version will overwrite them. 1. Click Start on the top, left hand side of the screen. 2. Select Settings as shown in Figure 45 below. . Figure 37 Figure 38 3. Click the System tab on the bottom of the Settings screen as seen above in Figure 46. 4. Click Remove Programs. 28 Uninstalling PocketCitation™ 5. Select the PocketCitation™ program to remove. 6. Click the Remove button on the bottom right of the screen, as shown below in Figure 47. Figure 39 7. Click the Yes button, as shown below in Figure 48. Figure 40 8. Click the checkbox to select which items to remove. Do not check the “Delete All Stored Tickets” box if tickets need to be retained, as seen below in Figure 49. Figure 41 29 Uninstalling PocketCitation™ 9. Click the OK button, as seen below in Figure 50. The program is removed. Figure 42 10. Click the X to return to the main screen, as seen below in Figure 51. Figure 43 30 Troubleshooting X. Troubleshooting A. SmartConnect Error Customers who purchase printers from another source must purchase the SmartConnect software from APS. If the printer was purchased through APS and the printer received the error shown in Figure 44 below, please email or call APS Technical Support. If the printer was not purchased at APS, please contact your APS Sales Representative for information regarding the SmartConnect software. Figure 44 B. Contacting APS For additional information or troubleshooting assistance, please refer to the Quick Start Guides for the handheld device and printer or contact APS Technical Support at (954) 354-3000 or email [email protected]. 31