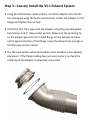
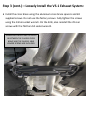
1
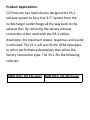
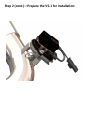
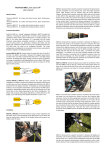
VS‐1 USER MANUAL AND INSTALLATION GUIDE Product Descrip on: The VS‐1 (Variable Sound Exhaust) is a precision engineered 3.5” mandrel bent stainless steel exhaust system for the BMW F30/F32 335i/435i. It u lizes a high flow sports muffler with a wide open race mode that is controlled by either the factory BMW computer or CG Precision’s VSC‐1 remote controller. The system was designed for the maximum flow and fastest turbo spool and response. The VS‐1 package includes: QTY 1: VS‐1 rear muffler sec on QTY 1: VS‐1 front pipe QTY 1: VS‐1 to OEM downpipe flange adapter QTY 2: 3.5” V‐band gaskets QTY 2: 3.5” V‐band clamps QTY 2: Chassis brace spacers QTY 6: Chassis brace m8 X 25mm screws QTY 1: VSC‐1 remote controller (op onal) Product Applica ons: CG Precision has me culously designed the VS‐1 exhaust system to be a true 3.5” system from the turbocharger outlet flange all the way back to the exhaust ps. By removing the factory exhaust connec on when used with the DR‐1 catless downpipe, the maximum power, response, and sound is achieved. The VS‐1 will also fit the OEM downpipe or other performance downpipes that u lize the factory connec on type. The VS‐1 fits the following vehicles: BMW 2012+ F30 335i Sedan BMW 2013+ F32 435i Coupe Installa on with Factory Downpipe Connec on Installa on with High Flow Downpipe Connec on Installa on: Tools Required: 10mm box end wrench or small socket wrench ½” deep socket wrench 16mm deep socket wrench 13mm standard socket wrench with extension T50 torx bit socket wrench T60 torx bit socket wrench (for 435i installa E10 external torx socket wrench Flathead screwdriver or small pry bar on only) Step 1—Remove the Factory Exhaust System: Make sure the car is off. Using the 16mm deep socket wrench, remove the nut on the band clamp from the downpipe to the exhaust system. There is a small wedge shaped spacer that will s ll lock the screw and the band togeth‐ er. By inser ng the p of the flathead screwdriver or small pry bar be‐ tween the spacer and the clamp, pry the spacer off the band and screw assembly. Remove the band clamp assembly. Remove the screws from the front hanger with the E10 external torx socket wrench. Remove 4 of the chassis cross brace screws using the T50 torx bit sock‐ et wrench. Leave one screw on each side installed loosely to help sup‐ port the exhaust system. Unplug the valve motor on the driver side muffler outlet. While suppor ng the exhaust system, remove the 2 nuts from the rear hangers using the 13mm socket wrench with extension. Fully remove the chassis cross brace and exhaust system. On the 435i there are two addi onal screws towards the rear wheels. Use the T60 torx bit socket wrench to remove the screws. Step 2—Prepare the VS‐1 for Installa on: Remove all hangers from the factory exhaust system and install onto the VS‐1 in the exact same posi on. Remove factory valve motor and spring clip. Install onto the VS‐1 in the exact same posi on. If using a VSC‐1, install it on top of the valve motor using the factory hardware at this me. Fully ghten the 3X screws with the 10mm box end wrench or socket wrench. *Con nued on next page. Step 2 (cont.)—Prepare the VS‐1 for Installa on: Step 3—Loosely Install the VS‐1 Exhaust System: Using the 16mm deep socket wrench, install the adapter onto the fac‐ tory downpipe using the factory band clamp. Center the adapter on the flange and ghten the nut fully. Install the VS‐1 front pipe onto the adapter using the provided gasket, band clamp, and ½” deep socket wrench. Make sure the centering lip on the adapter goes into the V‐band flange on the exhaust and does not hit against the face of the flange. Leave the clamp loose enough so that the pipe can be rotated. The flex pipe sec on will accommodate some varia on in the adapter placement. If the flange ma ng does not seem correct, re‐check the centering of the adapter to downpipe connec on. Step 3 (cont.)—Loosely Install the VS‐1 Exhaust System: Install the cross brace using the aluminum cross brace spacers and 6X supplied screws. Do not use the factory screws. Fully ghten the screws using the 13mm socket wrench. On the 435i, also reinstall the 2X rear screws with the T60 torx bit socket wrench. ALUMINUM SPACERS ARE INSTALLED IN BETWEEN THE CHASSIS CROSS BRACE AND THE CHASSIS. NEW LONGER SCREWS ARE INCLUDED. Step 3 (cont.)—Loosely Install the VS‐1 Exhaust System: Install the 2X factory screws on the front hanger and fully ghten using the E10 external torx socket wrench. Install the VS‐1 rear muffler sec on by installing the 2X factory nuts and fully ghten using the 13mm socket wrench and extension. Install the provided rear V‐band clamp and gasket using the ½” deep socket. Leave the clamp loose enough that the pipe can be rotated. Step 4—Adjust Front Pipe and Exhaust Tip Posi ons: Adjust the clearance between the front pipe and the underbody by rota ng the pipe up towards or down away from the body to balance the space between the underbody and the chassis cross brace. Make sure there is enough clearance, about ¼” minimum, that the front pipe will not hit on the cross brace even when the car goes over a bump. Note the front pipe’s rota on also slightly changes the p loca on. For a larger gap between the ps and the bumper cutout, rotate the front pipe up towards the body. For a smaller gap between the ps and the bumper cutout, rotate the front pipe down towards the cross brace. Fully ghten the front V‐band clamp using the ½” deep socket wrench. Adjust the ps side to side within the bumper cutouts by rota ng the hanger mounts about the moun ng to the body. This is easiest when the 13mm nuts are already somewhat ght. Rotate either by hand or by using a screw driver or pry bar between the hanger mount and the body. Make sure the hanger nuts are s ll ght. Last, make sure the gap between the driver side p and the bumper cutout is the same as the passenger side p and the bumper cutout. Rotate the muffler about the rear V‐band as required to achieve an even gap. Fully ghten the V‐band clamp with the ½” deep socket wrench. Step 5—Plug in the Valve Motor or VSC‐1: If using the VSC‐1 controller, plug the factory plug into the VSC‐1 and the VSC‐1 into the valve motor. Refer to the VSC‐1 installa on manual if needed. If not using the VSC‐1 controller, plug the factory plug back into the valve motor. You are ready to start your vehicle and enjoy the complete control over your car’s sound and performance exclusively offered by the CG Preci‐ sion VS‐1 exhaust. Failure to follow the procedures in this document may cause product damage. Please consult CG Precision with any instal‐ la on ques ons or concerns. Please contact CG Precision for addi onal support: Email: [email protected] Phone: 520‐789‐6305 * CG Precision provides a 12 month warranty against defects in material and workmanship for as long as the original purchaser owns the vehicle. * Products are not EPA or CARB approved and are intended for off-road/track use only. * All liabili es resul ng from the use of these products lies solely with the purchaser/user. Please use at your own risk. WWW.CGPRECISION.COM © All images and content are property of CG Precision LLC.