1
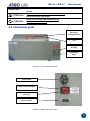
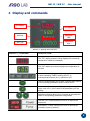
WATER BATHS
User manual
WB 12 / WB 22
WB 12 / WB 22
User manual
Sommario
1
Warranty .................................................................................................................................. 1
2
Contents of package ................................................................................................................ 2
3
First use ................................................................................................................................... 2
3.1
Getting started .................................................................................................................. 2
3.2
Filling of the tank............................................................................................................... 2
3.3
Instrument parts ................................................................................................................ 3
4
Display and commands ............................................................................................................ 4
5
Operation ................................................................................................................................. 5
6
5.1
Switching on the instrument .............................................................................................. 5
5.2
Turn on/off of the circulation pump (if present) .................................................................. 5
5.3
Setting of parameters........................................................................................................ 5
5.3.1
Working temperature ................................................................................................. 5
5.3.2
Working time.............................................................................................................. 5
Emptying of the tank ................................................................................................................ 6
6.1
Use of the emptying kit (if present pump) .......................................................................... 6
7
Clean and maintenance ........................................................................................................... 8
8
Disposal of electronic equipment ............................................................................................. 8
WB 12 / WB 22
User manual
1 Warranty
Thank you for purchasing an ARGO LAB instrument. In normal use conditions, the instrument is
guaranteed for a period of 24 months from the date of purchase.
The warranty is valid only if the product is original. It does not apply to any product or parts of it
that have been damaged due to incorrect installation, improper connections, improper use,
accident or abnormal conditions of operation.
The manufacturer declines all responsibility for damage caused by failure to follow instructions,
lack of maintenance and any unauthorized modification.
1
WB 12 / WB 22
User manual
2 Contents of package
The instrument is delivered complete with the following parts:
1.
2.
3.
4.
5.
Water bath
Stainless steel bottom plate
Emptying kit (in case of presence of pump)
Power supply cable
User manual
3 First use
3.1 Getting started
The water bath should be installed in follow conditions:
1.
2.
3.
4.
5.
Dry, clean and stable work table with a flat horizontal surface
Respect minimum spaces of 20 cm around instrument
Room temperature between 5 °C and 40 °C, and relative humidity maximum of 85%
Power supply socket with earth connection
Power feed between 220-240 V - 50 Hz
3.2 Filling of the tank
Fill the tank with deionized water. The water level must always be above the outlet nozzle of
the pump (where present), or in any case in such quantity as to leave uncovered the heating
element (see Picture 1).
ATTENTION: during the filling of the tank must always consider the natural evaporation of
water. You must therefore always maintain a sufficient level of water (at least 4-5 cm below
the upper edge of the tank), see Picture 1.
Picture 1
2
WB 12 / WB 22
User manual
The water bath is designed to be used ONLY with non-flammable
IMPORTANT:
liquids
The tank of the water bath should never be filled
ATTENTION!
with a liquid other than water!
Never use the water bath without first put
ATTENTION!
the water inside the bath!
3.3 Instrument parts
Opening /
closing handle
Lid
Display
Adjustment
keys
Picture 2 – Front of the water bath
Fuse holder
Power switch ON/OFF
Pump switch (if
present)
Power socket
Picture 3 – Rear of the water bath
3
WB 12 / WB 22
User manual
4 Display and commands
PV Display l
SV Displayl
Multicolor
LED
Shift key
Adjustment
keys
SET key
Picture 4 – Display and controller
DISPLAY / COMMAND
DESCRIPTION
PV Display
The "PV" display (present value) displays the measured
temperature inside the waterbath.
SV Display
The "SV" display (set value) displays the temperature or
set time
The LEDs indicate, respectively, when the controller is:
in timer operating TIMER, heating (HEAT), in
overtemperature alarm (AL1), operations (AT).
The SET button allows you to enter / exit the setup menus
of the operating parameters and to confirm them.
The SHIFT key allows you to quickly change the digit
(ones, tens, etc..) of the value of the parameter you are
editing.
Adjustment buttons allow you to increase or decrease the
value of the operating parameter being edited.
The ON / OFF button allows you to turn on and off the
instrument
The ON/OFF “Pump” allows you to turn on and off the
circulation pump (if present).
4
WB 12 / WB 22
User manual
5 Operation
5.1 Switching on the instrument
Before turning the power you need to fill it with water (see § Errore. L'origine riferimento non
è stata trovata.)
Connect the power cord to a power supply socket with earth connection.
Turn on the instrument by the ON / OFF main switch located on the rear of the water bath. The
button and the main display will light up.
The displays show the initialization sequence and then the instrument is ready for use
NOTE: if the set temperature (see display SV) is higher than that detected in the water bath (see
display PV), the water bath begins to heat as soon as the initialization phase is finished with the
parameters of set temperature and set timer.
5.2 Turn on/off of the circulation pump (if present)
If installed, the circulation pump can be switched on or off at any time using the button "Pump" on
the back of the water bath. The pump can be operated only if the boiler is switched on, when the
"Power" button is in the ON position.
NOTE: in the first use or after emptying of the tank of the water bath is possible that the pump has
at their internal air bubble and therefore functions "vacuum". If during this stage you hear a sucking
sound abnormal aspiration, immediately turn off the pump and bring the water level above the
nozzle outlet of the heat pump (see §Errore. L'origine riferimento non è stata trovata.).
5.3 Setting of parameters
5.3.1 Working temperature
When instrument is switched on, pushing once the key (SET)
, the display PV shows “SP”
(=set point) and the SV display shows the last set value of temperature.
Set the wanted temperature value (Celsius degree) pressing keys
Confirm the set value with another press of (SET)
.
.
NOTE: It’s possible a quick movement between the digits using the key (SHIFT)
5.3.2 Working time
After confirmed the temperature value, the PV display shows “ST” (=set time) and the SV display
shows the last set value of time.
Set the wanted temperature value (in minutes) pressing keys
Confirm the set value with another press of (SET)
.
.
NOTE: It’s possible a quick movement between the digits using the key (SHIFT)
5
WB 12 / WB 22
User manual
IMPORTANT: the value “000” indicates the operation mode "continuous", means that the water
bath works until it is turned off with the ON / OFF maintaining the set temperature.
If, however, has been set to a value defined time, for example 30 minutes, the water bath works for
30 minutes.
The count up can be viewed at any time by pressing the key
: the PV display will show “TIME”
and the SV display will show the time passed from the start of the cycle.
After the set time an intermittent beep and the word “end” on the SV display alerts you to the end
of the heating cycle.
Press any button to silence the buzzer.
NOTE: when the heating cycle is finished and silenced the buzzer, the water bath doesn’t start
automatically to heat buti t remains in standby phase with “end” script on SV display.
To resume heating is required, turn off the water bath using the button on the back of
"Power".
At this point the heating cycle start again with the set temperature and set time, or it’s possible to
set again them and start the working cycle.
6 Emptying of the tank
When you want to empty the tank of the water bath is essential that
ATTENZION!
the heating element is no longer powered and was first cooled down.
For this reason it is necessary, therefore, before emptying the boiler, always disconnect the
electrical resistance in this way:
WATERB BATH WB 12 /
WATER BATH WB 22 (without pump)
WATER BATH WB 22 Pump (with pump)
-
-
Turn off the water bath through the
"Power" button on the back
-
Set a working temperature lower than room
temperature
Switch off the pump through the button “Pump”
on the rear of the instrument
Turn off the water bath through the "Power"
button on the back
Before proceeding with the removal of water wait until it has
ATTENZION!
sufficiently cooled!!!
Once cooled, it’s possible to emptying with help of a tank and / or absorbent cloth or paper.
For the instruments with circulation pump, it’s possible to proceed as indicated at § 6.1 .
6.1 Use of the emptying kit (if present pump)
If the instrument is equipped with circulation pump is able to use for the emptying of the water bath
together with a kit of emptying rubber provided with the instrument
The water bath can be emptied using the above kit as follows:
6
WB 12 / WB 22
1.
2.
3.
4.
5.
6.
7.
8.
9.
10.
User manual
Turn off the heating element by setting of the working temperature lower than the room
temperature (see § Errore. L'origine riferimento non è stata trovata.);
Turn off the circulation pump by the switch “Pump” (vedi § Errore. L'origine
riferimento non è stata trovata.);
Switch off the water bath by the button “Power” (vedi § Errore. L'origine riferimento
non è stata trovata.);
Wait for the cooling of the water;
Using to the special double cone white, connect the short tube to the suction nozzle of
the pump at the bottom of the tank (see picture 5);
Connect the long tube to the output nozzle in the top of the tank (see picture 5). Put the
other terminal of the tube in a recipient of a sufficient capacity;
Switch on the water bath by the “Power” button and verify that the heating element
isn’t heating: the “HEAT” LED must be off !
Switch off the pump through the button ON/OFF “Pump” to start the emptying: in this
way the pump transfer the water from the tank into the external recipient;
Using the shorter tube take away the remaining water on the bottom of the tank and
once the pump start to work at vacuum switch it off immediately;
If necessary remove the last traces of water with an absorbent cloth or paper.
The pump musn’t be use at vacuum, but only for the circulation of
ATTENZION!
water, bacause it is designed to pump liquids and not air.
Picture 5 – Emptying kit for water bath with pump
7
WB 12 / WB 22
User manual
7 Clean and maintenance
Proper maintenance and cleaning of the instrument guarantee its good conditions.
The tank of the instrument is made of stainless steel, so it can be cleaned with any detergent
provided it is not aggressive and / or corrosive.
You should clean the inside and outside surfaces with a standard all-purpose cleaner sprayed on a
soft cloth.
Before proceeding with any cleaning or decontamination, the user must ensure that the method
used does not damage the instrument.
ATTENZIONE!
In case of use of absorbent paper, take particular care to avoid that
traces of it remain inside the tank.
Eventually pieces of paper can gravely damage the pump.
IMPORTANT: if the instrument must be returned for service, it is necessary to provide for proper
cleaning and possible decontamination by pathogens of the same.
It is also recommended to put the instrument in its original packaging to send it in for repairs.
8 Disposal of electronic equipment
The electrical and electronic equipment marked with this symbol may not be
disposed of in landfills.
In accordance with EU Directive 2002/96/EC, the European users of electrical
and electronic equipment have the opportunity to give back to the distributor
or manufacturer upon purchase of a new one.
The illegal disposal of electrical and electronic equipment is punished with an administrative fine.
8