1
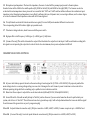
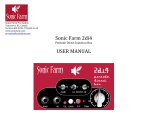
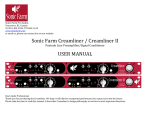
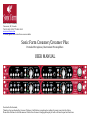
Sonic Farm Pro Audio, Vancouver, BC, Canada Tel 310-‐402-‐2390, 778-‐863-‐1613 www.sonicfarm.com for email, please use contact box on our website Sonic Farm Creamer/Creamer Plus Pentode Microphone/Instrument Preamplifiers USER MANUAL Dear Audio Professional, Thank you for purchasing the Creamer. We hope it will deliver exceptional recordings for many years into the future. Please take the time to read this manual. It describes Creamer’s design philosophy as well as its most important functions. DESIGN PHILOSOPHY Our initial idea was to create a studio preamp that not only is not a replica of a vintage, or any other known unit, but also offers a tonality unavailable or at least hard to find in existing units on the market. There are enough “better mouse traps” out there. Audio Engineers hear subtle tonal and spectral differences most folks are unaware of. Those are the target people Sonic Farm design team had in mind. To an average ear, all mic preamps in the world sound similar, as long as there is no brutal distortion happening. But to a golden-‐eared recording engineer, the differences are vast. For our first product, we wanted a colored preamp. Something that is transparent yet warm, colored but not fuzzy or dirty and fat without losing definition. Only a carefully designed tube circuit can deliver that. In fact, Creamer is a HYBRID design preamp. It uses both tubes and solid-‐state components in its signal path. To start with, we definitely preferred the sound of an input transformer to that of an electronically balanced input. Our choice is an oversized Cinemag transformer with a sweet sound and high saturation threshold. It steps up the mic signal by 20 or 26dBs (switchable). The instrument input goes directly to the tube, where it sees an input impedance similar to that of a tube guitar or bass amp. (The following section deals with electronic circuit explanation and can be interesting for those inclined.) The next tone-‐crucial factor is the kind of gain structure used and the corresponding negative feedback loop. For the latter reduces distortion, sometimes even the desirable kind…In addition, preamps that use tons of negative feedback to tame down a very high open-‐loop gain rarely sound good. Due to many gain stages a tiny time latency builds up by the time signal reaches the output of the preamp. When fed back to the input (usually through the gain pot) to bring gain to the desired level, this time delay causes a 180˚ phase shift at a particular high frequency, and turns negative feedback into a positive one. The system loses stability and enters into oscillation (ringing). This needs to be addressed by introducing additional phase shifts with extra capacitors. Even then, a lot of phasing occurs at high frequencies and the top end sounds blurry (the case with some classic mic pre’s) Therein lies the reason we omitted the conventional input gain pot. We sacrificed comfort to keep the tone. An EF86 pentode operating in class A is Creamer’s only active gain stage. It works in either triode or pentode mode. Bypassing cathode increases the gain. Selective bypass using inductors and capacitors yields a subtle, but very musical tone control (Creamer Plus only) This circuit exhibits a certain non-‐linearity (coloration); the harmonic distortion may exceed 1% before the actual clipping occurs. To preserve it, we purposely refrained from using transformer tap negative feedback, found in many circuits. Instead, the tube stage is followed by a solid-‐state buffer, passive high-‐pass filter and the output level control. Finally, a modern discrete transistor complementary buffer with extremely low distortion is used to drive the output transformer and the load. The standard output transformer has a Ni-‐Fe alloy core, but Creamer can be also ordered with 100% Fe or100% Ni transformers. Those can even be combined on the 2 channels. This, along with a switchable solid-‐ state balanced output, yields the final tone coloring. (Tip: If you prefer a softer high end, try a 100% Fe output transformer.) SOME REMINDERS REGARDING TUBES Tubes work with very high supply voltages. There are points inside Creamer that measure in excess of 350V DC. If touched, those voltages could be lethal! Make sure that no pointed objects (especially metal) or liquids penetrate the inside of the unit through its cooling grilles or otherwise. If that accidentally occurs, immediately pull the plug out of the power socket and wait for the unit to discharge. Creamer must not be operated if moisture penetrates inside. Before opening the unit (to change tube, wipe off moisture, etc) one must disconnect the mains cord and then wait several minutes for the internal capacitors to discharge. When mounting in a rack enclosure, always leave an empty space above the Creamer to ensure proper cooling. Please do not replace the mains fuse with one of a higher value: use only 600mA@115V (500mA also works fine) (250 to 300mA@220-‐240V) Legal Disclaimer: Neither Sonic Farm nor anybody associated with it can take any liability for damage to persons or property caused by either use, modification or servicing this unit. HOW TO CHANGE TUBES This only applies to a functional unit. Please entrust any repairs to qualified service personnel. Only an EF-‐86 (or equivalent, like 6267, 6CF8 or Russian 6J32P) pentode can be used. Pull out the power cord. Wait for at least 10 minutes for all the capacitors to discharge. Remove Creamer’s cover by loosening screws encircled red and marked with an asterisk (3 on the rear panel and one on the front one) as well as all side screws (new Creamers have 4 on either side). You will need an allen wrench (some models will have Phillips screws). While pressing on the edge of the vertical PC board (the one containing the tube) with you right hand, pull out the tube with your left hand. Small, but fast forward-‐reverse motion may be needed to loosen the tube from a tight socket. Do not bend the tube much out of the axis because you can break the pins or cause air to enter the tube and destroy it. Paying attention to the pin alignment, push the replacement tube into the socket using same motions but in the opposite direction. Make sure it goes in all the way. Due to electric shock danger, testing the preamp with the lid removed is not recommended. Screw the cover back in place and you’re done. CREAMER’S FRONT PANEL CONTROLS: 1 Phantom power switch with the corresponding light. Creamer’s soft phantom circuit eliminates the annoying audible “crack” with MOST microphones. However, some rare microphones, due to their circuit design, will still cause a loud pop a few seconds AFTER the phantom voltage is switched off. With those, you will still need to mute or lower your monitoring level. 2 Input attenuation 15dB pad, pre-‐transformer. Also lowers mic input impedance. 3 Increases input transformer gain step-‐up by 6dB (from 20 to 26dB) while decreasing mic input impedance 4 times. Means the 10kΩ will become 2.5kΩ (or 2500Ω) and so on. Some preamps mark this as “impedance switch”. 4 Instrument input selector (push in to activate the instrument input). Creamer Plus also has a dedicated Line input with a separate 1:1 transformer. Great to insert into a master buss (or any individual track) for tonal coloration. To use the Creamer Plus instrument input, simply push the switch for “Line” and insert a ¼ plug into the front panel jack. 5 1/4 inch unbalanced instrument input. Good for guitar, bass or keyboards. The input impedance is 2.2MΩ. 6 Gain boost, gives just under 5dB boost in triode and about 9dB in pentode mode. 7 Bi-‐color LED (green/red) signal presence/overload indicator. Red indicates clipping distortion. To eliminate it, disengage the “gain up” and/or “+6dB” switch, and take the tube into “triode” mode (switch out). The last resort is the pad. 8 Output level. Does not affect tube gain or overload level, just determines how hard the output buffer, transformer, and ultimately the load are driven. The Creamer may drive your next unit (Compressor, EQ, Converter, Mixer) into clipping even though the red light doesn’t indicate any distortion. In that case, reduce Creamer’s output level. Its always better to start with lower output level and then increase it as much as your audio chain allows, as distortion can occur at more than one point. 9 Output select: low-‐distortion solid-‐state IC or transformer (driven by a discrete buffer). Solid-‐state mode will sound somewhat cleaner, and the transformer rounder and fatter. Creamer “A” has Ni/Fe (50/50), and Creamer “B” 100% Fe transformers. B sounds more vintage. 10 Phase reverse (at the very output of the preamp). Affects both mic and instrument inputs. 11 Power switch. 12, 13 and 14 (Creamer Plus only) Low and high frequency shelving boost starting at 400 or 600Hz, and 2.2kHz or 7kHz respectively. Mid position is flat. “Gain up” switch will bypass this filter. This is a subtle tone control meant for a gentle boost, adding depth or air to the signal. It does not use a separate stage; rather, it utilizes the tube gain stage (only one in the signal chain). The boost level can be adjusted by 2 trim-‐pots, accessed from the top lid, between the boost switches and about an inch in from the front panel (13, marked by a red pointer). Use a mini slot (.098”/2.5mm Ø, .031”/0.8mm wide) or hex (.104”/2.64mm hex x .055”/1.4mm deep) screw driver to adjust pots. The default settings are maximum: 4.5dB in triode, 9dB in pentode mode. 6dB/octave. Low boost uses a real inductor for a fat tone. 15 Microphone input impedance. The lower the impedance, the more of a load will the preamp input present to the microphone. Standard values will be 10kΩ for the middle position (HI), 900Ω for the left (LO) and 2400Ω for the right (MED). The Creamer can also be ordered with custom impedance values, please call us or email for that. “PAD” and “+6dB” switches will also influence the resultant mic input impedance value. Changing input impedance is more likely to influence the tone of dynamic mics, to some degree ribbons, and to a lesser degree or not at all condensers. Lower impedance values will roll off some high end. 16 Triode/Pentode mode switch. Pentode mode has more gain (33 versus 24dB) and somewhat different tone character. The corresponding yellow LED indicator lights up in pentode mode. 17 Tube heater voltage indicator, should come on with the power switch. 18 High-‐pass filter cutoff frequency. 160Hz (pos. 1) or 80Hz (pos. 2), 6dB/octave 19 (Creamer Plus only) This switch attenuates the output of the tube before the output level control pot. It will be useful when working with hot signals to avoid operating the output level control at levels close to minimum, where precise adjustment is difficult. CREAMER’S REAR PANEL CONTROLS: 20 AC power inlet. Always operate the unit on the mains voltage it was designed for (115VAC or 220-‐240VAC). We purposely omitted the mains voltage selector as a wrong voltage setting can cause a lot of damage to the unit. Creamer’s power transformer can be rewired for a different operating voltage but that is something only a qualified service technician would do. 21 Mains fuse. Please replace it only with the one of value indicated. (600mA@115VAC, 300mA@220-‐240VAC) 22 Ground lift switch. It should normally be kept in “Gnd On” position. However if you encounter hum when the unit is patched into your system, switch it over to “Gnd Lift”. This will remove hum due to ground loops only; it will not help eliminate hum that comes in with the signal! Do not disconnect the ground wire on your 3-‐prong mains plug! 23 and 24 Outputs. Balanced connection only! (XLR pin connection: 1=GND, 2=HOT, 3=COLD). Creamer can put out up to +22dBU of level. 25 and 26 (Creamer Plus only) Line level inputs. Balanced connection only! (XLR pin connection: 1=GND, 2=HOT, 3=COLD) 27 and 28 Microphone inputs. Balanced connection only! (XLR pin connection: 1=GND, 2=HOT, 3=COLD) TECHNICAL SPECIFICATIONS: 2 channels Variable input impedance (for mic input only) Frequency response: 10Hz-‐50kHz +/-‐ 3dB Maximum gain: 74dB Harmonic distortion: <2% before clipping level, quickly decreases if driven less. Maximum output level: 32dBu Minimum output load: 600Ω Connectors: XLR mic and output, balanced only Instrument input: 1/4” unbalanced, mono Power consumption: 30W WARRANTY INFORMATION Sonic Farm gives a one year warranty on parts and labor from the date of purchase. Should you need to send in your unit for warranty covered service, please contact us for an RMA number first. We will also tell you where to send the unit. Any Modification of the unit voids the warranty. CONTACT INFORMATION: Sonic Farm Pro Audio, Vancouver, BC, Canada Tel 310-‐402-‐2390, 778-‐863-‐1613 www.sonicfarm.com For email, please use contact box on our website