1
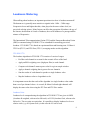
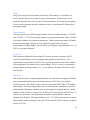
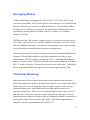
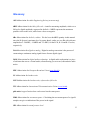
K-Meter
User Manual
Contents
2
2
2
3
5
7
8
9
11
11
12
13
Welcome To K-Meter
System Requirements
Compatibility
Installation and Authorization
K-Meter User Interface
K-System Metering
K-System Monitor Calibration
Loudness Metering
Averaging Modes
True-Peak Metering
Meter Specifications
Glossary
Welcome To K-Meter
MeterPlugs K-Meter brings professional loudness and peak metering to your audio
workstation. K-Meter is a fully compliant K-System meter that features a pink noise
generator, perceived loudness meter and a true-peak meter. These tools help you preserve
fidelity throughout mixing and mastering, giving you more time to focus on making the
best possible recordings. This guide will introduce you to the concepts behind K-System
metering, perceived loudness measurements and true-peak detection. We at MeterPlugs
would like to thank you for choosing K-Meter and welcome you to the future of
metering!
System Requirements
•
Mac OS X v10.5.7 or greater
•
Windows XP, Vista, 7 or 8
•
AAX, Audio Unit, or VST 2.4 compatible DAW
Compatibility
Mac
K-Meter comes in three versions on the Mac: an AAX plug-in for Pro Tools (10.3.7+), an
Audio Unit and a VST 2.4 plug-in. All plug-ins are 32/64-bit universal binaries.
Windows
K-Meter is available as a 32/64-bit AAX plug-in for Pro Tools (10.3.7+) and a VST 2.4
plug-in on Windows.
2
Installation and Authorization
Mac
To install K-Meter on Mac OS X, run the installer and follow the on-screen instructions.
K-Meter will be installed into the following folders by default:
•
AAX: /Library/Application Support/Avid/Audio/Plug-Ins/
•
AU: /Library/Audio/Plug-Ins/Components/
•
VST: /Library/Audio/Plug-Ins/VST/
Most DAWs will scan these folders to discover plug-ins. See your DAW’s manual for
more information.
Windows
To install K-Meter on Windows, run the installer and follow the on-screen instructions.
K-Meter will be installed into the following folders by default:
•
AAX: C:\Program Files\Common Files\Avid\Audio\Plug-Ins\
•
VST: C:\Program Files\Steinberg\VSTPlugins\
You may need to configure your DAW to scan this directory. See your DAW’s manual
for more information.
Authorization
When you first install and run K-Meter, an authorization dialog will prompt you for your
e-mail address and serial number. The e-mail address must be the one that you used
when purchasing K-Meter.
3
Figure 1: K-Meter Authorization
Authorizing K-Meter using the authorization dialog (Figure 1) requires an Internet
connection. If you prefer, it is possible to authorize K-Meter without an Internet
connection by performing the following steps:
•
Create a text file named kmeter-license.txt containing the e-mail address that you
used when purchasing K-Meter, your serial number and the license signature,
each on a separate line. A sample license file is shown below.
•
Place kmeter-license.txt in the same directory that K-Meter is installed in. For
example, /Library/Audio/Plug-Ins/Components/ on Mac OS X or C:\Program
Files\Steinberg\VSTPlugins on Windows.
Once K-Meter has been successfully authorized, the authorization dialog will no longer
be displayed when K-Meter is run. If you have difficulty authorizing K-Meter, try the
following:
•
If you are authorizing K-Meter using the authorization dialog (Figure 1), ensure
that you are connected to the Internet.
•
If you create the license file manually, make sure it is a plain text file.
•
Contact us! We’re happy to assist you!
Sample License File
[email protected]
KMR10-C8H2Z-Y24QB-Q8XNT-2H4EN
MC4CFQCXPK4UfE3vWzW07lUxB6F8o0yhpgIVAMPXs1lsfl3ZguJvm+3LhVWtjBSv
4
K-Meter User Interface
K-Meter’s user interface can be viewed in expanded or collapsed mode. Expanded mode
is used to configure K-Meter’s settings while collapsed mode is useful because it
occupies less screen space. Double-click the wood paneling to switch between the two
modes.
Figure 2: K-Meter's Expanded Mode
Figure 3: K-Meter's Collapsed Mode
K-Scale Dial
Selects the meter scale: full-scale, K-12, K-14 or K-20. See “K-System Metering” for
more information.
Average Dial
Selects the averaging algorithm to use for the average meter: ITU Fast (400 ms), ITU
5
Slow (3 s) or RMS. See “Averaging Modes” for more information.
Upsample Dial
Selects the peak upsampling rate: 1x, 2x, 3x or 4x. For example, a 48 kHz input signal
will be upsampled to 96 kHz when this dial is set to 2x. Note that the upsampled signal is
not output by the plug-in, but only used internally. See “True-Peak Metering” for more
information.
Noise L/R Toggles
Enables/disables pink noise output on the left and right channels. If only one of these
toggles is enabled, the other channel is muted. When both toggles are disabled, audio
passes through K-Meter as usual. Note that in some DAWs, audio must be playing
through K-Meter for pink noise to be output. See “K-System Monitor Calibration” for
more information.
Hold Toggle
Adjusts the length of time that the average and peak-over indicators hold their positions
before falling. The indicator holds for 10 s when disabled and forever when enabled.
Level Displays
Displays numeric peak-over and average-over levels. These displays, positioned to the
right of each meter, give you an indication of the maximum levels reached. The levels
are held for 10 s or infinitely, depending on whether or not the hold toggle is switched on.
If an overload occurs, the peak display turns red. Clicking a display resets its value.
6
K-System Metering
The K-System was invented by mastering engineer Bob Katz in an attempt to combat
excessive compression, improve dynamics and encourage consistent leveling practices in
the industry. Over the past decade, recording engineers have been pushing their
compressors to the limit to produce louder and louder mixes in the hopes of standing out
amongst the crowd. The K-System takes a different approach, promoting increased
dynamic range to create interest and reduce listener fatigue.
To begin using the K-System, you must first calibrate your monitors to be in sync with
the K-System meters (see “K-System Monitor Calibration” for details). This way, the KSystem meters provide a consistent and meaningful indication of how loud a mix is. By
calibrating your monitors, you free yourself to mix according to what sounds natural to
your ears. If your mix is too loud, your ears will tell you. If your mix lacks dynamic
range and punch, your ears will tell you. The meters will reinforce what you hear and
provide you with a more accurate picture of how loud your mix is.
The next step is to decide how much dynamic range your mix will have. Different genres
have different requirements. For example, classical pieces generally have more dynamic
range than pop mixes. The K-System defines three scales that differ in the amount of
headroom that they provide: K-12, K-14 and K-20. The K-12 scale is most suited to
broadcast material and provides 12 dB of headroom. The K-14 scale is used for pop,
country and rock, providing 14 dB of headroom. The K-20 scale is used for classical
music and provides 20 dB of headroom.
The choice of a K-System scale may also depend on whether you are mixing or
mastering. As a general rule, it is best to leave adequate headroom in a mix prior to the
mastering stage. This gives the mastering engineer more flexibility since dynamic range
is easy to reduce but difficult to add. For this reason, it is useful to mix using the K-20
scale and master using an appropriate scale for the target medium and genre.
Each K-System scale has a different alignment level, meaning that 0 dBr is offset from
the top of the meter. The alignment levels are as follows: -12 dBFS for K-12, -14 dBFS
for K-14 and –20 dBFS for K-20. While the three scales have a different alignment level,
7
they share the same 0 dBr reference loudness. In other words, 0 dBr on each scale
corresponds to the same loudness level when played through monitors that are calibrated
according to the K-System. Consequently, your monitors require a different gain for each
scale.
K-System Monitor Calibration
The three K-System scales (K-12, K-14 and K-20) share the same reference point: an
external meter shall read 83 dB SPL (C-weighted, slow) when a pink noise signal is
played back and reads 0 dBr on K-Meter’s averaging meter. K-Meter makes the
calibration process simple. Here are the steps:
•
Select an appropriate scale (K-12, K-14 or K-20) for your mix.
•
Select the RMS averaging mode.
•
Play back pink noise through your monitors using K-Meter. K-Meter has two
noise toggles, one for the left and one for the right channel. Enable only a
single channel at a time or your calibration will not be correct.
•
Using an external level meter, measure the SPL (use a C-weighted, slow
setting on the meter if available) of the pink noise being played through the
monitors. Take the measurement from your listening position.
•
Adjust your monitor gain until the external level meter reads 83 dB SPL.
•
Repeat this process for the other channel.
That is all! You now have a fully calibrated K-System. You may wish to repeat this
process for each scale and make a note of the required monitor gain. Then you can easily
switch between the various scales in K-Meter and apply the appropriate monitor gain.
8
Loudness Metering
When talking about loudness, an important question arises: how is loudness measured?
The human ear is generally most sensitive to signals in the 1 kHz – 5 kHz range.
Frequencies lower and higher than this, when played at the same volume level, are
perceived as being quieter. Many factors can affect the perception of loudness: the age of
the listener, the duration of a burst of loudness, the overall loudness of a passage and the
mixture of frequencies.
The International Telecommunications Union (ITU) and the European Broadcast Union
(EBU) recommend using ITU-R BS.1770 as a standard for measuring perceived
loudness. ITU-R BS.1770 is based on experimental data and listening tests. K-Meter’s
ITU Fast (ITU F.) and ITU Slow (ITU S.) averaging modes use this algorithm.
ITU-R BS.1770
The loudness algorithm in ITU-R BS.1770 consists of a series of stages:
•
Pre-filter each channel to account for the acoustic effects of the head.
•
Apply an RLB weighting curve (high pass filter) to each channel.
•
Compute each channel's mean square value for a given sample window.
•
Apply a channel weighting that is greater for rear channels.
•
Sum the results of each channel to produce a single loudness value.
•
Map the loudness value to a logarithmic scale.
It is important to note that the result of the algorithm is a single loudness value rather
than a set of per-channel values. As a result, K-Meter's left and right channels will
display the same value when using the ITU Fast and ITU Slow modes.
Loudness Units
Loudness levels computed using the algorithm in ITU-R BS.1770 are given in LKFS
(Loudness K-weighted, referenced to full-scale) or LUFS (Loudness Unit, referenced to
full-scale). The two units are equivalent. It is possible to display loudness levels on a
relative scale (e.g. a K-System scale); in this case the LU unit is used.
9
Gating
Long, quiet passages in a programme will lower LUFS readings. For example, in a
movie, dialogue between two characters may contain pauses. If these pauses are of
significant duration, they will lower the LUFS measurement. To account for this, gating
is used to ignore passages that have loudnesses under a given threshold. K-Meter does
not support gating.
Target Loudness
You may encounter two different target loudness levels in loudness literature: -23 LUFS
and -24 LUFS. -23 LUFS is the target loudness for gated measurements, while -24 LUFS
is the target loudness for un-gated measurements. Gated measurements tend to be louder
because quiet passages are ignored. As a result, the target loudness for gated
measurements is slightly higher. Since K-Meter only supports un-gated loudness, use -24
LUFS as your target loudness.
ATSC A/85
This document, published by the Advanced Television Systems Committee (ATSC)
covers recommended practices for loudness metering and content delivery. A/85
recommends a target loudness of -24 LUFS, un-gated, measured over the entire duration
of the programme, for content delivery and exchange. For live events, it recommends a
sliding window measurement that is 3 s - 10 s in duration. K-Meter's ITU Slow mode is
ideal for this.
EBU R128
This document, and its accompanying documents, cover loudness metering specifications
and recommended loudness practices for broadcasters. EBU 3341 gives detailed
specifications for “EBU Mode” meters, which are based on the ITU-R BS.1770 loudness
measurement. The meters support three types of measurements: momentary, short-term,
and integrated. Momentary and short-term measurements are un-gated and have sliding
windows of 400 ms and 3 s, respectively. K-Meter's ITU Fast (400 ms) and ITU Slow (3
s) modes are equivalent. The integrated measurement is gated and thus cannot be
obtained using K-Meter. The target loudness level is -23 LUFS, gated, measured over the
entire duration of the programme. Since the ITU Fast and ITU Slow modes are un-gated,
aim for -24 LUFS.
10
Averaging Modes
K-Meter supports three averaging modes: ITU Fast (ITU F.), ITU Slow (ITU S.) and
root-mean-square (RMS). The ITU fast and slow modes indicate perceived loudness and
take into account the ear’s sensitivity to different frequencies. The two modes differ in
the duration over which they are computed. The fast mode has a 400 ms window and
responds more quickly than the slow mode, with its 3 s window. See “Loudness
Metering” for details.
The RMS meter has a flat frequency response and gives you an idea of how much power
is in a signal. This mode may be useful for comparisons with other level meters, which
often use an RMS measurement. To get the best understanding of your audio’s loudness,
it may be beneficial to switch between the various averaging modes.
You may notice that the ITU modes consistently report lower levels than the RMS mode.
In general, ITU and RMS readings are not directly comparable since they measure
different things. The ITU reading is a measure of loudness, while the RMS reading is a
measure of signal strength. In K-Meter, the RMS measurement is calibrated according to
AES-17, so that a full scale 997 Hz sine wave reads full scale on the meter. This requires
the raw, mathematical RMS of the signal to be increased by approximately 3 dBr.
True-Peak Metering
Many peak meters fail to accurately detect peaks in audio signals because they don’t
detect inter-sample peaks (peaks occurring between samples). Inter-sample peaks may be
created when a DA converter interpolates between digital samples in order to create a
continuous analog signal. Inter-sample peaks are actually quite common so it is
important to detect them. K-Meter uses true-peak metering to improve the accuracy of
peak detection. The idea is to generate samples in-between the input signal’s samples
using interpolation. K-Meter can double, triple or quadruple the number of samples in an
input signal in order to more accurately detect peaks. The K-Meter implementation is
compatible with the recommendations in ITU-R BS.1770.
11
Meter Specifications
Peak Meter
•
rise time instantaneous
•
fall time 8.67 dBr / s
Averaging Meter (ITU fast or slow)
•
integration time 400 ms and 3 s for fast and slow mode, respectively
•
calibration reads 3.01 below full scale for a 1 kHz sine wave at full scale
(ITU-R BS.1770)
Averaging Meter (RMS)
•
rise/fall time 600 ms to reach 99% full deflection, with logarithmic response
•
RMS window 1024 samples
•
calibration reads full scale for a 997 Hz sine wave at full scale (AES-17)
12
Glossary
AES Abbreviation for Audio Engineering Society (www.aes.org).
dBFS Abbreviation for decibels, full-scale. A unit for measuring amplitude, relative to a
full-scale, digital amplitude, expressed in decibels. 0 dBFS represents the maximum
possible value on the scale, while lesser values are negative.
dBr Abbreviation for decibels, relative. We don’t use the dBFS quantity in this manual
since the K-System’s maximum level is greater than 0; rather, we use dBr with reference
amplitudes of –20 dBFS, -14 dBFS and –12 dBFS, for the K-20, K-14 and K-12 scales,
respectively.
DA Abbreviation for digital-to-analog. Digital-to-analog conversion is the process of
constructing a continuous analog signal from a discrete digital signal.
DAW Abbreviation for digital audio workstation. A digital audio workstation is a piece
of software that acts as a virtual studio, often allowing you to record, edit and mix audio
tracks.
EBU Abbreviation for European Broadcast Union (www.ebu.ch).
LU Abbreviation for loudness unit.
LUFS Abbreviation for loudness unit, referenced to full-scale.
ITU Abbreviation for International Telecommunication Union (www.itu.int).
pink noise A type of noise where each octave has the same power.
RMS Abbreviation for root-mean-square. Calculating the root mean square of a signal’s
samples can give an indication of the power in the signal.
SPL Abbreviation for sound pressure level.
13
upsampling The process of increasing the sample rate of a sampled signal. This can be
done by interpolating existing samples to generate in-between samples.
14