1
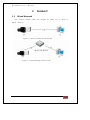
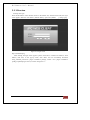
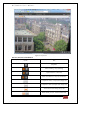
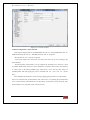
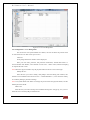
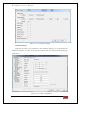
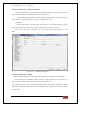
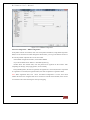
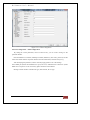
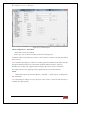
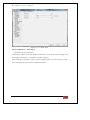
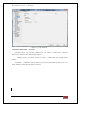
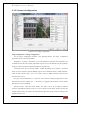
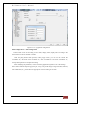
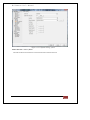
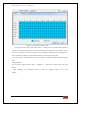
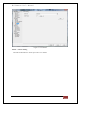
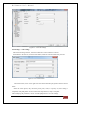
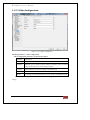
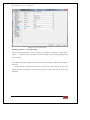
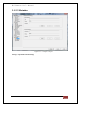
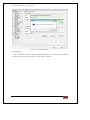
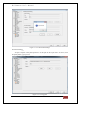
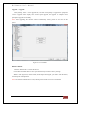
HD IPCameras User's Mannual
Thank you for purchasing our products, if you have any questions or need, please feel free to
contact us.
This manual applies to IPC-XXX series of network cameras.
This manual may contain technical inaccuracies or product features and operating areas do not
match, or typographical errors. This manual will be updated according to enhance the product's
functionality and regularly improve or update the product or process described in this manual,
updated content will be added in the new version of this manual without notice.
1
HD IPCameras User's Mannual
SafetyTips
The purpose of this content is to ensure that users use the product in order to avoid danger or
financial loss. Before using this product, please read this instruction manual carefully and retain it
for future reference.
As shown below, precautions are divided into "WARNING" and "CAUTION" in two parts:
WARNING: ignoring warnings could result in death or serious injury.
Note: ignore the precautions could result in injury or financial loss.
2
HD IPCameras User's Mannual
Directory
Directory.................................................................................................................................... 3 1 Connect ............................................................................................................................... 4 1.1 Wired Network ............................................................................................................. 4 1.2 Network Configuration.................................................................................................... 5 2 Network access and configuration parameters .................................................................. 6 2.1 Accessed through a browser ........................................................................................... 6 2.1.1 Preview ......................................................................................................................... 7 2.1.2 Playback...................................................................................................................... 12 2.1.3 Information inquiry .................................................................................................... 14 2.1.3.1 Device status information ....................................................................................... 14 2.1.4 Local record Setting.................................................................................................... 16 2.1.5 Device Setting............................................................................................................. 17 2.1.5.1 System Configuration .............................................................................................. 17 2.1.5.2 Camera Configuration ............................................................................................. 28 2.1.5.3 Video Configuration................................................................................................. 38 2.1.5.4 Disk Management.................................................................................................... 43 2.1.5.5 Maintain .................................................................................................................. 44 2.1.6 P2P........................................................................................................................... 48 3
HD IPCameras User's Mannual
1 Connect
1.1 WiredNetwork
The connection between camera and computer are mainly two, as shown in
Figure1.1.1and1.1.2:
Figure 1.1.1 directly connected via a network cable
Figure 1.1.2 Connected through a switch or router
4
HD IPCameras User's Mannual
1.2NetworkConfiguration
Before accessing the network through a wired network camera, you need to obtain its IP
address first, the user can search for the IP address of the network camera via IPC FINDER
software (device network automatically search software).
Run IPC Search Tools software, the software will automatically display the IP address, port
number, subnet mask, device type and other information, as shown in Figure 1.2.1:
Figure 1.2.1 IP address search
Note: The factory default IP network cameras as "192.168.1.11", the super user "admin",
password is " "
5
HD IPCameras User's Mannual
2 Networkaccessandconfiguration
parameters
After the hardware installation is complete, you can preview images, parameter
configuration, operation on the network camera through browser..
2.1Accessedthroughabrowser
Network cameras currently supports IE core browser, IE browser through the steps network
camera preview image below:
Note: Use IE10/IE11 browser was set compatibility: Open IE10/11 browser, [Tools ->
Compatibility View Settings B], add the IP address of the run settings, as shown in 2.1.1 show.
Figure 2.1.1 IE security level
6
HD IPCameras User's Mannual
2.1.1Preview
First step: IP Login
Enter the IP address of the network camera in the address bar, and then click Enter, the login
screen appears. Enter the "User Name" ( default: admin), "password" (default:
), click [Login].
Figure 2.1.2 login screen
Step 2: Install the plug
After entering the login screen appears "please click here to install web software!" Link
address, click here, in the pop-up menu, click "Run" and can successfully download
setup_webclient_activeX.exe plug-in installation package, install a new plug-in installation
package, updated plug-in version, as shown in Figure 2.1.3:
7
HD IPCameras User's Mannual
Figure 2.1.3 install plug
After the plug-in installation is complete, refresh the page to log in again, the image preview
interface shown in Figure 2.1.4:
8
HD IPCameras User's Mannual
Figure 2.1.4 preview
Preview interface information:
ICON
Info
SnapShot
Start recording / stop recording
Open Sound on / off sound
Start voice intercom / stop voice intercom
Compliance with 4:3 aspect ratio image size
Compliance with 16:9 aspect ratio image size
The location of the image size to fill
Main stream preview / off the main stream
9
HD IPCameras User's Mannual
preview
Sub-stream preview / Close sub stream preview
PTZ
Electronic amplification
In the preview screen, you can control the preview, video, capture pictures, voice intercom,
preview audio on and off.
Image size can be set according to user needs "4:3 size"、"16:9 size", "adaptive" mode.
Preview stream type can select the "main stream" and "sub-stream" preview. Click "PTZ
Control" to open the PTZ control interface.
Zoom
Press“Zoom”,Frame selected with the mouse to zoom in the area, click again
That
would restore the original screen.
PTZ Control:
PTZ control interface is shown in Figure 2.1.5, by
direction
Keys to control pan eight directions, click the button to
turn on automatic scanning.
Select "Camera" drop-down menu to open the auxiliary,
the "light", "wiper", "fan", "heater" and "ancillary equipment"
and other functions
Click the "Preset" be preset menu, click preset Area icon
to be preset editing and recall.
ICON
Info
Start / Stop Auto Scan
Focus + Near Far + IRIS + -
10
HD IPCameras User's Mannual
Camera / light / wiper /
fan / heater / auxiliary
equipment
Figure 2.1.5 PTZ control
11
HD IPCameras User's Mannual
2.1.2Playback
Enter data retrieval [View Media] -> [Local Playback] interface.
Figure 2.1.2.1 Local Playback
Local playback interface buttons are described below:
ICON
Info
ICON
Info
Play
Pause
Stop
Single Frame
Increase speed
De-increase speed
Last Frame
Next Frame
Sound On
Snapshot
Note: Single-frame playback, click the button once for each video frame advance; After opening
local playback, click the capture button, then the picture will be saved in the corresponding
directory.
Search
12
HD IPCameras User's Mannual
As shown, through the start / end time drop-down menu,
you can choose need to find the start / end time, Click Find
to search for video files entered into the time period
Figure 2.1.2.2 search Time
13
HD IPCameras User's Mannual
2.1.3Informationinquiry
2.1.3.1Devicestatusinformation
Figure 2.1.3.1.1 Device status information
Device status information -> Basic Information
You can view network camera "device name",
"Device Model", " Device serial number",
"Hardware version", "Software version", "Encoding Version" and other information,
"Video
Input Number", "audio input number", " alarm Input number ", "alarm output number", "SPOT
number", "voice Talk" according to the device supports different circumstances.
14
Eliminato: ¶
HD IPCameras User's Mannual
2.1.3.2logquery
Figure 2.1.3.2.2 View Log
Remote Log information -> View Log
Log-related information can be displayed as "number", "record time" and "event" in the
main interface.
Logs can be viewed by searching the specified log types, including the "system operating", "
Config
Operation", "record
operation", "User Management", "Alarm event", "exception
event" and "Storage Management." Start time and end time can be set as desired.
After selecting the main types of logs and associated time needed queries, click [search]
button to search for qualified logging
Click [Export] button to back up the current log to the corresponding log storage path.
Note: The maximum number of log no more than 10,000.
15
HD IPCameras User's Mannual
2.1.4LocalrecordSetting
Figure 2.1.4.1 Local Configuration
Local Record Setting:
Note: The write cycle is set to "Yes", when the memory card storage space is full, the system will
automatically delete the oldest video data to free storage space for the video card.
Set local video is "Enable circular record " down menu, select Yes or No, is set to "Yes", when
the local disk is full, the system will automatically delete the oldest video data to free up disk
space for video .
"Time length of record file " optional "five minutes", "10 Minutes" and "15 Minutes", "30
minutes", "60 minutes."
Set local storage point, where you can set the local store and local video capture.
After modifying the relevant parameters need to click [OK] to save the settings.
16
HD IPCameras User's Mannual
2.1.5DeviceSetting
Click [Settings], enter the device parameter configuration interface.
2.1.5.1SystemConfiguration
Figure 2.1.5.1.1 device parameters
Common Configuration -> Device Parameters
Parameters in the device configuration interface, you can set "device name."
After modifying the parameters, need to click the [Apply] button to save the settings, no
Other operations, click [save] to exit the "System Configuration" screen.
17
HD IPCameras User's Mannual
Figure 2.1.5.1.2 Date and Time
Common Configuration -> Date and Time
"Date Format" Display Mode "YYYY-MM-DD W hh: mm: ss", "YYYY-MM-DD hh: mm: ss",
"MM-DD-YYYY W hh: mm: ss", "MM-DD-YYYY hh: mm: ss" is optional.
"Time Format" of "24", "12 hours" is optional.
"Time Zone" displays the current time zone where the device can be set according to the
actual situation.
The date and time of the interface, you can configure the "automatic error correction", check
on: Enable "Enable NTP", the device can be calibrated in accordance with set time; time manually
or school, click on the button [Validate] will camera time is set to host PC time. (Click on
[Validate] button and click [Apply] key can be consistent with
the local
host PC
camera
time;)
After modifying the parameters, need to click the [Apply] ([save]) button to save the settings.
Note: The "Network Time Synchronization" and "Time Zone" in completing the specified DNS
server, "Network Time Synchronization" and "Time Zone" to take effect, and the "Network Time
Synchronization" only 24 points will be on time (in force).
18
HD IPCameras User's Mannual
Figure 2.1.5.1.3 summer season
Common Configuration ->DST
According to actual needs, users can enable the DST.
DST configuration can be configured to start the summer season of the year, end time, specific to
the time and day of the time difference.
Adjustment :"one hour" 、"two hours" two settings.
Mode of the "Date Mode" and “Weekly mode”, the "Date Mode" start and end time when a
specific date; "Weekly Mode" start and end time of the month to which the first few weeks.
After modifying the parameters, need to click the [Apply] button to save the settings, no other
operations, click [save] to exit the "System Configuration" screen.
19
HD IPCameras User's Mannual
Figure 2.1.5.1.4 User Management
User Configuration -> User Management
The current user is the system default user "admin", the user can follow the practical need
to create other users can then create up to 14 users.
Add User:
Click [Add], add the user interface will be displayed.
Enter your user name, password, and password confirmation, "Enable Bind MAC" to
choose "Disable" and "Enable", select "Enable" to enter "User's MAC" when, and then click [OK]
to complete the user to add.
Note: Bind user's physical address only the physical address of the PC to the remote login.
Modify the user:
Select the user you want to modify, click [Edit] to enter the editing user interface, this
interface can be modified in the "Password" and
" Enable Bind MAC " ,Users can add or modify
its "Authority Settings" permission settings.
Note: The system default user admin can change the password and the physical address, and the
default password is blank.
Delete User:
Select the user you want to modify, and click Delete message box will pop up, "Are you sure
delete this user" and click [OK] to delete the user.
20
HD IPCameras User's Mannual
Figure 2.1.5.1.5 permission settings
Authority Settings:
Select the user needs to set permissions, click [Authority Settings ] to set permissions set
permissions interface, according to the need to set permissions, click [OK] to finish setting user
permissions.
Figure 2.1.5.1.6 Basic Configuration
21
HD IPCameras User's Mannual
Network Configuration -> Basic Configuration
The basic configuration can set the device's IP address, subnet mask, gateway, DNS, HTTP
port, Command, Media port and Mobile port and other parameters.
After modifying the parameters, need to click the [Apply] button to save the settings, no
other operations, click [save] to exit the "System Configuration" screen
P2P setting:
Check "Enable P2P", enter P2P UID, click [save] to save setting parameters, pop-up
boxes "This setting will cause the set to restart, and the need to re-open the browser."
Note: If your network has a DHCP server, you can check the "Enable DHCP " to
take
effect.
Figure 2.1.5.1.7 PPPoE configuration
Network Configuration -> PPPoE
Select the Enable PPPoE, enter your user name and password, and click [Connect] button.
After modifying the parameters, need to click the [Apply] button to save the settings, no
other operations, click [save] to exit the "System Configuration" screen
Note: PPPoE username, password obtained from the operator. After setup is complete, the device
will reboot automatically dial, dial-up network information can be displayed in the success of the
network state.
22
HD IPCameras User's Mannual
Figure 2.1.5.1.8 DDNS configuration
Network Configuration -> DDNS configuration
In the public network environment, most users use dynamic IP addresses, using DDNS (Dynamic
DNS) to access the network camera through the domain name, you can get an effective solution to
the current problem of dynamic IP to access the camera.
In the DDNS configuration interface, check Enable DDNS.
If you choose DDNS server address is: menmbers.dyndns.org.
Domain name: The domain name, user and password are registered on the website. After
completing the settings, click [Apply] button, set successfully.
Click [Validate] button, the state is registered, the registration is successful, the status is updated
to: registration is successful, the registration fails, the status is updated to: registration failed.
Note: When registration fails, first
check
the DDNS configuration is correct, then check
whether the network is configured and can be connected to external networks NDS, if the camera
is connected to the router following the router port mapping.
23
HD IPCameras User's Mannual
Figure 2.1.5.1.9 mail configuration
Network Configuration -> Mail Configuration
By setting the e-mail parameters, when an alarm occurs, you can send a message to the
specified mailbox.
Enter the SMTP server address, SMTP port number (default 25), user name, password, and the
name of the sender and the recipient's mailbox and other information, and then click [save].
After modifying the parameters, need to click the [Apply] button to save the settings.
Note: SMTP port (Please check SMTP server port) can be set, "Enable Secure Connection" (Some
SMTP server requires a secure connection), please check the actual mailbox.
Message content includes: Alarm/Event type, date and time, device type.
24
HD IPCameras User's Mannual
Figure 2.1.5.1.10 alarm input
Alarm Configuration -> alarm input
"Alarm name" can be set as desired.
"Alarm Type" you can choose "normally closed" and "normally open."
"Schedule" minute "day armed" and "Custom", when you select "Custom" and click [Set] arming
time can be set.
Note: The alarm input property contains two normally open and normally closed, please select the
appropriate attributes based access control alarm equipment and the actual use of the way.
Normally open: usually open, triggering an alarm signal when a short circuit is switched on.
NC: usually a short circuit, triggering an alarm signal when the circuit is disconnected.
Action:
Handle alarm input can select the "Record", "Snapshot", " Alarm Output", "Linkage PTZ"
and "send Email."
Note: PTZ linkage of settings can only call presets, cruise, track, no action one after the setup is
complete, click [save] button.
25
HD IPCameras User's Mannual
Figure 2.1.5.1.11 alarm output
Alarm Configuration -> alarm output
"Alarm name" can be set as desired.
"Output delay" means the end of the duration of the alarm, you can choose a time according to the
actual needs "five minutes" to "10 minutes" a number of options.
After modifying the parameters, need to click the [Apply] button to save the settings, no other
action, click [save] to exit the system configuration interface.
26
HD IPCameras User's Mannual
Figure 2.1.5.1.12 abnormal
Abnormal Configuration -> exception
"Exception Type" you can select "HDD Error", "IP conflict", "Invalid Visit", "Network
Disconnect", "disk full" and "disk Group Exception."
"Linkage process" can choose "Upload to Center ", "Send Email" and "Trigger Alarm
Output."
Send Email
notification when an alarm occurs, the alarm information by mail to users in a
timely manner to inform the user alarm occurrence.
27
HD IPCameras User's Mannual
2.1.5.2CameraConfiguration
Figure 2.1.5.2.1 image configuration
Image Configuration -> Image Configuration
On the image configuration interface, click [Default] button, the image configuration
parameters restore to the system default.
"Brightness", "Contrast", "Saturation", "hue" and "Sharpness" and other video parameters can
be adjusted to tune the video quality, adjustment range of 0 to 100, the default is 50, the brightness
setting is invalid when choose adjusts the brightness automatically.
"Anti-Flick mode" can be selected "50HZ", "60HZ" Depending on the format. " Anti-Flick
mode" for power frequency used in different regions, such as mainland China is 50HZ Anti-Flick,
while the best exposure time is set to 1/25, such as Japan is 60HZ Anti-Flick, while the best
exposure time set 1/30.
"Iris Type" choose "Manual Iris" or "Auto Iris", if the camera is actually using manual iris lens,
there shall be selected " Manual Iris ", the factory is equipped with automatic iris lens models
that option may not be modified.
"Exposure Time"
effect the camera shutter, the camera can be set according to different
scenarios with different exposure times, if you use a manual iris lens mode, the time set here the
longest exposure time, the camera will automatically adjust the exposure time according to the
brightness of the scene.
28
HD IPCameras User's Mannual
"Gain" value adjustment option means that the gain can be adjusted to the maximum extent.
"White Blance" optional "Manual White Balance", "auto white balance", "Lock White Balance",
"fluorescent", "incandescent", "warm light" and "natural light." "MWB" Support R, B gain
adjustable, "Lock White Balance" to lock the current color correction matrix, if the actual usage
scenarios for the fixed lighting types, according to four options for the actual selection,
"fluorescent" applies to 6500K color temperature environment "incandescent" applies to 3000K
color temperature environment, "warm light" applies to 4000K color temperature environment,
"natural light" applies to 5500K color temperature environments. You can choose the general
condition of the automatic white balance.
"3D-Denoise " select "Disable", "Low", "Normal" and "High", the option to adjust the level of
video processing for noise reduction, noise reduction and may also reduce the picture detail.
"BLC" default "disabled", the user can select the compensation according to the actual video
scene.
"WDR" option is currently WDR, select "Disable", "Low", "Normal" and "High" , the user can
adjust the level of actual need to change the value of a wide dynamic strength.
"mirror images" to symmetry direction, “Left Right” 、"up and down" and "Center" video
adjustment options, the user switches the video screen display symmetry direction.
"IR-Cut"
optional "day", "night", "Schedule" and "Auto." Under the "day" mode is a color
image, the next "night" mode to black and white image, select "Auto" when the device is
automatically controlled according to ambient brightness during the day and night mode, select "
Schedule
", the user needs to set the start time and day end time, in this period of time, the
camera will automatically use the daytime mode, outside this time period, the camera will
automatically use the night mode.
29
HD IPCameras User's Mannual
Figure 2.1.5.2.2 graphical configuration
OSD Configuration -> OSD configuration
Camera name can be set according to user needs, display name, display time according to the
actual needs can choose whether to enable.
Click the [Set] button OSD position, OSD pop-up menu, you can set the "Name the
coordinates X", "the name of the coordinate Y", "time coordinate X" and "Time Coordinate Y",
click [Confirm] button to complete the setting.
After modifying the parameters, need to click the [Applications] button to save the settings.
Note: OSD coordinate input range [0,703] X, Y is [0,575]. If the image is larger than D1(704x576)
size 1920X1080, etc., please fill in the appropriate value according to size ratio.
30
HD IPCameras User's Mannual
Figure 2.1.5.2.3 dynamic testing | | alarm
Motion Detection -> Move | alarm
Check the "Enable motion detection" means enable motion detection function.
31
HD IPCameras User's Mannual
Figure 2.1.5.2.4 Detection Area
Settings area:
Click [area], pop-up "detection area " menu, the system default detection area for all regions.
Cancel the motion detection area when drawn, or click the right mouse button and drag to draw
the cancellation can be done to move the region; while drawing motion detection area, or click the
left mouse button and drag motion detection can be done to draw the region, after the drawing is
complete, click [confirm] to return to the
motion detection interface.
Sensitivity: Sensitivity select "low sensitivity", "high sensitivity" and "medium sensitivity."
32
HD IPCameras User's Mannual
Figure 2.1.5.2.5 motion detection time
Arming time select "day armed" and "Custom." Arming time can be edited when selecting
"Custom", click [Set] button, press and hold the left button and drag can be continuously set the
time, you can click on to set an hour, the color can be changed to small lattice corresponding color,
after completing the settings, click [Confirm] button to exit the menu arming time.
Note: If you select a day arming time, the video presents 7 * 24 hours motion detection recording
state.
Linkage method:
You can select "trigger channel video", " Snapshot ", " Alarm-out", "trigger PTZ" and "send
Email."
After modifying the parameters, need to click the [Apply] button to save the
settings.
33
HD IPCameras User's Mannual
Figure 2.1.5.2.6 Mosaic
Mosaic -> Mosaic Setting
Check the "Enable Mosaic" means open video cover feature.
34
HD IPCameras User's Mannual
Figure 2.1.5.2.7 video settings area covered
Locale:
Click [Area] button to enter the area of the interface, click or drag delineation covered field, if
you need to cancel cover the area delineated right mouse click to the region, after completing the
settings, click [Confirm] button to exit the setup regional menu, return to the video cover interface.
Note: You can set up four block area.
35
HD IPCameras User's Mannual
Figure 2.1.5.2.8 PTZ settings
PTZ Settings -> PTZ settings
After the PTZ setting interface, select the Enable PTZ control interface as shown:
PTZ address in the text box, enter the PTZ address, baud rate and select PTZ PTZ protocols.
Figure 2.1.5.2.10 PTZ watch
Check PTZ watch, click on the right side of the head watchman [Set] button interface shown
below:
Select the watch period, only check the preset point, cruise, a trajectory set, after setting is
completed, click [OK] button to return to the PTZ setup interface, setup is complete.
After modifying the parameters, need to click the [OK] button to save the settings.
36
HD IPCameras User's Mannual
Note: PTZ preset point can only watch, cruise trajectory of a (joint state mutex setting).
37
HD IPCameras User's Mannual
2.1.5.3VideoConfiguration
Figure 2.1.5.3.1 Basic Configuration
Encoding parameters -> Basic Configuration
Video Configuration parameters are described as follows:
Parameter
Explanation
Stream Type
Complex Stream、Video Stream
Resolution
Different types of camera supports multiple resolutions, choose according
to the actual needs of the corresponding resolution
Framerate
Video frame rate can be set according to the actual needs
Bitrate Type
CBR、VBR
Bitrate
According to the selected resolution, you can set the corresponding bit rate
After modifying the parameters, need to click the [Apply] button to save the
settings.
38
HD IPCameras User's Mannual
Figure 2.1.5.3.2 event recording
Encoding parameters -> Event Recording
In the event recording interface, you can "stream type", "Resolution", "Framerate", "Bitrate Type",
" Bitrate
", "pre-Record time" and "Delay" and other parameters settings, click [Apply] key, then
set successfully.
Note: When the rate type is CBR, bit rate can be set, when the rate type is VBR, the picture quality
can be set;
Pre-Record time is the length of time before an alarm event occurs before the recording, the
Post-Record time is the length of the police after the close of the video after the alarm event
eliminated.
39
HD IPCameras User's Mannual
Figure 2.1.5.3.3 sub-stream
Encoding parameters -> sub stream
In the sub-stream interface, can be correlated pairs stream "Resolution",
"Frame-rate",
"Bitrate Type" and other parameters are set, click [Apply] After the set successfully.
Figure 2.1.5.3.4 capture configuration
40
HD IPCameras User's Mannual
Snapshot Configuration -> Snapshot
By configuring the capture parameters, the device can automatically capture.
"Image Resolution" optional "CIF" and "D1".
"Image Quality" optional "high", "medium", "Normal."
"Snapshot" optional "1", "2", "3."
"Capture Interval" interval can be set as desired, select "1", "2", "3", "4", "5", the time unit is
"seconds."
After modifying the parameters, need to click the [Apply] button to save the settings.
Note: The current capture function is not supported.
Figure 2.1.5.3.5 video program
Schedule -> Record Plan
Video program interface, you can set the "no record", "Timer Record" and "Motion Record"
Time program list, move the mouse to the type you want to set the video icon at the click of the
left mouse button, the time schedule, left by you can set the time of continuous live drag, click to
set an hour, the color can be changed to a small table in the corresponding color, click on the
[apply], then set successfully.
Video program interface, you can set the video type "main stream" and "sub-stream", click
[Apply] to save the set parameters.
41
HD IPCameras User's Mannual
Figure 2.1.5.3.6 Parameter Management
Advanced->Parameters Management
In the parameter management interface, select the drop-down list in the cycle is written or
not.
You can set the audio input type "linear input" and "Jimmy input."
After modifying the relevant parameters need to click [Apply] button to save the settings.
Note: The write cycle is set to "Yes", when the memory card storage space is full, the system will
automatically delete the oldest video data to free storage space for the video card.
42
HD IPCameras User's Mannual
2.1.5.4DiskManagement
Figure 2.1.5.4.1 HDD Browse
Common->HDD Browse
You can view the SD / TF card type, status, capacity and remaining capacity.
Click the [Refresh] button to, you can update the current status of SD / TF card, capacity and
remaining capacity.
Click [Format], you can put SD / TF card format, the formatting is complete, clear the disk data
format as FAT32.
43
HD IPCameras User's Mannual
2.1.5.5Maintain
Figure 2.1.5.5.1 Import / Export
Settings->Upload/Download Settings
44
HD IPCameras User's Mannual
Figure 2.1.5.5.2 Upload Settings
Upload Settings:
Select the profile you want to import, and click [Start] button, pop-up box, click [OK] button
to bring up the "Import successful, the device may restart" prompt box.
45
HD IPCameras User's Mannual
Figure 2.1.5.5.3 Download Settings
Download Settings:
"Export Complete" Click [Select] button to set the path for the export file to be stored, click
the [Start] button, pop-up boxes
Figure 2.1.5.5.4 Upgrade
46
HD IPCameras User's Mannual
Upgrade -> Upgrade
Click [Select], select a local upgrade file, and then click [Start] to upgrade the equipment
version. Upgrade status displays the current speed upgrade, the upgrade is complete when
prompted to upgrade successfully.
Note: After upgrading the network camera automatically restart, please do not turn off the
power.
Figure 2.1.5.5.5 Default
Default->Default
Click the "Reboot IPC" to restart the device.
Click "Restore Default Device" device parameters fully restored to factory settings.
When a video signal loss, motion alarm, alarm output alarm signal, you need to clear the alarm,
click the [Clear Alarm] button.
Note: The "Restore Default device" later, admin password will not revert to the default.
47
HD IPCameras User's Mannual
2.1.6 P2P
Click [P2P], go to Scan QR Code interface, as shown in Figure 2.6.1:
Figure 2.1.6.1
If the Network Configuration -> Basic configuration in P2P-enabled services and set the
correct UID number, click P2P dimensional code, pop-up boxes
48
HD IPCameras User's Mannual
, You can directly scan two-dimensional
code.
49