1
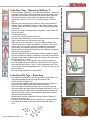
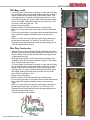
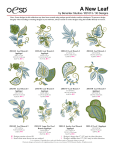
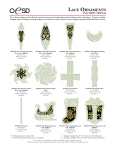
Holiday Magic In-the-Hoop Tags & Gift Bags Created by Elaine Cibelli Inspired by the Holiday Gift Bags project available on bernina.com, these gift bags take a slight twist. Create lined gift bags, a padded wine bag and in-the-hoop tags using the BERNINA Exclusive Design Collection - Holiday Magic #82009. This retro-inspired collection is sure to be a holiday favorite year after year. The Tree Skirt and Drink Koosies pictured are from All About Blanks and are embroidered with designs from Holiday Magic. Supplies Machine & Accessories BERNINA Sewing & Embroidery Machine BERNINA Embroidery Software 7 Machine Embroidery Hoops - Large Oval & Jumbo Teardrop Embroidery Foot #26 Edgestitch Foot #10/10C/10D Patchwork foot # 57/57D with Guide Embroidery Design Collection BERNINA Exclusive Embroidery Collection Holiday Magic #82009 Fabric Gift Tags - 1 fat quarter each - Main fabric Benartex Burlap and Lining fabric Benartex Holiday Magic Large Gift Bag - ¾ yd. each - Main fabric Benartex Burlap and Lining fabric Benartex Holiday Magic Medium Gift Bag - ½ yd. each - Main fabric Benartex Burlap and Lining fabric Benartex Holiday Magic Wine Bottle Gift Bag - ¼ yd. each - Main fabric Benartex Burlap and Lining fabric Benartex Holiday Magic Notions OESD Ultra Clean and Tear Away Stabilizer OESD Fuse and Fleece OESD Appliqué Fuse & Fix OESD Poly Mesh Cut Away Stabilizer Annie’s Soft and Stable Mettler Web Bond TA101 Temporary Spray Adhesive Needle - Sizes 80 Buttonhole Cutter and Block Set Threads Isacord Thread Yenmet Metallic Embroidery Bobbin thread All purpose thread for piecing quilt Visit bernina.com Projects ● Webinars ● Promotions ©2014 BERNINA of America, Inc. Page 1 of 4 In-the-Hoop Tags - Embroidery Software 7 Open the design – 82009-35 > From the Digitize toolbox > select the rectangle tool and Satin outline and create a square by clicking in the upper left corner and then moving the mouse to the lower right and click again. Select the square and unlock proportional scaling > change the numbers to 5½” or 5.5. In Color film select > Move to start. While the satin outline square is selected > click on the Advanced Appliqué Tool in the Digitize Toolbox > Under Fabric Patches, click on Place Fabric and Colors in Patches > there will be white gridwork in the patch. Click on the + sign to view/open fabric collections > select fabric and click on the patch. Click Back and Close. In Color Film, select the Move to Start icon. Select the Insert Embroidery icon and navigate to the first letter of the name > Open and move into position on the tag. Right click on the Lettering icon > type the remaining letters of the name in the text box > select the Alphabet > click OK > click on the screen and move into place. Resize the alphabet if necessary by right clicking on the lettering which opens Object Properties and change the size according to the minimum and maximum recommendations in the User Manual. Select the Buttonhole icon in the Digitize toolbox and place a buttonhole in the middle top. While it is selected > right click to open Object properties. Select the buttonhole type and the slit length. In this case the slit length is .2” or 5mm. To add backing fabric to the tag and have a placement stitch and satin stitch appliqué square stitch last > Hold down the ALT key and select the placement stitch > Copy > Paste. Hold down the ALT key and select the satin stitch appliqué square > in Color film, click on the Move to End icon. Save the design and send it to the machine. In-the-Hoop Gift Tags - Embroidery Iron Appliqué Fuse and Fix to the wrong side of the main fabric. Cut using the templates provided or using the CutWork Files included and the CutWork tool. Hoop Polymesh Stabilizer and stitch the placement line. Place the cut square on the placement line and continue stitching. When the duplicated placement stitch sews out, remove the hoop from the machine and spray lightly with Mettler Web Bond TA 101 on the backing fabric and place on the underside of the tag. Return the hoop to the machine (make sure that backing fabric stays in place) and finish with the satin stitch. Bobbin thread could be changed for the satin stitch so the back is just as lovely as the front. Trim close to the satin stitches being careful not to cut the stitches. Use a buttonhole block to open the slit and thread with ribbon or cord. ©2014 BERNINA of America, Inc. Page 2 of 4 Gift Bags - Cutting & Prep Large Gift Bag - A Gift for You • Cut one rectangle each of Main Fabric, lining and OESD Fuse and Fleece - 14” x 31” • Cut two strips of Bag Fabric for handles - 2” x 22” • Cut two strips of OESD Fuse and Fleece - 2” x 22”. Medium Gift Bag - Buon Natale • Cut one rectangle each of Main Fabric, lining and OESD Fuse and Fleece -13” x 27½” • Cut two strips of Bag Fabric for handles - 2” x 22” Cut two strips of OESD Fuse and Fleece - 2” x 22”. Wine Bottle Bag - Cheers • Cut one rectangle each of Main Fabric, lining and 14” x 18” • Cut one rectangle of Annie’s Soft and Stable 14” x 13”. For the Large and Medium gift bags: iron the Fuse and Fleece to the wrong side of the main fabric. Spray OESD Clean and Tear with Mettler Web Bond and affix the main fabric. Combine the designs and lettering in the BERNINA Embroidery Software. Gift Bags - Design Set-up & Embroidery Open design 82009-01 (A) and insert 82009-07 (G) > move the G into position. Right click on the Lettering icon > type the remaining letters of the name in the text box > select the Alphabet > click OK > click on the screen and move into place. Resize the alphabet if necessary by right clicking on the lettering which opens Object Properties and type the rest of the word “ift” in the text box > select the London alphabet and change the height to 1.25” > OK. > Move into position next to the G. Right click on the lettering icon and type the word “for” with a height of 1.25” > OK > Move into position. Insert the design 82009-25 > Move into position. Right click on the lettering icon and type the rest of the word “ou” with a height of 1.25” > OK > Move into position. To change the color of any of the lettering hold down the ALT key and select the letter and click on the desired color on the color bar. Save As: A Gift for You. Send the design to the machine. NOTE: Each gift bag follows the same procedure for combining a collection design with the lettering in the software. Change the words and alphabets as desired. For each bag, spray Mettler Web bond on a piece of OESD Ultra Clean and Tear. Affix the main fabric, hoop and embroider. Gift Bags - Construction For self-fabric handles, use the fabric strips pre-cut for handles. On the long edges of handle fabric, press a ¼” seam toward the wrong side. Apply ¼” Steam-a-Seam to one long edge. Press these long edges in half width- wise, lining up the folded edges. Using the Edges- stitch Foot#10, edge stitch both lengthwise edges of the handles With right sides together, fold the embroidered rectangle in half lengthwise. Stitch the side seams together using the Patchwork foot # 57 / 57D with guide and a ¼” seam allowance. Press the side seams open. ©2014 BERNINA of America, Inc. Page 3 of 4 Gift Bags cont’d To form a gusset in the bottom of the bag, on each side of the bag, line up the side seam with the center bottom of the bag, forming a triangle. Determine the desired width of the bottom gusset. (The Large gift bag has a 3” gusset; the Medium gift bag has a 2” gusset; the Wine bag has a 1” gusset.) Mark the desired gusset width across the triangle, dividing the width evenly on either side of the side seam. Stitch along this line. Trim. Repeat for the lining fabric. Mark the centers for the Embroidered fabric and the lining. Mark 2½” on either side of the center mark and pin the handles in place. Turn the lining right side out and place inside the embroidered main fabric, right sides together matching seams, centers and raw edges. Stitch a ¼” seam around the opening, reinforcing the stitching at the handles and leaving a 3-4” opening. Turn and Press. Use Edgestitch foot #10 and topstitch around the edge making sure to close the opening left for turning. Wine Bag Construction Spray the piece of Annie’s Soft and Stable with Mettler Web bond and affix to the embroidered fabric matching the bottom edge. The Soft and Stable is shorter than the Main fabric and lining for ease of gathering when tying. With right sides together, fold the embroidered rectangle in half lengthwise. Stitch the side seams together using a ½” seam allowance. Press the side seams open. To form a gusset in the bottom of the bag, on each side of the bag, line up the side seam with the center bottom of the bag, forming a triangle. Determine the desired width of the bottom gusset. (the Wine bag has a 1” gusset.) Mark the desired gusset width across the triangle, dividing the width evenly on either side of the side seam. Stitch along this line. Trim. Repeat for the lining fabric. Mark the centers for the Embroidered fabric and the lining. Turn the lining right side out and place inside the embroidered main fabric, right sides together matching seams, centers and raw edges. Stitch a ¼” seam around the opening, reinforcing the stitching at the handles and leaving a 3-4” opening. Turn and Press. Use Edgestitch foot #10 and topstitch around the edge making sure to close the opening left for turning. Tie with decorative cord or ribbon. ©2014 BERNINA of America, Inc. Page 4 of 4