1
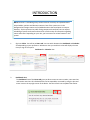
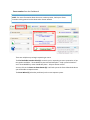
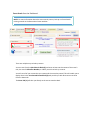
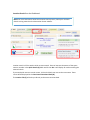
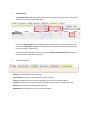
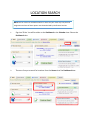
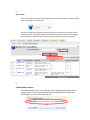
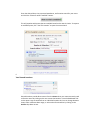
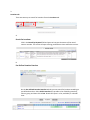
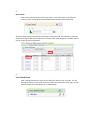
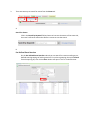
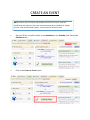
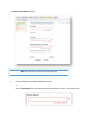
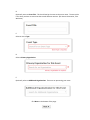
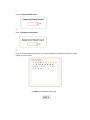
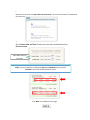
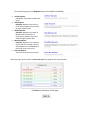
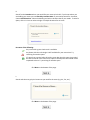
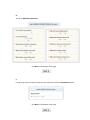
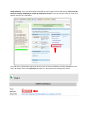
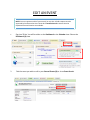
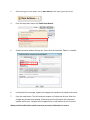
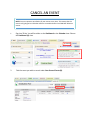
25Live Event Management 2015 User Manual INTRODUCTION NOTE: Series25 is a scheduling utility Coastal Carolina University has implemented to help schedule, optimize and allocate resources. Part of the system runs in the background and assigns rooms to all scheduled sections that need space on campus. However, 25Live represents its public‐facing component that allows users to request scheduling of spaces and events and search for a wide variety of information regarding rooms and events. Depending on your role, you have access to various features in the system. 1. Sign into 25Live. You will be on Home tab. You can switch between the Dashboard and Calendar view depending on your preference. Whichever view you used last is what will display the next time you sign in the system. Dashboard vs. Calendar view 2. Dashboard view The Dashboard view of the Home tab gives you direct access to event creation, event searches and location searches. All individual blocks can be expanded or retracted by using the plus and minus icons on the top right corner of the blocks. Use the refresh icon to update information. Event creation from the Dashboard: NOTE: For more information about the event creation process, look up our Event Creation training manual on the Reservation Center website. C A There are multiple ways to begin requesting an event. The Find Available Locations block (A) can assist you in requesting an event reservation. It has two options available: “I know WHEN my event should take place ‐‐ help me find a location!” and “I know WHERE my event should take place ‐‐ help me choose a time!” B You can click on the Create an Event button (B). It will take you to the Event Wizard tab where you will be able to request events. The Event Wizard (C) tab takes you directly to the event request system. Event Search from the Dashboard: NOTE: For more information about the event search process, look up our Event Search training manual on the Reservation Center website. C A B There are multiple ways to look up events. You can start from the Quick Search block (A) and enter at least two characters of the event’s title, the event’s Reference Number, or CRN if you wish to look up a course. You will star all of your events that you create until the event has passed. This will enable you to display them in the Your Starred Events block (B) and provide you with direct access to these from the Home tab. The Event Tab (C) will take you directly to the events searches dash. Location Search from the Dashboard: NOTE: For more information about the Location search process, look up our Location Search training manual on the Reservation Center website. C A B Location search in 25Live works similar to event search. Enter at least two characters of the space name or number in the Quick Search (A) block and click on Go. It will display all results matching the entered criteria. If you need quick access to certain rooms, click on the blank star next to the room name. These rooms will be displayed in the Your Starred Locations block (B). The Location Tab (C) will take you directly to the events searches dash. 3. Calendar View The Calendar view shows you certain events in a certain time period. You can set what type of events you wish to see and on what days. B A C Click on the Showing (A) field’s drop down arrow to limit the events to your preference and then click on Dates (B) to change the time period. You can open any events or locations from here by clicking on the blue titles. You can also start creating an event by clicking on the paper with a pen icon (C) displayed on the bottom of the event list for every day. 4. Individual tabs uses: Home tab: Redirects back to the dashboard Event Wizard tab: Opens an event wizard to request an event Events tab: Allows you to search events and opens up events on a separate sub‐tab Locations tab: Allows you to search locations and opens up locations on a separate sub‐tab Resources tab: Displays recently viewed resources Organizations tab: Displays recently viewed organizations LOCATION SEARCH NOTE: You can search for available location in 25Live for your event any time, but the assignment and uses of these spaces must be authorized by Conference Services. 1. Sign into 25Live. You will be either on the Dashboard or the Calendar view. Choose the Dashboard view. 2. There are 3 ways to search for locations from the Home tab of the Dashboard view. B A C A. Quick Search Enter at least two characters of the location name or the room number in the blank field next to the space icon and click Go. All rooms matching the entered criteria will open in the Locations tab. You can further refine the search, by clicking on More Search Options next to the search field, change to the Availability or Calendar view, and customize the way the results are displayed. B. Find Available Locations This block enables you to cross reference events and the location you wish to assign to them. If you know when the event should take place and you are searching for a room, click on the first line. Enter the desired date, time, expected attendance, and location search for your event and click the “Show me what’s available” button. This will populate with spaces that are available based on the search criteria. To request an available space, click “Use This Location” to open the event wizard. C. Your Starred Locations Starred locations provide direct access from the Home tab to your most commonly used or favorite rooms by clicking on the star next to that location. From the dashboard click on the space name to see details on an individual location tab. You can change between views, select a different date range, or select other functionalities by clicking on the Actions drop down arrow. 3. Locations tab There are two ways to search for locations from the Locations tab. A. Search for Locations A B Click in the Search by Keyword field and enter at least two characters of the room’s name or number. The results will open offering you different views and further actions. B. Pre‐Defined Location Searches On the Pre‐Defined Location Searches sub‐tab you can search for locations according to pre‐defined searches. Select Public Searches (this provides a list of building searches), select a group, and then click on Run. Results will open in a list, availability or calendar view. EVENT SEARCH NOTE: Event search is available for all University employees and students without signing into 25Live. Logged‐in users have many more options and access. 1. Sign into 25Live. You will be either on the Dashboard or the Calendar view. Choose the Dashboard view. 2. There are multiple ways to search for events from the Home tab of the Dashboard view. A B A. Quick Search Enter at least two characters of the event name, or the event code, or the CRN of a course you wish to look up in the blank field next to the paper icon and click Go. All events matching the entered criteria will open on the Events tab. You can further refine the search by clicking on More Search Options next to the search field, change to a Calendar view, or click on its title for more information. B. Your Starred Events After creating and saving an event, 25Live offers the ability to star an events. This will allow direct access to your most commonly used or favorite events. Once again, click on the title to open the event details on an individual tab. 3. There are two ways to search for events from the Event tab. A. Search for Events A B Click in the Search by Keyword field and enter at least two characters of the event title, the event’s reference code or the CRN for a course to start the search. B. Pre‐Defined Event Searches On the Pre‐Defined Event Searches sub‐tab you can search for events according to pre‐ defined search groupings of existing searches. First select a grouping, then pick a Search from the opening list, then click on Run. Results will open in a list or a calendar view. CREATE AN EVENT NOTE: In 25Live you can look up and schedule events but not classes. Those are scheduled by the registrar’s office and roomed automatically by Schedule 25. Google Chrome is the recommended browser. Internet Explorer cannot be used. 1. Sign into 25Live. You will be either on the Dashboard or the Calendar view. Choose the Dashboard view. 2. Click on the Create an Event button. The Event Creation Wizard will open: NOTE: All fields with a red asterisk must be completed! 3. Fill out the fields A‐Q to request scheduling of an event. A. Enter an Event Name. The event name cannot have abbreviations or names. (40 character limit) B. Optionally enter an Event Title. This should not be the same as the event name. The event title is for when you have an event that has several different sections. (EX. Name: Orientation, Title: Welcome) C. Select an event Type. D. Select a Primary Organization. E. Optionally select an Additional Organizations. These are co‐sponsoring your event. Click Next on the bottom of the page. F. Enter the Expected Head Count. G. Enter the Registered Head Count. H. Enter a brief description of the event. This will be published on calendar feeds. Do not simply repeat your event name. Click Next on the bottom of the page. I. Determine if the event has more than one occurrence. All occurrences must be scheduled at the same time. J. Set the Event Date and Time. Choose the start and end date/time of the first occurrence. These dates must be the same NOTE: You are required to include both Setup and Takedown time of at least 5 minutes, to provide a buffer between events. Click Next on the bottom of the page. For reoccurring events, the Repeats options list simplifies scheduling. Ad Hoc Repeats: Individually select dates to add to the event. Daily Repeats: Examples: Repeats every day for 5 occurrences; Repeats every 3rd day through a specific date. Weekly Repeats: Examples: Repeats every week on Monday and Thursday for 12 occurrences; Repeats every other week through a specific date. Monthly Repeats: Examples: Repeats every month on the 1st and 15th through a specific date; Repeats every 3rd Monday of the month for 6 occurrences. Does Not Repeat: The event only has one occurrence. After selecting a repeats option the Occurrence List will populate with selected dates. Click Next on the bottom of the page. K. Search for the Locations where you would like your event to be held. If you know where you are holding your event you can Search by Location Name. If you need to search for a location, choose Saved Searches. Select the building and select a location that fit your needs. To select a Space, click on it. You can select a single or multiple locations for an event. Be aware of the following: Any room with a green check mark is available. Any Room with the red triangle is NOT available for your event time. Try searching for another space. If a space has a vertical white ˂ inside a green box then this space is occupied but can be shared. Class sessions are input as shared spaces and should not be requested to share. Try searching for another space. Click Next on the bottom of the page. L. Search and select any physical resources you need for the event (e.g. AV, Fac, etc.). Click Next on the bottom of the page. M. Answer all Mandatory Questions. Click Next on the bottom of the page. N. If requesting event on behalf of someone else, indicate this with the Requested For field. Click Next on the bottom of the page. O. Use Event Comments to add any setup direction or additional event details that may be helpful to the successful completion of the event. Click Next on the bottom of the page. P. Check mark I Agree to confirm the following statement: I acknowledge that I have accurately completed this event request to the best of my ability. I understand that this is only a request, and my event is not confirmed until I have received a confirmation email from the Office of Scheduling & Space Management. I also understand that my resource request is not confirmed until I receive a confirmation email from the respected office. Q. Click on the Save button to submit your request. Congratulations. You have successfully summited an event request. 25Live will display “This event has been successfully submitted for review by Conference Services.” You can star the event for easier and quicker access to it in the future. An email with a confirmation notice will be sent once an event coordinator reviews and approves the event. Be aware of the event Reference number as it will make event tracking much faster. EDIT AN EVENT NOTE: You can request an edit of your event(s) at any time. All edit request must be approved by Conference Services. Please do a Location Search to ensure that the requested time and location are available. 1. Sign into 25Live. You will be either on the Dashboard or the Calendar view. Choose the Dashboard (A) view. A 2. Find the event you wish to edit in your Starred Events (B) or via an Event Search. B 3. 4. After locating your event details, click on More Actions at the upper right of the screen. From the drop down menu click Email Event Details. 5. 6. A communication window will pop up. Ensure that the Scheduler ‘To box’ is checked. In the body of the message, explain the changes that needed to be made to the event. Press the send button. This will send your request to Conference Services. After the changes are reviewed and applied, a follow‐up email confirmation with requested updates will be sent. Changes will not applied until a confirmation email is received. 7. Always read all confirmation emails to ensure your event information is correct. CANCEL AN EVENT NOTE: You can request a cancellation of your events at any time. This means that the event is still going to be visible but will have a cancelled status. You CAN NOT delete an events. 1. Sign into 25Live. You will be either on the Dashboard or the Calendar view. Choose the Dashboard (A) view. A B 2. Find the event you wish to cancel under Your Starred Events (B). 3. 4. After locating your event details, click on More Actions at the upper right of the screen. From the drop down menu click Email Event Details. 5. 6. A communication window will pop up. Ensure that the Scheduler ‘To box’ is checked. In the body of the message, state that you need to cancel this event. Press the send button, This will send your request to Conference Services. After the changes are reviewed and applied, a follow‐up email confirmation with requested updates will be sent. Changes will not applied until a confirmation email is received. 7. Always read all confirmation emails to ensure your event information is correct.