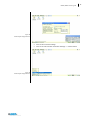
1
ASEM Open Automation Systems USER’S GUIDE HMI30 / HMI30-TF Code 86060322 Version A01 Date 16.07.2012 ii Revisions Revisor Thei Thei – Mantovani - Fumagalli Thei – Boscolo – Zamò Mantovani Date 22/11/2011 16/06/2012 Release ES Draft A00 A01 iii Summary SECTION 1 ........................................................................................................................................................................................................... 1 1 Preliminary Information ............................................................................................................................................................................. 1 1.1 General notes .................................................................................................................................................................................... 2 1.2 Trademarks........................................................................................................................................................................................ 2 1.3 Instructions on disposal ..................................................................................................................................................................... 2 1.4 Description of safety symbols............................................................................................................................................................. 3 1.5 Qualified Personnel ........................................................................................................................................................................... 4 1.6 Basic knowledge required .................................................................................................................................................................. 4 1.7 Proper use of the product .................................................................................................................................................................. 4 1.8 Purpose of the user’s guide ................................................................................................................................................................ 4 1.9 The manual is a part of the system ..................................................................................................................................................... 4 1.10 Figures ............................................................................................................................................................................................... 4 1.11 Scope of the operating instructions .................................................................................................................................................... 5 1.12 Safety instructions ............................................................................................................................................................................. 5 1.12.1 Installation according to the instructions .................................................................................................................................. 5 1.12.2 Hazardous areas ....................................................................................................................................................................... 5 1.12.3 Working on the control cabinet................................................................................................................................................. 5 1.13 Notes about usage ............................................................................................................................................................................. 6 1.14 Applicable standard ........................................................................................................................................................................... 6 SECTION 2 ........................................................................................................................................................................................................... 7 2 Description ................................................................................................................................................................................................ 7 2.1 Product description............................................................................................................................................................................ 8 2.2 Key features....................................................................................................................................................................................... 8 2.3 Package ............................................................................................................................................................................................. 8 2.4 Configuration ..................................................................................................................................................................................... 9 2.4.1 HMI30 (full aluminium front panel) ............................................................................................................................................... 9 2.4.2 HMI30-TF (aluminium front panel with true flat technology) ......................................................................................................... 9 2.4.3 Main difference between full aluminium front panel and aluminium front panel with true flat technology .................................. 10 2.5 Front view ....................................................................................................................................................................................... 11 2.5.1 Full aluminium front panel .......................................................................................................................................................... 11 2.5.2 Aluminium front panel with True Flat technology ........................................................................................................................ 11 2.5.3 Widescreen ................................................................................................................................................................................. 12 2.6 Rear view......................................................................................................................................................................................... 13 2.7 Side view ......................................................................................................................................................................................... 15 2.8 Connector view ................................................................................................................................................................................ 16 2.8.1 Labels.......................................................................................................................................................................................... 16 2.9 Touchscreen .................................................................................................................................................................................... 17 2.10 Putting in operation HMI30 .............................................................................................................................................................. 18 2.10.1 Configuration and project creation ......................................................................................................................................... 18 2.10.2 Process management.............................................................................................................................................................. 18 2.11 Software options ............................................................................................................................................................................. 19 SECTION 3 ......................................................................................................................................................................................................... 21 3 Installation and connection ...................................................................................................................................................................... 21 3.1 Preparation for installation .............................................................................................................................................................. 22 3.1.1 Select the mounting location ....................................................................................................................................................... 22 3.2 Checking the package contents ........................................................................................................................................................ 22 3.3 Checking the operating conditions ................................................................................................................................................... 22 3.4 Mounting position ........................................................................................................................................................................... 23 3.4.1 Damage due to overheating ........................................................................................................................................................ 23 3.5 Checking installation distances......................................................................................................................................................... 24 3.6 Preparing the mounting cut-out ....................................................................................................................................................... 24 3.6.1 Degrees of protection .................................................................................................................................................................. 25 3.6.2 Cut-out measures ........................................................................................................................................................................ 25 3.7 Mounting the device ........................................................................................................................................................................ 27 3.7.1 Position of the mounting clamps ................................................................................................................................................. 27 3.7.2 Tools to tighten the mounting clamps.......................................................................................................................................... 28 3.7.3 Procedure ................................................................................................................................................................................... 29 3.8 Connecting the device ...................................................................................................................................................................... 32 3.8.1 Notes on connection ................................................................................................................................................................... 32 3.8.2 Grounding and bonding ............................................................................................................................................................... 32 3.8.3 Power supply connection ............................................................................................................................................................ 32 3.8.4 Switching on and testing the HMI Device ..................................................................................................................................... 33 3.9 Connecting the configuration PC ...................................................................................................................................................... 34 3.9.1 Procedure ................................................................................................................................................................................... 37 SECTION 4 ......................................................................................................................................................................................................... 39 4 Commissioning the device ........................................................................................................................................................................ 39 4.1 Backup design .................................................................................................................................................................................. 40 iv 4.2 Internal memory .............................................................................................................................................................................. 40 4.3 Slot for memory card ....................................................................................................................................................................... 41 4.4 Installation/removal of a memory card ............................................................................................................................................ 41 SECTION 5 ......................................................................................................................................................................................................... 43 5 Commissioning a project .......................................................................................................................................................................... 43 5.1 Overview ......................................................................................................................................................................................... 44 5.2 Transfer ........................................................................................................................................................................................... 44 5.3 Configuring the serial port................................................................................................................................................................ 44 5.3.1 Connecting the serial port ........................................................................................................................................................... 46 5.4 Managing the project ....................................................................................................................................................................... 46 5.4.1 Stopping the running project ....................................................................................................................................................... 47 5.4.2 Starting the project ..................................................................................................................................................................... 48 5.4.3 Debugging the project ................................................................................................................................................................. 49 5.4.4 Trasfer the project from HMI30 to the configuration PC ............................................................................................................... 51 5.5 Backup and restore .......................................................................................................................................................................... 52 5.6 Updating the operating system ........................................................................................................................................................ 52 SECTION 6 ......................................................................................................................................................................................................... 53 6 Maintenance and care.............................................................................................................................................................................. 53 6.1 Calibration of the touchscreen ......................................................................................................................................................... 54 6.2 Maintaining & cleaning .................................................................................................................................................................... 55 6.2.1 Procedure ................................................................................................................................................................................... 56 6.2.2 Backup battery replacement (CR2032 3V) .................................................................................................................................... 56 6.3 Technical support & repairs.............................................................................................................................................................. 59 6.4 Recycling and disposal ..................................................................................................................................................................... 59 SECTION 7 ......................................................................................................................................................................................................... 61 7 Technical specifications ............................................................................................................................................................................ 61 7.1 Technical specifications.................................................................................................................................................................... 62 7.1.1 5.7” display characteristics .......................................................................................................................................................... 65 7.1.2 7” display characteristics ............................................................................................................................................................. 65 7.1.3 8.4” display characteristics .......................................................................................................................................................... 65 7.1.4 10.4” display characteristics ........................................................................................................................................................ 66 7.1.5 12.1” (SVGA) display characteristics............................................................................................................................................. 66 7.1.6 12.1” (XGA) display characteristics .............................................................................................................................................. 66 7.1.7 15.0” display characteristics ........................................................................................................................................................ 67 7.2 Certificates and approvals ................................................................................................................................................................ 67 7.3 Dimension drawings ........................................................................................................................................................................ 68 7.3.1 HMI30 5.7” (Full Aluminium front panel) ..................................................................................................................................... 68 7.3.2 HMI30-TF 5.7” (Aluminium front panel with True Flat technology) ............................................................................................... 69 7.3.3 HMI30 7.0” (Wide Full Aluminium front panel) ............................................................................................................................ 70 7.3.4 HMI30-TF 7.0” (Wide Aluminium front panel with True Flat technology) ...................................................................................... 71 7.3.5 HMI30 8.4” (Full Aluminium front panel) ..................................................................................................................................... 72 7.3.6 HMI30-TF 8.4” (Aluminium front panel with True Flat technology) ............................................................................................... 73 7.3.7 HMI30 10.4” (Full Aluminium front panel) ................................................................................................................................... 74 7.3.8 HMI30-TF 10.4” (Aluminium front panel with True Flat technology) ............................................................................................. 75 7.3.9 HMI30 12.1” (Wide Full Aluminium front panel) .......................................................................................................................... 76 7.3.10 HMI30-TF 12.1” (Wide Aluminium front panel with True Flat technology) ............................................................................... 77 7.3.11 HMI30 15.0” (Full Aluminium front panel) ............................................................................................................................... 78 7.3.12 HMI30-TF 15.0” (Aluminium front panel with True Flat technology) ........................................................................................ 79 7.4 Ports PINOUT ................................................................................................................................................................................... 80 7.4.1 COM1 – DB15M Serial ................................................................................................................................................................. 80 7.4.2 LAN1 – LAN2 ............................................................................................................................................................................... 80 7.4.3 USB1 / USB2................................................................................................................................................................................ 83 7.5 Technical support & repairs.............................................................................................................................................................. 83 v HMI30 / HMI30-TF User’s guide SECTION 1 1 Preliminary Information 1 2 SECTION 1 – Preliminary Informations 1.1 General notes a) The information in this manual is subject to change and is in no way binding upon ASEM S.p.A. b) ASEM S.p.A. is not responsible for technical errors or other omissions in the manual, and shall not accept any responsibility deriving from its use. 1.2 Trademarks a) All brands and product names mentioned in this manual are trademarks of their respective owners. 1.3 Instructions on disposal Il simbolo sul prodotto o sulla confezione indica che il prodotto non deve essere considerato come un normale rifiuto domestico, ma deve essere portato nel punto di raccolta appropriato per il riciclaggio di apparecchiature elettriche ed elettroniche. Provvedendo a smaltire questo prodotto in modo appropriato, si contribuisce a evitare potenziali conseguenze negative per l’ambiente e la salute, che potrebbero derivare da uno smaltimento inadeguato del prodotto. Per informazioni più dettagliate sul riciclaggio di questo prodotto, contattare l’ufficio comunale, il servizio locale di smaltimento rifiuti o il fornitore da cui è stato acquistato il prodotto. The symbol on the product or in its packaging indicates that this product may not be treated as household waste. Instead it shall be handed over the applicable collection point for the recycling of electrical and electronic equipment. By ensuring this product is disposed of correctly, you will help prevent potential negative consequences for the environment and human health, which could otherwise be caused by inappropriate waste handling of this product. For more detailed information about recycling of this product, please contact your local city office, your household waste disposal service or the supplier where you purchased the product. Le symbole sur le produit ou son emballage indique que ce produit ne peut être traitè comme décher ménager. It doit être remis au point de collecte dèdié à cet effect (collect et recyclage du matèriel èlectrique et èlectronique). En procèdant à la mise à la casse règlementaire de l’appareil, nous prèservons l’environnement et notre sécurité, s’assurant ainsi que les dèchets seront traitès dans des conditions appropriées. Pour obtenir plus de dètails sur le recyclage de ce produit, veuillez prendre contact avec les services de votre commune ou le distributeur où vous avez effectué l’achat. IT EN FR HMI30 / HMI30-TF User’s guide 3 DE Das Symbol auf dem Produkt oder seiner Verpackung weist darauf hin, dass dieses Produkt nicht als normaler Haushaltsabfall zu behandeln ist, sondern an einem Sammelpunkt für das Recycling von elektrischen und elektronischen Geräten abgegeben werden muss. Durch ihren Beitrag zum korrekten Entsorgen dieses Produkts schützen Sie die Umwelt und die Gesundheit Ihrer Mitmenschen. Umwelt und Gesundheit werden durch falsches Entsorgen gefährdet. Weitere Informationen über das Recycling dieses Produkts erhalten Sie von Ihrem Rathaus, Ihrer Müllabfuhr oder den Distributoren, in dem Sie das Produkt gekauft haben. El simbolo en el producto o en su embalaje indica que este producto no se puede tratar como desperdicios normales del hogar. Este producto se debe entregar al punto de recolección de equipos eléctricos y electrónicos para reciclaje. Al asegurarse de que este producto se deseche correctamente, usted ayudará a evitar posibles consequencias negativas para el ambiente y la salud pública, lo qual podria ocurrir si este producto no se manípula de forma adecuada. Para obtener informaciónes mas detalladas sobre el reciclaje de este producto, póngase en contacto con la adMinistraciòn de su ciudad, con su servicio de desechos del hogar o con el surtidor donde comprò el producto. simbolo no produto ou na embalagem indica que este producto não pode ser tratado como lixo doméstico. Em vez disso, deve ser entregueado ao centro de recolha selectiva para a reciclagem de equipamento electrico e electronico. Ao garantir uma eliminação adequada deste produto, ira ajudar a evitar eventuais consequencjas negativas para o meio ambiente e para a saude publica, que, de outra forma, poderiam ser provocadas por un tratamento incorrecto do produto. Para obtener informações mais detalhadas sobre a reciclagem deste produto, contacte os serviços municipalizados locais, o centro de recolha selectiva da sua area de residência ou no distribuidor onde adquirir ou produto. ES PT 1.4 Description of safety symbols This symbol indicates a danger to life or health of personnel. Danger Attention Note This symbol indicates a danger to the hardware and / or the environment. This symbol indicates an additional information meant to provide a better understanding. 4 SECTION 1 – Preliminary Informations 1.5 Qualified Personnel a) HMI30 may be operated only by personnel qualified for the specific task in accordance with the relevant documentation for the specific task, in particular its warning notices and safety instructions. b) Qualified personnel are those who, based on their training and experience, are able to identify risks and avoid potential hazards when working with these systems. 1.6 Basic knowledge required a) To understand operating instructions a general knowledge of automation technology is needed. b) Knowledge of personal computers and the Microsoft operating system is required to understand this user’s guide. 1.7 Proper use of the product a) ASEM products may only be used for the applications described in the catalogue and in the technical documentation. b) If products and components from other manufacturers are used, these must be approved by Asem. c) Proper transport, assembly, installation, storage, commissioning, operation and maintenance are required to ensure that the product operates safely. d) The indicated environmental conditions must be observed. e) The information in this user’s manual must be observed. 1.8 Purpose of the user’s guide a) This user’s manual contains information based on the requirements defined by DIN EN 62079 for mechanical engineering documentation. b) These operating instructions are intended for: 1. Users. 2. Commissioning engineers. 3. Maintenance personnel. c) Pay attention at the information in the chapter "Safety instructions". d) More information such as operating instructions, examples and reference information, are available in the online help of Premium HMI 3 software and Ubiquity software. 1.9 The manual is a part of the system a) This user’s guide belongs to HMI30 and is also required for commissioning. b) Keep all supplied documentation for the entire service life of HMI30. 1.10 Figures a) This manual contains illustrations of the described devices. b) Some details of the illustrations may differ from the device provided. HMI30 / HMI30-TF User’s guide 5 1.11 Scope of the operating instructions c) The operating instructions apply to the HMI30 family devices in conjunction with the Premium HMI 3 software. The devices are the following: 5.7” 7.0” Wide 8.4” HMI30 10.4” Full aluminum front panel 12.1” 15.0” 5.7” 7.0” Wide 8.4” HMI30-TF 10.4” Aluminum front panel with True Flat technology 12.1” 15.0” 1.12 Safety instructions 1.12.1 Installation according to the instructions Commissioning the HMI device is prohibited until it has been absolutely ensured that the system in which the HMI device is to be installed complies with all the applicable EU and international regulation. 1.12.2 Hazardous areas Do not use HMI30 in hazardous areas. 1.12.3 Working on the control cabinet Open equipment The HMI device is open equipment. This means that the HMI30 may only be integrated in housings or cabinets, where it can be operated from the front panel. The cabinet in which HMI30 is installed may only be accessed with a key or tool and only by trained and authorized personnel. Dangerous voltage Opening the cabinet may expose high voltage parts. Before opening the cabinet always disconnect the power. 6 SECTION 1 – Preliminary Informations 1.13 Notes about usage HMI30 is approved for indoor use only. HMI30 may be damaged if operated outdoors. 1.14 Applicable standard Please refer to section 8 for details about the relevant standards. HMI30 / HMI30-TF User’s guide SECTION 2 2 Description 7 SECTION 2 - Description 8 2.1 Product description The HMI30 family is the HMI solution with RISC architecture that allows running Premium HMI3 and Ubiquity software platforms. Based on ARM Cortex A8 processor and Microsoft Windows Embedded Compact 7 (C7P) operating system, HMI30 is available in BASIC or ADVANCED version according to Premium HMI 3 runtime installed. The systems can have standard (HMI30) or true flat (HMI30-TF) front frame. 2.2 Key features CPU ARM CORTEX A8 Frontal IP 65 O.S. Microsoft Windows Embedded Compact 7 (C7P) installed on flash memory. Data and programs are contained in two different flash disk devices. Asem Premium HMI software. Asem Ubiquity software. 2.3 Package HMI30 package consists of: HMI30 system Table 1 Package User’s guide CD Quick Installation guide n.10 Clamps with grub screw (depending of the LCD size) n.1 Power supply plug Premium HMI software CD Ubiquity software CD HMI30 / HMI30-TF User’s guide 2.4 Configuration The following figures show the various configurations. 2.4.1 HMI30 (full aluminium front panel) Figure 1 HMI30 5.7” HMI30 2.4.2 5.7” 7.0” Wide 8.4” 10.4” 12.1” 15.0” Full aluminum front panel HMI30-TF (aluminium front panel with true flat technology) Figure 2 HMI30-TF 5.7” HMI30-TF 5.7” 7.0” Wide 8.4” 10.4” 12.1” 15.0” Aluminium front panel with True Flat technology 9 SECTION 2 - Description 2.4.3 Main difference between full aluminium front panel and aluminium front panel with true flat technology The aluminium front panel has a “step” between the front panel and the touchscreen. Step Figure 3 Front panel “Step” detail The front panel with true flat technology has no “step” between the front panel and the touchscreen, therefore it can be easily cleaned. The polyester top-film covers the resistive touchscreen up to the aluminium border. NO Step Figure 4 Front panel “No step” detail 10 HMI30 / HMI30-TF User’s guide 2.5 Front view 2.5.1 Full aluminium front panel 1 2 Figure 5 Full aluminium front panel detail 1 Full aluminium front panel 2 Touchscreen display 2.5.2 Aluminium front panel with True Flat technology 1 Figure 6 Aluminium front panel with true flat technology detail 2 1 Aluminium front panel with top polyester film 2 Touchscreen display 11 SECTION 2 - Description 2.5.3 12 Widescreen In HMI30 family, the systems with 5.7” and 8.4” display have 4:3 aspect ratio, while the system with 7.0” display has 15:9 (wide) aspect ratio. The 7.0” wide display provides 25% more area than the smaller 5.7” size. HMI30 7.0” is available with aluminium front panel or true flat and widescreen. 2.5.3.1 Widescreen Full aluminium front panel 1 Figure 7 widescreen full aluminium front panel detail 2 1 Frame 2 Touchscreen display 2.5.3.2 Widescreen aluminium front panel with True Flat technology 1 Figure 8 widescreen aluminium front panel with true flat technology detail 2 1 Frame 2 Touchscreen display HMI30 / HMI30-TF User’s guide 2.6 Rear view 2 Figure 9 HMI30 5.7” rear view 1 1 Ventilation holes 2 Mounting seal Note: rear panels may be different depending on display size. Figure 10 HMI30 7.0” rear view 2 1 Note: the user manual refers to HMI 5.7” version. Other versions will be discussed only when necessary. 7.0” 1 Ventilation holes 2 Mounting seal 13 14 SECTION 2 - Description 1 Figure 11 HMI30 8.4” rear view 1 Ventilation holes 2 Mounting seal 15 HMI30 / HMI30-TF User’s guide 2.7 Side view 1 1 1 2 Figure 12 HMI30 5.7” side view 2 2 1 Ventilation holes 2 Recess for fixing clamps 1 1 2 Figure 13 HMI30 5.7” side view 2 2 2 1 1 Ventilation holes 2 Recess for fixing clamps SECTION 2 - Description 16 2.8 Connector view 9 8 7 6 5 Figure 14 HMI30 5.7” connectors 1 2 4 3 1 Power DC input 6 2 USB2 (2.0) 7 3 Reset button 8 LAN1 (10/100 Mbps) Fieldbus LAN2 (10/100 Mbps) Ubiquity Power on LED 4 SD card slot 9 USB1 (2.0) 5 COM 1 (RS232/422/485 MPI) For detailed description refer to section 8. 2.8.1 Labels On the rear panel are present the following the connectors label and the CE label. Figure 15 HMI30 connectors label detail Figure 16 HMI30 CE label detail HMI30 / HMI30-TF User’s guide 2.9 Touchscreen Table 2 Touchscreen Size Standard True Flat 5.7” 7.0” wide 8.4” 10.4” 12.1” 15.0” 5.7” 7.0” wide 8.4” 10.4” 12.1” 15.0” Touchscreen 4 - wire 5 - wire 5 – wire 5 – wire 5 – wire 4 – wire 5 – wire 5 – wire 5 – wire 5 - wire Panel technology The touchscreen is installed from the back of the front panel. There is a step between the front panel and the touchscreen. The user touches directly the touchscreen. The touchscreen is fully planar with the aluminium front panel. No step. The touchscreen is covered by an overlay film (polyester) which is glued to the touchscreen with an optically clear adhesive (OCA) for improved optical performance 17 SECTION 2 - Description 18 2.10 Putting in operation HMI30 To put in operation HMI30 the followings two phases must be done: ● Configuration and creation of the project of HMI30. ● Process management. 2.10.1 Configuration and project creation During the configuration phase, you create the user interfaces for operation and monitoring of the technical process by using a PC on which is installed Premium HMI development environment. Configuration also includes: Creating the project. Saving the project. Testing the project. Simulating the project. After compiling the configuration, you load the project into the HMI30 device. Figure 17 Configuration and project creation 2.10.2 Process management Process management is a two-way communication between HMI device and PLC. Figure 18 Process management HMI30 / HMI30-TF User’s guide 2.11 Software options Function Table 3 Software options Table 4 Graphic interface Table 5 Alarm log Table 6 Recipes – Data loggers Table 7 Trends Table 8 Users & Passwords RealTime DB Scaling ODBC Realtime Trace DB Data Structure OPC Client DA Networking Premium HMI 3.0 BASIC for Win CE Max. 512 bytes Yes Yes Yes Yes Yes Yes Premium HMI 3.0 ADVANCED for Win CE Max. 4096 bytes Yes Yes Yes Yes Yes Yes Yes Yes Yes Yes Yes Yes Yes Yes Yes Yes Yes Yes Yes Yes Yes Yes Yes Yes Yes Yes Yes Yes Yes Yes Yes Yes Yes Yes Max. 512 Alarms Yes Yes Yes No Max. 2048 Alarms Yes Yes Yes Yes Yes Yes Yes Yes Yes Max 2 Yes Yes Yes Yes Yes Yes Yes Yes Yes Yes Yes Yes Yes Yes Graphic Interface Vectorial Graphic Editor Support for BMP, GIF, JPG, WMF, EMF Dynamic Animation Symbols Library Import/Export Symbols Public Symbols Power Templates (VBA Symbols) Grid Synapsis Scheduler Editing Menu Style Source Management in Symbols IP Camera Viewer Alias management in Objects Alarm Logs Alarms Management Historical Management (XML) Historical Management (ODBC) Alarms Notification (SMS, Email, Voice) Alarms Area Comments on alarm ACK Recipes – Data Loggers Recipes / Data Logger (XML) Recipes / Data Loggers (ODBC) Textual Report Trends Trend RealTime Historical Trends on file .CSV Historical Trends (linked to DataLogger XML) Historical Trends Database (ODBC) Data Analysis Users & Passwords Use 1024 levels User Groups CFR21 Runtime Users Yes Yes Yes Yes Yes Yes Yes Yes 19 SECTION 2 - Description Table 9 Dynamic multilanguage Table 10 Drivers Table 11 Event Object Table 12 Scaling Object Table 13 Scheduler Object Table 14 Logics Table 15 Networking Table 16 Child Projects Table 17 Software options Table 18 Visual studio source safe 2005 integration Table 19 Web server Table 20 Touch Screen Support Table 21 Cross Reference Table 22 Debugger Dynamic Multilanguage Unicode support Drivers Max. number of Driver PLC Tag Importer Yes Yes Max nr. 2 Yes Yes Yes Max nr. 4 Yes Event Object Yes Yes Scaling Object Yes Yes Scheduler Object Yes Yes Logics IL Logic (Step5-Step7) VBA Logic (WinWrap Basic) Sinapsis Logic Yes Yes Yes Yes Yes Yes Networking Yes Yes Child Projects Yes Yes Screen Navigation Yes Yes Visual Studio SourceSafe 2005 Integration Yes Yes Web Server No Yes (Max 2 clients) Touch Screen Support Yes Yes Cross Reference Yes Yes Debugger Yes Yes 20 HMI30 / HMI30-TF User’s guide SECTION 3 3 Installation and connection 21 SECTION 3 – Installation and connection 22 3.1 Preparation for installation 3.1.1 Select the mounting location Points to observe when selecting the mounting location: a) Position HMI30 to avoid exposure to direct sunlight. b) Position HMI30 such that it is ergonomically accessible for the operator. c) Choose a suitable mounting height. d) Ensure that the ventilation holes are not covered. 3.2 Checking the package contents Note: please refer to paragraph 2.3 Package. Check the package content for visible signs of transport damage and for completeness. In the case of damaged parts, contact your ASEM representative. Do not install parts damaged during shipment. 3.3 Checking the operating conditions Read carefully the standards, approvals, EMC parameters and technical specifications for operation of the HMI device. This information is available in the following sections: o Certificates and approvals (see section 8). o Electromagnetic compatibility (see section 8). Check the mechanical and climatic ambient conditions for operation of the HMI device: Ambient conditions (see section 8). Follow the instructions for local use of the HMI device: Notes about usage. Adhere to the permissible rated voltage and the associated tolerance range: o 24V o Range: 18÷36 VDC HMI30 / HMI30-TF User’s guide 23 3.4 Mounting position The HMI device is suitable for installation in: Mounting cabinets Control cabinets Switchboards Consoles 3.4.1 Note: For installation in control cabinets and, in particular, in closed containers, make sure the recommended ambient temperature is maintained. For further details please refer to section 8.1 Technical specifications. Figure 19 Mounting position Damage due to overheating The operative temperature must be between 0° and 50°C. All HMI systems are designed for vertical mounting position. An inclined installation reduces the thermal convection by the HMI device and the maximum permissible ambient temperature for operation. Please contact ASEM for details. The HMI device may otherwise be damaged and its certifications and warranty will be void. SECTION 3 – Installation and connection 24 3.5 Checking installation distances To ensure adequate ventilation it is necessary leaving the following open spaces around the system: X direction 15 mm (min.) for each side. Y direction 50 mm (min.) for each side. Z direction 10 mm (min.). Y X X Z Y Figure 20 Installation distances 3.6 Preparing the mounting cut-out In order to ensure a proper mounting of the system, the material of the mounting cut-out must be sufficiently stable. To obtain the degree of protection described below, the material of the mounting panel must not deform due to the use of clamps on the operator panel. HMI30 / HMI30-TF User’s guide 3.6.1 25 Degrees of protection The degrees of protection of the system are guaranteed only if the following conditions are satisfied: Material thickness at the mounting cut-out for IP65 protection: 2mm to 4 mm. Deviations of the plane of the mounting cut-out limits: ≤ 0.5 mm. This condition must be satisfied even when the HMI30 is installed. Allowed surface roughness in the area of the seal: ≤ 120 microns (Rz 120). 3.6.2 Cut-out measures 3.6.2.1 5.7” cut-out 3.6.2.2 7.0” wide cut-out 3.6.2.3 8.4” cut-out Figure 21 HMI30 5.7” cut-out Figure 22 HMI30 5.7 cut-out” Figure 23 HMI30 5.7” cut-out SECTION 3 – Installation and connection 3.6.2.4 10.4” cut-out 3.6.2.5 12.1” cut-out 3.6.2.6 15.0” cut-out Figure 24 HMI30 10.4 cut-out” Figure 25 HMI30 12.1 cut-out” Figure 26 HMI30 15.0 cut-out” 26 HMI30 / HMI30-TF User’s guide 27 3.7 Mounting the device 3.7.1 Position of the mounting clamps To obtain the declared degree of frontal protection for the system, it is necessary to respect the positions of the clamps shown below. The table below shows the number and the position of the clamps for each HMI30 size. System Clamp Quantity HMI30 / HMI30-TF 5.7” 7 HMI30 / HMI30-TF 7.0” 7 HMI30 / HMI30-TF 8.4” 8 HMI30 / HMI30-TF 10.4” 10 Table 23 Position of the mounting clamps Clamp position SECTION 3 – Installation and connection HMI30 / HMI30-TF 12.1” 10 HMI30 / HMI30-TF 15.0” 10 3.7.2 Tools to tighten the mounting clamps 1.5 mm hexagonal key. 28 HMI30 / HMI30-TF User’s guide 3.7.3 Procedure 1. Figure 27 Installation Figure 28 Installation Insert HMI30 into the mounting cut-out from the front. 29 SECTION 3 – Installation and connection Figure 29 Installation 2. Figure 30 Installation Figure 31 Installation Insert the fixing clamps into the housings of the device. 30 HMI30 / HMI30-TF User’s guide 3. Tighten the fixing clamps with a 1.5 mm hex key. 4. 5. Repeat steps 2 and 3 for all mounting clamps. Check the seal seat. Figure 32 Installation Note: adhere to the permissible torque when tightening the threaded pin of the mounting clamp: 0.2 Nm. Figure 33 Installation 31 SECTION 3 – Installation and connection 32 3.8 Connecting the device 3.8.1 Notes on connection HMI30 must be installed in accordance with the indications contained in this operating instructions. 3.8.2 Grounding and bonding Whenever two pieces of equipment connected to each other are far apart, it is possible that their ground connections could be at a different potential level. The data cable screens connecting the equipment’s chassis on one end and the HMI’s chassis on the other end can therefore be subject to a high current circulation capable of destroying the interface. To overcome this hazard such current must be steered away from the interface. To achieve this goal the following methods can be used: 1. Use an equipotential bonding cable (16mm ) to connect the equipments’ ground to the HMI’s ground. Connect the data cable screens to the equipotential bonding rail on both sides before connecting the cable to the interfaces. 2. 2 3.8.3 Power supply connection The device may only be connected to a 24V (maximum permissible operating voltage range 18V to 36V) power supply which satisfies the requirements of Attention: the system must safe extra low voltage (SELV) in accordance with IEC/EN/DIN EN/UL60950-1. be powered with a voltage of 24V (18V÷36V). The power supply has to fulfil the requirements NEC Class2 or LPS in accordance with IEC/EN/DIN EN/UL60950-1 2 Connect the device with a cable cross-section of 0.75 – 1.5 mm (AWG18 to AWG16). Remove the three poles connector from the system. Connect the positive pole, the negative and the ground one (also refer to the label on the back of the system) to the respective terminals of the three pole connector. Figure 34 Power supply connection detail EMC Ground (0V) - (0V) + (24V) HMI30 / HMI30-TF User’s guide Figure 35 Power supply connection detail 3.8.4 Switching on and testing the HMI Device Connect the power supply cable to HMI30. Switch On the power supply. The green led will light. Figure 36 Power supply connection detail The display will switch on accordingly, and after few seconds the Windows CE desktop will appear. 33 SECTION 3 – Installation and connection 34 3.9 Connecting the configuration PC You can connect the configuration PC to HMI30 in several ways: 1) By using a Ethernet cross cable connected by one end to the configuration PC and on the other end to one of two Ethernet ports of HMI30. 2) By connecting HMI30 to a Ethernet switch on which the configuration PC and HMI30 are both connected 3) By connecting HMI30 and the configuration PC to the office LAN Please note that HMI30 comes with DHCP service enabled. It means that in case of the point 3 above it is enough to connect HMI30 in LAN and the DHCP server of the LAN will assign automatically an IP address to HMI30. In case there is not a DHCP server available, you must assign a static IP address to HMI30 compatible with the IP address of the configuration PC. For Example if the PC has IP address 172.17.17.20 you must configure for example HMI30 with the IP address 172.17.17.182. To configure the IPC address in the panel you must: Click on the start Button, select “Settings” -> “Network and Dial-up Connections” According to the Ethernet port you want to configure choose the port to configure according to the table: Figure 37 Connecting the configuration PC Table 24 Connecting the configuration PC LAN port on HMI30 LAN1 LAN2 LAN Connection in control panel General purpose Ubiquity For instance if you need to configure LAN1 double click on FEC1, Click on “Specify an IP address” and write the IP address and default Gateway like in the figure below HMI30 / HMI30-TF User’s guide Figure 38 Connecting the configuration PC Figure 39 Connecting the configuration PC Click on Ok to save the settings. Click on the “Start” button and select “Settings” -> “Control Panel” 35 SECTION 3 – Installation and connection Then double click on “Registry Saver” Click on the “Save” button and confirm clicking on “Ok”. This operation will save your setting in a permanent way. Figure 40 Connecting the configuration PC Figure 41 Connecting the configuration PC 36 HMI30 / HMI30-TF User’s guide 3.9.1 Procedure After the connection between HMI30 and the configuration PC, to transfer the project into HMI30 you must: Start Premium HMI Developing tool. Load the project to transfer. Click on the transfer icon (see picture below). Figure 42 Connecting the configuration PC The following window will appear: Figure 43 Connecting the configuration PC Attention: please transfer the project into the MMC Memory or into the SD card. This allows you not to loose its content when HMI30 will be switched off. To transfer the project into the MMC Memory, you must specify MMCMemory (like in the example of the picture above). Select TCP in the upper left list. Write the IP address of HMI30 Choose where to download the project into HMI30 specifying the “Upload Device Path”. To transfer the project to HMI30 click on the button “Upload Project!”. There is another possibility to transfer the project to the panel. It is by using an USB key. Copy from the configuration PC to the USB Key the folder in which is stored the HMI30 project. Insert the USB Key into HMI30 Copy the project folder from the USB Key to the MMC memory. 37 SECTION 3 – Installation and connection Note: the name of the memory card are according to the following table: NAND Name used by Windows Explorer NANDFlash MMC MMCMemory SD SDMemory USB Key Hard Disk Memory Table 25 Procedure Note Internal memory used to store the operating system. It is a read only memory. Memory to store data and executables. Read and Write memory. Removable Memory. Read and Write memory. USB key inserted into a USB port of HMI30. In the picture below an example of file Explorer on HMI30. Figure 44 Connecting the configuration PC 38 HMI30 / HMI30-TF User’s guide SECTION 4 4 Commissioning the device 39 SECTION 4 – Commissioning the device 40 4.1 Backup design HMI30 comes as standard with 2 memories: a NAND Flash and a e-MMC memory. The purpose of the NAND memory is to store the boot loader (used during the start-up of HMI30), the operating system and all the executable needed to HMI30. Writing to the NAND memory can be switched ON and OFF by means of a special program in order to protect the integrity of the date stored into the NAND memory. The e-MMC memory can be used to store other data, like process data or other executable. It is not possible to disable writing into eMMC. You can always read and write the eMMC memory. The purpose of this memory is to store data produced during the running of the machine or plant supervised by HMI30. 4.2 Internal memory The NAND memory, as default is read only. In this way is protected from losses of data, but the NAND memory can be made writable. To make the NAND memory writable you must go into the Windows folder of HMI30 and click on MakeNANDWritable (see picture below). In this way you can store some exe you want to keep safe. After the operation you can make the NAND memory read only as before. To make the NAND memory read only you must go into the Windows folder of HMI30 and click on MakeNANDReadOnly (see picture below) Figure 45 Commissioning the device HMI30 / HMI30-TF User’s guide 4.3 Slot for memory card HMI30 can optionally accommodate an SD/SDHC card slot V. 2.0 (push-push type). Figure 46 Slot for memory card Slot for memory card Attention: potential data loss Do not remove the memory card while data is being accessed. Data on the memory card is lost if you attempt to remove it while HMI30 is accessing its data. 4.4 Installation/removal of a memory card Insert the memory card into the slot as indicated in the figure. Pay attention to the beveled edge. Figure 47 Slot for memory card Beveled edge Attention: removing the system memory card while the project is running. If you remove memory card while a project is running, the project may stop. Figure 48 Slot for memory card memory card (example) Push the card all the way. 41 SECTION 4 – Commissioning the device Figure 49 Slot for memory card Push the card previously inserted. Extract the memory card from the slot. Figure 50 Slot for memory card Figure 51 Slot for memory card 42 HMI30 / HMI30-TF User’s guide SECTION 5 5 Commissioning a project 43 SECTION 5 – Commissioning a project 44 5.1 Overview Configuration phase A project includes screen, alarms, variables used to represent the real plant of machine. The configuration phase is the creation of the project according to the user needs and interaction between the humans and the machine. Transferring the project to HMI30 You can transfer a project to HMI30 as follows: ● Transfer from the configuring PC by using an Ethernet connection ● Copy the Project by using a USB key Process control phase After the project is transferred, HMI30 is ready to communicate to one or more PLC and to visualize the screens according to the configured project. ATTENTION: if you need to communicate with a device connected to the serial port you must configure the serial port. See chapter 5.3. Commissioning and re-commissioning When you switch on the first time HMI30, there is no project inside. At first you need to transfer a project into HMI30. After you download a project you can retransfer another project or another version of the same project without any special operation, also while the project is running on HMI30. 5.2 Transfer HMI30 is always ready for accepting the download of a project, even when a project is running. In this way, if HMI30 is connected by means of Ethernet to the configuration PC, you are able to download a new project or a new version of the same project even without stopping the project. (see Chap. 3.10.1) 5.3 Configuring the serial port If your project need to communicate with a device connected to the serial port, you need to configure the serial port according to the type of serial connection you use for your communication. The following types of communications are supported by the serial port of HMI30: RS 232 RS 422 RS 485 HMI30 comes as default with the serial port set as RS 232. If you want to change the type of serial communication you must do the following: HMI30 / HMI30-TF User’s guide Go in control panel Figure 52 Configuring the serial port Double click on “Serial Port Configuration” Figure 53 Configuring the serial port Choose the type of serial communication Figure 54 Configuring the serial port 45 SECTION 5 – Commissioning a project 46 And confirm by pressing the “Apply” button. A warning message will raise, advising to store that new configuration is active and saved a permanent way. Figure 55 Configuring the serial port This applet can be used just to check which serial communication mode is active; in this case it is enough to push the “red cross” on the high right side of the panel (fig 54). Please note that MPI mode cannot be selected: when this protocol will be used by HMI software all required settings will be applied automatically. 5.3.1 Connecting the serial port A unique DB15 male connector hosts all serial protocols (please check par. 7.4 for pin-out details) so it is necessary to adapt this connection to plant needs; Asem can supply connector adapters as optional parts but user can adapt DB15 connector by himself. For further details please contact ASEM 5.4 Managing the project HMI30 has powerful tools to manage a running project. With the same mask used to transfer the project (see below) you can also: 1. Stop the HMI30 project from the configuration PC 2. Start the HMI30 project from the configuration PC 3. Debug the project from the configuration PC 4. Transfer the project from HMI30 to the configuration PC. HMI30 / HMI30-TF User’s guide 5.4.1 Stopping the running project Figure 56 Stopping the running project To stop a project running in HMI30 you must: 5. Select TCP in the upper left list 6. Write the IP address of HMI30 7. Click on the button “Stop Device Project!” You will see the project in HMI30 stopping (see below) Figure 57 Stopping the running project 47 SECTION 5 – Commissioning a project 5.4.2 Starting the project Figure 58 Starting the project To start a project in HMI30 by using the configuration PC you must: 8. Select TCP in the upper left list 9. Write the IP address of HMI30 10. Click on the button “Start Device Project” You will see the HMI30 project starting (see below). Figure 59 Starting the project If there isn’t a project in HMI30 you will have an error 48 HMI30 / HMI30-TF User’s guide 5.4.3 49 Debugging the project You can debug the project in HMI30 by connecting with the configuration PC. In order to be able to use the debugging functionality you must prepare your project as follows: 1. Select “Networking” in the project explorer window of Premium HMI 2. Enable the property “Debugger” in the Properties window of Premium HMI 1 Figure 60 Debugging the project 2 Transfer the project to HMI30 and make it running. NOTE: Be sure that the project is running otherwise you cannot debug the project To debug the project running in HMI30 from the configuration PC you must: 1. Select TCP in the upper left list 2. Write the IP address of HMI30 Click on the button “Attach To Process…” SECTION 5 – Commissioning a project Figure 61 Debug the project The following window will appear Figure 62 Debug the project Write the IP address of HMI30 and click on the “OK” button. A new windows asking for user and password will appear Figure 63 Debug the project 50 HMI30 / HMI30-TF User’s guide 51 In case the project is not protected, just click on the “OK” button, otherwise insert the name and password of a project user that has the rights to change the project. You will see that a debug session will start in Premium HMI on the configuration PC. Now you are able to: See the project screens and navigate between them. Please note that you can see different screen from those seen on HMI30 and that your debugging is not affecting the normal running of HMI30 project See and change the value of the variables Put breakpoint and debug Visual Basic scripts running in the project 5.4.4 Trasfer the project from HMI30 to the configuration PC This option allows you to transfer the project from HMI30 to the configuration PC in order to check or change and hence transfer again into HMI30. Hint: It is always suggested to protect the project with a password in order to don’t allow changes to the project by not authorized users. Be sure that the project is not running on HMI30, run Premium HMI on the configuration PC, click on the “File” menu and select “Open Device Project…” Figure 64 Debug the project 1. Select TCP in the upper left list 2. Write the IP address of HMI30 3. Write the path on which you want to store the project on your configuration PC 4. Click on the button “Get Project from Device!” SECTION 5 – Commissioning a project 52 Figure 65 Debug the project After the transfer of the project you will see the project explorer containing the project resources in Premium HMI and you will able to check, test and change the resources of the project 5.5 Backup and restore HMI30 has tools to backup and restore the contents of its internal memory in order to manage the project and the operating system of HMI30. For more information please contact the support center of ASEM. 5.6 Updating the operating system Please contact the support center of ASEM. HMI30 / HMI30-TF User’s guide SECTION 6 6 Maintenance and care 53 SECTION 6 – Maintenance and care 54 6.1 Calibration of the touchscreen HMI30 is designed to don’t require touchscreen calibration, but in some cases, like update of the operating system, you must recalibrate the touch screen. To calibrate the touch screen: Go in control panel. Open the “Stylus” application. Figure 66 Calibration of the touchscreen Figure 67 Calibration of the touchscreen The following window will appear. HMI30 / HMI30-TF User’s guide Figure 68 Calibration of the touchscreen Click on the “Recalibrate” button and follow the instructions. 6.2 Maintaining & cleaning HMI30 is designed for maintenance-free operation except for the replacing of the battery backup when necessary. It is recommended to clean the touchscreen with a damp cleaning cloth and a display cleaning solution. Note: clean the front panel of the system with a soft damp cloth only. Attention: Do not use detergents, solvents, cleaners or objects that could scratch the surface. Attention: switch off the power before any cleaning operation. 55 SECTION 6 – Maintenance and care 6.2.1 Procedure Proceed as follows: a) Switch off the HMI device or lock the touch screen. b) Spray the cleaning solution onto a cleaning cloth. c) Do not spray directly onto the display. d) Clean the display from the screen edge inwards. 6.2.2 Backup battery replacement (CR2032 3V) Remove the two screws as indicated in figure. Remove the two columns as indicated in figure. Figure 69 Backup battery replacement Figure 70 Backup battery replacement 56 HMI30 / HMI30-TF User’s guide For 8.4 model please refer to the following images. Remove the two columns as indicated in figure. Remove the two screws as indicated in figure. Figure 71 Backup battery replacement Figure 72 Backup battery replacement Figure 73 Backup battery replacement 57 SECTION 6 – Maintenance and care Locate the battery position. Remove the battery and replace it with one of the same model (CR2032 3V). Figure 74 Backup battery replacement Figure 75 Backup battery replacement Figure 76 Backup battery detail 58 HMI30 / HMI30-TF User’s guide 59 Figure 77 Backup battery replacement Figure 78 Backup battery detail 6.3 Technical support & repairs ASEM offers wide-ranging, complete after-sales technical support. The staff who deal with this handle questions on the entire range of products skilfully, quickly, and efficiently. You can phone our staff in the service department, and they will give you complete, prompt advice on how to resolve your problems. telephone: fax: e-mail: +39 0432 967435 +39 0432 967480 [email protected] 6.4 Recycling and disposal HMI30 can be recycled due to the use of materials with low environmental impact. Contact a certified disposal service company for environmentally sound recycling and disposal of your old devices. SECTION 6 – Maintenance and care 60 HMI30 / HMI30-TF User’s guide SECTION 7 7 Technical specifications 61 62 SECTION 8 - Technical specifications 7.1 Technical specifications Table 26 System software characteristics System software characteristics Integrated sysOperating System tem software HMI Remote control Premium HMI 3 characteristics I/O Bytes (Tags) Synoptics Graphic libraries Power Templates Alarms Accelerators and menus Microsoft Windows Embedded Compact 7 (C7P) Premium HMI 3 runtimes (BASIC, ADVANCED versions) ASEM Ubiquity runtime BASIC ADVANCED 512 4.096 ● ● ● ● ● ● 512 2.048 ● ● Touchscreen History Log events Dynamic language change ● ● ● ● ● ● IL Logic (SoftLogic) VBA Multithreading ActiveX- OCX CFR21 part 11 Debugger Online/Remote ● ● ● ● ● ● ● ● ● ● IP Camera Dynamic trends History trends, Data Analysis ● ● ● ● ● ● ● ● ● Max 2 ● Max 2 No No ● ● ● ● ● Max 4 ● 2 Users BASIC ● ● ● ● ● No PRO* ● ● ● ● ● ● No No ● ● ● ● ● ● No ● No ● ● ● Recipes OPC DA Client Networking Data Loggers Text Reports Multi-Drivers SMS/E-mails Web Server Ubiquity characteristics Remote desktop File manager Task manager Chat Screenshot VPN with access to the remote PC Ethernet subnet VPN up to remote PC Remoted serial (no MPI) API for customer applications interface Persistance log on runtime operations Domain creation, users account and remote PC organization structured Assistance requests notified by runtime Automatic connection * PRO version will be soon available. HMI30 / HMI30-TF User’s guide Table 27 System hardware characteristics System hardware characteristics Touchscreen 5.7” 7.0” 8.4” 10.4” 12.1” 15.0” Motherboard Model RTC Buzzer CPU Processor Memory bus Graphic Controller System memory Type / Size / Socket Serial interfaces Type Ethernet interfaces USB interfaces Optoisolation Type Type Mass storage Internal / not removable External access / removable Battery Table 28 Electrical characteristics Buttons, LEDs and keys Type Lifetime Reset buttons LEDs Electrical characteristics Power supply Type Input voltage Protections Power consumption (Max.) Table 29 Mechanical characteristics Table 30 Environmental characteristics Mechanical characteristics Case Type Material Front panel Construction Protection Color Environmental characteristics Temperature Operation Storage Humidity Operation/Storage 63 4 wires – analog - resistive 4 wires – analog - resistive 5 wires – analog - resistive 5 wires – analog - resistive 5 wires – analog - resistive 5 wires – analog - resistive All-in-one, ASEM R131 Hardware with battery backup Yes ARM Cortex A8 - Freescale i.MX535 - 1 GHz 400MHz GPU with integrated LCD controller 512 MB, / DDR3-800 / Soldered (contact ASEM for other memory options) 1 x RS232/422/485 (DB15M) software selectable No 2 x 10/100Mbps (RJ45) with Link/Activity leds 2 x USB 2.0 (rear, TYPE-A, host port, single channel software switch off) NAND-FLASH: 256 MB (Read Only) for Operative System, Premium HMI3 and Ubiquity runtime. eMMC: 2 GB - 8 bit v. 4.4 compatible (for data and user program) SD/SDHC card slot V. 2.0 (push-push type) Coin (CR2032 3V) removable 3 years System Power / Removable Storage activity Integrated on board, auto ranging 18÷36 VDC with 3 poles connector Anti-inversion polarity, over-voltage, fuse soldered on the board [email protected]” 6.7W@7,0” 7.0W@8,4” 9.0W @10,4” 14.0W @12.1” (SVGA) 17.0W @12.1” (XGA) 15.5W @15,0” Panel mount Steel, white zinc galvanizing Full Aluminium alloy Aluminium alloy True Flat frame with polyester foil IP65 IP65 PANTONE Cool Grey 4C 0° ÷ +50°C -20° ÷ +60°C 80% (non-condensing) SECTION 8 - Technical specifications Table 31 Displays Table 32 Measuraments Table 33 Warranty & approvals Displays 5,7” LCD Size Resolution Colors Backlight 7” W LCD Size Resolution Colors Backlight 8,4” LCD Size Resolution Colors Backlight 10,4” LCD Size Resolution Colors Backlight 12,1” LCD Size Resolution Colors Backlight 12,1” LCD Size Resolution Colors Backlight 15,0 LCD Size Resolution Colors Backlight 5,7” 640 x 480 (VGA) 256K Sidelight LED 7” Widescreen 800 x 480 (WVGA) 256K Sidelight LED 8,4” 800 x 600 (SVGA) 16M Sidelight LED 10,4” 800 x 600 (SVGA) 16M Sidelight LED 12,1” 800 x 600 (SVGA) 16M Sidelight LED 12,1” 1024 x 768 (XGA) 16M Sidelight LED 15,0” 1024 x 768 (XGA) 16M Sidelight LED Dimensions 5,7” Full Aluminium (W x H x D) True Flat Alu (W x H x D) Cutout (W x H) 175 x 145 x 40 175 x 145 x 40 164 x 134 7” W Full Aluminium (W x H x D) True Flat Alu (W x H x D) Cutout (W x H) 215 x 155 x 40 215 x 155 x 40 204 x 144 8,4” Full Aluminium (W x H x D) True Flat Alu (W x H x D) Cutout (W x H) 255 x 190 x 48,5 255 x 190 x 48,5 243 x 179 10,4” Full Aluminium (W x H x D) True Flat Alu (W x H x D) Cutout (W x H) 245 x 230 x 48,5 245 x 230 x 48,5 283 x 219 12,1” Full Aluminium (W x H x D) True Flat Alu (W x H x D) Cutout (W x H) 325 x 260 x 48,5 325 x 260 x 48,5 313 x 249 15,0” Full Aluminium (W x H x D) True Flat Alu (W x H x D) Cutout (W x H) 390 x 305 x 48,5 390 x 305 x 18,5 378 x 294 Warranty & approvals CE Emission Conforms to EN 55022 Information technology equipment – Radio disturbance characteristics Immunity Conforms to EN 55024 Information technology equipment – Immunity characteristics Safety Conforms to EN 60950-1 – Information technology equipment – Safety 64 HMI30 / HMI30-TF User’s guide 7.1.1 Table 34 5.7” display characteristics 5.7” display characteristics Dimensions Technology Display area Resolution Display color Pixel Pitch Luminance Horizontal viewing angle (left + right) Vertical viewing angle (up + down) Contrast ratio Response time (Rise) Backlight 7.1.2 Table 35 7.0” display characteristics 5.7” (4:3) TFT active matrix 115.2 (W) x 86.4 (H) mm 640 x 480 pixels 256 K colors 0.18 (W) x 0.18 (H) mm 500 cd/m2 100◦ 140◦ 250:1 50 ms (Typ.) LED 7” display characteristics 7” display characteristics Dimensions Technology Resolution Display color Pixel Pitch Luminance Horizontal viewing angle (left + right) Vertical viewing angle (up + down) Contrast ratio Response time (Rise) Backlight 7.1.3 Table 36 5.4” display characteristics 5.7” display characteristics 7” wide (15:9) TFT active matrix 800 x 480 pixels 256 K colors 0.1905 (W) x 0.1905 (H) mm 350 cd/m2 140◦ 130◦ 400:1 (Typ.) 10 ms LED 8.4” display characteristics 8.4” display characteristics Dimensions Technology Display area Resolution Display color Pixel Pitch Luminance Horizontal viewing angle (left + right) Vertical viewing angle (up + down) Contrast ratio Response time (Rise) Backlight 8.4” (4:3) TFT active matrix 170.4 (W) x 127.8 (H) mm 800 x 600 pixels 256 K colors 0.213 (W) x 0.213 (H) mm 350 cd/m2 150◦ 130◦ 600:1 (Typ.) 10 ms (Typ.) LED 65 SECTION 8 - Technical specifications 7.1.4 Table 37 10.4” display characteristics 10.4” display characteristics Dimensions Technology Display area Resolution Display color Pixel Pitch Luminance Horizontal viewing angle (left + right) Vertical viewing angle (up + down) Contrast ratio Response time (Rise) Backlight 7.1.5 Table 38 12.1” (SVGA) display characteristics 10.4” (4:3) TFT active matrix 158.4 (W) x 211.2 (H) mm 800 x 600 pixels 16.2M colors 0.264 (W) x 0.264 (H) mm 400 cd/m2 160◦ 140◦ 700:1 (Typ.) 20 ms (Typ.) LED 12.1” (SVGA) display characteristics 12.1” display characteristics Dimensions Technology Display area Resolution Display color Pixel Pitch Luminance Horizontal viewing angle (left + right) Vertical viewing angle (up + down) Contrast ratio Response time (Rise) Backlight 7.1.6 Table 39 12.1” (XGA) display characteristics 10.4” display characteristics 10.4” (4:3) TFT active matrix 184.5 (W) x 246.0 (H) mm 800 x 600 pixels 16.2M colors 0.264 (W) x 0.264 (H) mm 500 cd/m2 160◦ 140◦ 800:1 (Typ.) 4 ms (Typ.) LED 12.1” (XGA) display characteristics 12.1” display characteristics Dimensions Technology Display area Resolution Display color Pixel Pitch Luminance Horizontal viewing angle (left + right) Vertical viewing angle (up + down) Contrast ratio Response time (Rise) Backlight 12.1” (4:3) TFT active matrix 184.32 (W) x 245.76 (H) mm 1024 x 768 pixels 16.2M colors 0.240 (W) x 0.240 (H) mm 600 cd/m2 160◦ 140◦ 700:1 (Typ.) 5 ms (Typ.) LED 66 HMI30 / HMI30-TF User’s guide 7.1.7 Table 40 15.0” display characteristics 67 15.0” display characteristics 15.0” display characteristics Dimensions Technology Display area Resolution Display color Pixel Pitch Luminance Horizontal viewing angle (left + right) Vertical viewing angle (up + down) Contrast ratio Response time (Rise) Backlight 15.0” (4:3) TFT active matrix 228.1 (W) x 304.1 (H) mm 1024 x 768 pixels 16.2M colors 0.297 (W) x 0.297 (H) mm 450 cd/m2 160◦ 140◦ 700:1 (Typ.) 2 ms (Typ.) LED 7.2 Certificates and approvals ASEM’s products are compliant with European Directive 89/336/EEC concerning electromagnetic compatibility and Directive 73/23/EEC concerning the safety of electrical products, and subsequent variations. Emission Conforms to EN 55022 Information technology equipment – Radio disturbance characteristics Conforms to EN 61000-3-2 – Limits for harmonic current emissions Conforms to EN 61000-3-3 – Limits of voltage fluctuation and flicker Immunity Conforms to EN 55024 Information technology equipment – Immunity characteristics Safety Conforms to EN 60950-1 – Information technology equipment – Safety SECTION 8 - Technical specifications 7.3 Dimension drawings 7.3.1 Figure 79 HMI30 5.7” front view Figure 80 HMI30 5.7” bottom view Figure 81 HMI30 5.7” side view HMI30 5.7” (Full Aluminium front panel) 68 HMI30 / HMI30-TF User’s guide 7.3.2 Figure 82 HMI30-TF 5.7” front view Figure 83 HMI30-TF 5.7” bottom view Figure 84 HMI30-TF 5.7” side view HMI30-TF 5.7” (Aluminium front panel with True Flat technology) 69 SECTION 8 - Technical specifications 7.3.3 Figure 85 HMI30 7.0” front view Figure 86 HMI30 7.0” bottom view Figure 87 HMI30 7.0” side view HMI30 7.0” (Wide Full Aluminium front panel) 70 HMI30 / HMI30-TF User’s guide 7.3.4 Figure 88 HMI-TF30 7.0” front view Figure 89 HMI30-TF 7.0” bottom view Figure 90 HMI30-TF 7.0” side view 71 HMI30-TF 7.0” (Wide Aluminium front panel with True Flat technology) SECTION 8 - Technical specifications 7.3.5 Figure 91 HMI30 8.4” front view Figure 92 HMI30 8.4” bottom view Figure 93 HMI30 8.4” side view HMI30 8.4” (Full Aluminium front panel) 72 HMI30 / HMI30-TF User’s guide 7.3.6 Figure 94 HMI30-TF 8.4” front view Figure 95 HMI30-TF 8.4” bottom view Figure 96 HMI30-TF 8.4” side view HMI30-TF 8.4” (Aluminium front panel with True Flat technology) 73 SECTION 8 - Technical specifications 7.3.7 Figure 97 HMI30 10.4” front view Figure 98 HMI30 10.4” bottom view Figure 99 HMI30 10.4” side view HMI30 10.4” (Full Aluminium front panel) 74 HMI30 / HMI30-TF User’s guide 7.3.8 Figure 100 HMI30-TF 10.4” front view Figure 101 HMI30-TF 10.4” bottom view Figure 102 HMI30-TF 10.4” side view HMI30-TF 10.4” (Aluminium front panel with True Flat technology) 75 SECTION 8 - Technical specifications 7.3.9 Figure 103 HMI30 12.1” front view Figure 104 HMI30 12.1” bottom view Figure 105 HMI30 12.1” side view HMI30 12.1” (Wide Full Aluminium front panel) 76 HMI30 / HMI30-TF User’s guide 77 7.3.10 HMI30-TF 12.1” (Wide Aluminium front panel with True Flat technology) Figure 106 HMI-TF30 12.1” front view Figure 107 HMI30-TF 12.1” bottom view Figure 108 HMI30-TF 12.1” side view SECTION 8 - Technical specifications 7.3.11 HMI30 15.0” (Full Aluminium front panel) Figure 109 HMI30 15.0” front view Figure 110 HMI30 15.0” bottom view Figure 111 HMI30 15.0” side view 78 HMI30 / HMI30-TF User’s guide 7.3.12 HMI30-TF 15.0” (Aluminium front panel with True Flat technology) Figure 112 HMI30-TF 15.0” front view Figure 113 HMI30-TF 15.0” bottom view Figure 114 HMI30-TF 15.0” side view 79 SECTION 8 - Technical specifications 80 7.4 Ports PINOUT 7.4.1 Table 41 COM1 – DB15M Serial COM1 – DB15M Serial PIN 1 2 3 4 5 6 7 8 9 10 11 12 13 14 15 Signal +5 VDC Transmit Data (RS-232) Receive Data (RS-232) Request To Send Clear To Send Data Set Ready Ground Data Terminal Ready Carrier Detect Transmit Data +/Receive Data + (RS-485/RS-422) Transmit Data -/Receive Data - (RS-485/RS-422) Ring Indication (RS-232) Receive Data + (RS-422) Receive Data - (RS-422) N.C. I/O OUT OUT IN OUT IN IN OUT IN I/O I/O IN IN IN N.C. Any polarization or termination resistor is connected to RS422/485 channel so, if required, it has to be provided by the user into the plant connector. 7.4.2 LAN1 – LAN2 Table 42 LAN1 – LAN2 PIN 1 2 3 4 5 6 7 8 Signal TX+ TXRX+ Shield Shield RXShield Shield HMI30 / HMI30-TF User’s guide 7.4.3 Table 43 USB1 – USB2 81 USB1 / USB2 PIN 1 2 3 4 Signal +5 Vcc USB Data USB Data + GND 7.5 Technical support & repairs ASEM offers wide-ranging, complete after-sales technical support. The staff who deal with this handle questions on the entire range of products skilfully, quickly, and efficiently. You can phone our staff in the service department, and they will give you complete, prompt advice on how to resolve your problems. telephone: fax: e-mail: +39 0432 967435 +39 0432 967480 [email protected] Index of figures Figure 1 HMI30 5.7” ............................................................................................................................................................ 9 Figure 2 HMI30-TF 5.7” ....................................................................................................................................................... 9 Figure 3 Front panel “Step” detail .................................................................................................................................... 10 Figure 4 Front panel “No step” detail ............................................................................................................................... 10 Figure 5 Full aluminium front panel detail ........................................................................................................................ 11 Figure 6 Aluminium front panel with true flat technology detail..................................................................................... 11 Figure 7 widescreen full aluminium front panel detail .................................................................................................... 12 Figure 8 widescreen aluminium front panel with true flat technology detail .................................................................. 12 Figure 9 HMI30 5.7” rear view .......................................................................................................................................... 13 Figure 10 HMI30 7.0” rear view ........................................................................................................................................ 13 Figure 11 HMI30 8.4” rear view ........................................................................................................................................ 14 Figure 12 HMI30 5.7” side view ........................................................................................................................................ 15 Figure 13 HMI30 5.7” side view ........................................................................................................................................ 15 Figure 14 HMI30 5.7” connectors ..................................................................................................................................... 16 Figure 15 HMI30 connectors label detail .......................................................................................................................... 16 Figure 16 HMI30 CE label detail ........................................................................................................................................ 16 Figure 17 Configuration and project creation ................................................................................................................... 18 Figure 18 Process management ........................................................................................................................................ 18 Figure 19 Mounting position ............................................................................................................................................. 23 Figure 20 Installation distances ........................................................................................................................................ 24 Figure 21 HMI30 5.7” cut-out ........................................................................................................................................... 25 Figure 22 HMI30 5.7 cut-out” ........................................................................................................................................... 25 Figure 23 HMI30 5.7” cut-out ........................................................................................................................................... 25 Figure 24 HMI30 10.4 cut-out” ......................................................................................................................................... 26 Figure 25 HMI30 12.1 cut-out” ......................................................................................................................................... 26 Figure 26 HMI30 15.0 cut-out” ......................................................................................................................................... 26 Figure 27 Installation ........................................................................................................................................................ 29 Figure 28 Installation ........................................................................................................................................................ 29 Figure 29 Installation ........................................................................................................................................................ 30 Figure 30 Installation ........................................................................................................................................................ 30 Figure 31 Installation ........................................................................................................................................................ 30 Figure 32 Installation ........................................................................................................................................................ 31 Figure 33 Installation ........................................................................................................................................................ 31 Figure 34 Power supply connection detail ........................................................................................................................ 32 Figure 35 Power supply connection detail ........................................................................................................................ 33 Figure 36 Power supply connection detail ........................................................................................................................ 33 Figure 37 Connecting the configuration PC ...................................................................................................................... 34 Figure 38 Connecting the configuration PC ...................................................................................................................... 35 Figure 39 Connecting the configuration PC ...................................................................................................................... 35 Figure 40 Connecting the configuration PC ...................................................................................................................... 36 Figure 41 Connecting the configuration PC ...................................................................................................................... 36 Figure 42 Connecting the configuration PC ...................................................................................................................... 37 Figure 43 Connecting the configuration PC ...................................................................................................................... 37 Figure 44 Connecting the configuration PC ...................................................................................................................... 38 Figure 45 Commissioning the device................................................................................................................................. 40 Figure 46 Slot for memory card ........................................................................................................................................ 41 Figure 47 Slot for memory card ........................................................................................................................................ 41 Figure 48 Slot for memory card ........................................................................................................................................ 41 Figure 49 Slot for memory card ........................................................................................................................................ 42 Figure 50 Slot for memory card ........................................................................................................................................ 42 Figure 51 Slot for memory card ........................................................................................................................................ 42 Figure 52 Configuring the serial port ................................................................................................................................ 45 Figure 53 Configuring the serial port ................................................................................................................................ 45 Figure 54 Configuring the serial port ................................................................................................................................ 45 Figure 55 Configuring the serial port ................................................................................................................................ 46 Figure 56 Stopping the running project ............................................................................................................................ 47 Figure 57 Stopping the running project ............................................................................................................................ 47 Figure 58 Starting the project ........................................................................................................................................... 48 Figure 59 Starting the project ........................................................................................................................................... 48 Figure 60 Debugging the project ...................................................................................................................................... 49 Figure 61 Debug the project ............................................................................................................................................. 50 Figure 62 Debug the project ............................................................................................................................................. 50 Figure 63 Debug the project ............................................................................................................................................. 50 Figure 64 Debug the project ............................................................................................................................................. 51 Figure 65 Debug the project ............................................................................................................................................. 52 Figure 66 Calibration of the touchscreen .......................................................................................................................... 54 Figure 67 Calibration of the touchscreen .......................................................................................................................... 54 Figure 68 Calibration of the touchscreen .......................................................................................................................... 55 Figure 69 Backup battery replacement ............................................................................................................................. 56 Figure 70 Backup battery replacement ............................................................................................................................. 56 Figure 71 Backup battery replacement ............................................................................................................................. 57 Figure 72 Backup battery replacement ............................................................................................................................. 57 Figure 73 Backup battery replacement ............................................................................................................................. 57 Figure 74 Backup battery replacement ............................................................................................................................. 58 Figure 75 Backup battery replacement ............................................................................................................................. 58 Figure 76 Backup battery detail ........................................................................................................................................ 58 Figure 77 Backup battery replacement ............................................................................................................................. 59 Figure 78 Backup battery detail ........................................................................................................................................ 59 Figure 79 HMI30 5.7” front view ...................................................................................................................................... 68 Figure 80 HMI30 5.7” bottom view ................................................................................................................................... 68 Figure 81 HMI30 5.7” side view ........................................................................................................................................ 68 Figure 82 HMI30-TF 5.7” front view.................................................................................................................................. 69 Figure 83 HMI30-TF 5.7” bottom view .............................................................................................................................. 69 Figure 84 HMI30-TF 5.7” side view ................................................................................................................................... 69 Figure 85 HMI30 7.0” front view ...................................................................................................................................... 70 Figure 86 HMI30 7.0” bottom view ................................................................................................................................... 70 Figure 87 HMI30 7.0” side view ........................................................................................................................................ 70 Figure 88 HMI-TF30 7.0” front view.................................................................................................................................. 71 Figure 89 HMI30-TF 7.0” bottom view.............................................................................................................................. 71 Figure 90 HMI30-TF 7.0” side view ................................................................................................................................... 71 Figure 91 HMI30 8.4” front view ...................................................................................................................................... 72 Figure 92 HMI30 8.4” bottom view ................................................................................................................................... 72 Figure 93 HMI30 8.4” side view ........................................................................................................................................ 72 Figure 94 HMI30-TF 8.4” front view.................................................................................................................................. 73 Figure 95 HMI30-TF 8.4” bottom view .............................................................................................................................. 73 Figure 96 HMI30-TF 8.4” side view ................................................................................................................................... 73 Figure 97 HMI30 10.4” front view..................................................................................................................................... 74 Figure 98 HMI30 10.4” bottom view................................................................................................................................. 74 Figure 99 HMI30 10.4” side view ...................................................................................................................................... 74 Figure 100 HMI30-TF 10.4” front view.............................................................................................................................. 75 Figure 101 HMI30-TF 10.4” bottom view.......................................................................................................................... 75 Figure 102 HMI30-TF 10.4” side view ............................................................................................................................... 75 Figure 103 HMI30 12.1” front view .................................................................................................................................. 76 Figure 104 HMI30 12.1” bottom view............................................................................................................................... 76 Figure 105 HMI30 12.1” side view .................................................................................................................................... 76 Figure 106 HMI-TF30 12.1” front view.............................................................................................................................. 77 Figure 107 HMI30-TF 12.1” bottom view.......................................................................................................................... 77 Figure 108 HMI30-TF 12.1” side view ............................................................................................................................... 77 Figure 109 HMI30 15.0” front view .................................................................................................................................. 78 Figure 110 HMI30 15.0” bottom view............................................................................................................................... 78 Figure 111 HMI30 15.0” side view .................................................................................................................................... 78 Figure 112 HMI30-TF 15.0” front view.............................................................................................................................. 79 Figure 113 HMI30-TF 15.0” bottom view.......................................................................................................................... 79 Figure 114 HMI30-TF 15.0” side view ............................................................................................................................... 79 Index of tables Table 1 Package .................................................................................................................................................................. 8 Table 2 Touchscreen ......................................................................................................................................................... 17 Table 3 Software options .................................................................................................................................................. 19 Table 4 Graphic interface .................................................................................................................................................. 19 Table 5 Alarm log .............................................................................................................................................................. 19 Table 6 Recipes – Data loggers ......................................................................................................................................... 19 Table 7 Trends ................................................................................................................................................................... 19 Table 8 Users & Passwords ............................................................................................................................................... 19 Table 9 Dynamic multilanguage ....................................................................................................................................... 20 Table 10 Drivers ................................................................................................................................................................ 20 Table 11 Event Object ....................................................................................................................................................... 20 Table 12 Scaling Object ..................................................................................................................................................... 20 Table 13 Scheduler Object ................................................................................................................................................ 20 Table 14 Logics.................................................................................................................................................................. 20 Table 15 Networking ......................................................................................................................................................... 20 Table 16 Child Projects ...................................................................................................................................................... 20 Table 17 Software options ................................................................................................................................................ 20 Table 18 Visual studio source safe 2005 integration ........................................................................................................ 20 Table 19 Web server ......................................................................................................................................................... 20 Table 20 Touch Screen Support ......................................................................................................................................... 20 Table 21 Cross Reference .................................................................................................................................................. 20 Table 22 Debugger ............................................................................................................................................................ 20 Table 23 Position of the mounting clamps........................................................................................................................ 27 Table 24 Connecting the configuration PC ........................................................................................................................ 34 Table 25 Procedure ........................................................................................................................................................... 38 Table 26 System software characteristics ......................................................................................................................... 62 Table 27 System hardware characteristics ....................................................................................................................... 63 Table 28 Electrical characteristics ..................................................................................................................................... 63 Table 29 Mechanical characteristics ................................................................................................................................. 63 Table 30 Environmental characteristics ............................................................................................................................ 63 Table 31 Displays .............................................................................................................................................................. 64 Table 32 Measuraments ................................................................................................................................................... 64 Table 33 Warranty & approvals ........................................................................................................................................ 64 Table 34 5.7” display characteristics ................................................................................................................................ 65 Table 35 7.0” display characteristics ................................................................................................................................ 65 Table 36 5.4” display characteristics ................................................................................................................................ 65 Table 37 10.4” display characteristics .............................................................................................................................. 66 Table 38 12.1” (SVGA) display characteristics .................................................................................................................. 66 Table 39 12.1” (XGA) display characteristics .................................................................................................................... 66 Table 40 15.0” display characteristics .............................................................................................................................. 67 Table 41 COM1 – DB15M Serial ........................................................................................................................................ 80 Table 42 LAN1 – LAN2....................................................................................................................................................... 80 Table 43 USB1 – USB2 ....................................................................................................................................................... 83 ASEM S.p.A. Via Buia, 4 33011 Artegna (UD) Italy Tel. +39/0432-9671 Fax. +39/0432-977465 Via Prealpi, 13/A 20034 Giussano (MI) Italy Tel. +39/0362-859111 Fax. +39/0362-859121 [email protected] www.asem.it