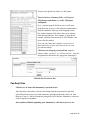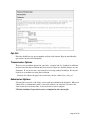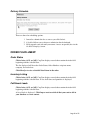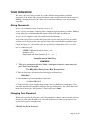
1
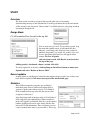
CorpComContact
Web-based Contact Management with Integrated
Multi-media Distribution Services
CorpComContact User Manual
CORPORATE COMMUNICATIONS CENTER, INC.
Page 1 of 55
CorpComContact User Manual
Table of Contents
FOREWARD .................................................................................................................................. 5
About This Guide........................................................................................................................ 5
Parent—Child Relationship: Accounts and Contacts ................................................................ 5
Typographic Conventions ............................................................................................................... 6
Screenshots ................................................................................................................................. 6
Help ............................................................................................................................................. 6
Online Help ................................................................................................................................. 6
SCREEN LAYOUTS...................................................................................................................... 6
Navigation Button Row – Top of Screen .................................................................................... 6
LEFT HAND VERTICAL MENU BAR .................................................................................... 7
START ............................................................................................................................................ 8
Overview ..................................................................................................................................... 8
Design Mode ............................................................................................................................... 8
Click Personalize Start, located at the top left. ........................................................................... 8
Recent updates ............................................................................................................................ 8
Statistics ...................................................................................................................................... 8
Recent e-mail campaigns and fax blasts ..................................................................................... 9
Unsubscribe................................................................................................................................. 9
Quick Search ............................................................................................................................... 9
Listing Screen Features ............................................................................................................. 10
Navigation Buttons ................................................................................................................... 10
Filter Tabs ................................................................................................................................. 10
Filter Tab Types ........................................................................................................................ 11
Viewing Filters and Creating Filter Tabs – “Listing of All Filters” Bar .................................. 11
“Listing of All Filters” compared to “Filter Management” ...................................................... 12
Filter Counts Menu Bar ............................................................................................................ 12
Alphabetic Index Section Selector ............................................................................................ 13
Column Headings...................................................................................................................... 13
Page Numbers and Record Count – Bottom of Screen ............................................................. 14
Listing Rows – Click “Detail” to Open Full Edit Screen for a Record .................................... 14
Menu Shortcuts ......................................................................................................................... 14
Contact Detail Screen -Address Fields ..................................................................................... 15
Account Detail Screen -Address Fields .................................................................................... 15
Creating a Record .................................................................................................................. 16
Linking an Account................................................................................................................... 16
Agenda ...................................................................................................................................... 17
Associations .............................................................................................................................. 17
FIND ACCOUNT OR CONTACT: QUICK SEARCH AND ADVANCED SEARCH ........ 17
Using Quick Search or Advance Search ................................................................................ 17
Page 2 of 55
Quick Search........................................................................................................................... 18
Advanced Search ................................................................................................................... 19
EXPORT WIZARD ..................................................................................................................... 20
IMPORT WIZARD ...................................................................................................................... 23
FILTER MANAGEMENT ........................................................................................................... 25
What is a filter? ............................................................................................................................. 25
Filter Management .................................................................................................................... 25
Filter Management and Counts Screen ..................................................................................... 25
Counts ....................................................................................................................................... 26
Filter Builder Screen ................................................................................................................. 26
Create New Filter, Revise or Copy Filter ................................................................................. 26
Detailed Mode ........................................................................................................................... 28
Result Panel .............................................................................................................................. 29
Action Lists.................................................................................................................................... 32
THE REPORT WIZARD ............................................................................................................. 33
Report Management .................................................................................................................. 34
CALENDAR ACTIVITIES .......................................................................................................... 36
Calendar Overview ................................................................................................................... 36
Event Types .............................................................................................................................. 36
Reminders ................................................................................................................................. 36
Journal and Communication Log .............................................................................................. 38
INSPECT DUPLICATE ACCOUNTS......................................................................................... 39
MANAGING AN E-MAIL BROADCAST ................................................................................. 41
Campaign Management Screen ................................................................................................ 41
E-mail Options .......................................................................................................................... 41
SENDING E-MAIL BROADCASTS........................................................................................... 42
Preparing an E-mail Campaign ................................................................................................. 42
Define E-mail Header ........................................................................................................... 42
Select Recipients ................................................................................................................... 42
E-mail Message Body ........................................................................................................... 43
Attachments .......................................................................................................................... 44
Preferences ............................................................................................................................ 44
HTML Tracking ........................................................................................................................ 45
Submission Options .................................................................................................................. 45
Delivery Schedule ..................................................................................................................... 45
MANAGING A FAX BLAST ...................................................................................................... 46
Campaign Management Screen ................................................................................................ 46
SENDING FAX BROADCASTS................................................................................................. 47
Preparing a Fax Blast ................................................................................................................ 47
Define Fax Header .................................................................................................................... 47
Select Recipients ....................................................................................................................... 47
Fax Body Files .......................................................................................................................... 48
Opt-Out ..................................................................................................................................... 49
Transmission Options ............................................................................................................... 49
Submission Options .................................................................................................................. 49
Delivery Schedule ..................................................................................................................... 50
Page 3 of 55
ORDER FULFILLMENT ............................................................................................................. 50
Order Status .............................................................................................................................. 50
Inventory Listing ....................................................................................................................... 50
Fulfillment Leads ...................................................................................................................... 50
YOUR PASSWORD .................................................................................................................... 51
Strong Passwords… .................................................................................................................. 51
Changing Your Password ......................................................................................................... 51
Resetting Your Password .......................................................................................................... 52
Personalization .......................................................................................................................... 53
Copyright .................................................................................................................................. 54
Support Information .................................................................................................................. 54
Page 4 of 55
FOREWARD
About This Guide
From sending e-mail broadcasts, to managing your clients and prospects, this guide
illustrates how to get things done efficiently and quickly. There are examples and
screenshots to make following along a snap.
This guide is intended for end-users; admin only functions are not covered.
CORPCOM BASICS
Parent—Child Relationship: Accounts and Contacts
Corpcom has separate record layouts for Parent and Child records. The default names are
Accounts (a Parent record typically used for company names) and Contacts (a Child
record used for individual names).
A parent record may be linked to as many child records as necessary, but a child may
have only one parent record. Thus an Account (typically a company or organization)
may have:
•
No contacts linked to it
•
One contact linked to it
•
Multiple contacts linked to it
Conversely, a Contact (typically, an individual) may be or have:
•
Linked to no accounts, the contact is an entry for an individual only.
•
A link to one account. For example, the individual contact works for a given
company. ( A single contact may not be linked to more than one account)-
Your administrator may have chosen a different context for the parent/child metaphor.
For example: Schools and Teachers, or Buildings and Tenants.
We’ve used “account” and “contact”, where “account” is the parent and “contact” is the
child throughout this manual. E.g. an account can have any number of contacts associated
with it, but a contact will only be related to one account.
Page 5 of 55
Typographic Conventions
Description
Convention Example
Check for the confirmation e-mail.
Words in bold indicate an instruction or
critical information. Text directing you to a
figure, illustration, or table will be bolded as
well.
Click Delete to remove the record. Italicized words are used for emphasis.
Delete is permanent—there’s no way to
recover a deleted record.
Screenshots
We’ve included various screenshots to give you a visual aid to go along with the text
throughout the guide. We use the default layout and default theme. Keep in mind that
your screen may look different, depending on your layout and theme choices.
Help
In the upper right-hand corner, just below your username, you’ll notice an icon.
The question mark launches our online help system.
Online Help
The question mark in the upper right of each screen launches our
online help system. Help on this topic displays a selection of key
topics based on the screen you’re viewing.
Figure A
FAQ’s will close help and navigate to a list of frequently asked questions.
Question/Feedback--ask a question we haven’t covered or assist us in improving
CorpCom with a suggestion or observation. Enter your desired text in the box and
click the submit button.
SCREEN LAYOUTS
Navigation Button Row – Top of Screen
At the top of most screens you will see a row of context-sensitive buttons. These are
to reach: “Find Contact”, “Find Account”, “Add Contact”, “Go to Contact Listing”,
“Go to Account Listing”, “Compose Letter”, etc. If you are in an Administrator
account, other buttons are available to customize the system for all users.
Click a button to open the desired screen.
Page 6 of 55
LEFT HAND VERTICAL MENU BAR
At the left side of all screens a vertical menu helps you navigate to various operations.
Security and Settings - Allows you to customize your screens and password
My List
- Reaches various list maintenance operations
Communications
- Opens email and fax broadcast
Configurations
- Administrator accounts only. Customization, user-defined fields
Page 7 of 55
START
Overview
The Start screen is made up of panels that provide quick access for entering
data/retrieving most up-to-date information. You may personalize the layout and content
of this screen to suit your needs. Choose from 13 available panels by using drag-and-drop
operation in Design mode.
Design Mode
Click Personalize Start, located at the top left.
You are now in design mode. To reposition a panel, drag
the menu bar with the cursor. A horizontal blue line
indicates a valid drop point. You have four sections in
which to drop panels: top, middle left, middle right, and
bottom. Any panels that you close will appear under
content. To clear all panels
and start from scratch, click Reset Layout located at
the top of the page.
Adding panel(s): checkmark, choose a section, click Add.
To exit design mode at any time, click anything on the left-hand menu or mouse-over
Options and select “Return to Browse Mode”.
Recent updates
A quick glance at your Recent Contact/Account updates shows records you or other users
have added or updated. Click more to navigate to the detailed info page.
Statistics
Three different statistics categories are available as
individual panel. Select Context and Lookup field to
generate a quick count of those records. User-Defined
fields of numeric data type also tally the sum of value
assigned to each record.
Auto-Logs keep track of changes made to User-Defined
fields tagged by your administrator. When an update is
made on a tagged User-Defined field, the system captures
both the original and revised value, along with the date
time and User ID information. These log entries serve as
a tool to monitor how active a given record is. These log
Page 8 of 55
entries serve as a tool to monitor the activity of checkbox, radio button or dropdown list
fields. Multi-word field names (up to 50 characters), may serve as scripts to define
actions to be taken. Clicking the appropriate checkbox tracks the dates various activities
are marked as complete.
Filter Statistics
Filter statistics works in conjunction with three other statistic panels. Click Filter to
view the list of filters you’ve created. Selecting a filter applies it to your opened
statistic panels. In other words, the counts/sums in statistic panels reflect only records
returned by the selected filter. Remove reverts to the counts/sums of unfiltered list.
Recent e-mail campaigns and fax blasts
Recent e-mail campaigns and fax blasts allow you to check the status of your
broadcasts. Click Job No. to glance at the job status. Click details to look up or
opt-out a specific e-mail address in that broadcast. You can also do this from the
start page via the unsubscribe e-mail or unsubscribe fax panels.
Unsubscribe
Use Unsubscribe tools when you need to add a Contact to CorpCom suppression/Opt-out
list. Type e-mail address/fax number into its respective field, and click Submit. The
individual remains in your list, but his/her address will be automatically excluded from
future e-mail/fax lists. An Opt-out entry stays in CorpCom suppression list, even when
the Contact record is removed permanently.
Quick Search
Quick Search is reached from the Start screen and also from the row of buttons at the top
of most screens, These screens include the Contact Detail, Account Detail, Contact
Listing and Account Listing screens. Click the “Find Contact” or “Find Account” button
to open the search function.
See the “Find Account or Contact: Quick Search and Advanced Search” section later in
this manual for details on how to use the search functions.
Page 9 of 55
CONTACT LISTING AND ACCOUNT LISTING SCREENS
The Contact Listing and Account Listing screens display row-by-row listings of contacts
or accounts. The screens are reached by clicking on Contact Listing or Account Listing
in the left hand vertical menu, or on the buttons for “Go to Contact Listing” or “Go to
Account Listing” found at the top of most screens
Listing Screen Features
•
•
•
•
•
•
•
•
•
Navigation Button Row – Top of screen. Buttons to reach other screens
Filter Tabs – Horizontal set of tabs to select and apply a filter and view results
Listing of All Filters bar. Click the down-arrow icon to open a filter list or create a new
tab
Filter Counts bar – Click the down arrow icon to open a set of counts for the active
Filter Tab
Alphabetic Index Section Selector – Following “[All]”, the A B C D …Z selector tool,
used to display records by letter of the alphabet, or by clicking [All], the entire list.
Page Navigation Arrow Icons - Right of screen arrows ◄ ► to page through the list
Column Headings – Click a heading to sort the page by that column. Click again to
reverse
Listing Entries – Each row shows a company (Account) or individual (Contact).
Page Number and Record Count – Bottom of screen.
Contact Listing Screen
Navigation Buttons
The row of buttons at the top of the screen used to reach other screens such as “Find
Contact”, “Add Contact”, etc. These are context sensitive buttons which vary from
screen to screen.
Filter Tabs
A horizontal row of tabs used to control which records are shown in the list. Click the
tab “ALL RECORDS” to display the full list, page by page. The other buttons represent
various filters which can be applied. Clicking a filter button will apply the filter and
Page 10 of 55
display the resulting filtered records in the listing below. The active tab is shown in a
solid color.
To apply a different filter click one of the other tabs. Creation of new filter tabs is
described in the Listing of All Filters section below.
Filter Tab Types
Fixed Tabs. These tabs, including the leftmost “ALL RECORDS” tab are always visible
on the Listing Screens. They are designed for use by all users in your organization.
Fixed Tabs can be changed, new ones created, or deleted from the Administrator’s
Account.
Removable Tabs. Tabs marked with an “X” may be removed by clicking the X.
Removing a tab does not delete the underlying filter, however it does delete the tab itself.
To restore a removed tab you must recreate it using the “Create Tab” command opened
from the “Listing of All Filters” bar.
Viewing Filters and Creating Filter Tabs – “Listing of All Filters” Bar
Click “Listing of all Filters” to drop down list of all available filters. This opens a filter
utility to:
Limit the list to My Filters or expand to All Shared Filters
Create tabs for filters
My Filters and All Shared Filters Buttons. Click My Filters to list only those filters
created in your account and those you’ve copied from shared filters. Click All Shared
Filters to list all filters.
Note that the function cannot prevent viewing or use of your filters by other users. The
function does not control which Tabs are displayed. Tabs are controlled by the Create
Tab command and removed by the “X” icon within the tab itself.
A tab may not exist for a filter you see on the list and need. Use “Create Tab” as
described below.
Create tab. Click “Create Tab” to the left of the filter you want to use. This will create a
tab for the filter. The active tab is highlighted and the resulting list is also displayed.
Page 11 of 55
You may create tabs for multiple filters; however for easy navigation, you should only
add tabs for filters that are commonly used. When you exceed four tabs, click the arrow
buttons◄ ► at the right of the tabs bar to scroll through them.
Click on a tab to make it the active tab. The active tab is highlighted with a solid color,
depending on the color scheme you have chosen for your account. An active tab displays
the list based on its underlying filter. Click the x inside a tab to remove it. When you
remove an active tab, the listing reverts back to the left-most tab. The left-most tab will
always be the unfiltered list. It is the default tab and cannot be removed.
You may toggle between account and contact listing views using the “Switch to
Account Listing” or “Switch to Contact Listing” link shown on each screen.
“Listing of All Filters” compared to “Filter Management”
The menus reached from Listing of All Filters, a bar shown on Listing Screens, helps you
use filters.
view a list of filters,
click a tab to display a filtered list
create tabs and remove tabs.
Menus reached from Filter Management, a tab on the left of all screens, helps you build
and modify filters:
View a list of filters
Inspect a filter (The terms within the filter)
Copy a filter
Modify a filter
Write a new filter
View counts of accounts and contacts produced by a filter. (Filter Counts
described below also shows counts)
See the chapter “Filter Management” for instructions on writing filters.
Filter Counts Menu Bar
Click on this bar to open a set of counts produced by a filter. The Contact Listing screen
shows counts of contacts, the Account Listing screen shows count of accounts.
The counts are presented in a grid. The first line shows counts of records selected by the
filter.
The second line shows the total records in the data base.
Page 12 of 55
Three columns are presented for both rows. For contacts the columns are:
Column 1
Contacts With No Link To an Account
Column 2
Contacts Linked To An Account
Column 3
Total Contacts – Includes both contacts linked to an account and
individual contacts with no link to an account. The counts are nonduplicated – a name is counted only once.
A similar grid is used for accounts on the Account Listing screen.
The Filter Management menu, described in a later section, provides both the Contact and
Account numbers in a single six-column grid.
Alphabetic Index Section Selector
The alphabetic row lets you click on a letter to restrict the list.
Depending on whether you are in the Contact Listing screen or Account Listing screen,
you will see the bolded word Contact or Account, followed directly a letter, or the
word [All]. If a letter, that will be the only section of the alphabet displayed in the list.
The All signifies that you can page through the entire list.
Column Headings
The default column headings are Company Name, First Name, Last Name, Title and
Department. Your Administrator may define a different set of columns. Alternate
headings might be Phone Number, Address, City, State, ZIP, Email Address, etc.
A small window is displayed above the alphabet row. This allows you to choose which
column the alphabetic selector feature operates on. Choose the column you want as the
index from the dropdown list, then click an index letter (A-Z), or [All]. CorpCom
displays records beginning with the index letter. If All is selected it starts at the
beginning of the list.
For example, if you want to list all records whose city starts with “B,” choose City as the
index and B as the index letter.
There are two cases when CorpCom
displays zero records:
1. No records contain
the field. E.g., you select Phone,
but none of your records contain phone numbers.
2. No fields begin with the letter. E.g., you select State and the letter B, but
there are no states in the U.S. that begin with B.
You may also see rows with no entry for Company Name, Last Name, etc. This indicates
that there is a record, probably entered with a Title or Department only, but no person or
firm name exists. The record may be valid. Or, you can inspect the de
Click a column header to sort alphanumerically. This sorts the entries on the page only,
Page 13 of 55
not the entire database. Clicking detail navigates to the full record.
Page Numbers and Record Count – Bottom of Screen
In the bottom left the page number and number of pages is shown. For example: Page 1
of 15, or Page 3 of 15. Below that the Total Records shows the number of records
selected by the filter. This will match the Total counts shown by the more detailed
“Filter Counts” dropdown previously described.
Bottom right of the screen provides an arrow ◄ ► navigation tool to navigate forward
and back through pages, or by using the dropdown box to a specific page number.
Listing Rows – Click “Detail” to Open Full Edit Screen for a Record
Each row in the list shows a record. Click the word “Detail” to the left of a name to open
a “Contact Detail” or “Account Detail” screen. These screens are full edit screens that
show all database fields.
Checkboxes Left of Names. A checkbox is seen at the left of each listing line. The
boxes may be check to mark an entry for Deletion or Add to Action List.
To delete a record(s): Click the checkbox(es) next to the records you want to delete, then
in the top of screen “Navigation Button Row” click the “Delete Selected Records” button.
You will be given a warning “Are You Sure You Want to Delete These Record(s).
Confirm your choice. The records will be permanently deleted.
For Action List selections see the section below.
Menu Shortcuts
Click Add Account or Add Contact, depending
on which type of record your viewing, create a
new record.
Click on Find Account or Find Contact to
navigate to the respective search screen. More
information on using the search function can be
found on page (enter page number).
Page 14 of 55
DETAIL SCREENS – ACCOUNTS AND CONTACTS
Contact Detail Screen -Address Fields
Contacts may hold two addresses:
1. Individual address such as home address and
2. Account Address, such as the company address.
Address Type. The Address Type dropdown list lets you specify which address will
show in the address fields. You can toggle between the Individual Address view and the
Account Address (typically the contact’s company address) view using the dropdown.
An Account Address exists only if the contact is linked to an account.
Editing Addresses. Select the address type from the dropdown bar for editing.
Individual addresses may be entered or modified in the Contact Detail screen.
Note that the address data for Account Addresses (shown greyed-out) must be entered on
the Account Detail screen. Move to the Account Detail screen, enter or update the new
account address on the Account Detail screen, then switch back to the Contact Detail
screen to see the entry listed on the contact screen. When you switch away from the
Contact Detail screen, then return back from the Account Detail screen, note that the
address shown on the Contact Detail screen will default to whichever address is specified
in the Address for Mailings buttons.
Further note that the buttons for “Address for mailings” and “Address Type” dropdown
work independently. This allows you to change address data in either the Account
Address or the Individual Address without changing the specification for which address
to export for mailings.
Update Button. Be sure to click the “Update” button if you want to save any changes to
the Address Type status or to any changes to Address, City, State, Zip, etc.
Contact Detail Screen – Edit Individual Address or Account Address
Account Detail Screen -Address Fields
Accounts (typically companies) are limited to a single address. Account address field
Page 15 of 55
names are preceded with the letters AC (for Account). This helps you distinguish
between account address data and contact data fields if you export the list to Excel.
1. Individual address such as home address and
2. Account Address, such as the company address.
Creating a Record
After clicking Add new account or Add new contact from the top row button menu, you
will be presented with a blank edit screen in which to enter the new account/contact data.
After you have filled on all the relevant fields, click Save.
If you have a contact that will be linked to an account you may have two scenarios:
An account already exists
Contact
-
Open the account detail, then click “Create new
record”. Enter the new contact data, then save.
Account does not yet exist
-
Create a new account first, enter the account data,
click “Save”, then from the resulting Account Detail
screen, click “Create new Contact record”. Enter
the new contact data, then save.
Linking an Account
When adding a contact, you can link it to an account. You
can add a contact directly automatically linked to an
account by clicking the Create new Contact Record link on
an account screen. This screen also lists all other contact
associated with the account.
The alternative way to link a contact to an account is to
click on the Account bar of a contact and enter the account
name in the provided field. Click View Results. A list of matches is shown below. Click
select next to the correct account. Your contact is now linked to the selected account.
Contact Detail Illustration
You can unlink a contact from an account by clicking the unlink icon next the
account name. If you choose to delete an account which is linked to a contact, be
sure to unlink any contacts you wish to keep before making the deletion. When the
Page 16 of 55
Account is deleted any linked contacts will be deleted as well.
Agenda
Any events, notes, and journals you set in Calendar appear in the Agenda accordion
panel for the account/contact they’re linked with. Communication Log displays fax and email broadcast activity for that record.
Click New Entry to jump to event creation in Calendar.
Associations
Use Associations to form links between records in CorpCom. This is an easy way, for
example, to make your own shortcuts in order to jump between related contacts and
accounts.
FIND ACCOUNT OR CONTACT: QUICK SEARCH AND
ADVANCED SEARCH
Using Quick Search or Advance Search
These functions allow you to quickly “Find” or “Search For,” an individual person
(contact) or company (account). Look at the top menu bar of most pages and you will see
buttons for “Quick Search” and “Advance Search”. Quick Search may also be found on
the Start Menu.
Clicking on one of the buttons takes you to the Search functions Quick Search and
Advanced Search:
Page 17 of 55
Quick Search
Quick Search provides a single window to enter either a last name or company name.
The system will find and show a list of any matches. The system looks for both partial
and full character matches.
1. First it looks for the first characters you enter to match a name.
2. If you continue typing a full name, the system will look for an exact match.
3. If neither a full name or first characters-typed match is not found, the system will
look for a character string match within the name, and will display any matches.
Thus you don’t need to specify whether you want first few characters, full name or
contains-characters match. The system will intelligently look for all three and will
display the correct matches in the Search Results widow. Click on the word DETAIL
next to results person name or company name desired. This will open a Contact Detail or
Account Detail edit screen.
Quick Search Results Menu.
Page 18 of 55
Some Quick Searches may yield a large number of matches. If so, two tools are available
to find the exact entry desired in the list of matches. The first allows you to group entries
by column. This may be used if you have a large number of result entries to look through
and you want to inspect your list of results by City, State or ZIP.
A second tool, the small windows below each heading may be used to further filter a long
list of results to find the name desired. Enter a few characters in the box, then click the
Filter icon.
Advanced Search
Advanced Search allows you to search on multiple fields at once. It is available for
Contacts or Accounts. The advance search windows look similar to full edit screen.
Enter characters in any combination of fields, for example “Last Name” and “City”, then
click the “Find All” button. It will display a list of any matches. Unlike Quick Search,
the Advance Search does not use the grouping or filter tools because the list of matches is
typically quite small.
Advance Search allows you to search by any field or combination of fields such as Phone
Number, ZIP code, Email Address, category, document code, etc.
A window allows you to specify whether you want to search by the first few characters,
by a full match or by a string of characters within a name.
Page 19 of 55
EXPORT WIZARD
The Export utility uses a wizard-style approach. It allows full/partial extract of your
CorpCom list.
Select a filter containing records that you want to export. Selected filter panel
displays the filter’s name and total record count. To export the entire CorpCom list, select
_Master List. You may only export one filter at a time. Selecting a different filter will
replace any previously selected one. Click Next.
Tip: Select e-mail/fax exclusion to leave out any records referenced in Opt-out list.
Contact and/or Account fields that you need to export. The top to bottom order of the
fields in Selected fields panel reflects the field sequence in export file. Both the Account
Fields and Contact Fields are available by clicking the appropriate bar. Uncheck to
remove from Selected fields panel. Click Next.
Select export file format and type the file name, then click Run. Download button will
appear when export file is ready. Upon clicking the button, your browser will display a
Page 20 of 55
File Download dialog box. Save the file to your computer.
Stored Templates for Repetitive Exports. You may have certain export field selections
you use repetitively. Once defined, these selections are stored within the Export List
wizard (see screen-shot below labeled “Export List”.) Within the “Select Templates”
section of the Export List screen, see the list of any templates already created for your
organization. Click “Select” at the left of the template name you wish to select. This will
cause the list of desired fields to be exported to be displayed in the Selected Field(s)
section on the left of the screen. Then proceed with the Wizard using the “Next” button
in the lower right.
To define a new set of fields to be stored as a template, first select the desired fields as
described in the instructions above. Then, use the “Save Field Selections As Template”
option at the bottom of the screen to save the selection. First, give the field selection a
name and enter it in the box left of the “Save As New Template” button. Click the button
to save your field selection and template name. Click “Select Templates” above to refresh
and see your new template name in the list. The new Stored Template will also be
assigned an associated ID number. A Stored Template may hold both Account and
Page 21 of 55
Contact fields.
Modifying Existing Stored Templates. Select the template you wish to edit, use the
click boxes to add or delete fields, (both Accounts and/or Contacts), then click “Save
Template Updates” to keep the modified template under its old name.
Alternatively, use the “Save As New Template” button to store it without overwriting the
original template. In this case, give your modified template a new name by entering the
new name in the box just to the left, then click “Save Template”. This sequence allows
you to keep both the old template and the modified version. If you do not enter a new
name for your modified Stored Template the system will create a new template using the
old name coupled with a new number.
Stored Template The sequence described above uses the menu boxes shown below:
Page 22 of 55
IMPORT WIZARD
The Import utility uses a wizard-style approach. Know your source file name and
location before you begin. The utility supports only Comma Separated Value (.csv)
format. Complex files may need to be transformed and loaded by the technical staff at
Corporate Communications Center, Inc.
Click Browse to locate the file that you want to import. Remember to click
Upload before moving to the next step.
Source fields list box displays all fields contained in your .csv file. To map Source to
Destination one field at a time, highlight a field from Source and its destination, then
click Connect. Verify each pair of mapped fields listed on Mapped fields panel. Click
disconnect icon next to a pairing to undo its mapping. Toggle between Account/Contact
to display fields from either context. Click Next.
Tip: You can map a source field to more than one destination field, but you still need
to map one field at a time.
Page 23 of 55
If necessary, you may designate default values to the rest of destination fields. Highlight
a field and type into/select a value from Default value. Remember to click Set Default
button before selecting another destination field. Click disconnect icon next to the
destination field to undo. Click Run to start import routine.
Upon completion, Result panel displays the number of records successfully imported into
CorpCom. Click Download button to review which records did not get imported, if
any. Contact the technical staff at Corporate Communications Center for help with any
import errors.
Page 24 of 55
FILTER MANAGEMENT
What is a filter?
A filter or query is a set of conditions designed to select records from the list based on
the content of one or more fields. It can be made up of a simple condition, or a
compound condition. Compound conditions are made up of multiple conditions
connected by And or Or. There is no limit to the number of simple conditions that can
be present in a filter. Every record in the database is matched against the filter, those
that meet the filter conditions are selected for viewing on the screen, printing in a
report, exporting to a file or generating a list count.
Using the filter you may select sub-lists from the database. Filters apply to both
accounts and contacts. CorpCom’s filter utility allows you to use point and click
techniques to build a query, name it and store it for repetitive use.
Filter Management
Filters generate lists of contacts and accounts that meet specified conditions. The
resulting sub-lists are used for:
Contact Listing Screen
Account Listing Screen
Generating List Counts Export lists to Excel, CSV and text files
Email and Fax Broadcasts
The Filter Management utility is opened from any screen from the left-hand vertical
menu bar. Click “Filter Management” to open the Filter Mgmt and Counts screen.
Filter Management and Counts Screen
This screen provides a list to view filter names, open counts, copy a filter, revise a
filter and create a new filter. It also lets you control whether you view only your own
filters or system-wide filters. My Filters displays only those filters that you’ve
created. Click on the column names to sort the filters ascending/descending.
The screen is arranged in columns and rows. Each row shows a filter.
Page 25 of 55
Counts
To the left is a column of “ + “ (plus) signs. Clicking the + opens a count grid for the
filter.
It shows counts for both contacts and accounts and has subtotals for contacts linked to
an account and contacts with no link to an account. It shows counts for totals
compiled by the filter as well as counts for the entire database.
To delete filters permanently, checkmark them and click Remove Selected Filters from
the shortcuts popup. Grayed out (non-editable) filters were created in older versions of
Corpcom. These filters cannot be revised or cloned, but you can still use them in the
screens listed above.
Filter Builder Screen
Reach the Filter Builder Menu from the Filter Mgmt and Counts Screen:
Create New Filter button
Top button row
Copy
Left of each filter name row
Revise
Far left of each filter name row
The Filter Builder menu uses point and click methods. Filters may have one condition
line or multiple condition lines. Each line represents one condition. A condition
specifies a field (last name, city, category, date added, document code, etc.) and a value
that the field must match.
Create New Filter, Revise or Copy Filter
Click the Create New Filter button at the top of the screen. Click Revise to edit the
filter. Click Copy to clone the filter, with the option to revise, and save it as a new filter.
Tip: Cloning makes it easy to create a filter with similar conditions.
Click Create new Filter from the shortcuts popup to open a blank Filter Builder. If you
click Copy or Revise next to the filter name on the filter listing screen, Filter Builder
will open with all the conditions listed for editing.
Page 26 of 55
Naming Filters
When naming a filter, choose a short description that will assist in its use. The name
might describe the conditions contained in the filter, might identify the list or use other
terms that will identify the list in a useful way.
Context and Field Name
Context selection dictates the location of the Field Name.
Operators
The Operator compares the Field Name contents with the Value. Clicking the
dropdown arrow will list your choices. The operator choices displayed will
depend on the field name selected in the box to the left.
Operators for fields with alphabetic data:
Is equal to Looks for records that exactly match the value you select Is not equal
to Looks for records that do not match the value Starts with Matches the initial
character(s) you enter in the value field. Contains Matches a character string
within the value you enter Is Blank Looks for records where the specified field is
blank Is not blank Looks for records where the specified field contains any data
Operators for fields with numeric data:
Is equal to Field Name contents are equal to the number specified Is not equal to
Does not equal the value, may be either greater than or less Is greater thanField
Name contents are greater than the Value Is less than Field Name contents are
less than the Value Is blank Field Name contains no data Is not blank Field Name
contain data
Page 27 of 55
Operators for fields with dates
Is greater than Dates older than the date value entered
Is less than Dates more recent than the date value entered
Value
The value box lets you type in the value that the field must match (or, most not
match if you have chosen the “is not equal” operator). Lookup fields are a special
case. Do not type in the value, instead select from the list of values by clicking on
the dropdown.
Pick an Operator and Value. The
filter engine compares the Field
Name to the Value,using the
Operator as the relationship. Click OK. Adding more than one condition causes
the engine to potentially return fewer matches.
The second and any successive lines will require use of the “And/Or” function.
Filter Builder defaults to Basic mode, in which the use of And operator is implied.
To use “Or” connector, you need to switch to Detail mode.
Detailed Mode
Detail mode allows for advanced/complex filtering (compounding conditions). The
parentheses and the And/Or operators become available.
And/Or
The “And/Or” options do not show until you have two conditions. And/Or is used to
connect condition lines.
Use “And” to create a sub-list of only those records that fulfill both conditions. This is
the same as using Basic mode.
Use “Or” to retrieve those records that fulfill either of the condition
independently.
The difference between “And” and “Or” becomes more pronounced when several lines
are created. Multiple “Ands” will produce fewer records and multi-line “Ors” will return
more records. Parentheses
Some filters use open and close parenthesis marks to control the order in which
condition within the filter are evaluated. Nested, multi-level parentheses are permitted.
Page 28 of 55
Operations within the innermost set of parentheses are evaluated first. Operations within
the next level are evaluated next and then those in the outermost set of parentheses.
Lastly, operations outside of the parenthesis are performed.
Tip: The number of open parentheses must match the number of close
parentheses.
Call your assigned account manager at CCC if you need assistance on building multiline
filters with parenthesis or other filter questions.
Result Panel
This is a small box with the counts grid in the middle of the Filter Builder screen. After
you add a query, the Result Panel displays six numbers. The Result number is how many
records matched your filter. The Total number is how many records CorpCom filtered. It
shows results for both Contacts and Accounts, including those linked and unlinked.
During the writing and re-writing of filters, the grid can help you evaluate the desired
results. This lets you see the effect of using various operators, parenthesis and conditions
during a single filter writing session.
Note that this grid is the same one opened directly from the Filter Mgmt and Counts
screen using the + sign operators.
Page 29 of 55
EXAMPLE Basic Filter
For this example, we need to create a filter that pulls all contacts that are in the city of
Dallas. We are an account manager. Here’s how we’ve set up this filter:
1. Type the Filter Name, e.g.: “Dallas Contacts”
2. Click Add Condition to add a condition line.
3. Select “Contact” from Context dropdown. Field Name appears. Chose which field
in the record you want to match, which in this case is “City”.
4. Under Operator, select “is equal to”
5. Since City is a lookup type field, Value field shows a list of predefined Cities.
Select “Dallas”.
6. Click OK to insert the condition into the list of conditions. Click Revise to edit it.
Click Cancel at any time during condition selection to back up one step.
If you create a new filter or make any changes to an existing filter, remember to click
the Save button to store it in the system.
We’ve successfully created the filter.
The Result Panel shows us that CorpCom searched a total of 9,964 records and found 35
that matched our query.
EXAMPLE Advanced Filter
Now we need to find all of Mr. Page’s contacts that reside in either the state of Texas of
Page 30 of 55
Illinois. Make sure you are in Detail mode. Follow the first six steps outlined above. The
next steps are to add two condition lines to specify Texas or Illinois contacts.
To add a condition line for State = “TX”:
7. Click Add Condition to add a condition line. Make sure to use an open parenthesis.
8. Select “Contact” from Context. Select “State” from Field Name.
9. Pick “is equal to” from Operator.
10. Since State abbreviation is used in this database, type “TX” in Value field. Click
OK to insert the condition to the list.
Now we need to add another condition for State = “IL”.
11. Click Add Condition. Do NOT open with a parenthesis.
12. Select “Contact” from Context. Select “State” from Field Name.
13. Pick “is equal to” from Operator. Type “IL” in Value field.
14. Close the parenthesis opened in the previous condition with a closing parenthesis.
15. Since we want all Bob Page’s contacts that reside in EITHER the state of Texas
or Illinois, make sure the connector between the last two condition lines is set to
“Or”.
Note that the use of parentheses on the first condition line is optional.
In the completed filter, CorpCom narrowed our results from 11 to 10.
Page 31 of 55
Action Lists
You may have a special project that requires you to compile a list of select
Accounts/Contacts. While a filter allows you to pull out records based on specific
conditions/patterns, Action lists provide a way to build a list of individually selected
records.
To add a contact to an action list, go to the Contact Listing screen. Note the checkboxes
to the left of each contact entry.
1. Click the checkbox next to any contact(s) you wish to add to the Action list.
2. In the top of screen button row click “Add selected records to Action List”
3. Use the Action List tab to view the newly added entries to your action list.
4.
(If there is no Action List tab you must create one, instructions below)
5. To remove a record(s) from the action list, view the list using the Action List tab,
click the checkbox(es) next to the record(s) you wish to remove, then click
“Remove selected records from Action List” button in the top of screen row.
6. To clear the entire Action List, click the top row button “Clear my Action List”.
This does not delete any records, but does remove their links to the action list.
Action List Tab. The Action List tab works like other tabs. To create or re-create this
tab go to the Contact Detail or Account Detail screen, then click the “Listing of all
Filters” bar. Navigate through the list of filters to a permanent one named “My Action
List 1”.
Create tab. Click “Create Tab” to the left of the line holding My Action List 1. This will
create a tab for the action list. The action list tab is highlighted and the resulting action
list is also displayed.
The list does not make a copy of a record; rather it stores references to the actual records
in CorpCom. Consequently, the reference is removed when you delete the record
permanently from CorpCom. The Action list holds the references until you decide to
remove the selected record or remove all records from the action list.
Tip: If you are working on a new project, you may want to clear the Action List before
adding a new set of select Accounts/Contacts to your new action list.
Page 32 of 55
THE REPORT WIZARD
Corpcom allows you to create various reports using pre-made templates. Below
is a list of what each report will contain.
Address Listing
Name, title, company name, address, phone, email
Avery Listing
First name, last name, address, city, state, zip
Detail Listing
Name, title, company, address, phone, fax, email, owner, source, status,
account mgr, group/subgroups, documents
Phone Listing
One line per record, name, company, phone, fax, email
List Distribution
Sheet
Count totals by all group/subgroups and document codes
Note Listing
By name & date, a printout of notes in the notes section
Reports are available in Word (.doc), Rich text (.rtf), Plain text (.txt), and PDF (.pdf).
Click Manage Report Templates in the Shortcuts menu to customize reports.
Click the icon to the right of Author to view a report template. This allows you to view
the selected template in Word format.
Click the icon of the preferred format. Click next.
Select the filter to use as the data source. Click Next.
Page 33 of 55
Click the checkboxes in the order you wish the report to be sorted.
For instance, if you want to sort a report by last name, then first name, check the first
name checkbox, then the last name checkbox.
Click Finish.
Large reports will be split into multiple files.
Click the numbers below Result to download each part of the report.
Report Management
You can create, edit, and delete reports using the Report Management screen.
When creating a template there are a few simple guidelines to follow. Each report
template must start with «TableStart:Record» and end with «TableEnd:Record».
Page 34 of 55
Between these tags add the fields you want your report to display. They should be in the
following format: «Context.Field Name».
Here are some examples.
«Contact.First Name»
«Contact.Middle Name»
«Contact.Last Name»
«Account.Company Name»
You can look at existing report layouts by clicking the icon to the right of the author.
Once you have created your report template, upload it by clicking the browse button and
locating the file.
Choose the type of report using the radio buttons. Choose what type of fields the
reports contains.
Click upload.
Feel free to contact CCC is you need assistance creating report templates.
Delete reports by clicking the checkbox next to the report and click Remove Selected
Report Templates under the shortcuts menu.
Page 35 of 55
CALENDAR ACTIVITIES
Calendar Overview
You’ll use the Calendar to track upcoming meetings (events), store commentary (notes),
and as a reminder system.
Daily View shows you calendar activities listed by hour.
Click a day on the mini-calendar to switch days, and click an hour to create a
new event or explore an existing one.
Weekly View displays each weekday and any scheduled activities.
Click on a day to open the event planner for that day.
Monthly View gives you a traditional calendar display.
Click on a day to open the event planner for that day.
Listing View displays a listing of Events and Notes in chronological order.
Click on view to display the details for a particular event.
Event Types
There are three types of calendar entries.
Events Scheduled are used to schedule a meeting or phone call notes. Events are
normally used in a shorter fashion for describe an upcoming activity for the calendar.
Although the event will have one of the predefined subjects that you click in from the list,
you may type in a longer description in free form style.
Notes can be any length and used for any subject. Notes are used to type-in any desired
information in free-form style. Text or data from various Windows applications such as
Word or Excel may be pasted into the note using the clipboard. Your formatting will not
carry through; the data is stored as text. Although notes are stored by date, they are not
meant to be used as a calendar entry for the future. Future calendar items are called
events.
Journal entries keep a record of your communications. It can track everything sent to a
prospect so you are able to inspect the journal of what they have received. Journal
entries are automatically added when you do a fax or email broadcast.
Reminders
The calendar utility includes a reminder system to notify you via email of an upcoming
event. The reminder time may be set from a range of a few minutes to a few days of the
event. The reminder is sent to your default email address or to an email address that you
enter into the reminder utility.
Recurring events may also be scheduled for various intervals and time horizons.
Use the Event Planner to schedule appointments.
Page 36 of 55
Click Calendar ► Add Activity
Select Private to hide it from the All records list. Set Start time and End time to reflect
when your event will begin and end.
Linking your event to an account or contact adds it to the
record detail screen.
To remove the link, click the broken link icon. This removes the event from the record
detail screen.
Page 37 of 55
With Reminder enabled, you’ll get an e-mail at the specified
Within-time before the event start time. If you set a
Recurrence, you’ll be reminded for each one.
Tip: set up an e-mail account that automatically forwards
or CC’s to a group of people and put that address in the
Deliver to box. Result: everyone on the list receives event reminders from CorpCom.
End after creates that many
instances of the event. End by
copies up to the selected date.
Click save at any time to save
this
After your event is saved, you may edit it at any time. Update ALL Occurrences applies
the edit to all copies you generated with Recurrence, while Update this Event applies the
edit only to this instance. Delete will remove all occurrences of the event.
Journal and Communication Log
Journal displays logs of changes to user-defined fields. Your administrator must enable
this feature. Communication Log tracks e-mail and fax broadcast activity.
Page 38 of 55
INSPECT DUPLICATE ACCOUNTS
To assist with managing your data you can use the Inspect Duplicate Accounts section to
find duplicate accounts and consolidate the information.
When you first access this section you will be shown a list of all the duplicate accounts in
your database. These accounts are considered duplicates if the names are exactly the
same.
ABC
ABC
Smart Smiths
Smart Smiths
Select two accounts by checking the checkbox next to the name.
Click on the Compare Records button and you will see both accounts information listed
side by side. This is where you can choose to copy information from one account to the
other and update the information in one account and remove the other account.
To transfer contacts from one account to the other you can use the Arrow
Page 39 of 55
Buttons located between the two panes. This will allow you to safely move the contacts
over into the correct account before deleting the duplicate. Finish by clicking update to
save all changes.
Note: If you choose to delete an account any contacts linked to that account will also be
deleted.
Page 40 of 55
MANAGING AN E-MAIL BROADCAST
Campaign Management Screen
The frame in the center of the screen displays the Job Number, Status, Release
Date/Time, and Campaign Description.
Each e-mail campaign has a unique Job Number, which will expand to show the results
of an e-mail, i.e. the number of successful, opened, and blocked e-mails.
Click Summary next to the job number to get a detailed breakdown of the
campaign results.
Scheduled/Immediate Releases displays all submitted e-mail jobs.
Click the Test Run/ Drafts to display all submitted test e-mails.
Any job that has been placed on hold will be displayed when On Hold Campaigns is
selected. Click Cancel to delete the campaign or Resume to continue the campaign.
Recurring campaigns are displayed when you click the Recurring Campaigns radio
button.
Click Remove to permanently delete the recurring campaign. Click Load to start a
new e-mail using the campaign template.
E-mail Options
The Opt-out line, the refer-a-friend opt-in line, and the physical address line can all be
customized. Mouse-over E-mail Options in the top right hand corner of the screen
and click on a selection to navigate to the Campaign Template menu.
Click the link you wish to customize from the Link Type dropdown list.
Click Create new and enter the new link text in the provided HTML or TEXT
editors. Click Save when you are finished.
Page 41 of 55
SENDING E-MAIL BROADCASTS
Preparing an E-mail Campaign
When preparing an e-mail campaign, the files and lists that you choose are displayed in
the info window.
First, fill out the information under Header and Recipient List(s).
Define E-mail Header
Type the Subject Line for your e-mail.
FROM is the e-mail address that the recipient will see the e-mail originating from.
Display-as is the name that is will be displayed as the sender.
Reply-to is the e-mail address that a recipient’s responses will be sent to.
Select Recipients
Click the check box
beside send only one
copy to each recipient
if you wish to dedupe
your list.
3
6
-
Page 42 of 55
Manually enter e-mail addresses by entering them in the text box provided, inserting a
comma between each entry.
Click My Lists to use a list that you have in CorpCom. Click Select next to each list
you wish to use for your e-mail. To use a list in .csv format, Click My .csv file.
Click browse and choose a .csv file. Click open
and upload.
Note: you must map the fields in your .csv file now.
E-mail Address is the only required field.
If the first row of your .csv file contains column
names, click the checkbox at the top of the mapping
section.
For each destination field, choose the correct column
from the dropdown list. For example, to map the email address, click the drop down box next to “E-mail
Address” and choose the e-mail.
You can also limit the recipients of your fax to
those that have or have not received one of your
previous broadcasts.
Click Previous Campaigns next to Limit scope to…
Choose received or did not receive from the dropdown box and choose the
appropriate campaign(s).
E-mail Message Body
Click the Upload e-mail message from my computer radio button to upload an html
body. After choosing the .htm file, click upload.
Click the Compose new e-mail message radio button to type in your e-mail
message directly into the text box.
Page 43 of 55
Attachments
Click browse and find the document you want to attach. After choosing a document,
select the file format from the dropdown list and click upload. Repeat this process for
each document.
Click the Preferences bar when you’re done.
Preferences
CorpCom offers a default
opt-out line that is added to
the bottom of the e-mail by
default. If you have your
own opt-out line in the
body of the e-mail you can
choose Insert my own optout ink from the dropdown.
You can add Corporate
Communications Center’s
postal address or your own
address by choosing the
option from the Postal
address drop-down.
A Forward-to-friend link can
be added to your e-mail so
that the recipient can easily
share your e-mail with
others. They will be given a
link that allows them to be added to the distribution list.
Page 44 of 55
HTML Tracking
CorpCom can track which recipients open your e-mail and what links within your e-mail
they follow. Enable these options by clicking the Open rate and Click-thru rate
checkboxes.
Submission Options
The Reference Code is the description used when viewing the list of previous e-mail
broadcasts.
When you submit an e-mail broadcast, a confirmation e-mail is sent to the address you
enter here.
Selecting the owner for a job allows you to track who submitted the broadcast.
If you use the same layout for an e-mail multiple times, try saving a template. Click the
checkbox if you wish to create a template for the current job.
Delivery Schedule
There are three e-mail scheduling options:
1
Immediate submits the e-mail as soon as you click Submit.
2
Scheduled allows you to choose a submission date beforehand.
3
Hold suspends your job until you resume. Access suspended jobs via the
On Hold Campaign screen.
Page 45 of 55
MANAGING A FAX BLAST
Campaign Management Screen
The frame in the center of the screen displays the Job Number, Status, Release
Date/Time, and Campaign Description.
Each fax blast has a unique Job Number, which will expand to show the results of a fax,
i.e. the number of successful or undeliverable faxes.
Click Details next to the job number to get a detailed breakdown of the
campaign results.
Scheduled/Immediate Releases displays all submitted fax blasts.
Click the Control Copies radio button to display all submitted test faxes.
Any job that has been placed on hold will be displayed when On Hold Campaigns is
selected.
Click Cancel to delete the campaign or Resume to continue the campaign.
Recurring campaigns are displayed when you click the Recurring Campaigns radio
button.
Click Remove to permanently delete the recurring campaign. Click Load to start a
new fax blast using the selected template.
Page 46 of 55
SENDING FAX BROADCASTS
Preparing a Fax Blast
When preparing a fax blast, the files and lists that you choose are displayed in the info
window.
Clicking the Recycle Bin icon removes incorrect lists or files.
First, fill out the information under Header and Recipient List(s).
Define Fax Header
Campaign Name will be used as the description displayed when viewing the
listing of previous faxes.
FROM will be displayed at the header of the fax.
Select Recipients
Click the checkbox beside send only one copy to each recipient if you wish to dedupe
your list. To manually enter fax numbers, enter them in the text box with a comma
between each entry.
Click Managed Lists to use a list that you have in CorpCom. Click Select next to each list
you wish to use for your fax.
Page 47 of 55
You can also upload lists in the .csv file format.
To use a list in .csv format, click .csv file upload.
Click browse and choose a .csv file. Click open
and upload.
Note: you must map the fields in your .csv file now.
If the first row of your .csv file contains column names,
click the checkbox at the top of the mapping section.
For each destination field, choose the correct column
from the dropdown list. For example, to map the fax
number, the drop down box next to “Fax Number” and
choose the fax number.
You can also limit the recipients of your fax to
those that have or have not received one of your
previous broadcasts.
Click Previous Campaigns next to Limit scope to…
Choose either “received” or “did not receive” from the
dropdown box and choose the appropriate campaign(s).
Click the Fax Documents bar.
Fax Body Files
Click browse to choose the document(s) you want to fax.
After choosing a document, select the file format from the dropdown list and click
upload. Repeat this process for each document, uploading them in the order you want
them to be sent, i.e. the first document you upload will be the first document to come out
of the recipients fax machine.
Once you have finished uploading your document(s), click the Preferences bar.
Page 48 of 55
Opt-Out
Each fax should have an opt-out number and pin at the bottom. Keep in mind that this
opt-out line must be added manually.
Transmission Options
There are two resolution options for your faxes: standard and fine. Standard is sufficient
for most faxes but fine resolution may be necessary if there are detailed pictures in your
document. If you’re not sure, send yourself a test using standard resolution. If it doesn’t
look clear, try another test using fine resolution.
You may also choose the paper size needed for your fax, either Letter or Legal.
Submission Options
Selecting the owner for a job allows you to track who submitted the broadcast. When you
submit a fax, a confirmation email is sent to the address you enter here. If you use the
same layout for a fax many times, it may be useful to save a template.
Click the checkbox if you wish to create a template for the current job.
Page 49 of 55
Delivery Schedule
There are three fax scheduling options:
1
2
3
Immediate submits the fax as soon as you click Submit.
Scheduled allows you to choose a submission date beforehand.
Hold suspends your job until you resume. Access suspended jobs via the
On Hold Campaign screen.
ORDER FULFILLMENT
Order Status
Click a letter (A-Z), or [All]. CorpCom displays records that contain the index field
beginning with the selected letter.
The list displayed will show the Order Status, Order Number, recipients name,
company, and order date.
Click Manifest to view a detailed list of items in the order.
Inventory Listing
Click a letter (A-Z), or [All]. CorpCom displays records that contain the index field
beginning with the selected letter. A list of all items and quantities is displayed.
Fulfillment Leads
Click a letter (A-Z), or [All]. CorpCom displays records that contain the index field
beginning with the selected letter.
A list of leads is displayed. Click Import next to each lead that you want to add to
your database as a new contact.
Page 50 of 55
YOUR PASSWORD
We store your CorpCom password in a secure database using industry-standard
encryption. You are the only person who knows your password and we cannot retrieve it.
Making a strong password is one of the easiest and most effective ways of protecting
your data.
Strong Passwords…
are at least 8 characters long. You may use up to 50.
do not contain your name, company name, computer logon username, pet name, birthday,
or any other piece of information that anyone could easily find out about you.
do not contain complete words you could find in the dictionary.
are fundamentally different from other passwords you are using or previous passwords
you have used. If you use the same password for your e-mail account, computer logon,
CorpCom login, etc., a thief only needs one password to compromise all of your data.
use a combination of…
. UPPERCASE and lowercase letters ( A-z )
. Numbers ( 0-9 )
. Punctuation and other Symbols ( $,%,*,~,@… )
Strong Passwords Made Easy
EXAMPLE
1. Think of a sentence or phrase. Make it strange or bizarre in some way and
you’ll find it hard to forget.
The Milky Way Galaxy Loves Blue Orange Juice
2. Take the first letter of each word and mix upper and lowercase.
2
tMwGlBoJ
3. Add a number you can remember to both sides.
1984tMwGlBoJ4891
4. Your password is now stronger than average and very difficult to compromise. You
can make it practically airtight by adding a few special characters. Do a final check and
make sure it meets our “best practices” criteria and you’re done.
Changing Your Password
When you log in for the first time, you’ll be prompted to change your password, and you
may do so at any time thereafter. As you enter characters for your new password, our
system will report its strength level.
Click My Profile ► Password.
Page 51 of 55
Resetting Your Password
Click Forgot Password
You’ll see a unique six-character security code to prevent an accidental reset. If you can’t
read it for any reason, just refresh the page in your browser.
Enter the code, your username, click submit.
You’ll be asked to answer the security question* that you
submitted when you first logged in. You’ll receive an email from [email protected] with your new
password, randomly and securely generated by our
system.
When you log in with your temporary password, you
will be prompted to change it.
*If you can’t remember the answer to your security
question, you won’t be able to reset your password automatically. You may call us at
888-760-6034 toll-free during regular business hours and we’ll assist you.
If it’s after hours, send an e-mail to [email protected] and we’ll contact you with
further instructions.
Page 52 of 55
Personalization
Click My Profile ► Personalization.
Set your default time zone. All timestamps in
CorpCom are based on your selection. You may also
change layout and theme. Layout determines where
the navigation menu is anchored while theme selects a
color combination and a graphic across the top.
The last option in My Profile is e-mail. If your e-mail
address changes, update it in CorpCom immediately.
Page 53 of 55
Copyright
Information in this document is subject to change without notice. Companies, names,
and data used in examples herein are fictitious unless otherwise noted. No part of this
document may be reproduced or transmitted in any form or by any mean, electronic or
mechanical, and or for any purpose, without the express written permission of Corporate
Communications Center, Inc. This document and the software it described are furnished
under a license agreement, and may be used or copied only in accordance with the terms
of the license agreement.
Support Information
Telephone (regular business hours)
(888) 760-6034
E-Mail
[email protected]
Page 54 of 55
CORPORATE COMMUNICATIONS CENTER, INC.
4030 Harry Hines Blvd. Dallas, TX 75219
(214) 871-2941
1-888-760-6034
www.corpcom.com
Page 55 of 55