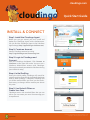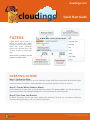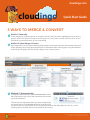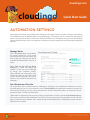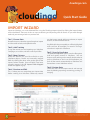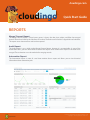
1
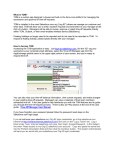
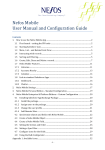
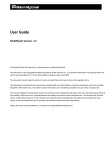
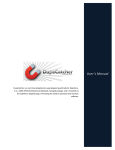
cloudingo.com
cloudingo
TM
chases down and eliminates duplicate data
FREE TRIAL!
Quick Start Guide
CONGRATULATIONS!
You’re one step closer to working more efficiently,
increasing performance, and gaining clean, enhanced data.
You’ll find that Cloudingo is easy to setup, simple to use, and great at doing its job. In just a few steps you’ll be
connected to Cloudingo and you’ll see an initial profile of your data to determine how many duplicates you have.
Then dive right in with the prebuilt filters or create your own.
If you get stuck or need help, an award-winning support team is standing by to guide you.
This guide will
show you how to:
• Install and connect to Cloudingo
• Dashboard overview
• Build and run filters
• Merge and Convert Duplicates
• Setup automation settings
• Import files
• Run reports
USER MANUAL
A more detailed users manual is built-in to Cloudingo.
For more information visit www.cloudingo.com
copyright © 2015 Symphonic Source, Inc.
cloudingo.com
cloudingo
TM
Quick Start Guide
INSTALL & CONNECT
Step 1: Install the Cloudingo Agent
Before you can get started, you must install and
deploy the Cloudingo Agent inside salesforce.com.
You can find the Cloudingo Agent in the Salesforce
AppExchange (http://appexchange.salesforce.com)
Step 2: Create an Account
Setup a Cloudingo account by visiting
https://app.cloudingo.com/account/register.
Step 3: Login to Cloudingo and
Connect
From the Cloudingo dashboard, Click Connect to
Salesforce on the upper left corner. You must use a
Salesforce Administrator account with Cloudingo.
(You may have already connected to Salesforce during
your initial trial setup.)
Step 4: Initial Profiling
During the initial profile, Cloudingo will search for
patterns and clues that will help it to identify duplicate
records. When profiling is complete, Cloudingo will
run all the standard filters and show you the results.
Don’t worry; no changes will be made to your data at
this point.
Step 5: Use Prebuilt Filters or
Create Your Own
Cloudingo comes with standard filters that you can
edit or you can create your own. We encourage you
to experiment!
For more information visit www.cloudingo.com
copyright © 2015 Symphonic Source, Inc.
cloudingo.com
cloudingo
TM
Quick Start Guide
DASHBOARD & NAVIGATION
1
Grid & List Views
The dashboard has two versions - grid and list views. Within both views you can choose the order you want
your filters to be displayed by dragging and dropping the filter names in the list view, and clicking Re-Order
Filters in the Actions menu.
The grid view allows you to quickly sort, resize, and reorder the columns. You can also search within each
column and set parameters.
2
Actions & Menus
3
Activity Stream
Here you can create, re-order, and re-calculate filters, run reports, and manage automation jobs. Upload .csv
files using the Import Wizard.
The activity stream can be pinned or hidden. Search within the activity stream to find specific merges and
track when a merge failed. Hovering over a failed message displays a popup explaining the failure.
3
2
1
For more information visit www.cloudingo.com
copyright © 2015 Symphonic Source, Inc.
cloudingo.com
cloudingo
TM
Quick Start Guide
FILTERS
A filter allows you to look at a
bucket of records that match
based on certain criteria, or fields
within the record. Cloudingo
comes with standard filters, but
it’s easy to edit or create your
own.
View results by clicking on the
group or matches count.
CREATING FILTERS
Step 1 | Define the Filter
A filter is defined by the objects it scans for duplicates. Single-table filters compare like object to like object
(example: contacts to contacts). Multi-table filters compare leads to either accounts or contacts.
Step 2 | Choose Which Fields to Match
Select standard or custom fields to identify duplicate matches. The primary field is one that everything is
grouped by to begin with. Secondary fields are used to further filter or match duplicates.
Step 3 | Fine Tune Your Results
By default Cloudingo will scan your entire database for duplicates. However, you can choose to limit the
search by setting parameters, such as by date or record type.
For more information visit www.cloudingo.com
copyright © 2015 Symphonic Source, Inc.
cloudingo.com
cloudingo
TM
Quick Start Guide
3 WAYS TO MERGE & CONVERT
1 Method 1 | Manually
In the merge grid, duplicate records are displayed side-by-side. The column highlighted in blue shows a
preview of how the record will appear once changes are saved. Select a master record to serve as your
baseline, the correct field values, or use inline editing.
2 Method 2 | Mass Merge & Convert
Mass merge allows you to select multiple duplicate groups at one time and simply click a button to have all
of the selected groups merged/converted based on Automation Rules. Select groups using the checkbox
to the left of each group and click the Mass Merge / Mass Convert button.
1
2
3 Method 3 | Automatically
3
To begin an automation job, select Start Automation from a
filter drop down menu or from the Automation menu at the
top of the dashboard.
Choose from the Automation Rules you have configured for
the specific object. Click Continue to load an estimate of API
resource usage and a finish time for the automation job then click Start Job. You will see a small
spinning icon on any filter that has an automation job running.
For more information visit www.cloudingo.com
copyright © 2015 Symphonic Source, Inc.
cloudingo.com
cloudingo
TM
Quick Start Guide
AUTOMATION SETTINGS
Automation Rules allow you to define how Cloudingo will merge records using Mass Merge or Auto-Merge.
Create different rules for different filters or for different jobs. For example, you can create rules that apply to
imports only and not to filters run from the dashboard. Within your automation rules, you can control things
down to the field level as well as set exceptions (situations where you would not want Cloudingo to merge the
records).
Manage Rules
Tab 1 (The Basics) allows you to define
the primary object for a rule, name
and describe the rule, and choose the
kinds of jobs for which the rule will be
available (dashboard filters, imports, or
both).
Tab 2 (How Do You Want to Merge
Records?) is where you define the
specifics of how you want Cloudingo
to merge your duplicate records.
When defining your automation rules,
Cloudingo begins at the highest level
(master record selection), and works
down to the individual field level and
exceptions.
Run Window and Throttle
This page allows you to control resources allocated to Cloudingo, and to define the timeframe in which
an automation job can run. Limit resources under Throttle Options by defining the maximum number of
API resources Cloudingo can use, and/or the maximum number of duplicate groups or records that can be
processed within a 24-hour period of time.
Define when an automation job can run by setting a range of times and days under the Run Window Settings.
Jobs can be started from the dashboard at any time, but auto-processing of the duplicate records will only
happen within the hours defined. Jobs started outside of the available times will be held in queue until the
defined time is reached.
For more information visit www.cloudingo.com
copyright © 2015 Symphonic Source, Inc.
cloudingo.com
cloudingo
TM
Quick Start Guide
IMPORT WIZARD
Import and dedupe .csv or tab delimited files using the Cloudingo import wizard by clicking the Import button
on the dashboard. There are six tabs or steps to cleansing and importing a file of records. As you work through
each tab, you cannot go back to a previous tab.
Tab 1 | Choose Data
Name the import, select the type of records to import
and the action to take, and upload the file.
Tab 2 | Add Tracking
Assign the records you are importing to a Salesforce
Campaign, set a status, and add a note if you’d like.
Tab 3 | Map Columns
Match the columns on your file to fields on your
Salesforce objects. Correct any incorrectly mapped
fields by clicking the down arrow to the right of the
import column header. Once all fields have been
correctly mapped, the All Import Fields Mapped
button will appear in gray.
Tab 4 | Preview and Edit
This is where you can manipulate your import data
before sending it to Salesforce. Delete any records
you don’t want, search within any column, re-export
records, or edit individual records.
Any field cells that pose problems will be highlighted
with a red box, for example, if a record is missing a
value that is required in Salesforce.
Tab 5 | Scan for Duplicates
The Scan for Duplicates option scans the file against
itself and against records in Salesforce. You can
choose to do nothing and manually decide what to
push to Salesforce or don’t scan for duplication, just
push all the records automatically to Salesforce and
create them as new Salesforce records.
Tab 6 | Review Data
Check the status of the import records and manage
them by deleting, exporting, rescanning, pushing, or
merging.
For more information visit www.cloudingo.com
copyright © 2015 Symphonic Source, Inc.
cloudingo.com
cloudingo
TM
Quick Start Guide
REPORTS
Merge/Convert Report
The Merge/Convert report is a bare bones report. It shows the date, time, object, and filter that merged
records. Records are listed by the Salesforce ID number. The final record is listed as a hyperlink into Salesforce.
The report stores data over time and can be exported.
Audit Report
The Audit Report is very similar to the Merge/Convert Report, however it is customizable. As part of the
Automation Rules, you can select fields for each of the objects to be added to this report as the records are
merged. These selections must be made before merging records.
Automation Report
The Automation Report is more of a real time monitor than a report and allows you to view historical
information about automation jobs.
For more information visit www.cloudingo.com
copyright © 2015 Symphonic Source, Inc.