1
COMMUNITAKE
TECHNOLOGIES
INTACT USER GUIDE
COMMUNITAKE TECHNOLOGIES LTD.
INTACT USER GUIDE
COMMUNITAKE INTACT, User Guide
Copyright © 2015, COMMUNITAKE Technologies Ltd., Yokneam, Israel.
All rights reserved.
For a hard-copy book: No part of this publication may be reproduced, stored in a retrieval system, or
transmitted, in any form or by any means, electronic, mechanical, photocopying, or otherwise without the prior
written permission of the publisher, CommuniTake Technologies Ltd.
For a Web download or e-book: Use of this publication shall be governed by the terms established by the vendor
at the time this publication was acquired.
PROPERTY OF COMMUNITAKE™ | 2009-2015
2
COMMUNITAKE TECHNOLOGIES LTD.
INTACT USER GUIDE
Contents
PRELIMINARIES ......................................................................................................................... 8
WHAT IS COMMUNITAKE INTACT ...................................................................................................... 8
ABOUT THIS DOCUMENT .................................................................................................................... 9
GETTING STARTED FOR ADMINISTRATORS............................................................................ 10
SYSTEM COMPONENTS AND BEHAVIOR .......................................................................................... 10
ACTIVATING YOUR ACCOUNT ........................................................................................................... 11
GENERAL SETTINGS ........................................................................................................................... 11
GENERAL CONNECTION INTERVALS .............................................................................................................. 12
PRIVACY RESTRICTIONS .................................................................................................................... 12
IOS BUSINESS REGISTRATION ........................................................................................................... 13
LDAP INTEGRATION .......................................................................................................................... 13
EXCHANGE CONFIGURATION ............................................................................................................ 16
PRECONDITIONS FOR ACCESSING THE EXCHANGE SERVER USER ................................................................. 16
TO PERFORM EXCHANGE CONFIGURATION ............................................................................................ 17
SECURE CONTAINER .......................................................................................................................... 18
TO SET SECURE MESSAGING ACCESS ............................................................................................................ 19
TO SET SECURE FILE CONTAINER ACCESS ...................................................................................................... 19
TO GRANT A DEVICE ACCESS TO THE CONTAINER ........................................................................................ 20
TO REMOVE DEVICE ACCESS TO THE SECURE CONTAINER ........................................................................... 21
GLOBAL ENROLLMENT PROCESS ...................................................................................................... 22
POLICIES............................................................................................................................................. 23
TO SET DEFAULT INHERITANCE FOR NEW GROUPS ...................................................................................... 23
SECURE EMAIL INTEGRATION ........................................................................................................... 24
TO CONFIGURE SECURE EMAIL ..................................................................................................................... 24
SYSTEM ALERTS ................................................................................................................................. 24
TO SEND SYSTEM ALERTS .............................................................................................................................. 24
GETTING STARTED FOR DEVICE USERS................................................................................... 26
INTACT APPLICATION INSTALLATION ............................................................................................... 26
SMS INVITE .................................................................................................................................................... 26
PROPERTY OF COMMUNITAKE™ | 2009-2015
3
COMMUNITAKE TECHNOLOGIES LTD.
INTACT USER GUIDE
SELF-REGISTRATION ...................................................................................................................................... 29
GLOBAL ENROLLMENT VIA PIN CODES .......................................................................................................... 30
SECURE COMMUNICATIONS FOR DEVICE USERS ................................................................... 31
SECURE VOICE CALLS - USER EXPERIENCE ..................................................................................................... 31
TO ACTIVATE SECURE VOICE CALLS ............................................................................................................... 31
SECURE MESSAGING - USER EXPERIENCE...................................................................................................... 36
TO ACTIVATE SECURE MESSAGING ............................................................................................................... 37
TO ACCESS THE CONTAINER .......................................................................................................................... 41
TO ACCESS A FILE VIA THE DEVICE ................................................................................................................ 42
SYSTEM DASHBOARD ............................................................................................................. 44
DASHBOARD DATA AND KEY PERFORMANCE INDICATORS (KPIS) .................................................. 44
DASHBOARD GUI MANAGEMENT .................................................................................................... 47
CHANGING DASHBOARD COMPONENTS' LOCATION AND PRESENCE ........................................................... 47
DASHBOARD DATA EXTRACTION...................................................................................................... 48
FLEET........................................................................................................................................ 49
ENTERPRISE GROUPS ........................................................................................................................ 49
TO CREATE A GROUP ..................................................................................................................................... 50
TO DELETE A GROUP ..................................................................................................................................... 51
DEVICES ............................................................................................................................................. 51
DEVICES INVENTORY VIEW ............................................................................................................................ 51
INCLUDING SUBGROUPS ............................................................................................................................... 53
TO ADD A DEVICE .......................................................................................................................................... 54
TO ADD DEVICES VIA BULK UPLOAD ............................................................................................................. 56
TO REMOVE A DEVICE ................................................................................................................................... 57
TO ADD AN IOS DEVICE ................................................................................................................................. 59
TO REMOVE AN IOS DEVICE .......................................................................................................................... 61
TO EDIT DEVICE ATTRIBUTES ......................................................................................................................... 61
TO REFRESH DEVICE DATA............................................................................................................................. 62
TO RESEND SMS ............................................................................................................................................ 62
TO SEND A MESSAGE ..................................................................................................................................... 63
TO EXPORT DATA TO EXCEL........................................................................................................................... 64
DEVICES TABLE BUSINESS VIEWS .................................................................................................................. 65
SPECIFIC DEVICE MANAGEMENT ...................................................................................................... 69
MOVE DEVICES / USERS ................................................................................................................................ 69
ALLOW DEVICE ACCESS ................................................................................................................................. 70
BLOCK DEVICE ACCESS .................................................................................................................................. 70
RESET DEVICE CONTAINER PASSWORD ......................................................................................................... 70
PROPERTY OF COMMUNITAKE™ | 2009-2015
4
COMMUNITAKE TECHNOLOGIES LTD.
INTACT USER GUIDE
DEVICE USERS .................................................................................................................................... 70
TO DELETE A DEVICE USER ............................................................................................................................ 71
SYSTEM USERS .................................................................................................................................. 71
ADMINISTRATORS ......................................................................................................................................... 71
SUB ADMINISTRATORS .................................................................................................................................. 72
POLICIES .................................................................................................................................. 75
PASSWORD POLICY ........................................................................................................................... 75
TO DEFINE A PASSWORD POLICY................................................................................................................... 76
TO DISCARD A PASSWORD POLICY ................................................................................................................ 76
PASSWORD POLICY ENFORCEMENT .............................................................................................................. 77
MOBILE APPLICATIONS POLICY ........................................................................................................ 78
BLACKLIST APPLICATIONS POLICY ................................................................................................................. 78
TO MANUALLY DEFINE PROHIBITED APPLICATIONS...................................................................................... 79
TO DEFINE PASSWORD PROTECTED APPLICATIONS ...................................................................................... 80
TO ACTIVATE ANDROID BLACKLIST POLICY BY TIME ..................................................................................... 81
ENFORCEMENT OF PROHIBITED APPLICATIONS............................................................................................ 83
REQUIRED APPLICATIONS POLICY ................................................................................................................. 83
IOS ‘IN-HOUSE’ APPLICATIONS DISTRIBUTION .............................................................................................. 86
ANDROID WHITELIST APPLICATIONS POLICY................................................................................................. 86
CATALOG POLICY ........................................................................................................................................... 87
BACKUP POLICY ................................................................................................................................. 88
TO DEFINE BACKUP SETTINGS ....................................................................................................................... 88
TO REMOVE BACKUP SETTINGS .................................................................................................................... 89
ADDING IOS RESTRICTIONS CONFIGURATION ................................................................................. 90
ADDING ANDROID RESTRICTIONS CONFIGURATION ....................................................................... 92
GENERIC ANDROID DEVICE RESTRICTIONS .................................................................................................... 93
SAMSUNG SAFE DEVICE RESTRICTIONS......................................................................................................... 93
COMMUNITAKE FIRMWARE DEVICE RESTRICTIONS ..................................................................................... 94
ANDROID ENHANCED DEVICE RESTRICTIONS ................................................................................................ 95
TO DEFINE ANDROID RESTRICTIONS ............................................................................................................. 95
TO DEFINE ANDROID RESTRICTION BY TIME ................................................................................................. 96
TO DEFINE ANDROID RESTRICTION BY LOCATION ........................................................................................ 96
VIOLATIONS DRIVEN POLICIES ENFORCEMENT ............................................................................... 97
BROWSER CONTROL ......................................................................................................................... 99
TO ACTIVATE BROWSER CONTROL ................................................................................................................ 99
TO REMOVE DOMAIN/URL IN BROWSER CONTROL .................................................................................... 100
TO ACTIVATE BROWSER CONTROL BY TIME ................................................................................................ 100
TO ACTIVATE BROWSER CONTROL BY LOCATION ....................................................................................... 100
PROPERTY OF COMMUNITAKE™ | 2009-2015
5
COMMUNITAKE TECHNOLOGIES LTD.
INTACT USER GUIDE
DEVICE USER EXPERIENCE ........................................................................................................................... 101
FILE DISTRIBUTION .......................................................................................................................... 101
TO DISTRIBUTE FILES TO DEVICES ............................................................................................................... 102
TO EDIT AN EXISTING FILE ........................................................................................................................... 102
HOME SCREEN ................................................................................................................................. 103
TO ADD WALLPAPER.................................................................................................................................... 104
TO ADD ICONS ............................................................................................................................................. 104
TO ADD BOOKMARKS / WEB CLIPS.............................................................................................................. 104
LAUNCHER ....................................................................................................................................... 105
TO DEFINE LAUNCHER ................................................................................................................................. 105
EXPENSE CONTROL ............................................................................................................... 107
USAGE PLANS .................................................................................................................................. 107
TO MANGE USAGE PLANS ........................................................................................................................... 107
USAGE REPORT ................................................................................................................................ 109
SUPPORT ............................................................................................................................... 112
REMOTE SUPPORT .......................................................................................................................... 112
ACTIVATING REMOTE SUPPORT ..................................................................................................... 113
CONFIGURATIONS ................................................................................................................. 114
SETTING CONFIGURATIONS ............................................................................................................ 114
ADDING EXCHANGE ACTIVESYNC CONFIGURATION ................................................................................... 115
ADDING WI-FI CONFIGURATION ................................................................................................................. 115
ADDING VPN CONFIGURATION ................................................................................................................... 116
DEVICE ................................................................................................................................... 117
DEVICE STATUS................................................................................................................................ 117
LOCATE THE DEVICE ........................................................................................................................ 118
LOCATE DEVICE POSITION ON A MAP ......................................................................................................... 118
LOCATE DEVICE VIA ALARM ........................................................................................................................ 119
LOCK THE DEVICE ............................................................................................................................ 120
TO LOCK A DEVICE ....................................................................................................................................... 120
WPTO UNLOCK A DEVICE ............................................................................................................................ 121
WIPE ON-DEVICE DATA ................................................................................................................... 121
TO ACTIVATE A COMPLETE WIPE ................................................................................................................ 122
TO ACTIVATE A SELECTIVE WIPE ................................................................................................................. 123
ENTERPRISE WIPE............................................................................................................................ 124
PROPERTY OF COMMUNITAKE™ | 2009-2015
6
COMMUNITAKE TECHNOLOGIES LTD.
INTACT USER GUIDE
TO WIPE ENTERPRISE DATA......................................................................................................................... 124
TO ALLOW / BLOCK SECURE CONTAINER ACCESS ....................................................................................... 125
BACKUP ON-DEVICE DATA .............................................................................................................. 125
TO BACK UP ON-DEVICE DATA .................................................................................................................... 125
TO RESTORE DEVICE DATA .......................................................................................................................... 126
EXCHANGE ACTIVESYNC POLICY ..................................................................................................... 126
TO MANAGE EXCHANGE ACTIVESYNC POLICY............................................................................................. 126
DIAGNOSTICS .................................................................................................................................. 127
APPLICATIONS ................................................................................................................................. 129
CATALOG ......................................................................................................................................... 129
PROPERTY OF COMMUNITAKE™ | 2009-2015
7
COMMUNITAKE TECHNOLOGIES LTD.
INTACT USER GUIDE
1
PRELIMINARIES
WHAT IS COMMUNITAKE INTACT
COMMUNITAKE INTACT allows businesses to perform highly secure communications while holistically managing
their mobile devices covering inventory, security, policies and analytics.
INTACT can be deployed in three security levels:
1.
INTACT Level 1 (software): Secure voice calls and messaging plus apps’ security tools.
2.
INTACT Level 2 (firmware): Custom Android-like firmware plus level 1 feature set.
3.
INTACT Level 3 (hardware): Hardened device locked with a custom firmware and apps’ security.
All deployments contain a central device management system.
COMMUNITAKE INTACT includes:
Secure voice calls
Secure messaging
Secure file container (SharePoint files view)
Browsing control
Mobile device inventory management
Grouping by organizational hierarchy
Device data protection: locate; lock; alarm; wipe
Device data backup and restore (contacts and messages)
Password policy enforcement
Internal apps catalog
Mobile applications management (Blacklist; Whitelist)
Location and time driven policies
Use restrictions management
Expense control via usage plan monitoring and usage reporting
Mobile configurations (Exchange ActiveSync; Wi-Fi; VPN)
Enterprise wipe for selective business data
System dashboard
Remote support for mobile devices
Self-service portal for managing data protection
COMMUNITAKE INTACT is intuitive and easy to manage, allowing system users to perform quickly and effectively
without the need for extensive training.
PROPERTY OF COMMUNITAKE™ | 2009-2015
8
COMMUNITAKE TECHNOLOGIES LTD.
INTACT USER GUIDE
ABOUT THIS DOCUMENT
This document presents step-by-step guidelines for using COMMUNITAKE INTACT. It encompasses directives to
the system features under a demarcation between an enterprise administrator and an enterprise employee.
Important
This document presents COMMUNITAKE INTACT features. Please refer to the COMMUNITAKE
Remote Care Manual for guidance on the remote support feature set.
PROPERTY OF COMMUNITAKE™ | 2009-2015
9
COMMUNITAKE TECHNOLOGIES LTD.
INTACT USER GUIDE
2
GETTING STARTED FOR
ADMINISTRATORS
COMMUNITAKE INTACT is an application of COMMUNITAKE solutions suite for businesses.
An account has been defined for your organization. All you need to do is activate the account and begin using it
for managing your enterprise's mobile devices.
SYSTEM COMPONENTS AND BEHAVIOR
There are three main components that facilitate system operation: On-device client; cloud based server; User
Interface (UI). (The solution can also contain a custom firmware and hardened device – based on the specific
deployment)
Two processes occur when an on-device client is properly installed on a device:
1. The on-device client publishes the device's Mobile Device Management related capabilities to the cloud-based
server. These capabilities will vary as different OSs support different capabilities;
2. The system will automatically alter the Graphical User Interface (GUI) to allow each device to show its specific
supported features as operational components in the system UI. For this reason, not all operations are available
in the UI for some devices.
Based on policies, settings and other actions taken by users of the system, the UI creates tasks for the device and
generates requests for push notifications to be sent to the device. When the push notification reaches the
device, the device will connect to the cloud services and it will read and perform the next task in line.
The speed in which a device will perform a task is directly related to the speed in which it receives push
notifications. Furthermore, a device with no SIM card or an Android device that is not registered, will not receive
any push notifications.
The device client handles requests one at a time. If a device has received a task that requires fulfillment time (Get
location, for example), and immediately afterward , the user issues a backup request, the backup will not start
until the first task finishes and the device connects to the server to get the next one in line.
If the client is not properly installed on the device, the device will not publish its actual capabilities to the cloud
service. In such a case, the cloud service will not be able to properly perform requests.
INTACT is not designed to perform "live", "no latency" changes on multiple devices. Requests are published to
the device as push notifications via a 3rd party service. Whereas the system usually performs immediately, there
are times that it might take a few minutes for requests and their driven changes to propagate to the devices.
PROPERTY OF COMMUNITAKE™ | 2009-2015
10
COMMUNITAKE TECHNOLOGIES LTD.
INTACT USER GUIDE
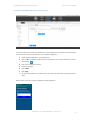
ACTIVATING YOUR ACCOUNT
1.
Click on the 'Activate Account' link in the welcome email you have received from us.
2.
You will be directed to a login page. Your user name has been defined to be your email address.
3.
Define your password to the INTACT’s Enterprise Mobility Management (EMM).
4.
Usernames and passwords in INTACT EMM are case sensitive.
5.
Click the 'Login' button.
Once you are logged-in, you will be directed to the system dashboard.
Important
The system allows you to add several business administrators with equal administration rights.
Please see the 'System Users' module under the 'Fleet' tab.
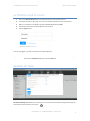
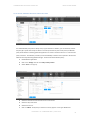
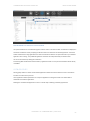
GENERAL SETTINGS
The 'General Settings' area allows you to define generic connection and enforcement settings that will apply for
all the devices that are defined in the system.
PROPERTY OF COMMUNITAKE™ | 2009-2015
11
COMMUNITAKE TECHNOLOGIES LTD.
INTACT USER GUIDE
The General Settings tab provides you with the flexibility to define system behavior in the following areas:
General connection intervals
Usage collection enablement / disablement
Violations driven policies enforcement
Actions on SIM change
Actions on Device Administrator removal
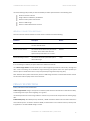
GENERAL CONNECTION INTERVALS
General connection intervals between the cloud service and device include the following:
Parameter
Description
Default
Device connection interval
The time interval in which the system
30 minutes
connects with the device.
Device not seen interval
The amount of time which must pass with no
48 hours
connection to the device after which the
system will report the device as “not seen”.
Device SIM change interval
The amount of time the system will report a
7 days
device SIM change.
If no new settings are defined, the system will use the default time intervals.
The "Collect Usage statistics" function allows you to collect usage data per device for call minutes, messages and
data – local and roaming. This is valuable for usage monitoring and expense control. The system provides you
with the option to disable this function as may be required by the organizational privacy policy.
Note: Violations driven policies enforcement, Actions on SIM change and action on Device Administrator removal
are discussed under the policy section of this document.
PRIVACY RESTRICTIONS
Privacy restrictions contain two elements:
Collect Usage Statistics: Usage is anonymous but still the system allows the administrator to eliminate the ability
to track the general use per device regarding use in general.
The default system state is active usage collection. Uncheck it if you wish to halt the system from collecting usage
data.
Enable BYOD privacy: Once BYOD privacy is activated, a ‘BYOD’ checkbox is added to the new device attributes in
the enrollment process. If a device is marked as BYOD, the administrator cannot view its location, its backups and
its applications. The default BYOD setting is inactive.
PROPERTY OF COMMUNITAKE™ | 2009-2015
12
COMMUNITAKE TECHNOLOGIES LTD.
INTACT USER GUIDE
IOS BUSINESS REGISTRATION
Apple requires a one-time procedural step to allow the INTACT EMM system to manage your iOS devices.
Requesting and uploading the iOS certificate is done through the system 'Setting' located on the upper right
corner of the screen.
1.
If you do not already have an Apple ID, you should create one via the following Apple site link:
http://appleid.apple.com
2.
Click on 'Settings', located on the top right corner of the system user interface and select ‘iOS’.
3.
Fill in the email and your name using the values you used for creating your Apple ID.
4.
Click 'Request Certificate' and save the file.
5.
Using the above certificate, request a certificate from Apple. Go to the following Apple site link
https://identity.apple.com/pushcert/ and log in using your Apple ID.
6.
Click 'Create a Certificate' and agree to the terms of use.
7.
Upload your certificate request (which you have saved in step 4). After a few seconds, your certificate
will be ready for download. Download and save the certificate.
8.
Click 'Settings' again on the system user interface. Upload the certificate that you have downloaded
from Apple.
9.
You are now ready to add iOS devices to the INTACT CEM system.
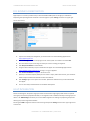
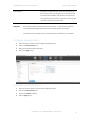
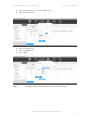
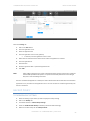
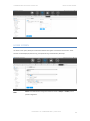
LDAP INTEGRATION
Devices are managed in the system via groups. Devices are allocated to logical groups with similar use policies.
These groups are built and populated manually or via integration with an LDAP that already contains groups and
devices. The 'LDAP Settings' tab allows you to create LDAP integration for defining and populating the system's
devices groups via the organizational LDAP.
Accessing the 'LDAP' integration interface is done through the system 'Setting' located on the upper right corner
of the screen.
PROPERTY OF COMMUNITAKE™ | 2009-2015
13
COMMUNITAKE TECHNOLOGIES LTD.
INTACT USER GUIDE
The system enables LDAP integration for performing the following:
1.
Populating the system with groups and users from the LDAP
2.
Defining which groups should be synchronized
3.
On-demand synchronization of groups and /or users
Integrating with your organizational LDAP will facilitate rapid creation of the organizational groups in the MDM
system.
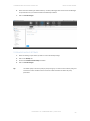
To complete LDAP integration:
1.
Set the following definitions:
a.
Username – This user must have, at minimum, LDAP read permissions
b.
Password
c.
Secured LDAP (Checked / Unchecked)
d.
Secured LDAP parameters:
i.
Upload the certificate
ii.
Certificate password
iii.
Certificate type
e.
Primary Host Port (mandatory parameter)
f.
Secondary Host Port
g.
Root Context
h.
Users Organizational Unit (mandatory parameter)
i.
Groups Organizational Unit (mandatory parameter)
j.
Domain Alias
k.
LDAP Field Mapping
i.
User ID
ii.
User Display Name
iii.
User Email
iv.
Group ID
v.
Group Display Name
vi.
User Object Class
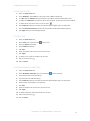
PROPERTY OF COMMUNITAKE™ | 2009-2015
14
COMMUNITAKE TECHNOLOGIES LTD.
vii.
l.
INTACT USER GUIDE
Group Object Class
Check the ‘Enabled Periodic Sync’ for periodic updates
m. Define the ‘Periodic Sync Interval’ in hours.
n.
Define if you want the device to be deleted from the system when its owner is deleted from
the LDAP. Otherwise, the device will remain attached to the group.
2.
Once defined, click on 'Save Configurations'
3.
Click 'Choose Groups to import' to select which groups to import.
a.
You will be presented with the groups that are currently available for import from the LDAP
(the default is to import all).
b.
Select the groups that you wish to import into the system.
Please note that if a child group is selected, its parent group will also be selected.
c.
Click 'Import' to initiate the import process.
The process will import the selected groups and all their valid users. A valid user is a user that
has an email address.
d.
The status of the import process is displayed in the top right corner.
During the import process, all the LDAP groups are locked and cannot be accessed.
4.
Click on 'Import Users Only', if you wish to refresh the users in the groups that were imported.
The status of the import process is displayed in the top right corner. During the import process, all
LDAP groups are locked and cannot be accessed
5.
Click on 'Test Connection', if you wish to verify proper connection without an actual population of the
system groups.
The end result of this process is a group structure and their allocated users present in the system. All you have to
do is add the device to the user (MSISDN or Email), define the display name for the device in the system and
define the self-service access.
Important
If a user is removed from the LDAP, the user will be also removed from the system
along with all his related devices.
If a group is deleted from the LDAP, all the users in that group that were not moved to
another group which was imported to the system, will be deleted along with their
related devices.
If a group is deleted from the LDAP, all the devices that are directly attached to the
group will be deleted.
When a user is moved between different LDAP groups, his device remains in the
original group.
When a group is moved in the LDAP to a different location, all the users and the
devices that are attached to this group will also move. It means that the group’s policy
could potentially change if a policy is “inherited”.
In order to perform an import from the LDAP, the MDM system servers must be able
to access the LDAP servers. Once the import is completed, you can close the access
connection until next time it is needed for an import or sync.
A device can only be attached to a user that is defined in the LDAP group.
PROPERTY OF COMMUNITAKE™ | 2009-2015
15
COMMUNITAKE TECHNOLOGIES LTD.
INTACT USER GUIDE
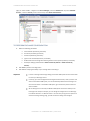
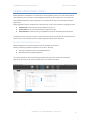
EXCHANGE CONFIGURATION
The 'Exchange Settings' tab allows you to define the Exchange server through which the device will access emails
and contacts and its generic ActiveSync settings. Accessing the 'Exchange Settings' configuration interface is
done through the system 'Setting' located on the upper right corner of the screen.
The Exchange Settings enables the system user to block / allow devices accessing the exchange server;
Use cases for connecting the exchange server with the INTACT EMM system:
1.
Only devices attached to the INTACT EMM system can access the Exchange server.
2.
Blocking a device from accessing the Exchange server if it has outstanding policy violations.
The INTACT EMM system utilizes the remote configuration capabilities of the Exchange server to manage
different settings directly on the Exchange.
PRECONDITIONS FOR ACCESSING THE EXCHANGE SERVER USER
The Exchange connection uses port 443.
Currently, only Exchange 2010 is supported
Exchange integration requires a username and password for accessing the Exchange server.
The user must be a part of a Role Group that has Mail Recipient Creation rights. To perform this, make
the run as user that is part of the 'Recipient Management' Role Group. You can achieve it by going to
'Exchange Management Console' 'Microsoft Exchange' 'Microsoft Exchange On-Premises'
Toolbox Role Based Access Control (RBAC) User Editor'.
The user name must have Remote PowerShell rights. Gain these rights by going to the 'Exchange
Management Shell' and running the following cmdlet:
Set-User UserNameHere-RemotePowerShellEnabled:$true
The Exchange server must be configured to allow remote management.
The Exchange 2010 server must allow basic authentication. To allow Basic Authentication perform the
following: 'IIS Manager' 'Sites' 'Default Website' Powershell'. Select the 'Authentication' feature
and enable 'Basic Authentication'. If 'Basic Authentication' is not an option on the 'Authentication' feature
PROPERTY OF COMMUNITAKE™ | 2009-2015
16
COMMUNITAKE TECHNOLOGIES LTD.
INTACT USER GUIDE
page, you should install it: navigate to the 'Server Manager'; select the 'Web Server' role; select 'Add Role
Services', under the 'Security' node in the tree view; select 'Basic Authentication'.
TO PERFORM EXCHANGE CONFIGURATION
1.
Define the following parameters:
a.
Server Address (mandatory parameter)
b.
Username (mandatory parameter)
c.
Password (mandatory parameter)
d.
Ignore server certificate (checked / unchecked)
e.
Delete device from exchange when deleting device from the system (checked / unchecked)
f.
ActiveSync Settings (select between 'Allow all clients by default' or 'Block all clients by
default')
2.
Click 'Save' to perform the configuration
3.
Click 'Test' for verifying the validity of your settings without activating it.
Important
In order to manage the Exchange settings, the INTACT CEM system servers must be able
to access your Exchange servers
Currently, if you have configured the Exchange to block all clients, when you add a new
device to the INTACT CEM system, it is not automatically allowed in the Exchange. You
must click the device in the INTACT CEM system, go to the Security tab and move the
device to Allow.
All the settings that are done by the INTACT CEM system can be done directly on the
Exchange server itself; for example, you can change the configuration in the Exchange
from “Block all clients” to “Allow all clients”. The next time you log into the system and
check the Exchange settings page, you will see that the settings have changed
PROPERTY OF COMMUNITAKE™ | 2009-2015
17
COMMUNITAKE TECHNOLOGIES LTD.
INTACT USER GUIDE
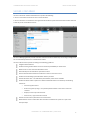
SECURE CONTAINER
The Secure Container enables enrolled devices to perform the following:
1. Access a contained environment for secure communications.
2. Access content that is maintained in the organizational SharePoint system. Authorized device holders will have
a view-only access to SharePoint content.
The Secure Messaging module provides users with a safe environment in which they can exchange messages that
are not accessible by external non-enrolled device holders.
The Secure File Container operates according to the following guidelines:
Integrates with SharePoint
Enables accessing the SharePoint content via the Enterprise Mobility on-device client
Allows access to users which have SharePoint access
Automatically uses the SharePoint's permission scheme
Uses the device holders SharePoint credentials in order to access the content
Enables content browsing by the SharePoint directory structure
Provides file status view - not downloaded; downloaded; newer version available
Enables the device holder to perform on-demand download of files to the device by the following
restrictions:
o
Stores encrypted content
o
Device encryption by using a user provided password which is also used to access the
container
o
Displays content only inside the client
o
Prevents cut / copy of document content
Provides control to block / allow device to access the files
Allows deletion of the on-device files when the device is deleted from system or as part of the
enterprise wipe
PROPERTY OF COMMUNITAKE™ | 2009-2015
18
COMMUNITAKE TECHNOLOGIES LTD.
INTACT USER GUIDE
TO SET SECURE MESSAGING ACCESS
Perform the following steps to set Secure Messaging access:
1.
Click on "Settings".
2.
Click on the tab "Secure Container ".
3.
Under 'Messaging' check 'Messaging Support'. This enables the device holder to exchange messages
with enrolled devices without the need to enter the environment with a password. This is a mandatory
checkbox for activating the access to Secure Messaging.
4.
Under 'Messaging' check 'Protect the messaging inside the secure container'. This enables the device
holder to exchange messages with enrolled devices only after keying-in a password to the contained
environment.
5.
Click on "Save".
TO SET SECURE FILE CONTAINER ACCESS
Perform the following steps to set Secure File Container access:
1.
Click on "Settings".
2.
Click on the tab "Secure Container ".
3.
Check the "Enable Sharepoint" checkbox.
4.
Define the server host IP address (mandatory).
5.
Check the "SSL" checkbox to define encrypted connectivity.
6.
Fill in the Domain name (mandatory).
7.
Fill in the Project name (optional).
8.
Click on "Test" to test the connectivity.
9.
a.
Enter valid SharePoint credentials and click “Test”
b.
Test results will be displayed when the test completes.
Click on "Save".
PROPERTY OF COMMUNITAKE™ | 2009-2015
19
COMMUNITAKE TECHNOLOGIES LTD.
INTACT USER GUIDE
TO GRANT A DEVICE ACCESS TO THE CONTAINER
1.
Check the "Secure Container" checkbox when adding a device to the Enterprise Mobility. (You can
define access after device enrollment via the "Edit" function in the devices table).
2.
The Enterprise Mobility generates a random one time password to access the container
3.
Enable container access message is sent to the device along with an initial password
4.
The Enterprise Mobility sends a “welcome to container” email to device owner which includes the first
time password.
5.
The device holder launches the Enterprise Mobility application on his device.
6.
The device holder is prompted to enter the first time password and to select a new password.
PROPERTY OF COMMUNITAKE™ | 2009-2015
20
COMMUNITAKE TECHNOLOGIES LTD.
INTACT USER GUIDE
1.
The device holder is prompted to enter his SharePoint credentials.
2.
The application checks the credentials via the server and the SharePoint credentials are stored
encrypted.
TO REMOVE DEVICE ACCESS TO THE SECURE CONTAINER
1.
Disable the device’s Secure Container access via the "Edit" function or by selecting the device and
clicking “Block” on the action bar
2.
Remove Secure Container access message is sent to the device.
3.
Once received, the device performs the following actions:
a.
Deletes all on-device stored files.
b.
Erases the SharePoint's stored credentials
c.
Erases the password
d.
Removes the “Container” button from the on-device application UI
PROPERTY OF COMMUNITAKE™ | 2009-2015
21
COMMUNITAKE TECHNOLOGIES LTD.
INTACT USER GUIDE
GLOBAL ENROLLMENT PROCESS
The system enables a global enrollment process prior to allocating Android devices to actual users.
It allows administrators to get a global PIN code for a specific group. Devices which will enter this PIN will be
registered to this group.
Perform the following steps to set a global enrollment process:
1.
Click on "Settings".
2.
Click on the tab "PIN code ".
3.
Click on the Add Group icon.
4.
Select the group / groups to which you wish to add devices.
5.
Once added, the system will automatically assign a PIN code to this group.
6.
Any device which enters this PIN code will be registered to this group.
Important
The global enrollment process is only applicable to Android devices.
PROPERTY OF COMMUNITAKE™ | 2009-2015
22
COMMUNITAKE TECHNOLOGIES LTD.
INTACT USER GUIDE
POLICIES
The system allows you to define the default inheritance when creating a new group.
The inheritance settings alternatives are as follows:
Password Policy: inherit; disable
Blacklist: enable; inherit; adopt
Whitelist: enable; inherit; adopt
Recommended (apps): enable; inherit; adopt
Backup Policy: inherit; disable
iOS Restrictions: inherit; disable
Android Restrictions: inherit; disable
Web Control: enable; inherit; adopt; disable
File Distribution: enable; inherit; adopt
Home screen: inherit; disable
Launcher: inherit; disable
The default inheritance is set for 'inherit'.
TO SET DEFAULT INHERITANCE FOR NEW GROUPS
1.
Click on the 'Settings' icon.
2.
Click on the 'Policies' tab.
3.
Mark the required inheritance for the target policy.
4.
Click on 'Apply'.
PROPERTY OF COMMUNITAKE™ | 2009-2015
23
COMMUNITAKE TECHNOLOGIES LTD.
INTACT USER GUIDE
SECURE EMAIL INTEGRATION
The secure email module is managed in such a way as to ensure that neither email content nor access credentials
are stored on the registered mobile device. When the device holder accesses the emails, the system retrieves the
email content from the email server. The Mail session is run mostly on-line but can also be off-line based on the
administrator judgment. Reading email content and sending emails are performed within the native email
application – no need to use third party applications to view and compose emails. The on-device emails do not
include email attachment but only a link embedded in the email body. The attachments are not downloaded to
the mobile device but are viewed in a browser window and the user cannot manipulate the email attachments.
The secure email module allows definition of implied sensitive information based on key words thus blocking out
this information from contacts / calendar / appointments notes etc. Email data is always encrypted and a profiles
engine can set different permissions to different users' profiles.
The secure email module is provided via a third party application by LetMobile.
Secure Email configuration is done via the LetMobile Secure Email interface tab in the Enterprise Mobility
console.
TO CONFIGURE SECURE EMAIL
1.
Click on the arrow near your user name in upper right end of the screen.
2.
Select the 'LetMobile Settings'. This will open a pop-up with your LetMobile Secure Email credentials.
3.
Verify your user name and password.
4.
Click on 'Submit'.
5.
You will be able to access the LetMobile Secure Email administration interface from which you can
define how to operate the Secure Email features for the devices.
Important
If the enterprise has not purchased the Secure Email module, the user will not be able to
access the Secure Email administration interface.
Detailed instructions on how to configure the Secure Email features can be found in the Secure
Email user manual.
SYSTEM ALERTS
The system alerts module allows the system administrator to send alerts when policy or use violations occur.
The drive for this alert will be to inform system administrators and managers of violations for increased
awareness and as acceleration for resolution. The system enables you to granularly set alerts so that recipients
will receive various alerts for various events with different alerts timing.
TO SEND SYSTEM ALERTS
1.
Click on the ‘General Settings’ icon at the upper right of the application screen.
2.
Click on the ‘Alerts’ tab.
3.
Click on the plus icon to add and define an alert.
PROPERTY OF COMMUNITAKE™ | 2009-2015
24
COMMUNITAKE TECHNOLOGIES LTD.
4.
INTACT USER GUIDE
Click on the plus icon next to ‘Send alerts for’ to define the initiation for the alert. Alerts causes can be
the following violations: Whitelist; Blacklist; Exclusive Whitelist; Password Policy; Not Enrolled; Client
Removal; Roaming; Usage Plan Violation; SIM Change; Lost Connection; Rooted.
5.
Click on the ok icon to approve the selection.
6.
An alert will be sent as soon as possible, once defined and activated.
7.
Check the following activation options are required:
a.
‘Send alert even if resolved’
b.
‘Then send an alert every <number> Hours’ (can be every 15 minutes; every 30 minutes;
every one hour; every six hours; every twelve hours; and once a day).
c.
‘And stop after <number> Day’ (can be every day; every two days; every three days; once a
week)
8.
Key-in the recipient’s email address in the ‘Send To’ data field. Click on the plus icon near this field for
adding more recipients.
9.
Click on ‘Apply’ to activate the alerts mechanism.
PROPERTY OF COMMUNITAKE™ | 2009-2015
25
COMMUNITAKE TECHNOLOGIES LTD.
INTACT USER GUIDE
3
GETTING STARTED
FOR DEVICE USERS
INTACT APPLICATION INSTALLATION
The device holder can install the INTACT CEM application on the device in three methods:
1.
SMS invite based installation
2.
Self-registration using Active Directory / LDAP credentials
3.
Global enrollment via PIN codes
The enrollment method will be defined by the system administrator.
SMS INVITE
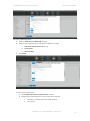
The enrollment via an SMS invite occurs as follows:
You manually add the user and his / her device to the system (one by one or via bulk upload). Note to select Self
Service access and / or Secure Container access and / or BYOD policy.
Once added, the system automatically sends an SMS invite, containing a download link, to install the INTACT CEM
application.
PROPERTY OF COMMUNITAKE™ | 2009-2015
26
COMMUNITAKE TECHNOLOGIES LTD.
INTACT USER GUIDE
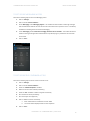
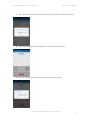
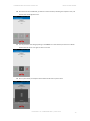
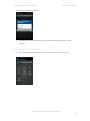
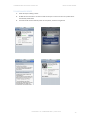
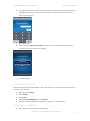
The device holder should open the SMS, install the INTACT CEM application and follow the directives during the
installation:
Open the SMS
Download starts
automatically
Click ‘Install’
Click ‘Accept’. You may be
presented with a PIN code
screen at first launch
Downloading
Click ‘Open’
PROPERTY OF COMMUNITAKE™ | 2009-2015
27
COMMUNITAKE TECHNOLOGIES LTD.
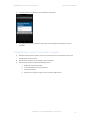
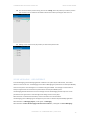
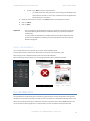
Click ‘Activate’
INTACT USER GUIDE
The INTACT CEM
application
If you have marked the self-service access and / or the Secured Container access, the user will receive email for
each module access.
For accessing the Secured Container and performing secure messaging or secure SharePoint files view, the user
should click on the Secure Container icon and enter the temporary password as sent in the email. Then the user
will be directed to replace the password with a new password.
PROPERTY OF COMMUNITAKE™ | 2009-2015
28
COMMUNITAKE TECHNOLOGIES LTD.
INTACT USER GUIDE
SELF-REGISTRATION
1.
The system integration with Active Directory / LDAP structures the hierarchical groups in the system.
2.
Each group contains the users that are attached to it, without the allocated devices.
3.
Once the integration process is concluded, you can initiate the self-registration process.
4.
Send an email to users, inviting them to register.
5.
The invite should contain the link to download the application: https://mydevice.communitake.com/d
6.
Direct the users to download the CEM application and install it.
7.
After installation, users are required to check the Active Directory Login checkbox and enter their
Active Directory / LDAP credentials in order to complete the enrollment.
8.
On registration completion, the device is being automatically added to the user’s group and obtains all
the policies that were defined for it.
Important
For devices running pre iOS 7.0:
When entering the Active Directory / LDAP credentials, a PIN code is displayed at the bottom
of the screen. This PIN is also displayed in the system portal fleet view.
The user should enter this PIN code when the registration process requires it.
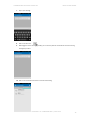
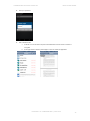
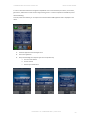
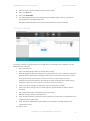
For Android devices:
Once the download link is selected, the
device holder will be presented with this
screen. The user should check the Active
Directory Login checkbox.
For Android devices:
Once checked, the user will be presented
with this screen. The user should enter
the credentials. On completion, the
device will be enrolled in the INTACT CEM
system.
PROPERTY OF COMMUNITAKE™ | 2009-2015
29
COMMUNITAKE TECHNOLOGIES LTD.
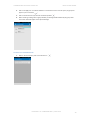
For iOS devices:
Once the download link is selected, the
device holder will be presented with this
screen. The user should check the Active
Directory Login checkbox.
INTACT USER GUIDE
For iOS devices:
Once checked, the user will be presented
with this screen. The user should enter
the credentials. On completion, the
device will install the INTACT CEM profile
and enroll in the INTACT CEM system.
GLOBAL ENROLLMENT VIA PIN CODES
The system allows you to allocate devices to groups without allocating them to specific users. These devices are
allocated to pre-defined groups via a group’s PIN code. (Please refer to the section named ‘Global Enrollment
Process’).
For enrolling a group related device, you should send the user an invite email / SMS with a link to download the
device administrator app. You should also indicate in the invite email / SMS the pre-defined PIN code of the
user’s group.
The user will be required to enter the specific PIN code during the enrollment process.
Important
The global enrollment process is only applicable to Android devices.
PROPERTY OF COMMUNITAKE™ | 2009-2015
30
COMMUNITAKE TECHNOLOGIES LTD.
INTACT USER GUIDE
4
SECURE COMMUNICATIONS
FOR DEVICE USERS
SECURE VOICE CALLS - USER EXPERIENCE
Once Secure Phone is defined in the system by the administrator, all enrolled devices can have access to it. The
secure voice calls are performed in the Enterprise Mobility client via the system. The voice communication is
always encrypted since the conversation is performed via the Enterprise Mobility server.
The Secure Phone module requires an access password and encrypts all the in-client voice calls thus adding
another security layer.
The Secure Phone icon will appear as part of the on-device Enterprise Mobility application.
TO ACTIVATE SECURE VOICE CALLS
You can initiate a conversation with other enrolled users or continue an existing conversation.
Secure voice calls are only applicable to Android devices.
To activate secure voice calls, perform the following:
1.
Click on the 'Enterprise Mobility' icon.
2.
Click on the 'Secure Phone’ icon.
PROPERTY OF COMMUNITAKE™ | 2009-2015
31
COMMUNITAKE TECHNOLOGIES LTD.
3.
INTACT USER GUIDE
Key-in your 'Secure Container' password to log-in. For a first time activation, use the password that was
sent to you in the welcome email. You will be prompted to define your own password. Your password
will serve you in the following secure phone sessions.
4.
Once opened, you will be directed to the ‘PhoneBook’ tab.
5.
Select the contact with whom you wish to communicate from the contacts list. Note that this list
contains only enrolled device holders. It is not your generic contacts list.
6.
If needed, you can search for the contact name via the search function.
PROPERTY OF COMMUNITAKE™ | 2009-2015
32
COMMUNITAKE TECHNOLOGIES LTD.
INTACT USER GUIDE
7.
Once selected, the system will initiate the registration to the voice server and will ring the recipient.
8.
You will hear the ringing voice while waiting for the recipient to respond to the call.
9.
Once the recipient answers the call, the system initiates the encryption phase.
PROPERTY OF COMMUNITAKE™ | 2009-2015
33
COMMUNITAKE TECHNOLOGIES LTD.
INTACT USER GUIDE
10. Once the voice call is established, you will see an active interface, indicating the recipient’s name, call
duration and call management icons.
11. You can pause the voice dialog by clicking on the ‘Pause’ icon. Once selected, the ‘Pause’ icon will be
marked. Click the ‘Pause’ icon again to return to the call.
12. Once in pause mode, the recipient’s device will show the session’s pause status.
PROPERTY OF COMMUNITAKE™ | 2009-2015
34
COMMUNITAKE TECHNOLOGIES LTD.
INTACT USER GUIDE
13. You can mute yourself by clicking on the ‘Mute’ icon. Once clicked, the ‘Mute’ icon will be marked.
Clicking it again will release the mute state.
14. You can turn on the speakerphone and speak through it. Selecting the speakerphone will mark the
speakerphone icon. Clicking it again will cancel the speakerphone function.
15. You can end the call by clicking on the ‘End call’ icon.
PROPERTY OF COMMUNITAKE™ | 2009-2015
35
COMMUNITAKE TECHNOLOGIES LTD.
INTACT USER GUIDE
16. You can see the entire previous call log. Click on the ‘Call log’ tab. It will present you with the previous
calls’ contacts. You can initiate an immediate call with the contact by clicking the ‘Start call’ icon.
17. Clicking on the contact name, will present you with all the previous calls.
SECURE MESSAGING - USER EXPERIENCE
Once the Messaging / Secure Messaging module is defined in the system by the administrator, all enrolled
devices can have access to it. The Messaging and the Secure Messaging are performed in the Enterprise Mobility
client via the system. These messages are not related to the generic SMSs. The messages' communication is
always encrypted since the conversation is performed via the Enterprise Mobility server.
The Messaging module allows direct access to messages. The Secure Messaging module requires an access
password and encrypts all the in-client messages thus adding another security layer.
When the client is removed from the device, all the conversations are removed with it.
The Messaging / Secure Messaging icon will appear as part of the on-device Enterprise Mobility application.
When defined as a 'Messaging Support', it will appear as 'Messaging'.
When defined as 'Protect the messaging inside the secure container', it will appear as 'Secure Messaging'.
PROPERTY OF COMMUNITAKE™ | 2009-2015
36
COMMUNITAKE TECHNOLOGIES LTD.
INTACT USER GUIDE
TO ACTIVATE SECURE MESSAGING
You can initiate a conversation with other enrolled users or continue an existing conversation.
To activate secure messaging, perform the following:
1.
Click on the 'Enterprise Mobility' icon.
2.
Click on the 'Secure Messaging' icon.
3.
Key-in your 'Secure Container' password to log-in. For a first time activation, use the password that was
sent to you in the welcome email. You will be prompted to define your own password. Your password
will serve you in the following messaging sessions.
4.
Select the contact with whom you wish to communicate from the contacts list. Note that this list
contains only enrolled device holders. It is not your generic contacts list.
5.
If needed, you can search for the contact name via the search function.
6.
Click on the contact name.
PROPERTY OF COMMUNITAKE™ | 2009-2015
37
COMMUNITAKE TECHNOLOGIES LTD.
INTACT USER GUIDE
7.
Key-in your message.
8.
Click on the send icon.
9.
When logged-in in the messaging module, you can see the previous conversations and new incoming
messages by senders.
10. Click on the conversation to view it and continue the dialog.
PROPERTY OF COMMUNITAKE™ | 2009-2015
38
COMMUNITAKE TECHNOLOGIES LTD.
INTACT USER GUIDE
TO CREATE A CONVERSATION GROUP
1.
When in the 'Contacts Book', click on the Add Group icon.
2.
Name your group and click on the 'Next' icon.
3.
You will be directed to the contacts book. Select the contacts for this group.
PROPERTY OF COMMUNITAKE™ | 2009-2015
39
COMMUNITAKE TECHNOLOGIES LTD.
4.
INTACT USER GUIDE
Click on the Apply icon. You will be directed to a conversation screen. From this point, the group will
appear in your contacts list.
5.
Click on the Discard icon if you wish to cancel the operation.
6.
When receiving a message from a group member, the message headline will be by the group name.
The sender named will appear in the opened message.
TO DELETE A CONVERSATION
1.
When in the conversation, click on the Discard icon.
PROPERTY OF COMMUNITAKE™ | 2009-2015
40
COMMUNITAKE TECHNOLOGIES LTD.
2.
INTACT USER GUIDE
Approve the deletion when prompted.
TO DELETE A CONVERSATION GROUP
1.
When in the 'Conversations', press on the group's conversation.
2.
Click on the Discard icon.
3.
Press 'Ok' to approve the deletion.
4.
The conversation will be deleted along with its group.
5.
Note that the group will be deleted from your device but it will continue to appear in the other group
members.
TO ACCESS THE CONTAINER
1.
Launch the Enterprise Mobility application on your device.
2.
Enter the first time password and to select a new password.
PROPERTY OF COMMUNITAKE™ | 2009-2015
41
COMMUNITAKE TECHNOLOGIES LTD.
INTACT USER GUIDE
3.
Enter your SharePoint credentials.
4.
The application checks the credentials via the server and the SharePoint credentials are stored
encrypted.
TO ACCESS A FILE VIA THE DEVICE
1.
Launch the Enterprise Mobility application on your device and click the “container” button.
PROPERTY OF COMMUNITAKE™ | 2009-2015
42
COMMUNITAKE TECHNOLOGIES LTD.
2.
Enter your password
3.
Click a SharePoint file
a.
INTACT USER GUIDE
If the file is not on the device requests and downloads it from the server and stores it
encrypted
b.
Unencrypt the file in memory and display it to the user inside the application
PROPERTY OF COMMUNITAKE™ | 2009-2015
43
COMMUNITAKE TECHNOLOGIES LTD.
INTACT USER GUIDE
5
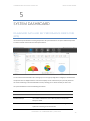
SYSTEM DASHBOARD
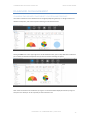
DASHBOARD DATA AND KEY PERFORMANCE INDICATORS
(KPIS)
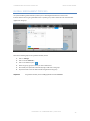
The initial view presented when accessing the system is the system dashboard. The system dashboard provides
an instant overview of the state of the enterprise's devices.
You can select to view information for current group or current group along with its subgroups. The Dashboard
components that are displayed and the order of their display can be customized to your personal preference.
This order and filtering is maintained between sessions, allowing you to choose the KPIs you wish to see.
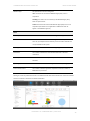
The system dashboard contains the following information:
Presentation
Description
Alerts
Scheduled backups
The number of devices that have a backup policy but the periodic
backup has failed.
Lost connection
The number of devices which have exceeded the time configured in the
system for connecting to the cloud service.
PROPERTY OF COMMUNITAKE™ | 2009-2015
44
COMMUNITAKE TECHNOLOGIES LTD.
INTACT USER GUIDE
SIM change
The number of devices that have replaced their SIM card.
Usage Plan
The number of devices which have exceeded one or more usage
thresholds set in the system. These thresholds include items defined in
the Usage plans such as calls minutes, SMSs and data.
Jailbroken / Rooted
Number of devices that are jailbroken or rooted.
Policy enforcement
The number of devices which have exceeded the allowed grace period
for policy violations and the system has activated enforcement
measurements against them.
Client removal
The number of devices in which the user disabled the Android device
administrator for the MDM application or an iOS MDM profile was
deleted.
Policies
Password Policy
This presentation has three categories:
'OK': the device has received the Password Policy and is in compliance.
'Not Supported': the device cannot fulfill the Password Policy due to OS
limitations.
'Pending': the device has not yet received the Password Policy from the
system server.
'Failed': the device has received the Password Policy but is not in
compliance.
Required Apps
This presentation has three categories:
'OK': the device has received the Required Apps policy and has installed
all required applications.
'Pending': the device has not received yet the Required Apps policy
from the system server.
'Failed': the device has received the Required Apps policy but has not
yet installed all required applications.
Blacklist Apps
This presentation has three categories:
'OK': the device has received the Blacklist Apps policy and is in
compliance.
'Pending': the device has not received yet the Blacklist Apps policy from
the system server.
'Failed': the device has received the Blacklist Apps policy but is not in
compliance (the device has an application installed that appears in the
blacklist).
PROPERTY OF COMMUNITAKE™ | 2009-2015
45
COMMUNITAKE TECHNOLOGIES LTD.
Whitelist Apps
INTACT USER GUIDE
This presentation has three categories:
'OK': the device has received the Whitelist Apps policy and is in
compliance.
'Pending': the device has not received yet the Whitelist Apps policy
from the system server.
'Failed': the device has received the Whitelist Apps policy but is not in
compliance (the device has an application installed that does not
appear in the Whitelist apps list).
Status
No backup
Number of devices that do not have an assigned backup procedure.
Not enrolled
The number of devices that have been registered in the system but
have not yet completed the enrollment process and their attributes are
not yet available to the system.
Roaming devices
The number of devices that have a roaming usage indication.
Restrictions
The number of devices that have violated either iOS or Android
restrictions.
Cellular operator distribution
The distribution of devices by service provider to which their SIM is
allocated.
Operating system distribution
The distribution of devices according to their mobile operating system.
Current license status
The number of devices registered compared to the total number of
MDM licenses purchased.
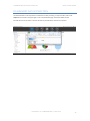
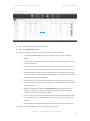
Clicking on one of the presentation areas in the dashboard will show further details such as the list of devices
that are in violation or details on the device distribution:
PROPERTY OF COMMUNITAKE™ | 2009-2015
46
COMMUNITAKE TECHNOLOGIES LTD.
INTACT USER GUIDE
DASHBOARD GUI MANAGEMENT
CHANGING DASHBOARD COMPONENTS' LOCATION AND PRESENCE
The location of elements on the dashboard can be changed by simple drag and drop. To change a location of a
dashboard component, click on the component and drag it to the desired location.
Clicking the 'Filter' icon on the upper right corner of the dashboard screen, opens a drop down menu with which
you can select the dashboard components that you wish to see when accessing the system.
Filter choices and locations are saved when you log out. The same view will be displayed next time you log into
the system. This allows you to see only what you want and need to see.
PROPERTY OF COMMUNITAKE™ | 2009-2015
47
COMMUNITAKE TECHNOLOGIES LTD.
INTACT USER GUIDE
DASHBOARD DATA EXTRACTION
The dashboard data can be exported to an Excel file for further processing. To export the data, click on the
'Export' button located in the upper right corner of the dashboard page. An Excel file will be created.
Each KPI will have its own sheet in the Excel file and only the KPIs which have data are exported.
PROPERTY OF COMMUNITAKE™ | 2009-2015
48
COMMUNITAKE TECHNOLOGIES LTD.
INTACT USER GUIDE
6
FLEET
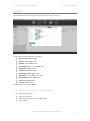
The 'Fleet' tab provides a view of the enterprise's devices. Device assets are viewed and managed by groups.
ENTERPRISE GROUPS
Enterprise groups appear in the left section of the console screen. Every device holder must be part of a group.
The top level group will be the overall enterprise. Below this, you can define sub-groups according to any logical
structure that suits your needs. These groups can be by device type, by organizational role, by device holder
location, by department etc. The enterprise groups are the basis for implementing any kind of activity on the
device such as enforcing password policy, implementing backup policy and conducting mass deployment
campaigns.
In the initial group set-up, you will see only the top level group, representing your organization. From this point,
you should build the group hierarchies that best serve you in managing your enterprise devices. You can add
devices from different operating systems and different vendors to the same group.
Actions and definitions made in the device management areas will be valid for the selected group at the time of
definition and activation. It is recommended to select the upper group, representing the entire enterprise for
generic actions that need to take place across the organization.
PROPERTY OF COMMUNITAKE™ | 2009-2015
49
COMMUNITAKE TECHNOLOGIES LTD.
Important
INTACT USER GUIDE
A Group's hierarchical location has significance since it is possible to indicate an inheritance
mechanism for policies. This mechanism activates on the child group the same policy as defined
for its parent group. Make sure to locate groups under the proper parent group through which
you want to define identical policies.
The triangle on the left side of the group name appears when it is a parent group that has child
Tip
groups. No such triangle will appear if it is a group with no child groups.
Clicking on this Triangle will display all the child groups connected to the parent group.
Important
Business groups represent logical clusters of devices that have similar policies but differentiated
policies as compared to other groups. As an initial step, it is highly recommended to carefully
and thoughtfully build the business structure and allocate the policies to each and every group
and only then add the devices to the groups.
TO CREATE A GROUP
1.
Click on the group for which you want to create a child group.
2.
Click on the 'Add Group' button.
3.
A pop-up box appears for entering the new group name. Enter the new group name.
4.
Click the 'Add' button in the pop-up box.
5.
The new group will be added under the group that you have selected.
PROPERTY OF COMMUNITAKE™ | 2009-2015
50
COMMUNITAKE TECHNOLOGIES LTD.
INTACT USER GUIDE
TO DELETE A GROUP
1.
Click on the group which you want to delete.
2.
Click on the 'Delete Group' button.
3.
The group will be deleted from the groups' hierarchy tree.
Important
You cannot delete a group that contains devices, users or child groups. You must delete all the
devices, users and child groups associated with the group prior to deleting it.
DEVICES
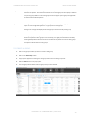
The 'Fleet' section presents the enterprise device inventory along with device attributes
DEVICES INVENTORY VIEW
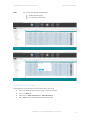
Select the 'Fleet' tab and then click on the 'Devices' tab.
Note
This is the default presentation when clicking the 'Fleet' tab. The system will present a table
showing all the devices that are assigned to the selected group at the time of selection.
You can select to see devices only from the current group or the devices from the current group
and all its subgroups.
PROPERTY OF COMMUNITAKE™ | 2009-2015
51
COMMUNITAKE TECHNOLOGIES LTD.
INTACT USER GUIDE
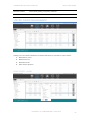
The device table presents a default view with following attributes:
Item
Description
Device Owner Name
Device holder name as defined when the device was added to the system
Number/Email
The MSISDN or the email address as defined when the device was added to
the system
User name
Device user email address. It will be used for Exchange configuration such as
blocking the user from accessing the Exchange server as well as the MDM
system user name for device holders who are given self-service access.
Self-service access
Checkbox for defining the device user as a self-service user.
Group
The organizational group to which the device is assigned
PIN code
The PIN code identifies the device in the enrollment process. It might be
required by the device holder in order to conclude the enrollment process.
Once connected to the MDM system, this PIN code will no longer be necessary
and will not appear in the table.
OS
Device mobile operating system
Remote Control
One-click remote access to the device for support.
All columns contain filters or search capabilities.
PROPERTY OF COMMUNITAKE™ | 2009-2015
52
COMMUNITAKE TECHNOLOGIES LTD.
INTACT USER GUIDE
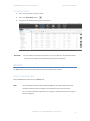
The device table icons:
Icon
Description
Policy setting has failed
Policy setting is not supported
Policy setting is pending
Policy setting has succeeded
Policy not set
Policy is violated
Roaming is not viable
Roaming is viable
The device is not rooted
The device is rooted
INCLUDING SUBGROUPS
Including subgroups allows you to see and manage all the groups that are under the selected group. Once
'Include Sub Groups' is checked, the devices table will present all the devices that are under the selected
hierarchy group. If it is not checked, the system will show only the devices that directly associated with the
selected group.
PROPERTY OF COMMUNITAKE™ | 2009-2015
53
COMMUNITAKE TECHNOLOGIES LTD.
INTACT USER GUIDE
TO ADD A DEVICE
1.
Click on the group to which you want to add a device.
2.
Click on the 'Add New Device' button.
3.
A pop-up box appears for entering the new device attributes. Enter the following:
a.
The new device MSISDN (phone number for a mobile phone) or an email address (for
tablets);
b.
Define the device owner name as you wish it to appear in the system. Device owner name
serves only for display;
c.
The device owner email. The Email address will be used for Exchange configurations and as
the user name for the device owner to access the self-service device protection features.
d.
Domain username. For some enterprises, the domain username is different than the email
address. For this reason, this data field must also be filled. This will allow proper operation of
configurations such as Exchange and VPN.
e.
Self-service access. This access will allow the device user to access the self-service device
protection features. Checking this option will generate a welcome email to the device user for
activating his access.
f.
BYOD. This will appear only when the ‘Enable BYOD Privacy’ is checked in the general
settings. It prohibits system administrator from viewing the device location; the device
backups; and the on-device applications attributes.
g.
Secure container access. This access will allow the device user to access the SharePoint files
via the device client. This is only available for a Secure Container that is configured in the
Settings
h.
4.
Email language. The selected welcome email language that will be sent to the device user.
Make sure that the MSISDN/email is not used elsewhere in the system.
PROPERTY OF COMMUNITAKE™ | 2009-2015
54
COMMUNITAKE TECHNOLOGIES LTD.
5.
INTACT USER GUIDE
If a device with the same SIM is used, you will be prompted by an alert indicating that the number is in
use.
6.
Click the Add button in the pop-up box. A PIN code is assigned to the device.
7.
The new device will be added to the devices table under the group that you have selected.
8.
An SMS is sent to the device with a client download link. The assigned PIN code is embedded in the
SMS thus ensuring accurate device identification. The device must have a valid SIM card in order to
receive SMS messages and push notifications.
9.
The device holder should install the device client as follows:
a.
Open the SMS / Email.
b.
Activate the link and download the device client.
c.
Once the download was completed, activate the client. Device registration is completed only
after the device holder downloads and activates the on-device client.
10. Once the client has finished installing, the device will show "Successfully Registered" message. If there
was no such message, the device did not yet register. (In Android devices, the message is presented in
the upper status bar).
11. Samsung SAFE and Android Enhanced devices are required to install an extra component that
empowers the additional capabilities. The device holder can install the extra component from the
Google Play store or locally - for Samsung SAFE or just locally – for Android Enhanced (requires allowed
installation from unknown sources). It is recommended to install the extra component via the Google
Play store if the user has access to it.
12. You can check if your device is Samsung SAFE enabled in the following link:
http://www.samsung.com/us/business/samsung-for-enterprise/index.html?cid=omc-mb-cph-111210000022
13. You might be prompted to enter a PIN code in order to complete the device registration. Please use the
PIN that was created when the device was added.
PROPERTY OF COMMUNITAKE™ | 2009-2015
55
COMMUNITAKE TECHNOLOGIES LTD.
INTACT USER GUIDE
14. Make sure that there are no network issues. The client will try to reconnect every few seconds as long
as it is running. It will update the capabilities when connected.
15. For every action instance made in the web page and that needs to be updated in a device, a push
notification will be sent.
16. If there is no SIM card or if the device is an Android device that was not correctly registered with an
account (user and password), the device will not be able to receive a push notification and it would
seem as if the action did not take place. In this case, the message will reach the device the next time it
periodically connects to the system
17. To make the client simulate a push notification, open the client on the device, click on options and click
on "Sync Now".
18. An email is sent to the device holder enabling him to define an access password for self-managed
device protection features. The device holder user name for the system is his email address as specified
in the device addition process.
Important
Email address on the third field is a mandatory data field. The self-service access is optional.
If the installation SMS / email does not reach the device, you can download and install the client
by manually launching the device’s web browser to the following URL:
http://mydevice.communitake.com/d
TO ADD DEVICES VIA BULK UPLOAD
The system allows you to add devices via bulk upload. Bulk upload populates a group by importing an external
Excel / CSV file that contains device holders details.
PROPERTY OF COMMUNITAKE™ | 2009-2015
56
COMMUNITAKE TECHNOLOGIES LTD.
INTACT USER GUIDE
To add device holders via bulk upload:
1.
Click on the 'Fleet' tab.
2.
Click on 'Devices' tab.
3.
Select the group which should be populated.
4.
Click on the 'More' tab.
5.
Select 'Bulk Upload' in the dropdown list.
6.
Download the Excel file template.
7.
Populate the Excel file with details by the template. Make sure to build this file in the right order. Align
the data to the upper left corner of the spreadsheet.
8.
Upload the file with the device holders details.
9.
Click on 'Next'.
10. Once uploaded, the system verifies that the file is in the proper structure.
11. Click on 'Next'.
12. The system provides view of details and upload status. Verify completion for the new devices.
13. Click 'Close'.
TO REMOVE A DEVICE
1.
Click on the group from which you wish to delete a device
2.
Select the device or devices to be deleted in the table.
3.
Click on the 'Remove' button (you must select a device to see this button).
4.
The device will be deleted from the system and from the table.
PROPERTY OF COMMUNITAKE™ | 2009-2015
57
COMMUNITAKE TECHNOLOGIES LTD.
5.
INTACT USER GUIDE
The device will display a message stating that it has been deleted. If you wish to reconnect the device
to the system, you must first uninstall the on-device client and reinstall it via a new SMS.
Important
After removing a device, the device should show an alert saying it was disconnected. If no alert
is shown, open the client on the device; click on options and then on 'Sync Now'. After the
device is successfully disconnected, it can no longer connect to the server. If you try to manually
launch the application at this point it will automatically quit. Use the device's application
manager to completely uninstall the client, instead of just deleting it.
Important
To remove an on-device client: Delete the device from the group it is in. Once removed from the
group, a message on the device should inform the device holder that the device was
disconnected successfully. An attempt to reconnect with the same device (performed by
starting the client on the device) should return an error message.
Use the device's "uninstall application" mechanism to make sure that all the files that are
related to client are removed.
Use the device's remove application program in 'Options' 'Device' 'Application
Management'.
PROPERTY OF COMMUNITAKE™ | 2009-2015
58
COMMUNITAKE TECHNOLOGIES LTD.
INTACT USER GUIDE
TO ADD AN IOS DEVICE
1.
Follow the steps of adding a device.
2.
An SMS will reach the device. The device holder should open it and click on the link. A profile will be
automatically downloaded.
3.
The device holder should install the profile. On completion, the device is registered.
PROPERTY OF COMMUNITAKE™ | 2009-2015
59
COMMUNITAKE TECHNOLOGIES LTD.
INTACT USER GUIDE
In order to allow more iOS device management capabilities such as contacts backup and restore, sound alarm,
get location, web browser control and data usage tracking, there is a need to complete the installation process
with the following:
Once the profile was installed, you are required to install the INTACT CEM application that is displayed on the
device.
1.
Install the application from the Apple store.
2.
Launch the application.
3.
Accept the following three requests (you must accept all three):
a.
Use of current location
b.
Access contacts
c.
Receive push notifications
PROPERTY OF COMMUNITAKE™ | 2009-2015
60
COMMUNITAKE TECHNOLOGIES LTD.
4.
INTACT USER GUIDE
The application then requests a PIN code. The PIN code is the same for both the profile installation and
the application installation. It remains in the “Devices table” until the complete installation of the
profile and the application.
5.
Key-in the PIN code.
6.
Verify to receive a “Registered Successfully” notification. This is the indication that the application
connects to the server and finishes syncing with it.
7.
Close the application.
TO REMOVE AN IOS DEVICE
Delete the device from the Enterprise Mobility system, in the same way you would remove any other device. On
the device, do the following:
1.
Select the system 'Settings'.
2.
Select 'General'.
3.
Select 'Profile'.
4.
Select 'CommuniTake MyDevice' and click 'Remove'.
5.
Delete the “CommuniTake MyDevice” application (long press on it and click the “X”).
TO EDIT DEVICE ATTRIBUTES
1.
Click on the group in which you want to edit a device.
PROPERTY OF COMMUNITAKE™ | 2009-2015
61
COMMUNITAKE TECHNOLOGIES LTD.
INTACT USER GUIDE
2.
Click on the 'More' tab.
3.
Click on the 'Edit' Device.
4.
An editable table will be opened with Device Owner Name; Number/Email; User Name, for all the
devices in the selected group.
5.
You can edit the following device details:
a.
Phone number / email address
b.
Device owner name
c.
User name (e.g., user email address).
i.
Attach a device to a user
ii.
Remove a user from a device, leaving just the device in the group Switch the device
between users
If the device is attached to a new user, the user will receive a welcome email inviting him to
the system.
6.
d.
Self-service access.
e.
Secure Container access.
Click Save to save your changes.
Important
If there was an error while changing device’s details, you will remain in the edit mode with only
the devices that require details completion.
TO REFRESH DEVICE DATA
The devices table is refreshed via user generated events. Clicking on the 'Refresh' button generates an
immediate update of the table data with the recent data that resides in device management system server.
TO RESEND SMS
Device enrollment process requires sending an installation SMS. Through this SMS, the device holder downloads
and installs the on-device management client. If the enrollment process was not concluded or the device holder
accidently deleted the SMS, the system enables a resend procedure.
1.
Click on the group in which you want to edit a device.
PROPERTY OF COMMUNITAKE™ | 2009-2015
62
COMMUNITAKE TECHNOLOGIES LTD.
INTACT USER GUIDE
2.
Select the device / devices for which you wish to resend an SMS.
3.
Click on the 'More' tab.
4.
Click on the 'Resend SMS'.
5.
You will be displayed with a list of the devices for which the SMS is being re-sent to, along with the
current PIN code and the SMS sending status.
SMS status and PIN code presence are refreshed automatically as they become available.
TO SEND A MESSAGE
A message can be sent to a group of devices or to a single device. The message can be a notification from the
MDM application or an email.
1.
Click on the ‘Fleet’ tab.
2.
Click on the devices group to which you wish to send a message.
3.
Check the checkbox to select all the devices that are presented on the screen. A notification will appear
above the devices’ table headers indicating the number of the checked devices. If you wish to send to
all the group’s devices, click on the link ‘Click here to select all <number> devices’ next to the
notification about the checked devices. Once clicked, you will be notified that ‘All <number> devices
are selected’. Click on the ‘Clear selection’, if you wish to cancel your selection.
4.
If you wish to send a message to a single device, check only this device in the table.
5.
If you wish to send a message only to a number of devices, check the devices you wish to send the
message to.
6.
Click on the ‘Send message’ at the left bottom part of the screen.
7.
Write the message in the pop-up message screen.
8.
Check ‘Send also by email’ if you wish to send the message as an email as well. The email will be sent to
the defined “device’s owner email”.
9.
Check ‘Force Show’ (applicable for Android devices) if you wish that the message will pop on the
recipient device screen.
10. Click on ‘Send’.
PROPERTY OF COMMUNITAKE™ | 2009-2015
63
COMMUNITAKE TECHNOLOGIES LTD.
Note
INTACT USER GUIDE
You can also send messages to devices from:
The KPI drill down popup.
From the device’s location tab.
TO EXPORT DATA TO EXCEL
Devices table data can be extracted to an Excel file for further processing:
1.
Click on the devices group for which you want to export its attributes.
2.
Click on the 'More' tab.
3.
Select either to ‘Export Current View’ or ‘Export All Columns’
4.
Click on Export. The requested table will be exported to Excel.
PROPERTY OF COMMUNITAKE™ | 2009-2015
64
COMMUNITAKE TECHNOLOGIES LTD.
INTACT USER GUIDE
DEVICES TABLE BUSINESS VIEWS
There are five pre-defined views of the devices' data:
Table view
Attributes
Default
Item
Device Owner Name; Number/Email; User name; Self-service access; Group; PIN code;
OS; Remote Control
Policies
Device Owner Name; Number/Email; Password policy; OS; Required Apps Violation;
WhiteList Violations; BlackList Violations; Restrictions Violations; Last Seen; Last
Backup
Configurations
Device Owner Name; Number/Email; OS; Exchange Violations; Wi-Fi Violations; VPN
Violations
Device Info 1
Device Owner Name; Number/Email; Vendor; Model; OS; OS Version; Firmware; Client
Version; Rooted
Device Info 2
Device Owner Name; Number/Email; Operator; Country; Roaming; IMSI; IMEI
To select a pre-defined table view:
1.
Select the devices' group.
2.
Click on the Views filter icon on the right area in the sub tabs area.
3.
Check in the drop down views the desired view.
4.
The table view will be changed in real time by the selected view.
PROPERTY OF COMMUNITAKE™ | 2009-2015
65
COMMUNITAKE TECHNOLOGIES LTD.
INTACT USER GUIDE
The following table describes the content of each parameter:
Parameter
Description
Device Owner Name
Device holder name as defined when the device was added to the system
Phone number
MSISDN as defined when the device was added to the system
User name
Device user email address. It will be used for Exchange configuration such as
blocking the user from accessing the Exchange server as well as the MDM system
user name for device holders who are given self-service access.
Self-service access
Checkbox for defining the device user as a self-service user.
Secure container
Device’s Secure Container access status. This is only available when secure container
is defined
PIN code
The PIN code identifies the device in the enrollment process. It might be required by
the device holder in order to conclude the enrollment process. Once connected to
the MDM system, this PIN code will no longer be necessary and will not appear in
the table.
Group
The organizational group to which the device is assigned
Device vendor
Device manufacturer name
Device Model
Device brand model name
Last seen
The last time the device was connected to the system cloud service
Last backup
Last backup date
Password policy status
Yes / no indication whether there is a defined and active password policy on the
device
OS
Device mobile operating system
OS version
Device mobile operating system version
Firmware version
Device firmware version (not available for all operating systems)
Client version
Version of the On-device device management client that is currently installed and
operating
Rooted
Yes / no indication whether the device is rooted or jailbroken
Country
The country as identified by Mobile Country Code (MCC) to uniquely identify a
network operator
Roaming
Yes / no indication whether the device is roaming enabled
IMEI
The International Mobile Equipment Identity is a unique number identifying GSM,
WCDMA, iDEN and some satellite phones. The IMEI number is used by the GSM
network to identify valid devices.
PROPERTY OF COMMUNITAKE™ | 2009-2015
66
COMMUNITAKE TECHNOLOGIES LTD.
IMSI
INTACT USER GUIDE
An International Mobile Subscriber Identity is a unique number associated with all
GSM and UMTS network mobile phone users. It is stored in the SIM inside the phone
and is sent by the phone to the network.
Required Apps Violation
Yes / no indication whether the device is fulfilling the mandatory applications' policy.
Whitelist Violations
Yes / no indication whether the device is fulfilling the only allowed applications’
policy.
Blacklist Violations
Yes / no indication whether the device is fulfilling the prohibited applications' policy.
Wi-Fi violations
Yes / no indication whether the device installed the configuration (if supported).
Exchange violations
Yes / no indication whether the device installed the defined configuration (if
supported).
VPN violations
Yes / no indication whether the device installed the defined configuration (if
supported).
Restriction violations
Yes / no indication whether the device installed the defined policy (if supported).
Remote Control
One-click remote access to the device for support.
SORTING AND SEARCHING DEVICES TABLE ATTRIBUTES
The system allows you to filter the devices table according to column attributes.
To select a filtered table view by column parameter:
1.
Select the devices' group.
2.
Click on the magnify glass icon to the left of the desired column heading.
3.
Select the parameter from the drop down list or write your search item. Search is case sensitive.
4.
The table view will be changed in real time showing only the devices by the selected parameter.
5.
Click on the refresh icon or close the filter to resume the original table view.
PROPERTY OF COMMUNITAKE™ | 2009-2015
67
COMMUNITAKE TECHNOLOGIES LTD.
6.
INTACT USER GUIDE
Click on the small arrows near the column headline to sort the column data by descending and
ascending order.
The table parameters filtering options are as follow:
Parameter
Filter
Device Owner Name
A specific or partial name
Phone number
A specific or partial number
User name
A specific or partial name
Self-service access
Yes / No selection
PIN code
A specific or partial number
Group
A specific or partial name
Device vendor
A specific or partial name
Device Model
A specific or partial name / number
Last seen
A specific or partial date item
Last backup
A specific or partial date item
Password policy status
Success; violated; pending; unsupported; undefined
OS
Dropdown selection: Android; iOS; WP (pending validity)
OS version
A specific or partial number
Firmware version
A specific or partial number
Client version
A specific or partial number
Rooted
Yes; No; Unknown
Country
A specific or partial name
Roaming
Yes; No; Unknown
IMEI
A specific or partial number
IMSI
A specific or partial number
Required Apps Violation
Success; violated; pending; unsupported; undefined
Whitelist Violations
Success; violated; pending; unsupported; undefined
Blacklist Violations
Success; violated; pending; unsupported; undefined
Wi-Fi violations
Success; failed; pending; unsupported; undefined
Exchange violations
Success; failed; pending; unsupported; undefined
VPN violations
Success; failed; pending; unsupported; undefined
PROPERTY OF COMMUNITAKE™ | 2009-2015
68
COMMUNITAKE TECHNOLOGIES LTD.
INTACT USER GUIDE
Restriction violations
Success; failed; pending; unsupported; undefined
Remote Control
CSR Available; CSR Client Not Installed; CSR Client Not Supported; Undefined
SPECIFIC DEVICE MANAGEMENT
Checking one or more device checkboxes in the devices table allows you quick links to up to four actions:
1.
Move (devices / users)
2.
Allow device access
3.
Block device access
4.
Reset container password
MOVE DEVICES / USERS
PROPERTY OF COMMUNITAKE™ | 2009-2015
69
COMMUNITAKE TECHNOLOGIES LTD.
INTACT USER GUIDE
"Move" allows you to edit the location of devices in the group:
1.
Check the device which you wish to edit.
2.
Click on the Move Devices / Users" at the bottom of the screen.
3.
Select the group to which you wish to move the device.
4.
Click on "Commit".
ALLOW DEVICE ACCESS
"Allow Device Access" enables the device to access the Secure File Container:
1.
Check the device which you wish to edit.
2.
Click on the Allow Device Access" at the bottom of the screen.
3.
The action will generate the process of Secure File container Access enablement.
BLOCK DEVICE ACCESS
"Block Device Access" removes the device access to the Secure File Container:
1.
Check the device which you wish to edit.
2.
Click on the "Block Device Access" at the bottom of the screen.
3.
The action will generate the process of removing Secure File container Access.
RESET DEVICE CONTAINER PASSWORD
"Reset Device Container Password" initiates new password settings for accessing the Secure File Container:
1.
Check the device which you wish to edit.
2.
Click on the "Reset Device Container Password" at the bottom of the screen.
3.
The action will generate the process of resetting the access password to the Secure File Container.
DEVICE USERS
Device users are device holders that are allowed to operate device data protection procedures via the system.
These procedures include: locate a device on a map; activate a device alarm; lock a device; wipe device data;
backup device data.
Once a device is added to a group, its holder is added to the system as a user.
Once a user is defined in the system, he can be identified and authorized to run these procedures. A user is
defined in the system by the email address that was defined in the device addition process.
PROPERTY OF COMMUNITAKE™ | 2009-2015
70
COMMUNITAKE TECHNOLOGIES LTD.
INTACT USER GUIDE
TO DELETE A DEVICE USER
1.
Select the device group in which the user is defined.
2.
Click on the 'Users' tab.
3.
Check the user line.
4.
Click on 'Delete Users' button.
5.
You can select to delete just the user or the user and his/her devices.
6.
Deleting the user but not his/her device will result in the device remaining in the group and only the
administrator can access it (same as adding a device with no user).
You can add a user after the initial enrollment process. If you wish to enable self-service for
Tip
device protection, check the Self-service access box in the devices table or in the edit devices
table. This will generate the process to send a welcome email to the device holder through
which he can activate his access to self-manage the device protection features.
SYSTEM USERS
The System Users module allows you to add system administrators and Customer Service Representatives (CSR)
to the system. Once added, the system will generate for every user a similar account activation process, including
sending a welcome letter and a requirement to set a password.
ADMINISTRATORS
Administrators are additional administrators who can manage the system. Administrators have complete
administration rights equal to the administrator who has activated the account for the first time.
TO ADD ADMINISTRATORS
1.
Select 'System Users' under the 'Fleet' tab.
2.
Click 'Add' under the Admin users section.
3.
Define the 'Display name' for the user.
4.
Write the 'Username' (the user's email address).
5.
Select the preferred 'Language'. This will define the welcome letter language.
6.
Click 'Add'.
PROPERTY OF COMMUNITAKE™ | 2009-2015
71
COMMUNITAKE TECHNOLOGIES LTD.
INTACT USER GUIDE
The new administrator will receive a welcome letter that includes links to the device management application
and to the remote support application. Once the newly added user will activate his account by setting his unique
password, he will be able to enter the system with his user name (email address) and the password and perform
complete administration tasks.
TO DELETE ADMINISTRATOR
1.
Select 'System Users' under the 'Fleet' tab.
2.
Select the Administrator you wish to remove.
3.
Click on 'Delete' user.
4.
Confirm the action.
SUB ADMINISTRATORS
Sub administrators are additional administrators with lower access privileges who can manage the system.
Sub administrators can only view policies and configurations but they cannot change them.
TO ADD SUB ADMINISTRATORS
1.
Select 'System Users' under the 'Fleet' tab.
2.
Click 'Add' under the Sub Admin users section.
3.
Define the 'Display name' for the user.
4.
Write the 'Username' (the user's email address).
5.
Select the preferred 'Language'. This will define the welcome letter language.
6.
Click 'Add'.
PROPERTY OF COMMUNITAKE™ | 2009-2015
72
COMMUNITAKE TECHNOLOGIES LTD.
INTACT USER GUIDE
The new sub administrator will receive a welcome letter that includes links to the device management
application and to the remote support application. Once the newly added user will activate his account by setting
his unique password, he will be able to enter the system with his user name (email address) and the password
and perform administration tasks.
TO DELETE SUB ADMINISTRATOR
1.
Select 'System Users' under the 'Fleet' tab.
2.
Select the Sub Administrator you wish to remove.
3.
Click on 'Delete' user.
4.
Confirm the action.
TO ADD A REMOTE SUPPORT USER
Remote Support Users are additional users that can perform remote support via device takeover. Remote
Support Users have complete device takeover rights but no system administration rights.
1.
Select 'System Users' under the 'Fleet' tab.
2.
Click 'Add' under the Remote Support users section.
3.
Define the 'Display name' for the user.
4.
Write the Username (the user's email address).
5.
Select the preferred 'Language'. This will define the welcome letter language.
6.
Click 'Add'.
PROPERTY OF COMMUNITAKE™ | 2009-2015
73
COMMUNITAKE TECHNOLOGIES LTD.
INTACT USER GUIDE
The new Remote Support user will receive a welcome letter that includes a link to the remote support
application. Once the newly added user will activate his account by setting his unique password, he will be able
to enter the system with his user name (email address) and the password and perform complete remote support
tasks.
TO DELETE REMOTE SUPPORT USER
1.
Select 'System Users' under the 'Fleet' tab.
2.
Select the Remote Support user you wish to remove.
3.
Click on 'Delete' user.
4.
Confirm the action.
Tip
You cannot delete yourself as an administrator. You can remove only other administrators.
Tip
Both the administrator and the Remote Support user can also be device owners. You should simply
put in their usernames when adding their device to a group.
PROPERTY OF COMMUNITAKE™ | 2009-2015
74
COMMUNITAKE TECHNOLOGIES LTD.
INTACT USER GUIDE
7
POLICIES
Device management policies are courses of action and procedures conforming to the philosophy by which the
enterprise regards its employees' mobile experience. The system allows the following policies:
1.
Password policy: enforcement of on-device password in accordance to the OS capabilities.
2.
Blacklist Applications policy: enforcement of on-device prohibited applications.
3.
Required Applications policy: enforcement of on-device mandatory applications.
4.
Whitelist Applications policy: enforcement of on-device allowed applications.
5.
Recommended Applications policy: recommended on-device applications.
6.
Backup policy: periodic backup of on-device contacts and messages.
7.
iOS restrictions
8.
Android restrictions
PASSWORD POLICY
A password policy defines the following attributes:
Feature
Description
Inherit policy
Automatically implements the parent group password policy on
the selected group
Enable
Enable / disable the password policy
Minimum password length
The minimum characters number for setting a password
History length
How many former passwords the system will remember and
deny reuse
How many days between changing
The number of days after which the device holder will be
passwords
required to change the password
Number of failed attempts before wiping the
Number of failed attempts before the device will undergo a
device
factory reset deleting all its data
How long before the device locks (seconds)
How many seconds of device inactivity before the device is
locked
Complex policy
Automatically implements the complex policy enabled by the
device operating system
PROPERTY OF COMMUNITAKE™ | 2009-2015
75
COMMUNITAKE TECHNOLOGIES LTD.
Disk encryption
INTACT USER GUIDE
Encrypts the on-device disk data. The device encrypts the user’s
files, contacts, emails and messages, both on the internal drive
and the SD card (if available) using the device’s lock password.
The encryption key is the device’s lock password. The encryption
is handled by the operating system itself.
Important
Disk encryption requires a password to be set on the device. To activate disk encryption on
android the password length must be at least 6 and complex (letters and numbers).
For iOS devices, disk encryption is done automatically when a password is set on the device.
TO DEFINE A PASSWORD POLICY
1.
Select the group for which you wish to deploy the password policy.
2.
Click on the 'Password Policy' tab.
3.
Define the password attributes parameters.
4.
Click on the 'Apply' button.
TO DISCARD A PASSWORD POLICY
1.
Select the group for which you wish to discard the password policy.
2.
Click on the 'Password Policy' tab.
3.
Uncheck the 'Enabled' checkbox.
4.
Click the 'Apply' button.
PROPERTY OF COMMUNITAKE™ | 2009-2015
76
COMMUNITAKE TECHNOLOGIES LTD.
INTACT USER GUIDE
PASSWORD POLICY ENFORCEMENT
The password policy enforcement varies by the mobile OS:
Criteria / OS
Android
iOS
Minimum length
4
4
History length
Supported
Supported
Expiration
Supported
Supported
Max attempts
Supported
Supported
Lock timeout
Supported
Supported
Complex
Letters and numbers
Letters, numbers and one symbol which is
before wipe
neither.
Disk encryption
Android 3.0 and above
Enabled automatically when the password
is defined.
Enforcement
The user is forced to change the password
The user is granted a one hour grace
as soon as the policy reaches the device.
period for setting a password. After the
hour expires, the user is forced to set a
password.
Status change in
Status is updated when the password is
Device status is queried after an hour. By
the portal
set.
then the user must set a password.
Important
Samsung SAFE enabled devices enforce the password via the Samsung SAFE services.
Adding a device to a group on which a password policy is deployed, will automatically
implement the set password policy on the new device.
The 'Inherit Policy' check box will be disabled for a group if it does not have a parent
group with a set password policy.
'Inherit Policy' always works regardless of the 'Enabled' status of the parent group. If
the parent group password policy is disabled then so will be the child group password
policy.
'Complex' relates to the most complex password as defined by the device operating
system. This will vary by the operating systems. The device owner will be directed to
define the most complex password in the event of password definition.
Password expiration is supported for Android 3 and above.
Disk encryption is supported for Android 3.0 devices and above.
'OS Specific Guideline' provides guidelines re possible password complexity, password
components and encryption support by the device OS version.
PROPERTY OF COMMUNITAKE™ | 2009-2015
77
COMMUNITAKE TECHNOLOGIES LTD.
INTACT USER GUIDE
MOBILE APPLICATIONS POLICY
Mobile applications management is conducted via the system application policies. The system allows defining
which application must not reside in the device (Blacklist applications); which applications must reside in the
device (Whitelist applications); which applications are recommended to reside in the device (Recommended
applications).
Mobile applications policy is managed by the enterprise groups. There are three states for managing this policy:
1.
'Inherited only': inherit the parent group applications policy as is.
2.
'Do not inherit': do not inherit the parent group applications policy.
3.
'Adopt inherited': inherit the parent group applications policy but allow adding more applications.
To fulfill these policies, the system activates a smart content management mechanism that constantly scans the
devices' state and automatically removes or deploys applications by the policies definitions.
BLACKLIST APPLICATIONS POLICY
Blacklist applications are on-device applications that are prohibited on the device.
Selecting and defining a prohibited application can be done in two ways:
1.
Selecting an application from a pre-built applications list.
2.
Manually defining a prohibited application.
The pre-built applications list is automatically generated by the system as it reviews and collects all the
applications that reside on the enterprise devices which are enrolled in the system.
PROPERTY OF COMMUNITAKE™ | 2009-2015
78
COMMUNITAKE TECHNOLOGIES LTD.
INTACT USER GUIDE
TO DEFINE PROHIBITED APPLICATIONS FROM THE PRE-BUILT APPLICATIONS LIST
1.
Select the 'Blacklist' tab.
2.
Select the heritage state. Note that only when selecting 'Do not inherit' or 'Adopt Inherited', the
system will present the available applications.
3.
Check the selected application checkbox in the applications list.
4.
Click on 'Add' to shift the applications to the prohibited application list.
5.
Click 'Submit'.
TO MANUALLY DEFINE PROHIBITED APPLICATIONS
1.
Select the 'Blacklist' tab.
2.
Click on the 'Add Manually' button.
3.
Select the mobile OS from the OS list.
4.
Enter the application name.
5.
Enter the application ID.
6.
Click 'Add'.
7.
Click 'Submit'.
You have the flexibility to shift between two prohibited applications states:
1.
Totally prohibited applications.
2.
Time / location driven prohibited applications.
To shift between these two states act as follows:
1.
Define Blacklisted applications.
2.
Define the time or location policy.
3.
Click on "Kill" to prohibit the application from running by the time / location but allow it to reside
on the device.
4.
Click on "Uninstall" to totally block the application from running on the device, regardless of time
/ location policy.
5.
Verify that the "Kill Violated" indicate "Yes" for kill only and "No" for blocking.
6.
Click on "Apply".
PROPERTY OF COMMUNITAKE™ | 2009-2015
79
COMMUNITAKE TECHNOLOGIES LTD.
INTACT USER GUIDE
TO DEFINE PASSWORD PROTECTED APPLICATIONS
This module allows you to restrict the activation of on-device applications via a password. The device holder
will be required to key-in the password prior to running these applications.
1.
Define prohibited applications, as described above.
2.
Click on "Kill" to prohibit the application from running by the time / location but allow it to reside
on the device.
3.
Click on the ‘Edit Password’ button.
4.
Define the password.
5.
Click ‘Submit’.
6.
Click ‘Apply’.
7.
To remove the application and switch back to “Kill” mode, you should enter an empty password in
step 4.
Device holder’s screen for approving a password protected application:
PROPERTY OF COMMUNITAKE™ | 2009-2015
80
COMMUNITAKE TECHNOLOGIES LTD.
INTACT USER GUIDE
TO ACTIVATE ANDROID BLACKLIST POLICY BY TIME
The default Blacklist policy state is always active, by your definitions. However, you can selectively activate
the policy by a specific time of day and week. In this time period and only at this time period, the Blacklist
policy will be viable thus allowing prohibited applications to reside on the device but not run under the time
policy restrictions. This definition provides you with the flexibility to allocate various policies to devices with
different ownership addressing BYOD challenges. To define time driven Blacklist policy:
1.
Define Blacklist applications
2.
Click on the "Change" link near the "Policy is always active".
3.
Select "Time" in the pop-up.
4.
Select the start time and the end time in hours and minutes.
5.
Select the days of the week.
6.
Select the time zone.
7.
Click on "Submit". Verify that your selection summary appears on the upper Blacklist bar.
PROPERTY OF COMMUNITAKE™ | 2009-2015
81
COMMUNITAKE TECHNOLOGIES LTD.
INTACT USER GUIDE
8.
Click on "Change" near the summary if you wish to alter it.
9.
Click on the "Kill" icon to activate the policy. Verify that the "Kill Violated" has turned to "Yes".
10. Click on the "Block" icon if you wish to uninstall the prohibited application once the policy is
violated, regardless of the time policy.
11. Click on "Apply".
TO ACTIVATE ANDROID BALCKLIST POLICY BY LOCATION
The default Blacklist policy state is always active, by your definitions. However, you can selectively activate
the policy by a specific device location. In this location and only at this location, the Blacklist policy will be
viable. To define location driven Blacklist policy:
1.
Define Blacklist applications
2.
Click on the "Change" link near the "Policy is always active".
3.
Select "Location" in the pop-up.
4.
You can define the location in two ways:
a.
Define specifically the latitude and the Longitude
b.
Click on the "Map".
i.
You will be shown New York city location as the starting point. Navigate to the
desired location and click on on the map. The latitude and the Longitude fields
will be populated in accordance.
ii.
Define the desired radius in meters in the "Radius" field for the selected point
location.
5.
Click on "Submit".
6.
Click on "Apply".
Important
The system by its nature is not a real time system and it depends on the data transmitted by the
devices to the cloud service. As such, you may not see immediately all the applications that
reside across all the enrolled devices once you log-in to the system. To view all these
applications, log-out and log-in again to refresh this view and create a more up-to-date
PROPERTY OF COMMUNITAKE™ | 2009-2015
82
COMMUNITAKE TECHNOLOGIES LTD.
INTACT USER GUIDE
applications list.
Applications are managed by OS. Make sure to define the applications per OS.
Blacklist policy by time and location is valid only to Android devices.
You can define Blacklist viability by location or by time – not by both.
ENFORCEMENT OF PROHIBITED APPLICATIONS
Once an application is defined as a prohibited application, the policy enforcement varies by the mobile OS:
OS
Blacklist enforcement
Android
The system administrator is notified through the violation status in the devices table.
For Android Enhanced devices (devices for which CommuniTake has enhanced
management capabilities) and Samsung SAFE devices, the application will be
automatically removed. This is applicable for most Samsung, LG and HTC devices. For
non-Android Enhanced devices, a notification is displayed in the devices notification
center prompting the device holder to uninstall the application. The device holder is
blocked from using the application. The application should be manually removed by
the device holder.
This can be done either by clicking the notification or by clicking the application inside
the MDM application under “Blacklist Status”.
For Samsung SAFE enabled devices, the prohibited applications will be silently
uninstalled.
iOS
The system administrator is notified through the violation status in the devices table.
The application should be manually removed by the device holder.
The user can see the Blacklist application status in the on-device application.
REQUIRED APPLICATIONS POLICY
Required applications policy defines all the mandatory applications that the enterprise expects to have on the
device. The Device Management Required Applications function also acts as a smart mechanism for mass
deployments and patch management.
The system deploys the mandatory application in two possible ways:
1.
Installing the application files on the device.
2.
Installing the application via a link to its location in the web / app store.
PROPERTY OF COMMUNITAKE™ | 2009-2015
83
COMMUNITAKE TECHNOLOGIES LTD.
INTACT USER GUIDE
There is a need to indicate in the system one of these two data sources.
TO DEFINE MANDATORY APPLICATIONS
1.
Select the 'Required Apps' tab.
2.
Click on the 'Add' button.
3.
Enter the application name.
4.
Select the application OS.
5.
Select the application version. (Optional).
a.
In Android, enter the application’s version code.
6.
Define with the slider the OS versions for which the installation should occur.
7.
Enter the application ID.
8.
Add comments.
9.
Enter the application URL or upload the application file.
10. Click 'Add'.
11. Click on the edit icon near the app for corrections, once required.
Note
When adding required apps, the system automatically detects the ID and the version number
for Android APKs uploaded to the system. The system automatically detects ID from the Google
Play links or from the iOS App Store links.
ADDING REQUIRED IOS APPLICATIONS
When adding an iOS application, the system allows you to pass additional parameters as follows:
System parameters: UDID, Wi-Fi MAC, Bluetooth MAC, Ethernet MAC, MSISDN, IMEI and IMSI
User defined static values such as server to connect with, PIN code and more.
To add parameters:
1. Click on the “Policies” tab.
2.
Click on the “Required Apps” tab.
3.
Select iOS as the OS.
PROPERTY OF COMMUNITAKE™ | 2009-2015
84
COMMUNITAKE TECHNOLOGIES LTD.
4.
In the process of adding an app, click on the “Edit” button.
5.
Key-in the parameter name.
6.
Select the parameter value.
7.
Click on the “Add” button.
8.
Click on “Save”.
Note
INTACT USER GUIDE
iOS added parameters are also applicable when adding recommended apps.
PROPERTY OF COMMUNITAKE™ | 2009-2015
85
COMMUNITAKE TECHNOLOGIES LTD.
INTACT USER GUIDE
ENFORCEMENT OF MANDATORY APPLICATIONS
Once an application is defined as a mandatory application, the policy enforcement will vary by the mobile OS:
OS
Required Apps enforcement
Android
The system administrator is notified through the violation status in the devices table. A
notification is displayed on the device’s notification center prompting the user to install
the application. The application should be manually installed by the device holder. This
can be done either by clicking the notification or by clicking the application inside the
MDM application under “Required Apps Status”.
For Samsung SAFE enabled devices, and Android Enhanced devices (devices for which
CommuniTake has improved management capabilities), required APK files will be silently
installed. The files should be uploaded to the system or should contain direct download
links.
In any case, Google Play applications must be manually installed by the user.
iOS
The system administrator is notified through the violation status in the devices table. The
application is automatically installed on the device. The user may be prompted to enter his
/ hers iTunes password.
IOS ‘IN-HOUSE’ APPLICATIONS DISTRIBUTION
The system allows distribution of Ad-Hoc in house applications to iOS devices. These devices must be managed
inside the provisioning profile used to sign the application. Once built and signed, the iApp file can either be
uploaded directly to the system or a link can be provided to an internet location where the file can be
downloaded from.
ANDROID WHITELIST APPLICATIONS POLICY
Whitelist applications policy defines the applications that the enterprise allows to run on an Android device.
No other applications can run on the device once this policy is set.
To enable Whitelist mode for Android devices
1.
Check the checkbox ‘Android – allow apps only from whitelist’
2.
Click ‘Apply’
Once applied, all Android “required” applications now define the Whitelist apps:
These applications are mandatory on the device
These applications are the only 3 party applications which are allowed to run on the device
rd
PROPERTY OF COMMUNITAKE™ | 2009-2015
86
COMMUNITAKE TECHNOLOGIES LTD.
INTACT USER GUIDE
ENFORCEMENT OF WHITELIST APPLICATIONS
The system administrator is notified through the violation status in the devices table. A notification is displayed in
the devices notification center prompting the device holder to uninstall the not allowed application. The device
holder is blocked from using applications that were not defined as allowed. The system will 'kill' any not allowed
application from running. The prohibited application should be manually removed by the device holder.
This can be done either by clicking the notification.
On Samsung SAFE and Android Enhanced devices, applications which are not part of the whitelist will be silently
uninstalled.
CATALOG POLICY
Catalog policy defines on-device recommended applications which the business wishes to have on the devices
but does not enforce their presence.
These applications will be presented in an enterprise applications catalog from which users will be able to
download and install the applications.
Defining the recommended application is done in a similar way to defining mandatory applications.
PROPERTY OF COMMUNITAKE™ | 2009-2015
87
COMMUNITAKE TECHNOLOGIES LTD.
INTACT USER GUIDE
Select the 'Catalog' tab.
1.
Click on the 'Add' button.
2.
Enter the application name.
3.
Select the application OS.
4.
Enter the application version code. (optional)
a.
In Android, enter the application’s version code.
5.
Define with the slides the devices' OS version for which the application is intended.
6.
Enter the application ID.
7.
Add comments.
8.
Write the application URL or upload the application file.
9.
Click 'Add'.
Note
When adding catalog apps, the system automatically detects the ID and the version number for
Android APKs uploaded to the system. The system automatically detects ID from the Google
Play links or from the iOS App Store links.
Once the recommended application is defined, the device holder will be able to view all the recommended
application on his / her device via the application client. The user can select to install the apps directly from
the list on the device.
BACKUP POLICY
TO DEFINE BACKUP SETTINGS
1.
Select the device group for which you wish to deploy the backup settings.
2.
Click on the 'Backup' tab.
3.
The default selection is 'Inherit Backup Settings'.
4.
Check the 'Enable Periodic Backup' checkbox (uncheck the default settings).
5.
Define the number of days for the 'Backup Interval'.
PROPERTY OF COMMUNITAKE™ | 2009-2015
88
COMMUNITAKE TECHNOLOGIES LTD.
6.
INTACT USER GUIDE
Select which data detail types will be backed up: Contacts; Messages; Note that Contacts and Messages
are pre-defined once you mark the Enable Periodic Backup checkbox.
7.
Click on 'Commit Changes'.
TO REMOVE BACKUP SETTINGS
Tip
1.
Select the device group for which you wish to remove the backup settings.
2.
Click on the 'Backup' tab.
3.
Uncheck the 'Enable Periodic Backup' checkbox.
4.
Click on 'Commit Changes'.
The default policy is the inherit policy by the parent group. In order to select another policy, first
uncheck the inherit checkbox and then check the enable checkbox and define the policy
parameters.
PROPERTY OF COMMUNITAKE™ | 2009-2015
89
COMMUNITAKE TECHNOLOGIES LTD.
INTACT USER GUIDE
ADDING IOS RESTRICTIONS CONFIGURATION
The iOS restrictions module allows you to limit user’s access to services.
Optional configuration for iOS restrictions:
Device functionality
Allow installing apps
Allow use of camera
o
Allow FaceTime
Allow Screen Capture
Allow Automatic Sync while Roaming
Allow Siri
Allow voice dialing
Allow In-App Purchase
Force user to enter iTunes Store password for all purchases
Allow multiplayer gaming
Allow adding Game Center friends
Applications
Allow use of Youtube
Allow use of iTunes store
Allows use of Safari
o
Enable autofill
o
Force fraud warning
o
Allow JavaScript
o
Allow pop-ups
Accept Cookies: Never / From visited sites / Always
Allow user to use Passbook while device is locked
PROPERTY OF COMMUNITAKE™ | 2009-2015
90
COMMUNITAKE TECHNOLOGIES LTD.
INTACT USER GUIDE
Allow user to use GameCenter
Allow user to use Bookstore
Allow user to access Erotica in Bookstore
iCloud
Allow backup
Allow document sync
Allow Photo Stream (disallowing can cause data loss)
Security and Privacy
Allow diagnostic data to be sent to Apple
Allow user to accept untrusted TLS certificates
Force encrypted backups
iOS 7 restrictions
Block Account Modification
Block Air Drop
Block App Cellular Data Modification
Block Assistant User Generated Content
Block Find My Friends Modification
Block Fingerprint For Unlock
Block Host Pairing
Block Lock Screen Control Center
Block Lock Screen Notifications View
Block Lock Screen Today View
Block Open From Managed To Unmanaged
Block Open From Unmanaged To Managed
Block OTA PKI Updated
Do Not Force Limit Ad Tracking
To define iOS restrictions:
1. Select the devices group for which you wish to define iOS restrictions.
2. Click on the 'Policies' tab.
3. Click on the 'iOS Restrictions' tab.
4. Select the heritage behavior.
5. Check the required restrictions.
6. Click on 'Apply'.
Important
The implication of activating a restriction: for example, disabling the camera will cause the
camera application to disappear from the device.
PROPERTY OF COMMUNITAKE™ | 2009-2015
91
COMMUNITAKE TECHNOLOGIES LTD.
INTACT USER GUIDE
ADDING ANDROID RESTRICTIONS CONFIGURATION
The Android restrictions module allows you to limit user’s access to services. These limitations defer by device
type. There are four different device types which allow distinctive restrictions:
1.
Generic Android devices.
2.
Samsung SAFE devices.
3.
Devices containing the CommuniTake’s secure firmware.
4.
Devices containing CommuniTake’s enhanced management capabilities – namely non-SAFE Samsung,
LG, HTC and newest Sony devices (Samsung SAFE does not require downloading the extra component).
PROPERTY OF COMMUNITAKE™ | 2009-2015
92
COMMUNITAKE TECHNOLOGIES LTD.
INTACT USER GUIDE
GENERIC ANDROID DEVICE RESTRICTIONS
Optional configuration for generic Android restrictions:
Block Camera
Wi-Fi: ‘Always on’ or ‘Always block’ or ‘No policy’.
Bluetooth: ‘Always on’ or ‘Always block’ or ‘No policy’.
Disable Non-System Apps when Wi-Fi is not available.
SAMSUNG SAFE DEVICE RESTRICTIONS
PROPERTY OF COMMUNITAKE™ | 2009-2015
93
COMMUNITAKE TECHNOLOGIES LTD.
INTACT USER GUIDE
Optional restrictions for Samsung SAFE devices:
Block factory reset
Block SD card access
Block setting changes
Block non market apps
Block tethering
Block cellular data
Block USB debug
Block USB mass storage
Block USB media access
Block Location services
Block email forwarding
Block Google Play
Block Web browser
Block YouTube
COMMUNITAKE FIRMWARE DEVICE RESTRICTIONS
Optional configuration for a dedicated ROM that can be provided as part of the deployment
Block SMS
Block Mobile Data
Block Voice Calls
Applications installation: : allow; allow with password; block
USB access: allow; allow but with password; block
PROPERTY OF COMMUNITAKE™ | 2009-2015
94
COMMUNITAKE TECHNOLOGIES LTD.
INTACT USER GUIDE
ANDROID ENHANCED DEVICE RESTRICTIONS
Android Enhanced devices are devices for which CommuniTake has obtained improved management capabilities.
This is applicable for most LG, HTC and the newest Sony devices.
Optional configuration for Android Enhanced devices:
Block GPS
Roaming: Always on; Always block; No policy
Unknown sources: Always on; Always block; No policy
Block USB Debug
Block Airplane Mode
Mobile Data: Always on; Always block; No policy.
TO DEFINE ANDROID RESTRICTIONS
1.
Select the devices group for which you wish to define Android restrictions.
2.
Click on the 'Policies' tab.
3.
Click on the 'Android Restrictions' tab.
4.
Select the heritage behavior.
5.
Select the restrictions by the Android device type.
6.
Check the required restrictions and define the passwords, once required.
7.
Click on 'Apply'.
For Samsung SAFE enabled devices, the Android restrictions are implemented via the SAFE services.
PROPERTY OF COMMUNITAKE™ | 2009-2015
95
COMMUNITAKE TECHNOLOGIES LTD.
INTACT USER GUIDE
TO DEFINE ANDROID RESTRICTION BY TIME
The default Android Restrictions policy state is always active, by your definitions. However, you can
selectively activate the policy by a specific time of day and week. In this time period and only at this time
period, the Android Restrictions policy will be viable. This definition provides you with the flexibility to
activate security restrictions that are viable to work hours for example. To define time driven Android
Restrictions policy:
1.
Define Android Restrictions policy.
2.
Click on the "Change" link near the "Policy is always active".
3.
Select "Time" in the pop-up.
4.
Select the start time and the end time in hours and minutes.
5.
Select the days of the week.
6.
Select the time zone.
7.
Click on "Submit". Verify that your selection summary appears on the upper policies bar.
8.
Click on "Change" near the summary if you wish to alter it.
9.
Click on "Apply".
TO DEFINE ANDROID RESTRICTION BY LOCATION
The default Android Restrictions policy state is always active, by your definitions. However, you can
selectively activate the policy by a specific device location. In this location and only at this location, the
Android Restrictions policy will be viable. This can be valuable when you wish to block security breaches of
unauthorized data collection in the organization premise. To define location driven Android Restrictions
policy:
1.
Define Android Restrictions policy.
2.
Click on the "Change" link near the "Policy is always active".
3.
Select "Location" in the pop-up.
4.
You can define the location in two ways:
a.
Manually define the latitude and the Longitude
b.
Or click on the "Map" to locate your location.
i.
You will be shown New York City location as the starting point. Navigate to the
desired location and click on the map. The latitude and the Longitude fields
will be populated in accordance.
5.
Define the desired radius in meters in the "Radius" field for the selected point location.
6.
Click on "Submit".
7.
Click on "Apply".
PROPERTY OF COMMUNITAKE™ | 2009-2015
96
COMMUNITAKE TECHNOLOGIES LTD.
INTACT USER GUIDE
VIOLATIONS DRIVEN POLICIES ENFORCEMENT
The system allows you to enable the enforcement actions once a policy violation occurs.
1.
Click on 'Settings' on the upper right corner of the screen.
2.
Click on the General tab.
3.
Check the 'Enable Policy Enforcement' checkbox.
4.
Check the policies violations events for which you wish to activate enforcement:
5.
6.
a.
'Blacklist'
b.
'Whitelist'
c.
'Password'
d.
'Rooted'
Check one or more of the automated actions that will take place once a violation event occurs:
a.
'Block from Exchange' ( this is only available if the Exchange server is properly configured)
b.
'Lock the device with a password (Android only)'
c.
'Enterprise Wipe'
d.
'Block secure file container access’
Define the grace period in days for the enforcement activation. The default time is set to 0.
PROPERTY OF COMMUNITAKE™ | 2009-2015
97
COMMUNITAKE TECHNOLOGIES LTD.
INTACT USER GUIDE
For action on SIM Change event:
1.
Check the 'Enable action on SIM change' checkbox
2.
Enable one of the following actions once the device SIM card is changed:
3.
a.
'Lock device with password (Android only)'
b.
'Factory Reset'
c.
'Enterprise Wipe'
Click 'Submit'.
For device admin removal event:
1.
Check ‘Enable action on device admin removal’ checkbox
2.
Enable one of the following actions once the device client is removed:
a.
‘Lock device’. If selected, define the ‘Unlock password’.
b.
‘Factory reset’.
PROPERTY OF COMMUNITAKE™ | 2009-2015
98
COMMUNITAKE TECHNOLOGIES LTD.
INTACT USER GUIDE
BROWSER CONTROL
Web browser control has two deployments:
1.
Blacklist: allows you to block certain domains / URLs from access by the device.
2.
Whitelist: allows you to define domains / URLs that will the only ones the device will be able to
navigate to.
The control over the web use is fulfilled via a dedicated COMMUNITAKE browser. URLs are also black listed using
Google’s safe browsing.
TO ACTIVATE BROWSER CONTROL
1.
Select the group for which you wish to define browser control.
2.
Click on the 'Policies' tab.
3.
Click on the 'Browser Control' sub tab.
4.
Select the preferred action: 'Disable' or 'Enable' or 'Inherit' or 'Adopt'.
5.
Select 'Blacklist' or Whitelist.
6.
Click on 'Add URL'.
7.
Enter the URL in the designated data field.
The URL is required to have a legal format (for example: http://)
8.
Select Domain to block the entire domain, or uncheck to block only the specific URL
9.
Click 'Add'.
Important
If the required URL (for whitelist or blacklist) is accessible with and without WWW
then you must add both options.
PROPERTY OF COMMUNITAKE™ | 2009-2015
99
COMMUNITAKE TECHNOLOGIES LTD.
INTACT USER GUIDE
TO REMOVE DOMAIN/URL IN BROWSER CONTROL
1.
Select the group for which you wish to remove browser control.
2.
Click on the 'Policies' tab.
3.
Click on the 'Browser Control' sub tab.
4.
Select the preferred action: 'Disable' or 'Enable' or 'Inherit' or 'Adopt'.
5.
Select 'Blacklist' or Whitelist.
6.
Select the URL you wish to remove.
7.
Click on 'Delete URL'.
8.
Click 'Delete' on the pop-up.
When Browser Control is activated, the “Browser” button will appear in the on-device application
client.
All popular browsers are automatically disabled ('killed') when launched.
Additional browsers can be handled via Application Blacklist.
TO ACTIVATE BROWSER CONTROL BY TIME
The default Browser Control policy state is always active, by your definitions. However, you can selectively
activate the policy by a specific time of day and week. In this time period and only at this time period, the
Browser Control policy will be viable. This definition provides you with the flexibility to activate productivity
enforcement during work hours for example. To define time driven Browser Control policy:
1.
Define Browser Control policy
2.
Click on the "Change" link near the "Policy is always active".
3.
Select "Time" in the pop-up.
4.
Select the start time and the end time in hours and minutes.
5.
Select the days of the week.
6.
Select the time zone.
7.
Click on "Submit". Verify that your selection summary appears on the upper policies bar.
8.
Click on "Change" near the summary if you wish to alter it.
9.
Click on "Apply".
TO ACTIVATE BROWSER CONTROL BY LOCATION
The default Browser Control policy state is always active, by your definitions. However, you can selectively
activate the policy by a specific device location. In this location and only at this location, the Browser Control
policy will be viable. This definition provides you with the flexibility to activate productivity enforcement
when on the organization premise for example. To define location driven Browser Control policy:
1.
Define Browser Control policy.
2.
Click on the "Change" link near the "Policy is always active".
3.
Select "Location" in the pop-up.
4.
You can define the location in two ways:
a.
Manually define the latitude and the Longitude
PROPERTY OF COMMUNITAKE™ | 2009-2015
100
COMMUNITAKE TECHNOLOGIES LTD.
b.
INTACT USER GUIDE
Or click on the "Map" to find the required location.
i.
You will be shown New York City location as the starting point. Navigate to the
desired location and click on on the map. The latitude and the Longitude fields
will be populated in accordance.
5.
Define the desired radius in meters in the "Radius" field for the selected point location.
6.
Click on "Submit".
7.
Click on "Apply".
Important
iOS: The application cannot disable the browser on iOS devices. This will be done via iOS
restrictions (blocking default browser) and Blacklist (which only notifies the application
administrator).
In order to block the Safari browser, and iOS restrictions policy which disables the Safari
browser must be applied to the devices' group. All other browsers must be handled via
Blacklist management.
DEVICE USER EXPERIENCE
The on-device web access is conducted only via the on-device application client.
Once the web browser is activated, the device holder is required to enter the domain / URL
When trying to access a prohibited domain / URL, the access will be blocked.
When accessing the web, the device user can leverage Bookmarks, History and Add bookmarks.
FILE DISTRIBUTION
The file distribution module allows you to send files to groups of devices. The files are defined in the system for
distribution and the devices pull them once they connect to the system. If a distributed file already resides on the
device, the new file will overwrite it. In iOS devices, the files are viewed via the on-device MDM application but
can be exported to external applications. In Android devices, the files are visible in the device file system.
PROPERTY OF COMMUNITAKE™ | 2009-2015
101
COMMUNITAKE TECHNOLOGIES LTD.
INTACT USER GUIDE
TO DISTRIBUTE FILES TO DEVICES
1.
Select the ‘Files distribution’ tab.
2.
‘Inherit’ is the default state. Change the inheritance status to ‘Adopt’ or ‘Enable’.
3.
Click on the 'Add' button.
4.
Select ‘URL’ for a file pull via a URL or ‘File’ to upload a file.
5.
For ‘URL’ enter the ‘File URL’ address (mandatory);
6.
For ‘File’, click ‘Upload File’ and select the file you wish to upload
7.
Enter the ‘File name’ (mandatory)
8.
Enter ‘Comment’ (optional). Note that this comment will be displayed inside the iOS application
9.
Enter the ‘Download to directory’ location to which the files will be downloaded (mandatory).
10. Click on ‘Add’ to activate the procedure
11. Click ‘Apply’ when you finish adding all the files
TO EDIT AN EXISTING FILE
1.
Select the ‘Files distribution’ tab.
2.
Click the edit button
3.
Change one or more of the following:
a.
near the file you wish to edit.
Update the file by either changing the download URL or uploading a new file. You can also
switch between the two modes.
b.
Update the file name.
c.
Update the comment.
d.
Change the download directory.
4.
Click ‘Save’ to save the changes.
5.
Click ‘Apply’ to finalize the process and activate the changes.
Note
There is a 25 MB size limit for uploading a file to the system.
Not all edit operations result in the file being re-downloaded.
If the download fails due to on- device memory limit, the system will attempt to redistribute the file until a successful distribution
In Android, the system does not track if the user deleted, moved or renamed the file.
PROPERTY OF COMMUNITAKE™ | 2009-2015
102
COMMUNITAKE TECHNOLOGIES LTD.
INTACT USER GUIDE
HOME SCREEN
The ‘Home screen’ policy allows you to define the elements that appear on the device’s home screen. These
elements contain Wallpaper (Android only), Icons (Android only) and Bookmarks / Web clips.
Note
Inherit’ is the default state. Change the inheritance status to ‘Adopt’ or ‘Enable’ prior to
specific configuration.
PROPERTY OF COMMUNITAKE™ | 2009-2015
103
COMMUNITAKE TECHNOLOGIES LTD.
INTACT USER GUIDE
TO ADD WALLPAPER
1.
Select the ‘Home screen’ tab.
2.
Under ‘Wallpaper’, select ‘URL’ for a file pull via a URL or ‘File’ to upload a file.
3.
For ‘URL’ enter the ‘File URL’ address (mandatory). The address should be initiated with http://.
4.
For ‘File’, click ‘Upload File’ and select the file you wish to upload. The file source should be a PNG file.
5.
To delete the file, click on the clear icon near its name.
6.
Enter ‘Comment’ (optional). Note that this comment will be displayed only in the web portal
7.
Enter the ‘Download to directory’ location to which the files will be downloaded (mandatory).
8.
Click ‘Apply’ when you finish adding all the files.
TO ADD ICONS
1.
Select the ‘Home screen’ tab.
2.
Under ‘Icons, click on the add button
3.
Enter the ‘App ID’ (mandatory).
4.
Enter ‘Comment’ (optional).
5.
Click ‘Add’.
6.
Check the checkbox near the icons that you wish to add.
7.
Click ‘Apply’.
8.
To delete an icon, check the checkbox near its name.
9.
Click on the minus button
to add an icon.
.
10. Click on ‘Delete’.
TO ADD BOOKMARKS / WEB CLIPS
1.
Select the ‘Home screen’ tab.
2.
Under ‘Bookmarks / Web clips’ click on the add button
3.
Enter the bookmark’s name (mandatory).
4.
Enter the bookmark’s URL (mandatory).
5.
Enter ‘Comment’ (optional). Note that this comment will be displayed only in the web portal
6.
Upload a file for the bookmark’s icon (optional).
7.
Click ‘Add’.
8.
Check the checkbox near the icons that you wish to add.
9.
Click ‘Apply’.
to add a bookmark.
10. To delete a bookmark, check the checkbox near its name.
11. Click on the minus button
.
12. Click on ‘Delete’.
PROPERTY OF COMMUNITAKE™ | 2009-2015
104
COMMUNITAKE TECHNOLOGIES LTD.
INTACT USER GUIDE
LAUNCHER
The ‘Launcher’ policy allows you to the lock the use of the device to only specified services.
By default, the launcher will show applications defined via the “Android’s whitelist” module and applications
installed from the internal enterprise catalog.
The device ‘settings’ application will also be only available via the Launcher’s menu.
You can choose to add more common applications:
Phone
Messaging
Email
CommuniTake’s Enterprise Mobility applications (Enterprise Mobility, Secure browser, Secure
messaging and the enterprise store)
TO DEFINE LAUNCHER
1.
Select the ‘Launcher’ tab.
2.
‘Inherit’ is the default state. Change the inheritance status to ‘Adopt’ or ‘Enable’.
3.
Check the Launcher’s checkbox.
4.
Check the desired launcher’s services: Phone; Messages; Email; MDM Applications.
5.
Click ‘Apply’.
PROPERTY OF COMMUNITAKE™ | 2009-2015
105
COMMUNITAKE TECHNOLOGIES LTD.
INTACT USER GUIDE
Once defined, the device holder will be required to complete the action when trying to access device services.
PROPERTY OF COMMUNITAKE™ | 2009-2015
106
COMMUNITAKE TECHNOLOGIES LTD.
INTACT USER GUIDE
8
EXPENSE CONTROL
The Expense Control module allows the user to monitor usage across the enterprise's devices that are enrolled in
the system. Usage monitoring is governed by two factors:
1.
Enterprise's groups as defined in the system.
2.
The usage plans that are defined in the system and that are associated to groups. A device usage will be
examined in accordance to its group's plan.
USAGE PLANS
Usage plans are set in the system by the user.
TO MANGE USAGE PLANS
TO ADD A NEW PLAN
1.
Click on the 'Expense' tab.
2.
Click on the + near the 'Add plan'.
3.
Enter the plan name.
4.
Click 'Submit'.
TO REMOVE AN EXISTING PLAN
1.
Click on the 'Expense' tab.
2.
Click on the “–" (minus sign) near the plan you wish to remove.
3.
Click 'Submit'.
PROPERTY OF COMMUNITAKE™ | 2009-2015
107
COMMUNITAKE TECHNOLOGIES LTD.
INTACT USER GUIDE
TO DEFINE PLAN ATTRIBUTES
You can allocate usage parameters to a new plan or amend usage parameters to an existing plan.
Supported usage parameters by mobile operating system:
Usage Parameter
Android
iOS
Call In (Seconds)
Yes
No
Call Out (Seconds)
Yes
No
Data (KB)
Yes
Yes
SMS Out
Yes
No
Roaming Call in (Seconds)
Yes
No
Roaming Call out (Seconds)
Yes
No
Roaming Data (KB)
Yes
Yes
Roaming SMS out
Yes
No
1.
Select the plan which you wish to define.
2.
Set the timeframe for which you wish to monitor the usage. It can be on a monthly basis or a weekly
basis. For a weekly basis, define the first day of the week.
3.
4.
Define the usage level for each plan parameter:
a.
Call In (Seconds)
b.
Call Out (Seconds)
c.
Data 3G (KB)
d.
SMS Out
e.
Roaming Call in (Seconds)
f.
Roaming Call out (Seconds)
g.
Roaming Data 3G (KB)
h.
Roaming SMS out
Define for each parameter the monitoring mechanism:
a.
'Unlimited' use will not generate monitoring procedure
PROPERTY OF COMMUNITAKE™ | 2009-2015
108
COMMUNITAKE TECHNOLOGIES LTD.
b.
INTACT USER GUIDE
A 'Threshold' defines the percentage of the limit for that parameter by which you wish to
create an alert mechanism. The alert will be performed in accordance to the threshold
percentage and the plan attribute.
5.
Check 'Notify Device on Exception of a Threshold Definition' if you wish the system to generate a
notification to the device holder when the threshold is reached.
6.
Define the 'Message to send to device on threshold exception'
7.
Attach the groups to the plan:
a.
Click on the 'Manage' button the 'Attached Groups' table
b.
Select the groups you wish to attach the plan.
c.
Click 'Done'.
Please note that adding a group does not automatically adds its subgroups. You will be
prompted to select the behavior.
If the selected group is already attached to a different plan, you will be requested to override
the attachment.
8.
Click 'Apply'.
USAGE REPORT
Usage report provides you with an approximate usage view based on the parameters that were set in the usage
plans.
The report provides data for the following parameters:
1.
Device Number (MSISDN).
2.
Device User Name.
3.
Call In (Minutes).
4.
Call In % of defined Usage.
5.
Call Out (Minutes).
6.
Call Out % of defined Usage.
7.
SMSs.
8.
SMSs % of defined Usage.
PROPERTY OF COMMUNITAKE™ | 2009-2015
109
COMMUNITAKE TECHNOLOGIES LTD.
9.
INTACT USER GUIDE
Data (MBs).
10. Data % of defined Usage.
11. Calls In Roaming (minutes).
12. Calls Out Roaming (minutes).
13. SMSs Roaming.
14. Data Roaming (MBs).
The % of usage relates to the parameter level in the price plan.
TO RUN USAGE REPORT
1.
Select the devices group.
2.
Click the 'Expenses' tab.
3.
Click the 'Usage Report' tab.
4.
Select the time period for which you wish to see the usage data.
5.
Click on 'Submit'.
Important
The system presents an approximate usage based on the device's counters. This usage
presentation does not replace the usage calculated by the billing system and cannot be
considered as accurate as the billing system calculations.
The system collects usage once the device in enrolled. It cannot present historic usage data that
has occurred prior to the device enrollment.
PROPERTY OF COMMUNITAKE™ | 2009-2015
110
COMMUNITAKE TECHNOLOGIES LTD.
INTACT USER GUIDE
TO EXPORT USAGE DATA TO EXCEL
1.
Usage data can be exported to an Excel file for further processing.
2.
Select the devices group.
3.
Click the Expenses tab.
4.
Click the Usage Report tab.
5.
Select the time period for which you wish to see the usage data.
6.
Click on Submit. This is a mandatory step prior to exporting.
7.
Click on the Export button.
PROPERTY OF COMMUNITAKE™ | 2009-2015
111
COMMUNITAKE TECHNOLOGIES LTD.
INTACT USER GUIDE
9
SUPPORT
REMOTE SUPPORT
The 'Support' module enables the system user to remotely assume complete control over the mobile device. It
enables technical experts to take over a mobile phone or tablet through an Internet connection, regardless of the
phone’s actual location. After installing a small device client with the active participation of the phone holder, the
system user can remotely view and operate the phone as if he is holding it in his hands, while simultaneously
talking with the device holder.
Remote Support includes the following features:
A fully operational device replica
On-device screen drawing in real time for guiding on "How Do I?" queries
Automated resolution macros for resolving operational problems
Extensive device diagnostics
Device data management for managing device files and content
Operations to manage device applications
Permission solicitation mechanism for device access authorization by device user
A floating replica across other applications /web sites
Remote iOS configuration without complete takeover
Remote iOS screen captures view
Remote access pause due to privacy constraints
Automated reconnect after device restart
One-click screen capture and recording
Textual chat
PROPERTY OF COMMUNITAKE™ | 2009-2015
112
COMMUNITAKE TECHNOLOGIES LTD.
INTACT USER GUIDE
ACTIVATING REMOTE SUPPORT
Activating the remote takeover for a device is performed via the devices table under the 'Fleet' tab.
Once activated, the system launches the remote support module under a new 'Support' tab:
1.
Select the 'Fleet' tab and then the 'Devices' tab below it.
2.
Select the 'Default' view.
3.
Select the device for which you wish to conduct remote takeover.
4.
Click on 'Assist' at the line of the selected device. (You can shift to the Remote Support table view for
an easy access to the remote support request).
5.
The system will deflect you to a new tab where the remote support application will be launched.
6.
If needed, the remote support application will automatically send the support client download SMS to
the target device by the number indicated in the devices table.
7.
Proactively guide the device holder how to install the remote support client.
8.
Once the client is installed and the device holder has approved the terms of use, the remote takeover
will take place.
9.
At the end of the remote support session, disconnect from the device by clicking the disconnect icon in
the remote support application.
PROPERTY OF COMMUNITAKE™ | 2009-2015
113
COMMUNITAKE TECHNOLOGIES LTD.
INTACT USER GUIDE
10
CONFIGURATIONS
The system enables four configuration setting:
1.
Exchange ActiveSync
2.
Wi-Fi
3.
VPN
SETTING CONFIGURATIONS
Setting a configuration is performed using the same flow for all configurations:
1.
Select the 'Configurations' tab.
2.
Select the configuration type out of the options: Exchange ActiveSync; Wi-Fi; iOS restrictions; VPN. The
system indicates the mobile OSs for which the configuration is valid.
3.
Click on the plus icon near the 'Add configuration'.
4.
Define the Configuration name in the 'Add new configuration' box.
5.
Click on 'Submit'.
6.
Define the configuration parameters as presented for the configuration type. Make sure to define the
mandatory parameters marked in *.
7.
Under the 'Attach Groups' click on 'Manage'.
8.
Select the groups for which you wish to deploy the configuration.
9.
Click on 'Apply'.
PROPERTY OF COMMUNITAKE™ | 2009-2015
114
COMMUNITAKE TECHNOLOGIES LTD.
INTACT USER GUIDE
ADDING EXCHANGE ACTIVESYNC CONFIGURATION
For Exchange ActiveSync configuration make sure to define the following mandatory parameters:
1.
Name
2.
Exchange ActiveSync Host
Important
This configuration is supported for the following Android devices: Samsung SAFE, Motorola
EDM, HTC Pro and Sony MDM Version 4.0 and above devices.
ADDING WI-FI CONFIGURATION
For Wi-Fi configuration make sure to define the following mandatory parameters:
1.
Name
2.
Service Set Identifier
PROPERTY OF COMMUNITAKE™ | 2009-2015
115
COMMUNITAKE TECHNOLOGIES LTD.
INTACT USER GUIDE
ADDING VPN CONFIGURATION
For VPN configuration make sure to define the following mandatory parameters:
1.
Name
2.
Server
3.
Account
Important
This configuration is supported for the following Android devices: Samsung SAFE, Motorola
EDM, HTC Pro and Sony MDM Version 4.0 and above devices. For Android 2.2 – 2.3.6
devices, activating the CEM defined VPN connection, is done via the on-device Enterprise
Mobility application, under VPN.
PROPERTY OF COMMUNITAKE™ | 2009-2015
116
COMMUNITAKE TECHNOLOGIES LTD.
INTACT USER GUIDE
11
DEVICE
DEVICE STATUS
The system provides quick device status with the following parameters:
Parameter
Description
Dates
Last seen
The last date in which the device has connected with the application.
Last backup
The last date in which the device has performed data backup.
Policies
Password policy
The device password policy status: 'Success'; 'Not Supported'; 'Pending'; 'Failed''
Required Apps
The device Required Apps policy compliance status: 'Success'; 'Pending'; 'Failed'
violations
Whitelist violations
The device Whitelist policy compliance status: 'Success'; 'Pending'; 'Failed'
Blacklist violations
The device Blacklist policy compliance status: 'Success'; 'Pending'; 'Failed'
Restrictions violations
The device restrictions policy compliance status: 'Success'; 'Pending'; 'Failed'
Configurations
Exchange violations
The device Exchange configuration status: 'OK'; 'Not Supported'; 'Pending'; 'Failed'
Wi-Fi violations
The device Wi-Fi configuration status: 'OK'; 'Not Supported'; 'Pending'; 'Failed'
VPN violations
The VPN configuration status: 'OK'; 'Not Supported'; 'Pending'; 'Failed'
PROPERTY OF COMMUNITAKE™ | 2009-2015
117
COMMUNITAKE TECHNOLOGIES LTD.
INTACT USER GUIDE
The system provides device protection features that allow the enterprise system administrator or the device
holder to resolve lost or stolen device situations. Device protection includes:
Locate the device on a map;
Activate device alarm from afar
Lock the device (with or without a password)
Wipe on-device data
Backup and restore on-device data
The system user can navigate to these features by clicking on the selected device from the devices table under
the 'Fleet' tab.
LOCATE THE DEVICE
There are two ways to locate a device: on map position and via activating its alarm.
Based on your country’s regulation, you may or may not be able to track other users' devices.
LOCATE DEVICE POSITION ON A MAP
1.
Select the group to which the device is assigned.
2.
Click once on the device line in the devices table.
3.
Click on the 'Location' button.
4.
A map with device location indicator will be presented. This is the last known location as perceived by
the system based on the level of accuracy that the device itself achieves (either via GPS location or via
nearest cell location).
5.
Click the 'Update Location' button if you wish to see the device's current location after a time shift.
PROPERTY OF COMMUNITAKE™ | 2009-2015
118
COMMUNITAKE TECHNOLOGIES LTD.
Important
INTACT USER GUIDE
Push notifications in iOS devices do not wakeup the application without the user
consent. If the user doesn’t click on the notification, the action will only be performed
when the device wakes up the app in the background. It may take a while for this to
happen.
LOCATE DEVICE VIA ALARM
1.
Select the group to which the device is assigned.
2.
Click once on the device line in the devices table.
3.
Click on the 'Location' button.
4.
A map with device location indicator will be presented. This is the current location as perceived by the
system.
5.
Click on the 'Sound Alarm' Button for activating an alarm even if the device in on silent.
6.
Click on ‘Send message’ for sending SMS or SMS & Email to the device.
Important
You can activate the device alarm from afar even if the device is set to silent mode.
PROPERTY OF COMMUNITAKE™ | 2009-2015
119
COMMUNITAKE TECHNOLOGIES LTD.
INTACT USER GUIDE
LOCK THE DEVICE
Locking a device from afar will require from the device holder to enter a set password prior to operating it.
Lock device features:
Feature
Description
Lock device
Lock with the current device password (If exists): Locks the device with
the password that was defined
Or,
Set New Password
Set lock password
Defines the password for the lock without activating the lock
Clear on-device password
Clears the on-device password that is used to lock the device
TO LOCK A DEVICE
1.
Select the group to which the device is assigned.
2.
Click once on the device line in the devices table.
3.
Click on the 'Security' button.
4.
Click on the 'Lock Device' Button.
PROPERTY OF COMMUNITAKE™ | 2009-2015
120
COMMUNITAKE TECHNOLOGIES LTD.
INTACT USER GUIDE
You should define a minimum of four (4) characters password on an Android device. Lock
Tip
password is not supported on all mobile operating systems.
When setting a new lock password, the password must be compliant with current password
Important
policy - otherwise it might fail.
WPTO UNLOCK A DEVICE
Unlocking the device is done by the device holder: once activating the locked device, the device holder will be
requested to key-in the unlock password. Entering the password will unlock the device.
Another option is to clear the on-device password thus no password will reside on the device.
WIPE ON-DEVICE DATA
Wipe on-device data has two dimensions:
1.
Choosing the on-device data that should be wiped:
a.
Complete wipe via factory reset
b.
Selective wipe through which the device holder can select to wipe only portions of that data
stored on the device.
2.
Under which conditions will the wipe data function be activated:
a.
Only after a successful backup
b.
Regardless of a successful backup
PROPERTY OF COMMUNITAKE™ | 2009-2015
121
COMMUNITAKE TECHNOLOGIES LTD.
INTACT USER GUIDE
TO ACTIVATE A COMPLETE WIPE
1.
Select the group to which the device is assigned.
2.
Click once on the device line in the devices table.
3.
Click on the 'Security' button.
4.
Check the 'Complete Wipe Factory Reset' checkbox.
5.
Check a backup before wipe checkboxes by your preference. Checking the 'Backup' checkbox will
require a complete successful backup prior to on-device data wipe. Checking 'Wipe regardless of
backup errors' will activate a wipe even if the back was not completed successfully.
6.
Click the 'Wipe Now' button.
Important
Not all the devices support Factory Reset. Factory Reset also deletes the SD card data.
Factory Reset status might not be updated when the device goes through a reset process.
This is driven by the fact that at times, the device reboots before it manages sending back the
reset status.
PROPERTY OF COMMUNITAKE™ | 2009-2015
122
COMMUNITAKE TECHNOLOGIES LTD.
INTACT USER GUIDE
TO ACTIVATE A SELECTIVE WIPE
1.
Select the group to which the device is assigned.
2.
Click once on the device line in the devices table.
3.
Click on the 'Security' button.
4.
Check the data items checkboxes of your choice in the selective wipe area. You can select one or many
of the data items: Contacts; Messages; Image Files; Documents; Movie Files; Music Files; Files on the
SD Card; Call Logs.
5.
Check a backup before wipe checkboxes by your preference. Checking the 'Backup' checkbox will
require a complete successful backup prior to on-device data wipe. Checking 'Wipe regardless of
backup errors' will activate a wipe even if the back was not completed successfully.
6.
Click the 'Wipe Now' button.
PROPERTY OF COMMUNITAKE™ | 2009-2015
123
COMMUNITAKE TECHNOLOGIES LTD.
INTACT USER GUIDE
ENTERPRISE WIPE
Enterprise Wipe allows the system user to delete the on-device Exchange email configuration.
TO WIPE ENTERPRISE DATA
1.
Select the devices group.
2.
Select the required device from the devices table.
3.
Click on the 'Security' tab.
4.
Click on 'Enterprise Wipe'.
5.
You can choose to either delete all the exchange configurations from the device or to selectively define
which email account to delete by providing their email addresses.
Important
iOS devices can only delete Exchange configurations which were created via the 'Exchange
Configuration'.
PROPERTY OF COMMUNITAKE™ | 2009-2015
124
COMMUNITAKE TECHNOLOGIES LTD.
INTACT USER GUIDE
TO ALLOW / BLOCK SECURE CONTAINER ACCESS
1.
Select the devices group.
2.
Select the required device from the devices table.
3.
Click on the 'Security' tab.
4.
Click on 'Secure Container'.
5.
You can choose to either allow or block access to the container or set the access password.
BACKUP ON-DEVICE DATA
TO BACK UP ON-DEVICE DATA
1.
Select the group to which the device is assigned.
2.
Click once on the device line in the devices table.
3.
Click on the 'Backup' tab.
4.
There are two backup alternatives: periodic backup and on-demand backup.
a.
b.
For periodic backup:
i.
Check the 'Enable periodic backup' button.
ii.
Define the 'Backup Intervals' in days.
iii.
Check which data items should be backed-up: Contacts; Messages;
For on-demand backup
i.
Click on the 'Backup' button. The system will back up now the data.
PROPERTY OF COMMUNITAKE™ | 2009-2015
125
COMMUNITAKE TECHNOLOGIES LTD.
INTACT USER GUIDE
TO RESTORE DEVICE DATA
Restoring device data allows you to restore backed up data from one device to another device:
1.
Select the group to which the device is assigned.
2.
Click once on the device line in the devices table.
3.
Click on the 'Backup' tab.
4.
Select the required backup from the 'Available Backups' under Restore Data.
5.
Click on the 'Restore' button. The backed up data will be restored on the device in context.
Restore can generate duplicated Contacts and Messages.
Important
Different devices support different contact attributes. Contacts might be slightly altered and
may lose parameters if restored to a different device.
A user can restore data to a new device. If the user has a new device in the system defined for
him, replacing a previous device, then the restore data procedure can be apply to the new
device thus transforming previous device data to the new device.
EXCHANGE ACTIVESYNC POLICY
Exchange ActiveSync settings enable to block or allow a device to access the Exchange server.
TO MANAGE EXCHANGE ACTIVESYNC POLICY
1.
Click 'ActiveSync Policy'.
2.
If the device is not automatically detected in the Exchange:
a.
Enter the email which is defined on the device and click 'Show devices for this email'.
b.
Select the device from the list
3.
The current status of the device in the Exchange server is displayed
4.
Set a new status by selecting the required status radio button
PROPERTY OF COMMUNITAKE™ | 2009-2015
126
COMMUNITAKE TECHNOLOGIES LTD.
Important
INTACT USER GUIDE
The device must try to connect to the Exchange server at least once before its status
can be set.
If a device has more than one Exchange email account, the status will be set for all
the email accounts.
DIAGNOSTICS
Device diagnostics provides insights on the device' hardware, software and connectivity parameters.
It can provide an initial directive to problems or drivers for malfunctions.
Diagnostics Criteria
Description
Device vendor
Device manufacture name
Device ID
A unique identifier for the device. The device ID is used when
accessing the Enterprise Mobility database and other device
management services.
Device model family
The family of manufacture models to which the device is related
IMEI
The International Mobile Equipment Identity is a unique number
identifying GSM, WCDMA, iDEN and some satellite phones. The IMEI
number is used by the GSM network to identify valid devices.
IMSI
An International Mobile Subscriber Identity is a unique number
associated with all GSM and UMTS network mobile phone users. It is
stored in the SIM inside the phone and is sent by the phone to the
network.
Operating system version
The version of the system that runs the device
PROPERTY OF COMMUNITAKE™ | 2009-2015
127
COMMUNITAKE TECHNOLOGIES LTD.
INTACT USER GUIDE
Screen resolution
The current actual screen resolution on the device
Hardware screen resolution
The maximum screen resolution possible on the device
Rooted
Device status whether rooted
Signal strength
Device’s connection strength
Battery status
Device’s battery charging state
Operator name
The name of the service provider
RAM free memory
The free device’s Random Access Memory (RAM) in which information
can be accessed in any order
User profile
User permission scheme to self-operate the system
Ringtone volume
As is
Network type
The type of wireless network by which the device operates such as
GSM, UMTS etc.
Speaker
An indication whether the speaker is on or off
Speaker volume
As is
UI language
Language used across device’s user interface
MCC | Mobile Country Code
Mobile Country Code (MCC) is used in identifying mobile stations in
wireless telephone networks, particularly GSM and UMTS networks.
An MCC is often combined with a Mobile Network Code in order to
uniquely identify a network operator. The MCC is part of the
International Mobile Subscriber Identity (IMSI) number, which
uniquely identifies a particular subscriber, and is stored on a
removable SIM card.
MNC | Mobile Network Code
A Mobile Network Code (MNC) is used in combination
with a Mobile Country Code (MCC) to uniquely identify
a mobile phone operator/carrier using the GSM, CDMA,
iDEN, TETRA and UMTS public land mobile networks and some
satellite mobile networks.
APN | Access Point Name
Access point name (APN) identifies an IP packet data network (PDN),
that a mobile data user wants to communicate with. An APN consists
of two parts: Network Identifier and Operator Identifier.
Client version
The client version installed on the device allowing the device
management
Cell ID
A GSM Cell ID (CID) is a unique number used to identify each Base
transceiver station (BTS) or sector of a BTS within a Location area code
PROPERTY OF COMMUNITAKE™ | 2009-2015
128
COMMUNITAKE TECHNOLOGIES LTD.
INTACT USER GUIDE
(LAC) if not within a GSM network.
Cell location area code
A "location area" is a set of base stations that are grouped together to
optimize signaling. To each location area, a unique number called a
"location area code" is assigned.
RSSI | Received signal strength
Received signal strength indicator (RSSI) is a measurement of the
indication DB
power present in a received radio signal
Roaming
An indication whether the device in a roaming state
APPLICATIONS
The 'Applications' section presents all the applications that reside on the device.
Selecting a specific application will show its related details such as name, version and location URL.
CATALOG
The recommended applications catalog was defined in the applications policy section. It illustrates the
applications which the business wishes to have on the devices but it does not enforce their presence.
To deploy recommended application on the device
1.
Click on 'Catalog' tab.
2.
Check the applications you wish to install in the device.
3.
Click on 'Send'.
Important
The catalog tab will appear only if recommended applications were defined the device
group and for the device OS.
PROPERTY OF COMMUNITAKE™ | 2009-2015
129