1
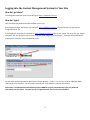
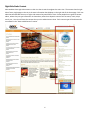
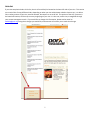
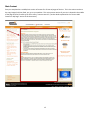
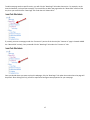
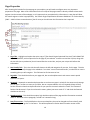
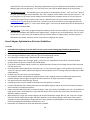
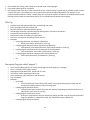
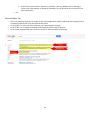
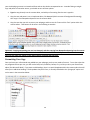
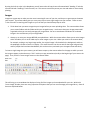
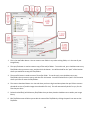
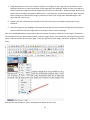
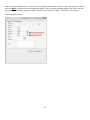
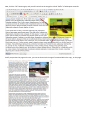
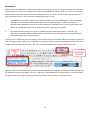
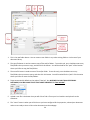
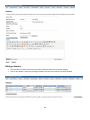
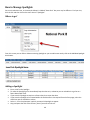
WebAdmin.Pork.Org Content Management Site 2012 This document is the main user manual for use of the WebAdmin.Pork.org content management site. It will be updated on a continual basis as functionality to the WebAdmin.Pork.org site is updated. Your Pork Checkoff At Work Table of Contents Logging into the Content Management System for Your Site ................................................................................................ 4 How do I get there? ............................................................................................................................................................ 4 How do I login? ................................................................................................................................................................... 4 Nomenclature ......................................................................................................................................................................... 5 What are the sections of my site called? ............................................................................................................................ 5 Whole Site Sections......................................................................................................................................................... 5 Home Page Sections........................................................................................................................................................ 9 Internal Page Sections................................................................................................................................................... 12 How to Manage Pages on My Site ........................................................................................................................................ 16 Where to go? .................................................................................................................................................................... 16 Managing Navigation ........................................................................................................................................................ 16 Page Properties ................................................................................................................................................................. 19 Search Engine Optimization & Content Guidelines .......................................................................................................... 20 Content ......................................................................................................................................................................... 20 Title Tag ......................................................................................................................................................................... 21 Description Tag (also called “snippet”) ......................................................................................................................... 21 Keyword Meta Tag ........................................................................................................................................................ 22 How to Add Content on My Page ......................................................................................................................................... 23 The Content Editor ............................................................................................................................................................ 23 Copying Content from Other Sources ............................................................................................................................... 23 Formatting Your Copy ....................................................................................................................................................... 24 Images ............................................................................................................................................................................... 25 Documents ........................................................................................................................................................................ 33 How to Manage Homepage Features ................................................................................................................................... 36 1 Where to go? .................................................................................................................................................................... 36 Adding a Feature ............................................................................................................................................................... 37 Editing a Feature ............................................................................................................................................................... 38 Adding a Featured Recipe using the Recipe Picker ........................................................................................................... 39 How to Manage Spotlights.................................................................................................................................................... 40 Where to go? .................................................................................................................................................................... 40 Adding a Spotlight ............................................................................................................................................................. 40 Editing a Spotlight ............................................................................................................................................................. 41 How to Manage Flex Tabs ..................................................................................................................................................... 42 Where to go? .................................................................................................................................................................... 42 Adding a Flex Tab .............................................................................................................................................................. 42 Editing a Flex Tab .............................................................................................................................................................. 43 Scheduling/Expiring: Pages, Content, Features, Spotlights and Flex Tabs ........................................................................... 45 How to Manage Online Calendar .......................................................................................................................................... 46 Where to go? .................................................................................................................................................................... 46 Adding a New Calendar Item ............................................................................................................................................ 47 Editing Existing Calendar Items ......................................................................................................................................... 48 What if I Accidentally Delete Something? ............................................................................................................................ 49 What if I Need Help? ............................................................................................................................................................. 50 Online Support .................................................................................................................................................................. 50 Email Support .................................................................................................................................................................... 50 Phone Support .................................................................................................................................................................. 50 Advanced Topics – more information coming soon ............................................................................................................. 51 Image Galleries.................................................................................................................................................................. 51 Advanced Search Information .......................................................................................................................................... 51 RSS Feeds .......................................................................................................................................................................... 51 2 Parent Child Lists ............................................................................................................................................................... 51 Audio Files ......................................................................................................................................................................... 51 Videos................................................................................................................................................................................ 51 Anchor Tags....................................................................................................................................................................... 51 Adding a Link to “Download” a Photo or Document ........................................................................................................ 51 Reports that Users will Receive ............................................................................................................................................ 52 Google Analytics................................................................................................................................................................ 52 AddThis.com Reports ........................................................................................................................................................ 52 3 Logging into the Content Management System for Your Site How do I get there? To manage the content for your site you will go to https://webadmin.pork.org. How do I login? Your username and password should have been sent to you. If you forget your login information, you can go to https://webadmin.pork.org. Click the “Home” link and click the “Forgot Password” link. If you forget your username, first browse to https://webadmin.pork.org. Click on the “Home” link, then click the “Forgot Username” link. On the next screen there is a link that reads “Forgot your User Name?”. Click that link and follow the instructions to have your username emailed to you. You may also call the National Pork Board Service Center Monday – Friday, 7 a.m. to 5 p.m. (CST) at 1-800-456-PORK (7675) to get your username. You will need to provide your email address in order to retrieve this. Please Note: The National Pork Board Service Center CANNOT see your password and/or give you password information over the phone. You must use the “Forgot Password” link to reset your password. 4 Nomenclature What are the sections of my site called? Each website is comprised of different “sections.” Some of the sections/functionality may not be present on your site. If any of them are NOT on your site, and you would like to incorporate them into your site, please send an email to [email protected], and someone will work with you to get them added in. The pork.org site will be used in many of the below examples. Whole Site Sections Top/Main Navigation The top or main navigation section of your site is the navigation is that is shown throughout your entire site. These are the main categories of content on your site. The top/main navigation of the pork.org site is circled below. Yours will be similar. At this time, you cannot edit this portion of your site without assistance from National Pork Board. If you’d like to change this top level navigation, please email [email protected], and someone will contact you about the changes. Footer The footer of your site is the content at the very bottom of your site. This is where you will have links to your site’s privacy policy, sitemap, as well as other general links. The footer is also where we most generally put your copyright statement. This content is displayed across the entire site, on every page, and also cannot be changed without assistance from National Pork Board. Please send a message to [email protected] if you would like to have any information added or removed from this section of your site. 5 Right Side Static Content Most websites have right side content on their site that is static throughout the entire site. That means that the right side of every single page on the site is the same information that displays on the right side of the home page. Each site administration decides what sort of right side content they would like to have. Some people have a general content editor, where they can type information in themselves; others have dynamic content such as events, news, recipe search, etc. Your site will have the content that your site administrator chose. Each content type will be discussed in more detail in the “How to Add Content” section. 6 Links List If your site template includes a links list, then it will most likely be located at the lower left side of your site. This section can contain links of many different kinds, depending on what your site administrator asked to have set up. It is able to link to other portions of your site, external websites, documents or an email link. This portion of the site, if present in the lower left location, will show up on every single page of your site. It is also not, at this time, manageable through your content management tools. If you would like to change this information, please send an email to [email protected] listing what changes you would like, and someone will contact you to make that change. 02 7 Flex Tabs If your site template includes flex tabs, they will most likely be located at the bottom right side of your site. These are completely manageable by your website administrator, through the webadmin.pork.org site. This section of the site includes three tabbed content items that can link to a photo and one or two links. The links can be to external sites, a page within your site or any other web link. This section will be visible on every page of your site. Quick Links If your site template includes quick links, they will normally be located at the top of your site within the header of the site. This section of the site will be visible on every single page. These items can be quick links to anything you choose and include a small icon to represent each link. At the current time, these are not manageable within the webadmin site. If you have a need to change them, please email [email protected] with a description of your changes. 8 Home Page Sections Feature Rotator If your site template includes a feature rotator, it will be normally located at the top/center of the home page of your site. This section is only visible on the home page of your website. The items within this feature rotator are completely configurable through the webadmin.pork.org content management site. You may configure these items to go live immediately, or schedule them to go live in the future. You may also choose recipes from the PorkBeInspired.com recipe database to display in the feature rotator. At this time, there may only be three features, no more and no less. 9 Spotlights If your site template includes spotlights, then those will normally be displayed under the feature rotator on the home page of your site. This section is only visible on the home page of your website. The items within this spotlight section of the site are completely configurable through the webadmin.pork.org content management site. You may configure these items to go live immediately, or schedule them to go live in the future. At this time, the maximum number of spotlights that you may have at one time is three, you may choose not to fill all of your spotlights, if you choose, but that could cause some display issues depending on how you configure them. 10 Left Side Content Every site template allows for a “left content” section on the home page of the website. There are many different choices for the type of content that is displayed in this section such as news releases, events, generic content control or recipe search. 11 Internal Page Sections Left Side Navigation After clicking one of the main/top navigation links, you will be transitioned to that “section” of your website. Under each main/top section of the site, will be left side navigation. This means that each “section” can be divided into “subsections” and these sub-sections are listed on the left side of the site. At this time, left side navigation can be three levels deep. The PorkRetail.org site shows a good example of the three levels of navigation that the Checkoff sites support: 12 Right Side Section Specific Content Some site templates, that are not configured to have “right side static content” [S.M.E. LINK TO THAT SECTION], have what is called “right side section specific content.” The pork.org site shows a good example of how this works. If you click on the main/top navigation, into each of the sections of the site, you will notice that the right side of the site changes with each section and is not the same as the home page right side section of the website. There are many different choices for the type of content that is displayed in this section such as news releases, events, generic content control or recipe search. 13 14 Main Content Every site template has a middle/main section of content for all internal pages of the site. This is the main area where the copy,images,links,lists,feeds, etc. go on your website. This main content section of your site is located in the middle of the page and can be made up of one to many “content controls” ( further details explained in the “How to Add Content on My Page” section of this document). 15 How to Manage Pages on My Site Where to go? To add a new page and/or edit existing pages on your website, you will start by logging into https://webadmin.pork.org with your unique username and password, and then navigating to the “Page Administration” menu item under the site that you would like the new page located (some users may manage more than one site). Managing Navigation After clicking the “Page Administration” menu item, you will see what is called a “tree-view” of the structure of your site. At this point, you must decide where this new page, that you wish to create, will be located. The tree-view defaults to having all the pages of your site collapsed, but you can click the plus “ section of your site to see the pages contained within that section. 16 ” sign next to each main/top navigation To add a new page under a specific section, you will click the “New Page” link under that section. For example, on the Iowa Pork website, in the previous example, if you would like to add a new page under the “About IPPA” section of the site, then you would click the “New Page” link under the title “About IPPA.” If, instead, you want a new page under the “Contact Us” portion of the the site (the “Contact Us” page is located UNDER the “About IPPA” section), then you would click the “New Page” link under the “Contact Us” title. Once you decide where you want to place this webpage, click the “New Page” link under the section where the page will be placed. After clicking this link, you will be required to configure some properties for your new page. 17 If you are editing an EXISTING page, you will find the page title within the tree-view list of all the pages of your site, and click the link to that page that you wish to edit. You will then be taken directly to the “main content area” tab, to manage the content of that existing page. 18 Page Properties After choosing the location for the new page on your website, you will need to configure some very important properties of the page. Most of the information on the first step of the page creation is directly related to how search engines view the content of the webpage, so it’s important that you optimize this information in a way that will allow the search engines to index it appropriately. See “Search Engine Optimization & Content Guidelines” for further details, [S.M.E. – Add link here to named section], but for now you should enter the information that is required. 1. Page Title – Highlight and replace the entire copy of “[Put Search Engine Optimized Text Here]” INCLUDING THE SQUARE BRACKETS, with a unique title for this page of your website. Leave the vertical bar in place, along with the site URL (test or production) that is located after the vertical bar, and put your unique title before that information. 2. Nav Friendly Title – This is the title that will show on the left side navigation of your site, for this page. This title is also used to identify the page in the webadmin “tree-view” control mentioned earlier, so make sure to name it something that you will recognize. This field must be 50 characters or less. 3. Page URL – This should be similar to your page title, but must be alphanumeric and cannot contain special characters or spaces. 4. Keywords – Keywords are words and phrases that an end user may type in to look for the content on that page. You can type in as few or as many as you’d like, but our recommendation is 3 to 5 keywords (there will be a further discussion about how keywords relate to your specific site search where the “Rank” and “Featured” fields will be discussed. If you do not know this means, please just enter arank of “1” and check the featured checkbox at this time). 5. MetaDescription – This should be a unique, high-level description of the page and the information contained within it. Should be a short paragraph, around 2 to 3 sentences long. 6. Date/Time to Post – This field defaults to the current date/time, but can be changed to a future date if you’d like for the page to “go live” in the future. This will be explained in further detail in another section of this 19 manual [S.M.E. link to section here]. Normally, people leave the “go live” date/time as the default, as they are adding a page to go live right away. So, if you aren’t sure, just leave the default date/time in this property. 7. Page Navigation Level – The dropdown gives you choices of “Do Not Display in Nav”, “Left” and “Top.” Most of the time, your new pages will be viewable in the “Left” navigation of the section of the site that they are in. Top level navigation is only used if you are adding a brand new top/main navigation section to your site (you can configure the pages/content in that section, but can’t add the actual link to that section without contacting [email protected] and asking for assistance). Sometimes you have the need to create a page that does not display in the left navigation; i.e. all the news release pages. In this case you would select the “Do Not Display in Nav” option in the drop down. 8. Security Level – If your site is programmed with the ability to show content for different “roles” of users on your site, then this dropdown will populate with “Regular (http)”, along with a list of all the different “roles” of users on your site. For most users, this dropdown will only have the option of “Regular (http)” and this property is defaulted to this option, therefore you will rarely have to change/set this option. Search Engine Optimization & Content Guidelines Content: Remember that each page (or at the VERY least every main section landing page) should be optimized for a certain keyword(s)/keyword phrase(s) with search engine/keyword optimized content. Optimize content for your chosen keyword targets (keyword density tools can be helpful). Every web page should be unique, make sure you are not duplicating content. Try to keep your content length “above the fold” whenever possible. Include visual “helpers”such as images, graphs, .pdf’s, links, etc. Upload them to the server, and refer to them textually within the location in which they should appear. If you’d like a visual helper and do not have one, please describe the nature of the image that you’d like so that we can find one for you. Understand the actual keywords your customers use; i.e. if you want your page to come up when users search for “swine flu” then you need to optimize the page for those keywords, even if it’s letting customers know that it’s NOT called swine flu. Do what’s best for your users, not search engines. Use headlines, bullets and subheads as opportunities to “hide” keywords (these are called search engine power positions because search engines recognize that these words are of higher importance on a page). Use alternate forms of keywords (e.g. plurals). Compelling content on your website is essential to attracting visitors to the site. Content should be dynamic. Identify areas that you will update regularly and put those front and center; keep the static contentin less important locations. Keep in mind that web surfers don’t necessarily always “read” your content. Scannable text is vital. Use headlines to break up the article. Use bulleted lists. Long, unbroken blocks of text tend to turn away visitors because they are difficult to read on a monitor. When possible, try to get your content length to be at least 250 words or longer. But not “too” long. Don’t stretch content to fit this requirement though. Ask these questions: Have I said everything I could? Have I overcome all objections? Is the keyword/phrase usage seamless? Have I placed my keyword/phrase in the search engine power positions (headings, titles/headlines, bulleted lists, etc.)? Remember your audience. Be short and sweet when possible. 20 Don’t inflate your writing, keep it down to earth and avoid “sales language.” Copy needs specific goals to accomplish. Don’t forget to link internally to other sections of the site, internal linking is a great way to promote content in other sections of the site. The technique is a very important part of search engine optimization. For example, if you mention PQA Plus under the “News” section, make sure you link the mention of PQA Plus in the News section to the PQA Plus section under the Certification section. This is viewed favorably within search engines. Title Tag • • • • • • • • Provides some SEO spell out SEO value, provides high user value Every web page must have a unique title 60 to 65 characters maximum (includes spaces) Include target keywords, separate keywords with hyphens, commas or vertical bars Lead with the most important keyword first End title with name of company or organization After that, put common misspellings if there are any Examples: o Home page (Keyword: Pork Industry Information) Home, Pork Industry Information | Pork.org o Landing Page for Research section (Keyword: Pork Research) Pork Research, Pork Industry Research, Pork Science Research | Pork.org o Landing Page for Certification Section (Keyword: Pork Certifications) Pork Certifications, Pork Industry Certifications | Pork.org o Landing Page for Resources (Keyword: Pork Industry Resources) Pork Industry Resources, Pork Resources | Pork.org o Etc… Description Tag (also called “snippet”) • • • • • • • Users read this description on the search results pages of search engines (i.e. Google) This is a summary of the page’s content Language should be descriptive, include call‐to‐action Use same or similar target keywords as title Use as advertising copy: informative and persuasive 2 to 3 sentences Examples : o Home Page If you are looking for Pork Industry Information, pork.org has everything you need. Your #1 resource for breaking industry news of all things pork. o Landing Page for Research Section Looking for the latest research within the pork industry? Searching for historical research on a swine topic? Find it here on pork.org. o Landing Page for Certification Section Show your commitment to the pork industry by getting certified in one of the pork certification programs. Whether it is PQA Plus or TQA, your certification makes a difference. o Landing Page for Resources Section 21 o Find all of your pork industry resources in one place – pork.org. Whether you’re planning a career in the swine industry or looking for factsheets, you can find all of your resources for the pork industry here. Etc… Keyword Meta Tag • • • • This is not extremely important any longer for the main Google Search Results (and other search engines), but it is extremely important for your own personal site search. List AT LEAST 2 or 3 versions of the keywords you’re optimizing for the page. List AT LEAST 2 to 3 frequent misspellings of the keywords you’re trying to optimize. List any other keywords that users may use to search for the information on that page. 22 How to Add Content on My Page The Content Editor The tool that you will use most frequently throughout the webadmin.pork.org site will most likely be the content editor. The content editor looks a lot like any other text editor (Microsoft Word, for example), so it should be familiar to most people. This is the location where you will manage several types of content that you want displayed your website including copy, images, links, documents, tables, etc. When you first edit a blank page, the content editor page will look like this: Copying Content from Other Sources One important rule when using any online content management system is that you should not copy formatted text from Microsoft Word or other web pages and electronic documents and directly paste them into your new site. When you do this, you inadvertently copy background/hidden formatting from the original source into your website. This pasted text will cause all of the formatting and styling that is programmed into your site to be overwritten. This leads to 23 your site displaying content in mismatched fonts and can also lead to unexpected errors. Instead of doing a straight copy and paste from another source, you should use one of three options: 1. Type the copy directly into the content editor, and add your formatting after the text is typed in. 2. Copy the text and paste it into a simple text editor, like Notepad (which removes all background formatting), then copy it from Notepad and paste it into the content editor. 3. Copy the text that you wish to put on your webpage, and then use the “Paste as Plain Text” option within the content editor. That button can be seen in the following screenshot. Option #2 – Copying and pasting your text into Notepad, and then copying from Notepad and pasting into the content editor is the SINGLE BEST WAY TO COPY YOUR CONTENT FROM Microsoft Word. If you ever have issues formatting your text any other way, please try this option before contacting the help desk. Formatting Your Copy Once you have your unformatted copy added into your webpage, you then may need to format it. To use the styles that are programmed into your site, you will use the bold, italic, underline, bullets, etc. just like you do in your favorite text editor (like Microsoft Word). If you want to add headings, there is a special dropdown within the content editor that will allow you to add these headings. The dropdown that you will use, is normally defaulted to the “paragraph” option and can be seen in the screenshot below: 24 By using the built in styles in this dropdown, you will ensure that all copy that are formatted with “Heading 1” look the same and all with “Heading 2” look the same, etc. This ensures consistency across your site and makes it more visually pleasing. Images Images are a great way to make your site more interesting for users of your site, and they are a great way to showcase your content. The content editor gives you a very easy way to insert single images into your content. There are two “rules of thumb” for working with images on your site that you should always keep in mind: 1. Think about how you want to organize your images before you start uploading them. The content editor allows you to create folders and sub-folders within your image directory. Use these to keep your image content wellorganized so that you can easily manage your image assets. Do not to save dozens and dozens of unrelated images in the root directory of your image folder. 2. Always try to resize your images BEFORE you upload them. While the content editor allows you to resize images within the editor, this is not an ideal way to resize images on your site. When you resize in the content editor, for example, making a very large image smaller, the original image is first loaded in the background, and then the webpage is forced to resize it on display. This means that the user has to wait for the larger image to load, and for people that have lower bandwidths, this can be an issue, and make your site appear slow and clunky. To insert a single image into your content, you will want to open up the content editor for the page on which you wish the image to appear, and make sure to “click” inside your copy somewhere (usually at the beginning of your text on the page). Then, click the “Insert Image” button on the content editor. This will bring up a new window that displays a listing of all the images you have uploaded for your site. Within this “Insert Image” window, there are many properties and options that you can use to manage your image library. Some of these are explained below: 25 1. This is the new folder button. You can create a new folder in any other existing folder, or in the root of your image library. 2. The copy file button is used to create a copy of files and/or folders. To use this tool, put a checkbox next to any files/folders that you want to copy, and then click this button. You will be asked for the “path” of the location where you would like to copy the files/folders. 3. The move file button is used to move a file and/or folder. To use this tool, put a checkbox next to any files/folders that you want to move, and then click this button. You will be asked for the “path” of the location where you’d like to move the files/folders. 4. The create a thumbnail button is a nice tool when you have a high resolution photo that you’d like to create a thumbnail version of (smaller image size and smaller file size). This will automatically do this for you, for the files that you select. 5. Delete checked file(s) will delete any files/folders that you have placed a checkbox next to within your image library. 6. Edit file/folder name will allow you to edit the name of the file/folder by clicking the pencil icon next to that file/folder. 26 7. Image layout options are a series of options that you can configure for the image that you are about to insert. Alignment allows you to control the position of the image within the webpage. Border size lets you configure a border around your image and set how large that border will be and what color. Width and height allows you to specify that your image is displayed at a different size. If you leave the “Constrain Proportions” option checked, when resizing, then it will keep the image in proportion to itself if you change either width OR height; it will adjust the over value for you. 8. Upload a new file is the button that you will click to find a file on your local machine and upload it to the webserver. 9. Insert the image into your webpage is the button that you will click once you have configured all the properties that you would like with your image and are now ready to insert it into the webpage. After you have decided where you would like to place your photo, and you’ve clicked the “insert image” link and have set the properties for your photo and clicked the “insert the image” button, you may want to edit the positioning of your photo a little more within the text of your page. To do this, right click on your image, and choose “Properties” from the menu. After you click the “Properties” option, a dialog box will display on the screen. 27 There are three tabs on the dialog box that is displayed. The first one that you can see is titled “Image.” On this tab, you can change the image that is displayed, by clicking the “Browse” button (if you’d like to switch the current image with a different one in your image library), then the other important areas are the “Layout” area and the “Spacing” area. The screenshot below, explains each section. 28 The second tab, titled “General” also provides some useful properties for you to set, if you wish, to position your image within the text of your webpage. The two most used attributes on this tab are the “Text-align” and “Float” attributes (“Alignment” can also be used, but is an “older” attribute that may be inconsistent across some browsers). “Text-align” allows you to align the text that is surrounding the image, the choices are shown below: “Float” allows you to float the image within the copy on the page, and can be used to gain a similar effect as the “Textalign” attribute. The only options for the “Float” attribute are left and right: We also provide two Css Classes for you to use: imageLeft imageRight If you insert one of these classes into the “Css Class” attribute area of the “General” tab, then it will automatically put white space around your image. The imageLeft class is for images that you wish to place on the left side of your copy/text and the imageRight class is for images that you wish to place on the right side of your copy/text. So, let’s run through an example. If we insert an image into our copy, and place it as the first element on the page (at the beginning of the copy), the image and copy would look a lot like the below screenshot, in the content editor. 29 Now, let’s set the properties for this image so that it is aligned, within the text and to the right of the page copy. We can do this by RIGHT clicking the photo and selecting properties. After the properties dialog appears, click on the “General” tab and set the “Text-align” attribute to “Right” and the “Float” attribute to “Right”. Then click the “OK” button. See the screenshot below: 30 After you click “OK” you can see that the image is now displayed to the right of the copy/text and that the text nicely wraps the image. If you want some more white space around the image, so that the text doesn’t bump up against the image so closely, right click on the image again, and click the “Properties” menu item. Then set the horizontal and vertical spacing property with 5 or more as the value (this value is measured in pixels, not inches). 31 Now, click the “OK” button again, and you will notice that the image has a little “buffer” of whitespace around it. And if you preview this page on the site, you can see how nice the image is formatted within the copy , on the page: 32 Documents Linking to electronic documents is a great way to enhance the relevancy of your site content and make your site more interesting for users of your site. Electronic documents can add additional content, quickly, to your site. The content editor gives you a very easy way to insert links to documents into your content. There are two “rules of thumb” for working with documents on your site that you should always keep in mind: 1. Think about how you want to organize your documents before you start uploading them. The content editor allows you to create folders and sub-folders within your documents directory. Use these to keep your documents well-organized so that you can easily manage your documents assets. Do not to save dozens and dozens of unrelated documents in the root directory of your document library folder. 2. If possible (and when another file type is not needed) save your documents as PDF’s. This allows your documents to be downloaded by a wider audience. The PDF format is normally a more compressed file type, making downloads faster for your web user. To insert a link to a document into your content, you will want to open up the content editor for the page on which you wish the image to appear. Make sure to “highlight” the word(s) within your copy that you would like for the web user to be able to click and open the document. Then, click the “Downloadable Files” button on the content editor. When you click the “Downloadable Files” button, the Downloadable Files dialog box will be displayed with a listing of all the documents you have uploaded for your site. Within this “Downloadable Files” window, there are many properties and options that you can use to manage your document library. Some of these are explained below: 33 1. This is the new folder button. You can create a new folder in any other existing folder or in the root of your document library. 2. The copy file button is used to create a copy of files and/or folders. To use this tool, put a checkbox next to any files/folders that you want to copy, and then click this button. You will be asked for the “path” of the location where you’d like to copy the files/folders. 3. The move file button is used to move a file and/or folder. To use this tool, put a checkbox next to any files/folders that you want to move, and then click this button. You will be asked for the “path” of the location where you’d like to move the files/folders. 4. Target automatically defaults to the value of “Not Set”, but ANYTIME YOU LINK TO AN ELECTRONIC DOCUMENT, YOU WILL WANT TO SET THIS TARGET PROPERTY TO “New window”. 5. Upload a new file is the button that you will click to find a file on your local machine and upload it to the webserver. 6. The “Insert” button is what you will click once you have configured all the properties, selected your document and are now ready to insert a link to that document into the webpage. 34 Once you click the “Insert” button, your screen will return to your content within the content editor, and you should see that the text that you highlighted will now be “clickable” on the page. You can tell this because the text will change to a blue color and be underlined (the typical “look” of hyperlinks). 35 How to Manage Homepage Features Where to go? Go to main website menu, in the example below it is labeled “State Sites” but yours may be different. Find your site, click the link and then click on the menu item of “Features.” 36 From this screen you can Edit or Delete an existing Feature content, or you can add a new one by clicking on the Add New Feature Item button. Adding a Feature Enter a title; this will appear within the box on the right. To make the Feature go live immediately, keep the date as is, otherwise you can schedule it to go live at a future date and/or time. If you want the feature to expire at a future date, then enter that date. If you want to add the feature but not make it active yet, then uncheck the Active checkbox. Select 1 – 3 in which you want this feature to appear. Copy and paste the URL of the full story here if you want to link to it. If you want the link to use the same window, choose Same Browser Tab, otherwise choose New Browser Tab. The image is what is shown to the left of the feature title; the image must be 300x300. If the image is on your computer, click the Browse button, select the image and then click Upload Image. If the image is already on the server, click Use an Existing Image and select the image you want. In the text box at the bottom, enter a brief description of what the feature is about. You can use the controls on the toolbars to format the text if you choose to. Once all the information is entered, click Save and then click Publish on the next screen. 37 Editing a Feature Click the Edit link next to the Feature you want to Edit and make the necessary changes. You can also delete a Feature by clicking the Delete link next to the Feature you want deleted. 38 Adding a Featured Recipe using the Recipe Picker You also have the option to search Recipes if you want to add a recipe as a feature. 39 How to Manage Spotlights Go to main website menu, in the example below it is labeled “State Sites” but yours may be different. Find your site, click the link and then click on the menu item of “Spotlights.” Where to go? From this screen you can Edit or Delete an existing Spotlight or you can add a new one by click on the Add New Spotlight Item button. Adding a Spotlight Enter a title for the Spotlight. To make the Spotlight go live immediately keep the date as is, otherwise you can schedule it to go live at a future date and/or time. If you want the Spotlight to expire at a future date, then enter that date. If you want the Spotlight to be viewed within the Archive after it has expired from the front page, select the check box next to Viewable in Archive. Select 1 – 3 for the placement in which you want this Spotlight to appear. Copy and paste the URL of the full story here if you want to link to it. 40 Enter the text of the link for the full story, i.e. Click Here for Full Story. If you want the link to use the same window, choose Same Browser Tab, otherwise choose New Browser Tab. In the text box at the bottom, enter a brief description of what the Spotlight is about. You can use the controls on the toolbars to format the text if you choose to. Once all the information is entered, click Save and then click Publish on the next screen. Editing a Spotlight Click the Edit link next to the Spotlight you want to Edit and make the necessary changes. You can also delete a Spotlight by clicking the Delete link next to the Spotlight you want deleted. 41 How to Manage Flex Tabs Go to main website menu, in the example below it is labeled “State Sites” but yours may be different. Find your site, click the link and then click on the menu item of “Flex Tabs.” Where to go? From this screen you can Edit or Delete an existing Flex Tab or you can add a new one by click on the Add New Flex Tab Item button. Adding a Flex Tab Enter a title, which will appear on the tab. Titles must be 8 characters or less. To make the Flex Tab go live immediately, keep the date as is, otherwise you can schedule it to go live at a future date. If you want the Flex Tab to expire at a future date, then enter that date. If you want to add the Flex Tab but not make it active yet, then uncheck the Active checkbox. Select 1 – 3 in which position you want this flex tab to appear. Copy and paste the URL of the full story here if you want to link to it. Enter the text that you want the link to the full story to say. 42 If you want the link to use the same window, choose Same Browser Tab, otherwise choose New Browser Tab. The image is what is shown in the box below the tab; the image must be 190x100. If the image is on your computer, click the Browse button, select the image and then click Upload Image. If the image is already on the server, click Use an Existing Image and select the image you want. If you want to create a second link, i.e Read More, then enter the URL to that page. Enter the text that you want the link to the similar story to say. If you want the link to use the same window, choose Same Browser Tab, otherwise choose New Browser Tab. Once all the information is entered, click Save and then click Publish on the next screen. Editing a Flex Tab Click the Edit link next to the Flex Tab you want to Edit and make the necessary changes. You can also delete a Flex Tab by clicking the Delete link next to the Flex Tab you want deleted. 43 44 Scheduling/Expiring: Pages, Content, Features, Spotlights and Flex Tabs Throughout your site, you can schedule different pieces of information to go live in the future and/or you can schedule pieces of information to expire on a date/time within the future. On your homepage, you can schedule/expire features, spotlights, flex tabs and if you have any “content items” on your front page (areas that you manage the content that displays and it’s not an automatic feed). Within your site, you can schedule both PAGES and the CONTENT that is displayed on those pages. If you see a field that is labeled “Date/Time to Post,” then you can schedule that item to go live in the future. For example, within the Features, you can see the “Date/Time to Post” field below. This means that you can set aside some time each week/month and plan your features for the future including which dates they will go live, and then sit down and schedule them to go live throughout the coming weeks. This will greatly increase your ability to keep your site updated and dynamic, but at the same time be able to work on your site when it fits into your schedule. The “Expiratin Date” works similarly. If you have information on your site, whether it’s a page or content within a page, that you only want displayed for a specific amount of time, and then you would like for that information to cease to display on the site on a certain date, you can set the date for the expiration of that content. For example, within the Featues, you can see the “Expiration Date” below. Items that are scheduled to expire, will expire at midnight on the date you choose. 45 How to Manage Online Calendar Where to Go? Go to main website menu, in the example below it is labeled “State Sites” but yours may be different. Find your site, and click the link, and then click on the menu item of “Calendar.” Your site’s calendar will be displayed on the screeen. The events that you’ve previously added will be at the top of the screen, an area for you to add new items will be in the middle section of the screen and an option to delete expired items will display at the bottom of the screen. 46 Adding a New Calendar Item There are several properties that you can set when you add a new calendar item to your site’s calendar. 1. Start Date/Time – you can set the start date and time for your event. 2. End Date/Time – you can set the end date and time for your event. 3. Show event time when viewed in full detail – if you place a checkmark in this box, then the events begin and end time will show on the calendar item online. If you do not place a checkmark in this box, then only the dates are displayed. 4. Short description will be the “title” that is displayed on the calendar, while the Long Description will be the extra information that online users see when they view all the details of the calendar items. 5. Location is available for you to specify the exact location of the calendar event. Please Note: All of the National Pork Board events will be pre-populated on your state’s calendar, in a different color than your state’s events, so you do not need to populate the national events. 47 Editing Existing Calendar Items If you need to edit an existing calendar item, click the “edit” link next to that item in the list of items. When you click the “Edit” link, the calendar item details will populate in the form fields below the item, and you will notice that the label changes from “New Event” to the name of the event. In this case, “Swine Ventilation Workshop.” 48 What if I accidentally delete something? There is no automatic way to recover something that has been deleted on your site. We are working on tools to allow this, but for now, please email [email protected] with the link to your page and as much information as you can give us, and someone will contact you within one business day to attempt to recover your missing content. Please Note: THERE IS NO GUARANTEE THAT WE CAN RECOVER ACCIDENTALLY DELETED CONTENT. Please delete with care. 49 What if I need help? Online Support Most answers to your questions can be found in the online user manual, located by clicking the “Help Menu” link on the top right side of the webadmin site: Once you click that link, you will see a box display that says “General Help Document”. This is the link to the document that you are reading right now. Email Support If you cannot find the answer to your question in the online help manual, you can email: [email protected] And someone should respond to your request within one business day. Phone Support You may also call the National Pork Board Service Center Monday – Friday, 7 a.m. to 5 p.m. (CST) at 1-800-456-PORK (7675) to get assitance with your site. They will either help you right away or direct you to the appropriate person. 50 Advanced Topics – more information coming soon Image Galleries Creating links on the site to the galleries Add/Edit/Deleting of photos Advanced Search Information RSS Feeds Directions: Main Webadmin Menu, RSS item – Add new feed On the “parent” page Add a control of type RSSList AND o Click on the RSS Feed tab and check the “Auto-Add my children to the RSS Feed:” and choose the feed you created in step one. o Add “children” pages under the parent. Parent Child Lists Audio Files Videos Anchor Tags Adding a link to “download” a photo or document 51 Reports that Users will receive Google Analytics AddThis.com reports 52