1
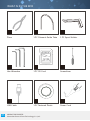
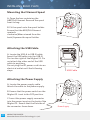
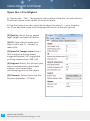
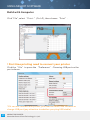
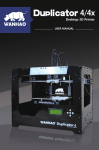
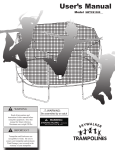
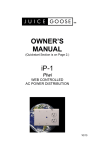
Migbot S1 Desktop 3D Printer USER MANUAL MIGBOT ® Made in China [email protected] +86-755-66604440 www.migbot.com ShenZhen Eternal Feat Technology Co.,Ltd. Migbot S1 USER MANUAL 3D Printer—May Dreams Come True D o m i n a t e d b y p r of e s s i o n a l R & D g r o u p , S h e n z h e n E t e r n a l F e a t Te c h . C o . , L t d . e x t e n d s i t s b u s i n e s s a l l o v e r t h e w o r l d t o provide all-dimensional rapid prototyping solution. Within o n e y e a r ’s R & D a n d p r o d u c t i o n , M i g b o t h a s a c c u m u l a t e d a b u n d a n t p r o d u c t s ’e x p e r i e n c e , b e c o m i n g t h e c a p i t a l 3 D p r i n t e r p r of e s s i o n a l m a n u f a c t u r e r i n A s i a n - Pa c i f i c r e g i o n , selling products to more than 30 countries and regions. ETRNAL FEAT We h a v e w e n t t h r o u g h m a n y i n t e r n a t i o n a l c e r t i f i c a t i o n l i ke : C E , F CC , R O H S . A n d w e a r e a p p l y i n g f o r a n u m b e r of p r o d u c t p a t e n t s a s w e l l . We c a n p r o v i d e y o u O E M / O D M a n d s i n c e r e l y invite you to join us! call: +86-755-66604440 Building C, East Zone NO.1 Shangxue Industrial Area Longgang District, Shenzhen City,China. 3D Printer Produces 3D Printer OEM/ODM SLA/DLP Photocuring 3D Printer Filament Processing TABLEOFCONTENTS A WELCOME LET’S GET STARTED Specifications. . . . . . . . . . . . . . . . . . . . . . . . . . . . . . . . . . . . . . . . . . . . . . . . . . 04 How does it work . . . . . . . . . . . . . . . . . . . . . . . . . . . . . . . . . . . . . . . . . . . . . . 05 B SETTING UP YOUR MIGBOT S1 Migbot S1 Diagram . . . . . . . . . . . . . . . . . . . . . . . . . . . . . . . . . . . . . . . . . . . . 06 Unpacking your Migbot S1 . . . . . . . . . . . . . . . . . . . . . . . . . . . . . . . . . . . . 07 Installing Filament Guide Tube and Spool Holder. . . . . . . . . . . . . 08 Installing Building Plate . . . . . . . . . . . . . . . . . . . . . . . . . . . . . . . . . . . . . . . 09 Powering on the Migbot S1. . . . . . . . . . . . . . . . . . . . . . . . . . . . . . . . . . . . 10 C STARTUP PROCESS: LEVELING,LOADING,TESTING Leveling the Build Plate. . . . . . . . . . . . . . . . . . . . . . . . . . . . . . . . . . . . . . . . 12 Loading PLA Filament . . . . . . . . . . . . . . . . . . . . . . . . . . . . . . . . . . . . . . . . . 14 Making a Test Object From the SD Card . . . . . . . . . . . . . . . . . . . 15 D MAKING AN OBJECT WITH MIGBOT SOFTWARE Using Migbot Software . . . . . . . . . . . . . . . . . . . . . . . . . . . . . . . . . . . . . . . . 16 E FREQUENTLY ASKED QUESTIONS FAQ. . . . . . . . . . . . . . . . . . . . . . . . . . . . . . . . . . . . . . . . . . . . . . . . . . . . . . . . . . . . . 21 MIGBOT 3D PRINTER Shenzhen Eternal Feat Technology Co.,Ltd. 02 This User Guide is designed to start your journey with the Migbot S1 Desktop 3D Printer in the right direction. Even if you are familiar with earlier Migbot S1 machines. it is essential that you read through this guide, as there are several important and exciting updates with the Migbot S1. In chapter A and B, you will learn the basics of the Migbot S1, how to unbox safely, and how to get set up. Chapters C~E will take you though leveling, printing, maintenance, and troubleshooting, Migbot is excited to welcome you to the world of the Migbot S1. Following this guide will help ensure that you are getting the most out of your machine, and that you continue to make amazing things. WARNING:The Migbot S1 generates high temperatures and includes moving parts that can cause injur y. Never reach inside the Migbot S1 while it is in operation. Always allow the Migbot S1 to cool down before reaching inside. WARNING:Do not leave the Migbot S1 unattended during operation. WARNING:If opening the Migbot S1 for ser vice, ensure that the power supply is turned off and the cord is disconnected. 03 MIGBOT 3D PRINTER Shenzhen Eternal Feat Technology Co.,Ltd. SPECIFICATIONS PRINTING Print Technology: The Max Printer Size: Nozzle Diameter: Layer Resolution: Filament Diameter: Nozzle Diameter: PHYSICAL DIMENSIONS FDM Technology 28*20*19cm 0.1-0.4mm XY:11 microns{0.0004in} Z:4micons{0.00016in} 1.75mm{0.069in} 0.4mm{0.015in} Without Spool: 48*37*41cm With Spool: 48*50*41cm Shipping Box: 58*45*52cm Net Weight: 15kg Shipping Weight: 18kg TEMPERATURE MECHANICAL Ambient Operating Temperature: 15°-32℃[60°-90°F] Storage Temperature: 0°-32℃[32°-90°F] Chassis: Body: Build Platform: Stainless Steel 304 STEEL Aluminum heating plate XYZ Bearings: Wear-resistant,oilinfused bronze Stepper Motors: 1.8° step angle with 1/16 micro-stepping ELECTRICAL AC Input: Power Requirements: Connectivty: 100-240V, ~2amps, 50-60Hz 24V DC @ 6.25amps USB, SD card[FAT 16,max. 2GB] SOFTWARE Support Software: File Types: Supports: Cura, Slic3r .stl, .Gcode Windows(XP/7/8) Linux(Ubuntu 10.04+) Mac OS X(10.7/10.8) MIGBOT 3D PRINTER Shenzhen Eternal Feat Technology Co.,Ltd. 04 WHAT IS IN THE BOX 05 Pliers 1 PC Filament Guide Tube 1 PC Spool Holder Hex Wrenches 1 PC SD Card Screwdriver USB Cable 1 PC Textured Plastic Power Cord MIGBOT 3D PRINTER Shenzhen Eternal Feat Technology Co.,Ltd. SPECIFICATIONS [1] GANTRY SYSTEM [2] LCD PANEL [3] KEY PAD [4] THE EADED Z-AXIS ROD [5] BUILD PLATFORM [6] FILAMENT GUIDE TUBE [7] EXTRUDER CABLE [8] EXTRUDER [9] FILAMENT SPOOL 8 1 2 [10] SPOOL HOLDER 5 4 3 6 7 10 9 MIGBOT 3D PRINTER ShenZhen Eternal Feat Technology Co.,Ltd. 06 UNPACKING YOUR MIGBOT S1 Opening the Box A. Place the Migbot S1 box on the ground. B. Open the box and remove the sponge at top of the box。 Removing the Migbot S1 A. Using hand-held live on both sides of the machine, the machine is removed from the carton, flat on the floor or on the desktop. B. Find package manuals, inventor y packaging accessories. If you find that the package is missing parts, please contact our sales staff or sales department. [email protected] NOTE: Your Migbot S1 should now be fully unpacked. We recommend that you keep the box and foam inserts in case you need to transport you 07 MIGBOT 3D PRINTER Shenzhen Eternal Feat Technology Co.,Ltd. INSTALLING FILAMENT GUIDE TUBE AND SPOOL HOLDER Installing the filament Guide Tube A. Locate the filament guide tube . Insert one end into the hole at the top of the extruder and push the tube in as far as it will go. B. Insert the other end of the filament guide tube into the left guide tube holder(when viewed from the back)on the back of the Migbot S1. Make sure that the end of the filament guide tube is flush with the bottom of the guide tube holder. The filament guide tube should not hang down past the bottom of the guide tube holder. Installing the Spool Holder A. Locate the spool holder.Tighten it with the screws. MIGBOT 3D PRINTER Shenzhen Eternal Feat Technology Co.,Ltd. 08 INSTALLING BUILD PLATE Mounting the Filament Spool A. Open the box containing the ABS/PLA filament. Remove the spool from its bag. B. Fit the spool onto the spool holder. Ensure that the ABS/PLA filament unwinds clockwise(When viewed form the back).Squeeze the spool holder. Attaching the USB Cable A. Locate the USB-A to USB-B cable. Insert the USB cable into the USB-B Port on the right of the Migbot S1. Do not attach the other end of the USB cable to anything. Do not plug the AC power cord into an electrical outlet until the following steps. USB Cable Attaching the Power Supply A. Locate the power supply cable. Attach the cable to the power supply. B. Ensure that the power switch on the Migbot S1 is set to the OFF position. C. Insert the power supply connector into the power input on the back of the Migbot S1. Ensure that the flat side of the connector faces down. 09 MIGBOT 3D PRINTER Shenzhen Eternal Feat Technology Co.,Ltd. P ower Supply POWERING ON THE MIGBOT S1 Powering on the Migbot S1 A. Plug the AC power cord into an electrical outlet. B. Set the power switch on the ON position. C. The Migbot will display “Mendel Ready”text on the LCD panel This is the beginning of the startup script that will guide you through initial calibration and your first build. Knob Operation The display can be done by metal knobs below the display control. Display Interface When you press the knob to access the menu options. By turning the knob to the left and right to select menu items. After selecting the option, press the knob again, you can confirm the operation. Knob MIGBOT 3D PRINTER Shenzhen Eternal Feat Technology Co.,Ltd. 10 POWERING ON THE MIGBOT S1 Display Menu Info screen The current status of the printer is displayed Prepare Preparation before boot-related printing operations Control Temperature Action Restart the printer No card Select the SD card File Print (Print from SD) * Detailed Analysis of Obser vation Surface 02 01 03 04 05 06 07 [1] [2] [3] [4] 11 Nozzle Temperature bed Temperature rate progress XYZ axis position MIGBOT 3D PRINTER Shenzhen Eternal Feat Technology Co.,Ltd. [5] Print speed [6] Progress Bar And Time-consuming [7] Printer Status LEVELING THE BUILD PLATE ! Why Leveling is Important If the build platform is too far from the extruder nozzle, or if one part of the plate is farther away from the nozzle than another part, your builds might not stick to the build plate. If the build platform is too close to the extruder nozzle, the build plate can block the Printer PLA filament from extruding from the nozzle. Leveling your build plate often will help ensure that objects adhere well 2 to the plate. * How to Level the Build Plate To level the build plate, you must adjust the four knobs which under the build platform. These four knobs lower and raise the build plate. Tightening the knobs [turning them to the right] moves the build plate away from the extruder nozzle. Leveling Knobs Loosening the knobs [turning them to the left] moves the build plate closer to the extruder nozzle. Step 1、Auto Home A. Enter the main menu, select “Prepare" C. Enter this option, Select "Auto Home" Info screen Prepare > Control No card ↑ → → → Main Disable Steppers > Auto Home Preheat PLA ↑ → → → MIGBOT 3D PRINTER Shenzhen Eternal Feat Technology Co.,Ltd. 12 LEVELING THE BUILD PLATE Step 2、Leveling Knobs As you adjust each knob, make sure A4 Paper just slides between the nozzle and build plate. You should fell some friction on the A4 Paper but still be able to easily pass the Paper between the plate and the extruder nozzle without tearing or damaging the Paper. Compare you printed raft with the following Nozzle height checking diagram to ensure you have the correct nozzle height and filament width. NOZZLE TOO HIGH: Not enough pressure on the filament into the bed, therefore small contact area between filament and bed. Raft may detach in mid print . OK: Filament pushed into the bed slightly to maximise surface area contact with bed, but still maintain extrusion flow. NOZZLE TOO LOW: Not enough clearance for the filament to be extruded, damaging either the extruder or the bed. 13 MIGBOT 3D PRINTER Shenzhen Eternal Feat Technology Co.,Ltd. LOADING PLA FILAMENT Feed the Filament Through the Filament Guide Tube Free the end of the PLA Filament from the filament spool, With a pair of scissors, cut a clean edge. Feed the end of the PLA filament into the end of the guide tube where it attaches to the back of the Printer. Feed the PLA Filament through the guide tube until it emerges from the other end of the tube. Push the Filament into the Extruder A. To use one hand to push the loading button down and take the end of the PLA filament closest to the extruder and firmly push it into the bole in the top of the extruder. Ensure that the filament goes into the center of the opening and doesn’t get caught at the edge of the opening. B. Press down on the piece of metal, hard pushed to PLA Filament the bottom of the extruder. C. Loosen metal piece, pull the PLA filament slightly to make sure filament into the extruder. Press left metal piece Push the Filament into the Extruder MIGBOT 3D PRINTER Shenzhen Eternal Feat Technology Co.,Ltd. 14 MAKING A TEST OBJECT FROM THE SD CARD Locate the SD Card The Migbot S1 package includes an SD card pre-load with files for making test objects. Insert the SD card into the left rear of the display interface Select a Project from the SD Card After you have successfully leveled the build platform and loaded the PLA Filament into the extruder, You will be able to print test. Press the knob and select "Print from SD". To select a model, press the knob. The Printer will begin to build your object. You can use the LCD panel to monitor the temperature of the extruder and the status and progress of your object. 15 MIBGOT 3D PRINTER Shenzhen Eternal Feat Technology Co.,Ltd. USING MIGBOT SOFTWARE Install Migbot Software A. Install Migbot software from the CD-ROM B. Use the supplied USB cable to connect your Migbot to your computer. Open Migbot Software [1]Zoom in and out:You can also use the scroll wheel on your mouse to zoom in and out. [4]Scale:Changing the print volume of the object [2]View: Click and drag with your mouse to rotate the plate and the object [5]Rotate:Click and drag with your mouse to rotate the object in all directions. [3]move:Click and drag with your mouse to move an object around the plate. [6]Mirror:Reflect the object in X,Y,Z respectively. 5 6 4 MIGBOT 3D PRINTER Shenzhen Eternal Feat Technology Co.,Ltd. 16 USING MIGBOT SOFTWARE Open the .stl in Migbot A. Click on the “File”. Navigate to the location of the file .stl and select it. The file will open at the center of the build plate. B. Use the buttons on the right side to adjust the object’s size, location, etc. Then detailed setup to printing specification on the left options. [1]Quality: Select this to adjust layer height and shell thickness. [2]Fill: Select this to make your object infill rate. It’s better to make 10%. [3]Speed & Temperature: Select this to adjust printing speed, suggested speed: 50; suggested printing temperature: 200-220. [4]Support: Select this to have your object include easily removable support structures under overhanging parts of the object. [5]Filament: Select this to set the filament diameter : 1.75mm. 17 MIGBOT 3D PRINTER Shenzhen Eternal Feat Technology Co.,Ltd. USING MIGBOT SOFTWARE Advanced Options It is set when you come to this page. Little tip: Do not set up this specification other wise it will affect the print. Build from SD Card A. Click “File” after set up all the specification, navigate to “save as .gcode”. The file will automatic generation to “.gcode” format. B. Save .gcode file to your SD card. Put the SD card to the card slot and choose the saved file to print. MIGBOT 3D PRINTER Shenzhen Eternal Feat Technology Co.,Ltd. 18 USING MIGBOT SOFTWARE Build with Computer Click "File", select “Print...”(Ctrl+P), then choose “Print”. ! First time printing need to connect your printer. Click the “File” to press the “Preference”. Choosing USB port on the port column. *If it can not connect with printer, you need to reboot the software or change USB port(pay attention to whether you plug USB stable). 19 MIGBOT 3D PRINTER Shenzhen Eternal Feat Technology Co.,Ltd. USING MIGBOT SOFTWARE Printing Operation Interface with Computer Shown as below: nozzle temperature bed temperature *This operation interface can adjust nozzle temperature and bed temperature. Printing Platform Fine Adjustment Refer to the following description before or being-in printing if you want to fine adjustment. Fine adjustment to X, Y, Z axis, home in the middle. *EXTRUDE:Filament operation to make sure loading filament naturally. MIGBOT 3D PRINTER Shenzhen Eternal Feat Technology Co.,Ltd. 20 FREQUENTLY ASKED QUESTIONS PROBLEM 1. Can’t load Filament into the extruder SOLUTION Make a fresh cut at the end of the Filament. Cut the Filament at an angle-a narrow tip will help with loading. Use more force when pushing the Filament into the extruder. Grasp the filament firmly and push it into the middle of the hole on top of the extruder. Ensure that you insert the Filament straight down into the extruder, not diagonally. After you fell the motor grab the filament, continue to maintain pressure on the filament for another five seconds. 2. Object is stuck to build plate Wait for the object to cool down. Objects will detach more easily after they have cooled. If the object is still stuck , take a thin metal craft spatula and care fully work the blade under the edge of the object. When the blade is most of the way under the object, twist the handle slightly. The Object should come free. 3 . Can’t remove the Filament from extruder 21 Run the filament load script in the onboard screen menu and preheat PLA for about 15 seconds. After finished heating, push filament into 2-3cm, then pull out the filament. MIGBOT 3D PRINTER Shenzhen Eternal Feat Technology Co.,Ltd.