1
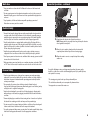
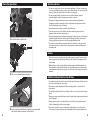
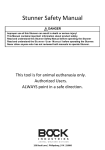
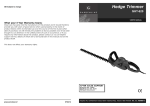
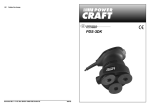
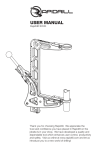
Maintenance
* Ensure that the abrasive wheel is free of cracks and surface defects. Replace the
abrasive wheel when it has worn out.
* The motor unit winding is the very ‘heart’ of the power tool. Exercise due care to
ensure the winding does not become damaged and/or wet with oil or water.
* Repairs should be done only by a qualified service technician using identical parts
to ensure safe and effective use for this product.
* Clean dust and debris from vents. Clogged vents can cause heat build-up due to
insufficient air flow.
* Under normal conditions, this tool has a sufficient supply of lubrication to ensure
smooth running. When it is time to replace the carbon brushes, have a qualified
technician do the work.
* Do not open the motor housing for any reason. Electrical shock may occur that
would cause serious bodily injury. Only have a qualified technician repair the tool.
4-16 Portable Hydraulic Hose Saw
Instruction Manual
(Patent Pending)
CAUTION!
Use only abrasive wheels rated at least 7,400 rpm to avoid injury that may result from
flying debris.
Specification
Voltage:
Cycle:
Power:
120 VAC 780 W
60 Hz / 1 phase
6A
No-load speed:
Wheel size:
Arbor hole:
7,400 rpm
6”
7/8”
WA R N I N G !
Read and understand INSTRUCTIONS and RULES FOR SAFE OPERATION
carefully before operating. Failure to follow the safety rules and other
basic safety precautions may result in serious personal injury.
Always observe the safety regulations to reduce the risk of fire, electric
shock and personal injury. Keep these instructions in a safe place.
ALWAYS USE SAFETY GLASSES.
35039-M
8/11
Save These Instructions!
Work Area
* Keep your work area clean and well lit. Cluttered benches and dark areas invite
accidents.
* Do not operate power tools in explosive atmospheres such as in the presence of
flammable liquids, gases or dust. Power tools create sparks which may ignite dust
or fumes.
* Keep bystanders, children and visitors away while operating a power tool.
Distractions can cause you to lose control.
Power On Operations - continued
Electrical Safety
* Grounded tool must be plugged into an outlet properly installed and grounded in
accordance with all codes and ordinances. Never remove the grounding prong or
modify the plug in any way. Do not use any adapter plugs. Check with a qualified
electrician if you are in doubt as to whether the outlet is properly grounded.
4. Slowly lower the abrasive wheel into the work piece.
* Double insulated tools are equipped with a polarized plug. This plug will fit in a
polarized outlet only one way. If the plug does not fit fully in the outlet, reverse the
plug. If it still does not fit, contact a qualified electrician to install a polarized outlet.
Do not change the plug in any way.
5. When the cut is complete, slowly raise the abrasive wheel
6. Allow the motor to come to a complete stop before making
* Avoid body contact with grounded surfaces such as pipes, radiators, ranges or
refrigerators. There is an increased risk of electric shock if your body is grounded.
* Don’t expose power tools to rain or wet conditions. Water entering a power tool will
increase the risk of electric shock.
* When operating a power tool outside, use an outdoor extension cord marked “W-A”
or “W”. These cords are rated for outdoor use and reduce the risk of electric shock.
Personal Safety
* Stay alert, watch what you are doing and use common sense when operating a
power tool. Do not use tool while tired or under the influence of drugs, alcohol or
medication. A moment of inattention while operating power tools may result in
serious personal injury.
* Dress properly. Do not wear loose clothing or jewelry. Contain long hair.
Keep your hair, clothing and gloves away from moving parts. Loose clothes, jewelry
or long hair can be caught in moving parts.
* Avoid accidental starting. Be sure switch is off before plugging in. Carrying tools
with your finger on the switch, or plugging in tools that have the switch on invites
accidents.
* Remove adjusting keys or switches before turning tool on. A wrench or a key that is
left attached to a rotating part of the tool may result in personal injury.
* Do not overreach. Keep proper footing and balance at all times. Proper footing and
balance enables better control on the tool in unexpected situations.
* Use safety equipment. Always wear eye protection. Dust mask, nonskid safety shoes,
hard hat or hearing protection must be used for appropriate conditions.
1
NOTE: Always start the cut gently. Never bang or bump the abrasive
wheel against the work piece.
completely from the work piece before releasing trigger.
another cut.
CAUTION!
If any of the following events occur during normal operation, the power supply
should be cut off at once and the tool thoroughly inspected by a qualified person,
and repaired if necessary:
* The turning parts get stuck and speed drops abnormally low.
* The tool shakes abnormally or is accompanied by abnormal noise.
* Heavy sparks occur around the motor area.
6
Power On Operations
1. Pull out on knob to unlock saw.
Tool Use and Care
* Do not force saw. Use the correct saw for your application. This saw is designed to
cut 4-wire braid hydraulic hose up to one inch inside diameter. The correct saw will
do the job better and safer at the rate for which it is designed.
* Do not use saw if switch does not turn it on or off. Any saw that cannot be
controlled with the switch is dangerous and must be repaired.
* Disconnect the plug from the power source before making any adjustments,
changing accessories or storing the saw. Such preventive safety measures reduce
the risk of starting the saw accidentally.
* Accessories must be rated for at least the rpm of the saw.
* Store idle saw out of reach of children and other untrained persons. Saws are
dangerous in the hands of untrained users.
* Check for misalignment or binding of moving parts, breakage of parts and any other
condition that may affect the saw’s operation. If damaged, have the tool serviced
before using. Many accidents are caused by poorly maintained tools.
* Use only accessories that are recommended by the manufacturer for your model.
Accessories that may be suitable for one saw may become hazardous when used
on another saw.
Service
5
* Saw service must be performed only by qualified repair personnel. Service or maintenance performed by unqualified personnel could result in risk of injury and void
the warranty.
* When servicing a tool, use only identical replacement parts. Follow instructions in
the maintenance section of this manual. Use of unauthorized parts or failure to follow maintenance instructions may create risk of electric shock or injury and void the
warranty.
2. Place hose in mounting fixture as shown.
3. Press in switch lock with thumb and pull in power switch with
index finger. Allow the motor to reach full speed.
Additional Safety Rules for Cut-Off Saw
* Use only abrasive wheels rated for at least 10,000 rpm. Wheels rated below the tool
speed can break apart and cause injury.
* Check new or replacement wheels before mounting. Replace a cracked wheel
immediately.
* Do not tighten abrasive wheel excessively since this can cause cracks in the abrasive
wheel.
* Always use proper guard with abrasive wheel. A guard protects operator from broken
wheel fragments.
* Abrasive wheel must be securely attached as described in the operation manual
before connecting the tool to a power supply.
* Never use the tool if its cover or any bolts are missing. If the cover or bolts have
been removed, replace them prior to use. Maintain all parts in good working order.
2
Additional Safety Rules for Cut-Off Saw - continued
* Never start a tool when its rotating component is in contact with the work piece.
Allow the machine to reach full speed before applying work piece.
* Do not touch the abrasive wheel or work piece immediately after operation.
* Use this machine only for approved applications. Never use coolants or water.
Never use the abrasive wheel as a grinder.
Functional Description
This abrasive cut-off saw is used for cutting 4-wire braid hydraulic hose up to one inch ID.
Use only the proper abrasive wheel made for this tool. DO NOT use any other type of saw blade.
Assembly
WARNING! Do not connect saw to power source until assembly is complete. Failure to
comply could result in accidental starting and possible serious injury.
Cutoff wheel removal
1. Make sure saw is unplugged and in the
“OFF” position.
2. Pull out the locking pin and raise the
saw to its full open position.
3. Using a Phillips head screwdriver,
remove the inner blade guard cover
screw.
4. Swivel the outer blade guard up to
reveal the hex head bolt.
5. Place the pins of the supplied flange
wrench into the holes in the outer
flange and hold the outer flange steady.
6. Using the supplied blade arbor wrench,
remove the hex head bolt by turning it
counterclockwise.
7. Remove outer flange washer and outer flange.
8. Remove cutoff wheel.
Cutoff wheel installation
WARNING! Use only reinforced, 6 inch cutoff wheels, rated for 10,000 RPM or higher.
1. Disconnect saw from the power source.
2. Inspect the replacement wheel for defects such as cracks, chipping, and correct speed
rating. If defects are found or the speed rating is not 10,000 RPM or higher, discard the
wheel and select another.
3. Remove any debris from the inner flange.
4. Position the new cutoff wheel against the inner flange.
3
Assembly - continued
5. Align the outer flange with the wheel arbor, then slide it onto the arbor until it rests flush
against the cutoff wheel.
6. Place the outer flange washer against the cutoff wheel.
7. Insert the hex head bolt into the threaded end of the wheel arbor and hand tighten.
8. Insert the pins of the flange wrench into the holes of the outer flange and hold the outer
flange steady.
9. Using the blade arbor wrench, firmly tighten the hex head bolt in place.
WARNING! Do not over tighten the hex head bolt. Over tightening can cause the new wheel
to crack, resulting in premature failure and serious personal injury.
10. Swivel the outer blade guard back to
its original position, making sure that
the guard cover pivot slides back into
the guide arm.
11. Align the hole in the inner blade
guard cover with the hole in the inner
blade guard.
12. Insert the inner blade guard cover
screw through the inner blade guard
cover, into the inner blade guard.
13. Using a Phillips head screwdriver,
firmly tighten the inner blade guard
cover screw.
This Package Contains:
* Hydraulic hose cut-off saw
* Abrasive cut-off wheel, 3 each
* Flange wrench
* Blade arbor wrench
* Instruction manual
* Spare brushes
WA R N I N G !
This tool must be grounded while in use to protect the operator from
electric shock. Improperly connecting the grounding wire can result in
injury. Do not expose tool to rain, or use in damp locations.
* Always unplug tool before changing accessories or servicing your tool.
* Do not use tool with the wheel guard removed, or use tool as a
grinder with the abrasive wheel exposed. Such usage may cause
serious injury.
* Always wear safety glasses or eye shields when operating tool. Failure
to do so could result in dust, shavings or loose particles being
thrown into your eyes.
4