1
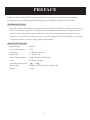
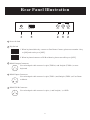
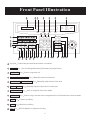
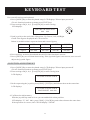
Multi-Function Control Keyboard
PIH-801
INSTRUCTION MANUAL
CONTENTS
1 Preface
............................................................................................. 2
................................................................................. 2
Introduction
Specifications
............................................................................... 2
2 Rear Panel Illustration
......................................................................... 3
3 Front Panel Illustration
........................................................................ 4
4 Keyboard Setup
................................................................................. 7
<4.1> Dip Switch Setting
...................................................................... 7
<4.2> Keyboard ID Setting ..................................................................... 7
<4.3> RS485 Baud Rate Setting
............................................................... 7
<4.4> Maximum DVR Control Setting
...................................................... 8
................................................................... 8
<4.5> DVR Control Setting
<4.6> Keyboard Audio Setting
............................................................... 9
....................................................................... 9
<4.8> Keyboard Lock Activate/Deactivate .............................................. 10
<4.7> Password Setting
5 Keyboard Test
................................................................................. 11
Joystick Adjustment
6 Fast Dome Operation
..................................................................... 11
......................................................................... 13
<6.1> Fast Dome Operation via Keyboard directly
<6.2> Fast Dome Operation via Matrix
..................................... 13
.................................................... 13
<6.3> Fast Dome Operation via DVR ....................................................... 13
7 Matrix & DVR Operation
.................................................................... 14
1
PREFACE
Thank you for choosing PIH-801 control keyboard. For trouble free installation and optimum
performance please read this manual throughly before attempting installation or operation.
INTRODUCTION
PIH-801 is a control keyboard for a range of matrix switchers, DVR, dome cameras and telemetry
receivers. It allows operation of all functions of that equipment and provides a simple operator
interface. Up to 8 keyboards can be used on any one system. If more than one keyboard is to be
used on the system then a suitable matrix must also be included. Data is transmitted via screened,
twisted pair cables, usually in a daisy chain configuration.
SPECIFICATIONS
Input Voltage
: DC12V
Power Consumption
: 10W
Connector
: 3 x RS485 connector
Dip Switch
: 1 x Dip Switch
Data Communication
: RS485 Standard 9600 Baud
LCD
: LCD Data Display
Operating Temperature : -5
~ +60
Dimensions
: 250mm(L) x 395mm(W) x 100mm(H)
Weight
: 2.4Kg
2
Rear Panel Illustration
RS-485
1
2
3
2
4
3
ON
DVR
1
2
3
4
5
2
3
4
2. When keyboard connect to DVR or Matrix, please turn all keys to [OFF].
ON
3
RS485 Output Connector
2
3
4
Use twisted pair cable connect 1st pin (TXDO+) and 2nd pin (TXDO-) to next
1
keyboard
RS485 Input Connector
Use twisted pair cable connect 1st pin (TXDI+) and 2nd pin (TXDI-) to Fast Dome
2
3
5
1. When keyboard directly connect to Fast Dome Camera, please turn number 1 key
to [ON] and rest keys to [OFF].
ON
1
1
IN
Dip Switch
4
3
OUT
2
3
2
1
Dip Switch
Power In Jack
2
3
DC12V
1
1
2
1
or Matrix.
1
RS485 DVR Connector
Use twisted pair cable connect 1st pin (+) and 2nd pin (-) to DVR.
2
3
1
3
Front Panel Illustration
37
36
35
34
33
32
31
F3
PWR
F1
ALARM
R/T
F2
F4
SET
ON
10
9
EXIT
OFF
15
ESC
MON
CAM
AUTO
PAN
PRESET
16
1
2
3
AUTO
FOCUS
AUTO
IRIS
21
DVR
CALL
SEARCH
ALARM
RESET
SEQ
4
5
6
ZOOM
IN
ZOOM
OUT
MATRIX
WIPER
SPRAY
CTRL1
CTRL2
7
8
9
FOCUS
FAR
FOCUS
NEAR
SHIFT
LOCK
AUX
LIGHT
DWELL
180
CLR
0
ENT
IRIS
O
IRIS
C
14
13
12
20
19
25
30
1
11
24
29
23
28
22
27
18 17
8
7
6
5
4
3
2
1
26
Joystick Control the pan and tilt movement of cameras.
2
PRESET Key For recalling and storing Fast Dome preset positions.
3
AUTO IRIS Key Start or stop auto iris.
4
ZOOM IN ZOOM OUT Key Manually control zoom lens.
5
FOCUS FAR FOCUS NEAR Key Manually adjust focus of the lens.
6
IRIS O IRIS C Key Manually open or close the iris of the lens.
7
AUTO FOCUS Key Start or stop lens auto focus mode.
8
AUTO PAN Key Start or stop a scanner into auto pan mode or Fast Dome into auto tour mode.
9
CAM Key Camera recall key.
10
MON Key Monitor recall key.
11
ESC Key DVR or Matrix set up menu exit key.
4
12
ENT Key DVR or Matrix setting confirm key.
13
0 ~ 9 Numeric Keys For entering camera, monitor numbers ets.
14
CLR Key Clears entered data
15
16
DVR Play Back Control Keys
Recording
Frame By Frame Play Forward
Play
Frame By Frame Play Backward
Stop
DVR Split Screen Selection Keys
Screen Division 4
Screen Division 13
Fast Forward 2x, 4x, 6x, 8x
Fast Rewing 2x, 4x
Screen Division 6
Screen Division 16
Screen Division 9
17
SEQ Key Start or Stop DVR auto sequencing.
18
ALARM RESET Key Clears alarms and video loss alarms detected by Matrix.
19
SEARCH Key DVR data search key.
20
CALL Key DVR spot monitor recall key.
21
DVR Key This is used to switch the keyboard to DVR control mode.
22
CTRL 1 CTRL 2 Key These are spare control keys for use with telemetry receivers.
Note There are two ways to operate these keys
1. Momentary : Press the key to activate the control point and release the key to stop.
2. Toggle : Press Shift + CTRL 1 once to activate the control point and press one more
time to stop.
23
SPRAY Key This operates the washer system where fitted to a camera housing.
Note There are two ways to operate this key
1. Momentary : Press the key to activate water spray and release the key to stop.
2. Toggle : Press Shift + SPRAY once to activate the water spray and press one more time
to stop.
24
WIPER Key This operates the wiper, where fitted to housing.
Note There are two ways to operate this key
1. Momentary : Press the key to activate wiper and release the key to stop.
2. Toggle : Press Shift + WIPER once to activate the wiper and press one more time to
stop.
5
25
MATRIX Key This is used to switch the keyboard to Matrix control mode.
26
180
27
DWELL Key Keyboard spare key.
28
Key Fast Dome camera 180
instant flip key.
AUX LIGHT Key Switching auxiliary lighting on and off.
Note There are two ways to operate this key
1. Momentary : Press the key to turn on the light and release the key to turn off.
2. Toggle : Press Shift + AUX LIGHT once to trun on the light and press one more time to
trin off.
29
LOCK Key Keyboard lock key or keyboard setup key.
30
SHIFT Key Shift key
31
F1 F2 F3 F4 Key
For Matrix camera titles, time, date OSD setting.
F1
DVR ID selection key
To store Fast Dome Preset dwell time.
F2
To recall latest 10 alarms or video loss signals detected by matrix.
DVR ID selection key
F3
To store Fast Dome preset moving speed.
To adjust OSD position on Monitor from Matrix.
Keyboard set up menu selection key.
DVR ID selection key
F4 To store Fast Dome preset group.
32
EXIT Key Keyboard setting menu exit key.
33
OFF Key Keyboard setting control key.
34
ON Key Keyboard setting control key.
35
SET Key DVR or Matrix setup menu recall key.
36
LCD Screen LCD screen shows camera ID, Matrix ID, DVR ID and Fast Dome preset status.
37
PWR Power indication light, red light on when connects to power.
R/T RS-485 signal indication light, light flashing when connects to matrix.
ALARM key pressing light, light flashing when key is pressing.
6
KEYBOARD SETTING
PIH-801 keyboard can directly control fast dome camera or matrix and PDR series Stand alone DVR.
The dip switch on the keyboard must be corrected set before input the power.
DIP SWITCH SETTING
When keyboard is directly linking to fast dome camera, please turn the 1st key of the dip switch
to "ON" position before input power.
1
2
3
4
ON
When keyboard is linking to matrix or DVR, please turn all the keys of the dip switch to "OFF"
positions before input power.
1
2
3
4
ON
KEYBOARD ID SETTING
(KB ID)
Up to 8 keyboard can be used when keyboard is linking to matrix or DVR. Each keyboard needs
to be assigned an ID. Keyboard does not require any ID when directly links to fast dome camera.
(Only one keyboard can be used when directly links to Fast Dome camera.)
1. Press [LOCK] key to enter keyboard setup, LCD displays "Please input password"
(To exit from keyboard set up menu press [EXIT] key.)
2. Enter setting code [9, 0, 0, 2] and [ON] key to enter setting.
LCD displays
KB ID [0, 1, 2, 3, 4, 5, 6, 7]
00
3. Enter ID number 0 ~ 7 (0 is the 1st keyboard and 7 is the 8th keyboard, factory default is 00 1st
keyboard.
4. Press [EXIT] key to exist when finished or press [F3][F4] keys to select next setting item.
RS485 BAUD RATE SETTING
(BAUD RATE)
Our system uses RS-485 teltmetry with 9600 bit/sec baud rate. The factory default setting is 9600
BIT/sec. User can change baud rate as following:
1. Press [LOCK] key to enter keyboard setup, LCD displays "Please input password"
(To exit from keyboard set up menu press [EXIT] key)
2. Enter setting code [9, 0, 0, 2] and [ON] key to enter setting
LCD displays
KB ID [0, 1, 2, 3, 4, 5, 6, 7]
00
7
3. Press [F3] key to select baud rate setting.
LCD displays
BAUD RATE 1=1200..4=9600
00
4. Enter 1 to 4 (factory default is 4)
1 = 1200 BIT / sec
2 = 2400 BIT / sec
3 = 4800 BIT / sec
4 = 9600 BIT / sec
5. Press [EXIT] key to exit when finished or press [F3][F4] keys to select next setting item.
MAXIMUM DVR CONTROL SETTING
(Total Amount of DVR)
PIH-801 can control up to 64 DVR in one system. The factory default setting for max. DVR
control is 64 DVR. Throuhg this setting user can assign the number of DVR can be controlled by
this keyboard.
1. Press [LOCK] key to enter keyboard setup, LCD displays "Please input password"
(To exit from keyboard set up menu press [EXIT] key.)
2. Enter setting code [9, 0, 0, 2] and [ON] key to enter setting.
LCD displays
KB ID [0, 1, 2, 3, 4, 5, 6, 7]
00
3. Press [F3] key to select max. DVR control setting.
LCD displays
TOTAL AMOUNT OF DVR
00
4. Enter 1 to 64 (factory default 64)
5. Press [EXIT] key to exit when finished or press [F3][F4] keys to select next setting item.
DVR CONTROL SETTING
(DVR ENABLE)
The factory default setting allows user to control DVR through this keyboard. User can disable
this function.
1. Press [LOCK] key to enter keyboard setup, LCD displays "Please input password"
(To exit from keyboard set up menu press [EXIT] key)
2. Enter setting code [9, 0, 0, 2] and [ON] key to enter setting.
LCD displays
KB ID [0, 1, 2, 3, 4, 5, 6, 7]
00
8
3. Press [F3] key to select DVR control setting.
LCD displays
DVR ENABLE (0=NO,1=YES)
01
4. Enter 1 or 0 (factory default is 1)
0 = NO (can not control DVR)
1 = YES (can control DVR)
5. Press [EXIT] key to exit when finished or press [F3][F4] keys to select next setting item.
Note : When 0 is selected, this keyboard will be unable to control DVR.
KEYBOARD AUDIO SETTING
(KEY SOUND)
The factory default setting for keyboard audio is on. User can trun off the audio.
1. Press [LOCK] key to enter keyboard setup, LCD displays "Please input password"
(To exit from keyboard wet up menu press [EXIT] key)
2. Enter setting code [9, 0, 0, 2] key and [ON] key to enter setting.
LCD displays
KB ID [0, 1, 2, 3, 4, 5, 6, 7]
00
3. Press [F3] key to select audio setting.
LCD displays
KEY SOUND (0=NO,1=YES)
00
4. Enter 1 or 0 (factory default is 1)
0 = NO (no audio when operates keyboard)
1 = YES (with audio when operates keyboard)
5. Press [EXIT] key to exit when finished or press [F3][F4] keys to select next setting item.
Note : When 2 is selected, there will be no audio when operating the keyboard.
PASSWORD CHANGE (Change User Password)
The factory default password is 1234, user can change this password.
1. Press [LOCK] key to enter keyboard setup, LCD displays "Please input password"
(To exit from keyboard set up menu press [EXIT] key)
2. Enter setting code [9, 0, 0, 2] and [ON] key to enter setting.
LCD displays
KB ID [0, 1, 2, 3, 4, 5, 6, 7]
00
9
3. Press [F3] key to select password change.
LCD displays
CHANGE USER PASSWORD
1243
4. Enter 4 digit numeric password and [ENT] key to confirm.
5. Press [EXIT] key to exit when finished or press [F3][F4] keys to select next setting item.
KEYBOARD LOCK ACTIVATE/DEACTIVATE
To activate keyboard lock:
Activate
1. Press [LOCK] Key to enter keyboard setup, LCD displays "Please input password"
(To exit from keyboard set up menu press [EXIT] key)
2. Enter 4 digit numeric password and [ON] key to confirm.
LCD displays
KEYBOARD IS LOCKED
Deactivate
1. Press [LOCK] Key to enter keyboard setup, LCD displays "Please input password"
(To exit from keyboard set up menu press [EXIT] key)
2. Enter 4 digit numeric password and [OFF] key to confirm.
10
KEYBOARD TEST
User can self test keys on keyboard.
1. Press [LOCK] Key to enter keyboard setup, LCD displays "Please input password"
(To exit from keyboard set up menu press [EXIT] key)
2. Enter setting code [9, 0, 0, 1] and [ON] key to enter setting.
LCD displays
TEST KEY & JOYSTICK
000 000
3. Push joystick to the end of the 4 directions, Up, Down, Left, and Right.
Check if the figures displayed on LCD is correct.
Below is each direction's represent letter and correct figure
Direction
UP
DOWN
LEFT
RIGHT
Letter
U
D
L
R
Figure
007 000
007 000
000 007
000 007
4. Press each key on the keyboard and check LCD if the function is correct.
5. Press [EXIT] key to exit when done testing. If the joystick figure is not correct, user can self
adjust the joystick figure.
JOYSTICK ADJUSTMENT
1. Press [LOCK] Key to enter keyboard setup, LCD displays "Please input password"
(To exit from keyboard set up menu press [EXIT] key)
2. Enter setting code [9, 0, 0, 1] and [ON] key to enter setting item.
LCD displays
TEST KEY & JOYSTICK
3. Before operating the joystick, press [Shift] + [ENT] key and release them at the same time.
LCD displays
TEST KEY & JOYSTICK
ORG PRESET 000 000
4. Up Direction Adjustment
Push the joystick up ward as far as you can and hold it at that position.
LCD displays "U" 007 000 press [Shift] + [LOCK] key and release them at the same time.
If the operation is correct, the LCD will display "UP OK".
11
5. Down Direction Adjustment
Push the joystick downward as far as you can and hold it at that position.
LCD displays "D" 007 000 press [Shift] + [AUX/LIGHT] key and release them at the same
time.
If the operation is correct, the LCD will display "DOWN OK".
6. Left Direction Adjustment
Push the joystick to the left as far as you can and hold it at that position.
LCD displays "L" 000 007 press [Shift] + [DWELL] key and release them at the same time.
If the operation is correct, the LCD will display "LEFT OK".
7. Right Direction Adjustment
Push the joystick downward as far as you can and hold it at that position.
LCD displays "R" 000 007 press [Shift] + [180 ] key and release them at the same time.
If the operation is correct, the LCD will display "RIGHT OK".
8. After joystick adjustments, try to operate it in different direction and see if the figures on LCD
is correct. If not, please re-adjust joystick.
9. Press [EXIT] key to exit when done adjustment.
12
FAST DOME OPERATION
Following are Fast Dome operation through different connection :
Fast Dome Operation via Keyboard directly
1. When power is applied to keyboard, LCD displays:
1.
2. Press any key to enter and LCD displays:
Welcome!
P = PAN
Press any key to enter
F = FOCUS
I = IRIS
2.
M = MANUAL
A = AUTO
STATUS==> P=M F=M I=M
CAM = CAMERA No.
CAM: 00 S:000 D:000 DATA:000
S = SPEED (Fast Dome Preset Speed)
D = DWELL (Fast Dome preset Dwell)
DATA = Data Entered
3. For Fast Dome operation control through keyboard directly, please refer to Fast Dome User
Manual
Fast Dome Operation via Matrix
1. When power is applied to keyboard, LCD displays:
2. Press [MATRIX] key to switch to Matrix mode
and LCD displays:
= PAN
P
= FOCUS
F
= IRIS
I
= MANUAL
M
= AUTO
A
KEYPRESS = Data Entered
3. For Fast Dome operation control via Matrix, please refer
to Matrix User Manual.
1.
Welcome!
Press any key to enter
2.
MATRIX P=M F=M I=M
KEY PRESS:0
Fast Dome Operation via DVR
1. When power is applied to keyboard, LCD displays:
2. Press [DVR] key to switch to DVR mode
and LCD displays:
ID = DVR ID
3. Fast Dome operation control via DVR, please refer to
DVR User Manual.
13
1.
Welcome!
Press any key to enter
2.
DVR
ID=01
MATRIX & DVR OPERATION
Matrix Operation
Press [MATRIX] key on the keyboard to switch to Matrix mode.
For matrix operation, please refer to Matrix User Manual.
DVR Operation
Press [DVR] key on the keyboard to switch to DVR mode.
Use [F1, F2, F3, F4] key to select DVR and DVR ID will displays on LCD.
For DVR operation, please refer to DVR User Manual.
14
DISTRIBUTOR:
PLP-801CSE-1