1
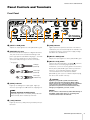
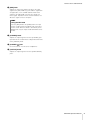
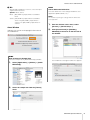
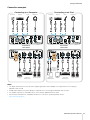
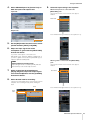
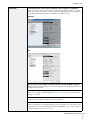
EN Contents Contents Message from the Development Team..2 Panel Controls and Terminals ...............3 Front Panel......................................................3 Rear Panel ......................................................5 Software ..........................................................7 Using the UR22mkII ..............................10 Connections..................................................10 Configuring Audio Driver Settings on the DAW Software ........................................................12 Recording/Playback .....................................12 Using the UR22mkII with connected MIDI device ...........................................................15 Troubleshooting....................................16 Appendix................................................19 Block Diagrams ............................................19 Message from the Development Team Thank you for choosing the UR22mkII USB Audio Interface. Since the introduction of the MR816CSX and MR816X in 2008, the Steinberg audio interface lineup has expanded to cover a wide range of applications with the UR824 and UR28M released in 2011, the UR22 in 2013, the UR44 and UR12 in 2014, and the UR242 in 2015. The UR22, a model that was adopted by a broad spectrum of users, has now been refined, updated, and released as the UR22mkII. As implied by the “mkII” designation, the UR22mkII is an evolved descendant of the UR22. The most prominent new features are iOS support and a loopback function. The extensive adoption of mobile recording by today’s creators meant that iOS support would be essential, but hardware limitations in the original UR22 design made it impossible to offer that functionality as a simple update. That was an issue we were determined to resolve, and now with this new release the entire UR series supports the three major platform: Windows, Mac, and iOS. In addition to USB bus power it is now possible to use a USB mobile battery, allowing high-quality recording even where reliable mains power is not available. Loopback has been included in response to the growing need for easy distribution of high-quality audio content via the Internet. The UR22mkII provides loopback functionality that, like other UR series models, allows a convenient distribution environment to be set up quickly and easily. Of course the basics have not been overlooked, and the refinements do not end with the new features mentioned above. The UR22mkII has gone through the same rigorous testing and tuning for optimum audio quality as all new models, ensuring that it delivers solid, punchy lows with detailed midrange and extended, open highs. We are confident that the sublime balance with which our D-PRE microphone preamplifiers capture the entire audio spectrum will contribute to smoother, more enjoyable mixing and production as well. Detailed adjustments have also been applied to ensure that the sound delivered to the monitor speakers is faithful to the musical nuances of each recorded source. The UR22mkII was developed to bring a popular model to the forefront of cutting edge production trends. We are dedicated to giving our users the tools they need when they need them, and are determined to stay at the forefront. Our greatest satisfaction is knowing that we contribute to the creative output of our users, wherever they are and whatever their artistic goals might be. The Steinberg Hardware Development Team UR22mkII Operation Manual 2 Panel Controls and Terminals Panel Controls and Terminals Front Panel 1 [INPUT 1 GAIN] knob 5 [USB] indicator Adjusts the input signal level of the [MIC/LINE 1] jack. 2 [MIC/LINE 1/2] jacks For connection to a microphone or digital instrument. This jack can be connected to both XLR-type and phone-type (balanced/unbalanced) plugs*1. The XLRtype is set to the optimum level for microphone connection and phone type is for line connection. Lights up when the power is turned on. This flashes continuously if a connected computer or iPad does not recognize the device, or if the power supply voltage falls below the standard level. 6 [INPUT 2 GAIN] knob Adjusts the input signal level of the [MIC/LINE 2] jack. 7 [INPUT 2 HI-Z] switch *1 Plug types XLR-type (balanced) Phone-type (balanced) Phone-type (unbalanced) Switches the input impedance (on O/off N). Turn this switch on when connecting high impedance instruments, such as an electric guitar or electric bass, directly to the [MIC/LINE 2] jack. When you turn this switch on, use an unbalanced phone plug for connection between the instruments and the [MIC/LINE 2] jack. If you use a balanced phone plug, this device will not work correctly. CAUTION 3 [PEAK] indicator Lights up according to the input signal. Lights up when the input signal is 3 dB below the clipping level. HINT Setting optimum recording levels Adjust the gain knobs so that the [PEAK] indicator flashes briefly at the loudest input volume. To protect your speaker system, leave the monitor speakers turned off when turning the [INPUT 2 HI-Z] switch on/off. It’s also a good idea to turn all output level controls down to their minimum. Neglect of these precautions may result in loud noise bursts that may damage your equipment, your ears, or both. NOTICE Do not connect or disconnect any cables while turning on the [INPUT 2 HI-Z] switch. Doing so can damage the connected device and/or the unit itself. 4 [+48V] indicator Lights up when the [+48V] switch (phantom power) is turned on. UR22mkII Operation Manual 3 Panel Controls and Terminals 8 [MIX] knob Adjusts the signal level balance between the input signal to the [MIC/LINE 1/2] jacks and the signal from an application, such as DAW software. Both of the signals to the [MIC/LINE 1/2] jacks are mixed as a mono signal. Operation of this control knob does not affect the signal sent to a computer. HINT Using the Mix knob Turn the [MIX] knob to the [DAW] side if the input volume is high and to the [INPUT] side if the input volume is low. When the knob is turned fully to the [DAW] side, only the input sound from DAW can be heard. 9 [PHONES] knob Adjusts the output signal level of the [PHONES] jack. Operation of this control knob is independent from that of the [OUTPUT] knob. ) [PHONES ] jack For connection to a set of stereo headphones. ! [OUTPUT] knob Adjusts the output signal level of the [LINE OUTPUT] jacks. UR22mkII Operation Manual 4 Panel Controls and Terminals Rear Panel 1 [5V DC] port For connecting a USB power adapter or USB mobile battery. Use a Micro USB B connector for connection. Use a power supply when connecting the UR22mkII to a device that does not supply sufficient bus power, such as an iPad. (The UR22mkII does not include a USB power adapter or USB mobile battery.) NOTICE • Read the safety precautions for the USB power adapter or USB mobile battery that you use. • Use a USB power adapter or USB mobile battery that can supply power in compliance with USB standards with a 5-pin micro USB plug. Output voltage: 4.8 V to 5.2 V Output current: 0.5 A or greater HINT Using the [5V DC] port Even when the UR22mkII is connected to a computer, you can supply power via the [5V DC] port by external power supply if the [POWER SOURCE] switch is set to the [5V DC] side. Using an external power supply can help to prevent noise and other audio degradation caused by drawing power from the USB terminal of a computer. 3 [USB2.0] terminal For connection to a computer or an iPad. NOTICE Be sure to observe the following points when connecting the device to the computer’s USB interface. Failing to do so may result in the computer freezing or shutting down, as well as corruption or even loss of data. If the device or computer does freeze, restart the application or computer. • Use an AB type USB cable. USB 3.0 cables are not supported. • Be sure to wake the computer from sleep/suspended/standby mode before connecting it to the UR22mkII with a USB cable. • Before connecting/disconnecting the USB cable, quit all open software applications on the computer. • Before connecting or disconnecting the USB cable from the [USB2.0] terminal, be sure to set all output level controls to the minimum. • Do not connect/disconnect the USB cable in rapid succession. Wait at least six seconds between connecting/disconnecting the USB cable. 4 [MIDI OUT] jack For connection to the MIDI IN jack of the MIDI device. Transmits MIDI signals from the computer. 5 [MIDI IN] jack 2 [POWER SOURCE] switch For selecting the port for supplying power to the UR22mkII.To supply bus power via the [USB2.0] terminal, set this switch to the [USB2.0] side. To supply power via the [5V DC] port, set this switch to the [5V DC] side. When using an iPad, set this switch to the [5V DC] side. Even if you set the power supply to [5V DC], the power to the UR22mkII will not come on unless it is connected to a computer or an iPad by the [USB 2.0] terminal. For connection to the MIDI OUT jack of the MIDI device. Receives and inputs MIDI signals to the computer. NOTE When using a USB mobile battery, if the power of a computer or iPad connected to the [USB 2.0] terminal is off, the power supplied via the [5V DC] port is also stopped to prevent wasteful consumption of the battery. UR22mkII Operation Manual 5 Panel Controls and Terminals 6 [+48V] switch Turns on and off the phantom power. When you turn this switch on, phantom power will be supplied to the XLR jack connected to the [MIC/LINE 1/2] jacks. Only turn this switch on/off after connecting a phantom powered condenser microphone to the device. Always turn the phantom power switch to OFF when it is not required. NOTICE When using phantom power, observe the following to prevent noise and possible damage to UR22mkII or connected equipment. • Do not connect or disconnect any devices while the phantom power switch is turned to ON. • Set all output level controls to the minimum before turning the phantom power switch to ON or OFF. • When connecting devices not requiring phantom power to the [MIC/LINE 1/2] jacks, make sure to turn the phantom power switch to OFF. NOTE When the phantom power switch is turned on and off, all inputs/outputs will be muted for a few seconds. 7 [LINE OUTPUT 2/R 1/L] jacks For connecting to monitor speakers or external devices with line level signals. These jacks can be connected to phone-type (balanced/unbalanced). UR22mkII Operation Manual 6 Panel Controls and Terminals Software Yamaha Steinberg USB Driver is a software program that allows communication between the UR22mkII and a computer. In Control Panel, you can configure the basic settings for the audio driver (Windows) or confirm the audio driver information (Mac). NOTE Installing the Yamaha Steinberg USB Driver is not necessary when connecting the device to an iPad. Windows 2 Enable Loopback Turns the loopback function on and off with check box. Check the check box to set the loopback function on and off. HINT What is loopback? Loopback is a convenient function for broadcasting over the Internet. It mixes the input audio signals (such as microphone and guitar) with the audio signals playing back in the software in the computer into two channels in the UR22mkII, and sends them back to the computer. How to Open the Window Background music Deliver Use the following two methods. • Select [Control Panel] [Hardware and Sound] or [Sounds, Speech, and Audio Devices] [Yamaha Steinberg USB Driver]. • From the Cubase series menu, select [Devices] [Device Setup...] [Yamaha Steinberg USB ASIO] [Control Panel]. How to Select Windows Click the upper tabs to select the desired window. Steinberg UR22mkII Window This window is for selecting the sample rate and for setting the loopback function. UR22mkII NOTE When using the loopback function, turn off the monitor functions on your DAW software. If the loopback function is on while you are monitoring input signals form the UR22mkII via DAW software, it will cause loud noise. This is because an infinite loop of the audio signal is generated between the UR22mkII and the DAW software. 3 Mix When Enable Loopback is set to on, select the input signal to Mono or Stereo. Options: Mono, Stereo Mono: [MIC/LINE 1/2] inputs will be recorded as mono. Stereo: [MIC/LINE 1/2] inputs will be recorded as stereo. The [MIC/LINE 1] input will be Lchannel. The [MIC/LINE 2] input will be Rchannel. 1 Sample Rate Lets you select the sample rate of the device. Options: 44.1 kHz, 48 kHz, 88.2 kHz, 96 kHz, 176.4 kHz, 192 kHz NOTE The available sample rates may differ depending on the particular DAW you're using. UR22mkII Operation Manual 7 Panel Controls and Terminals ASIO window Mac For selecting the ASIO driver settings. How to Open the Window Use the following two methods. • Select [System Preferences] [Yamaha Steinberg USB]. • From the Cubase series menu, select [Devices] [Device Setup...] [Steinberg UR22mkII] [Control Panel] [Open Config App]. Steinberg UR22mkII Window This window is for setting the loopback function. 1 Device Lets you select the device for use with the ASIO driver. (This function is available when connecting two or more devices that are compatible with the Yamaha Steinberg USB Driver to the computer.) 2 Buffer Size Lets you select the buffer size for the ASIO driver. The range varies depending on the specified sample rate. The lower the value of the ASIO buffer size, the lower the value of audio latency. Sample Rate Range 44.1 kHz/48 kHz 64 Samples – 2048 Samples 88.2 kHz/96 kHz 128 Samples – 4096 Samples 176.4 kHz/192 kHz 256 Samples – 8192 Samples NOTE The available sample rates may differ depending on the particular DAW you're using. 3 Input Latency/Output Latency 1 Enable Loopback Turns the loopback function on and off with check box. Check the check box to set the loopback function on and off. HINT What is loopback? Loopback is a convenient function for broadcasting over the Internet. It mixes the input audio signals (such as microphone and guitar) with the audio signals playing back in the software in the computer into two channels in the UR22mkII, and sends them back to the computer. Indicates the latency (delay time) for the audio input and output in millisecond units. Background music Deliver About window Indicates the version and copyright information of the audio driver. UR22mkII NOTE When using the loopback function, turn off the monitor functions on your DAW software. If the loopback function is on while you are monitoring input signals form the UR22mkII via DAW software, it will cause loud noise. This is because an infinite loop of the audio signal is generated between the UR22mkII and the DAW software. UR22mkII Operation Manual 8 Panel Controls and Terminals 3 Mix When Enable Loopback is set to on, select the input signal to Mono or Stereo. Options: Mono, Stereo Mono: [MIC/LINE 1/2] inputs will be recorded as mono. Stereo: [MIC/LINE 1/2] inputs will be recorded as stereo. The [MIC/LINE 1] input will be L channel. The [MIC/LINE 2] input will be R channel. HINT How to Select the Buffer Size Select the buffer size in the settings window for each application (DAW software, etc.). NOTE The method for opening the settings window is different for each application. 1. From the Cubase series menu, select [Devices] [Device Setup...]. About Window Indicates the version and copyright information of the audio driver. 2. Click [Control Panel] in [Steinberg UR22mkII] in the menu on the left side of the window. HINT How to Select the Sample Rate Select the sample rate in [Audio MIDI Setup] window. The window for selecting the buffer size appears. 1. Select [Applications] [Utilities] [Audio MIDI Setup]. 2. Select the sample rate from the [Format] menu. UR22mkII Operation Manual 9 Using the UR22mkII Using the UR22mkII 6. Connect an electric guitar to the [MIC/LINE 2] jack. Connections 7. Turn the [INPUT 2 HI-Z] switch on. 8. Turn the [+48V] switch on when using a condenser microphone which requires phantom power. This section covers instructions for connecting a microphone and an electric guitar to the UR22mkII with a computer. 1. Confirm that the output level of the [OUTPUT] and [PHONES] knobs are set to the minimum. CAUTION Make sure that you set all volume levels to minimum before connecting or disconnecting the external device. Otherwise, high-volume output may damage your hearing or the equipment. 2. Confirm that the [+48V] and [INPUT 2 HI-Z] switches are off. The connection for a microphone and an electric guitar are now complete. For the connection for other devices such as an iPad, refer to the connection examples. NOTICE Do not connect or disconnect any cables while turning on the [+48V] switch and the [INPUT 2 HI-Z] switch. Doing so can damage the connected device and/or the unit itself. 3. Move the [POWER SOURCE] switch on the rear panel to the [USB2.0] side. 4. Connect the device directly to the computer by using the included USB cable. NOTE • Make sure that only one device compatible with Yamaha Steinberg USB Driver is connected. • (Windows only) Connect the USB cable to the same USB terminal that you used when installing the Yamaha Steinberg USB Driver. If you connect the USB cable to a different USB terminal, the Yamaha Steinberg USB Driver will be installed again. 5. Connect a microphone to the [MIC/LINE 1] jack. UR22mkII Operation Manual 10 Using the UR22mkII Connection examples Connecting to a Computer Microphone Keyboard Guitar Headphones Connecting to an iPad Microphone Keyboard Guitar Front Panel Front Panel Rear Panel Rear Panel To [USB2.0] side Headphones To [5V DC] side Apple iPad Camera Connection Kit/ Lightning to USB Camera Adapter Computer Synthesizer/ MIDI Keyboard Monitor speakers USB Adapter / USB Mobile battery iPad Synthesizer/ MIDI Keyboard Monitor speakers NOTE • The Apple iPad Camera Connection Kit or Lightning to USB Camera Adapter are required when connecting the UR22mkII with an iPad. • A USB mobile battery or a power adapter is required when connecting the UR22mkII with an iPad. • The loopback function is unavailable when connecting the UR22mkII with an iPad. • For the latest information on compatible iOS devices, refer to the Steinberg website below. http://www.steinberg.net/ UR22mkII Operation Manual 11 Using the UR22mkII Configuring Audio Driver Settings on the DAW Software This section provides examples of connecting the UR22mkII to a computer. The explanations in this section assume that the Yamaha Steinberg USB Driver has been properly installed according to the “Getting Started” instructions included with the package. Recording/Playback This section explains simple recording/playback operations for using a microphone and an electric guitar, using an existing template in Cubase (default settings). Cubase Series Programs 1. The [steinberg hub] window appears. Cubase Series Programs 1. Make sure that all applications have been closed. 2. Launch the Cubase series DAW. 3. When the [ASIO Driver Setup] window appears while the Cubase series program is launching, confirm that the UR22mkII is selected, then click [OK]. Launch the Cubase series DAW. 2. Select a project template in [Recording], then click [Create]. The following example uses the [Clean E-Guitar + Vocal] template. This template already includes some tracks for recording a clean electric guitar and vocals. The audio driver settings are now complete. NOTE Programs other than Cubase Series 1. • If the [Missing Ports] window appears, select a UR22mkII port for each [Mapped ports]. Make sure that all applications have been closed. 2. Launch the DAW software. 3. Open the audio interface settings window. 4. (Windows only) Select the ASIO Driver for the audio driver settings. 5. Set the ASIO Driver for Windows and audio interface for Mac as follows. • Check [Map Always], and then click [OK]. By checking [Map Always], the [Missing Ports] window will not appear again. 3. Select [Devices] [VST Connections] and open [VST Connections] window. Sets the input/output between Cubase and UR22mkII. Windows Set the ASIO Driver settings to [Yamaha Steinberg USB ASIO]. Mac Set the UR22mkII to the appropriate audio interface settings. The audio driver settings are now complete. UR22mkII Operation Manual 12 Using the UR22mkII 4. Select UR22mkII ports for [Device Port] on both the inputs and outputs tabs. Inputs Tab 9. Select the input routing in the inspector. When a microphone is connected to the [MIC/LINE 1] jack: Click the track name on the left side of the project window. Track name Outputs Tab In the window that appears below, select [Mono-In 1]. 5. Set the [MIX] knob of the device to the center position between [INPUT] and [DAW]. 6. Adjust the input signal level of the microphone or guitar with the [INPUT GAIN] knob on the device. If you have a microphone connected to the [MIC/LINE 1] jack, adjust the [INPUT 1 GAIN] knob. If you have a guitar connected to the [MIC/LINE 2] jack, adjust the [INPUT 2 GAIN] knob. HINT Setting optimum recording levels Adjust the gain knobs so that the [PEAK] indicator flashes briefly at the loudest input volume. 7. While singing into the microphone or playing the guitar, adjust the output signal level of the headphones with the [PHONES] knob on the device. 8. Select desired track for recording. When a guitar is connected to the [MIC/LINE 2] jack: Click the track name on the left side of the project window. Track name Click the [Clean E-Guitar] track or [Vocals] track in this template. The recording is ready when clicking the track. Track In the window that appears below, select [Mono-In 2]. Track name UR22mkII Operation Manual 13 Using the UR22mkII 10. Click [] at the top of the screen to start recording. 11. Programs other than Cubase Series 1. Launch the DAW software. 2. Adjust the input signal level of the microphone or guitar with the [INPUT GAIN] knob on the device. HINT Setting optimum recording levels Click [] at the top of the screen to stop recording. 12. Click the Ruler to move the project cursor to Adjust the gain knobs so that the [PEAK] indicator flashes briefly at the loudest input volume. 3. Set the [MIX] knob of the device to the center position between [INPUT] and [DAW]. 4. While singing into the microphone or playing the guitar, adjust the output signal level of the headphones with the [PHONES] knob on the device. 5. Start recording on your DAW software. 6. After finishing recording, stop it. 7. Playback the newly recorded sound to check it. the desired point for starting playback. 13. Click [R] at the top of the screen to check the recorded sound. When listening to the sound over monitor speakers, adjust the output signal level by the [OUTPUT] knob on the device. The recording and playback operations are now complete. For more detailed instructions on using the DAW software, refer to your particular DAW’s software manual. The recording and playback operations are now complete. For more detailed instructions on using Cubase series programs, refer to the PDF manual, available from [Help] in the Cubase series menu. UR22mkII Operation Manual 14 Using the UR22mkII Using the UR22mkII with connected MIDI device This section explains the Cubase settings for using the VST instrument HALion Sonic SE with connected MIDI device. 1. 4. Select the input routing in the inspector. Click the track name on the left side of the project window. Track name Confirm the connection between the MIDI device and UR22mkII. Connect the MIDI IN of the UR22mkII to the MIDI OUT jack of the MIDI device with a MIDI cable. To MIDI IN In the window that appears below, select [All MIDI Inputs] or [Steinberg UR22mkII-1]. To MIDI OUT Synthesizer/MIDI keyboard 2. Open the Instrument track in the project window. [Project] [Add Track] [Instrument…] 3. In the window that appears below, select HALion Sonic SE and click [Add Track]. The settings are now complete. For more detailed instructions on using the DAW software, refer to your particular DAW’s software manual. The appropriate instrument track will be added to the template. UR22mkII Operation Manual 15 Troubleshooting Troubleshooting Power does not turn on. (The USB indicator is off or flashing continuously, even though the UR22mkII is connected to a computer.) Has the Yamaha Steinberg USB Driver been installed properly? Refer to the Getting Started instructions to complete the Yamaha Steinberg USB Driver installation. To confirm the installation, follow these steps: 1. Connect the device directly to the computer by using a USB cable. Make sure not to connect it to a USB hub. 2. Open the Device Manager windows (Windows) or Audio MIDI Setup window (Mac) as follows. Windows Select [Control Panel] [Device Manager]. Click on the [+] mark or [>] mark next to “Sound, video and game controllers.” Mac Select [Applications] [Utilities] [Audio MIDI Setup]. 3. Confirm that the device name is listed. Confirm whether or not a proper USB cable is being used. If the USB cable is broken or damaged, replace the USB cable with a new one. Make sure to use a USB cable no longer than 3 meters. Is the [POWER SOURCE] switch set properly? Set the power source switch accordingly: to [USB2.0] when using bus-powered operation, or to [5V DC] when connecting to a USB AC adapter or USB portable battery. No sound Has the Yamaha Steinberg USB Driver been installed properly? Refer to the Getting Started instructions to complete the Yamaha Steinberg USB Driver installation. Confirm whether or not a proper USB cable is being used. If the USB cable is broken or damaged, replace the USB cable with a new one. Make sure to use a USB cable no longer than 3 meters. Are the volume controls of the device set to appropriate levels? Confirm the levels of the [OUTPUT] knob and [PHONES] knob. Are the microphones and monitor speakers connected to the device properly? Refer to the section “Connection Examples” (page 11) to confirm the connection. Are the audio driver settings on DAW software set properly? Refer to the section “Configuring the Audio Driver Settings on DAW Software” (page 12) to set it. UR22mkII Operation Manual 16 Troubleshooting No sound Is the [ASIO Driver] setting on the Cubase series program set properly? From the Cubase series menu, open the [Devices] [Device Setup…] [VST Audio System], then confirm that the [Yamaha Steinberg USB ASIO] (Windows) or [Steinberg UR22mkII] (Mac) is selected on the [ASIO Driver]. Windows Mac Was the power of the device turned on before starting the DAW software? Before starting the DAW software, connect the device to a computer and turn on the power of the device. Is the input/output routing set properly? Refer to the section “Recording/Playback” (page 13) to check the input/output routing in the DAW. Is the monitor speaker switch turned on? Confirm that the monitor speaker switch is turned on. Is the buffer size set too low? Increase the buffer size compared to the current settings. For instructions, refer to the section “Yamaha Steinberg USB Driver (Windows)” (page 8) or “How to Select the Buffer Size (Mac)” (page 9). UR22mkII Operation Manual 17 Troubleshooting Unusual sound (noise, interruption, or distortion) Does your computer satisfy the system requirements? Confirm the system requirements. For the latest information, see the Steinberg website below. http://www.steinberg.net/ Are you recording or playing long continuous sections of audio? The audio data processing capabilities of your computer will depend on a number of factors including CPU speed and access to external devices. Reduce the audio tracks and check the sound again. Are the microphones properly connected to the device? Connect a microphone with an XLR plug to the device. If you use a phone plug, the volume may be insufficient. Is the [MIX] knob set properly? Turn the [MIX] knob fully to the [DAW] side if both the input signal to the device and the output signal from DAW software are being output. Is the loopback function set properly? Set Enable Loopback to off when not using the Loopback function. For instructions, refer to the section “Steinberg UR22mkII Window (Windows)” (page 7) or “Steinberg UR22mkII Window (Mac)” (page 8). For the latest support information, refer to the Steinberg website below. http://www.steinberg.net/ UR22mkII Operation Manual 18 Appendix Appendix Block Diagrams UR22mkII Operation Manual 19 Steinberg Website http://www.steinberg.net/ Manual Development Department © 2015 Yamaha Corporation Published 9/2015 MW-A0