1
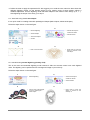
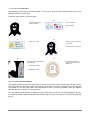
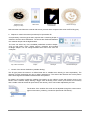
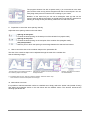
SPECTACULAR FILL for HOTFIX AREAS This stone fill type is available (optional) in HOTFIX ERA software starting on version 11.30. In this article we will show the SPECTACULAR fill for HOTFIX areas, will explain for what type of areas / objects we recommend its use, and will describe the sequence to build an area using this fill type. The following images are design samples or design parts that use HOTFIX areas with SPECTACULAR fill. Review As shown on the above sample figures, the SPECTACULAR fill type places stones outside the outline of the created area / object, but stones are contained within another predefined shape. The body of the created area is free of stones, that is, it will have an effect similar to a hole. This fill style is ideal to build big size designs, with medium dimension objects / areas. Creation Sequence 1. Start a new design (open a new document / blank design) 2. Select the hotfix tab, which contains the creation tools. 3. Select the area fill group: “area with hotfix” 4. Finally select the desired fill: “spectacular hotfix area” The program will show the ribbon with the available tools for this fill type. The “body” tab will remain selected, indicating that the fill will be applied to the object we are creating (though the stones will be placed outside the outline). Afterwards, we will be able to complete the area's outline with another fill type. HOT FIX ERA Articles- Spectacular Fill 1 5. Define the area to apply the spectacular fill. We suggest you to read the user manual to learn about the different digitizing modes. On the present article we only mention some of these modes, without a detailed explanation. Use the digitizing mode that better adapts to the needs of each design (a, b, c…). After digitizing the shape of the area, go to step 6. 5.a. Area built using closed auto-shapes It is a quick mode for creating areas with predesigned shapes (basic shapes, advanced shapes). Follow the steps shown on the next figure. 1 2 Manual Digitizing Choose the shape to contain the stones. Closed Shapes Choose Stones Advanced Shapes Choose 3 4 Click on the work area Press Enter to finish the object or continue to the next step 6. 5.b. Area built using manual digitizing (click by click) This is the most recommended digitizing mode because it offers an accurate control over each digitized node. The digitizing can be performed over a background image or just on the fly. Follow the steps shown on the next figure. 1 2 Manual Digitizing Choose the shape to contain the stones. Choose Stones 3 4 Click on each node (straight or curve), following the area's shape. HOT FIX ERA Articles- Spectacular Fill Press Enter to finish the object or continue to the next step 6. 2 5.c. Area built with auto-trace This digitizing mode requires an image (raster or vector) over which the auto-trace will take place on the shapes included on such image. Follow the steps shown on the next figure. 1 2 Load an image to the design document Choose Container Choose Stones 3 4 Select Auto-Trace Locate the cursor inside the area to trace. Press the space bar (space) 5 6 If the shape has holes that must be considered: Press Enter to finish the object, or continue with the next step 6. Select Hole function Repeat Auto-Trace 5.d. Area built with auto-complete This digitizing mode requires an image (raster or vector) over which the auto-complete will take place on the shapes included on such image. When you digitize in this mode to apply the spectacular fill, the results are very similar to the auto-trace mode, with the difference that in the auto-complete, holes are digitized automatically (that is, step 5.5 is not necessary). This is probably the quickest way to digitize, though it offers less control than the manual digitizing. Anyway, it is always possible to adjust the shapes with the Edit Object function, the same as to insert holes (see next figure). HOT FIX ERA Articles- Spectacular Fill 3 Digitize the area (using any mode). Select Hole Digitize the hole. Press ENTER Get the result (**) Notice that the area holes are covered with stones (reverse effect compared with other HOTFIX fill types). 6. Shapes to contain the stones (containers) for Spectacular fill One peculiarity of this fill type is that it requires that a containing shape is defined to limit the stone distribution. The stones are distributed between the container shape and the digitized area. The user can select any of the available predefined container shapes, such as: trap outline, circle / ellipse, square / rectangle, and rounded rectangle shapes. You can change between them with a click. See the examples: Trap, Follow the outline. Ellipse Rectangle Rounded Rectangle 7. Control of the stones distribution (variable density) This fill type places the stones in a defined area with a variable stone density (or stone separation). The direction in which the density can vary is called “variation line”. The ends of the direction line are the places where both largest and smallest stone densities are specified. By default, the system locates the variation line starting on the object's center and finishing close to the border of the container shape, defining a bigger value of density on the center (more dense, more stones) and a smaller value at the border (less dense, less stones), which can be later adjusted by the user. The location of the variation line ends can be adjusted through the context menu (right mouse button), selecting “Customize Spectacular Fill Density”. HOT FIX ERA Articles- Spectacular Fill 4 The program shows a line with a square mark (1) on one end that is the start point, and the other end (3) with a triangular mark that is the end point. You can freely drag these points to locate the line according to your needs. Besides, on the same line you can see a rectangular mark (2) that can be moved, and that defines the position of the half point of the density variation line allowing to modify the way the density varies from one end to the other. 8. Properties to control the stone spacing / density Adjust the stone spacing values on the tool ribbon. Spacing at start point: Controls the bead spacing on the start point of the variation line (square mark) Spacing at end point: Controls the bead spacing on the end point of the variation line (triangular mark) Half point position: Define a point in which the spacing is the average between the start and end values. 9. How to control the size of the container shape on the spectacular fill: The size of the container shape can be adjusted through the ends of the variation line. See the following images: The end position cursor defines the size of the containing shape of the object. Extending the variation line of the previous figure enlarges the area. Attention, this element can lead to non desired effects. (**) This effect does not occur when the containing shape is “follow the outline / trap”. Such container is the most used option for this fill type. 10. Add Outline to an Area It is possible to add and automatic outline to a defined area. Simply select the “border” tab (instead of body) and adjust the properties shown in the tool ribbon with the desired values. This function enhances the amazing Spectacular fill! HOT FIX ERA Articles- Spectacular Fill 5