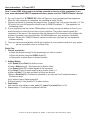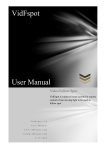
1
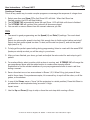
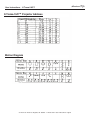
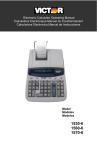
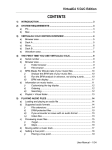
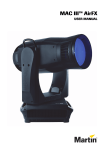
American DJ
user Instructions
®
X-Treme/19C
™
X-Treme™Controller
2b
4
11
5
13
14
15
16
1
17
2
3
6
7
8
9
10 12
1. Selects Projector
2. Preset Motion/direction selectors
3. Show Keys
4. Cut output (blackout)
5. Clear projectors and motions not shows
6. Insert adds extra step to show program
7. Delete Show program step
8. Up/Down steps thru show
9. Run selected Show(s)
10. Enter scene into show memory
Thank you for purchasing this American DJ® product. Please read the instructions on the following
pages before installing or using your new unit.
Warnings
1.Never operate unit when case is open.
2.Never operate unit in damp, moist conditions
3.Follow standard electrical safety precautions
when installing, operating or servicing the unit
to prevent electrical shock, fire, or equipment
damage.
4. Always replace fuses with same type.
For service, contact your American DJ® dealer.
18
19
11. Fade selects speed of crossfade
12.Level1,2,3,4 selects small to large motion
13. Rate Adjust time between motions
14. Speed adjusts speed of motion movement
15. Color adjustment of projector selected
16. Gobo change of projector selected
17. Joystick pan/tilt of projector selected
18. Chase activation key
19. Manual Button override of show memories
Also sets chase parameters in Chase mode
Model: X-Treme/19C™
SPECIFICATIONS:
Output channels:
64
Projectors:
16
Signal :
USITT DMX512
Signal connector:
3pin XLR
Predesigned motions: 56
Memory:
512K
Shows:
6
Mounting:
3 rack units
Clearance:
85mm
Dimensions:
19” x 5.25” x 3”
Weight:
3Kg
Voltage:
110V
Power consumption:
200W
Specifications subject to change without notice.
© American DJ® Los Angeles, CA. 90058 - X-Treme/19C™ User Instructions Page 1
User Instructions - X-Treme/19C™
American DJ®
Introduction
The X-TREME 19C gives you the power to easily control moving lights or other DMX512 devices. It can be operated in a traditional step-by-step linear method. However, you will really start to
save time when you learn to use the pre-programmed motions. This will open up tremendous creative options by taking advantage of X-Treme/19C’s modular programming capabilities. Modular
programming is fast, powerful and eliminates most of the tedious work associated with programming.
Features
• 64 channel DMX 512 output.
• Ergonomic joystick control of pan/tilt motion.
• 56 professionally designed pan/tilt motions.
• 6 Show memories of 300 steps.
• Show memories can be chased for long concerts.
• Instant manual override and control of all projectors and functions
• Built-in gobo & color chases
• Quick, intuitive modular programming
• Motions can be placed in any location
• Standard rack mount design
• Rugged extruded aluminum case
• Convenient 3 unit 19" rack mount design
Getting Started:
1. Unpack and inspect X-TREME 19C. The box should include:
a. X-Treme/19C
b. Power cord
c. User manual
2. Mount the X-TREME 19C on a suitable rack.
3. Attach power cord and plug into properly grounded socket.
Check to make sure that the voltage marked on the X-TREME 19C is correct for your area.
4. Connect X-TREME 19C to DMX512 equipment with proper cabling. See the "DMX Basics"
manual on the importance of correct, high-quality cables.
5. Assign DMX addresses for each X-TREME that will be controlled by the X-TREME 19C. See
the reference table at the back of this manual for addressing chart.
© American DJ® Los Angeles, CA. 90058 - X-Treme/19C™ User Instructions Page 2
User Instructions - X-Treme/19C™
American DJ®
Note: Correct DMX addressing is absolutely essential to the use of this equipment. If you
have never addressed DMX512 equipment before, please read the "DMX512 Basics" manual.
6. Turn on Power. All of X-TREME 19C LEDs will light up in a pre-programmed test sequence.
When the test sequence is completed, the controller is ready for use.
7. Choose a projector by pressing the projector key. "Projector one" will control channels 1-4. The
DIP switch on your first projector should be set to DMX512 address" 1 ". See appendix for
addressing chart.
8. If your equipment has the correct DMX address, by slowly moving the sliders up from 0, you
should be able to control the functions of your projector. The joystick should control the
movement of the mirror. If the projector does not respond to the movement of the sliders, the
problem is probably not in the controller- the DMX address on your projector is probably
incorrect. Review the "DMX512 Basics" manual to make sure you have set the equipment
address correctly.
9. Once you have become familiar with all the functions of your projectors and all of your projectors
can be controlled, move on to Basic Play.
Basic Play:
1. Choose a projector:
a.Press the projector key(s) for the projector(s) you wish to control.
b.Open the shutter using the GOBO slider(16).
c.Use joystick to place beam in desired location.
2. Adding Motion:
a.Set Speed(13)and Rate(14) sliders to zero
b.Press a Motion key(2) - See Appendix for Motion Chart
c.Use Speed slider(13) to adjust speed of the movement
d.Use Level(12) key to select small to large motion levels 1-4
e.Select a Fade(11), for fast and hard, for slow and smooth
f.Select a Direction(2b): Clockwise is standard or you can use the Counterclockwise or
Bi-direction keys.
g.For perfect motion Adjust speed(14).
h Wrong location? Use joystick(17) to place motion.
3. Final touch:
Now use the other sliders to add, color(15), gobo(16), strobe(Gobo to 10).
4. Repeat steps 1-3 until all your projectors are set.
© American DJ® Los Angeles, CA. 90058 - X-Treme/19C™ User Instructions Page 3
User Instructions - X-Treme/19C™
American DJ®
Programming
Creating a show. Once you have mastered the prervious steps, you can now start to enjoy
the creative versatility of your X-TREME 19C .
1. Press a Show (3) key; the Show key LED will light up.
2. Clear the Show Memory by pressing the Delete (7) and Show (3) keys at the same time.
The LED above the Show key will flash rapidly.
3. Press the Projector(1) key to choose a projector. The Projector LED will begin flashing.
4. Follow the steps in Basic Play until the projector is doing what you want it to do.
5. Press the Projector (1)key again, LED will stop flashing. Projector is now set.
If you want to make any changes just press the Projector key again and the
LED will start flashing. Make any changes you want then press the Projector (1)key again; the
Show LED will stop blinking.
6. It you want to program more than one projector, select a new projector by choosing the
appropriate Projector (1) key, then follow the steps in Basic Play. When you are finished, press
the Projector (1) key again so the LED stops flashing.
7. Repeat this process until all the projectors are doing what you want them to do.
8. Now press Enter(10). These settings are now the first step of the Show. Make sure that none
of the LEDs are blinking when you press Enter,or that setting will be lost.
9. Repeat steps 3-8 to program the next step.
10. To copy a step, hold the Enter (10) key for 2 seconds, This will copy the last scene you pro
grammed into the next step. This will speed up programming, because you can take the copied
step and make changes to it. Please follow instructs for Copy below.
11. Continue until finished.
12. Press the Run (9) button to see your Show.
Copy Function:
The Copy function copies the last scene to the next scene. This allows you to change the position of one projector without affecting the others, or change the color of all the projectors without
changing their position. This will reduce the amount of time that you spend on programming, this
is one of the most valuable features of the X-TREME 19C. in addition, the Copy function is the
only way to
program complex movements.
To use the Copy function:
1. Hold down the Enter (10)key for around three seconds. The projectors will turn off, and return
to their original positions. Projector LEDs will be lit. You have now copied your last scene
to the next step.
2. Press the Projector (1) key of the projector you want to make changes to. The Projector LED
will start to blink
3. In the Copy mode, the settings on all sliders are locked. That means the settings cannot be
changed until you "unlock" the slider.
© American DJ® Los Angeles, CA. 90058 - X-Treme/19C™ User Instructions Page 4
User Instructions - X-Treme/19C™
American DJ®
4. To unlock a slider while in the Copy mode, you must:
a. Use the slider to make a "high/low" signal by moving the desired function slider up to the
maximum (10), then down to the minimum (0). This will "unlock" that function slider to
allow you to make adjustments.
b. Repeat this process to unlock all the functions you want to change.
5. When you have made all of the adjustments to that projector, press the Projector (1)key again.
The Projector LED will stop flashing. That projector is now set.
6. Repeat steps 1 through 5 until all the projectors have been adjusted.
7. Press the Enter (10) key to go onto the next step.
Helpful Hint: If you forgot to copy a step, use the Down (8) key to return
to the last step, then press the Enter (10) key for 5 seconds and copy the scene again.
Editing Show Programs
To review a show manually:
1. Press the Show (3) key.
2. Use the Up/Down (8) keys to step through the show.
Editing
1. Select a Show (3) memory to be edited.
2. Use the Up and Down (8)keys to move through the memory to the step you wish to change.
3. Select the Projector (1) you want to add or change. The Projector LED will start to blink.
4. Make changes to motion or colors, then press the Projector (1)key again. The Projector LED
will stop flashing.
5. Press the Enter (10) key. The change is now completed.
Inserting a Step
1. Select Show (3) memory to be edited.
2. Use the Up and Down (8) keys to move through memory to where you wish to
insert a step.
3. Follow Basic Play to set-up the scene you want.
4. Press the Insert (6) Key.
5. Press Enter (10) . The step is now saved.
6. Repeat steps 1 through 5 as required.
Deleting a Step
1. Select a Show (3) memory to be edited.
2. Use the Up and Down (8) keys to move through the memory to the step you wish to delete.
4. Press the Delete (7) Key. That step is now deleted.
5. Repeat steps 1 through 4 as required.
Clearing Show Memory
1. Press the Show (3)and Delete (7) keys at the same time.
2. The Show LED will flash very quickly
© American DJ® Los Angeles, CA. 90058 - X-Treme/19C™ User Instructions Page 5
User Instructions - X-Treme/19C™
American DJ®
Details:
Cut Output (4)
Use as a standby or blackout function. Stops all DMX512 output.
Clear (5)
This key clears all controller functions.
Chase
Chase automatically creates color and gobo chases. Chases will cycle from zero to the location of
the color/gobo slider. To use the Chase function:
Push the Chase (18) key. The LED will light
Set the color/gobo Sliders (15,16) to last color/gobo you want to chase.
Press the Manual (19) key under the slider. The LED will light
The chase will begin from zero and continue up to the location of your slider, then return back
to zero and start over again.
5. To adjust the chase speed:
a. Press the Chase (18) key. The LED will turn off.
b. Move speed slider up for faster speed, or down for slower speed.
c. Follow steps 1-3 above.
1.
2.
3.
4.
Advanced Techniques
Manual Override
To manually take control of the projector(s) functions while a Show is running:
1. Press the Manual (19)key under the function you want to override or control manually:
Speed/Rate (13,14), Color(15), or Gobo(16). The LED light above that function will come on.
All the projectors will now manually respond to the position of the slider. You can now make
changes in real-time without altering the Show memory.
2. When finished, just press the manual key or Projector(s) (1)key to return to the Show mode.
Hint Program your favorite motions into a Show. Then just use the manual keys to change
all the colors or gobos to fit the music or mood.
Follow Spot
If you need a follow spot to focus on the stage or highlight a dancer:
1. Press the Manual key(18) under the joystick
2. Select the Projector(1) you want to use as a followspot.
3. Use the sliders to set to projector to the Color(15) and Gobo (16) you require. (You do not need
to press any keys)
4. Move joystick (19) now you have a real-time follow spot .
© American DJ® Los Angeles, CA. 90058 - X-Treme/19C™ User Instructions Page 6
User Instructions - X-Treme/19C™
American DJ®
Creating a Concert
This is a very useful way to create complex programs or rearrange the sequence of a large show
1. Select more than one Show,(3)The first Show LED will blink. When that Show has
finished running, the LED will stop blinking.
2. The X-TREME 19C automatically starts the next Show. LED will blink until show is finished.
3. The X-TREME 19C will continue this cycleuntil all shows are played.
4. You can add or remove Shows from the concert whenever you like.
TIPS
1. The secret to good programming are the Speed(14) and Rate(13) settings. Too much dead
time?
Rate is too slow and/or speed is too fast. Not enough time to finish motion before next step?
Rate is too fast and/or speed too slow. To start, set the rate low (near 0), and set the speed
high (near 8 or 9).
2. To help get the perfect speed setting during programming, listen to music with the same BPM
(beats per minute) as what you will be using in your shows.
3. After you have finished your show, go back and adjust the rate control for each step to get it
perfect.
4. For overlay effects, select a motion while a show is running, and X-TREME 19C will merge the
pre-programmed show with the added motion to create some stunning effects.
Experiment to find the wildest variations of your pre-programmed shows to use in real time
during a concert.
5. Save a few short one or two scene shows in Shows 1,2,3. When DJing, just press all three
and let them chase. For spontaneous spice, hit a manual key to synch all the colors, or all the
gobos, or the shutters.
6. In one of the Shows, save a "focus" (all the projectors in a static position). Press this Show to
get attention or add emphasis during a concert. A highimpact move.
7. Use the Up and Down (8) keys to skip or force the next step while running a Show.
© American DJ® Los Angeles, CA. 90058 - X-Treme/19C™ User Instructions Page 7
User Instructions - X-Treme/19C™
X-Treme-19/C™ Projector Address
Motion Diagram
© American DJ® Los Angeles, CA. 90058 - X-Treme/19C™ User Instructions Page 8
American DJ®