1
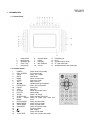
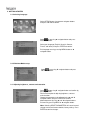
Bluetooth
DIGITAL PHOTO FRAME
User Manual
DPF-752
Thanks for purchasing our product, please read user manual carefully before use
SAFETY PRECAUTIONS
Thanks for purchasing our digital photo frame DPF-752. Before operating this player, please read this manual and
retain it for future reference.
This symbol is intended to alert the user of the
presence of non-insulated “dangerous voltage”
within the product’s enclosure that may be of
sufficient magnitude to constitute a risk of electric
shock to a person.
This symbol is intended to alert the user of the
presence of important operation and maintenance
instructions in the Digital Picture Frame User’s
Manual.
CAUTION
TO REDUCE THE RISK OF FIRE OR
ELECTRONIC SHOCK, DO NOT EXPOSE
THIS UNIT TO RAIN OR MOISTURE.
CAUTION
TO REDUCE THE RISK OF ELECTRIC SHOCK, DO NOT REMOVE THE
PLASTIC CASE OR SERVICABLE PARTS INSIDE. REFER SERVICING TO
QUALIFIED PERSONNEL ONLY.
SAFETY PRECAUTIONS
Thanks for purchasing our digital photo frame. Before operating this player, please read this manual and retain it
for future reference.
Warning
To reduce the risk of fire or electric shock, do not expose this appliance to rain or moisture.
To avoid electric shock, do not touch the plug with moist or wet hands.
Please immediately cut off power supply if you notice any abnormality.
Do not attempt to open the digiframe to change or refit any parts. Refer to Qualified Personnel.
Do read this manual carefully before use, and retain it for future reference.
Safety Notice
1. Ensure correct voltage supply to the machine before use.
2. If liquid and dirt should fall onto frame, remove plug. Only resume use once qualified personnel have confirmed
it as safe to use.
3. Always unplug the power adapter after use.
Location
1. Put frame in well ventilated location to avoid over heating.
2. Do not place frame in hot room or in direct sunlight.
3. Stand frame horizontally on a flat, level surface, or hang firmly on to the wall.
4. Do not place frame in dusty environments.
Condensation
Dew may form if you transfer the frame suddenly from a cold to warm location. If condensation occurs and the
frame does not start normally, leave for 3 hours before using again in order to allow the temperature of the unit to
balance with its environment.
Cleaning
Use a soft cloth with a SMALL AMOUNT of neutral wash to clean the unit casing, screen and remote control. Do
not use abrasive, alcoholic or caustic based substances.
Main Features
User friendly display
Supports playback for JPEG/MUSIC/WMA/some format of MP4.
Supports Clock/Calendar/Alarm Clock function.
Supports picture slide show with music as background.
Different transition effect for JPEG files.
Supports USB1.0/2.0 (high-speed)
Supports SD, MS, MMC Card, CF, XD card, Usb drives.
Supports receiving of files from Bluetooth devices.
CONTENTS
1. INTRODUCTION ............................................................................................................................................ 4
1.1. Control Panel .......................................................................................................................................... 4
1.2. Remote Control ...................................................................................................................................... 4
2. GETTING STARTED ...................................................................................................................................... 5
2.1. Selecting language ................................................................................................................................. 5
2.2. Slideshow mode set up .......................................................................................................................... 5
2.3. Adjusting brightness, contrast and saturation ........................................................................................ 5
2.4. Setting date and time.............................................................................................................................. 6
3. SELECTION MODE AND FILE SOURCE ...................................................................................................... 6
3.1. Selecting TEXT or PICTURE file ............................................................................................................ 6
3.2. Navigating in TEXT files ......................................................................................................................... 6
3.3. PHOTO functions ................................................................................................................................... 7
3.3.1. Manual mode .................................................................................................................................. 7
3.3.2. Pre-visualization of images ............................................................................................................ 7
3.3.3. Slide show mode ............................................................................................................................ 7
4. EDIT ................................................................................................................................................................ 8
4.1. Duplicating files ...................................................................................................................................... 8
4.2. Deleting files or a subdirectory ............................................................................................................... 8
5. MUSIC, MOVIE AND COMBO FUNCTION ................................................................................................. 8
6. BLUETOOTH FUNCTION .............................................................................................................................. 9
7. TV OUT FUNCTION ....................................................................................................................................... 9
8. TROUBLE SHOOTER GUIDE ..................................................................................................................... 10
9. TECHNICAL SPECIFICATION..................................................................................................................... 11
For further information on the TEXET range, please refer to www.texet.com
1. INTRODUCTION
1.1. Control Panel
1
2
3
4
5
Power on/off
Navigate left
Navigate right
Enter / Play
Navigate up
6
7
8
9
10
Navigate down
Return
USB port
Mini USB port
AV Out
11
12
13
14
15
1.2. Remote control
1
2
3
4
5
6
7
8
9
10
11
12
13
14
15
16
17
18
19
20
21
22
23
24
POWER
FULL SCREEN
VIDEO
MUTE
MENU
SETUP
VOL+/▲▼◄►
ENTER/PLAY
PAUSE
STOP
RETURN
ROTATE
ZOOM
SLIDE SHOW
SLIDE
SHOW
MUSIC
PHOTO MODE
MUSIC MODE
VIDEO MODE
CALENDAR
EDIT
12 PICTURE
Switch on/off and standby
Full screen on/off
Switch to TV mode
Mute on/off
Return to main menu
View menu setup
Adjust volume
Up/down/left/right navigation
Enter / play selected file
Pause play
Stop play
Return to previous menu
Rotate image
Zoom in on image
Switch to photo slide show
Switch to photo slide show with
music
Switch to photo mode
Switch to music mode
Switch to video mode
Switch to calendar mode
Previous chapter
Next chapter
Switch to edit mode
Switch to 12 picture view mode
Earphone port
DC In
Remote control sensor
CF card reader port
SD/MMC/MS/XD card reader port
2. GETTING STARTED
2.1. Selecting Language
Select SETUP by pressing ◄ or ► navigator buttons
and press ENTER to confirm.
Select
by pressing ► navigator button and press
ENTER to confirm.
Select your language (English, Spanish, German,
French, and Italian) and press ENTER to confirm.
Exit language menu by pressing MENU button or ◄
navigator button.
2.2. Slideshow Mode set up
Select
by pressing ▼ navigator button and press
ENTER to confirm.
2.3. Adjusting brightness, contrast and saturation
Select
by pressing ▼ navigator button and confirm by
pressing ENTER.
You have the option of adjusting brightness, contrast
and saturation.
Choose the parameter to be adjusted using ▲ and ▼
navigator buttons and press ENTER to confirm.
Make adjustment by using ▲ and ▼ navigator buttons.
Exit menu by pressing MENU or ◄ navigator button.
Note: Selecting RESET PARAMETERS will cancel manual
changes and revert frame to default, factory setting. Press
ENTER to confirm changes.
2.4. Setting date and time
Select
by pressing ▼ navigator button and press
ENTER to confirm.
Use ▲▼ navigator buttons to adjust year, month, day and
time.
To accept date and time, press ENTER to confirm changes.
Press this button once again to return to the main menu.
Once back at Main MENU, select CALENDAR, and press
ENTER to activate date and time.
3. SELECTION MODE AND FILE SOURCE
3.1. Selecting TEXT or PICTURE file
Select TEXT or PICTURE using ◄ or ► navigator
buttons and press ENTER to confirm.
Select file source (SD/MMS/MS/XD USB) using ▲▼
navigator buttons and press ENTER to confirm.
Select the file you want to display using ▲▼ navigator
buttons and press ENTER to confirm.
Note:
If you want to go back to the superior level of the
menu, press down on ◄ navigator button.
3.2. Navigating in TEXT files
During reading of the file:
• select the page by pressing the ◄ or ► navigator buttons
• make a line stream in by pressing the ▲▼ navigator buttons
• go backwards in the menu by holding down on the STOP button.
(Note: the machine does not support files other than of .txt format)
Simply press down on MENU button to return to Main Menu.
3.3. PHOTO functions
3.3.1 Manual mode
Upon display of photo, hold down PAUSE button to switch to manual mode.
In this mode, you can perform the following actions:
• Rotation: hold down continuously on ROTATE button to rotate the photo clockwise.
• Display full page: hold down on the FULLSCREEN button.
• Zoom (4 positions): hold down continuously on the ZOOM button.
• Proceed to the next photo: hold down on ◄ or ► navigator buttons.
Note:
You can switch to slide show mode at any time by holding down on the PLAY button. The reading speed
depends on file size; for example the larger the display size, the longer the waiting time will be.
3.3.2. Pre-visualization of images
For fast and easy viewing, Press 12 PICTURE button
to obtain pre-visualization of 12 images.
Use ▲▼◄ ► navigator buttons to select photo and
press ENTER to display.
3.3.3. Slide show mode
Upon display of a photo, the slide show mode is started (automatic mode displayed at the bottom of
screen).
If you have come from manual mode, hold down PLAY button.
Select the desired function with the aid of the ▲▼◄ ► navigator buttons and press ENTER to
confirm.
Manual Mode
4. EDIT
Select EDIT by pressing ◄ or ► navigator buttons and
press ENTER to confirm.
Select the source type (SD/MMS/MS/XD USB) by pressing
►▼ navigator buttons and press ENTER to confirm.
Select the file you want to edit by pressing ►▼ navigator
buttons and press ENTER to confirm (
).
4.1. Duplicating files
Select the file you want to duplicate by pressing ►▼ navigator buttons (a paw print will appear to the left of
file name) and EDIT button to reveal
-Return,
◄navigator button to select card or USB source.
-Duplicate and
-Delete). Select
and press
4.2. Deleting files or a subdirectory
Select the file by holding down on the EDIT button and then select
. Press ENTER to confirm.
5. MUSIC, MOVIE AND COMBO FUNCTION
Select MUSIC (MOVIE OR COMBO) by pressing ◄ or
► navigator buttons and press ENTER to confirm.
Select the source type (SD/MMS/MS/XD USB) by
pressing ►▼ navigator buttons and press ENTER to
confirm.
You can also use the remote control to select MUSIC
or VIDEO MODE.
6. BLUETOOTH FUNCTION
Select SETUP by pressing ◄ or ► navigator buttons
and press ENTER to confirm.
Select
by pressing the ▼ navigator button and
press ENTER to confirm.
Switch on the Bluetooth device (e.g. mobile phone, PC) that you want to transfer files from and conduct search
for DPF-752. The search will identify frame as “TEXETDPF752” and you will be prompted for a password code.
Type in 0000 and follow any prompts from device. Transmission of selected picture and music files from
Bluetooth device (mobile phone, PC) can now happen. Once the files are transferred, they will be stored in the
internal memory.
Select MUSIC (MOVIE OR COMBO) by pressing ◄ or ► navigator buttons and press ENTER to confirm.
Select the source type (SD/MMS/MS/XD USB) by pressing ►▼ navigator buttons and press ENTER to confirm.
You can also use the remote control to select MUSIC or VIDEO MODE.
NB: Bluetooth on the device is always turned on.
7. TV OUT FUNCTION:
Please switch TV mode to AV mode on your TV set.
Power on digital photo frame and enter main interface.
Connect the TV-out cable with digital photo frame as per below picture.
Connect the other end of TV-out cable to your TV
Press “Video” button once on your remote control to switch to AV out mode.
Then the display of the digital photo frame shall be black and the main interface of the digital photo frame shall
appear on your TV set
Use the remote control to navigate to desired functions
8. TROUBLE SHOOTER GUIDE
If the photo frame does not function correctly, please read the following information carefully. Before
requesting technical assistance, you need to identify the problem:
Failure symptom
No power supply
Probable cause and possible solution
If there is no power supply, check that the photo frame is well connected to its
power supply and the DC In cable is not loose.
No display
Check that you have inserted a compatible memory card or USB key into the
appropriate readers/ports. Only JPG and TXT formats are supported.
The remote control does 1. The distance is too far from remote sensor panel or the angle exceeds 30
not function.
degrees.
2. The battery of the remote control is discharged.
3. The infrared sensor is experiencing interference by another source (e.g.
solar rays)
Your photo frame dies or This may be provoked by an electrostatic environment. You need to make a
reverts back to the
stop/forward step of your photo frame, if you know its origin, and keep the
welcome screen.
frame away from the source generating electrostatic problems (ESD).
It does not function with
The digital photo frame will not function when connected to a PC. The USB
PC
port is intended to receive USB keys uniquely in order to read .JPG or .TXT
files.
My Bluetooth is enabled
1. Please note that our digi frame is compatible with most popular
but device isn’t connecting
Bluetooth enabled devices. Please ensure that Bluetooth is switched
with the digiframe.
on and the correct passkey has been typed in. If not, please repeat
Step 6.
2. Your Bluetooth device doesn’t have the necessary profiles for sending
files. Please refer to your Bluetooth manufacturer user manual.
9. TECHNICAL SPECIFICATION
Screen size: 7 inches
Supported image file format: .JPG
Supported audio files: MP3, WMA
Supported video files: MPEG4, DIVX
Supported text file format: .TXT
Acceptable photo cards: MS, MMC, SD, XD, CF
USB ports: USB 1.1 and USB 2.0
Power supply: AC 110V-240V~60/50Hz (DC9V)
Max power consumption : 13 W
Disposition: placed or suspended
Internal memory and Bluetooth function
Dimensions (with frame): 233(L) x 178(W) x 38(H) mm
Weight of Frame: 0.7 Kg