1
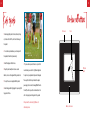
The moment keeps going
Jackie on holidays
- Great ocean road, Melbourne
Bringing memories to life!
For additional hints & tips - visit us at www.digiframe.com.au
For Repairs & Service please contact CUSTOMER SERVICE on 1300 559 881
or email [email protected]
8" Optima Series
Bringing memories to life!
Product User Manual
(Model No's: DF-F8007b & F8008w)
1.
2.
What’s inside
Welcome!
Jess & Chris
Welcome
1
Safety Information
3
On-board buttons
4
Accessories
6
Remote Control
7
Your DigiFrame is designed to bring your digital photos out of your
Connection
8
computer and into your life! It is packed with great features (like movies
Start-up setting
10
& functions) to help you get the most out of your special moments.
Functions
11
Technical Parameters
19
Congratulations on your purchase of a DigiFrame! We understand how
special memories of your loved ones and moments that you encounter
through your journey are. Now they can be treasured in high quality
digital form.
- Friends forever
3.
4.
On-board Buttons
Safety info
Front cover
1. Avoid exposing the product to rain, moisture, oil drops
Panel
etc, to reduce the risk of fire, short circuit or damage to
the product.
2. Do not under any circumstances open or tamper with
the product as this will void your warranty.
3. Avoid blocking any ventilation holes.
Dan gets the ball
- Age 15, striker
7. If you encounter any needs for service or repair for all
4. Keep the product away from heat source such as
non-functions, please return it to Digiframe. Application
radiators, stoves or other equipment that generates heat.
for repair is only accepted when the product is damaged.
5. Use only the accessories supplied with the product.
6. Avoid leaving product live (plugged in to power point) for
long periods of nil use.
Protection
plastic
Non acceptable claims for repair include for example:
power supply cable or socket is damaged; fluids flow into
the unit; the unit is exposed to rain and moisture or the
unit is not properly used or dropped onto the ground.
All repairs must be carried out by DigiFrame or its
authorised repairers.
Remote control sensor
3.
4.
On-board Buttons
Safety info
Front cover
1. Avoid exposing the product to rain, moisture, oil drops
Panel
etc, to reduce the risk of fire, short circuit or damage to
the product.
2. Do not under any circumstances open or tamper with
the product as this will void your warranty.
3. Avoid blocking any ventilation holes.
Dan gets the ball
- Age 15, striker
7. If you encounter any needs for service or repair for all
4. Keep the product away from heat source such as
non-functions, please return it to Digiframe. Application
radiators, stoves or other equipment that generates heat.
for repair is only accepted when the product is damaged.
5. Use only the accessories supplied with the product.
6. Avoid leaving product live (plugged in to power point) for
long periods of nil use.
Protection
plastic
Non acceptable claims for repair include for example:
power supply cable or socket is damaged; fluids flow into
the unit; the unit is exposed to rain and moisture or the
unit is not properly used or dropped onto the ground.
All repairs must be carried out by Digiframe or its
authorised repairers.
Remote control sensor
5.
6.
On-board Buttons Cont’
Standard Accessories
1. Power Adapter
1. Menu button
2. Enter button
3. Right button
4. Left button
5. Up button
6. Down button
7. Mini USB jack
8. Ear phone jack
9. AV out
10. DC power
11. Power switch
12. USB socket
13. CF card socket
14. SD/MMC/MS/XD
card sockets
Accessories
2. USB Cable
3. AV Cable
My favorite flower
- Grandad gardening
4. Remote Control
5. Stand
7.
8.
Remote Control
Installation of the stand:
The stand can be installed in either vertical or horizontal orientation.
Below is an illustration of installing the stand in landscape (horizontal) orientation.
Power on/off
Play/Pause Button (Auto/Manual Slidehow)
MUTE
Voice on/off
Fast Rewind Button
PHOTOS
Access PHOTOS Mode
Fast Forward Button
VIDEOS
Access VIDEOS Mode
Previous Button
MUSIC
Access MUSIC Mode
Next Button
P&M
Access P & M Mode
VOL+
Increase volume
TEXT
Access TEXT Mode
VOL-
Decrease volume
OSD
Access OSD Mode from the main
menu; display menu list in other
function modes.
ZOOM
Enlarge photo by 5 times
Up Button (move cursor)
Down Button (move cursor)
Left Button (move cursor)
Right Button (move cursor)
ENTER
OK Button (Confirm or Enter)
Stop Button
1
2
ROTATE Rotate photo by 90° angle
VIEW
Display nine images in one screen
(Thumbnail view)
MENU
Return to main menu
AV OUT AV OUT Mode
CALENDAR
Access CALENDAR Mode
Connect the adapter to the power supply and to the machine
as shown to the right.
Connection
10.
9.
Connection Cont’
Remove plastic from the remote control battery casing to activate.
Start-up Setting
Your Digiframe is factory set to “auto-start” photo slideshow.
(This can be changed in the menu).
After connecting the Photo Frame to the power
supply, switch the power to “ON” and the start-up
screen will appear:
To connect your DigiFrame to a computer: Use the supplied USB Cable.
This function is only for models with an internal memory device.
Note:1. Should be turned on when it is connected to a computer.
2. Cannot be operated when connected to a computer.
3. Should be restarted after USB cable is disconnected from
a computer.
To access MAIN MENU, push MENU.
Select “SETTINGS” by using left or right
button. Then press the enter button to go
to the settings menu.
Main menu screen
Use the up and down buttons to go to the settings
menu for languages, pictures, clock, alarm, start-up,
video and default settings. Press enter to go to the
sub menu and use up, down and enter buttons to
make your selections. After finishing settings, press
the left button to go back to previous menu or press
menu button to go back to main menu screen.
12.
11.
Functions - Photo Mode
PHOTOS Mode
Note:- The PHOTOS button on the remote control will
access the slideshow instantly.
To access PHOTOS Mode: On the main menu, move the cursor onto the
“PHOTOS” icon (the words below the icon will turn black) by pressing
left and right buttons on the remove control or onboard buttons.
OSD (on-screen display) description
(photo mode)
Functions - Video Mode
1. Status
2. Pause
3. Stop
4. Rotate
5. Enlarge
6. Previous photo
Navigate through preview of photo files to select desired
photo - press enter to start slideshow from the selected
file. Move the dark cursor onto the target file in photo
format by using up and down buttons.
CF
Press Enter button to access or watch the
Media Memory device of choice.
7. Next photo
8. File information
9. Display 9 images
in one screen for
thumbnail view.
10. Photo resolution
VIDEOS Mode
Note:- The VIDEO button on the remote
control will access internal memory
videos instantly.
To access VIDEOS Mode:
On the main menu, move the cursor onto
the “VIDEOS” icon (words below the icon
will turn black) by pressing the left and
right button on the remote control or the
photo frame.
Press Enter button to access
Media Memory Device of choice.
CF
Navigate to desired video file and press
enter to play video. (your digiframe will
play all available video files).
13.
14.
Functions - Video Mode / Music Mode
VIDEOS Mode:
While videos are being played, OSD button will activate
“On Screen Display”.
MUSIC Mode:
Note:- The MUSIC button on the remote control will
access your music files instantly.
On the main menu, move the cursor onto the “MUSIC” icon
(words below icon will turn black) by pressing left and right
buttons on the remote control or the onboard buttons.
Press Enter button to
access Media Memory
Device of choice.
1. Status
2. Playing time
3. Pause
4. Stop
5. Previous movies
6. Fast forward
7. Fast forward
8. Next movie
9. File information
10. Enlarge
11. Dual file view
1. File information
2. Play mode
Functions - Music Mode / P&M Mode
Move the dark blue cursor onto the target file in the music
format list by using up and down buttons and press enter.
After pressing enter button,
the product will circularly
play all music stored in the
media memory device from
the selected file.
1. Status
2. Playing time
3. Pause
4. Stop
5. Previous
6. Fast rewind
P&M Mode
Note:- The P&M button on your remote will
play photos and music instantly from the
internal memory. To access P&M Mode: On the
main menu, move the cursor onto the “P&M”
icon (the words below the icon will turn black) by
pressing the left and right buttons on the remote
control or onboard buttons.
7. Fast forward
8. Next music
9. Music information
10. File information
11. Play mode
Press Enter button to access Media
Memory Device of choice.
CF
CF
Select your Media Memory
Device of choice.
Note:- Photos and music must be stored on the same media
memory device (e.g. memory cards or internal memory).
Move the dark blue cursor to select media memory device by
using up and down buttons and press enter button to access
photos, music and file folders.
15.
16.
Functions - P&M Mode/ Edit Mode
Functions - Edit Mode
EDIT Mode:
To access EDIT Mode: On the main menu, move the cursor
onto the “EDIT” icon (words below the icon will turn black)
by pressing the left and right buttons on the remote control
or onboard buttons.
P&M Mode Continued:
Press enter button to access music and photos and the
folders index that contain music and photos. Select the
desired folder by using up and down buttons and press
enter until files in music format are displayed.
P&M OSD Display
Press “enter” to access
Media Memory Device
of choice.
To copy / paste / delete files between storage media:
Select “menu” button on remote. Navigate to “EDIT”
then enter button.
CF
CF
1. Music mode control
2. Photos mode control
Only available memory
devices can be accessed.
Move the cursor onto the target file by using up
and down buttons. Press right button to mark it
as a file to be copied. (A symbol will appear next
to file name.) You can mark multiple files.
Press the left arrow (<) button to return to
Navigate to the target media
memory devices page. Navigate to the memory
memory devices by using
device you wish to paste to. Press enter to open
direction buttons.
Media Memory Device of choice.
(Select the storage device you
wish to copy from / delete,
choose “enter” button to select.)
17.
18.
Functions - Edit Mode
Press the OSD / Calendar button and 3 icons will appear as
below. Navigate to “paste” and press “ok”.
Functions - Edit Mode / Caldendar Mode
DELETE FILES
Calendar Mode: To access CALENDAR Mode, move cursor
onto the “Calendar” icon by using left or right button
and press “enter”.
To delete a file
choose “EDIT” icon
from the main menu.
1. Cancel
2. Paste
3. Delete
CF
When it shows “Finish” on the screen, press enter
button to finish the operation.
Select the Media
Memory Device of
choice.
Press enter button to go to the files, and use up and down
buttons to choose the file that is to be deleted. Then press
right button to mark (icon will appear) as a file to be deleted.
Press OSD button on remote control and choose “delete” (bin
icon) on the screen to delete the file.
After deleting the files, press enter
to confirm.
To set time & date press “menu” on remote and navigate
to settings. Navigate to Clock set, push enter. Use up and
down arrows to adjust time/date. Use left / right arrows
to navigate between dates / times etc.
19.
20.
Technical Parameters
Panel
TFT Color Panel
Play mode
MUSIC / PHOTOS / P&M / VIDEOS
External memory
cards supported
CF / SD / MS / MMC / XD / USB
Multi-media
formats supported
MP3 / WMA / JPEG / JPG / MPEG1 / MPEG 2 / MPEG 4 (Divx - Xvid)
Text formats
supported
TXT
Ports
Two USB ports, one performs host function / earphone device
Power supply
DC9V/1.5A
Model
Arcylic front cover
We hope you enjoy your Digiframe
and all your special memories.
These parameters are for reference only.
Any change shall be subject to products without further notice.
For additional hints & tips - visit us at www.digiframe.com.au
For Repairs & Service please contact CUSTOMER SERVICE on 1300 559 881
or email [email protected]
19.
20.
Technical Parameters
Panel
TFT Color Panel
Play mode
MUSIC / PHOTOS / P&M / VIDEOS
External memory
cards supported
CF / SD / MS / MMC / XD / USB
Multi-media
formats supported
MP3 / WMA / JPEG / JPG / MPEG1 / MPEG 2 / MPEG 4 (Divx - Xvid)
Text formats
supported
TXT
Ports
Two USB ports, one performs host function / earphone device
Power supply
DC9V/1.5A
Model
Arcylic front cover
We hope you enjoy your DigiFrame
and all your special memories.
These parameters are for reference only.
Any change shall be subject to products without further notice.
For additional hints & tips - visit us at www.digiframe.com.au
For Repairs & Service please contact CUSTOMER SERVICE on 1300 559 881
or email [email protected]