1
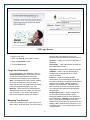
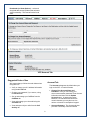
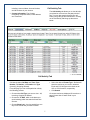
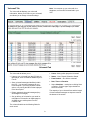
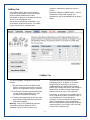
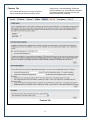
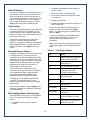
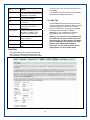
Single-User VoIP Service
User Manual
Version 20080501
Revised 20110202
Your VoIP Service
Table of Contents
Congratulations! You have chosen Voice over
Internet service (VoIP) to serve your
telecommunications needs. To use your VoIP
service, you will use the touch pad of your
telephone and the browser-based VoIP Control
Panel (VCP) – an interface that allows you to
easily manage your account.
Table of Contents ............................................... 2
Your VoIP Service .............................................. 2
Who Should Read this Manual.......................... 2
Basic Features .................................................... 2
Optional Features ............................................... 3
Terminology ........................................................ 3
Your VoIP Account ............................................. 3
Voicemail Set Up and Use ................................. 3
Table 1 - Voicemail Access.............................. 3
Table 2 - Recording Menu ............................... 3
Table 3 - Main Menu ........................................ 3
Accessing the Message Center ........................ 4
Table 4 - Message Center Menu (1 of 2) ......... 4
Table 5 - Message Center Menu (2 of 2) ......... 4
Other Useful Features ........................................ 4
Log in to the VCP ............................................... 4
Forgot Your Password? .................................... 5
Managing Your Account .................................... 5
Suggested Order of Use .................................... 6
Account Tab........................................................ 6
Call Activity Tab ................................................. 7
Voicemail Tab ..................................................... 8
CallBlast Tab....................................................... 9
CallBlast to IP Phones ................................... 10
To Set up CallBlast ........................................ 10
CallBlast Configuration Examples ................. 10
Features Tab ..................................................... 11
Caller ID Settings ........................................... 12
7-Digit Calling ................................................. 12
Voicemail Delivery Options ............................ 12
Call Handling Options .................................... 12
Table 6 - * Key Options Menu ........................ 12
Time Zone ...................................................... 13
911 Info Tab ...................................................... 13
To Enter or Change your 911 Address .......... 16
Great Options (Downloads) Tab ..................... 16
Softphone Application .................................... 16
To install Softphone on your Computer ......... 16
Table 7 - Softphone Keys .............................. 15
For Further Information ................................... 15
Who Should Read this Manual
This manual describes the user features of VoIP
service and the VCP. The manual is intended for
users who want to manage their VoIP service.
Basic Features
• Browser-based VoIP Control Panel (VCP) for
managing all features
• Voicemail sent to email as MP3 attachment
• Voicemail notification sent to alpha pager or
SMS-enabled mobile phone
• Access voicemail from email, VCP or any
phone
• Message-waiting indicator
• Phone number(s) with any desired area code
or even from a different country
• Do not disturb (DND)
• Multiple call appearances on multi-line phone
• Local time zone management
• CallBlast – intelligent combination of “find me /
follow me” features
• 3-way calling
• Call waiting
• Caller-ID and call waiting Caller-ID
• Softphone can be used as a “roaming” phone
anywhere on the planet
• Full 911 coverage in US and Canada
2
• The ATA (with analog phone) or IP Phone you
ordered with your VoIP service
Optional Features
• Additional phone numbers (Virtual numbers)
all ring to the same phone
• Any other phone including mobile phones,
PDAs, Softphones or regular landlines.
• Numbers can be from any area code or even
from different countries
Choose how you will set up voicemail from the
options in the following table and dial the
appropriate number.
• Toll-free number rings to the same phone
• Inbound faxes sent to email as PDF
attachment
Table 1 - Voicemail Access
• Outbound faxes sent from any Windows
application
Terminology
The following terms are important to know when
using your VoIP service and the VCP.
Access Type
Number to Dial
Your ATA or IP
Phone
00
Any other landline,
mobile or PDA
phone
Dial your full 10-digit
number. Wait for the
announcement, then press
the * key and enter your
password when prompted
Account — Where basic information is stored
(e.g., name, password, phone number(s), and
feature set).
You are now in the voicemail Main Menu. Press 2
to create a personalized voicemail greeting.
Follow the prompts to record your first and last
name and your greeting.
Mailbox — Where callers leave you voicemail.
Numbers – Existing phone numbers that have
been transferred, new DIDs (even from outside
the US and Canada), and new or transferred Tollfree numbers (TFNs) can all belong to your
account.
Once you have recorded your greeting, select
one of the following options.
Table 2 - Recording Menu
Your VoIP Account
When you signed you up for service, you were
assigned a permanent user ID (your phone
number) and a password.
You’ll use your user ID and password to set up
and access your voicemail box from your phone
and later to manage your account via your VCP.
Key
Option
1
Play the recording.
4
Cancel the custom recording and return to
the default system settings.
7
Redo the recording.
Cancel the recording and return to the Main
menu.
Use the recording and return to the Main
menu.
*
You can also access your voicemail as well as
change settings and greetings from any IP,
landline, or even mobile telephone regardless of
where that phone is on the planet.
#
Once you have set up your personal greetings,
return to the Main menu and select from one of
the following options.
Next, we’ll go through all the details of how to set
up and use your voicemail.
Table 3 - Main Menu
Voicemail Set Up and Use
To set up your voicemail, use the password
123456. After you log in the first time, you will
have the option to change your password. You
can set up your voicemail box from any of the
following types of phones:
3
Key
Option
1
Enter the Message Center (Message
Center menu).
2
Change your greeting (Recording menu).
3
Change your password.
4
Change your name (Recording menu).
5
Enter the Features menu.
#
End the call.
Other Useful Features
• Three-way calling — Enables you to talk with
two other people at a time.
• Call waiting — Enables you to put a caller on
hold while you answer another call.
• Star key (*) features — For information on
how to use these features from your phone,
consult the Quick Reference Guide that
accompanied your device or contact your
Service Provider.
Accessing the Message Center
The Message Center allows you to listen to your
current, saved and deleted messages. Select
option 1 from the Main menu to enter the
Message Center. Then select from the following
options.
Log in to Your VCP
Table 4 - Message Center Menu (1 of 2)
Key
Option
1
Listen to your messages (Message menu
for regular messages).
Once your voicemail is set up, you manage your
account with your VCP, a browser-based
interface. To access your VCP, either log in by
going to:
http://voip.groundcontrol.com
Listen to your saved messages (Message
menu for saved messages).
Listen to your deleted messages (Message
menu for deleted messages).
Note: The VCP is best used with Microsoft
Internet Explorer 6.0 and higher, with Apple
Safari browser 2.0 and higher., or with Firefox
browser 2.0 and higher.
*
Return the voicemail Main menu.
#
End the call.
The first thing that appears is the login screen, as
shown below:
2
3
Once you listen to your message, select from the
following options.
Table 5 - Message Center Menu (2 of 2)
Key
Option
1
Listen to the previous message.
3
5
7
Listen to the next message.
Repeat the message.
Delete the message (not available for
previously deleted messages).
9
Save the message (not available for
previously deleted and saved messages).
00
Forward the message to a mailbox.
*
Return to the Main menu.
#
End the call.
4
VCP Login Screen
To log in to your VCP:
series of tabs, each designed to give you
information about and control over your account.
• Enter your User ID (your phone number).
Account — change your account information or
password.
• Enter the Password 123456
• Click the Enter button.
Call Activity — view and/or export the calls you
have made and received.
Voicemail — listen to, save, or delete voicemail.
Forgot Your Password?
CallBlast — enter up to four different phone
numbers that will ring whenever your VoIP
number is dialed.
If you have forgotten your Password, click the
Password Recovery link, then enter your User
ID and account email address, and a new
Password will be emailed to you immediately.
Features — send voicemail as an MP3
attachment to your email address, and/or get
voicemail notification to an alphanumeric pager or
mobile phone via SMS; manage enhanced
features, such as Caller ID, Call Waiting and
DND or change your current time zone so that
your calls and voicemails will be appropriately
time-stamped.
Note: The Password Recovery process creates
an entirely new password, so you’ll have to
remember this new one going forward or change
it using the appropriate page in your VCP.
Warning: Three consecutive failed password
attempts will lock you out of both your VCP and
your voicemail. You’ll need to call customer
service and have them unlock your account.
911 Emergency Info — verify or change your
911 Emergency address, which is where
emergency personnel will go when called from
your VoIP service. Warning: If you do not have
any 911 Emergency information in this tab it
means that it is not enabled for your account. 911
Dialing is NOT automatic with VoIP service. You
can always call 911 from a regular phone or from
a mobile phone.
Managing Your Account
Once you successfully log in, you’ll see the VCP
Main Screen, as shown below. This screen has a
5
Downloads (or Great Options) -- order and
download add-ons and products that enhance
VoIP functionality. This manual is also found
there.
VCP Account Tab
Suggested Order of Use
Account Tab
We suggest that you follow the order below when
using the VCP:
The Account tab appears by default when you
login to the VCP. It has three areas.
• Verify or change your 911 address information
using the 911 Info tab.
• View and manage your voicemail using the
Voicemail tab
• Change Your Account Name and
Password. Here you can modify your
account name and/or password. Enter the new
information and then click the Update
Account button. A password must be
between 4-10 characters and should be
numeric because you may also use it to
retrieve voicemail via a telephone keypad.
• View and export all your calls from the Call
Activity tab.
• Account Summary. The Account tab also
provides a Summary of Account details
• Change your password, if you want to, using
the Account tab.
• Set up and manage your CallBlast from the
CallBlast tab.
6
including: Account Name, Account Number,
and all Numbers in your account.
Call Activity Tab
The Call Activity tab allows you to view all calls
you placed or received over the past period of
time. You can also search through your call
history using call type and date criteria. Clicking
on the Call Activity tab brings up the screen
below.
• Contact Information. The Contact
Information comprises Name, Email address
and Time Zone.
Call Activity Tab
• Select the desired Format Type – Default will
show the results on your screen, whereas
Excel and CSV will export the results as an
XLS or CSV format file, respectively.
Call data includes Call Date and Time, From
Number, To Number, call Duration and Type
(Incoming, Outgoing, Missed).
From this page you can review particular calls by
the following process:
• Click Search.
• Choose what Call Type you want to view - All,
Incoming, Outgoing or Missed.
On-screen results are displayed 25 records to a
page (if more than 25 were found in your
Search).
• Choose the To Date, which is the date up to
(and including) which the search will take into
account.
• Choose Show Last – the time period from one
day to one month that you wish to search.
7
Note: You must set up your voicemail via a
telephone, not from this Voicemail tab in your
VCP.
Voicemail Tab
The Voicemail tab displays your voicemail
information, allows you to listen to your voicemail,
and allows you to change voicemail settings.
Voicemail Tab
The Voicemail tab allows you to:
• Listen, clicking which plays the Voicemail.
• Listen to your voicemail from the VCP with an
MP3 player, such as Windows Media Player or
iTunes.
• Status – New, Played, Deleted or Saved.
• From Number – who left the voicemail
• Date, Time and Duration
• Save voicemail messages indefinitely within
the VCP. You can save messages to your
local computer if you have chosen the email
option, or by saving the MP3 file that’s played
in the above point.
• Select Checkbox – used prior to clicking Save
or Delete. Click the upper right checkbox to
select all records.
The capacity of your voicemail box and the length
of time unsaved messages are kept are noted at
the bottom of the screen.
• Delete unwanted voicemail messages (they
will disappear overnight).
• Set up delivery of voicemail to your email or
notification of voicemail to an alpha pager or
via SMS to your mobile phone from the
Features Tab
The voicemail table has the following fields for
each record:
8
Softphone, regardless of where the device is
located.
CallBlast Tab
The CallBlast feature gives you the option to
route your incoming calls to up to four different
phone numbers simultaneously and/or
sequentially so that you can answer the call from
wherever you may happen to be.
Examples of different CallBlast setups – Typical,
Simultaneous, Sequential, Overlap, and
International - are on the CallBlast tab, as shown
below.
Any phone can be used as a destination - your
home phone, another VoIP phone, your mobile
phone, even a PDA or computer with a
CallBlast Tab
The above CallBlast configuration would work
like this:
voicemails will all be on that other phone’s
messaging system! In addition, if the total of
Rings Delay plus # of Rings on any of the
CallBlasted phones is greater than that same
total for your Primary VoIP phone, the call will be
handed off to the Phone with the longest total,
and thus will not go to your VoIP Voicemail.
1. Ring the Primary VoIP line of 5039141300,
which is on D01L01 (the first line on the first
device) for 6 rings before going to voicemail.
2. If the Primary line hasn’t been answered after
one ring, begin ringing 5039141310, and
ring that for 4 rings before stopping.
This means, for example, if your mobile phone is
set to 0 rings and you have it turned off, many of
your calls may go to your mobile phone
voicemail. Or if your mobile phone Rings Delay
and # of Rings totals 8 in the example above,
then an unanswered incoming call will simply die
instead of going to your Primary VoIP voicemail,
since that only totaled 6 rings.
3. If neither phone has picked up after two rings,
begin ringing 3108614708 and ring that for 3
rings before stopping.
Warning: if any of your CallBlast phones has
voicemail that picks up before the call is
answered or goes to VoIP voicemail, your
9
We recommend having at least 2 Rings Delay for
your mobile phone, which will mean that your
VoIP phone will ring roughly 3 times before your
mobile phone begins to ring since it takes 1-2
rings on your VoIP for a CallBlasted phone to
begin ringing even if you have the Rings Delay
set to 0. And make sure that your mobile phone
will stop ringing at least 2 rings before your VoIP
phone sends the call to voicemail.
your calls will go to your mobile phone’s
voicemail. Also, if you immediately push the
Ignore Call button on your mobile, the call
goes to the mobile’s voicemail and not the
primary VoIP voicemail.
8. Warning: If any of phones one through four
has voicemail set up and their voicemail picks
up before the call is answered or goes to you
primary VoIP voicemail, your voicemails will
be on one of the non-primary phone’s
message systems.
CallBlast to IP Phones
To include an IP phone as one of your CallBlast
numbers, enter the IP Device ID, which is usually
in the form of a URI. A SIP URI is the ID and
network address of the IP phone and may bear
no resemblance to a “normal” telephone number.
CallBlast Configuration Examples
The CallBlast tab provides five different sample
CallBlast configurations. Look on the left side of
the CallBlast screen and click on the button for
the type of setup you want. A pop-up window
appears and describes the configuration and its
results.
To Set up CallBlast
1. Enter your mobile, home or other numbers in
the Phone 1 thru Phone 4 fields as shown.
2. You make the number active by checking the
Active checkbox, or take it out of CallBlast by
unchecking the box. If you want calls to go
directly to voicemail, you can either turn on
the DND feature by pressing *78 on your
phone, or you can enter 0 for the number of
rings on your Primary VoIP phone, or you can
make your Primary VoIP phone not active.
You can also enable the DND feature by
clicking the Features tab and selecting the
DND checkbox.
3. Next, set the Rings Delay, which is the
number of rings on your Primary VoIP line
that CallBlast waits before launching a call to
the CallBlasted number(s). Zero is
recommended for your Primary VoIP phone.
Note: It takes 1-2 rings for a mobile phone to
begin ringing even if you have the Rings
Delay set to 0.
4. Last, set the # of Rings for each device, after
which the CallBlast call to that device will be
stopped. When a call is answered on any of
the devices, CallBlast automatically stops
ringing all other numbers. If the call is still
unanswered after the # of Rings for the
Primary VoIP line, the call is delivered to your
VoIP voicemail.
5. Click on the Update CallBlast button to save
all changes.
6. Make a test call to your VoIP number to make
sure it works as expected.
7. Note: If your mobile phone is a CallBlast
number and you turn off the mobile phone, all
10
Calling set up, Voicemail Settings, Enhanced
Services Settings (e.g., Do Not Disturb or Disable
Call Waiting) and the Time Zone used to timestamp your calls and voicemails.
Features Tab
The Features tab allows you to further customize
various settings and features including 7-Digit
Features Tab
11
• Forward all unanswered incoming calls to a
specific number.
Caller ID Settings
• Block Caller ID for all outbound calls.
If you have more than one VoIP Number on your
account, this is where you choose which one is
used as Caller ID on all your outbound calls. If
you have only a single DID on your account, this
section won’t appear at all, as in the example
above. Make your selection and then click the
Apply button in the Caller ID Settings area.
• Do not accept calls from anonymous callers
(no Caller ID).
• Enable Do Not Disturb
• Disable Call Waiting on all incoming calls on a
fax or modem line.
7-Digit Calling
Click on the checkbox in front of the option or
options you desire and then click the Apply
button. To reverse the option, uncheck the box
and click Apply.
If you make a high percentage of your calls within
a single area code of US or Canada, you can
save yourself some key presses by leaving the
country code field set to 1 and entering that area
code in the second field.
You can also access these and additional call
handling options by using the * key on your
phone. See the following table for key
information.
It may be the area code of your VoIP phone
number or it may be completely different.
Whenever you dial just 7 digits, we automatically
prepend these two fields (1 + area code) to the
number you dialed. Click Apply to save your
choice.
Note: Do not enter the voicemail system before
using these numbers. Lift the handset and dial
them.
Table 6 - * Key Options Menu
Voicemail Delivery Options
In addition to retrieving voicemail from any phone
or through the VCP, you can have the full
voicemail sent to your email address as an MP3
attachment. This is also the easiest way to save
your voicemail to your local computer. The email
address field here identifies where voicemails
(and faxes if you have IP-Fax service on a
separate phone number) are sent.
Key
Option
*69
Place a call to the number from
which you were last called.
*72<number>
Forward all calls to the number
entered after 72.
*73
Cancel forwarding of all calls.
You can also have a notification of each
voicemail sent to your mobile phone via SMS or
to an alphanumeric pager. Pager and SMS
notifications are sent to an address in the
appropriate field just below the email field.
*92<number>
Forward all busy or
unanswered calls to the
<number> entered after 92.
*93
Cancel forwarding of all busy or
unanswered calls.
Changing your email address redirects your
voicemail. This might be useful if you are
traveling and don’t have access to your regular
email account.
*67
Once set up is complete, click the Apply button
and leave yourself a test voicemail to make sure
it works as desired.
*67<number>
*82
*82<number>
Call Handling Options (Star Features)
*77
This section area allows you to use checkboxes
to turn on and off certain star key (*) options,
such as:
*87
• Forward all incoming calls to a specific
number.
12
Block Caller ID for all outbound
calls.
Unblock Caller ID for all
outbound calls.
Block Caller ID for single call to
<number>.
Unblock Caller ID for single call
to <number>.
Don’t accept calls from
anonymous callers (no Caller
ID).
Accept calls from anonymous
callers (no Caller ID).
Key
Option
a new time zone from the drop down menu and
click Apply.
*78
Turn on Do Not Disturb (all calls
go directly to voicemail).
You can also see your time zone on the Account
tab, but cannot change it from there.
*79
Cancel Do Not Disturb.
*56
*57
*70<number>
*76<number>
*30
*31
911 Info Tab
Enable Call Waiting on all calls
on main line.
Disable Call Waiting on all calls
on main line (for a fax or
modem line).
Disable Call Waiting only for
this call to <number> (for a
single fax or modem call).
The 911 Info tab (see screen below) allows you
to verify or change the address to which you want
emergency personnel to come if you dial 911
from your VoIP phone. We verify your address
with regional and national 911 address
databases, so it is crucial that you change it
appropriately and re-verify if you move.
Enable Call Waiting only for this
call to <number>.
Disable call waiting on all user
lines.
Enable call waiting on all user
lines.
Warning: 911 response is not automatic with
your VoIP service. If your address has never
been entered or you move and do not change
your 911 address, a 911 call from your VoIP
phone may be significantly delayed or
misrouted. You can always call 911 from a
regular phone or from a mobile phone.
Time Zone
This area displays your currently selected time
zone, which is used to timestamp all your calls
and voicemails. To change your time zone, select
13
911 Info Tab
Warning: If your new 911 Address is not
confirmed, then emergency personnel may
not be able to send assistance to you.
To Enter or Change your 911 Address
To enter your address for the first time (if it
somehow didn’t get entered when you signed up
for service) or to change the address shown,
enter the new (or changed) data, carefully
following the fields. Note: Street # and Street
Name are in separate fields, and apartment or
unit numbers are in their own field, titled Address
Type #.
Please refer to the 911 Dialing section of our
Terms and Conditions of service for important
information on potential limitations of this 911
feature, including the differences between the
VoIP 911 feature and traditional 911 service.
Great Options (Downloads) Tab
Then click the Validate button and you’ll either
get a response Number is Valid, or Number isn’t
Valid, but here’s a few close choices. Once
you’ve gotten a valid response, then click Update
Entry to change you 911 Address.
From the Great Options tab you can download
add-ons and products that enhance your VoIP
service functionality. This manual is available for
download from this tab, as well.
This screen will look something like this:
Great Options (Downloads) Tab
• Click on the Softphone download link. The
following screen appears:
Softphone Application
Our Softphone is a Window-based application
that allows you to turn your computer into a VoIP
device and serve as a globally mobile VoIP
phone. Calls to your VoIP phone number will ring
on your computer when the Softphone application
is running, and you will be able to place calls
wherever you have access to a broadband
Internet connection.
All calls and voicemails will show up in your VCP
just as they do if you were sitting at your desk.
To install Softphone on your Computer
• Click on the Great Options tab in the VCP.
14
• Click Save to save the software installer to
your preferred directory or click Run to the run
the software installer immediately.
Table 7 - Softphone Keys
Key
• Run the installer and follow the prompts to
install and configure your Softphone.
Click here to get a dial tone or to make a
call if you have already entered the
number you wish to call.
Click here to use line one out of a possible
two.
Click here to use line two out of a possible
two.
Click here to adjust the microphone
volume. This is the volume at which the
outside caller hears you speak.
A
• Once you have installed Softphone, you see a
shortcut on your desktop.
B
• Double-click the shortcut icon to launch
Softphone. The Softphone interface appears,
as shown here:
C
D
E
Click here to mute your voice so that the
outside caller cannot hear you.
Click here to dial numbers, and the * and #
keys.
Click here to turn off either your computer
speakers or the USB phone speakers. If
you use this option, you will not be able to
hear the outside caller speak.
F
G
QuickTime™ and a
TIFF (Uncompressed) decompressor
are needed to see this picture.
Use the Softphone as you would your ATA or IP
phone. Use the mouse to click on the numbers you
want to dial. See the following table for information
on the Softphone keys.
Function
H
Click here to adjust the volume at which
you hear the outside caller speak.
I
Click here to show and configure device
settings.
J
Click here to launch the VCP.
K
Click here to show your call list.
L
Click here to end the call.
M
Click here to redial the last dialed number.
N
Click here to clear the last dialed digit.
O
Click here to close the Softphone
application.
Click here to display version information
about the Softphone application.
P
For Further Information
If you have other questions about your VoIP
service, please contact us.
15