1
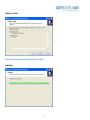
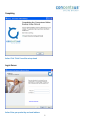
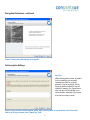
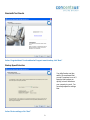
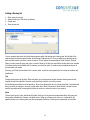
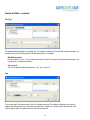
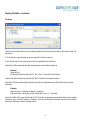
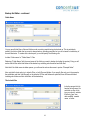
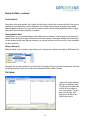
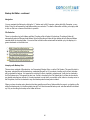
Concentsus Online Backup
User Manual
Concentsus Small Business
5252 Edgewood Drive, Suite 250
Provo, UT 84604
888-889-9949
www.concentsus.com
© 2008 Concentsus, a service of eFileCabinet, LC – All Rights Reserved.
0
Overview
Concentsus Small Business makes online backup secure, flexible and affordable, incorporating
innovative technology into a robust, easy-to-use solution. Concentsus online backup provides a
simple, straight-forward way for users to store their valuable business documents, correspondence,
and mission critical files in a reliable, off-site location. Concentsus delivers total data security with
advanced encryption and superior performance, making it the trusted online backup system for
home, small business and enterprise users worldwide.
Installation
To install Concentsus, you will need to download the latest version of our software by visiting
www.concentsus.com/signup.
Product Keys
Upon completion of installation, the Concentsus client will automatically obtain a product key and
configure itself according to the settings specified in the admin control panel.
Installation Step-by-step
When you run the installation wizard after downloading the Concentsus client, you’ll be presented
with a series of options. To successfully complete the installation, you will need:
• An available product key
• User Name
• Password
The following guide will provide step-by-step instructions for the installation and set-up of
Concentsus Small Business.
Need Technical Assistance?
The Concentsus Technical Support team is ready to help.
Phone
Email
Hours
801-374-5565
[email protected]
Monday – Friday, 8:00am – 5:00pm MST
1
Welcome
Action: Read and click “Next”
License Agreement
Action: Read, select “I accept the agreement” and click next or choose “I do not accept the agreement” and exit the
installer.
2
Install Destination
Action: Accept the default location: C:\Program Files\Concentsus
Or change it according to your preference and click “Next”
Start Menu Description
Action: Accept the default folder “Concentsus” or change it according to your preference and click “Next”
3
Ready to Install
Action: Review your choices as listed and click “Install”
Installing
4
Completing
Action: Click “Finish” to exit the set up wizard
Log-in Screen
Action: Enter your product key and email address.
5
Admin Details
Action: Choose a user name (your email address) and a password. You will need this password to restore
your files and login to the Concentsus site.
Encryption Preferences
IMPORTANT!
READ THE INFORMATION
BELOW BEFORE CHOOSING
YOUR ENCRYPTION METHOD.
Using Concentsus’ own 448-bit key protects your data with Concentsus’ own unique key. You won’t need
to keep this key anywhere on your system. It is kept for you on the Concentsus servers. Our own methods
of advanced encryption ensure against any kind of fraud and theft, and also guarantee that you will always
be able to decrypt your files.
Self encrypt indicates that you would like to encrypt your data using your own unique key phrase or file.
If you choose this method, you will be solely responsible for the protection and safety of your key.
If you lose it, you will not be able to decrypt your files should you ever need to restore them. Unfortunately,
given that there is no way to decrypt these files without the associated key; Concentsus will not be able to
help in this circumstance.
6
Encryption Preferences - continued
Action: Choose your preferred type of encryption.
Self-encryption Settings
Key Tips:
When entering a pass phrase, be certain
that it is something you can easily
remember and that it is not easily
guessed. It can be any length, but the
longer the better provided you can still
commit it to memory. It is a good idea to
save your key to a file and keep it in a
secure location, especially if you choose
a key that is not easy to recall.
Action: If you choose the self-encryption option, enter your key either as a pass phrase in the “Enter Key”
field or as a file you choose in the “Import Key” field.
7
Backup Sets
Backup sets are a powerful way to choose what kinds of files you would like to backup. Included are a number of
pre-built backup sets for many different types of files – office documents, bookmarks, music, photos, etc. If you
have other files that aren’t covered in the pre-built backup set, you can choose to use expert configuration, or
simply run the Concentsus Configuration Utility at a later time. See “Configuration” for more details.
Action: Choose files you would like to backup and click “Next.”
Bandwidth Test
Concentsus will perform a short
bandwidth test to ensure that
your broadband connection is
sufficient to run the program.
Action: Click “Start Test” to
begin.
8
Bandwidth Test Results
Action: Congratulations! Your broadband will support remote backup, click “Next.”
Backup Speed Selection
Your initial backup can take
awhile. We recommend that
you set Concentsus to run at ¼
speed so that backups run
quickly, but won’t slow down
your computer too much. You
can always adjust the settings
later.
Action: Review settings, click “Next.”
9
Setup Complete
Action: Upon completion of setup, you will be directed to windows that will enable you to configure exactly
what data you want to backup, how you want to back it up and when. Here, you may select “I’d like to
continue configuring my backup in Expert Mode” (instructions follow). You can also select start my
backup now to launch your backup immediately or start your initial backup at a later point when your
computer is idle.
Configuration
Concentsus can backup any file or file type on your local system. For your convenience, there are two ways to
select files. One is via Concentsus’ unique backup sets, the other is through direct file selection. To use either
method, simply open the Concentsus Configuration Utility. You can do so in any of three ways:
1. Right click on the “cent” icon in the system tray.
Select “Configure”.
2. Double click the “cent” icon in the system tray.
The Concentsus status window will open.
Simply click the “Configure” button.
3. Click the “Start” button, select “All Programs”
Select “Concentsus” and click on “Concentsus Configuration”
10
Layout
Each tab in the layout represents a different section of the user interface. In brief, the Backup Sets tab (shown
above) is the control panel for all backup sets, File System tab is where you can directly select files on your system
for backup, the Schedule and Options tab handles scheduling and general program options, respectively, while
History displays the results of each of your backups.
Viewing section: This is where each section will be displayed. Currently, the two-pane window for backup set
control is displayed.
Status Bar: This displays your quota, quota usage, save and cancel buttons, as well as a file count displaying how
many files you have configured to be backed up.
Increase Quota:
When you see that you are approaching using your full quota, you'll want to consider increasing your quota.
Clicking this button will take you online to purchase additional quota.
Quota Used Bar:
This is the easy way to see just how much of your quota the selected files will take. Note that this includes the quota
used from other computers, so as long as your file / backup sets selections stay below 100%, you'll be able to
successfully back up.
Quota:
This indicates your total quota.
Used:
The textual representation of the Quota-used bar. Indicates exactly how much quota your computer or computers
have utilized. It is displayed in this format:
Used: [local computer] ([all computer])
11
Layout – continued
Example:
Used: 1.2GB (1.5GB)
This would indicate that the local system is using 1.2GB of quota, while another computer is using .3GB for a total
usage of 1.5GB (as displayed in the parenthesis.
Remaining:
This will show exactly how much space you have left that you can use- be warned, however, that this number is
derived from exactly how much quota you have used at the moment you opened the configuration window - if you
have another computer on the account, it is possible that it will not have finished backing up, in which case, only the
amount backed up at the time you open the configuration window will be displayed, not the projected total.
Removing Files
If you receive an over quota error message, or find that you are about to run out of space available to backup, you
have two options. You can either raise your quota (see "Configuration: Status bar explained: Increase Quota", or
you can remove some files from your configuration. Doing so is as simple as un-checking them from within the
configuration window, either in "Backup sets" or in the "File System" tab. Once done, upon the next backup, the
file(s) that you unchecked will be marked for deletion on the Concentsus servers. The most recent version will be
kept for thirty days, after which the file will become irretrievable. Once unchecked, it will immediately release the
quota used by that particular file- previous versions of files do not count against your quota, as seen here.
Deleting, Renaming, and Moving Files
Concentsus recognizes when you delete, move, or rename files from your system and updates the server's copy
with each backup. As a general rule, Concentsus will always keep an exact copy of your system on the serversmeaning that all changes (deletions, moves, renaming) of files on your system are mirrored exactly on the servers.
Deleting
When you delete a file from your computer that is being backed up, on the next backup, Concentsus will mark the
file as deleted on the servers. The most recent version of the file will be kept, corresponding to the date of its last
backup, for thirty days after the file was marked for deletion and be available for restore, after which it will be purged
from the system and no longer be available for restore. The quota used by files that you delete will immediately be
freed- archives or previous versions of files do not count against your quota.
Renaming
When you rename a file on your system, Concentsus will treat this as a deletion of the old file and a creation of a
new file with the same contents. This is transparent to the user- to restore the file, if the date is prior to the
renaming, the file will bear the old name. After the date of renaming, the file will carry the new name. All versions
are kept.
Moving
When you move a file from one location to another on your file system, Concentsus will treat this as it does a
renaming- it will see a deletion of the old file and a creation of a new file with the same name and contents in a
different location. Again, this is transparent to the user- to restore the file, if the date is prior to the move, the file will
be located in its original folder. For dates after the move, it will be found in the new location. Note
12
Layout – continued
Moving- continued
Note: If you've moved the file to a location that is not being backed up, Concentsus will simply treat the file as
deleted.
Backup Sets
Backup sets can make your life a lot easier. With backup sets, you'll simply need to define the type of file you want
to backup, be they Office documents, pictures, music, or any other file type, then select the location you want
Concentsus to watch. Concentsus will then monitor that location and automatically select those files.
Action: To add a new backup set or edit an existing set, simply right-click anywhere in the left view pane
within the backup sets tab. Doing so will open the Add/Edit dialog:
13
Adding a Backup Set
1.
2.
3.
4.
Enter name for new set
Select location(s) of files to be considered
Create rules
Save the new set
You can create a backup set by right-clicking anywhere within the backup sets viewing pane- the left side of the
window where the backup sets are listed- and selecting "Add backup set". Doing so will bring up the backup set
editor and will present you with a number of options. Those options are enumerated in Rules: Include / Exclude
When you have a specific type, date, size, or name of folder or file that you would like to backup that is not included
in the base backup sets included with Concentsus, you have the option to create a new rule-based backup set to
accommodate your needs.
Following, you'll find documentation for the various rules, as well as some general tips for backup set creation and
modification.
Tips
Creating backup sets can be tricky. Especially when you have a backup set that includes chaining several rules
together to select the right files. Here are some tips that should help you in this process.
Avoid selecting an entire drive to be backed up. Even if your backup set will only include a few files, Concentsus will
have to monitor all changes to every file on the entire drive. While Concentsus is quite efficient, it's best to be as
specific as possible when choosing which folders to monitor to reduce the load on your system.
Rules
There are two types of rules: Include and Exclude. Each type of rule shares the same base filters- file types, size,
last modified, created time, filename, and folder name. Using any of these rules- alone or in combination- will
significantly aid you in ensuring that your files are properly backed up. Following is an explanation of each filter.
14
Backup Set Editor - continued
File Type
The quintessential specification for a backup set. This makes Concentsus look for files with a specific extension. An
extension is the part of the filename that follows the last period- for example:
WordDocument.doc
Has an extension of "doc". You can create a backup set to watch for as many file extensions as necessary. Just
type them all in, separated by a space:
doc xls txt rtf
This line will watch for files with extensions: .doc, .xls, .txt, and .rtf
Size
You can also have Concentsus watch for files of a certain size range. The simplest configuration is to create a
single rule for files greater than or less than a specified size. To watch for a certain range of sizes of files, you'll
need to add two rules: one greater than rule and one less than rule.
15
Backup Set Editor - continued
Last Modified
Similar to the Size rule, you can specify that Concentsus watch for files that have been modified in a specific range.
To specify a range, you'll need to add two rules: one greater than rule and one less than rule.
Created Time
Similar to the "Last Modified" rule set, working with the creation time of a file instead of the modified time.
16
Backup Set Editor - continued
File Name
There are several sub-options to aid in creating filename rules. Each works as a filter for the name of a file. The
options are:
Is: If the filename is exactly equal to the one specified, it will be backed up.
Is Not: All files that are not exactly equal to the one specified will be backed up.
Starts With: All file names that start with the characters entered will be backed up.
Example:
Starts with: Hi
Will backup all files that start with "Hi" like: "Hi.txt", "Hi world.rtf" and all others.
Doesn't Start With: Will backup all files that do NOT start with the characters entered.
Ends With: Will select and backup all files that end with the characters entered. Note that this does include
extensions.
Example:
Ends with .bmp : will backup all bitmap (*.bmp) files
Ends with h.bmp : will backup all files ending with h.bmp- i.e.: "ouch.bmp"
Doesn't End With: Will backup all files that do NOT end with the characters entered. Note that this also includes
extensions. Also note that a space is a separator- if you have a filename that includes a space, you will need to
enclose the filename in quotes: "Example name"
17
Backup Set Editor - continued
Folder Name
You can specify that files or files and folders under a certain parent directory be backed up. This is particularly
useful if you have a folder that you want to always backup, including new files, but you do not want to include any of
the sub-directories. To create such a backup set, you would specify the following rule:
Include: Folder name: Is: "Folder Name": Files
Replacing "Folder Name" with the exact name of the folder you want to backup (including the quotes). Doing so will
ensure that all files within that folder will be backed up, excluding sub-directories and their files.
Note that if the folder name includes spaces, you will need to enclose the name in quotes: "Example folder"
Also note that the last option is to include Files, or both Files and folders- if you specify files only, as in the example,
the subfolders and their child files will not be included. If Files and folders are specified, then all files and foldersincluding sub-folders and their child files- will be backed up.
The Include Rule
Including means that the
backup set will search for
and back up files of the
type you specify, whether
that be by type, size,
date modified, created,
name, or folder
18
Backup Set Editor - continued
.
The Exclude Rule
An exclusion is the exact opposite of an Include rule. Note that an exclusion will not ensure that files of the type you
specified will not be backed up in another backup set- it is localized to the backup set in question and is always
balanced against another rule. It is very useful if you want to create a backup set that will backup all files in a given
folder with a certain exception- .tmp files, for example.
Chaining Multiple Rules
As noted before, you can create a backup set with multiple rules- sometimes it is the only way you can achieve the
desired results. Backing up a range of file sizes is an excellent example of the need for multiple rules. Note that you
can use as many rules as many times as necessary- you can use more than one File name rule, in any combination
you deem necessary.
Editing a Backup Set
Editing a backup set is as simple as right-clicking on the backup set in question and selecting "Edit backup set":
Alternately, you can simply double-click on the backup set in question. Doing so will open the backup set edit dialog
and display a number of options, all of which are enumerated in Rules: Include / Exclude.
File System
Using the file system selection
method is as simple as it gets.
The left pane is the folder viewit will list all of the folders on
your local computer. The right
pane is the file view- it will
display all of the files in any
folder that you select.
19
Backup Set Editor - continued
Navigation
You can navigate the file tree by clicking the "+" button next to My Computer, a drive within My Computer, or any
folder. Doing so will expand the sub-folders within your selection. To view the files within a folder, you simply need
to click on the icon or name of the folder in question.
File Selection
There is a checkbox by both folders and files. Checking a file will select it for backup. Checking a folder will
automatically select all files and sub-folders. Note that checking a folder will also backup all new files and folders
created within the checked folder. You can tell that a folder's new contents will be backed up by the display of a
green checkmark on the folder icon:
Interplay with Backup Sets
There are two methods of file selection- via Concentsus’ Backup Sets, or via the File System. The result for both is
the same- selected files will be backed up, unselected files will not. If you select a backup set, the files it includes
will be checked for backup. It is important to note that if a file is checked in a backup set, it will also be checked in
the File System view. The opposite is also true- if a file is checked in the File System tab, it will also be checked in
any backup sets that may include it. It is also important to note that if you uncheck a file, either in a backup set or in
the file system, it will be unchecked in any other backup sets that may also include it.
When you have a backup set or directory that also specifies new files or folders within the parent, un-checking a file
within that backup set or in the file system view will *not* alter the new file backup rule- new files will still be backed
up. Only un-checking the backup set or folder will do so.
20
Schedule
Automatic
Allowing Concentsus to backup automatically will ensure that your backups are always up to date. This is
commonly called "Continuous Data Protection". When set to backup automatically, Concentsus will check the
conditions on your computer and backup and if the conditions you set here are met, Concentsus will perform
backup every two hours. There isn't a way to change this delay. Because the backup process could conceivably
interfere with your normal use of the computer, there are two options to control how Concentsus decides when to
backup:
Don't backup if the CPU is over this % busy
This is the percent of CPU usage that Concentsus will consider "idle".
Don't backup unless the computer has been idle for at least this long (minutes)
Concentsus will not perform a backup unless your computer has been idle (see above for changing Concentsus’
definition of "idle") for at least this long, set in minutes.
Pre-set Schedule
Backing up on a schedule is the best option if you are concerned about bandwidth usage, interference with your
normal operation of the computer, or you would prefer backups to happen less often. You can set Concentsus to
backup daily or weekly, and choose the time of backup. You may also extend the backup period by choosing the
number of days or weeks to pass between backups.
21
Options
General
a) Automatically login
If checked, you will not need to input your username or password when you open the configuration window. If
unchecked, it will prompt you for your password every time you wish to alter your configuration. Checked by default.
b) Show tooltips
Displays "ToolTips", or descriptions of controls in the configuration window, when the mouse is hovered over the
control. Checked by default.
c) Support for open files
Note: This option is unavailable on systems that do not have an NTFS-formatted drive.
If checked, Concentsus will be able to backup both open and locked files. Generally, files that are in use (open), or
being written to (locked) cannot be opened by another program. Concentsus uses advanced software technology to
enable it to open and read these files at the time of backup. Checked by default.
d) Show status after...
This will cause the status window to be displayed after every successful backup. Checked by default.
e) Show status when...
This will cause the status window to be displayed when every backup starts. Checked by default.
f) Warn me...
If checked, then a dialog will periodically pop up if you over quota. Note that un-checking this option will not allow
you to backup more than your quota- you will simply receive an error (AccountError3) when you reach that quota
and you will be forced to reconfigure to an appropriately sized backup. Checked by default.
22
Options - continued
General - continued
g) Automatically update
If checked, when the Concentsus software has been updated, it will automatically install any updates as soon as it
is released. Recommended, but unchecked by default.
h) Show all backup sets
Concentsus comes with a large number of pre-built backup sets. The program scans your system to determine if
you have any files that are included in any of these backup sets and if it finds them, it will display the appropriate
backup set. If you do not have any files that fit the backup set, it will simply not display it. If you would like to view all
backup sets, check this option. Un-checked by default.
i) Show all protected...
Concentsus is best used to backup files that you would not be able to replace- meaning documents, presentations,
photos, videos, and other files that you have created. Generally speaking, it isn't a good idea to backup programs
and their respective data files- these can be replaced by simply installing the program again on a different system.
For this reason, Concentsus has hidden the C:\Program Files and C:\Windows directories to assist users in making
wiser backup choices. If you need to backup files or folders within these directories, checking this option will show
these files and folders. Un-checked by default.
j) Reduce resource usage...
One of Concentsus’ more powerful features. When checked, it will force Concentsus to use less of your system
resources to perform a backup when someone is using the computer. It will decrease CPU usage and place an
artificial throttle on bandwidth. Doing so will slow down the backup process dramatically, but it will also ensure that
you have full access to all of your computers abilities, even at the time of a backup and as such is extremely useful
for running Concentsus in the background while continuously protecting your data. Checked by default.
Bandwidth Throttling
23
Options - continued
Bandwidth Throttling
Parameters:
You can limit Concentsus’ bandwidth to less than 1 Megabit per second. Enabling the throttle will ensure that
Concentsus will use only the specified bandwidth. If you have a slow or shared internet connection, you may want
to consider enabling this to preserve bandwidth for browsing or for other computers on your network.
Always/Schedule:
When throttling is enabled, you have the option to specify the times of day when it should be in effect. This is
particularly useful if you are not concerned about bandwidth at night or during off hours.
History
One of the best tools Concentsus provides to make sure that your files are completely backed up is the History
view. Here, it will list all of the files that were backed up in each backup session, list any problems there might have
been, and also let you know just how long it took to backup each file- more details than you ever thought you
needed.
Layout:
The history view is split in two sections- the top pane displays all backups performed, in a list format. The bottom
pane is reserved for details of the selected backup. You can select a backup by simply clicking on its entry in the
top pane.
Entries:
A large number of details of each backup is kept- the time, whether it was scheduled, automatic, or manually
initiated, duration, resulting status, file count, etc. For each backup, a full list of files backed up is also kept, along
with the backup details of each file.
24
History - continued
Note that an empty "Other details" indicates that the file had already been backed up and no changes were made to
the file. Also, please note that "File already on Concentsus servers" indicates that the file was backed up previously
and transfer was unnecessary.
Backing Up
The backup process couldn't be simpler- it's one of Concentsus’ many strong points. Whether you've chosen to
backup automatically or on a schedule, Concentsus won't require any supervision to ensure that your files are
safely and securely backed up. Concentsus was designed to run in the background and stay out of your way while
backing up your files.
Status Window
The status of the current backup (if running), or status of the last backup performed (if no backup is running) is
displayed in this, the "Status" window.
Backup in progress...
Indicates that a backup is currently running.
25
Backing Up - continued
Backing up (size)
Shows the full size of all files currently being backed up.
Estimated time
An estimation only of the time it will take to finish the current backup.
Progress Bars
Encoding bar:
This progress bar shows how much of the current backup set has been encrypted and encoded for transfer. This
will frequently stop as the actual transfer of the files being backed up catches up.
Network bar:
This progress bar indicates the percent of the current backup set that has been successfully transferred to the
Concentsus servers.
Buttons
26
Backing Up - continued
Buttons
Cancel/Start:
If a backup is running, this button will be labeled "Cancel Backup" and can be used to cancel the running backup. If
there is no backup in progress, it will display "Start Backup" and can be used to initiate a backup.
Configure:
If clicked, this button will open the configuration window (see Configuration).
History:
If clicked, the history view will be opened. See Configuration: History for more details.
Restore files:
This button, if clicked, will open your browser to the following location: https://concentsus.com/restore
This is the Concentsus Web Restore system. See Web: Restore for more details.
Hide:
Will close the status window.
Status Window - Complete
By default, the Status window will display after every successful backup. You can change this option in the
Configuration window on the Options Tab.
27
Client Restores
Sometimes you need to restore a file or two right away- suppose you've lost a business
manual or an important presentation and you desperately need it back. You'll simply need to
open "My Computer", select "Concentsus Online Backup", and you'll be able to instantly
restore the files you need. Even if you've made unwanted changes to a document and need
to return it to its original state, you'll be able to choose from any of the many versions you've
backed up with Concentsus.
Context Menu
You’ll notice, if you right click on a file or directory that is being backed up by
Concentsus, a new addition to the pop-up menu: "Restore files in folder" or "Restore
file". This is a fast and convenient way for you to restore or roll-back changes you've
made to the files on your system that you have backed up with Concentsus Online
Backup
Restoring a File
If you right-click on a file that
has been backed up with
Concentsus and select
"Restore file", a window will
open displaying all versions the
particular file you have backed
up of
A version is created at the time
of a backup. You can roll back
unwanted changes to files by
restoring previous versions. To
complete the restore process,
either double-click on the file or
right-click and select “Restoreto”
28
Client Restores – continued
Double-click (or right-click : Restore):
This will prompt you to overwrite the file on your current system, if there is a local copy. If you choose yes, then the
restored version will replace the current file. If you choose no, it will create a file with the same base name with an
"-#" appended to the end, where the "#" is replaced by a number, incrementing as necessary.
Right-click : Restore to
Selecting this option will allow you to restore the files or folders you've selected to a specific location on your hard
drive. You will be prompted for the location to restore to, after which the restore will proceed normally.
Choosing a Date or Version
As mentioned above, each date and time represents a date and time of backup and corresponds to a version of the
files backed up:
For example, if you backup a text file, then make changes in the next two hours, after which the file is backed up,
you will be presented with two date/times of backup. The first, if restored, will restore the original file. The second
will restore the file with the changes you made in that two hour period.
Restore to a Location
If you do not want to overwrite the files on your system, you can choose to restore to a different location, specifying
the location to save the files to. To do so, simply right-click on the file or folder in question and select: "Restore
to...":
Concentsus will then prompt you for the location to which you want to restore your files.
29
Client Restores – continued
Choosing a Date or Version
Once selected, it will promptly restore those files.
My Computer Restores
As documented above, you have the option to restore files using the right-click context menu
while browsing your files. There is also another way to restore your files without visiting the
web- using the "Concentsus Online Backup” drive in the "My Computer" display. Opening this
drive will display all drives and files that you have backed up with Concentsus and allow you
to browse them as you would your actual files. You can restore any file or folder by rightclicking and choosing either "Restore" or "Restore to". If it is a file, you can double-click the
file to bring up the restore dialog.
Browsing
Browsing the files you have backed up
with Concentsus is identical to browsing
the files on your local system. Doubleclicking on a folder will open it and display
any sub-folders or files. Double-clicking a
file will open the restore dialog.
30
Client Restores – continued
File Selection
You can select multiple files and folders for restore by holding the CTRL button down and clicking the various files.
Once you've selected all of the files/folders you would like to restore, right click on any of the selected files or
folders and select "Restore" or "Restore to".
Restore to a Location
If you choose to restore a file that already exists on your system, you will receive this warning:
If you do not want to overwrite the files on your system, you can choose to restore to a different location, specifying
the location to save the files to. Concentsus will then restore the files normally, saving them to the location of your
choice.
31