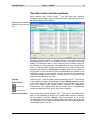
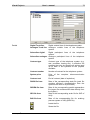
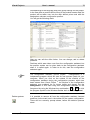
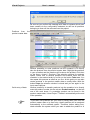
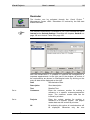
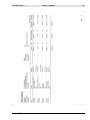
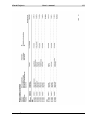
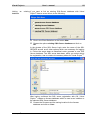
1
Visual Project ® - User Manual - Contents Introduction 1 Conventions and Symbols Installation 2 5 System Requirements Installing Visual Project Start of installation Remarks regarding installation on Vista, Windows 7 and Windows Server 2008 Installation Setup Program and Data Updates Deinstallation of Visual Project ® Remarks regarding Copy Protection Program Design/ Applications Program Modules Applications 5 5 5 6 9 13 14 14 16 16 17 Program starting/ending 19 ® 19 19 21 Start Visual Project After starting the program Ending the program Operation of the program ® The Visual Project Management-Center The Status line Operation with selection windows Page view and print Master data Countries Federal states ZIP-code book Salutations Lines of Business Text modules Company data Price groups Price types Value added tax characteristic Language Offer texts Edit 22 22 24 25 33 36 36 38 39 40 41 42 44 49 50 51 53 54 58 Projects Project editing Prospective Buyers/Customers Products Administration Import Supplier Data bases Reminder Outlook-Tasks Analysis Offer potential Product group division ABC-Potential Product evaluation Project status overview Caller List Extras Leasing offer Service-Center Solutions Consulting Options User administration User rights Change Password Changing Client Linking Microsoft Access Databases Linking a Microsoft SQL-Server Database Language Settings CTI-Settings Outlook-Settings Database reorganization Database Backup Master- / Slave-Mode Help Manual User support Program info Online-Support Wizard for program updates Products update wizard Send Service Protocol Licensing 58 66 101 131 139 139 148 150 152 153 155 157 160 162 165 166 166 166 170 170 172 172 175 177 178 180 183 189 190 192 192 193 194 200 200 200 200 201 202 205 209 209 Interfaces to other programs MS- Outlook Open Architecture Microsoft SQL-Server-Data base Access protection MS-Access Customization 212 212 216 216 216 216 217 Visual Project ® User`s manual 1 Introduction Congratulations! With Visual Project ® you have purchased an efficient and open sales tool which is especially made for the demands of telecommunication companies. With Visual Project ® you own an efficient tool which enables you to carry out an optimal computer-supported acquisition, project management, quoting, sales control and analysis. You have the possibility to file all relevant data regarding prospective buyers and customers. These are for example address data, branch assignments, contact persons, telephone calls, visits, stocks, contract data and many more. In the product master data you can enter and change all product information of any suppliers. You can create up to 10 price types in up to 10 price groups for every product. By means of the wizard for products update you can insert quickly and efficiently the latest current product data of various suppliers and create hereby your own pricing. Using our efficient quotation methods you can make competitive and tailor made offers which can then be assigned to the customers and prospective buyers. Special efforts were made to make the layout of the quotation flexible. This enables you to insert a product and a blank at any spot, create packages or use pre-defined text modules. Even discounts on each single price type of the products and product groups are possible, as well as a retrospective project calculation. The quotations can be changed in any way and at any time in order to provide maximum flexibility for the layout. Created quotations can be put into a resubmission list, so that an optimal project supervision is possible . Writing an offer will be accomplished by the highly efficient and fully integrative Add-On Visual Project Configuration. Visual Project Configuration is a configuration tool by which single components of telecommunications and information technology systems can be compiled to an optimum solution. By means of this tool, complex systems can be projected within a very short time on a graphical user interface. The configuration results or product data can be taken over into your Visual Project ® offer automatically. A latest leasing offer can be created with the leasing tool by just pressing one button. Furthermore, it offers analysis- and statistics possibilities which are efficient and easy to operate and this enables you to optimise control or planning of the business for success. Permanent access to all relevant information/data provides a complete transparency and security in every phase of the operation. Visual Project ® Revision 2013.12 Visual Project ® User`s manual 2 Visual Project ® offers the following possibilities: Creation and up-dating of customers’ and prospective buyers` database with acquisition and master data Up-dating of your own product master data Management of text modules Import of manufacturers’ and suppliers’ data with individual pricing Configuration-Tool Visual Project ® Configuration Leasing-Tool Creating and saving of quotations (Projects) Resubmission function Analysis and statistics Computer Telephone Integration (CTI) Consulting-Tool (Fitness-test) User administration, network capability Document administration Please remember that all the functions introduced in this user`s manual are the complete functions of Visual Project ®. Some functions may not be available or incomplete if a reduced version was purchased. Conventions and Symbols Conventions This symbol indicates an important remark. Alt + F4 Keys which are connected by a plus sign have to be pressed in succession, while the first key has to be pressed the whole time. F2 / S Keys which are connected by a slash sign have to be pressed in succession, one after the other. Program name Program names, section names and certain descriptions are written in italics. Field, „Field“ Names of fields within the text are printed in quotation marks or with bold fond. Visual Project ® Revision 2013.12 Visual Project ® User`s manual 3 Gradual step-by-step procedure is indicated by this symbol. Execute Instructions and symbols, which will perform certain actions, are printed in bold-italics. s.p. xxx See page xxx. Further information on the topic can be found there. Register Subfunction or input area, which is shown as a filing card (register). The register card can be activated, by clicking on the corresponding entry or use of the corresponding hot key, i.e. the Alt -key and the key whose letter is underlined on the register card have to be pressed. Jumping from one register to the other can be done with PgDn or PgUp or arrow keys or . Jumping within one register card can be done with Tab – or Shift + Tab . Symbols A selection list opens when this button is depressed. The list enables the transfer of data into the corresponding field. A direct entry into the field is also possible. Presettings can be edited in the selection window. A selection list opens when this button is depressed. The list enables the transfer of data into the corresponding field. A direct entry into the field is not possible. Presettings can be edited in the selection window . A selection list opens when this button is depressed. The list enables the transfer of data into the corresponding field. A direct entry into the field is not possible. The contents of the selection window can be searched according to the first letter. Back. Previous data record. Next. Next data record. Back to beginning. First data record. To the end. Last data record. The spin button helps in a simple way to change the numerical value. The desired data can be entered via the keyboard or by increasing or decreasing the number using the spin button, by depressing the respective arrow button. Changes the sorting order of the data. Up or down. In many database forms the button Info can be found. This button has to be selected to see the information of the data set. Visual Project ® updates this data with each amendment of the data record. The log-in Visual Project ® Revision 2013.12 Visual Project ® User`s manual 4 name of the user, creating the data record, and the time of creation will be saved. Furthermore Visual Project ® remembers the user and the time at which the data was changed previously. The data can be viewed in the selection window under created by, created on, amended by and amended on. The field, created by, will also be used to assign a user to customers / prospective buyers and projects. The owner of the data record has special rights to use and change the data. Information window Confirmation window Entry window Visual Project ® Revision 2013.12 Visual Project ® User`s manual 5 Installation Visual Project ® can be installed under Windows NT, Windows 2000 or Windows XP. System Requirements To use the program Visual Project following requirements : ® your system has to meet the IBM-compatible PC with a minimum Pentium of 350 MHz, 500 MHz or higher is recommended at least 256 MB of RAM 512 MB or higher is recommended Hard disk with at least 200 MB free saving capacity • Windows XP SP3, Windows Vista SP1 or higher, Windows 7, Windows Server 2003 SP2 or higher or 2008 VGA-graphics card, resolution 1024x768 or better Mouse Internet Explorer 8.0 or higher version Microsoft Word version 97 or higher is required for the Document administration and the Word-Export of projects for the Outlook interface Microsoft Outlook version 2000 or higher is required Microsoft .NET Framework version 4.0 or higher Installing Visual Project After having checked the system requirements and having ensured that there is sufficient disk space available on the hard disk, the program installation can be started.. Finish all running applications on the system. Start of installation Place the installation-CD into the corresponding drive of the computer. Choose the function <run> in the Windows start menu. Type d:\disk1\setup and click OK. Visual Project ® Revision 2013.12 Visual Project ® User`s manual 6 After the language selection the program will start the installation assistant, which will help you to go through the installation. The installation program of Visual Project ® will start automatically after placing the installation-CD into the CD-ROM drive provided that your PC supports the autorun-function of the CD. Remarks regarding installation on Vista, Windows 7 and Windows Server 2008 Due to the UAC (User Access Control) in Windows Vista resp. Windows 7, install actions that require administrative privileges can be blocked. Since our product installs require administrative permissions, there can be problems if the UAC is not turned off. Before installing Visual Project controls you must disable the UAC, and then run the installer normally. After you install the controls, you can enable UAC again. If you do not know how to disable the UAC, please follow the steps below: Be sure that you are logged into an account that has administrative Visual Project ® Revision 2013.12 Visual Project ® User`s manual 7 permissions. Administrative permissions are required for the product installs to complete successfully. Go to the start menu and select control panel. This option should appear in the right column of the start menu. Open User Accounts resp. User Accounts and Family Safety from the control panel. and then choose User Accounts. Visual Project ® Revision 2013.12 Visual Project ® User`s manual 8 Choose Change User Account Control settings. Change the setting for the UAC to Never notify. Visual Project ® Revision 2013.12 Visual Project ® User`s manual 9 Confirm the message withYes. Restart your computer afterwards for the change to take effect. After rebooting, you can install Visual Project ® as described in the installation instructions. After you install, you should go back to the UAC and turn it on again. Installation Setup The installation assistant will be installed for a short time. Visual Project ® Revision 2013.12 Visual Project ® User`s manual 10 The above welcome window will be shown on the screen after the installation assistant had been activated. Click on Next to continue. The setup can be closed at any time with Cancel . With Next the next installation step is performed. Before further installation you must agree to the software licence contract, which is displayed in this window. If you agree to the license agreement, the installation process is continued. Visual Project ® Revision 2013.12 Visual Project ® User`s manual 11 During the next step you have to type in the program directory. The directory C:\Program Files\Visual Project is suggested. It is, however, changeable, to do this choose the button Browse. In here a directory, even one which does not exist, can be chosen and will be automatically created by the system. Click Next, to continue the installation. Following this, the installation assistant will search for sufficient memory and existing parts of the program. Now you have to determine under which Windows-program group the program will be called later. The default is Visual Project. Click on Next, to continue. Visual Project ® Revision 2013.12 Visual Project ® User`s manual 12 The installation program will now install all components onto your system. The program displays a window in which the installation progress will be shown. After having finished the installation, the setup creates the program group which you defined or the standard program group with all its necessary program symbols automatically. There will be a message stating the success of the installation. It has to be confirmed with Finish. The installation is now finished. Visual Project ® Revision 2013.12 Visual Project ® User`s manual 13 Some systems might require to re-start the computer in order to finish the installation completely. A corresponding message will be displayed. Program and Data Updates In case you received a new program version or in case you want to install the program again because you deleted some files, please, start the installation assistant as usual. Proceed in the same way as for a new installation. Please, do not be afraid that your database will be deleted. The installation program recognizes that Visual Project ® is already installed and copies only the missing files or files which are not up-to-date. Our latest program versions will be provided to you on our homepage (http://www.visualproject.de/) as a full version in the form of a selfextracting file. Downloading of a current full version is recommended for a new installation of Visual Project ® Full versions always contain all components of the latest program and in addition all required foreign libraries (for example Crystal Report libraries). The update of your version can be seen in the file name. The 2-digit mark vp is followed by the year, the month and the day with 2 digits each. You can see the update of your program version in the Visual-Project menu <Help / Program-Info> under the entry Last Update. In case the date is not the same as the date of the latest program version, an update is necessary. After you copied the latest file version onto your PC, please, execute the file. The following window will appear: The installation assistant will start automatically after all files are decompressed. The self-decompressing files can be deleted after the installation process has been completed. Automatic updates Visual Project ® As a registered customer you get our latest program versions regularly in the form of online-updates. You can download these updates by means of the Program Update Wizard and install them. Further information can be found in the chapter Online-Support. Revision 2013.12 Visual Project ® User`s manual 14 from page 201. No other user is allowed to work with Visual Project ® in case an update of the Visual Project ® database is required. Otherwise the automatic installation routine will be cancelled. Deinstallation of Visual Project ® Under certain circumstances it can be useful to deinstall software in order to perform a new installation. The deinstallation process can be started via the option software of the system control. Choose the entry Visual Project and click the button Change/Remove.. All files of Visual Project ® will be deleted after a confirmatory question. Remark: Ensure prior to any deletion that a back up is performed. Remarks regarding Copy Protection Visual Project ® is protected against unauthorized use by means of a copy protection. Normally you receive a licence code with the software (serial number). You can activate your program licence with this licence code. Further information can be found in the chapter Licensing from page 209. In case you received a dongle (hardlock) with the software, plug this hardlock into the parallel or USB-interface of your computer before starting the program. Visual Project ® Revision 2013.12 Visual Project ® User`s manual 15 For using a hardlock the installation of the corresponding driver software is necessary. The installation files for the hardlock drivers as well as the documentation can be found on our homepage (http://www.visualproject.de/). Attention! The loss of the copy protection at the same time means the loss of your software licence!! Visual Project ® Revision 2013.12 Visual Project ® User`s manual 16 Program Design/ Applications Program Modules Visual Project ® consists of a basic module and several additional modules. The basic module already contains all essential functions, such as customer- / prospective customer administration, product master data, price administration, offer writing and configuration. Depending on your wishes you can extend Visual Project ® with the following additional modules: Network Version In the network version of Visual Project ® several users can work at the same database at the same time. Visual Project ® therefore provides you with high-performance functions. In the User Administration you can store any number of users and assign different rights to every single user. You find further information concerning User Administration in the chapters User administration from page 172 and User rights from page 175. The network version of Visual Project ® enables you to forward tasks or resubmissions to other users. Even forwarding of customers or projects to other users is possible. Further information concerning these features can be found in the chapters Projects from page 58 and Prospective Buyers/Customers from page 101. In the so-called slave mode of the network version, the common data can be processed even without network access. By means of this function, you are able to work at offers offline, for example at the customer’s site. In the chapter Master- / Slave-Mode on page 194 you find further information concerning this feature. External Interface The external interface of Visual Project ® provides you with extensive export and import functions. At different parts in the program you can export data to Excel in an easy and uncomplicated way. Product and customer data can be imported into Visual Project ® out of an Excel table. Please, do also read the chapters Projects (from page 58), Prospective Buyers/Customers (from page 101) and Products (from page 131). By means of the external interface Visual Project ® also provides you with an interface to Microsoft Outlook as an efficient COM Add-In solution. You have the possibility to administer your resubmissions as Outlook tasks, to export addresses and contact partners from Visual Project ® to Outlook and to import Outlook contacts to Visual Project ® . Further information can be found in the chapters Outlook-Tasks on page 150, Outlook-Settings on page 192 and MS- Outlook on page 212. Document Administration Visual Project ® The document administration enables you to store links to corresponding documents in the customer / prospective customer administration. Each entry in the contact history of a customer or prospective customer can contain a link to any document. Even creating new Word-documents directly out of a contact entry is possible. Revision 2013.12 Visual Project ® User`s manual 17 Another feature of the document administration is the Campaign Manager. By means of the campaign manager you can create serial letters and mailings for selected customers and prospective customers. You can find further information concerning the document administration in the chapter Prospective Buyers/Customers from page 101. CTI-Module With the CTI-Module of Visual Project ® you have a high-performance tool when your customer service needs to be optimised. The PCsupported dialling assistance enables fast and simple telephoning by mouse-click. Via an automatic call detection, incoming calls are identified and entered into a caller list. Automatic contact entries can be created in the customer / prospective customer administration for both incoming and outgoing calls. Further information concerning the CTI-Module can be found in the chapters Prospective Buyers/Customers (from page 101) and Caller List (from page 165) as well as CTI-Settings on page 190. Information about the modules of your Visual Project ® -licence can be found in the program under the menu option <Help/ Licencing>. Please, do also read the chapter Licensing on page 209. Applications Visual Project ® can be used as both a single user or network solution. Depending on your special case, Visual Project ® provides you with a suitable solution for your company. Application as Single User Version In case of a single user solution, program and data are in general on the local hard disk. If the need arises you can store the Visual Project®-database in a released directory on another PC or server. (Further information concerning the linking of the Visual Project ®database can be found in the chapter Changing Client from page 178.) If you use a single user solution of Visual Project ®, you can exchange project data with other Visual Project ®-users. You find further information in the chapter Projects from page 58. The copy protection for the single user version is located on the PC where Visual Project ® is installed. (Please, read also the chapter Remarks regarding Copy Protection from page 14.) Network Solution with Access via LAN If you use Visual Project ® as a network solution and realise the data access via LAN, the Visual Project ®-database is either on a released drive in the net (Microsoft Access-database) or on an SQL Server in the net (Microsoft SQL Server-database). Only the Visual Project ®program files are on the Client-PC. In the user administration, users can be entered or deleted as well as user rights can be defined. The project data exchange with other Visual Project ®-users is also possible. Similar to the single user version, a local copy protection is necessary Visual Project ® Revision 2013.12 Visual Project ® User`s manual 18 for every Client-PC. You find further information concerning this topic in the chapter Remarks regarding Copy Protection from page 14. Network Solution with Access via RAS/ DFÜ When using Visual Project ® as a network solution, an access on the Visual Project ®-database via RAS/DFÜ is possible, too. The performance parameters correspond with those of the network solution with access via LAN. A stable connection with high transfer rate (> 1 MBit) should be provided for data access. Terminal ServerApplication The application of Visual Project ® is also possible in a terminal server environment. For this solution, program and data are located on the local hard disc of the terminal server. Licencing is done by means of a copy protection at the terminal server where the number of available program licences is stored. The number of available program licences determines how many users can use Visual Project ® on the terminal server at the same time. You can use our automatic update service for the network solution at the terminal server in order to install program updates. Information concerning this feature can be found in Appendix D: Automatic update service for Visual Project ® on page 228. Working in the slave mode will not be possible if you use Visual Project® on a terminal server. Visual Project ® Revision 2013.12 Visual Project ® User`s manual 19 Program starting/ending Start Visual Project ® Please click on Start in the toolbar of your Windows program screen and the Windows – Start menu will open. There, select the group Programs, then Visual Project ® and finally the program Visual Project ® . The application will open. Please note that a valid copy protection hardlock is required to work with the program. Should any problems occur with the hardlock when starting the program, please follow the notes in the section Remarks regarding Copy Protection on page 14. After starting the program The program entry window with the licence information and the program version will be shown after starting the program. During this time the program is loaded, initialized and your databases are checked. Connecting to a database Visual Project ® After the first program start of Visual Project ® there will be no database in Visual Project ®. The following dialog is shown: Revision 2013.12 Visual Project ® User`s manual 20 Visual Project ® provides the possibility of setting up an individual database. You can choose between Microsoft Access and Microsoft SQL-Server as a basis for the database. For most use cases a Microsoft Access database solution is sufficient. Further information concerning the connection to databases can be found under Changing Client from page 178. Data-reorganization After having started Visual Project ® it is possible that an automatic database reorganisaion will be carried out first. Please confirm this action, if necessary, with OK . You will see the Visual Project ® Start screen after the program start. With a simple Click of the mouse in the area of the Start screen or by pressing the Enter -key you will go directly to the Visual Project ® management center in case the registration / log-in system is not activated. The menu <Visual Project / Login> offers the same function. Log-in system Visual Project ® The log-in system of Visual Project ® under the single user version is activated if a password is allocated or if the system administrator has a password under a network version. For security reasons a password should be allocated in order to protect your data against unauthorized access. Please, see the section Change Password for information how to allocate or change a password. Revision 2013.12 Visual Project ® User`s manual With the log-in system activated, Visual Project start screen shown below: 21 ® will report with the You will be asked to enter your user name and the password. The user who was logged in last at the selected database will be automatically suggested for Login. Change or supplement your entry and confirm with OK. The management center can only be reached if both entries are correct. The entry of the password will be concealed, i.e. a „*“ appears for each entered letter. In the single user version of Visual Project ® only the password without the user name will be asked for. Ending the program Please, proceed as follows if you want to end Visual Project ®: Click with the mouse on the menu <End> in the menu list and then on the function <End program>. or Press Alt / E / P or Double click on the System menu or Click on the System menu in the upper left corner of the screen and select Close. or Press Alt + F4 . Visual Project ® Revision 2013.12 Visual Project ® User`s manual 22 Operation of the program Visual Project ® is an application designed especially for Windows. You should be familiar with the general operation of Windows before starting your work with this program. If this is not the case, please read the corresponding chapters regarding the operation in your Windowsuser manual. You will quickly find your way within Visual Project ® if you are familiar with the operation and the structure of Windows. The Visual Project ® Management-Center The Visual Project ® Management Center desktop surface will appear after a successful log in to Visual Project ®. Below the selection of functions within Visual Project ® is shown. This is the management center for working with Visual Project ®. The window consists of the main menu, the quick start buttons as well as a status bar. You have access to all main functions of the program via the largesized quick start buttons. Therefore, you are in the position to navigate quickly through the program. The functions can also be started via the corresponding menus of the main menu bar of Visual Project ®. All functions of Visual Project ® can be reached through the main menu bar. Activate the desired function by clicking the corresponding main menu entry and the sub directory. The following illustrations show all functions of the main menu bar. Visual Project ® Revision 2013.12 Visual Project ® Visual Project ® User`s manual 23 Revision 2013.12 Visual Project ® User`s manual 24 The Status line The status line serves as an indication regarding the status of the keyboard and the program. The status line is divided into certain display fields and visible in every program point. Starting from the left, there are the following fields: Program status, Display mode, current Program-user, status of the Num-key, status of the Shift-key, status of Insert, current Time. The field display mode and the field current Program-user do not only show the current status, but they can also be changed with a „Double click“. Program status On the left side the Program status is shown. The wording Ready... can be seen if the program is waiting for your entries. Otherwise, you will see messages and program statuses. Program-user You can see the name (log-in name) of the user who is presently working with Visual Project ® in the field Program User. For the single user version it is always the system administrator „Admin“. This is the same case as for the network version without activated log in system. Display mode You can switch the display mode by double click on the field display mode. As shown below. Double Click If “Customer“ is displayed in this field, there is no need for worrying about presenting your offer to the customer on the PC because all purchase prices are masked. Look into the product master data, you will see that even there all purchase prices are masked. The administrator can’t be called as long as the status “Customer” is activated. The function „Customer“ is ineffective, if you do not own the user right "Purchase prices visible" in a network version. Keyboard status indicator Next to the user field on the right there is the CAPS-LOCK-field. It shows the writing mode you are in, i.e. upper-case letters or lowercase letters. In the NUM-field next to the CAPS-LOCK-field is shown that the numerical keypad of the keyboard is switched on or off. The INS-field shows whether you are in the insert or delete mode. On the very right you see the time. Visual Project ® Revision 2013.12 Visual Project ® User`s manual 25 Operation with selection windows While working with Visual Project ® you will often see selection windows in which data records or data is shown in tabular column form for further editing or for viewing. Example of a selection window of the product line Selection windows consist of standard fields in the upper area, the corresponding list field in the middle area and a button field at the bottom. The windows open in their minimum size, however, they can be enlarged to their maximum size depending on the screen limits. (Click on the full screen symbol of the window or a double click on the title bar of the window). A Scroll bar will appear either on the bottom or on the right in case the space of the corresponding list window is not sufficient enough for the number of data records or the quantity of information shown in the columns. Clicking on one of the arrows in the scroll bar will enable you to scroll. Sorting Data records ascending Visual Project ® sorts the data records according to the 1st left column in the selection window. By clicking the button Sorting order, the order in which the entries of the list are shown can be changed. With every click, the sorting order inverts either upwards or downwards. Furthermore, the sorting order will be shown by a corresponding symbol on the button field and in the column heading. descending Data record search Visual Project ® The sorting order will be fixed by the 1st left column. Simultaneously, there is the possibility to search for a certain data record by entering the first letters in the field Search. Type, for example, an „a“ so the blue selection bar will move to the first data record which starts with an „a“. Type then a „z“ so the blue selection bar will move to the next data record starting with „az“ etc. Revision 2013.12 Visual Project ® User`s manual 26 The event is reversible when deleting letters. Capitalization and the use of small initial letters are not taken into account. Visual help is provided during sorting and searching by the blue background of the column and the searching area. Changing the order You can determine the order and width in which each individual and width of the information regarding the data records will be shown. A change in the columns order of the columns is necessary if you want to change the sorting order or to show different information within the visible area of the listing field. For this, please click on the heading of the column to be moved and then drag, with left mouse button depressed, to the desired position. When the left mouse button is released the dragged column will be positioned in front of the column on which the mouse button is released. Change of position Another possibility is to click on the column header. On the right border of the header a button will appear for opening a selection list. Click on the button. In the list to be opened, you can select from all available columns which can change position with the current column. Width of column The width of the column can be changed by moving the mouse slowly to the border of two column headers. Within this area the mouse cursor will change into a double line with two horizontal arrows. Now change, with left mouse button depressed, the column to the desired width. In case the columns are smaller than the information they contain you can have the full field content displayed by resting the mouse cursor for some time on the field. A yellow window will appear with all field data. Visual Project ® Revision 2013.12 Visual Project ® Views User`s manual 27 You can save all attributes regarding the sorting order and the width of the columns chosen by you under you own name. Additionally, the visibility for the single columns can also be defined. Click on the button, on the right next to the Selection list for viewing. It will open the window View definition. Visual Project ® Revision 2013.12 Visual Project ® User`s manual 28 In the lower block you can see a list of all information categories which are available in the data record. Please, place a red tick in front of the description in case you want to see the columns in the data record list. The Column width can be changed in the field behind the description. The position of the information in the list field can be changed by clicking on the column „Width“ in the corresponding row. Afterwards, the row/line can be moved upwards or downwards by clicking on the big arrow keys. We recommend to define the position and the width of the columns directly in the list field of the selection window and then open the window View Definition. This has the advantage that you can see the amendments directly on the screen. Now, if necessary, change the column visibility and save the view. View scheme Visual Project ® For saving the view, please insert a name in the field View scheme and click on Save. All settings are retrievable in the selection window Revision 2013.12 Visual Project ® User`s manual 29 under the entered name. In case the name exists already, this will be pointed out to you before saving. A view can be deleted by a click on the button delete. For Changing a view, please select the scheme of the selection list. After that, you will find the data of the information categories in the lower list. Change the values as desired and save the view again with the help of the button Save. The button Close causes the acceptance of all selected settings into the current selection window. The button Cancel closes the window without any amendments. Choosing a scheme In the selection window a saved view will be recalled by a click in the corresponding name of the scheme in the selection list. The data records will be newly assorted and displayed. Standard View All views are user and selection mask related, i.e. every user can define and save their own viewing schemes for every selection window. Visual Project ® will create a Standard view automatically in case no view has been defined. The same is valid if all views were deleted. The standard view, of course, can be amended. The scheme which has been chosen before last closing will be shown when opening the selection mask. Filter/Search You can have your data records searched for according to certain information so that the view will be limited to criteria with regards to the contents. For this, please, click on the button Filter in the selection mask. Criteria The filter consists of 5 lines with Criteria, which can be connected by AND or OR. For defining a criteria, first select a Field of the selection list which you want to limit. In the second selection list select the desired Condition. Following the condition, 0-2 fields can follow for the Arguments, which can be defined freely. `Stand-ins` (so called „wildcards“) are also allowed here. When looking for the pattern „* HIPATH?00* all „HIPATH3000“ and „HIPATH4000“ will be displayed. The button Delete all will delete all entries in the filter. The button OK Visual Project ® Revision 2013.12 Visual Project ® User`s manual 30 will close the filter and start the search. If you execute the search, the selection window will display only those entries found according to your criteria. If no match was found the selection window will be empty. Example Product search Delete filter An activated filter can be de-activated by clicking on the button Delete (next to the filter on the right). After doing this all data records without limitations can be seen in the selection window again. An activated filter can be recognized by the caption "Filter activated" on the button. Special filter Depending on the kind of the data, certain Special filters can be in the upper area of the selection mask. In our example Searching Products those special filters are the fields “Manufacturer" and "Group". By means of the selection list "Manufacturer" you can limit the search to single manufacturers and by means of the selection list "Group" you can limit the search to single product groups. Both special filters can be combined with each other. The special filters are self-explanatory and easy to use. Please refer to the description of the respective topic for further information. Quantity of the data On the left below the data record list in the selection window you can find a line with the total quantity of the displayed data records. The record total quantity is the quantity of the filtered data records in case a filter is activated. Buttons Besides the listing of the data record there are also additional editing functions like Add, Edit, Delete, Print, Export depending on the selection window. By clicking on the button Add a new data record will be set up. Visual Project ® tries to make your work as easy as possible. Important entry fields will be pre-set with standard values. In case the data record requires a definite number, for example a customer number or a project number, Visual Project ® will suggest automatically the next one after the last entered number. In case this number is already allocated, the next highest following number will be suggested. When entering numbers manually, Visual Project ® will check for unequivocality and a Visual Project ® Revision 2013.12 Visual Project ® User`s manual 31 message will appear if necessary. The data record will be saved when leaving the window or changing to another data record. For editing a data record, highlight the desired entry and click on Edit. In some master data forms (customers, products) you can change between the data records with the navigation buttons and also edit them if necessary. Highlight one or several data records in the selection window, click with the mouse on the button delete and confirm in the following display window with YES. The data records will be deleted. Several consecutive data records can be deleted by clicking on the first data record and then, with the Shift key depressed, click on the last data record. The background of the highlighted data records will become blue. Highlight several data records with a click and the Cntrl -key pressed down. In special cases Visual Project ® will reject to delete some data records as important information in other data records will be lost. Visual Project ® Revision 2013.12 Visual Project ® resp. User`s manual 32 If you own the module external interface of Visual Project ®, you can export the data records of most selection windows directly into a Microsoft Excel file. You can find the button for the export either directly on the selection window or in the submenu of the Ex-/ImportButton. Give a name for the export and confirm with OK. All visible data records and all visible information categories of the selection window will be exported. Select certain information by setting the filter or define from the views. Closes the Selection window. This button will appear instead of the button Close in selection windows named as selection list in other forms in order to transfer one or several highlighted data records. With the help of the button Cancel you can cancel the editing in the selection window, named as selection lists in other forms, and close the window. Visual Project ® Revision 2013.12 Visual Project ® User`s manual 33 Small selection windows Some selection windows, especially under the menu point Master data, are limited in their function in order to speed up the work. „small selection window“ country administration In these small selection windows there is no view or filter possible. The editing of the data records is done directly in the listing field. For editing a value, click in the corresponding field and change the entry. The entry will be automatically saved when amending the data record or when closing the form. Page view and print On a lot of forms you find the function for the print of lists and reports. After having activated the print button, you can choose between several options in the on screen dialog box. You have the possibility to print the document, to export it into a file or to have a look at the print preview. If you want to have the print preview displayed on your monitor first, select the option Preview. In this window you can have a look at all pages of the printout before printing. Visual Project ® Revision 2013.12 Visual Project ® User`s manual 34 Prints the report, or Menu <Page view / Printer> Exports the report into different export destinations. A window will be opened for chosing the export format and the destination of your export. Select an export format from the selection list Format and confirm with OK. After the entry of the name, the file will be created. Please keep in mind that the format and layouts of the Visual Project® page preview cannot be transferred exactly into all formats. The Visual Project ® reports and lists were established with the report tool CrystalReport. The extensive format functions of Crystal Report are not supported by all export-formats, so that a manual revision is often necessary. Should there, nevertheless, be a permanent customization of the reports necessary, we recommend to edit your reports directly with Crystal Report. The report tool Crystal Report can be purchased in software shops or directly from us. Refresh of page view Visual Project ® Revision 2013.12 Visual Project ® User`s manual 35 Here you can enlarge or reduce the size of the page preview. Displays the first page of the printout Displays the previous page of the printout Displays the next page of the printout Displays the last page of the printout Stops the page composition Used to search for text in the page preview Visual Project ® Revision 2013.12 Visual Project ® User`s manual 36 Master data With the entering of the master data the foundation for an organized and flexible work with the program is laid. The more detailed your entries are, the better the program can support you in your daily work. The master data consists of several selection windows, like country administration or the ZIP-code book, which will provide you with information during the program. The call and the amendment of these data is also possible at these places. Countries Country administration can be found under <Master data / Countries> in the main menu. Countries are administered separately by Visual Project ®. You can call upon these countries at various stages of this program. For example addresses can be allocated to countries or when printing out quotations for a certain country the corresponding currency and exchange rate can be selected. Distinctive number code Visual Project ® country With the delivery of the program you will receive data of most European countries. You can, however, add new countries or delete some countries. When creating a country the software will suggest the next free country number code. Please find out the correct country number code and insert it in this field. The country number code uniquely identifies a country and cannot be allocated twice. When deleting a country, please keep in mind that a country cannot be deleted if addresses refer to this country. With the deletion of a country all country specific data to this country, like salutations, ZIP-code book and federal states will be deleted as well. Country Name of the country Country number The country number code is defined internationally and has to be distinctive. With a new entry the next free number will be allocated and it remains changeable. The field Revision 2013.12 Visual Project ® User`s manual 37 cannot be empty. Country abbreviation The country abbreviation can be entered without restriction with a maximum of 3 characters. It is used for the complete postal address. Visual Project ® Country code Please enter the telephone country code of the country. This field can be empty. Language Entry of the national language. This field has up to now only informative character and can be empty. Currency Currency symbol or currency sign for the corresponding country. It is used in printouts. Dec. Number of the decimals after the comma for printouts. Possible values are 0-2. If necessary, the value will be commercially rounded after conversion of the currency. Own Currency Quantity of own currency units for the calculation of the exchange rate. The value zero is not permitted. As the column headline the symbol of the own currency will be shown. This symbol originates from the field Currency in the window Company data (see also page 44) and represents your program specific currency. Exchange rate Quantity of foreign currency units of the specific country at own internal currency. The value zero is not permitted. Revision 2013.12 Visual Project ® User`s manual 38 Federal states The Federal states administration is opened through menu <Master data / Federal states>. You can create federal states or regions / provinces for every existing Country. Select Country By the selection list Country the desired country can be selected, to which the federal states will be assigned. The displayed countries are selected from the master data. The country which you have selected in the company data is pre-set. The button Add creates a blank line in which the federal state can be entered. Federal state Name of the federal state, the region or the province. The name has to be distinctive. The deletion and amendment of the entries is possible at any time. In case no federal state has been entered, the corresponding selection lists, e.g. when creating addresses, will be blank. Visual Project ® Revision 2013.12 Visual Project ® User`s manual 39 ZIP-code book A country specific ZIP-code book can be found <Master data / ZIPcode book>. Select country Select the desired country for which the ZIP-code is required through the selection list Country. The displayed countries are taken from the master data. The country which you have selected in the company data is pre-set. The button Add creates a blank line in which the new place/city can be entered. The following particulars belong to an entry: ZIP-code Max. 6 character ZIP code of the city. The ZIP code can occur several times. City Name of the city/place. Area code Area code of the city/place without the international country code. The area code has to start with a zero and end with a separation character. Otherwise the entry will be automatically corrected or rejected. As a separation character the backslash ”/” and the dash “-“ are permitted. Selected places/cities can be deleted with Delete. Visual Project ® Revision 2013.12 Visual Project ® User`s manual 40 Visual Project ® does not supply any data for the ZIP-code book. However, you do not have to take the trouble to enter all ZIP-codes manually. Visual Project ® automatically checks the entries in the ZIP code book when addresses are entered and will make automatic corrections if needed. Please refer to the self-learning ZIP-code book and read the section Prospective Buyers/Customers. Salutations Country specific salutations and To-the-attention-of texts can be found under <Master data / Salutations>. You can refer to these texts in the address administration for example. Select country Select the desired country through the selection list Country. The displayed countries are selected from the master data. The country which you have selected for yourself in the company data is pre-set. By clicking on Salutation text or For the attention of text, a corresponding text selection can be made. The button Add creates a blank line in which the text can be entered. Text Salutation text or For-the-attention-of text The deletion and amendment of the entries is possible at any time. In case no texts were entered, the corresponding selection lists, e.g. when editing addresses will remain empty. Visual Project ® Revision 2013.12 Visual Project ® User`s manual 41 Lines of Business Through the menu item <Master data / Lines of Business> you have the possibility to display individual lines of business in a hierarchial structure. A line of business can be allocated to every customer in the Prospective buyers and customers data so that an lines of business related analysis can be carried out later. In the analysis module evaluations can be made for all lines of business of a hierarchy (e.g. all hotels) as well as for separate lines of business. Add The lines of business administration is organized like the user administration. Click on an entry, to change the text in the field Designation or with Add a new entry can be created underneath the highlighted line of business. The field „Description“ has to be completed in any case. The same entry cannot be made twice. A yellow symbol in front of an line of business indicates that there are sub-lines of business underneath it. With a double click on this symbol the sub-lines of business can be displayed or suppressed. Delete To delete an line of business, click on the same in order to highlight it, and then click on the button Delete. Please keep in mind that lines of business to which addresses have been assigned cannot be deleted. Also lines of business with sub-lines of business cannot be deleted. The sub-lines of business have to be deleted first. When working with Visual Project for the fist time, there are no lines of business. Think carefully about a structure which would suit you best. Later you can make modifications in the hierarchy by shifting single lines of business or complete branches of lines of business to another place. Click on the corresponding entry and keep the left mouse button pressed. Now you can position the line of business to the correct place by moving the mouse. The entry All Industries cannot be removed. This standard data is allocated to all address data when making a new Visual Project ® Revision 2013.12 Visual Project ® User`s manual 42 entry. Altogehter a maximum of 9 levels with 999 entrys each is possible. Text modules The text module administration can be found under <Master data / Text modules >. Repeated texts, contract passages, delivery and payment conditions, salutations and much more can be saved here. These texts can be recalled at any time in the prologue or epilogue of projects. With the help of the selection list language, the desired language can be set. All changes in the other fields refer to the selected language and are automatically saved when leaving the field. New text In order to create a new text Click on the button Add A short text for identification of the module has to be entered in the field Designation. This text is only for finding the text module quickly. The actual Text of the module has to be entered in the big text field. It is not limited/restricted in size and texts from the clipboard of Windows can be processed as well. Highlight the requested text, for example in Word, take the text into the clipboard, change to text module administration of Visual Project® and press Cntrl + V when you are in the correct text module. In order to copy the desired and highlighted text for the text module from Windows into the clipboard just press the key combination Cntrl + C as usual. Text editing / Text deleting Visual Project ® To edit the text select the desired entry in the selection list. The selected text will appear immediately in the text window. The changes can be done at once. Please keep in mind that the text will be saved automatically when changing to another text module or when the window is closed. To delete the text depress the button Delete. Revision 2013.12 Visual Project ® User`s manual 43 The right for creating, editing or deleting texts in the text modul administration can be allocated user dependent in the Network version. Further information can be found in the chapter User rights from page 175. Visual Project ® Revision 2013.12 Visual Project ® User`s manual 44 Company data In the company data important individual pre-settings which were entered will have an effect on various functions of the whole program. The form can be opened through <Master data / company data>. It is divided into the following entry areas: Company data Visual Project ® Settings regarding your company. Address1 1. Line of your correspondence company name in Address2 2. Line of your correspondence company name in Street Address of your company ZIP-code The country abbreviation and the ZIP code of your company`s place of business. The country abbreviation is set automatically with the country allocation. The ZIP-code can be entered manually or read from the ZIP-code book. City Place of business Country A country from the country administration has to be allocated to your company. If necessary a new country can be created directly, in case the desired country is not in the selection list. After the country has been chosen, all country specific forms (e.g. ZIP-code book, federal states...) will be pre-set with your country in the future. Also when entering new addresses, your country will be used for the pre-setting of the country assignment. Telephone Your telephone number will appear on the quotation printout, if desired. The entry of text is also possible, e.g. Phone: Revision 2013.12 Visual Project ® User`s manual 45 Telefax Your telefax number will appear on the quotation printout, if desired. E-mail address E-mail address of your company, will appear on the quotation printout, if desired. Internet address Internet address of your company, will appear on the quotation printout, if desired. Company logo Your company logo can be placed here. With a double click on the blank space of the company logo window a window will open from which you can import an existing graphic file or a graphic can be created in a program on your PC. In case there is a graphic in the window already, it can be edited with a double click. Click on the logo once and then Delete -key to delete the logo. A range from 18 cm width and 3.5 cm height for the company logo is reserved in the heading of the offer. Only pictures in the BMP format can be processed. Currency The currency symbol for the internal currency. The currency for all prices in the product master data, in the calculation and in the analysis will be fixed here. Furthermore, the exchange rates of the country administration refer to this currency. Internal currency change Visual Project ® Revision 2013.12 Visual Project ® User`s manual 46 When you change the currency symbol for the internal currency, a window will be displayed in which you can enter the exchange rate for the new internal currency. As soon as you click on Take over the internal currency in the application will be changed. All product prices in product master data and in the inventory data of the customer will be changed automatically. Company's wage average Will be the project-specific standard average wage for the calculation of installation prices in new projects. Check Reminder on If this field has been ticked, the resubmission Program start list will be checked for due entries with every program start and opened if necessary. Printout All necessary settings for your printouts are made here: Print font With the help of the selection list select a font available on your system. We recommend Arial or Times New Roman. With other fonts it might be possible that not enough space is found in the allocated area of the forms and therefore will partly be cut. To ensure the processing of international fonts, this font is used for all printouts and as font for all text input fields in Visual Project ®. In the menu <Master data / Settings / Languages> you can define separate fonts for up to 3 languages that are required in Visual Project ®. These fonts are used for offer texts and product texts. View window text Print Visual Project ® Text which will be printed on the quotations in the size of 6 cpi above the addressee, so that the sender appears in the window of an envelope. Company If this box is ticked your company`s address, Revision 2013.12 Visual Project ® Printing area User`s manual 47 header telephone number and fax as well as your Internet and email address will be printed in the top right corner of the quotations. If you linked a company logo under company data, it will be printed on the first page of the offer. Upper margin Indicates the distance of the printing area to the upper edge of the page in the quotation. The margin can be changed in 0.1cm steps. The addressee will start at ca. 5.2 cm if the upper margin is set at 1 cm. Lower margin Lower margin in the quotations (please see “Upper margin”) Left margin Left margin in the quotations. Please keep in mind, that the quotation forms need a horizontal printing area of 18cm in order to print all data correctly. Therefore the sum of the left + right margin should not exceed 3.0cm if a DIN A4 paper sheet is used. Right margin Right margin in the quotations. Print pos. Page 2 – Indicates the start of the printout of the end quotation starting with the 2nd page. The space will be added to the upper margin. Example: The print of the position headers in the quotation will start with a margin of 3.0cm from the upper edge if the setting of the space is 2.0cm. (e.g. if company paper has a logo printed on it) Number of copies Database Settings for the database and the document management Sorting order Visual Project ® Quantity of the copies of the quotation with the direct printout of quotations. “0” means no copy and only the original is printed out. Select your language area in the selection list. With the selection the national peculiarities will be considered in the alphabetic sorting order of Revision 2013.12 Visual Project ® User`s manual 48 your data in the selection window. The change of the sorting order will only be effective after the next database reorganisation!! Automatic repair of Please enter the period in days here on which all databases an automatic database reorganisation will be carried out with the program start. (See also the paragraph Database reorganization). In the network version a “0” should be entered here, as the database reorganisation requires exclusive access to all data. The entry “0” will switch off the function. Authorization for all If you deactivate this entry, every user can only users to read see one’s own customers or in case there is a customer data team authorization, the user can only see the customers of the team. You can find more about user rights in the paragragh User administration on page 124 of this manual. Document administration In case you own the document administration of Visual Project ®, here you have the possibility to make company-specific settings. (Further information concerning document administration can be found in the chapter Prospective Buyers/Customers in this manual. Standard Directory of Standard directory for saving new wordDocuments documents from Visual Project ®. Enter automatically as contact with the Word export of projects Here you determine whether an entry in the contact history of the customer should be made, when exporting your project data into a Word-document (Menu Project / Microsoft Word in the project administration). The settings in the company data are valid for all users who work with Visual Project ®. In the network version you should protect your data with the assignment of the right Company data/ Settings in the user administration. Visual Project ® Revision 2013.12 Visual Project ® User`s manual 49 Price groups This function will be opened through <Master data / Settings / Price groups>. ® Price groups defined In Visual Project you have the possibility to create a maximum of 10 Price groups. Price groups can be used for structuring your prices into by the user groups. Each price group contains the quantity of price types fixed by you. Therefore, theoretically 100 different prices could be maintained for each product. In our example we have created a price group for retailers and a price group for final customers. The Description of the price group can be determined by you. If you really want to use the price you can tick the box in the column In use. Visual Project® remains organised in spite of the various price varieties. In the forms with price groups only the price groups which are in actual use will be displayed. If you do not want to use price groups, do not tick any box. You will meet the price groups at different places in the program: in the product master data, when updating product prices; you can print price group specific price lists, in the administrator the automatic price update is being supported by factors of each price group; in the customer master data a price group can be allocated to customers and prospective buyers in order to calculate the right price in the quotation. Visual Project ® Revision 2013.12 Visual Project ® User`s manual 50 Please be reminded that all existing prices of a price group in the product line will be deleted after closing the form if an already used price group is marked as unused! Price types This function will be opened through <Master data / Settings / Price types>. User ® Price groups defined In Visual Project you have the possibility to create a maximum of 10 Price types . Price types are used for calculation and price up-dating by the user of your products (see also the paragraph Price groups). You will find the important price types shown above after the installation of Visual Project®. You will meet the price types at different places in the program: in the product master data, when updating product prices; you can print price type specific price lists, in the administrator the automatic price up-date is supported by factors of each price type; in the quotation calculation each position can be given a separate price for each price type. Define your individual settings under Price types. In use Visual Project ® The use of the first four price types is firmly defined in the program. For all other price types you determine whether you really want to use the price type by ticking the box In use in front of the designation. Revision 2013.12 Visual Project ® Purchase/Sales User`s manual 51 Default Ticking a box in the column default pre-sets the price type in use for new projects. Description The Description of the price types can be determined by you. The description of the price type serves only the purpose to name the price inside the program. The texts for the printouts have to be created in the menu item Offer texts. Abbreviation The 3-digit Abbreviation for the price type has to be distinctive and serves for the allocation of the price types to each separate quotation position in quoting. Through this function the printout of an individual multi-price-quotation is possible. The program will always interpret the 1st price type in the table as the purchase price and the 2nd price type as the sales price, in order to have a clear allocation when calculating the margin. An abbreviation for the purchase price is not necessary, as the purchase price will not be supported when printing out the quotations. Please be reminded that all existing prices of the price type in all price groups in the product master data and in all existing projects will be deleted after closing the form if an already used price type is marked as unused! Value added tax characteristic The function will be opened through <Master data / Setting / Value added tax class > from the Visual Project ® Management Center. Visual Project ® Revision 2013.12 Visual Project ® User`s manual 52 Visual Project® can administer 10 different value added tax classes in total. The assignment of the tax class to the products can be achieved in the product master data. If, for example, the full tax class changed from 19% to 20%, then enter 20 in the tax class field and all products with this assignment will be associated with 20% value added tax. The above illustration shows the pre-settings of the table. You can change the description of the tax class and the tax class itself in the corresponding named columns. Visual Project ® Revision 2013.12 Visual Project ® User`s manual 53 Language The function will be opened through <Master data / Settings / Language > in the Visual Project ® Management Center . Visual Project ® can administer up to 3 language variations for product texts and offers. The language can be selected from a list. This list contains the name of the language as well as the two-digit language characteristic according to ISO-standard. The designation of the language serves only for the designation of the language in the program. You determine whether you really want to use a language by ticking the column In use in front of the designation. In case you do not wish to use any language variations, simply do not tick any box. Therefore, you do not get any selection list for languages during the course of the program. With font you define the font type which you want to use for product texts or language dependent texts in offers. Language variations are supported by Visual Project® to maintain short and long texts in the product master data, when selecting products with the administrator respectively via the Products update wizard and when printing out the offer. Furthermore, every customer or prospective buyer can be pre-set with a language so that the correct language text is used when issuing the offer. Enter the language dependent text for the price type, total sum, etc. in the menu <Offer texts>. Visual Project ® Revision 2013.12 Visual Project ® User`s manual 54 Offer texts The function is opened through <Master data/ Settings/ Offer texts> in the Visual Project ® Management center. With the help of the offer texts all important texts for your offers can be defined individually and language dependent. With the help of the selection list language, the desired language can be set. All changes in the other fields refer to the selected language and are automatically saved when leaving the field. Standard Prologue Enter Text in the prologue field if you want to pre-set an offer prologue for a new offer automatically. The text in the offer can be changed any time or you can use the text module. It is possible to reach the entry field of the text module with Cntrl + T . Pasting of text to the clipboard is possible with Cntrl + V. Epilogue Visual Project ® Pre-set for the offer epilogue (see also prologue) Revision 2013.12 Visual Project ® Headings User`s manual 55 Here you can determine individually, which headings are to be printed in the offer. Text for Printout In the upper area of the text for printout, you can select an individual language for your printouts. On the right side you will find a register of every price type used. The above illustration shows text pre-settings after the installation of Visual Project ®. Text for unit price Visual Project ® Text for the unit price appears underneath the Revision 2013.12 Visual Project ® User`s manual 56 offer position. The text for the unit price can be inserted in other texts of the price category as wildcard [P]. Text for rebates Text for the rebates in percentage of the unit price of the price type, appears underneath the offer position. The wildcard [D] will be replaced in the offer by the percentage. Text for discounts Text for a discount as amount of the unit price of the price type, appears underneath the offer position. Text for total price Text for the total price of the price type, appears below the offer. Text for a rebate on Text for a rebate in percentage of the total the total price price of the price type, appears underneath the offer. The wildcard [D] will be replaced in the offer by the percentage. Text for a discount Text for a discount as an amount of the total on the total price price of the price type, appears underneath the offer. Text for price total net Text for the total price of the price type after all rebates, discounts and without value added tax, appears underneath the offer. Text for value added Text for the value added tax line, appears tax underneath the offer between the total net and gross price. When printing the offer the wildcard [VAT] will be replaced by the VAT value and the wildcard [VATSUM] will be replaced by the total net price. If desired, those wildcards can be omitted. Text for total gross Text for the total price of the price type after price deduction of all rebates and discounts with value added tax, appears below the offer. General texts The general texts for the offer composition are located in the lower section of the of the window Text for printouts. Text for beginning package The text which is pre-set as the title when creating offer packages, appears as the heading at the beginning of the offer packages. Text for ending package The text pre-set as the ending of an offer package, appears at the end of the offer packages before the package sum. Text for beginning group The text pre-set as the title when creating offer groups (Sub total), appears as the heading at the beginning of the offer group (Sub total). The text for the group beginning can be inserted in to the text for the group ending as wildcard [T]. Text for the group The text pre-set as the ending of an offer group Visual Project ® Revision 2013.12 Visual Project ® User`s manual ending 57 (Sub total), appears at the end of the offer packages offer groups (Sub total). Text for alternative Text for alternative position, appears as the position heading of the position over the designation. Text for commodity Text for commodity position, appears as the heading of the position over the designation. position Visual Project ® Revision 2013.12 Visual Project ® User`s manual 58 Edit Projects The function is opened through < Edit / Projects > from the Visual Project ® Management Center, or directly with the fast-start button “Projects”. Projects can be added, deleted, edited, forwarded, exported and project lists can be printed with the help of the selection mask Projects. Futhermore via data exchange, the data exchange of projects via data media or per email is possible. Special filter For the selection and search of projects, a user filter from this selection window can be used. Select the desired user from the User selection list. Only projects assigned directly to the user are shown. Access protection When opening the selection window, all projects assigned to you and created by you are shown. The selection list contains only those users within the user hierarchy that have the appropriate access. (see also User administration) All other projects cannot be seen or changed. The system administrator has full access to all projects. The owner of the project can also be seen in the column created by in the selection window or through the menu <Extras / Project info> of the project editing. Forwarding Visual Project ® If you want other users to be able to fully work on your project, click on the button Forward Project. Under Forward Project you can insert the following: Revision 2013.12 Visual Project ® User`s manual 59 to user List for selecting the user who is to become the new owner of the project. Create task Is ticked if a corresponding resubmission or Outlook task is to be set up for the new user. Subject Subject line for the resubmission or Outlook task Remark Remark for the resubmission or Outlook task After confirming with OK, the project is assigned to the new user. This procedure will be useful if an employee leaves the company or a restructuring within the company results in re-assignment of projects. The case of an employee being replaced due to holidays is a classic example. Please note that the entry of team rights in the user administration can also effect the access. Project lists Visual Project ® With the button Project list, a project list can be printed. The project list corresponds to the filters and sorting in the page view. Revision 2013.12 Visual Project ® Visual Project ® User`s manual 60 Revision 2013.12 Visual Project ® Archive User`s manual 61 Visual Project ® offers the possibility to archive selected projects and to remove them from the project administration afterwards. This option could be useful if you want to remove old projects from the project administration but do not want to erase them irretrievably. In order to archive projects do the following: Mark those projects in the project administration which you want to archive. Click on Archive. Choose the directory in which the projects are to be archived and confirm with OK. While archiving, a window of the action in progress is shown. Each project to be archived is stored as a *.vpp file in the directory mentioned. Visual Project ® Revision 2013.12 Visual Project ® User`s manual 62 As soon as all projects have been archived a success message is shown. Before deleting the archived projects, a safety check appears. As soon as you click on Yes the projects are removed from the project administration. Project exchange When clicking onto this button you will find several possibilities for exporting and importing your project data. These possibilities enable the data alignment of several Visual Project ® databases. Select a project and choose one of the desired functions afterwards: Save project file Visual Project ® With this function you can save a project from Visual Project ® as a separate file (*.vpp). Before saving a selection window appears where you can determine options for exporting: Revision 2013.12 Visual Project ® Project data Visual Project ® User`s manual 63 Project data This box is checked if the project data (project title and name, delivery date, operational date and internal number) has to be exported. Customer data This box is checked if the customer data are to be exported. Delivery address This box is checked if the delivery data are to be exported. Statistics data This box is checked if the statistics data of the project are to be exported. Competitor This box is checked if the entries under Competitor are to be exported. Additional texts This box is checked if additional texts (project Revision 2013.12 Visual Project ® User`s manual 64 prologue/ epilogue) are to be exported. Prices Remarks Checked if remarks regarding the project are to be exported. Purchase Here you can determine into which target price type your purchase price (price 0) is to be exported. Sales Definition of the target price type for sales (Price 1) Installation Definition of the target price type for installation (Price 2) Service Definition of the target price type for Service (Price 3) Price 4 to Price 9 Definition of the target price type for price type 4 to 9 The vpp file will be saved in packed format with the file extension .zip. Load project file Via this function you can load a project file into Visual Project ®. Because the files in the current version of Visual Project ® will be saved in the packed format, the input file can be available both as a file with the extension .vpp as well as a .zip file. Choose an existing project file on your data medium. Visual Project ® checks whether the project is already existing. If this is the case, you will be asked whether you want to overwrite this project. In order to import the data this question has to be answered with Yes. If you click onto No the import will be cancelled. Visual Project ® Revision 2013.12 Visual Project ® User`s manual 65 For importing the project data the selection window for data exchange will be opened. Similar to exporting a project file you can determine here which project data is to be imported and whether and into which price types the original prices of the file should be imported. As soon as you have chosen the import options and confimed them with OK, the selected data of the project file will be imported. After having loaded the project file, the corresponding project is opened for editing it. In case the project had not been existing already, a new project with the next project number available is set up. After opening this project, the project number can be edited. Send project file Via this menu you have the possibility to send a previously selected project as a project file per e-mail. Similar to the export and import of a project file you have the possibility to choose which project data is to be sent and whether and into which price types the original prices of the file are to be sent via the selection window data exchange. Visual Project ® Revision 2013.12 Visual Project ® User`s manual 66 Project editing The project editing of Visual Project ® is actually your working environment. Here you edit your offer for your customers or prospective buyers. Project editing consists of its own main menu, a toolbar, a toolbar for the system configuration, different input areas and the status line. General structure If you want to edit a new project, the editing area Project Data is first activated and all important main data can be reached. If you want to process any existing offer, you will be transferred immediately to the area Positions. The following illustration is the complete menu of Project editing. Menu functions project editing Visual Project ® in Revision 2013.12 Visual Project ® User`s manual The menu Editing in the input area place with the right mouse button. 67 Postions can be called from any Toolbar In addition to the menu functions you have a toolbar for editing the project available in the project editing, which enable a fast access to the most important functions. It is equipped with so called pop-up tooltips. This means that under each symbol, when the mouse pointer is placed on the symbol for a short time, a help message is displayed. Basically, you will find for every symbol a corresponding menu item which has the same function. The symbols of the toolbar as well as the corresponding menu entries have different statuses. That means that every action is not possible at any time. It is dependent on what stage the program is at. Definite menu items for example can only be used if you have highlighted one or several positions. Configuration Assistant Toolbar Located below the icon bar is a toolbar for the system configuration. Via this toolbar you can reach all of the functions for creating, editing and deleting a system configuration.. The toolbar and the toolbar for the configuration assistant as well as the statusbar can be displayed or not displayed via the menu View. These setups depend on the PC and are saved when leaving the project editing. New project creation To create a new project, first select the button Add. The project editing form of Visual Project ® opens with the input area Project Data. Visual Project ® suggests a project number. Accept the number or enter your own 8-digit, distinctive project number. You will receive a message if the number has already been entered. After this, all entry fields are empty or pre-set and the entry of project data can begin. Language In case you defined additional languages via <Master data/ Settings/ Languages> for your offer texts, then you can choose via the menu option Language in which language your offer will be printed. Visual Project ® takes over all texts in the selected language. If you have not define a language, the language from the customer base and/or the first language from <Master data/ Settings/ Languages> will be taken over. Visual Project ® Revision 2013.12 Visual Project ® Project data Visual Project ® User`s manual 68 Project number A distinctive 8-digit project number. This number can only be defined or changed when creating a new project. Title Title of the offer. The title becomes the heading of the offer and is printed in bold format below the recipient`s address. It is pre-set with the Offer title which can be found in Offer texts. (See also Offer texts on page 54 and following) If the title remains blank, no heading is printed. Name Name or description of the project. The project name is printed on every page of the offer above the position headings. Search descriptions Short description of the project. Serves only for internal search and structuring of the data. If the field remains empty when leaving the field, the contents of the name field is used automatically. Date Date of the offer. Realization Date of realization of the project. Delivery date Delivery date of the system or products. Operational date Operational date of the system. Resubmission date Field for entering a resubmission date. After clicking onto the button on the right side of the field you will see a window for entering the date. You can enter the date and additional remarks for resubmission there. You can also delegate the resubmission entry to other users (See also Prospective Buyers/Customers) Internal number Order number or internal numbers (e.g. file number, order number) Revision 2013.12 Visual Project ® Customer data User`s manual 69 Customer data can be selected from the Visual Project ® Customer/Prospective buyer database and can only be saved in definite projects. For easing processing and further usability of data we recommend that you establish the customer in the customer master data. By doing this, the evaluation function is improved, for example, when you assign customers in the customer master data to branches and distribution channels – due to this connection you can evaluate projects according to this criteria. Of course, you can create new customers directly in the project processing. After the selection of the customer data, all corresponding fields in the project processing are filled in. In principle, all customer data is saved separately with the project. Changes in the individual fields only affect the project and are not saved in the customer database. Similarly, deletion of a customer does not delete the customer data in the project. Via the button on the right in the field Address Number the selection window customers / prospective buyers is opened. Set up a new customer or prospective buyer for the offer here or select an existing entry from the list. Connect the offer with the customer by applying the button Take over. During the takeover the selection window will be closed and all fields of customer data will be updated. By deleting the number the reference to the address is removed. Visual Project ® Address1 1st address line of the address Address2 2nd address line of the address Address3 3rd address line of the address e.g. for the attention of text. The line will be suppressed in the address if it is not filled in. Street / PO box Street and house number or PO Box of the address Country / ZIP code Country code and a max. 6-digit ZIP code of the address City City / Place of the address Contact person Customer’s contact person for the project. The transfer of the contact persons from the database will be supported by a selection list. Salutation text Salutation text of the customer’s contact person for the project. The transfer of the salutation texts from the database will be supported by a selection list. Salutations First name First name of the contact person. Surname Surname of the contact person. Telephone Telephone number of the customer for queries. Sales channel Allocation of a sales channel to a project. A selection list supports the insertion by Revision 2013.12 Visual Project ® User`s manual 70 displaying all previously used entries of your projects. Delivery address Statistics data Price group Assignment of a price group to a project. All price groups that you have defined and used are shown in the selection list. As default the price group is taken from the customer master data. After a change in the price group all new products get the price of the set price group of the project. Prices of products already available remain unchanged. Value added tax Indicates whether the value added tax will be shown on the printout. The default is taken from the customer master data. If the delivery address for the project differs from the recipient of the quotation. The delivery address will be printed below the total sum of the quotation above the epilogue. Address1 1st address line of delivery address Address2 2nd address line of the delivery address Street / PO box Street and house number or PO box of the delivery address Country / ZIP code Country code and a max. 6-digit ZIP code of the delivery address. City City / Place of the delivery address The statistics data can be evaluated in the analysis module of Visual Project ® (see also the section Analysis). It serves for example for the calculation of the offer potential, the business control or the limitation of the evaluation. Status Please enter a status for the condition of the project (i.e. Quotation, order). A status once entered by you will be automatically entered into the selection list and then be at your disposal for further entry. Object Unlimited entry of a project object (e.g. HiPath 3000, spare parts, computer etc). A selection list supports the entry by display of all previously used project objects in projects. Tender Ticked, if a tender is the basis of the offer. public Ticked, if the tender is public Order probability Indicates in percent the probability that the offer becomes an order. Preset is 100%. Relative worth of the Indicates the percentage share of the offer order which, in your opinion, will be the actual order volume in case the quotation will be accepted. The presetting is 100%. For example: In case you have submitted a quotation with positions which have a high probability of not becoming an order, enter a value less than 100%. Visual Project ® Revision 2013.12 Visual Project ® User`s manual 71 Competitor Competitors 1 till 5 Unlimited entry of a competitor. A selection list supports the entry by display of all competitors of former projects. Existing systems Manufacturer Manufacturer of the telephone system of the prospective buyers/customer. A selection list supports the entry by display of all manufacturers of former projects. System Kind of the telephone system of the prospective buyers/customer. A selection list supports the entry by display of all systems of former projects. Supplier Supplier of the telephone system of the prospective buyers/customer. A selection list supports the entry by display of all suppliers of former projects. Notes Unlimited remarks for the telephone system Positions Visual Project ® In the input area positions all positions to the project are recorded. Work will be made considerably easier because you can take over positions into your offer in several ways. Visual Project ® offers the possibility to have a system configuration established by means of the configuration assistant and the calculated positions can be taken over after that or product data can be inserted directly out of the product master data. It is also possible to insert unrestricted positions and unrestricted texts. Revision 2013.12 Visual Project ® System Configuration System Base data User`s manual 72 The menu option for the system configuration can be found in the menu configuration assistant or on the toolbar of the configuration assistant. By clicking onto the symbol system an input window will be opened. Here you can choose the system for the telephone equipment from a selection list and you can deposit all system-specific data such as the system number or a designation. Identifier Will be assigned by the program automatically. Designation Designation of the telephone system. Manufacturer Manufacturer of the telephone system. A selection list supports the entry by display of all manufacturers of former projects. In case of takeover of a configuration out of the configurator the manufacturer will be entered automatically. System Selection window HiPath3000. User country Country in which the system will be used. The entry is possible via a selection window. System number Number of the telephone system. for the system e.g. In case positions are already entered, the system of the telephone equipment as well as the system number will be shown in the column System of the position entry. Visual Project ® Revision 2013.12 Visual Project ® Details User`s manual 73 Digital Trunk line Digital outside lines of the telephone system. Analogue Trunk line Analogue outside lines of the telephone system. Subscriber digital Digital participant lines of the telephone system. Subscriber analogue Analogue participant lines of the telephone system. Contract type Contract type of the telephone system (e.g. rent, purchase, leasing etc.). A selection list supports the entry by showing all entries used up to date in the systems of the projects available. Contract number Number of contract for the telephone system. System price Price of system. Contract end End of contract (date of expiration). PARK file from Date of the corresponding stock file (park file contains efficiency characteristics from the system at the time of its purchase) REGEN file from Date of the corresponding partial regeneration file (regen file contains stock data directly from the system) SES file from Date of the corresponding order file for SAP of Unify BAV file from Date of the corresponding file for ordering process system of Unify (BAV file) the complete telecommunication Loads the file Saves the file Visual Project ® Revision 2013.12 Visual Project ® User`s manual 74 Opens the file Location Address 1 1st line of location address Address 2 2nd line of location address Street/PO Box Street/PO Box of the location address City City of the location address Telephone Telephone number of the location address Reference/Note: Unrestricted remarks concerning the telephone system Start the configuration The configuration assistant can be started via the menu <Config.assistant assistant> or via the symbol in toolbar of the system configuration as Add-On (additional tool). The use of the configuration assistant is the simplest way of preparing an offer. Start a configuration assistant by clicking onto the corresponding symbol or the corresponding menu option. Visual Project ® starts the assistant and hands the controlling over to it. The configuration assistant is in the foreground of your Visual Project ® window. Visual Project ® Revision 2013.12 Visual Project ® User`s manual 75 In the configuration assistant a graphical user interface is at your disposal in which you can configurate your system. After the complete configuration has been carried out, you can transfer the configuration result to your Visual Project ®. For doing that change to the product overview and press the button Take over. Further information about using the configuration assistant will be found in the associated user manual. The positions will be automatically inserted into the quotation. With the transfer the product numbers and quantities of the products will be accepted into Visual Project ®. During the transfer Visual Project ® will search the corresponding product in your product master data. If the product is found all product data (texts, prices ...) will be updated Visual Project ® Revision 2013.12 Visual Project ® User`s manual 76 corresponding to the language and price group settings for the project. In the case that no product will be found in the product master data, the product will be taken over into the offer without prices and with the designation unknown configuration position. You will get the following result: Now you can edit the offer further. You can change, add or delete positions. Positions which were taken over from the configuration assistant into the position entries can be given back to the configuration assistant when it is called again. In order to do this, start the configuration assistant again. The configuration assistant (Visual Project ® Configuration) is a independent program which will start its own process (task) on your computer. When you click on the outside of the window of the configuration assistant during the configuration process, which has been started from Visual Project ®, the window of the configuration assistant may suddenly be no longer visible and placed into the Background. In this case bring the configuration assistant to the foreground by using the Windows key combination Alt + Tab or click the program symbol in the Windows taskbar back to the Foreground. Delete systems Visual Project ® It is possible to remove all from the configuration assistant inserted positions via the trash icon in the toolbar for the system configuration. There will be a security prompt shown, before the deletion process starts. Revision 2013.12 Visual Project ® User`s manual 77 As soon as you confirm this message with Yes, all systems which have been created via the configuration assistant as well as all positions belonging to them will be removed from the project. Positions from the product master data Another possibility to enter positions into the quotation is to directly take the products from the product master data. Highlight the positions in your quotation and the insertion will be above the product. Click then on the menu <Insert / Products>.The selection window for products opens. Select one or several products and transfer them into the quotation in the marked order by a click on the button Take over. You can repeat this process as often as you like. At this point you can also create products in the product master data or modify them. With the button Close,the selection window is closed and you are again in the input area Positions. Quick entry of data Another possibility to transfer products into the quotation is to directly enter the product number into the column Product number on the last row of the work sheet. If a matching product can be found in the product master data, Visual Project ® inserts it automatically at the end of the quotation. If you take over products into your offer by taking them over from the product master data or by fast entry, these products will be assigned automatically to the selected system. Therefore, before taking over, check whether the system which you want to attach the product to is Visual Project ® Revision 2013.12 Visual Project ® User`s manual 78 selected. Edit product numbers You can edit the product numbers in the positions later on. However, the change is only effective if the changed product number is the number of one of the products existing in the product master data. After the change the data belonging to the product are taken over from the product master data. Free Position Click on the menu <Insert / Free Position> to paste an unrestricted position into the offer. Use this function if you want to use a product in this offer only. All product data must be manually entered. Free text Click on the menu <Insert / Free text> if you want to enter additional text positions (explanations, important remarks) in your offer. You can only fill in the columns “Position number”, „Designation“ and „Text“. Highlighting positions The first column in the table of the offer is shown in grey and consecutively prenumbered. If you click on a field in the first column, the entire accompanying row is highlighted with a black background. You can highlight several rows by dragging with the left mouse button depressed. In case you want to highlight all positions, click into the grey field above the first position. Deleting positions To delete one or several offer positions, highlight them and select under Edit the menu item Delete or press the Delete – key. After a confirmatory question the positions are deleted. Cut Paste Copying Positions Copy Paste You can also delete positions with <Edit / Cut>. The deleted positions can then be pasted into any desired place in the offer. In order to paste them before a starting position, highlight this first and then select in the menu <Edit / Paste> or click the Insert -symbol in the toolbar. Within the offer sheet you can copy offer positions in order to repeat them on another spot within the offer. Highlight the positions to be copied first. Select <Edit / Copy> or click the Copy-symbol on the toolbar. The copied positions can then be pasted into the desired place of the offer. In order to paste them before a starting position, highlight this first and then select the menu <Edit / Paste> or click the Insert symbol in the toolbar. Moving positions In order to retrospectively bring the positions into your desired order, proceed as follows: Highlight one or several positions which you want to move (black highlighting). Move the mouse cursor slowly above the top limit of the highlighted positions until the mouse cursor becomes an arrow. The highlighted positions then can be moved by depressing the left mouse button and dragging to the desired place. When moving, the positions are characterized with a black double line. The positions are pasted before the positions on which the mouse cursor is when the left mouse button is released. Changing positions Click with the help of the mouse into the field of the offer sheet to be changed and change the data as desired. You can only change fields that do not have a grey background. The work sheet automatically updates all calculations or calculation fields. Product details It is also possible to open the Product data window through the menu Visual Project ® Revision 2013.12 Visual Project ® User`s manual 79 <Edit / Detail>, via double-click onto the grey field on the left of the position number or the Magnifying-Symbol . The contents of this window correspond with the highlighted positions in the background of your work sheet. With the register General, Prices and Others all important position data can be changed. The entry in the fields has a direct effect on the corresponding cells on the work sheet. With an open window you can change between the positions with the help of the navigation buttons in the field „Product number“. Visual Project ® positions itself automatically on the actual row and column in the background. Price calculation Visual Project ® Visual Project ® provides for each price type defined and used by you, 6 dependent price columns. The naming of the price columns is done in accordance with the description of the price type set by you. In the first column the Base price of the product for the price type is shown. The basic price is not changeable and shows the price of the product in the product master data at the time of the transfer into the offer. The second column contains the actual Price. It shows the single price of the product in the offer and can be changed as desired. With a new position the pre-definition is the basic price, i.e. the price from the product master data. The next 3 columns are for rebates. If you have a rebate in percent in the column Rebate or a rebate as an amount of the unit price in the column Discount, then an R or a N will be set as a characteristics in the column Discount type. In the last column the Total price of the position calculated from the quantity, price and the rebate is shown. Revision 2013.12 Visual Project ® User`s manual 80 Between the two definite price types purchase and sale there are the columns Margin and Span in %. Margin The column Margin shows the profit margin for every product as a difference of the total sales price and the total purchase price. Span in % In the column Span in % the difference between the total sales price and the total purchase price is shown as percentage. The formula for calculating the sales span is: (total Total sum sales price – total total sales price purchase price) * 100% The sum of all price columns is shown and up-dated permanently in the second last line. The line is labeled Sum. If you want to grant rebates on the total sum of the offer, you can enter them in the last row, Total. The final project price for every price type is shown in the columns total price in the last row. A retrospective change of the price calculation of some or all positions of the offer is achievable with the menu <Edit / Price calculation> . Highlight one or several positions and click on the menu item Price calculation. In the opened window with the help of a selection list in the field Base you can define the price type from which another price type can be calculated. Define the price type to be calculated in the field Amendment by. Enter the calculation factors in the field Factor, Dec. and Surcharge. For all highlighted positions the entered price type is recalculated when clicking on the OK, according to the following formula: Changes from = Rounding ( Basic * Factor(%) ) + Surcharge Visual Project ® Revision 2013.12 Visual Project ® Position numeration User`s manual 81 The position numeration within the offer can be created absolutely individually. In the fields of the column Pos.-No. any entry with up to 12 characters is permissable. Visual Project ® supports you however with consecutive numbering. Highlight all numerated positions Use the Numbering – Symbol or the menu <Edit / Numerate > Choose for each Title, Position and U-position the Starting Value of the Numbering, the increment and the Minimum Number of Digits. Click on the button Take over. If the number of places of the position numbers is less than the entered number of digits, zeros are automatically entered to make up the minimum. As a result all highlighted positions in the column „Position number“ are numerated as desired. Package composition Visual Project ® You can compose packages within your offer as you like. Packages serve to „hide“ a single price (e.g. a relatively high single unit price compared to the other components of the package) and to improve the structure of the offer. By the package composition a new product is created which is made up from the different individual components and package positions. Package positions cannot have their own Revision 2013.12 Visual Project ® User`s manual 82 rebate. Rebates can only be granted on the total package. The value added tax is the same for all packages. The package has its own quantity. Due to this the real quantity of the package positions results from the multiplication of the package quantity and the number of individual package positions. The real number of components is shown in the column Qtty(real). With the creation of packages a row for the package beginning and a row for the package ending is inserted into the offer. The text in these rows can be changed individually and will be pre-defined with the standard values from the offer texts. A long text can also be entered for the package and the package positions can be suppressed for printout. Highlight all the positions that belong to the package. Use the package symbol in the toolbar or select the menu <Edit / Packaging>. Group composition Groups (Sub totals) serve as an overview as well as the subtotal creation of the related positions. Groups can be interlaced to any number of levels. You can enter sub totals in the offer at any place you like. Visual Project ® automatically does the calculation. Highlight all positions which should be entered into the desired sub total calculation Use the sum symbol in the toolbar or choose the menu <Edit / Grouping> Packages and groups are not allowed to overlap. A composition between packages is also not possible. Offer structure With your daily work you are forced to provide offers with individual structure. Next to the pure selling price or pure rental price it is possible to have a mixture of sales and rental - with and without service/maintenance, with and without installation - or other price types within an offer. Visual Project ® enables you to create multi-price offers. Doing this, one or several different price types can occur in every position. For every price type an individual or total rebate can be granted. At the end of the offer total sums for every price type with or without value added tax are shown. Price type column By the column price type of the worksheet, price types for every position can be defined that will be considered when printing out or for calculations on the worksheet. Enter a valid abbreviation for the price type here , e.g. „SA” for sale, „I” for installation or „R5” for 5 years rent. You can also enter several abbreviations by using a comma or a backslash as a separating sign. These abbreviations can be determined in the menu price types under <Master data / Settings>. (See also under Price types on page 50 of the manual.) As an alternative to that, the price types can also be selected in the detailled view of the position by ticking or removing ticks in the tag Prices. Visual Project ® Revision 2013.12 Visual Project ® User`s manual 83 After the entry of the price abbreviation or ticking the price type, they are shown in black and considered in printouts and sum calculations. All prices highlighted in red are neither considered in the sum formation nor in the printout. Since the purchase price and the sales price are necessary for the calculation of the margin, the calculation of the purchase price is also controlled by the abbreviation of the price type (sales price). The price columns for the purchase price will be in the same colour as the sales price in order to carry out an exact calculation of the project results. The purchase price will certainly not be printed out on your offers. By entry of the price types in the last line Total, the price types for all positions in the offer can be changed in one operation. This function is useful if you define or change the basic organisation of your offer. When setting up a new offer, the field will be pre-allocated with the price types marked as Standard under <Master Data/Constants/ Price Types> If new products are inserted into the offer, the value of the column price type from the previous line is selected. Position type column In this column you can determine whether the selected position should be a normal position or an alternative or request position. Alternative and request positions are not taken into account in the sum of the offer. For these positions only the single prices are shown in the offer. Offer Sheet Look Visual Project ® The offer sheet presentation can be changed with menu item <View/View definition > or the View icon. The dialogue window for the columns in the worksheet is shown in the illustration below. Revision 2013.12 Visual Project ® User`s manual 84 Check-Marks available in every line provide the option of showing or hiding a column. The width of the column can be defined in the field Width and it influences every column. Any desired scheme can be established, named and saved. If a scheme already exists, it is overwritten after a confirmatory prompt . All schemes are saved, user related. Changing the views Via the selection window on the right next to the view icon it is possible to change between the different views. While opening a project the view is loaded which was activated before having last closed the Project editing. Printing the Offer When you have included all customers and project relevant data, the offer can be printed through <Project / Print> or the Print icon. When printing directly, the number of copies are defined by the settings made in the Company data. Print Preview The offer can be viewed prior to printing through the menu item <Project / Preview > or the Preview icon. Visual Project ® Revision 2013.12 Visual Project ® User`s manual 85 A dialogue box appears in both variations for the setting of the Print Options before printing. Individual Options Print With Product Number Ticked if the product number is to be printed Visual Project ® With Product Text Ticked if the long text or the product description is to be printed. With Picture Ticked if pictures of the product master data are to be printed in the positions. With Unit Price Ticked if the unit price of the positions is to be printed. Without unit prices discount on positions cannot be printed! With Rebate / Discount Ticked if the rebates or discounts for the offer positions are to be printed. Cannot be set if no unit prices are to be printed. With Total Price Ticked if the total price of the offer is to be printed. Qtty with decimal places Selected, if the number with a decimal point after the comma, should be printed. With Packet Ticked if the packet positions are to be printed Revision 2013.12 Visual Project ® User`s manual 86 Positions Only Positions with Price Ticked if only those positions are to be printed whose total price of at least one price type (apart from purchase) is different from zero. With VAT for Position Ticked if the Value Added Tax rate is to be printed in every position. It is only printed if the field “VAT” is set in project data. Clicking on the button Exchange rate opens the country administration for the extraction of the currency details and the exchange rate for the offer printout. If required, select a country and confirm with OK. The exchange rate and the currency of the chosen country are entered in the following fields. The basis for the conversion is the internal currency set in the Company data. Preset is the internal currency without the exchange rate. For the normal printout these fields can be bypassed. Decimal Places Indicates the number of decimal places after the decimal point for the price details. When required it is rounded. Decimal places between 0 and 2 are allowed. With Total Rebate / Discount Ticked if the total rebate or discount of the offer is to be printed. Cannot be set if no total price will be printed. With total Price Ticked if the total price of the offer is to be printed. With total VAT Is ticked if the VAT is to be calculated for the total price too. Sales and Installation Ticked if the prices for sales and installation as Uniform Price are to be added up to a uniform price (see above). Form Sum Total for Ticked if a total sum is to be formed for sales Sales and Installation and installation (see above). Printout of the Offer The printout is produced as a complete offer. Printout Product List The printout is produced as a product list without the company’s letterhead and without the customer’s address. Visual Project ® Revision 2013.12 Visual Project ® User`s manual 87 By clicking onto the button Save as Default you have the possibility to define the set printing options as standard for new projects. The default settings for the printing options are user-defined, which means that every user can define and save ones own default settings. After having chosen the printing options, click on OK in order to start the printout or on Cancel in order to close the form. The printing options which are defined in the project will be saved with the project. On the following pages you can see an example. Visual Project ® Revision 2013.12 Visual Project ® Visual Project ® User`s manual 88 Revision 2013.12 Visual Project ® Visual Project ® User`s manual 89 Revision 2013.12 Visual Project ® Visual Project ® User`s manual 90 Revision 2013.12 Visual Project ® Visual Project ® User`s manual 91 Revision 2013.12 Visual Project ® User`s manual 92 Working with Word- There is the possibility to transfer the offer directly into a WordTemplates document. For creating the Word-document a suitable template is necessary. You can find an example template named Offer.dot in the folder Templates of your Visual Project ® program directory. You can adapt this template individually to your needs and save it under another name or create a new template. In Appendix C: of this user manual you can find a detailled description of the elements which can be used in this template. The Appendix B: contains a list of wildcards which can also be used in the template. In order to transfer an offer into a Word-document choose the menu option <Project / Microsoft Word> or use the Word symbol in the toolbar. Analogue to printing the offer or to the print preview, the dialogue box for choosing the printing options appears. Choose the corresponding options for the printout of the offer and confirm with OK . The application Microsoft Word will be opened and the dialogue for creating the new Word-document will be shown. Click now on the template on whose basis the Word-document is to be created and confirm with OK. During the transfer of the offer data to MS Word the progression will be shown. As soon as all data are transferred to Word, the application switches into Microsoft Word. Here you can see your finished Worddocument, where you can make supplementary changes (e.g. manual pagination) if necessary. In case you own the document administration of Visual Project ® and you activated the function During Word-export of projects enter as Visual Project ® Revision 2013.12 Visual Project ® User`s manual 93 contact automatically in your company data, you will be asked, whether you want to create a contact entry. (Read also the paragraph Company data on page 43 of the User Manual.) If you answer the Question with Yes an entry will be made in the contact history of the customer. The field status entry of the project data will be used as a key word. The project title/project name will be written in the contact entry under remarks. Under Document: the created Word-document will be referred to. A contact can only be entered into the contact history if the customer data were previously taken from the customer/prospective customer master data into the project. Visual Project ® Revision 2013.12 Visual Project ® User`s manual 94 After the export into the Word-document, Microsoft Word suggests to save this in the Standard-Document Directory, which is contained in your company’s data. If the field Status has a value (e.g. offer), a subdirectory will be set up in the Standard-Document directory, which will get the same designation as the field status. This sub-directory will then be chosen as the storage position. The Project Number will be suggested as the file name for the Word-document. Before saving you have the possibility to change both the storage position and the file name. In case you did not set up a standard-document directory or a valid standard document directory in your company data, the Visual Project ® Program Directory will be used as document directory. Visual Project ® Revision 2013.12 Visual Project ® Visual Project ® User`s manual 95 Revision 2013.12 Visual Project ® User`s manual 96 Fast Print Within the menu <Project> there is the option<Fast Print>. With this option the offer worksheet can be printed on the standard printer without special formatting and without customer data. The printout looks essentially the same as on the screen. The offer number, the designation and the name of the view scheme will be printed as well. Saving the offer All entered data can be saved for later access or processing. To Save, select the menu item <Project / Save> or the Save icon from the icon bar. Export view With the help of the menu <Data Exchange / Export view> you can export the offer worksheet (Register Positions) with all its visible columns and lines into Excel. To do this, mention the Excel-Version as well as the path and the file name for the export in the dialogue Export Data. Export positions The project positions can be exported into the Visual Project ® import format (see below). This can, for example, be very useful if you want to set up import templates for similar projects. If you want to do this, choose the menu option <Data Exchange / Export Positions> and insert the Excel-version, the path and the filename for the export in the on screen dialog box. Import positions With the help of the menu <Data Exchange / Import> you have the possibility to load project details from an Excel-table into the project. In the program directory of Visual Project ® you find an example of an Excel-table for the import of project details into Visual Project ®. The file is named ImportProjectDetails.xls and consists of 2 sheets. The sheet ImportProjectDetails contains all names of columns which are meant for an import of data into Visual Project ®. On the sheet Description you find the description of the column names including file type, standard value, designation and range of value which are supported by Visual Project ® . Send Quote Request Via the menu <Data exchange/ Send Quote Request (Webservice)> (Webservice) you can send quote requests per email to one or several suppliers. In a separate window all positions of one supplier which are inserted into the project will be shown. If your project contains positions of several suppliers, you can select the desired supplier via a selection list. Visual Project ® Revision 2013.12 Visual Project ® User`s manual 97 In addition the form for quote request contains your address which you inserted under Master Data/Company Data in Visual Project ® as well as your name and your email address out of the user administration. This information can be edited. In the text field on the right side of the form, additional information for the supplier can be inserted. In order to send the quote request to the supplier, click on the button Send Quote Request (Webservice). An email containing the data of the form will be sent to the selected supplier. You receive a copy of this message to the email address which you entered into the form. Send order (Webservice) A direct order of project positions with one of the suppliers listed in Visual Project ® is possible via the menu option <Send order (Webservice)>. Similar to sending a quote request, a form with the positions of one supplier which have been inserted into the project will be shown. Similar to sending a quote request, address, email address can also be edited here and additional information for the supplier can be entered. For sending an order the entry of an order number is absolutely necessary. If a project price for the positions to be ordered was agreed on with one supplier, it can be entered into the form in case the option project price was ticked. In order to send the order to the supplier, click on the button Send order (Webservice). An email containing the data of the form will be sent to the selected supplier. You receive a copy of this message to the email address which you entered into the form. Create order file Visual Project ® Via the menu option <Data Exchange / Create order file> you have the possibility to create an order file in Excel-format in which the positions Revision 2013.12 Visual Project ® User`s manual 98 to be ordered are displayed for every supplier. Unify Under the menu option <Data Exchange / Unify> you find special export possibilities for ordering with the Unify. Transfer data Customer Library into When the offer becomes an order, the data can be transferred into the Customer Library (also see Prospective Buyers/Customers). Mark all products to be transferred into your worksheet and then select the menu item <Project / Inventory acceptance >. The delivery is selected from project data, this date will be the date of the transfer. If no delivery date were entered, the current date is registered as date of the inventory transfer. Make sure once again the details of all entries are correct and click on the button Yes to transfer the products. If you take over the project positions into the stock of a prospective buyer, the mark customer is entered in the prospective buyer’s address. (See also under Prospective Buyers/Customers from page 101.) Display Solutions Via the menu option <Extras / Solutions> or the symbol Display Solutions you can call detailled information about suppliers and their solutions which are provided in Visual Project ® . Further information can also be found in the paragraph Solutions on page 170 of this manual. Closing the Offer Through the menu item <Project / Close> or the Close icon from the icon bar, project processing can be ended and you are returned to the Visual Project ® Management Center . If the data has not been saved yet, the following prompt window is shown asking if you want to save data: Leasing Offer Through the menu item <Project / Leasing offer> the calculation mask of the leasing module of Visual Project ® is opened. The leasing module is a separate program and can be opened from the Visual Visual Project ® Revision 2013.12 Visual Project ® User`s manual 99 Project ® Management Center . Visual Project ® submits all relevant data like Customer data, Project names and Leasing volume to the program. You can immediately print a current leasing offer for your customer after selection of the Term and Commission. Please refer to the Leasing Module manual for further information. Online Leasing request Via the menu option <Project/ Online Leasing request> you can call the Online-Leasing Tool of the Siemens Finance & Leasing, which enables an online leasing request. If applicable you can also conclude leasing contracts online. In this case there will be a credit assessment of the lessee in the database of the Siemens Finance & Leasing before concluding the contract. For the registration with the Online-Leasing Tool you need a user name and a password. Further information concerning Online Leasing Request as well as your entry data can be received via your contact partner at the Siemens Finance & Leasing. Product groups Via the Product Group input area, the following presentation is shown: In this illustration an overview of the offer can be obtained, in the following order : Suppliers Price Categories The resulting numerical values are calculated automatically and grouped according to these categories. When the price type in the rebate column is changed, these will automatically be transferred to the corresponding rebate columns of the offer position. Positions within an offer package will not be taken into account when inserting rebates under Product Groups. Visual Project ® Revision 2013.12 Visual Project ® Additional Text User`s manual Prologue 100 Text as long as desired, is printed as an introduction before the offer positions. With the new creation of a project, it is pre-selected from the < Master data / Settings / Offer Texts>. The text can be changed at any time. By clicking Text module on the menu list or the combination Cntrl + T you can have access to your text module. Inserting text from the Clipboard is also possible. Epilogue Remarks Visual Project ® Text as long as desired, is printed as an epilogue at the end of the offer ( see also Prologue). Unrestricted field for additional information and internal reference to the project (e.g final report). Is printed in the project list. The access to the text modules is also possible. Revision 2013.12 Visual Project ® User`s manual 101 Prospective Buyers/Customers The function can be started by menu item <Edit / Prospective buyers, customer administration> from the Visual Project ® Management Center or invoked by the fast start button Customers directly. With the selection mask customers or prospective buyers can be deleted, added, edited, forwarded, exported as well as address lists printed. Special filters On the selection window there is a filter for the selection and search of customers /prospective buyers. Select the desired user from the selection list User. Only the addresses directly assigned to the user are shown. Access Protection All addresses created in Visual Project ® are visible for all users when "Reading authorization on customer data for all users" in the Company data is ticked. (Also see Company data from page 44 of the manual) Every user can view and edit the address master data like address and general information to ensure optimal data maintenance. The data that all users can view and change can be found in the registers Base data und Additional data of the customer database. The registers Contacts, Contact person, Remarks and Status contain special information about customers/prospective buyers and are only accessible by the owner of the address or the user who is in the hierarchy above the owner. The user of the address can also be seen in the column created by in the selection window or via the button Info of the database form. Forwarding Visual Project ® This function enables forwarding of customer/prospective buyer data to Revision 2013.12 Visual Project ® User`s manual 102 another user. This button is deactivated if a user is selected under user whose data you are not allowed to process completely If you want to transfer your addresses or addresses on which you have full access to another user for complete processing, click the button Forward. Under Forward you can now insert the following: to user List for selecting the user who is to become the new owner of the address. Create task Is ticked if a corresponding resubmission or Outlook task is to be set up for the new user. Subject Subject line for the resubmission or Outlook task Remark Remark for the resubmission or Outlook task After confirming with OK, the address is assigned to the new user. This procedure is particularly useful if employees leave the company or a restructuring of the customer service makes a reassignment of the addresses necessary. Temporary replacement of an employee on holiday is also a classic example. If the option reading authorization for customer data for all users is ticked under company data, data sets are displayed under the selection All users even if you do not have an authorization for forwarding. This is the case when the displayed data set belongs to a user who is above you in the hierarchy level or if you do not have team rights for processing the data sets of this user or if the owner of the data set is in slave-mode. (Concerning Master-/Slave-Mode see also Master- / Slave-Mode from page 194.) When trying to forward such a data set you receive a corresponding message. Address card Visual Project ® Via these buttons you can print an address card for the selected address. The address card contains all data entered for this address including base data and contact history. Revision 2013.12 Visual Project ® Address lists Visual Project ® User`s manual 103 With the button Address list, the address lists of customers/prospective buyers can be printed. The address list is displayed in the page view according to the appropriate filter and sorting order. Revision 2013.12 Visual Project ® Visual Project ® User`s manual 104 Revision 2013.12 Visual Project ® Campaigns (document administration) User`s manual 105 By clicking onto this button you invoke the Campaign Manager of Visual Project ®. With the help of the Campaign Manager serial letters in Microsoft Word can be linked with selected customers or prospective buyers data. An entry in the Campaign Manager is made for each campaign. The entries contain the following information: Date Date when the campaign was created or executed. This field cannot be edited. Responsible Person Responsible person or contact person in your company. The name of the current user is preallocated. A selection list supports the entry by displaying all users of the user administration. Keyword Keyword for the campaign (e.g. invitation, mailing, brochure, etc.). The entry is supported by a selection list of all keywords used already. Document Linkage to the serial letter. Via this button the document for the serial letter can be chosen. If the campaign has already been linked to a serial letter, the symbol for Microsoft Word will be shown. Via this button you get a hint about the storage position of the serial letter. The button is not activated if there has not been a link yet. Visual Project ® Revision 2013.12 Visual Project ® User`s manual 106 The link to the serial letter can be removed by clicking this button. The document will not be deleted from the hard disk. The button is not activated if there has not been any link yet or if the campaign has already been executed. Remarks Free text for detailed remarks. In order to create a new campaign, do the following: Choose in the window Search Prospective buyers/Customers the addresses for your campaign. Either select the corresponding data or choose them by a filter or via an existing viewing scheme. (See also the paragraph Operation with selection windows from page 25.) By clicking on Campaigns you start the Campaign Manager. Set up a new campaign by clicking on New. In the upper part of the window the number of the selected data records for the campaign will be shown. Enter now the responsible person, the keyword and remarks and choose the document for the campaign. Visual Project ® Revision 2013.12 Visual Project ® User`s manual 107 In order to execute the campaign click on Execute. When executing the campaign the date of the campaign will be updated automatically and all entry fields will be locked. The serial letter will be opened. When executing the campaign the data of the prospective buyers/customers administration will be exported into an Excel table Visual Project ® Revision 2013.12 Visual Project ® User`s manual 108 and linked to the document as a data source. Afterwards they are at your disposal as serial letter fields. Now you can complete your serial letter and finish it via the Serial Print Manager of Word as usual. In order to ensure an efficient service for your customers, an entry in the contact history will be made for all customers or prospective buyers which were selected for this campaign. This entry also contains a linkage to the serial letter. If you want to delete a campaign which was already executed, click on the button Delete in the Campaign Manager. As soon as you anwered the following safety question with Yes, the campaign and all entries in the contact history of the prospective buyers/customers data belonging to the campaign will be deleted. However, the serial letter will not be deleted from the hard disk during this procedure. Visual Project ® Revision 2013.12 Visual Project ® User`s manual 109 The Campaign Manager is at your disposal only if you own the document administration of Visual Project ®. Ex-/ Import Via this button you are able to export addresses into Outlook or Excel and to import addresses from an Excel-table into Visual Project ® Outlook Export (main contact person) Here you can export the main contact person of all customers and prospective buyers shown to you in the selection mask as contacts into Outlook. Just click on the button Outlook Export (main contact person). A contact in Outlook will be created for each main contact person of each customer and prospective buyer. Outlook Export If you want to create a contact in Outlook for each contact person of each customer and prospective buyer, then choose the option Outlook Export. A contact in Outlook will be set up for the main contact person as well as for all further contact persons of each customer and prospective buyer. In Outlook you can branch out of the set up contacts via the button Visual Project into the corresponding customer in Visual Project ® . If you press the button Outlook Export again, you can synchronize changes which you made in Visual Project ® with your Outlook contacts. Any changes you made in the Visual Project® customer data can be synchronized with the Outlook contacts. A synchronization of changes in Outlook contacts with address data in Visual Project ® is not possible. Export view With the help of the menu <Data Exchange / Export view> you can export the offer worksheet (Register Positions) with all its visible columns and lines into Excel. To do this, mention the Excel-Version as well as the path and the file name for the export in the dialogue Export Data. Export positions The project positions can be exported into the Visual Project ® import format (see below). This can, for example, be very useful if you want to Visual Project ® Revision 2013.12 Visual Project ® User`s manual 110 set up import templates for similar projects. If you want to do this, choose the menu option <Data Exchange / Export Positions> and select the Excel-version, the path and the filename for the export in the on screen dialog box. Export Excel file (View) All data records visible in the selection window will be exported into Excel with all visible information. The headers which will displayed in the selection mask will be exported as column headers. Choose the option Export Excel file (View) and select the Excel-version, the path and the filename for the export in the on screen dialog box. Export Excel file The address master data can be exported into the Visual Project ® import format (see below). If you want to do this, choose the menu option Export Excel file and select the Excel-version, the path and the filename for the export in the on screen dialog box. Excel Import In the program directory of Visual Project ® there is an example of an Excel-table for importing addresses into Visual Project ®. The file is named ImportAddresses.xls and consists of several sheets. The sheet Addresses already contains all column names which are selected for an import of data into Visual Project ®. In this sheet you can enter all addresses to be imported line by line. On the sheet Description EN or Description FR you find a description of the column names supported by Visual Project ® including data type, standard value, description and range of value. However, you can also use any Excel-table for the import of addresses. Prerequisite for the import is the existence of a sheet named Addresses and at least the column AddressCode. Simply rename the Excel-sheet into Addresses and name the column with the address number in the 1st line AddressCode. Furthermore, give all the other columns of the sheet which should be taken over the corresponding column name. Visual Project ® takes over only these columns, other columns are not considered. The function for exporting and importing addresses is only at your disposal if you own the module External Interface of Visual Project ® . Visual Project ® Revision 2013.12 Visual Project ® User`s manual 111 New creation To create new customer/prospective buyers, select the button Add. The form Prospective buyers and customer administration opens showing the input areas. Visual Project ® recommends a free address number. Confirm the number or type in an 8-digit distinct address number. If the number is already allocated, a message is displayed. After this, all entry fields are cleared or pre-set and the entry of the address data can begin. Master data Address number Distinct 8 digit number of the customer/prospective buyers. This number can only be defined or changed during the creation of an address. Search Name Short description of the address. It is used only in the internal search and structuring of the data. If the field remains empty it automatically receives the contents of field “Address 1” , when leaving. Address 1 1. Address line of the address Address 2 2. Address line of the address. Address 3 3. Address line of the address e.g. for the attention of text of the address. The line will be suppressed when not filled out. The transfer from texts of the base data Salutations is supported by a selection list. Street Street and house number of the address Country / ZIP Code The postal country code is not changeable. It is selected automatically from the country Street Address Visual Project ® Revision 2013.12 Visual Project ® User`s manual 112 administration. Up to 6 digit ZIP Code can be entered.The transfer from the country specific ZIP-code book is supported through a selection list. City Link to Google Maps Postal Address Details of the city/place, for the address. The transfer from the country specific ZIP-code book is supported through a selection list. Via this button you can let Google Maps display the address of the customer/prospective buyer. An existing internet connection is a requirement. Street/PO Box Street and house number of a different postal address. Country/Zip Code Country Code and ZIP Code of a different postal address. The transfer from the country specific ZIP-code book is supported through a selection list. City Details of the city/place for a different address. The transfer from the country specific ZIPcode book is supported through a selection list. Enter a ZIP code in the ZIP code book totally or partially. Visual Project ® searches for a match when exiting the field in the ZIP code book of the respective country. If a clear match to an entry can be found, the complete ZIP code, the place and the area code are automatically transferred. The area code is accepted into those telephone fields which have not had any number entry yet. Should several entries be found with the same ZIP code or a part thereof in the ZIP code book, the ZIP code book opens with the first corresponding entry. Determine manually the city/place desired. The automatic system is only activated if the field “City” is empty. The same automatic search method also functions when exiting the field City, however the ZIP code field must be empty. Visual Project ® Country Code Assigns the address to a country. Select a country from the list Countries or create it if necessary. By allocation of the country the fields for the country abbreviation and the country code are entered into the address with the data of the country. Additionally, the country dependent forms like the ZIP code book and salutations of the allocated country are presented when opening. Federal State Assigns the address to a federal state. It is also possible to manually enter the details. The acceptance of data out of the Federal states is supported by a selection list. Revision 2013.12 Visual Project ® Communication User`s manual Telephone selection assistant 113 Central phone number of the address. The phone number must be entered with the area code but without the country code. The number always must start with a 0, may contain the hyphen or slash and the blank characters as separators for formatting. The first separator is evaluated for the separation of the area code. If you own the CTI module of Visual Project ®, you can choose the telephone number directly by clicking on the button beside the telephone numbers. When exiting the field “Telephone”, an automatic Update of the country specific ZIP code book is executed. The fields “ZIP code”, “City”, and the area code of the field ”Telephone” are entered into the ZIP code book of the country in case of a new entry. At the next address entry it will be available for automatic or manual search. Remember, that the entry is carried out in the ZIP code book of the country entered in the address!! Internet Branch out Main contact person Visual Project ® Internet address prospective buyer of the customer or If the field Internet contains a valid entry, your internet browser will be opened with the internet address entered by clicking on the button on the right in the entry field. Cust. Consultant The customer consultant or the contact person for the customer in your company. A selection list supports the entry by displaying all previously entered consultants in the address. Salutation text Salutation text of the address is not useable at the moment. Will be used later for the automatic introduction letters. The transfer of texts out of the database Salutations is supported by a selection list. First-/Lastname First- and Surname of the main contact person of the customers/prospective buyers. Position Position of the main contact person. A selection list supports the input by the display of all positions used up to date. Decision maker Activate a tick if the person is authorized to make decisions. Telephone 1 1st phone number for the address (see also Telephone) Private Telephone Private phone number for the address (see also Telephone) Revision 2013.12 Visual Project ® User`s manual 114 Mobile telephone Mobile phone number for the address (see also Telephone) Telefax Fax number for the address (see also Telephone 1) e-Mail-Address E-Mail-Address. MAPI-Support Notes By clicking on the button next to the e-mail address you can send an e-mail to the desired address. Prerequisite is a MAPI-supported email system. This e-mail-system should be selected on your PC a the standard e-mail program. You can make this setting under Internet Options in the System Control. Choose the corresponding application in the register Programs under E-Mail. Summary information (max. 255 characters). A manual line break can be created by Cntrl + Enter Photo Here you can insert a photograph of your main contact partner. As soon as you click into the empty field with the right mouse button, you get the displayed menu. When you click on New, you can choose an existing image file on your PC. After the takeover, the selected picture will be shown. The image file is saved in the subdirectory Photos in the database directory of Visual Project ®. The file name has the following structure: 99999999-0.XXX 99999999 Address Number 0 Contact-ID XXX File Name Extension The image of your main contact partner can be removed by clicking with the right mouse button onto the picture and selecting Delete afterwards. Hereby the file in the directory Photos is deleted. Main contact according to Outlook If you own the module External Interface of Visual Project ®, you can set up a contact in Outlook for the Main contact person of your costumer, you can branch out of this contact into Visual Project ® and synchronize changes with the Outlook contact which you made in Visual Project ® . In order to set up a contact for your main contact person in Outlook, click on the button Main contact to Outlook. Visual Project ® Revision 2013.12 Visual Project ® User`s manual 115 Your main contact person is exported to Outlook. You will receive a success message. Via the button Visual Project in your Outlook-Contact you get back to the customer data of Visual Project ®. Changes which you made in the customer data of Visual Project ® can be synchronized with the corresponding contact in Outlook by clicking again on the button Main contact to Outlook. A synchronization of changes in Outlook with the prospective buyers/customers data in Visual Project ® is not possible. Address Card Visual Project ® Via this button an address card can be printed. It contains all entered data for the address. Revision 2013.12 Visual Project ® Additional data Visual Project ® User`s manual 116 Line of business Allocation of the address to a line of business. The selection can only be carried out by means of selection list. The field is preset with All Industries. Sales Channel Allocation of a sales channel to a customer (e.g Partners, Direct etc). The field can be used for the search of addresses or as a criteria in the analysis. It is also useable as a unrestricted field for customer groups. A selection list supports the input by display of all entries in the address used up to date. Price groups Allocation of a price group to an address. In the selection list all Prprice groups defined and used by you are displayed. The price group serves as default for new projects of this address. It can be project specifically changed at any time. Value Added Tax Displays if a customer is Value Added Taxable or not. Serves as default for new projects of this address and controls the printout with or without the value added tax statement. It can be project specifically changed at any time Language Text Indicates the language text for printouts of the offer. In the selection list Language defined and used up to date are shown. The language serves as default for new projects of the address. It can be project specifically changed Revision 2013.12 Visual Project ® User`s manual 117 at any time. Customer Indicates if it is a customer or prospective buyer. If a tick is activated, then the financial bookkeeping account field will be visible. The field customer is ticked automatically if you take over project positions into the stock of a prospective buyer. (Further information can also be found in the paragraph Project editing from page 66.) Financial number Details Visual Project ® account It is possible here to enter a different customer number. This is for example an advantage if working with sales order processing or financial bookkeeping accountancy and if it is desired to co-ordinate the customer data. By special Visual Project ® interfaces with other programs this field is updated automatically. Lock note Unrestricted allocation of a note of nonnegotiability to a customer (e.g. collection, bankruptcy, stop of delivery etc). The field has informative character and can be used for search of addresses. A selection list supports the input by display of all entries in the addresses used up to date. Deleting note Activate the tick if the delete remark is desired (e.g. for dormant customers). The addresses with the delete remark can then easily be filtered and, if necessary, deleted . Employees Number of employees of the customer. Annual Turnover Information field for annual turnover of the customer Stock Capital Information field for stock capital of the customer Tax-ID Information field for the Tax-ID of the customer Manufacturer Telephone system manufacturer of the customers/ prospective buyers. A selection list supports the input by display of all entries up to date. System Telephone system of the customer/ prospective buyer. A selection list supports the input by display of all entries up to date. The field is dependent on the manufacturer. Digital Trunk line Digital exchange connections of the telephone system installed by the customer/prospective buyers. Analogue Trunk line Analogue telephone exchange system connections of installed by the the Revision 2013.12 Visual Project ® User`s manual 118 customer/prospective buyers. Subscriber digital Digital participating connections of the system installed by the customer/prospective buyers. Subscriber analogue Analogue participating connections of the system installed by customer/prospective buyers. Reminder Visual Project ® Remarks Unrestricted remarks to the telephone system. Contract Type Contract type of the telephone system of the customer/ prospective buyers ( e.g. rental, purchase, leasing etc.). A selection list supports the input by displaying all entries used in the addresses up to date. Contract Number Number of the contract for the telephone system. System Price Price of the total telecommunication system. Contract End End of contract (expiration date) Reminder Date of automatic resubmission. The appointment, that is entered under resubmission, guarantees that new negotiations can be entered with the prospective buyers at the right time. Revision 2013.12 Visual Project ® Visual Project ® User`s manual 119 Date Appointment for automatic resubmission. The current date will be used as a default. User The current user is displayed. The delegation of the resubmission to another user is possible by opening the drop-down field. Subject Possibility for entering a subject line. Comments Possibility for entering additional information for resubmission. Finished Deletion of the automatic resubmission. Revision 2013.12 Visual Project ® User`s manual 120 Working with Outlook tasks If instead of the internal resumission you chose the option Outlooktasks, the name and the e-mail address of the user would be displayed above the date. The name and e-mail address will be taken out of that folder which is chosen as your default Outlook folder under OutlookSettings for tasks in the program. (See also Outlook- on page 192.) The Outlook task will be passed on to this user. As soon as you pass the resubmission on to another user, the display of the resubmission changes. Now it is displayed to which user the task was passed on instead of the current user name. The resubmission entry cannot be edited by you in Visual Project ® any longer. Via the button Go to ... you get directly to Microsoft Outlook. Visual Project ® Revision 2013.12 Visual Project ® User`s manual 121 In case the customer address in Visual Project® contains a main contact person, a linkage to the Outlook contact of the main contact person will be deposited in the Outlook task. If there is no contact for the main contact person in Outlook, it will be created automatically. Further information concerning Outlook tasks can be found in the chapter Outlook tasks on page 150. Branching to projects Go to project Visual Project ® In this selection window there are all projects listed which belong to this customer. Via the button Go to you can branch the selected project. Revision 2013.12 Visual Project ® Contacts Visual Project ® User`s manual 122 In the input area Contacts all contacts with the customers and prospective buyers can be administered. Click on the button Add Contact to create a new contact in the address. A new data record is created and the fields are cleared. To delete a contact, mark the entry in the left list and then click on the button Delete contact. A contact is automatically saved with the change within data records or when closing the form. On the left of the page all contacts to the address are displayed in chronological order. Sorting can also be executed by a keyword, by moving the column keyword to the far left. Click on a contact in the list and the associated fields can be edited on the right side of the page. The number of entered contacts is shown in the heading of the register so that the user is informed in every place within the customer administration. Contact on Begin Date and time of the contact. The current date and time is preselected. Contact to End-date and end-time of the contact. If contacts are automatically created (CTI module), then end-date and end-time of the contact are entered into this field. On manual entry the field remains empty and can be filled out when desired. Duration Duration of the contact. If contacts are automatically created (CTI module), then the duration of the call is entered into this field. This field cannot be modified. Contact person Contact person in your company. The name of the current user is preselected. A selection list Revision 2013.12 Visual Project ® User`s manual 123 supports the input by display of all contact persons in the addresses. Contact with Contact person of the Customer/Prospective buyer . The name of the main contact person from the Master data is preselected. A selection list supports the input by display of all contact persons in the address. Key word Key word of the contact (e.g. telephone call, visit, training, trade fair etc.) Remarks Available text for detailed comments of the contact (e.g.visit note). Document Possibility to enter a linkage to any document (document administration). Via this button you can either add a linkage to an existing document or create a new Worddocument for your your contact. With the option Select document you can make a linkage to any file. Select a file and click on Open. The linkage to the selected document will be added to your contact entry. The name of the file will be written behind Document:. Visual Project ® Revision 2013.12 Visual Project ® User`s manual 124 Behind the name of the document there is the symbol for the application which the document is linked with. By clicking on the symbol the document will be opened in this application. Visual Project ® Revision 2013.12 Visual Project ® User`s manual 125 In case the file is no longer at the place which is referred to or in case the file is not available, this symbol is shown instead of the symbol for the application. By clicking on this button you have the possibility to choose a file for linking again. By clicking on this button you get detailed information about the storage position of the file. You can remove the linkage to the document if you click on this button. As soon as you have confirmed the following safety question with OK the linkage will be deleted from the contact entry. Visual Project ® Revision 2013.12 Visual Project ® User`s manual 126 If you want to create a new Word document in the contact entry, then choose New Word Document instead of Select Document. Now you can create your Word document via a template previously created by you in Word. After having selected the template for creating the Word document, you will be asked for the storage position for the document. After that a linkage to the new Word document will be made in the contact history. Via the button for the linkage you can invoke the document at any time directly in the associated contact entry. The template, on whose basis the Word document is created, can contain special wildcards. These will be replaced by the corresponding fields out of the customer/internet address during the creation of the Word document. An outline of all wildcards which can be used here is found in Appendix B: of the Manual. Automatic creation of By means of the CTI module contact entries can be created automatically in case of both incoming calls of customers and outgoing contacts calls. You find further information concerning this topic in the paragraph CTI-Settings of this Manual. Visual Project ® Revision 2013.12 Visual Project ® Contact Person Visual Project ® User`s manual 127 In the input area Contact Person certain contact persons of the customers /prospective buyers can be administered. Click on the button Add, to create a new contact person for the address. A new data record is created and the fields are cleared. To delete a contact person, mark the entry in the left list and then click on the button Delete. An entry is automatically saved with a change within data records or when closing the form. On the left of the page all contact persons of the address are displayed in order by name. You can change the sorting order by moving another column to the far left. Click on a contact person in the list and the associated fields can be edited on the right side of the page. The number of entered contact persons is shown in the heading of the register so that the user is informed in every place within the customer administration. Salutation text Salutation text of the contact person. (Also see Master data) First-/Lastname First- and Surname of the main contact person Position Position of the contact person. A selection list supports the input by the display of all positions used up to date. Decision maker Activate a tick if the person is authorized to make decisions. Telephone 1 Direct phone number of the contact person. The “Telephone number” is preselected from Master data. Private Telephone Private phone number of the contact person. Revision 2013.12 Visual Project ® User`s manual 128 Mobile Telephone Mobile phone number of the contact person Fax Direct fax number of the contact person. The fax number is preselected from Master data. e-Mail Address e-Mail-Address of the contact person. Notes Brief information regarding the contact person, max. of 255 characters (eg birthday) Photo Here you can insert a photograph of a contact partner. As soon as you click into the empty field with the right mouse button, you get the displayed menu. When you click on New, you can choose an existing image file on your PC. After the takeover the selected picture will be shown. The image file is saved in the subdirectory Photos in the database directory of Visual Project ®. The file name has the following structure:: 99999999-9.XXX 99999999 Address Number 9 Contact-ID XXX File Name Extension The image of your contact partner can be removed by clicking with the right mouse button onto the picture and selecting Delete afterwards. Hereby the file in the directory Photos is deleted. Contact to Outlook Remarks Visual Project ® You can set up a contact in Outlook for every contact person of your customer in the same way as for the main contact person under Base data. Click on the button Contact to Outlook. In this input section as much additional information as you like regarding the customers /prospective buyers can be entered. Revision 2013.12 Visual Project ® User`s manual 129 Status In the input area Status the actual system inventory of the customer can be administered. Click on the button Add to select new system components of the customers or prospective buyers From the product line The selection window for products opens when the confirmatory question is answered “Yes”. One or several products can be extracted one after the other from the Visual Project ® Product master data into the Customer Library with the button Take over. Click on Close to end the extraction. Manual entry When the confirmatory question was answered with “No”, then a new data record is created and the fields are cleared. Enter data manually in all relevant fields. This type of entry is especially suited for components from outside systems whose products are not included or maintained in your own product line. Out of project (order) The third variation of status maintenance is the automatic extraction of products or orders of Visual Project ®. Please read the description of the function <Project / Inventory acceptance> in the section Project editing. Visual Project ® Revision 2013.12 Visual Project ® User`s manual 130 To delete a product mark the entry in the left list and then click the button Delete. An entry is automatically saved when changing within data records or when closing the form. On the left of the page, all product data is displayed in chronological order. You can change the sorting order by moving another column to the far left. Click on a product in the list and the associated fields can be edited on the right side of the page. Visual Project ® Delivery date Delivery date of the product. The current date is preselected. Quantity Quantity of the product. The quantity 1 is preselected. Product number Product number of the component Description Brief name of the product Manufacturer Manufacturer of the product. A selection list supports the input by displaying all manufacturers entered in the addresses up to date. Group Product Group. A selection list supports the input by displaying all registered product groups in the addresses up to date. Category Category of the product. A selection list supports the input by displaying all registered categories in the addresses up to date. Contract number Number of the contract. Applicable to the system. Contract end Contract end of the component. Statistics Activate a tick if evaluation of the customer data using different criteria is desired. All or only the components with statistics can be included in the statistical evaluation (statistical product evaluations are not yet available in Visual Project ®) Prices The Prices register contains fields for all used price types in Visual Project ®. Enter the definite customer prices. This field is automatically filled in when data is extracted from projects. Enter only the prices which form or have formed the basis of your invoicing. Text In the register “Text” the current long texts for the products with reference to the delivery date or special remarks and information of the products can be deposited (e.g. for the installer). Revision 2013.12 Visual Project ® User`s manual 131 Products The function can be selected through <Edit / Products> in the Visual Project ® Management Center or invoked directly by the fast start button Products. A selection window appears with a listing of all products of your company. With the first start of Visual Project ® the list is empty. With the help of the selection mask products can be added, deleted, edited, exported and price lists can be printed. Use the Visual Project ® administration or the wizard for products update for the import of supplier databases! Special Filters For the selection and search of products there is in this selection window additionally a filter for the product manufacturers and a filter for the product groups available. Select the desired manufacturer from the selection list Manufacturer and/or from the selection list Group the desired product group. Only products which have the same manufacturer and/or same product group as specified in the filter are shown. Beside the special filter for the product manufacturers and product group you can also select the price group if desired. All prices displayed in the table as well as prices of the price list refer to the selected price group. Price list print Visual Project ® Different price lists can be printed with the button Price list. Revision 2013.12 Visual Project ® User`s manual 132 Select one of your price types in use from the selection list Price type. (e.g. sales price for sales price list). If necessary, one of the language versions for the printout can be selected in the field Language. When a short list is to be printed, remove the tick in the field Description, otherwise the products are printed with the complete description. Only those products are printed which are displayed in the product survey (see filter and special filter). The collating method of the list corresponds to the collating method of the product survey. Prices according to the chosen price group will be printed in the product survey. Visual Project ® Revision 2013.12 Visual Project ® Visual Project ® User`s manual 133 Revision 2013.12 Visual Project ® EX-/ Import User`s manual 134 By pressing this button you have the possibility to export product data to Excel and to import external products from an Excel-Table to Visual Project ®. Export Excel file (view) All data records visible in the selection window will be exported into Excel with all visible information. The headers which will displayed in the selection mask will be exported as column headers. Choose the option Export Excel file (View) and select the Excel-version, the path and the filename for the export in the on screen dialog box. Export Excel file The product data can be exported into the Visual Project ® import format (see below). If you want to do this, choose the menu option Export Excel file and select the Excel-version, the path and the filename for the export in the on screen dialog box. Import Excel file An example of an Excel table for the import of products to Visual Project ® can be found in the data directory of Visual Project ®. The file is called ImportProducts.xls and consist of several sheets. The sheet Products already contains all column headings that are required for an import of data to Visual Project ®. You can enter line for line of all products to be imported in this sheet. On the DescriptionEN sheet and the DescriptionFR sheet, a description of the column names supported by Visual Project ® with data type, standard value, description and value range can be found. Every arbitrary Excel table can also be used for the import of products. Prerequiste for the import is the existence of a sheet named Products and at least the column ProductNumber. Simply re-name the corresponding Excel-sheet into Products and fill the column with the product number in the 1st row with the name Product/Number. Fill also all other columns of the sheet to be transferred with the corresponding column names. Visual Project ® extracts these columns, other columns are not considered.. There is the possibility to import linked Excel tabels. Only link an Excel sheet which corresponds with the import regulations for Visual Project ® with values out of one or several other Excel files. The links will be updated automatically before the import. When importing products you can use the possibilities of Excel for pricing the products. For importing the prices we reserved columns which correspond with the price groups and price types of Visual Project ®: PG0Purchase Purchase, Price Group 0 PG0Sales Sales, Price Group 0 PG0Installation Installation, Price Group 0 PG0Service Service, Price Group 0 PG0P4-PG0P9 for free use, Price Group 0 PG1Purchase Purchase, Price Group 1 etc. In the columns you can use formulas and references in order to use all Visual Project ® Revision 2013.12 Visual Project ® User`s manual 135 possibilities of Excel. Visual Project ® only takes over the results of the calculations during the import. Therefore you obtain the possibility to take over existing Excel-product-price-calculations directly into Visual Project ® . Creation of a product Create a new product by clicking on the button Add. The Product Line entry form is opened with the entry areas Base data, Prices and Remarks. First enter a product number, then complete the other fields as required. Base data Product Number Distinct max. 40-digit alphanumeric number for the product. This number can only be defined or changed during the creation of a product. Search name Brief name of the product. Used only in the internal search and structuring of the data. If this field remains empty, the contents of the field “Description” will be used after leaving the same. Designation Brief description of the product (60 characters). Comments Long text of the product. Can be printed in offers and lists alternatively. No limitations. The fields Designation/Comments according to the settings under <Master data / Settings / Languages> are available for every used language.The register for the languages will not be displayed if no language is used. Otherwise click on the register of the language for processing/editing the respective language text. The font preset under <Master Data / Settings / Languages> is used for the display on the screen as well as for the pintouts. Picture Visual Project ® Picture information of the product. Revision 2013.12 Visual Project ® User`s manual 136 As soon as you click into the empty field with the right mouse button, you will receive the displayed menu. If you click on New, you can select an existing image file on your PC. After the extraction the selected image is shown. The image file will be saved in the subdirectory Pictures in the database directory of Visual Project ®. The product number with its corresponding file ending will be used as a file name. The image information for the product can be removed by clicking with the right mouse button on the image and by selecting Delete subsequently. By doing this the file will be deleted from the directory Pictures. If you want to print the pictures in the offer, they will be printed in their original size. Therefore you should ensure that the pictures which you insert are not too big. A format of ca. 250 x 200 pixel is recommended. Visual Project ® Manufacturer Name of the manufacturer (12 characters). The field cannot be edited when the product was imported from a supplier database. Manufacturer –No. Original manufacturer number of the product. Cannot be edited. It had been read when the product was imported. Prod.-Group Product group of the product (12 characters). Can be allocated without restrictions. A selection list supports the entry by display of all product groups which have already been used in products with the same manufacturer. Prod.-Category Product category of the product (12 characters). Can be allocated without restrictions; does not depend on the product Last Data Update Date of the last data comparison of the supplier. During the import of product data via the Products Update Wizard or the administration, this date will be taken over out of the corresponding Suppliers Database. Revision 2013.12 Visual Project ® Price User`s manual Price type/-groups 137 The appearance of the register for the prices adapts automatically to the used price types and price groups. A register is shown for every used price group. In this register there are the entry fields for each used price type. Enter your individual price for the product (also see section Price groups and Price types) The unit for the price is the internal currency. The right for editing prices can be allocated user dependent in the Network version. Manufacturer’s Price Manufacturer’s price or purchase price of the manufacturer for the product. Transferred as an info field and is updated when a product is read through the administration or the Wizard for supplier datas. Visual Project ® Price category Commercial price categories for the calculation of purchase prices. Further information concerning price categories and price calculation can be found under Administration/ Import Supplier Data bases from page 139. VAT rate Select a tax rate defined by you for the product from the selection list. Supplier 1-3 Enter a max. of 3 different suppliers for the product. The selection list displays all suppliers used up to date to ease data entry. Revision 2013.12 Visual Project ® Notes Visual Project ® User`s manual 138 Order No Corresponding order number of suppliers 1-3. Stock Stock of the product. Delivery Time Delivery time of the product (verbal). Statistics Activate with a tick if execution of special evaluations about products with statistics should be carried out in the analysis module (see also Product evaluation on page 160). Technical Notes Enter technical instructions or assembly instructions or other required information of the product. Assembly time Enter the time of assembly for the product in minutes. It is used later for the calculation of the assembly price. Revision 2013.12 Visual Project ® User`s manual 139 Administration This function is activated by <Edit / Administration> of the Visual Project ® Management Center or directly invoked by the fast start button Administration. The administration serves firstly as a convenient tool for import and the pricing of products from external data sources as well as the fast modification of product data. The import source are the supplier databases which are provided on the Visual Project ®-Server for downloading. After the start of the administration the following mask is shown: The mask subdivides into several areas. The right list, contains the Product data base. If no products were imported or entered manually, the list is empty. The products available for import are shown in the left window. Import Supplier Data bases To import from the suppliers’ databases select from the menu item<Supplier database>. The selection window for reading supplier data will be opened. Visual Project ® Revision 2013.12 Visual Project ® User`s manual 140 In the list in the upper part of the window, supplier databases are offered for takeover. You can now choose a supplier database from the list or search for a supplier database via the button Supplier Database. Supplier databases will be shown to you in the selection list only if they were saved on your hard disk previously via the Products Update Wizard (see Products update wizard from page 205). If you want to read in a supplier database from the list, do the following: Select from this list the supplier whose product data you wish to take over into your product master data and mark it. Click on Take over. The left list of the window will now be filled in with the data of the supplier. In case you want to load manufacturer data which is not shown in a selection list, you can search for a manufacturer database. Click on the button Supplier Database. Visual Project ® Revision 2013.12 Visual Project ® User`s manual 141 Search for the supplier database. The file extension is preset when opening the dialogue. Click on the desired file and confirm with Open. Exactly as during the selection of a supplier database from the selection list, the left side of the window is now filled with data of the supplier. The further procedure is also identic. During reading of the supplier file, the product number and the date of the last change of the product are checked if the read products have not yet been available in the product line of Visual Project ® or have been modified since the last data import. The column Type on the left list shows the topicality of the single products. The following values are possible: NEW, if it is a new product AMENDED, if the product data has been changed MISSING, if it is a product, which is available in the product master data but doesn't exist in the supplier database no mark, if the product data are the same as the product master data As long as no data has been transfered, all data records are marked with NEW. Later on, only products not available in your database will be marked with NEW The list can be viewed to obtain an idea of the products and which product data is provided by the supplier. Scroll vertically or horizontally with the help of the scroll bars. The list is sorted by the 1st left column in the window. To change this order, please click on the heading of the column to be moved and then Visual Project ® Revision 2013.12 Visual Project ® User`s manual 142 drag, with the left mouse button depressed, to the desired position. When the left mouse button is released the dragged column will be positioned in front of the column on which the mouse button is released. Another possibility is to click on the column header. On the right border of the header a button will appear for opening a selection list. Click on the button. In the list to be opened you can select from all available columns which can change position with the current column. Exporting of supplier Via this button it is possible to export the supplier database to Excel. To data do this, choose the Excel-Version and enter the path as well as the filename for the export. The list of suppliers’ data selected to be taken over can differ from the displayed list. You determine by downloading the data via the wizard for products update which suppliers’ data is available to you. (See also the Chapter Products update wizard from page 205 of the Manual.) Only the data of one supplier can be read at a time. The take over of data of several suppliers has to be carried out one after another. Selection for transfer/extraction The transfer of new or changed products is predefined . The products to be transferred can also be selected by choosing an entry from the selection list on the left of the button Take over. Available is: ALL, AMENDED, NEW/AMENDED or SELECT. If SELECTED is chosen, define the product for transfer by marking it. Highlight several products by clicking on the first product, then, keeping the Shift -key depressed and clicking on the last product. The selected products are then underlayed in blue. Several products can be marked through clicking on the products with Cntrl -key pressed. The number of the products selected for the transfer is displayed in the left window. Visual Project ® Revision 2013.12 Visual Project ® Transfer options Visual Project ® User`s manual 143 Via the button Take Over you can determine the options for taking over product data into your product master data. Different take over options can be defined dependent on the supplier. These settings will be saved. If you defined several price groups under Price groups in the menu <Master Data / Settings>, different take over options can be defined per price group and supplier. Revision 2013.12 Visual Project ® User`s manual 144 Price categories The price categories are read in from the corresponding suppliers database and have a standard price factor of 100%. In the column price factor the individual rebates, agreed on with the supplier, can be entered in order to generate the rebated supplier price (real purchase price). If, for instance, you get a rebate of 20% on the supplier list price from your supplier, a value of 80% has to be entered in the column price factor. Price factor for products without category An factor for calculation of Supplier price (w. disc.) for products without price category can be entered here. Price Calculation New By clicking on New you can define a new price category for the selected supplier. Delete Enables deletion of existing price categories. Read in Via the button Read in it is possible to read in your individual purchase rebates from an Excel table, which is provided by your supplier. Here you determine for each price group defined under <Master data / Settings / Price groups> the settings for calculating the different price types of the products. Basis for the calculations is the rebated delivery price of the supplier which is firmly fixed in the first line. All final prices can be calculated from the desired price type. Choose the price types defined in <Master data / Settings / Price Types> for the fields Starting Price and Target Price with the help of the selection list. Only the price types with the tick at the beginning of the line will be calculated from the top to the bottom. The Target price is calculated by multiplication of the Starting Price with the factor (in percent), then rounded to the entered number of decimal places after the decimal point. Final price = Rounding ( Source price * Factor(%) ) The results shown in the above image are automatically used as default settings by Visual Project ®. The calculation can be adapted to your company by using selective factors! Visual Project ® Revision 2013.12 Visual Project ® User`s manual 145 In this part of the window further options for the takeover can be determined. While doing this, different settings can be defined for new products and for already existing products. Product number Defines if and how the product number will be produced during the transfer into the product master data. Prologue Maximum of 4 successive characters that are added in front of the manufacturer’s product number to produce a unique product number. If the field remains empty, the manufacturer’s product number is selected as the product number. Epilogue Maximum of 4 successive characters that are added at the end of the manufacturer’s product number to produce a unique product number. If the field remains empty, the manufacturer’s product number is selected as the product number. Product designation Defines if the short text of the product is to be transferred. Visual Project ® Product comments Defines if the long text of the product is to be transferred. Assembly time Defines whether you want to take over the assembly times of the products. Product pictures Determines whether you want to take over existing product images of the supplier. Delete missing products Determines whether you want to delete products from the product master data which are missing in the supplier database. Create import protocol Determines whether you want to create a protocol file in Excel-Format about the imported products. In this file the imported product data for each supplier is recorded. You can find the protocol files in the folder Logs in the database directory of Visual Project ®. The file name shows the update of the protocol. The designation SupplierImport followed by an Revision 2013.12 Visual Project ® User`s manual 146 underscore is followed by the year with 4 digits and afterwards the month and the day with 2 digits each. The second underscore is followed by the time with 2 digits each for the hour, the minute and the second. All other fields of the supplier’s database can only be imported when they are not empty! Take over supplier data In order to take over the selected product data into your product master data, do the following: Close the pricing form. Click on the button Take over to import the product. Before the transfer is executed, a confirmatory question is asked as changes will directly affect the product master data. Thereafter all product data will be extracted from the supplier’s database into the product master data according to your selected settings and the Pricing is executed. After successful transfer, the right list is filled in or updated. If a product is marked in the left list (supplier database), a Visual Project ® Revision 2013.12 Visual Project ® User`s manual 147 corresponding entry will be highlighted in the right list (your product database). The scroll bar in the right list can be used to review the success of the data transfer and the pricing of the products. Fast Modification In the right list every visible field of the product database can easily be changed manually. Click in the desired field and change the entry. Changing to another product automatically stores the amendment. Modifications can also be made to the product data easily through Visual Project ® product master data (see section Products). For the transfer of further supplier`s data, open another database and proceed as shown above. Visual Project ® Revision 2013.12 Visual Project ® User`s manual 148 Reminder The function can be activated through the Visual Project ® Management Center <Edit / Reminder> or invoked by the fast start button Reminder. The internal resubmission is available to you if you selected the option internal under Outlook-Settings. Read also the chapters Outlook- on page 192 and Outlook-Tasks from page 150. With the resubmission it is possible to optimize the management of important appointments. In the right part of the window, all entries of the resubmission are shown in chronological order. By clicking on the entry all data will be displayed on the right. Date Resubmission date. Description Short description. Text Detailed Text Go to Customers Enter the customer number for making a reference to a specific customer/prospective buyer. The customer master data can be invoked by a button. Go to Projects Enter the project number for making a reference to a specific project. The project master data can be invoked by a button. All By activating this option all resubmissions will be displayed. Otherwise only the due Visual Project ® Revision 2013.12 Visual Project ® User`s manual 149 resubmissions are displayed. Own resubmissions Click on the button New. The current Date will be suggested. Change the date if necessary. You can also use the button for the calendar. Enter the Time. In the field Designation you can enter a key word for the resubmission, e.g. „Training“. The field Description/Details offers room for a detailed description, e.g. „Training Visual Project ® in the conference room“. If necessary, you can make a reference to a specific customer/prospective buyer or a project in the field Link to. Via the button Go to the data record can be invoked later directly. The entries are saved automatically when closing the form or when changing to another document. Delete With the button Delete you can remove the resubmission. Print With the button Print you can print a list of your reminder, preview the list before printing in the site preview and/or export the list in a file. Go to The button Go to branches in case of a valid entry in the reference to the corresponding data record in the customer/prospective buyer or project master data. Check You can set in the menu Company data whether the resubmission is to be opened automatically or not in case of due appointments with every start of Visual Project ® . Furthermore, you can see the status of the Resubmission at any time by means of the symbol on the fast start button: The icon for the resubmission is provided with a green tick when the resubmission is being edited and no resubmission appointments are currently running. The icon for the resubmission is provided with a red exclamation mark when the resubmission is being edited and resubmission appointments are currently due or overdue. Visual Project ® Revision 2013.12 Visual Project ® User`s manual 150 Outlook-Tasks The function Outlook-Tasks replaces the internal resubmission. It is invoked via <Edit / Outlook> starting from Visual Project ® Management-Center or directly by means of the fast start button Outlook-Tasks. The function Outlook-Tasks is only available in Visual Project ® if you deactivated the option internal under Outlook-Settings. Read also the paragraph Outlook-Settings on page 192. If you use Microsoft Outlook in order to administer your appointments and tasks, Visual Project ® offers you with this function an optimum interface for your appointment administration. Resubmission appointments which you set up in the customer or project administration of Visual Project ® will be saved directly in the folder Tasks of Outlook. When starting Visual Project ® the folder Tasks of Microsoft Outlook will be opened automatically. Visual Project ® Revision 2013.12 Visual Project ® User`s manual Tasks which were set up via Visual Project because the button Visual Project is activated. 151 ® can be recognized If you entered a resubmission appointment in the customer or project administration of Visual Project ®, you can branch via this button directly in the corresponding project or in the customer of Visual Project ®. In the same way as for the internal resubmission the icon for the Outlook-Tasks is provided with a green tick when the resubmission is being edited and no resubmission appointments are currently running. The icon for the Outlook-Tasks is provided with a red exclamation mark when the resubmission appointments are currently due or overdue. Visual Project ® Revision 2013.12 Visual Project ® User`s manual 152 Analysis The function can be found at < Edit / Analysis > in the Visual Project Management Center or invoked by the fast start button Analysis. ® In the mask shown with the start of the analysis and statistics module of Visual Project ® it is possible to influence the type and the content of the analysis by selection or insertion of different criteria. First select with the selection list Evaluation the desired evaluation. The inquiry can be limited in content by the use of filters in the following fields. Employee filter Project filter Visual Project ® Employees All are preselected. Restrict the inquiry by selection of an employee from the selection list. and subordinates Activate with a tick if all data of employees in the hierarchy under the selected employee is desired (e.g. departmental evaluations). Realization Restrict the selection of projects via the field Realization. Only projects with a realization date between the dates from - to are considered. A period of 4 weeks from the current system date is preset. Project volumes Restrict the selection of projects via the field Total Net Sales Price. Only projects with totalnet-retail price from- to are considered. A price of 0.00 to 999,999,900.00 monetary units is preset. Revision 2013.12 Visual Project ® Address filter Product filter User`s manual 153 Probability Restrict the selection of projects via the field Contract Probability. Only projects with an order probability between from-to are considered. A probabilty between 0 and 100% is preset. Status All are preselected. Restrict the inquiry by selection of project status from the selection list. Only projects with the same project status are considered. Project object All are preselected. Restrict the inquiry by selection of a project object from the selection list. Only projects with the same project object are considered. Line of Business All are preselected. Restrict the inquiry by selection of a line of business from the selection list. Only projects with customers from the selected line of business are considered. and subordinates Activate a tick if all lines of business under the hierarchy of the selected line of business are desired. Sales Channel All are preselected. Restrict the inquiry by selection of a sales channel from the selection list. Only projects with the selected sales channel are considered. With Statistic Activate a tick if only the articles with entries in the field Statistics in the product master data are to be considered in the product evaluation. This is useful if, for example, only the turnover of a certain article is to be evaluated repeatedly (see also section Products). Without the tick, all articles are included in the evaluation. Offer potential A summary of the existing offer potential can be obtained. After completion of the criteria for the analysis, start the analysis by actuation of the button Execute. The result can be viewed in the following image. Visual Project ® Revision 2013.12 Visual Project ® Visual Project ® User`s manual 154 Revision 2013.12 Visual Project ® User`s manual 155 Product group division The statistic function product group division provides a summary of the turnover distribution according to manufacturers and product groups. Product group division With the selection of the product group division the field Realization time frame is preset from 01.01. of the current year to the current system date. After completion of the criteria for the analysis, start the analysis by actuation of the button Execute. Visual Project ® Revision 2013.12 Visual Project ® Visual Project ® User`s manual 156 Revision 2013.12 Visual Project ® User`s manual 157 ABC-Potential The potential analysis allows time period related turnover planning. The field Realization changes in ABC potential. Enter in the field A to, the date for the A potential. The field is preset with a date 4 weeks after the current system date. Enter in the field B to, the date for the B potential. The field is preset with a date 12 weeks after the current system date. In C potential, all projects can be found with a realization time frame after the date of the B potential. After completion of the criteria for the analysis, start the analysis by actuation of the button Execute. All applicable projects are assigned in accordance with the Realization date to one of the classes A, B or C. The result can be seen in the following image. Visual Project ® Revision 2013.12 Visual Project ® Visual Project ® User`s manual 158 Revision 2013.12 Visual Project ® Visual Project ® User`s manual 159 Revision 2013.12 Visual Project ® User`s manual 160 Product evaluation Product evaluation allows products to be evaluated by quantity and turnover, time period related and employee related. Through the settings of the Project Status on Contract, all sold products in a time period can be determined. Carry out a direct product evaluation by using the product filter. (see also section Products). After completion of the criteria for the analysis, start the analysis by actuation of the button Execute. The result can be seen in the following image. Visual Project ® Revision 2013.12 Visual Project ® Visual Project ® User`s manual 161 Revision 2013.12 Visual Project ® User`s manual 162 Project status overview By means of the statistic function Project status overview you have an overview of the turnover distribution according to different project statuses. This function is useful if you entered different statuses (for example: offer, order, ...) for your projects in the field status. (see also Project editing from Page 66.) With the selection of the Project status overview the field Realization time frame is preset from 01.01. of the current year to the current system date. After completion of the criteria for the analysis, start the analysis by actuation of the button Execute. The result can be seen in the following image. Visual Project ® Revision 2013.12 Visual Project ® Visual Project ® User`s manual 163 Revision 2013.12 Visual Project ® Visual Project ® User`s manual 164 Revision 2013.12 Visual Project ® User`s manual 165 Caller List The CTI module in Visual Project ® has an automatic call recognition. All incoming calls (with call recognition) are entered into the caller list if the monitoring of incoming calls is activated under <Options / CTI Settings>. If the incoming phone number or part of it can be assigned to a phone number of the customer administration, the company and if available, the contact partner are entered as Info. The caller list can be called via <Edit / Caller List> starting from the Visual Project ® Administration Center. In the caller list all recognized incoming calls are displayed in chronological sequence. Entries can be removed via the button Delete. Branch If the entry in the caller list contains a phone number from the customer administration, you can branch this function directly to the respective customer or prospective buyer. Dialling support A PC-supported direct call is possible via the function dialling suppport. Just choose an entry from the caller list and apply the dialling support button. The menu option caller list is only available in connection with the CTImodule. Visual Project ® Revision 2013.12 Visual Project ® User`s manual 166 Extras Leasing offer This menu item starts the leasing tool from Visual Poject. This module enables customers to calculate and print customized leasing offers according to the conditions of Siemens Finance & Leasing. Furthermore, during the development of a leasing contract you will be supported step by step with specific information. In the module, for example, can also be found the telephone numbers and addresses of the responsible contact partners of Siemens Finance & Leasing in your region. Of course, all conditions and data are updated with our regular updates. For further information, please, read the documentation of the leasing module. Service-Center You can start the Service-Center via the menu option <Extras / ServiceCenter> or directly via the quick-start button Service-Center. The Service-Center is a separately running tool. By means of the Service-Center you receive information about files and entries in the registry for Visual Project ®. If necessary, you can generate protocol files about program statues of Visual Project ® in the Service-Center and register or deregister files. The Service-Center consists of a menu bar and several workplaces. Menu options of the Service-Center Via the menu bar you can get to the menu functions of the ServiceCenter. Settings Here you are able to change the settings for the internet access to the data-server, where the current supplier files for Visual Project ® are. Protocol Data-Server Use Visual Project ® Domain Selection of the protocol type for the access to the data-server. Internet address (URL) of the data-server. Name Is ticked, when the access to the data-server is Revision 2013.12 Visual Project ® User`s manual 167 System (DNS) to be done via Domain Name System. IP-Address If you deactivated the option Use Domain Name System you can enter the IP-address of the data-server here. (The IP-address of the Visual Project data-server has been preset already.) Internet Options Via this button you get into the menu Internet Options for your operating system. Here you can make further settings for the internet access, if necessary. Info Under Info you can read the program version and program revision of the Service-Center. In case you wish to contact our support, here you find the phone and fax number as well as the e-mail address. If you click onto the link under homepage, you get directly to our internet pages. End Exits the program completely. The symbol for the Service-Center is removed from the status area of the taskbar. Files Under Files you see a part of the Windows-Explorer. It shows all directories of the directory structure of your computer including all subdirectories used by Visual Project. Exactly as with the WindowsExplorer you can change the images of the symbols by the toolbar in the upper part. Visual Project ® Revision 2013.12 Visual Project ® User`s manual 168 For displaying large symbols For displaying small symbols For displaying a list For displaying details Shows the properties of the selected folder or the selected file. Possibility for registering a selected file. Several files have to be registered so that the operating system can use them correctly. This refers especially to files of the type dll or ocx. Normally this procedure takes place automatically during the program installation. A manual intervention is sometimes necessary in case of errors only. It should only be carried out by experts or with telephone instruction of our Support. Possibility to deregister a selected file. This function should only be carried out by experts or with telephone instruction of our Support (See also registering of selected files.) This function makes it possible to display a list of files needed by one program. It is also mainly used for telephone support. Process In this section of the Service-Center a list of all files currently in use by Visual Project is displayed. In case Visual Project is not active the message „Process: vp.exe not found“ is displayed in the toolbar. Two symbols are shown in the toolbar under Process. Visual Project ® Revision 2013.12 Visual Project ® User`s manual 169 By clicking on this symbol you can print a list of the displayed files on your standard printer. If necessary, this document can be faxed to our Support. You find the fax number on the printed list. Via this symbol you can see the properties of a selected file. Registry Visual Project ® Under Registry all registry keys used by Visual Project ® as well as the corresponding values are displayed. The values can also be changed at this place. However, these changes should only be done under instruction of our support because these changes affect the program. Revision 2013.12 Visual Project ® User`s manual 170 Logs Here all relevant protocol files for Visual Project ® are displayed. A double click on the file symbol enables you to look at the files. Tools Under Tools you find links to several utilities which might have to be used for trouble shooting in case of program errors. By double-clicking on the corresponding program symbol these programs can be started. Solutions Detailled information about the suppliers provided by Visual Project ® and their solutions can be found under the menu option Solutions. Choose therefore a solution. After having done this you find all suppliers as well as additional information. The content can be different depending on the supplier because this data is entered directly on our websites. This data can be updated via the internet by means of the products update wizard (menu option Help/ Service Center). Consulting This menu item starts the module Fitness Test. The Fitness Test is a new marketing tool for an efficient form of Project acquisition. The customer receives a questionnaire with a range of questions related to their objectives, business and communication processes. You can evaluate the questionnaire with the help of a PC expert system which provides telecomunication solutions to improve the operational situation of the customer and then present it in a workshop. The program evaluates the questionnaire and issues an enterprise related Fitness assessment, suggests individual customer solutions to increase the enterprise’ fitness of the customer through telecommunications, provides example solutions of leading companies which are in the same line of business as the customer as well as customer-specific graphics (GAP- analysis, Portfolio) for a successful Visual Project ® Revision 2013.12 Visual Project ® User`s manual 171 presentation of the results to the customer. For further information please read the information for the Fitness test. Visual Project ® Revision 2013.12 Visual Project ® User`s manual 172 Options User administration You surely would not want an employee who is only responsible for price maintenance having access to all projects and evaluations. In order to prevent unauthorized access to your valuable data, the program offers the possibility through the User Administration to enter applicable access rights and, in addition, check these access rights by entry of a password. The user administration is only available under network versions. The definition of your users can be executed by the function <Option / User Administration>. New program users can be created or deleted, working groups (teams) can be defined and certain user rights can be defined user related. System administrator Visual Project ® The program has only one user at program start. This user is the system administrator and has a special position. The admistrator is a firmly defined user, who is at the uppermost hierachy and has all rights. The administrator has the name ADMIN and cannot be deleted. As system administrator you have unlimited rights to create other users, to delete them, to reset passwords as well as to allocate rights. If Visual Project ® is started for the first time you are automatically registered as the system administrator (also see the status line). In the user administration other users can be defined and you can build a corresponding hierarchial order of your organisation. Revision 2013.12 Visual Project ® User`s manual 173 As long as the system administrator doesn`t have a password, the user administration is deactivated. In this case the user is selected as user ADMIN automatically and no registration question is asked when executing the program. To activate the registration system create a password for the system administrator in the menu <Option / Change password>. To protect your data you should as soon as possible define the user and enter a password for the user ADMIN, otherwise all users can view your data. The total user administration with all settings will only be activated by giving a password to the user ADMIN. The password can be entered or changed in menu <Options / Change password> see section Change Password. A new user does not have to be created in order to allocate a password to the system administrator. The password of the system administrator should be kept confidential. Therefore, note down the password in a way that you are always able to find it but nobody else can! User details User Id The entry of the name which the user is registered with. It must be unique with a max. of 16 characters (shown in the status line) Name Complete name of the user (it is suggested in the address data as customer advisor). If this field contains an entry, then it appears for the respective user in the sender address of the offer. Department Entry of the (informative) Location Place of the user, e.g. area (informative) Telephone Telephone number of the user. If this field contains an entry, then it appears for the respective user in the sender address of the offer. Fax Fax number of the user. This entry appears for the respective user in the sender address of the offer. E-Mail E-mail address of the user. If this field contains an entry, then it will be printed in the sender address of the offer. department of the user In case you work with Outlook-tasks, please ensure that for all users the e-mail address of the user is entered in the field Mail. Via the e-mail address of the respective user can be found out whether the active Outlook-Session belongs to the registered user of Visual Project®. If the entry of the e-mail address in the user administration is missing, Visual Project ® Revision 2013.12 Visual Project ® User`s manual 174 the tasks cannot be assigned to the users properly. Access denied A user`s program access can be locked here without deleting the user details by clicking on the empty field. A second click cancels the lock. The field Access denied is also ticked if a user logged out into the Slave-Mode. Additionally the word logout in red letters and a Slave-ID will be shown on the left next to the field. (Further information concerning the Slave-Mode can be found under Master- / Slave-Mode from page 194.) Team rights Project range Maximum rebate (%) Activate this field if the user is to have access to the data of equivalent hierachy level users. number Here you can define a separate project number range for each user. When creating new projects, a number from this project number range will be suggested to the user. project Insert here a maximum project rebate for each user. This value refers to the total discount of Price type sale. Does the user grant a higher total discount on the sales price, as defined in the user administration, an appropriate message will be shown on leaving the project. Instruction buttons Visual Project ® Add Creates a new user underneath the left highlighted user. The action has to be completed by entry of a distinctive user id. Delete Deletes the left highlighted user. Only users that contain no further users can be deleted. Resetting password Deletes the password of the left highlighted user. Rights Administration of program rights Close Ends the user administration Revision 2013.12 Visual Project ® User`s manual 175 User rights In Visual Project ® all user related data like the addresses and projects are assigned to single users. In principle, a user can access and change user data of users that are lower in the hierarchy of the same branch. In addition, users with the same hierarchy level can access the data by assignment of team rights. In the left illustration is an example of an exemplary user structure. If no user was team authorised, the user Rodgers would only be able to work on his own projects. The user TS could view and work on the projects of the users Martin, Brown and Johnson. Johnson, however, could not view the projects of Martin and Brown. Since Johnson is the account manager and requires to check the projects of Martin and Brown, he will get the necessary team rights. Rodgers, as project officer also gets team rights because he must access all projects of the sales representatives. Rodgers cannot access Smith’s projects. Martin and Brown also cannot work on any Johnson projects. Data assignments The owner of an address or a project is the user who has created the data record. Also see selection window „ Customers“ or „ Projects“ in the column „ created by“ or click on the corresponding master data command button „Info“. Addresses A small peculiarity with the address data is to be observed. If the option “Reading rights of all customer data for every user“ is ticked under company data (see from page 44), all users can access the general address data, such as address and phone number. That way a continuous maintenance of addresses is ensured (e.g. maintenance by a secretary). The user related writing right for the addresses refers only to the registers with costumer related data. These are, for example, customer contacts, special contact partners, remarks and the customer master data. Contrary to these restrictions, projects and addresses can also be forwarded to any chosen user (also see section Projects or Prospective Buyers/Customers) It can happen during forwarding of customer/prospective buyer data that you get a rejection. This happens if the displayed data set belongs to a user who is above the registered user in the hierarchy or if the registered user has got no team rights for processing these data sets or if the owner of this data set is in slavemode. (See paragraph Prospective Buyers/Customers.) The program rights for every user can be entered with the button Rights. A user can only change the rights of the users for which he has access in accordance with the above explanation. He cannot change his own rights. In addition, he can change only those rights which he owns. The following program rights are defined : Visual Project ® Revision 2013.12 Visual Project ® User`s manual 176 Company data/ constants The right to change company data and constants (price types, price groups, texts for printouts, etc.). Concerns the menus <Master Data / Company Data> and <Master Data / Constants>. User administration The right to use the user administration. Change external No. The right to assign external numbers in (Customer, Project) projects and financial accounts in the customer master data. Orders The right to place orders. Analysis/Statistics The right to carry out analyses and statistics. See also Analysis on page 152. Text modules administration The right to add and change texts in the text module management. Information concerning this can also be found in the paragraph Text modules on page 42. Edit selection boxes The right to do direct entries in fields of socalled selection lists and therefore to extend the entries within the selection list. Visual Project ® Revision 2013.12 Visual Project ® User`s manual 177 Products Product administration The right to start the Administration respectively the wizard for products update. This right is only in conjunction with the right "Purchase prices visible" effective. Edit product data The right to edit the product data (exept prices) in the product master data. Price maintenance in The right to change the several prices of the the product master product in the product master data. data Stock maintenance in The right to maintain products of the customer the customer master stock in the customer master data or to take data over products from projects into the customer stock. Purchase prices visible The right to see purchase prices in the program. The purchase prices will not be displayed in the product master data and in projects, for users who do not have this right. For evaluations and export features, purchase prices are suppressed. A product administration is not possible without this right. For the administration of product data are the rights for Product administration and the right "Purchase prices visible" needed. Change Password With this function you can allocate a password to the current user or change the password. With the first start of Visual Project ® no password is entered. When a new user is created in the User Administration, the user also does not have a password. After logging in without a password, you Visual Project ® Revision 2013.12 Visual Project ® User`s manual 178 can then enter your password as follows : The entry in the field “Old Password”, even with a password assigned already, is left blank for security reasons. When entering the password for the first time, leave this field empty or otherwise enter your current password. Enter your new Password in the field “New password”. Repeat the entry of your new Password in the field “Confirm”. Click on OK. Only when the two entries correspond, the new password is accepted and saved. Login System By entry of a password for the user Admin, the login system is activated. When the login system is activated, name and password are requested at the start of Visual Project ® to protect the data from unauthorized access (see section After starting the program). The login system can be deactivated by deleting the password of the user Admin. Password Deletion To delete your password, enter your old password in the field “Old password ”. Leave the other two fields empty and confirm with OK. It is also possible to delete the password in the User Administration. Keep the password of the user Admin secure. Without this password it is not possible to login as the system administrator. Changing Client Visual Project ® is able to administer any number of clients. Working with several clients can be advantageous if you want to maintain products and projects for different companies or if you want to use databases on different directories (e.g. local and in the network). You define your clients via the function <Options / Change Client>. You can set up or remove clients, change between single clients and determine the directory for automatic updates. Visual Project ® Revision 2013.12 Visual Project ® User`s manual 179 Update Directory Here you can determine the directory for automatic program updates. During the automatic download of program updates the files for the installation will be stored in this directory. If it should be necessary to access program updates manually in the internet, copy the selfextracting installation file into this directory. After every start of Visual Project ® the update directory will be searched for latest updates and, if necessary, an update installation will be carried out automatically. (Read also the chapter Program and Data Updates). Clients After the installation of Visual Project ® there is no client in the client administration. Therefore, you will be asked after the first start of the program, to link a database as a client. On the following pages you find further information about the creation of clients and the linking of databases. Change Clients In case you wish to change the client, select the desired client and click on Take over. Visual Project ® makes a new start with the desired client. Delete Clients Select the client which is to be deleted and click on Delete. Only the reference to the client is deleted. The database will be kept. Reorganizing database Client Information client Select the client whose data is to be reorganized. Then click on Reorganize. (Further information concerning reorganization of databases can be found in the chapter Database reorganization on page 192 of the manual.) Via the button Info you get information about the database version of your selected client. If you are in the slave-mode, apart from the database version, the slave identification (Slave-ID) of the database will be displayed, too. You can find further information concerning the slave-mode under Master- / Slave-Mode from page 194. Check Visual Project ® If you tick the field next to Show this dialog on every start, the Revision 2013.12 Visual Project ® User`s manual 180 dialog box for the client selection will appear with every start of Visual Project ® otherwise that database is used which was last used. Setting up new clients Visual Project ® offers the possibility to link Microsoft Access- or Microsoft SQL-Server databases as new clients in the client selection. The different possibilities of linking the databases are described in the following chapter. Linking Microsoft Access Databases Setting up a new database If you want to link an new Microsoft Access database, then do the following steps: Press the Button New in the Client Selection. Choose the option generate new Access database in the form and click on OK. Visual Project ® suggests Visual Project.mdb as a file name for the new file. You can change the file name but the file name suffix mdb must not be changed. Visual Project ® Revision 2013.12 Visual Project ® User`s manual 181 After Visual Project ® set up the new Access database, you will be asked, whether the data should be taken over from an existing Visual Project ® database. This might be useful if, for instance, you want to take Visual Project ® data out of an existing SQL-Server database into an Access database. If you want to create an empty Access database, which is only filled with standard data like countries, salutations etc, click on No. After that the new Access database will be shown in the client selection as a new client. If you want to take over data out of an existing Visual Project ® data base, answer the question with Yes. In the displayed selection window choose that file, whose data you want to take over into the new Access database. Please note that even when taking over data from an SQL-Server database, an Access database has to be selected as a file source. In this case the Access database is used as an interface and contains Visual Project ® Revision 2013.12 Visual Project ® User`s manual 182 linked tables which refer to the SQL database. After having selected the file source, Visual Project During the copying process the progress is shown. ® starts copying. As soon as the copying process is finished, the new database is shown in the client selection as a new client. The designation for the new client is preset with „New client“. However, this designation can be changed if necessary. Linking an existing database If, instead of a new database, you want to link an already existing Microsoft Access database, do the following: Click in the client selection on the button New. Choose the option existing Access-Database and click on OK. Visual Project ® Revision 2013.12 Visual Project ® User`s manual 183 Choose under Searching for data base the database which should be linked and click on Open. After you have taken over the selected database, you get back to the client selection mask automatically. You find the newly set up client in the window. The designation for the new client is preset with „New client“. However, this designation can be changed if necessary. Linking a Microsoft SQL-Server Database Setting up a new database Visual Project ® When setting up a new SQL Server database, the tables, which are necessary for working with Visual Project ®, will be set up in an existing SQL Server file. Therefore, before setting up the database with Visual Project ®, you should set up an SQL Server database with the Microsoft Enterprise Manager (SQL Server 2000) respectively with the Microsoft Management Studio (SQL Server 2005) if it does not exist Revision 2013.12 Visual Project ® User`s manual 184 already. If there are tables already in an existing SQL Server file , those tables will be deleted when setting up a new Visual Project ® database. If you want to set up a new SQL Server database, do the following steps one after another: Press the button New in the Client Selection. Choose the option generate new SQL-Server database and click on OK. In the window SQL Server Login under Server enter the name of the SQL Server, where your database is located. The server name can be entered in form of SERVERNAME [\Instancename] [,Port]. The single items mean the following: SERVERNAME name of the SQL-Server Instancename name of the instance (optional) Port Port address (optional) Click on Options>> in the window of the SQL Server Login in order to see all options for the login. Visual Project ® Revision 2013.12 Visual Project ® User`s manual 185 Now you can choose all options which are necessary in order to link to the SQL server database. The following settings can be done: Use Trusted Connection Is ticked if a trustworthy connection is used for the SQL Server. Login ID Enter your user name for accessing the SQL Server in case no trusted connection is used. Password Enter the password for accessing the SQL Server in case no trusted connection is used. Database Choose the SQL Server database which you want to link with. Language Language for the login account (is pre-set with Default) Application Name Name of the application (is pre-set with Visual Project Database Manager) WorkStation ID Name of the workstations logging in Click on OK after having entered all necessary data. Visual Project ® Revision 2013.12 Visual Project ® User`s manual 186 Visual Project ® sets up an Access database which is used as an interface to the selected SQL Server database. Choose the file name and the saving location for the Access database and click on Save. Now you have the possibility to take over data out of an existing data source. This might be useful if, for instance, you want to take Visual Project ® data out of an existing Access database into an SQL Server database. If you want to generate an empty database, click on No. After that the new database is shown in the client selection as a new client. If you want to take over data out of an existing database, answer the question with Yes. Visual Project ® Revision 2013.12 Visual Project ® User`s manual 187 Choose that file in the selection window whose data you want to take over into the new database. As soon as you have chosen the data source, Visual Project ® starts copying. Depending on the size of the database and the speed of the connection, this process can last several minutes. While copying a progress window is shown. After having finished copying, the new database is shown in the client selection as new client. The designation for the new client is pre-set with „New client“. If necessary, you can change this designation. Visual Project ® Revision 2013.12 Visual Project ® Linking an database User`s manual 188 existing If you want to link an existing SQL-Server database with Visual Project® data as a new client, do the following: Click in the Client Selection on the button New. Choose the option existing SQL-Server database and click on OK. In the window of the SQL Server Login enter the name of the SQL SERVER as well as all other options which are necessary for logging in. Follow the same steps as described under generate a new SQL Server database. The SQL server data base, which you select during the registration, has to contain all necessary tables for Visual Project ®. After having confirmed the SQL server registration with OK, Visual Project ® creates an Access database which is used as an interface to the selected SQL Server database. Choose the file name and the saving location for the Access database and click on Save. Visual Project ® Revision 2013.12 Visual Project ® User`s manual 189 As soon as Visual Project ® has set up the Access database the client selection window is displayed again. You can find the new client in the window. The designation for the new client is pre-set with „New client“. If necessary, you can change this designation. If several users work on one SQL database, only the first user has to choose the SQL Server database for setting up or taking over. All other users can link with the interface database via the option existing Access-Database. Language Settings Here you can select the language for Visual Project ®. Visual Project ® Revision 2013.12 Visual Project ® User`s manual 190 Note: In case you choose a program language which is not supported by your PC, it can happen that the menus of Visual Project ® are illegible! CTI-Settings The CTI module in Visual Project ® is able to recognize incoming calls and offers dialling support. Via the menu option <Options / CTISettings> you can make your personal settings for your work with the CTI module. Prerequisite for the use of the CTI-functions is the installation of a TAPI-Driver in your operating system. Connect through Here you can choose the telephone which your computer is to connect you with. Via the button Settings you get directly to the driver of the telephone. There you can make further settings. The settings depend on the respective telephone and the corresponding provider. Prerequisite for the work with the CTI module is that a provider offered by your telephone service has to be installed on your PC. Location Please choose your location (local network). Via the button Settings you get into the location dialogue of Windows and can make the necessary settings. Length for internal Here you can determine the length of the phone numbers phone numbers used internally. This function enables a differentiation between internal and Visual Project ® Revision 2013.12 Visual Project ® User`s manual 191 external calls. Monitoring incoming If you choose this option, all incoming calls calls with phone number recoginition will be entered into the caller list. Please read also the Chapter Caller List on page 165 Generate contact for In case you wish to create automatically a accepted calls contact entry in the customer administration when receiving the call of a customer or prospective buyer, then choose this function. The creation of contact entries is only possible if a customer can be identified in the customer administration by its telephone number. The incoming calls are compared to the entries telephone, telephone1, telephone private and mobile phone under base data and under the contact partner in the customer administration. Generate contact for You should activate this function if a contact outgoing calls entry for outgoing calls is also automatically to be made in the customer administration. When creating customer contacts via CTI, the data concerning contact start, end of contact, responsible person and contact partner is entered automatically. Furthermore, the duration of the call is recorded. The keyword is preset with “call ” for outgoing and “call ” for incoming calls. Except for the duration of the call, all entries can be changed afterwards. You also find further information concerning contact entries in the chapter Prospective Buyers/Customers. Visual Project ® Revision 2013.12 Visual Project ® User`s manual 192 The menu option CTI-settings is only available in connection with the CTI-module. Outlook-Settings Via the menu option <Options / Outlook Settings > you make your personal settings for your work with Microsoft Outlook. Here you can determine whether you want to use the internal resubmission of Visual Project ® or the folder Tasks of Microsoft Outlook for your appointment and task administration. (Please read the chapter Outlook-Tasks from page 150). The menu option Outlook-Settings is only at your disposal if you own the external interface of Visual Project ®. Tasks Outlook task folder which is used by Visual Project ® for resubmission entries. Internal If the option internal is ticked, the internal resubmission of Visual Project ® is used instead of the Outlook tasks. Contacts Current Outlook-folder for contact entries. Outlook-Category Will be entered under categories in Outlook– contact when exporting to Outlook automatically. (optional). Update Outlook contacts automatically If you activate this function, your Outlookcontacts will be updated automatically with the addresses from Visual Project ®. Database reorganization Due to a power failure or system crash, the data can be damaged, files destroyed, or are no longer readable. Visual Project ® Revision 2013.12 Visual Project ® User`s manual 193 No one hopes for this case but what should you do in such an occurrence ? The menu <Options / Data base reorganizing> should in principle always be executed if your program was not ended as per intended A program crash can result in data records being corrupted or destroyed and you can not or no longer access your data even thought it still exists. With the function <Options / Data base reorganizing> defective data can be recreated or reorganised. In most cases the problem will be solved after this. Please note that the recreation of the database can take some time depending on the size of your database! Regular Securing of Data In most cases access to the correct database is restored by the reorganisation. For your valuable data, the most essential protection is and remains, however regular saving of data or backing-up copies. You can if necessary retrieve the backup copies if a possible program or system crash occurred. Daily saving of data is recommended, particularly if large amounts of data is entered. Whether you use a streamer, an inhouse saving program or a backup program to save, the choice is left to you. The main point is that you can retrieve your backup copy in an accident! Safe Copy Independent of the above remarks, we have installed a small automatic safeguarding mechanism in our program. Whenever you reorgainse your data, a backup copy of your data is simultaneously created. You can execute the backup program in menu <Options / Data base backup>. With this, minimum protection from the files containing errors is guaranteed. It however does not replace a complete backup on a separate medium. This function can only be executed in the network version if you have exclusive access to all data i.e. if no other users are working with Visual Project ® or logged in. Database Backup With menu <Options / Data base backup> the database can be recreated to the time of the last data reorganisation(see also page 192) Before the backup, you will be asked if you really want to execute the backup. Note that all input changed up to this time will be irretrievably lost. Visual Project ® Revision 2013.12 Visual Project ® User`s manual 194 This function can only be executed in the network version if you have exclusive access to all data, i.e. if no other users are working with Visual Project ® or logged in. Master- / Slave-Mode In some situations it can be necessary that you need a local copy of your data, for example if you want to work on a project on your notebook at the customer’s premises. The switching over into the Slave-Mode is one possibility to do this. If you switch into the Slave-Mode, a copy of the central database is created. It contains all data of your central database and additionally a reference to the database, from which it was created as well as a reference to the user who created it. All changes which you carry out in the Slave-Mode will be copied back into the central database when switching later into the so-called Master-Mode. Slave-Mode In order to work in the Slave-Mode, please, do the following: Choose <Slave Mode> in the menu<Options>. In the following menu you can choose to take over product pictures and/or templates for Word-Export in the slave mode. Choose the corresponding options and click on OK. The data is now copied from the central database. This procedure may last a few seconds depending on the amount of data. Visual Project ® Revision 2013.12 Visual Project ® User`s manual 195 As soon as the copying procedure is finished, a registering window is displayed. Your user name has been preset already and cannot be changed. Insert your password, if necessary, and confirm with OK. After the registration you get back into the administration center of Visual Project ®. If you call the menu <Options> in the slave-mode, instead of the function Slave Mode the function Master Mode will be displayed. The date in brackets displayed behind, shows when you last logged out of the central database into the slave-mode. The Slave-Mode is visible in the title bar of the screen by the display [OFFLINE]. The function Master-/ Slave mode is only at your disposal in the network version of Visual Project ®. In the Slave-Modus all data from the central database is at your disposal. However, you can only make changes in projects and customers which are assigned to you as the user. Visual Project ® Revision 2013.12 Visual Project ® User`s manual 196 All other users of the Master-database cannot change projects which belongs to you as long as you are in the Slave-Mode. When trying to edit write protected data a message appears on the screen. The following changes in the customer/prospective buyer data can be done by other authorized users during the logout: Changes of basic and additional data as well as remarks Creation of new enties in the contact history Newly created entries in the contact history can also be processed or deleted. If there are changes in the basic data, additional data or remarks of one address simultaneously in the master database and the slave database, the changes of that user are maintained who has done the last change. Existing entries in the contact history of an address which belong to a user who is in slave mode can be changed or deleted momentarily, however these changes will be invalid with the registration in the master-mode. No changes can be done at all other data of a customer/prospective buyer address except the above mentioned, as long as the owner of the data sets is in slave-mode. Other users can see upon the remark which is displayed on top on the address field that the owner of the data set is in slave-mode. While you are in the Slave-Mode a registration in the central database with your user name is prevented. Refresh product data Visual Project ® In the slave-mode it is not possible to update the product master data via the Products Update Wizard or via the administration. Visual Project ® , however, provides the possibility to take over the latest Revision 2013.12 Visual Project ® User`s manual 197 product data from the master-database into the product master data of the slave-database without the necessity to log into the master mode. In order to update the product master data in the slave-file, select the menu option <Refresh product data> in the menu <Options>. The date in brackets behind < Refresh product data> shows when the last update of the product master data took place in the slave-mode. For updating the product master data in the slave-database, the master-database has to be accessible. Master-Mode As soon as you switch over into the Master-Mode, you can register in the central database again. To do this choose the menu option <Master-Mode> in the menu <Options>. All data records which are assigned to you as the user will now be copied into the central database. Hereby it is guaranteed that all changes which you made in the Slave-Mode are available in the central database. Same customer or project numbers Visual Project ® If you entered the same adress or project number during your work in slave-mode, as was created by other users in your central database, then those data records will be give new numbers during the switch from slave to master mode. Revision 2013.12 Visual Project ® User`s manual 198 The changed numbers will be shown in a seperate window. You can find these changes also in a file SlaveProtocol.txt, which can be found in the same directory as your slave-database.. To prevent to have the same project number, you can define project number ranges for each user in the user administration. Additional informations can be found in the Chapter User administration starting from page 172. Slave-ID If a user logs out of the slave-mode, a slave-ID is lodged in both the master- as well as the slave-database. By means of this slave-ID it is assured that only slave-databases can log in and copy their data into the master-database which have a lodged identification in the masterdatabase. However, in certain situations it can be necessary that the slave-ID for the slave-database has to be changed in the master-database. This can be the case if, for instance, a data-backup of the master-database has to be accessed in which another slave-ID is lodged for the slavedatabase. In oder to change the slave-ID in the master-database, do the following steps: Open the client selection on the PC of the logged out database via the menu option Change Client under Options. Click on the button Info in the Client Selection. Visual Project ® Revision 2013.12 Visual Project ® User`s manual 199 The database information for the logged out database will be displayed. Note down the slave-ID of the logged out database. Link via the menu option Options/ Change Client with the masterdatabase and register as administrator in this database. Open the user administration via the menu option Options/ User administration. Within the user administration select the user whose slave-ID has to be changed. Should there be no check mark behind locked, then set it now by clicking the appropriate field. Insert the slave-ID into the field left . The logged out user can now log into the master-database again. Visual Project ® Revision 2013.12 Visual Project ® User`s manual 200 Help Manual By calling the function <Help / Manual> the manual will be opened as a pdf-file. Prerequisite for this funciton is an installed version of Acrobat Reader on your PC. In case you do not have an installed version of the Acrobat Reader on your system, you can install it now. On the installation CD of Visual Project ® you find installation programs for the German and the English version of the Acrobat Reader in the directory AcroRead. Start the desired installation program and follow the on-screen instructions. Furthermore, the current version of the manual has to be in the program directory of Visual Project ® . The current manual is also on the installation CD in the directory Documentation or it can be loaded from the internet. The name of the documentation is vpxx.pdf, whereas xx stands for a language abbreviation (e.g. de for German). User support Selecting the function <Help / User support> opens the following window. Here our support details are shown; complete address, telephone and fax number, internet address as well as the e-mail address. On our internet site, you will find the latest information concerning our products. Furthermore customers with a maintenance agreement have the possiblity to download the latest program changes and updates. If you have any questions or suggestions on the program, please contact us via our e-mail address. Program info With the function <Help / Program info> the program info window is opened. Visual Project ® Revision 2013.12 Visual Project ® User`s manual 201 In the upper area of the window the Program name, the Version and the Revision are shown. It can occur, that programs have the same version number but have different revision numbers. This is for example the case when no significant functionality modifications have been made to the program. The Databank Version shows the version of the fundamental database in the program. The main number should always be identical to the main number of the program version. Underneath is the information about when an Update was performed previously. Furthermore you can read your Licence number and your Licence entry in this window. Please keep this information close at hand when making support enquiries. Online-Support Under certain circumstances it can be useful to analyze and process cases of support directly on the system concerned. In such a case the Remote-Tool Netviewer can be started via the menu option <Help / Online-Support>. Netviewer provides a direct, safe connection between your PC and a computer of our support staff. Installation, configuration or registration is not necessary for the users of Netviewer. An active internet connection is the only thing that is necessary. Every session is secured by an individually generated connection number. In that way it is ensured that only our support staff can see your screen content. If our support staff ask you, choose the menu option OnlineSupport in order to start the Netviewer. Visual Project ® Revision 2013.12 Visual Project ® User`s manual 202 Then you receive the connection number for the Netviewersession. Enter this number into the field Session number. A Netviewer message appears in which you will be asked whether your screen content should be transferred. Confirm this message with Yes. Our support staff will explain all further steps on the phone. Wizard for program updates The Wizard for program updates shows if new program updates are available for Visual Project ®. It can be called manually by selecting the function <Help / Wizard for program updates>. However, normally the wizard for program updates is called automatically after the program start of Visual Project ® if updates are available. Visual Project ® Revision 2013.12 Visual Project ® User`s manual 203 In the Program Update Wizard you can determine in which frequency the internet shall be searched for new program updates. After every program start, it is checked first if update files are available in the installation directory, which you selected in the client administration. (Further information concerning clients can be found in the section Changing Client from page 178). Depending on the frequency chosen, it will be checked afterwards, whether new program updates for Visual Project ® are available in the internet. The search in the internet for new updates takes place once a day at the most. If current update files are found, the Program Update Wizard will be opened. Visual Project ® Revision 2013.12 Visual Project ® User`s manual 204 Via the button Update details you get further information concerning the current program update. If you remove the tick in front of only new entries, apart from the current update information you get information concerning program updates which have already been installed, too. Executing update Visual Project ® In order to carry out the program update click on Next in the program update wizard. Revision 2013.12 Visual Project ® User`s manual 205 The update wizard carries out the update automatically. The progress of the update is shown. As soon as the program update has been finished, you can close the wizard for program updates by clicking on Done. In case of network versions we recommend to select a joint installation directory. In this case the download of the update files is carried out by one client only. Afterwards all other clients use the files existing in the update directory in order to update themselves. Products update wizard The wizard for products update offers two possibilities. One is to take over supplier data into the product master data of Visual Project ® in a Visual Project ® Revision 2013.12 Visual Project ® User`s manual 206 very easy and fast way and the second to call current information about the suppliers and their solutions which are provided in Visual Project ®. It can be called manually by selecting the function <Help / Wizard for supplier datas> If you make a new installation of Visual Project ® or if a supplier provides new data for downloading, the wizard for products update will be called after the program start of Visual Project® . Via the menu Run wizard you can determine the frequency, the Products Update Wizard should search for new supplier data. Visual Project ® Revision 2013.12 Visual Project ® User`s manual 207 After the first program start of Visual Project ® you will be offered the product data of all suppliers which are listed on the Visual Project ®Server. By ticking or removing the ticks behind the suppliers you define which product data have to be updated automatically. For using the configuration assistant it is always necessary to select the product data of the supplier Unify for takeover. Suppliers for which the option Not update was chosen or suppliers whose product data has been downloaded already, will not be shown in the selection list with the next start of the Products Update Wizard. In order to see all suppliers, click on the button All Suppliers. In order to get back to the list of the currently available supplier data for takeover, click on the button Open Tasks. Via this button you get into the takeover options of the single suppliers. Here you can, for example, change the rebate factors for the commercial product groups or the factors for making the prices. Further information about the takeover options can be found in the chapter Import Supplier Data bases from page 139. After having chosen the suppliers to be taken over and the corresponding takeover options, you get to the list of the selected suppliers by clicking on Next. Visual Project ® Revision 2013.12 Visual Project ® User`s manual 208 Click again on Next in order to start the update. The progress of the update is shown in the wizard for products updates. After the complete update of all product data you can close the wizard for products update by clicking on Done. You find all imported product data in the product master data of Visual Project ®. Changing the takeover options for the import of product data can also be done in the Administration of Visual Project ®. You can find further information for this in the chapter Administration from page 139. Visual Project ® Revision 2013.12 Visual Project ® User`s manual 209 Send Service Protocol The function <Help /Send service protocol> enables you to send protocol files about the program condition of Visual Project ® to our Support. Possible misfunctions or program errors can be localized better by means of these protocol files. Licensing Visual Project ® is protected from unauthorised use by a copy protection. All the data of your acquired program licence is saved in the copy protection. Furthermore it is possible to change program modules as well as program restrictions by an individual number code via the phone. The function <Help / Licencing> displays the following window License number This field contains your license number for Visual Project ®. In the fields underneath there is further information concerning your program licence, such Name, Customer number and CD-Key. Visual Project ® limited If you bought a time limited licence, a tick is shown in the field limited and the field valid to is displayed. In the field valid to you can read the duration of your program licence or change it. locked Is ticked if a limited program version has been expired or if a wrong key-code has been inserted repeatedly during the activation via telephone. Licenses The number of program licenses to be used simultaneously is shown. Counter Shows the number of trials for licencing via telephone. If you have inserted 5 times the wrong key-code while licencing via telephone, Revision 2013.12 Visual Project ® User`s manual 210 the copy protection cannot be used for activation via phone again. Key-Code The Key-Code serves to connect definite program functions. It consists of several number blocks which are separated by hyphens. If you want to execute an activation, enter the desired program function in Modul1 Modul6. On the form you can see a telephone number where you can obtain your key code. After having entered the number sequence in the field “Key Code“, confirm with the button Activate. With the correct number sequence, a corresponding success report is shown on the screen. Protection In this field the type of the recognised copy protection is shown. In case of hardware copy protection the location including port address are shown in addition. If you have hardware copy protection, the version number of the driver software is shown in the field APIVersion. System date In the field System date you can see the current system date of your PC. It cannot be changed. Update License By clicking on this button you have the possibility to update your copy protection via the internet. This can be necessary, for example, if you want to prolong a timely limited licence. Modul1 – Modul6 Modul1 – Modul6 displays the different program modules and functions. They can be executed differently from program version to program version. Generally there will be more functions with higher program versions. Please determine the actual acquired program according to the current valid price list and your invoice for the modules of the program. If you have purchased a module, a green tick is shown in front of the module name. For activation by telephone, select the desired modules by double-clicking with the mouse on the module name. The program no longer starts if you have a time limited program licence and the system date is after the validity date or after typing in a false key code five times for an activation. The number of possible trials left is shown in the field Counter. The copy protection is useless after this also for an activation by telephone. Visual Project ® Revision 2013.12 Visual Project ® User`s manual 211 Online Licensing In case you have not got a dongle, the Licensing Wizard is started with the first start of Visual Project ®. Insert the licensing number (serial number) which you received together with the software, in the designated field and confirm the button Online License –Activation during an existing internet connection for the activation of your license. After successful license activation Visual Project ® will be started. In case you have got an error message during the license activation or in case the online activation cannot be carried out, a license activation per telephone via our support is also possible. Our support staff are at your disposal from Mondays to Thursdays from 9.00 am to 12.00 am and from 1.00 pm to 5.00 pm as well as on Fridays from 9.00 am to 2.00 pm under the hotline-number +49 (3 94 1) 56636-70. Visual Project ® Revision 2013.12 Visual Project ® User`s manual 212 Interfaces to other programs MS- Outlook Since Microsoft Outlook is the mostly used tool for the administration of appointments, contacts, tasks and e-mail messages, Visual Project® provides a convenient interface to Microsoft Outlook. Via Visual Project ® it is possible to administer your resubmissions as Outlook-tasks, to export addresses and contact partners from Visual Project ® to Outlook and to import Outlook contacts to Visual Project ® (Read also the paragraphs Prospective Buyers/Customers, Outlook-Tasks and Outlook-Settings of the Manual.) Branch from Outlook From Microsoft Outlook you can link to the address of a customer or prospective buyer of Visual Project ®, if this address had been exported from Visual Project ® to Outlook previously. (You find further information concerning the export of addresses to Outlook in the paragraph Prospective Buyers/Customers from page 101.) You can check whether your Outlook contact already contains a link to Visual Project ®. Open the contact and choose the tab All Fields. If there is a link, you can see the fields AddressCode and ContactID in the Outlook contact. The field AddressCode contains a reference to the address number in Visual Project ®. In order to get to an address in Visual Project ® from Outlook, please to the following: Visual Project ® Revision 2013.12 Visual Project ® User`s manual 213 After having started Visual Project ®, choose the corrsponding contact in Outlook and open it for editing. Click on the button Visual Project at the top right of the mask. If the contact exists in Visual Project ®, the address will be opened in the customer and prospective buyer administration of Visual Project ® for editing. In case the address which the Outlook contact refers to was removed or the link was made from another client of Visual Project ®, you will receive a message. Branching in Visual Project ® is not possible in this case. Import of contacts from Visual Project ® enables you to import existing contacts from Outlook to Outlook Visual Project ®. Since Visual Project ® can administer several contact partners for one address, it is possible to import the Outlook contacts to Visual Project ® either as a new address or as a contact partner to an existing address. If there is no link between the contact in Outlook and an address in Visual Project ®, you receive a message on your screen after having clicked on the button Visual Project. Visual Project ® Revision 2013.12 Visual Project ® User`s manual 214 As soon as you have answered this message with Yes, a new address is created in Visual Project ® for this contact. The window for editing the address is displayed. The Address number for the address is set up automatically. However, it can still be edited afterwards. All matching fields from Outlook are taken over into the new address. In case you want to add a contact partner to an existing address in Visual Project ®, instead of creating a new address, then answer the question whether you want to set up an new customer for the contact entry with No. Afterwards the search window for customers/prospective buyers will be opened in Visual Project ®. Visual Project ® Revision 2013.12 Visual Project ® User`s manual 215 You can now save the contact as a contact partner to an address in Visual Project ®. For this select the corresponding address and click on Take over. In Visual Project® a new contact partner is set up to an existing address. In order to make it possible that contacts from Outlook can be taken over into Visual Project®, Visual Project® has to be open. If this is not the case, or if you do not have the module external interface of Visual Project®, you receive a message. Visual Project ® Revision 2013.12 Visual Project ® User`s manual 216 Open Architecture Visual Project ® was developed as an open tool on the basis of a relations database and provides the possibility of setting up an individual database. You can choose between Microsoft Access and Microsoft SQL-Server as a basis for the database. For most use cases a Microsoft Access database solution is sufficient. (reommendation ≤ 20 users). The database architecture of Visual Project ® enables you to access the data of Visual Project ® from nearly every application (e.g. Microsoft Excel, Microsoft Word, Microsoft Outlook...). You can also link and use the tables of Visual Project ® in other Access-databases. Microsoft SQL-Server-Data base For network versions with extensive data volume or for networks with ISDN-connections we recommend working with a Microsoft SQLServer-database. In this case the access to the data will take place via an Access-database, which contains links to the SQL-database. If you have not installed a Microsoft SQL-Server so far, you can use the SQL-Server 2005 Express Edition from Microsoft which is free. Access protection The table construction (field names, field types, ...) must not be changed without precise examination of the effect if the program is to run error free. For this reason we have provided the database with a multi-level protection concept. MS-Access In order to have access to the Visual Project ® database (*.mdb) through Access you must first connect with the security database (security.mdw) of Visual Project ®. Use the working group administrator of Microsoft Access. If you have successfully connected with the database you will be asked by the next start of Access for an user name and password. For „read only“ access to the data, the name is user and the password is readonly. Because of safety reasons the username and password for „change“ access can only be given out from our support to authorized users. Visual Project ® Revision 2013.12 Visual Project ® User`s manual 217 Customization Should you need the complete database structure with field descriptions, please contact us directly. For special customizations and interfaces from Visual Project ® to your available applications we are at your disposal to serve you with our extensive experience in this area. Please request a definite offer from us. Visual Project ® Revision 2013.12 Visual Project ® User`s manual 218 Appendix A: Files of Visual Project ® Visual Project Program files (always on the work station) vp.exe VP-Directory Visual Project ® program file vpprint.mdb VP-Directory Temporary database for printouts cti.mdb VP-Directory Database of the CTI-Modules security.mdw VP-Directory Security database *.rpt VP-Directory Reports, printouts res*.dll VP-Directory Ressource libraries sressource.dll VP-Directory Ressource-Interface basicforms.dll VP-Directory System library systemlib.dll VP-Directory System library tapimanager.dll VP-Directory TAPI-library VPOutlAddin.dll VP-Directory libary for Outlook-AddIn OutlLink.dll VP-Directory library for Outlook control dataview.ocx VP-Directory Data view-control tool StandardValues.xml VP-Directory Standard values for database creation ImportProducts.xls VP-Directory Example-file for the import of products from an Excel-table ImportAddresses.xls VP-Directory Example-file for the import of addresses from an Excel-table ImportProjectPositions.xls VP-Directory Example-file for the import of project positions from an Excel-table ImportSupplierPriceCat.xls VP-Directory Example-file for the import of price categories for the product data import from an Excel-table VPDE.pdf/ VPEN.pdf VP-Directory Visual Project ® manual in German/ English language Guide??.pdf VP-Directory Short guide for Visual Project ® in different languages (?? = two-digit language characteristic) VPUpdateService.exe VP-Directory Program file for the automatic update service for Visual Project ® NetViewer.exe VP-Directory NetViewer support program file for online Program files fort he configuration assistant (always on the workstation) VPConf.exe Visual Project ® VP-Directory ® Visual Project (configuration assistant) Configuration Revision 2013.12 Visual Project ® VPCde.pdf/ VPCen.pdf User`s manual VP-Directory 219 User manual for the configuration assistant in German/ English language Service-Center for Visual Project (always on the work station) ServiceCenter.exe VP-Directory Service-Center program file Visual Project Databases (in the data directory on the workstation or in the network) visual project.mdb/ *.mdb VP-Directory\DATA Database (all data of Visual Project ®) Product Pictures (Subdirectory in the Visual Project data directory on the workstation or in the network) *.gif, *.jpg, *.bmp, png, … VP-Directory\DATA\ PICTURES image file Supplier Data (Subdirectory in the Visual Project Installation Directory (See menu Options/Change client in the program) SUPPLIERNAME VP-Directory\DATA\ VPINST\SUPPLIER Directories with Supplier data Protocol files for the import of supplier data (Subdirectory in the Visual Project Data Directory on the work station or in the net) SupplierImport_[jjjjmmtt_h hmmss].xls VP-Verzeichnis\DATA\ LOGS Protocol files (jjjjmmtt_hhmmss will be replaced by the current date and time) Visual Project Installation Directory (See menu Options/Change client in the program) vpjjmmtt.exe VP-Directory\ DATA\VPINST Visual Project ® Full versions vpjjmmttu.exe VP-Directory\ DATA\VPINST Visual Project ® Updates Directory PROGRAM of the Visual Project Installation Directory (See menu Options/Change client in the program) *.* VP-Directory\DATA\ VPINST\ PROGRAM Visual Project ® update files Word Templates (Subdirectory in the Visual Project program directory or in the Visual Project Data Directory on the work station or in the net) *.dot VP-Verzeichnis\DATA\ TEMPLATES Word Templates with special wildcards for the Word-Export SFL-Tool Program Files and Databases (always on the workstation) sfl.exe Visual Project ® VP-Directory Siemens Finance- & Leasing-Tool Revision 2013.12 Visual Project ® User`s manual 220 sfl.mdb VP-Directory Database with leasing tables sfl.rpt VP-Directory Leasing offer Fitness-Test Program Files (always on the workstation) fit.rpt VP-Directory Letter gap.rpt VP-Directory GAP- Analysis portfol.rpt VP-Directory Portfolios fit.dll VP-Directory Fitness Test library Note: Files with the extension ldb are created temporarily and therefore do not necessarily belong to Visual Project ®. These files are set up with every start of the program. Visual Project ® Revision 2013.12 Visual Project ® User`s manual 221 Appendix B: Directory of the wildcards for MS-Word Usable in all Word-documents Wildcard Description Entry from $$CompanyAddress1$$ Name1 Company Data $$CompanyAddress2$$ Name2 Company Data $$CompanyHStreet$$ Street Company Data $$CompanyHZip$$ Post code Company Data $$CompanyHCity$$ City Company Data $$CompanyCountryCode$$ Country code Company Data $$CompanyPhone$$ Telephone Company Data $$CompanyFax$$ Fax Company Data $$CompanyEmail$$ E-Mail-address Company Data $$CompanyInternet$$ Internet-address Company Data $$CompanyLetterWindowText$$ Text in the letter window Company Data $$UserFullName$$ Full user name User Administration $$UserFunction$$ Department of the user User Administration $$UserLocation$$ Location (e.g. room) of the user User Administration $$UserPhone$$ Telephone number of the user User Administration $$UserFax$$ Fax number of the user User Administration $$UserEmail$$ E-mail of the user $$CustomerAccount$$ Financial account customer User Administration number of cust./prosp. buyers Usable in Word-documents of the contact history or of the campaign-manager (Module Document Administration) Wildcard Description Entry from $$AddressCode$$ Unequivocal address code cust./prosp. buyers $$Address1$$ Name1 cust./prosp. buyers $$Address2$$ Name2 cust./prosp. buyers $$AttentionOfText$$ For the attention of text in letters cust./prosp. buyers $$HStreet$$ Street (company address) cust./prosp. buyers $$HZip$$ Post code (company address) cust./prosp. buyers $$HCity$$ City (company address) cust./prosp. buyers $$POBox$$ Street (mail address) cust./prosp. buyers $$PZip$$ Zip code (mail address) cust./prosp. buyers $$PCity$$ City (mail address) cust./prosp. buyers Visual Project ® Revision 2013.12 Visual Project ® User`s manual 222 Wildcard Description Entry from $$CountryCode$$ Country code cust./prosp. buyers $$State$$ State cust./prosp. buyers $$Phone$$ Telephone cust./prosp. buyers $$Internet$$ Internet-address cust./prosp. buyers $$CustomerAdviser$$ Adviser cust./prosp. buyers $$AddressText$$ Contact partner*, salutation text cust./prosp. buyers $$Name$$ Contact partner*, surname cust./prosp. buyers $$FirstName$$ Contact partner*, first name cust./prosp. buyers $$Phone1$$ Contact partner*, telephone1 cust./prosp. buyers $$PhonePrivate$$ Contact private $$MobileTelephone$$ Contact partner*, mobile phone cust./prosp. buyers $$Fax$$ Contact partner*, fax cust./prosp. buyers $$Email$$ Contact partner*, E-mail-Address cust./prosp. buyers $$Notes$$ additional information concerning cust./prosp. buyers Contact partner* $$Employees$$ Number of staff cust./prosp. buyers $$Sales$$ Turnover cust./prosp. buyers $$CapitalStock$$ Stock capital cust./prosp. buyers $$CreditLimit$$ Credit limit cust./prosp. buyers $$ChOfDistribution$$ Distribution channel (e.g. direct, cust./prosp. buyers Distributor...) $$CustomerNumber$$ Bookkeeping account cust./prosp. buyers $$PhoneManufacturer$$ Manufacturer of the TK-plant cust./prosp. buyers $$PhoneSystem$$ System cust./prosp. buyers $$OfficeDigital$$ Digital connections trunk line cust./prosp. buyers $$OfficeAnalogue$$ Analogue connections trunk line cust./prosp. buyers $$ParticipantDigital$$ Digital connections subscriber cust./prosp. buyers $$ParticipantAnalogue$$ Analogue connections subscriber cust./prosp. buyers $$PlantComments$$ Remarks concerning the plant cust./prosp. buyers $$PlantPrice$$ Plant price cust./prosp. buyers $$KindOfContract$$ Type of contract cust./prosp. buyers $$ContractNumber$$ Contract number cust./prosp. buyers $$ContractEnd$$ End of contract cust./prosp. buyers $$Remember$$ Date of resubmission cust./prosp. buyers Visual Project ® partner*, telephone cust./prosp. buyers Revision 2013.12 Visual Project ® User`s manual 223 *) The data always refers to the contact partner selected in the contact history. Usable in the Word-documents of the projects (Module External Interface) Wildcard Description Entry from $$ProjectNumber$$ Project number Projects $$NationalCurrency$$ Internal currency symbol Projects $$Designation$$ Project designation Projects $$Date$$ Project date Projects $$Probability$$ Order probability in % Projects $$RelativeValue$$ Order value in % Projects $$RealizationDate$$ Realization date Projects $$OperationDate$$ Operation date Projects $$ProjectSubject$$ Project subject Projects $$Competitor$$ Competitor Projects $$AverageWages$$ Project specific average wage Projects $$Remember$$ Resubmission date Projects $$P0Total$$ Net total price type0 (Purchase) Projects $$P1Total$$ Net total price type1 (Sale) Projects $$P2Total$$ Net total price type2 (Installation) Projects $$P3Total$$ Net total price type3 Projects $$P4Total$$ Net total price type4 Projects $$P5Total$$ Net total price type5 Projects $$P6Total$$ Net total price type6 Projects $$P7Total$$ Net total price type7 Projects $$P8Total$$ Net total price type8 Projects $$P9Total$$ Net total price type9 Projects $$Comments$$ Remarks Projects $$AddressCode$$ Customer data address number Projects $$CustomerAccount$$ Customer account $$AAddress1$$ Customer Data Name1 Projects $$AAddress2$$ Customer Data Name2 Projects $$AAttentionOfText$$ Customer Data For the attention Projects of text $$AStreet$$ Customer Data Street Projects $$ACountryCode$$ Customer Data Country Code Projects $$AZip$$ Customer Data Zip Code Projects Visual Project ® data bookkeeping Cust./prosp.buyers Revision 2013.12 Visual Project ® User`s manual 224 Wildcard Description Entry from $$ACity$$ Customer Data City Projects $$AAddressText$$ Customer Data Salutation Text $$AName$$ Customer Data Contact Partner Surname of Projects $$AFirstName$$ Customer Data First Name of Contact Partner Projects $$APhone$$ Phone Contact Partner Projects $$State$$ State of Customer Projects $$DAddress1$$ Delivery Address Name1 Projects $$DAddress2$$ Delivery Address Name2 Projects $$DStreet$$ Delivery Address Street Projects $$DCountryCode$$ Delivery Address Country Code Projects $$DZip$$ Delivery Address Zip Code Projects $$DCity$$ Delivery Address City Projects $$DateOfDelivery$$ Date of Delivery Projects $$Preamble$$ Preamble Projects $$Epilog$$ Epilogue Projects $$InternalNumber$$ Internal Project Number (AKZ) Projects Projects Attention Wildcards in text fields cannot be replaced. Existing text fields should therefore be converted into position frames. Visual Project ® Revision 2013.12 Visual Project ® User`s manual 225 Appendix C: Description of the document copy for the export of projects to MS Word Except for the general wildcards and the special wildcards for project data, two tables for project positions have additionally to be integrated in the document. When doing this the following is to be taken care of. The beginning of the tables is each marked by a text mark. It has to be in line1 / column1 of the table. Each of these tables can exist several times. The wildcard is then additionally marked by a consecutive number. The number of lines is firmly defined, however, the number of columns can differ. Within the table lines wildcards can be used which are valid in this area only. 1. Position table, marked by text marks PositionTable, PositionTable1, ...: $$CaptionPos itionNumber$ $ $$Caption Quantity$ $ $$PositionNu mber$$ $$PositionNu mber$$ $$CaptionDesignation$$ $$CaptionDescription$$ $$CaptionUnitPrice$ $ $$CaptionTotalPrice $$ $$Currency$$ $$Currency$$ $$UnitPrice$$ $$Currency$$ $$Discount$$ $$Currency$$ $$TotalPrice$$ $$Currency$$ $$Captio nVAT$$ $$Designation$$ $$Comments$$ $$Quantit y$$ $$PositionNu mber$$ $$PacketBeginning$$ $$Comments$$ $$GroupBeginning$$ $$Comments$$ $$KindOfPosition$$ $$PositionNu mber$$ $$Quantit y$$ $$ProductNumber$$ $$ManufactNumber$$ $$OrderNumber$$ $$Supplier$$ $$Designation$$ $$Comments$$ $$Picture$$ $$PositionNu mber$$ $$Quantit y$$ $$ProductNumber$$ $$ManufactNumber$$ $$OrderNumber$$ $$Supplier$$ $$Designation$$ $$Comments$$ $$Picture$$ $$PositionNu mber$$ $$Quantit y$$ $$ProductNumber$$ $$ManufactNumber$$ $$OrderNumber$$ $$Supplier$$ $$Designation$$ $$Comments$$ $$Picture$$ $$GroupEnd$$ $$Comments$$ $$PacketEnd$$ $$Comments$$ $$PriceDesignation$$ $$DiscountDesignation$$ Visual Project ® $$VAT$$ Revision 2013.12 Visual Project ® User`s manual 226 The lines of the position table are used by Visual Project ® in the following way: Line 1 Column headlines from offer texts (The column headlines can also firmly determined in the Word-document.) Line 2 Formatting and wildcards for free texts Line 3 Formatting and wildcards for package start positions Line 4 Formatting and wildcards for group start positions Line 5 Formatting and wildcards for postion type (alternative, commodity) Line 6 Formatting and wildcards for normal positions Line 7 Formattin and wildcards for package positions Line 8 Formatting and wildcards for group positions Line 9 Formatting and wildcards for group group total positions Line 10 Formatting and wildcards for package end positions Line 11 Formatting and wildcards for total prices in positions Line 12 Formatting and wildcards for rebates or discounts on positions 2. Table of totals, marked by text marks SumTable, SumTable1, ...: $$PriceDesignation$$ $$TotalPrice$$ $$Curren cy$$ $$DiscountDesignation$$ $$TotalDiscount$$ $$Curren cy$$ $$PriceDesignation$$ $$TotalPrice$$ $$Curren cy$$ $$PriceDesignation$$ $$TotalPrice$$ $$Curren cy$$ $$PriceDesignation$$ $$TotalPrice$$ $$Curren cy$$ The lines of the table of totals are used by Visual Project ® in the following way: Line 1 Formatting and wildcards for net sum of the price type Line 2 Formatting and wildcards for total rebates or discounts of the price type Line 3 Formatting and wildcards for total net sum of the price type Line 4 Formatting and wildcards for the value added tax on the total net sum Line 5 Formatting and wildcards for the total gross sum of the price type The following wildcards can be used in the tables: Wildcard Description Usable in $$CaptionDescription$$ Caption for text Positionstabelle $$CaptionDesignation$$ Caption for designation Positionstabelle $$CaptionPositionNumber$$ Caption for position number Positionstabelle $$CaptionQuantity$$ Caption for quantity Positionstabelle Visual Project ® Revision 2013.12 Visual Project ® User`s manual 227 Wildcard Description Usable in $$CaptionTotalPrice$$ Caption for total price Positionstabelle $$CaptionUnitPrice$$ Caption for unit price Positionstabelle $$CaptionVAT$$ Caption for VAT rate Positionstabelle $$Comments$$ Text Positionstabelle $$Currency$$ Currency symbol Positionstabelle, Summentabelle $$Designation$$ Designation Positionstabelle $$Discount$$ Rebates or discounts on positions Positionstabelle $$DiscountDesignation$$ Designation for rebate/discount Positionstabelle, Summentabelle $$GroupBeginning$$ Designation for group start Positionstabelle $$GroupEnd$$ Designation for group total Positionstabelle $$KindOfPosition$$ Postion type Positionstabelle $$ManufactNumber$$ Manufacturer number Positionstabelle $$OrderNumber$$ Order Number Positionstabelle $$Packetbeginning$$ Designation for package start Positionstabelle $$PacketEnd$$ Designation for package end Positionstabelle $$Picture$$ Picture Positionstabelle $$PositionNumber$$ Position number Positionstabelle $$PriceDesignation$$ Designation of price type Positionstabelle, Summentabelle $$ProductNumber$$ Product number Positionstabelle $$Quantity$$ Quantity Positionstabelle $$Supplier$$ Supplier Positionstabelle $$TotalDiscount$$ Total rebate/discount Summentabelle $$TotalPrice$$ Total price Positionstabelle, Summentabelle $$UnitPrice$$ Unit price of position Positionstabelle $$VAT$$ VAT rate Positionstabelle Visual Project ® Revision 2013.12 Visual Project ® User`s manual 228 Appendix D: Automatic update service for Visual Project ® Visual Project ® provides the possibility to use a Windows-Service for a time-controlled installation of program updates for Visual Project ®. Prerequisites: Visual Project ® has to be installed on the PC on which the Windows-Service for Updating is carried out. The PC, on which the Windows-Service for Updating is carried out, has to be switched on. The Service needs an active internet link. The update directory for Visual Project ® has to be accessible (writing access). Setup: In the download area on our website the file VPUpdateservice.zip will be found. Extract this file in your Visual Project ® program directory. In the Windows menu Start choose the function <Run>. Click on Browse. Visual Project ® Revision 2013.12 Visual Project ® User`s manual 229 Choose the file VPUpdateService.exe in the Visual Project ® program directory and click on Open. Add the entry „ –install“ and click on OK. You receive a success message. Visual Project ® Revision 2013.12 Visual Project ® User`s manual 230 Open Services in the System Control. Click on the service VP Update Service and then in the menu Action on Start. The Update Service is now active. For setting up the Update-Service, double-click the file VPUpdateService.exe in the Visual Project ®-program directory. Set the desired time for starting the update service and click on OK. The update service is now started daily at the defined time (± 45 seconds). In the Event Viewer (under administration in the system control) you find the Event Logs of the application VPUpdateService. Visual Project ® Revision 2013.12