1
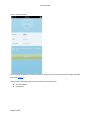
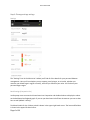
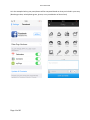
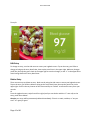
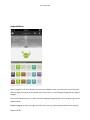
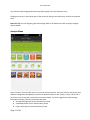
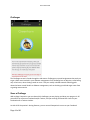
User’s Manual 008
mySugr Companion 2.5
User’s Manual 008
28. Febuary 2014
Page 1 of 26
User’s Manual 008
Introduction
What is mySugr Companion?
mySugr Companion is a charming, sometimes outspoken diabetes smartphone app.
The app allows you to record your blood sugar or other diabetes-related information digitally on your
smartphone so you always have your data nearby.
You can record a lot more than just your blood sugar, such as the amount of insulin taken, physical
activity, carbohydrates eaten, food description, and detailed notes. You can also add some contextual
items such as your location, your mood, or if you’re feeling sick or stressed for example. You can even
upload photos of your meals (Companion Pro).
Everyday life with diabetes is often stressful. It’s full of hurdles and extra work. mySugr Companion helps
make the demanding tasks of diabetes management a little bit easier and helps you better handle
diabetes in general.
The app offers a powerful overview of your diabetes management metrics and also displays graphical
representations of your blood glucose numbers. This allows powerful in-app analysis which you can
adapt to your needs. The search function (Companion Pro) enables you to find logged data quickly and
get an overview of how your blood sugar reacted to certain situations, activities, or meals. mySugr
Companion is a registered medical device. It is certified and has the CE marking (Medical This powerful
feature allows you to quickly access and consider those results when in similar situations, allowing you to
adjust and optimize your therapy decisions accordingly.
Devices Directive 93/42/EEC) and is registered with the FDA. This device cannot be combined with other
devices. Of course, you have to keep using your blood sugar meter, insulin pump, pens, etc. The use of
this app is completely independent of other products and devices.
Who is mySugr Companion for and what is our goal?
mySugr Companion was tailor-made for people with diabetes who:
● are older than 18 years old
● are proficient with digital technology
● own an iOS device with iOS 6 or above (optimized for iPhone 5)
● can get online regularly with the iOS device
● have an active account in the Apple App Store and know how to download apps
● own a credit card or are able to use another payment method accepted in the Apple App Store
mySugr Companion wants to make your daily diabetes management easier and optimize your overall
diabetes therapy. But this is only possible if you take an active and intense role in your care, specifically
around entering information into the app. In order to keep you motivated and interested, we’ve added
some fun elements into mySugr Companion.
It’s important to enter as much information as possible and to be completely honest with yourself. This is
the only way to benefit from recording your information. Entering false or corrupted data does not help
you.
Page 2 of 26
User’s Manual 008
mySugr Companion key features:
●
●
●
●
●
●
●
●
●
●
●
●
quick and easy data entry
smart search (Companion Pro)
convenient data analysis
neat and clear graphs
handy photo functions (multiple pics per entry) (Companion Pro)
exciting challenges
multiple report formats (PDF, CSV, Excel) (Companion Pro)
smile-inducing feedback
practical glucose reminders (Companion Pro)
social sharing functions
fast multi-device sync (Companion Pro)
registered medical device
What devices does mySugr Companion work on?
mySugr Companion was optimized for use on the iPhone 5, but can be used on any iOS device with iOS 6
or higher.
Installation instructions for iOS devices
Open the App Store on your iOS device and search for “mySugr Companion”. Click on the icon to see the
details, then press “Free” and then “Install” to start the installation process. You may be asked for your
App Store password, once entered mySugr Companion will begin to download and install.
Push Notifications
The first time you launch mySugr Companion you will be asked if the app can send you push notifications.
An example of a push notification is a blood sugar reminder or a message that you’ve successfully
completed a challenge.
Uninstall
If you would like to remove mySugr Companion from your iOS device tap and hold the mySugr
Companion icon until it starts to shake and you see a small “x” in the upper left corner of all icons. Tap on
the “x” in the corner of mySugr Companion and tap “Delete” when prompted.
Updates
Updates are released at irregular intervals, and usually only when our Monster programmers have some
brilliant new features to share. When a new update is available you will be automatically notified by the
Page 3 of 26
User’s Manual 008
App Store on your iOS device. If you have iOS 7, you can enable “Automatic Downloads” for Updates and
they will be downloaded and installed automatically.
If you have iOS 6 (or have not enabled automatic downloads for iOS 7) you will see a red circle with a
number on the corner of your App Store icon. The number indicates how many apps have updates
available. Tap on the App Store and locate mySugr Companion in the list of apps with updates available.
Tap on the “Update” button on the right, and your update will download and install, much like the initial
installation process. You will not be able to use mySugr Companion until the update process has finished.
How much does mySugr Companion cost?
There are 2 versions of mySugr Companion:
mySugr Companion Basic is a fully functional product that includes all of the main features and functions
that you need to manage your diabetes everyday. This version is completely free.
mySugr Companion Pro is all about flexibility and added features (add your own food images, blood
sugar reminders, multi-device sync, basal rates for pumpers, powerful search options, PDF & XLS
reports, and more). The Companion Pro features can be accessed through a one-time in-app purchase.
Usage
Getting Started
Once you have the mySugr Companion app installed on your smartphone it’s easy to get started. Just tap
on the icon to launch the app (you would have never guessed that, right?).
Page 4 of 26
User’s Manual 008
Step 1: Create Account
To use mySugr Companion you have to create an account. This is necessary in order to export your data
later (see “Reports”).
We’ll need the following things in order to create an account for you:
● An email address
● A password
Page 5 of 26
User’s Manual 008
Step 2: Therapy and app settings
Settings
The “Settings” item in the side menu is where you’ll find all of the details for your personal diabetes
management. Here you’ll set whether you use a pump, pens/syringes, or no insulin, whether you
measure your blood sugar in mg/dl or mmol/l, and how you measure your carbs. You’ll also set your
personal target ranges.
Basal Settings (Companion Pro)
Insulin pump users can enter their basal rates into Companion and decide whether to display the values
on the dashboard and logbook graph. If you set your basal rates in half-hour increments you can set that
here as well (default is hourly).
Total basal insulin for the 24-hour period is shown in the upper right hand corner. The last modified date
is shown in the upper left hand corner.
Page 6 of 26
User’s Manual 008
Tap the green check mark (upper right corner) to save your basal rates or the “x” (upper left corner) to
cancel and return to the settings screen.
Logbook Order (Companion Pro)
Would you like the order of your logbook data displayed differently? Do you want to see your carbs first
then your blood sugars? You can customize the order however you like by using this tool.
Additional Therapy Details
If desired, you can enter more details about your personal diabetes therapy tools and most recent A1C.
Sound Effects
Here you can set whether mySugr Companion makes any sounds. This includes the clicks and zings when
pressing buttons and moving between fields, but also controls whether your diabetes monster makes
any sounds.
Use Photo Library (Companion Pro)
This option determines whether the photos taken when making new entries will also be stored in your
photo library. This can be useful if you often eat the same things and don’t want to take a new picture
each time. You can choose that perfect pineapple pancake picture from your photo library!
Or, if you don’t want a bunch of food pictures cluttering up your phone’s photo library, turn it off. All of
your mySugr Companion pics will be just fine. The choice is yours!
Enhance Photos (Companion Pro)
Don’t tell your friends, but we’ve added a special mySugr photo filter to make your food
pictures look absolutely amazing. This is where you can turn that on or off.
Page 7 of 26
User’s Manual 008
Step 3: Get to know your dashboard
Let’s spend some time getting to know your dashboard.
The two most commonly used features are the Magnifying Glass, used to search for entries
(Companion Pro), and the Plus Sign, used to make a new entry. Both are featured prominently at the
very top of the screen and perfectly sized for your lancet-marked thumb.
Directly below is a Progress Bar that displays your current point total for the day. You get points for each
action you take to care for yourself, and the goal is to fill that bar with points each and every day. It’s
important to note that we don’t give more points for a “good” blood sugar than we do for a “bad” blood
sugar (there is no bad blood sugar - it’s all information). We give points for checking, logging, counting,
taking your insulin, etc. There’s no judging happening at mySugr! We know it’s hard being a pancreas!
Work hard to fill that bar everyday, and we think you’ll notice some great improvements in your
diabetes management.
Next up is the daily Graph. Here you’ll see a visual representation of your blood glucose for the day.
There are indicators for carbs and mealtime insulin along the bottom of the graph. On the right side you
will see your average blood sugar and standard deviation. Pro Tip: tap on the graph for a shortcut to
your logbook screen.
Page 8 of 26
User’s Manual 008
Under the graph you see tiles that contain:
● blood glucose average for the last 7 days
● blood glucose deviation for the last 7 days
● bolus or mealtime insulin taken that day
● amount of carbohydrates eaten that day
● number of hypers and hypos for the last 7 days
● duration of activity for the last 7 days
You will also see a variety of these tiles, depending on your configuration, whether you are a Companion
Pro user, or if you have started any Challenges:
● any active challenges
● thumbnail of your last mySugr Companion Pro photo
● aaaaaand your diabetes monster
Page 9 of 26
User’s Manual 008
Step 4: New Entry
Make an entry
To make an entry tap on the Plus Sign from your dashboard or select “New Entry” from the side menu.
The entry screen allows you to enter a lot of details. You decide what is important, but the more detail
you enter, the more useful mySugr Companion becomes.
In the entry screen there are fields for:
● Date & Time
● Location
● Photo (Companion Pro)
● Blood glucose
● Carbs
● Bolus (pump) / Insulin Short Acting (pen/syringe)
● Temp. Basal (pump) / Insulin Long Acting (pen/syringe)
● Activity
Page 10 of 26
User’s Manual 008
●
●
●
Notes
Tags (sick, tired, correction, traveling, etc.)
Reminders (Companion Pro)
Date / Time
The current date and time are automatically entered, but can be changed by tapping on the field and
selecting the desired values. This is great if you have readings to enter at a later time.
Location
If you have allowed it in your smartphone preferences, mySugr Companion can update this field
automatically based on your estimated GPS location. You can also enter a more friendly name such as
home, gym, office, mySugr HQ, etc.
Photo (Companion Pro)
Food plays a big role in diabetes management. By taking pictures of your meals you can get a nice visual
overview of your eating habits in the analysis screens. These pictures and corresponding blood sugar
details can be very helpful in the future when faced with an unfamiliar meal or a meal where you’re
unsure of the carb count. All pizza is not created equal!
Blood glucose
Goes without saying. That’s where you enter your blood sugar. No cheating!
Carbs
Here you enter the amount of carb exchanges or grams (depending on your setting) you are eating. You
can also add a detailed description of your meal just below.
Bolus (pump) / Insulin Short Acting (pen/syringe)
Enter the amount of insulin injected or pumped.
Temp Basal (Pump)
In some situations your body needs more or less basal insulin. You can enter that here.
Insulin Long Acting (pen/syringe)
When you take your long acting insulin, enter the amount here.
Activity
Movement is always good. The more the better. Here you can record the duration of your activity. In the
Activity Description field you can enter some notes describing your activity, eg. running, babysitting,
raking leaves, herding kittens, etc.
Notes
Have something more to add? Here’s the place to do it.
Page 11 of 26
User’s Manual 008
Tags
These powerful little icons allow you to provide a lot of context to the data you are entering. You can
describe your emotional state, what meal you just ate, whether you’re sick, traveling, stressed, angry,
etc. We know we haven’t covered every situation, but we think we’ve given you a good start. These
tags offer some powerful analysis and search options (see “Analysis menu” and “Search entries”). Note:
Search is a Companion Pro feature.
Blood Glucose Reminder (Companion Pro)
Sometimes it is hard to remember to check your blood sugar. To help, we’ve built a blood glucose
reminder function into mySugr Companion. If you’d like a reminder, you can choose if you’d like one after
15 min, 30 min, 1h, 2h, or 3h after your last blood sugar entry. Move the slider to the right until it is
above the desired time (the actual time of day when the reminder will go off is also displayed just above
the slider).
Save / Cancel
Once you’ve entered everything you want to enter, tap the green check mark in the upper right to save
Page 12 of 26
User’s Manual 008
your information. If you’d like to cancel, tap the “x” in the upper left.
Earn Points
You get points for each action you take to care for yourself, and the goal is to fill that bar with points
each and every day. It’s important to note that we don’t give more points for a “good” blood sugar than
we do for a “bad” blood sugar (there is no bad blood sugar - it’s all information). We give points for
checking, logging, counting, taking your insulin, etc. There’s no judging happening at mySugr! We know
it’s hard being a pancreas! Work hard to fill that bar everyday, and we think you’ll notice some great
improvements in your diabetes management.
In addition to the points listed below, we’ve built some fun “easter-egg” points into mySugr Companion.
See if you can spot them!
Points and Scoring:
●
●
●
●
●
●
●
●
●
●
●
Tag: 1 point
Blood Glucose: 2 points
Carbs: 2 points
Photo: 3 points (Companion Pro)
Description of Meal: 3 points
Location: 2 points
Bolus (pump) / Insulin Short Acting (pen/syringe): 2 points
Temp Basal (pump) / Insulin Long Acting (pen/syringe): 3 points
Activity: 3 points
Activity Description: 3 points
Notes: 3 points
Social Sharing / Share Entries
We are of the opinion that diabetes is not something to hide. Whether it is blood sugar numbers,
activities, or pictures of a delicious meal. With mySugr Companion you can share an entry with your
friends and followers via Facebook or Twitter. The only prerequisite is an existing account on the social
network you want to use.
In the privacy settings of your phone you can control whether the Companion app is allowed to access
your Facebook or Twitter accounts. We will never share an entry without your permission.
The social sharing functions are just below the reminder settings. Once you’ve made an entry that you’d
like to share, tap on the Facebook and/or Twitter icon. You can customize your message in the field
provided, then tap the “Save & Share” button to save your entry in Companion and send it to your
Facebook wall and/or Twitter timeline (we’ve restricted the character count to what will fit on Twitter
for now - yes, even for Facebook. We think our developer had just read Shakespeare’s quote - “Brevity
is the soul of wit.” before coding that part...).
Page 13 of 26
User’s Manual 008
As in the examples below, your posts/tweets will be composed based on what you include in your entry
(blood sugar value, carbohydrate grams, picture, or any combination of those three)
Page 14 of 26
User’s Manual 008
Example
Edit Entry
To change an entry, use the side menu to access your Logbook screen. Tap on the entry you’d like to
change to bring up the entry detail view, then tap the pencil icon in the upper right. Make any changes
you’d like, then tap the green check in the upper right to save the changes, or the “x” in the upper left to
cancel and go back to the entry detail view.
Delete Entry
There are two ways to delete an entry. Both start by using the side menu to access your logbook screen.
Tap on the entry you’d like to delete to bring up the entry detail view, then tap the pencil icon in the
upper right. Scroll to the very bottom of the screen and tap on “Delete” to remove this entry from your
records.
Or
From the Logbook screen, swipe from left to right (until you see the bar with the “x” turn red) on the
entry you’d like to delete.
Caution: your entry will be permanently deleted immediately. There is no undo, undelete, or “are you
sure?” It is gone for good.
Page 15 of 26
User’s Manual 008
Logbook Menu
Select “Logbook” from the side menu to access your Logbook screen. From here you can scroll up and
down through your entries on the bottom part of the screen, or tap and drag the graph left and right to
navigate.
You can also add a new entry or search entries by tapping the appropriate icon in the upper right of the
logbook screen.
Pro Tip: Dragging an entry from right to left will show you any notes entered and the first two tags (if
Page 16 of 26
User’s Manual 008
any). But be careful, dragging the other way (left to right) is how you delete an entry...
Tapping on an entry in the bottom part of the screen will bring up the detail entry view for the selected
entry.
Bonus Pro Tip: You can drag the graph left and right while in the detail entry view to quickly navigate
and see details.
Analysis Menu
Select “Analysis” from the side menu to access the Analysis function. Here you’ll find an overview of your
diabetes management arranged by month on the bottom and by the last 14 days, 7 days, and 24 hours
on the top. You can tap into each section to see more details. You’ll see a graph that shows average
blood glucose by day, then tiles just below that show:
● Average blood glucose for the selected time period
● Standard deviation for the selected time period
● Hypers and hypos for the selected time period
Page 17 of 26
User’s Manual 008
● Total carbs eaten for the selected time period (scary, right?)
● Total activity duration for the selected time period (go, you!)
Below the tiles you can see the tags that have been used and their frequency. Below that are any food
pictures you’ve taken. The food pictures offer a really useful overview giving you or your caregiver an
idea of your diet for the selected time period (is it diverse and colorful? Or bland and full of packages
and labels? Some good insights can be gained by this. Did your average blood sugar for the month go up
or down with a noticeable change in your food pictures, for example? And finally, below the food
pictures you can see which challenges you’ve won and how many times.
In the monthly analysis screens, the weekly graphs will stack on top of each other, two weeks at a time,
as you scroll down. This offers a visual opportunity to spot patterns and compare daily averages on a
weekly level through the month.
Search entries (Companion Pro)
Ah! One of the most powerful features of mySugr Companion! You access it from the magnifying glass
on the dashboard or logbook screen. This is how you make your diabetes data actionable! Make the
effort you put into keeping all of those records actually work for you instead of being a pile of
retrospective history and records.
An example is the best way to explain the search feature.
Search Example
Your friend, Scott, takes you to his favorite restaurant. You’ve been there before, but you don’t go often
enough to remember what you ordered or how you handled all of the diabetes details (carb estimate,
insulin taken, and how your blood glucose did afterward). You do remember that you logged everything
in mySugr Companion the last time you were there, including a note that you were having dinner with
Scott.
You tap the magnifying glass, type in the name of the restaurant and the word “Scott”, and you see the
entry from a year ago (wow! Has it really been that long?). You tap on the entry and see what you
ordered, how many carbs you estimated, how much insulin you took, and that your blood sugar ran high
for hours and hours afterward.
With that information you are able to make some different decisions. Either to order something
different, make a different carb estimation, and/or do something different with your insulin dose.
That’s powerful stuff!
Let’s crank it up a notch! You and Scott start having lunch more often at that same restaurant. After a few
visits you now have a searchable library of meals. More importantly, you can see your reaction to each of
those meals, which helps you make different decisions - proactively.
You can search for any piece of information: Text, Tag, Location, etc.
Page 18 of 26
User’s Manual 008
Challenges
The Challenges screen is found through the side menu. Challenges are special assignments that push you
to get a little more involved in your diabetes management. Each challenge has an objective, some lasting
only a few hours, others lasting a week or more. They are usually oriented towards achieving goals
related to better overall health or diabetes management, such as checking your blood sugar more often
or getting more exercise.
Share a Challenge
With mySugr Companion you can share which challenges you are playing and what your progress is. All
you need is an account on Facebook and/or Twitter, and you can brag and boast like a boss on your
Facebook wall or Twitter timeline.
As with all of Companion’s sharing features, you can control Companion’s access to your Facebook
Page 19 of 26
User’s Manual 008
and/or Twitter accounts in the privacy settings of your phone (see also: Share Entries). We’ll never share
anything without your permission.
To share a challenge just scroll to the bottom of the challenge you’d like to share, tap the Facebook
and/or Twitter button, enter any text you’d like (optional), then tap, “Let’s Get Started” (for a challenge
you’re just starting) or “Share Progress” (for a challenge already in progress).
Recommend mySugr Companion
Want to tell your friends or loved ones about mySugr Companion? Go ahead, it’s easy!
In the side-menu click the menu item “Recommend Companion”. You’ll see a new screen with a variety of
ways to share the joy:
- Recommend Companion by email
Page 20 of 26
User’s Manual 008
- Recommend Companion by SMS
- Recommend Companion by Social Media (Facebook/Twitter - account required)
- Recommend Companion by App Store
Tap the tile that corresponds to how you’d like to send your message. We’ve entered a basic message
for you, but you can personalize it however you’d like. Hopefully you’ll say something about how
awesome mySugr Companion is… :-)
Page 21 of 26
User’s Manual 008
Reports (PDF, MS Excel (both are Companion Pro features) & CSV)
Select “Reports” from the side menu. mySugr Companion Basic provides a CSV-Export for a two week
period. mySugr Companion Pro offers more format options and allows you to select a personalized date
range for your report.
Tap “Export” to view the report on your device screen. Once on your screen, tap the button in the upper
right to access the options for sending and saving. These options are dependent on what apps and
services you have installed on your device, but may include things like Message, Mail, Dropbox,
Evernote, Google Drive, etc.
Report Formats
PDF (Companion Pro) - Clear and simple, these reports are perfect for your doctor visit. Export and print
or email the report just before your visit.
MS Excel (Companion Pro) - This format is for serious number crunchers who like to play with
spreadsheets and make their own charts/graphs. It’s cool - we won’t slow you down!
Page 22 of 26
User’s Manual 008
CSV - This standard data format can be opened with many spreadsheet programs (Microsoft Excel,
Apple Numbers, Google Docs) and is also a common format for data backup.
Profile
In the side menu under “Profile” you can access information about your account.
Change name / email address / monster name
Name (or rename) your monster by tapping on the name, change your email address or any other
personal details here.
Advanced Profile
If you wish, you can enter more specific details about you, your diabetes type, and your diabetes
diagnosis date.
Change password
Want to change your password? Tap here and we’ll send you instructions via email on what to do next.
Page 23 of 26
User’s Manual 008
Explanation of terms, icons and colors
Dashboard
There are a number of elements on the dashboard that actively react to your glucose levels. The graph
background and diabetes monster change color with your average blood glucose for the day, and the
tile for your blood glucose average for the past 7 days changes colors as that value changes. The colors
are described below (see “Colors”), and the values at which they change are taken from your target
range in the Settings section of the side menu.
Side Menu
The side menu is where you navigate from screen to screen within mySugr Companion. It contains a text
description of each screen along with a small icon.
Tags
Each tag in the new entry (see “New entry”) screen describes a situation, scenario, some context, a
mood, or an emotion. There is a text description of each tag directly below each graphical icon. When a
tag is selected it changes from dark gray to bright green and changes shape, therefore making it easy to
determine if it is selected or not. You can toggle a tag selection on and off as desired.
Colors
The colors used in the variable areas of mySugr Companion (see “Dashboard”) are as described below,
based on target ranges provided by the user in the settings screen (see “Settings”).
●
●
●
Red:
Green:
Orange:
Blood glucose not in target range (high)
Blood glucose in target range
Blood glucose is not great, but not mega mega hig
Warnings
mySugr Companion cannot be used everywhere
mySugr Companion can generally be used anywhere it is possible to use a smartphone. There’s a clear
advantage in that you can enter and access your diabetes data almost anywhere and almost
Page 24 of 26
User’s Manual 008
immediately. However, there are some exceptions.
mySugr Companion may not be used in places where the use of a mobile phone is prohibited. These
places may include, but are not limited to, for example, certain areas in hospitals, in an aircraft, in a car if
you are driving, and wherever else the use of a smartphone is prohibited or advised against.
Limited Use
mySugr Companion should not be used by persons who, due to lack of mental capacity, lack of technical
understanding, or lack of medical understanding, are not able to properly manage or treat diabetes, or
who generally have difficulty with the operation of a smartphone.
mySugr Companion does not replace a visit to your doctor
mySugr Companion is a registered medical device and is used to support the treatment of diabetes. But
the app cannot replace a visit to your doctor nor a regular review of the long-term blood glucose value
(HbA1c). You must continue to independently manage your blood sugar. mySugr Companion does not
assume nor manage the independent release of insulin. In addition, mySugr Companion is not
synchronized with blood glucose meters.
Troubleshooting / Support
If you have questions about mySugr Companion, need help with the app, or have noticed a mistake or
problem, please contact us immediately at [email protected], or by telephone at +1 (855) 337-7847
(US toll-free), +44 800-011-9897 (UK toll-free), or +43 720 884555 (Austria).
Data Security
Your data is safe with us - this is very important to us (we’re users of mySugr Companion, too).
mySugr Companion is a registered medical device. It is certified, carries the CE marking (Medical Devices
Directive 93/42/EEC) and is registered with the FDA. As such, it is required to meet the highest of data
security and reliability standards. All medical data is stored exclusively on Amazon sourced servers based
in Europe and the United States.
Page 25 of 26
User’s Manual 008
About the manufacturer
mySugr GmbH
Hofmühlgasse 17/23
A-1060 Vienna, Austria
Telephone: +43 699 11109779
E-Mail: [email protected]
CEO: Frank Westermann
Company Registration Number: FN 376086 v
Jurisdiction: Commercial Court of Vienna, Austria
UID-Number: ATU67061939
User’s Manual Version 008 (English), 28. Febuary 2014
Page 26 of 26