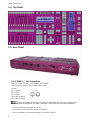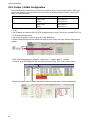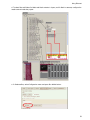
1
User Manual
PICCOLO SCAN
(Piccolo Scan 12 model shown)
Document Release July 2010
Revision A
Software v1.70
Leviton Piccolo Scan
Warranty
Leviton Manufacturing Co Inc. warrants this control console to be free of material and workmanship defects
for a period of two years after system acceptance or 26 months after shipment, whichever comes first. This
Warranty is limited to repair of replacement of defective equipment returned Freight Pre-Paid to Leviton
Lighting Management Systems Division at PO Box 2210, Tualatin, Oregon 97062, USA. User shall call 1800-959-6004 and request a return authorization number to mark on the outside of the returning carton, to
assure that the returned material will be properly received at Leviton. All equipment shipped back to
Leviton must be carefully and properly packed to avoid shipping damage. Replacements or repaired
equipment will be returned to sender freight prepaid, F.O.B. factory. Leviton is not responsible for removing
or replacing equipment on the job site, and will not honor charges for such work. Leviton will not be
responsible for any loss of use time or subsequent damages should any of the equipment fail during the
warranty period, but agrees only to repair or replace defective equipment returned to its plant in Tualatin,
Oregon. This Warranty is void on any product that has been improperly installed, overloaded, short
circuited, abused, or altered in any manner. Neither the seller nor Leviton shall be liable for any injury, loss
or damage, direct or consequential arising out of the use of or inability to use the equipment. This
Warranty does not cover lamps, ballasts, and other equipment which is supplied or warranted directly to
the user by their manufacturer. Leviton makes no warranty as to the Fitness for Purpose or other implied
Warranties.
Notice
Although the information contained within this user guide is believed to be accurate at the time of printing,
it is not guaranteed to be without fault and is subject to change without notice. Future software releases
may change the features or operation of this product. For current information contact:
Leviton Lighting Management Systems Division
20497 SW Teton, Tualatin, OR 97062
Mailing Address:
PO Box 2210
Tualatin, OR 97062
Customer Service: (800) 736-6682
Technical Support: (800) 959-6004
Fax: (503) 404-5601
Email: [email protected]
Internet: www.leviton.com
Copyright © 2010
Leviton Manufacturing Company Incorporated.
All Rights Reserved.
Table of Contents
Table of Contents
1. Introduction ..............................................................................................................................1
1.1. Features ......................................................................................................................................... 2
2. Specifications.............................................................................................................................3
2.1. Top Panel ....................................................................................................................................... 4
2.2. Rear Panel ...................................................................................................................................... 4
2.2.1. DMX In / Out Connections ......................................................................................................... 4
2.2.2. MIDI In / Out Connections......................................................................................................... 5
2.2.3. USB Connections ...................................................................................................................... 5
2.2.4. Ethernet Connection ................................................................................................................. 5
2.2.5. LT-Link Connection ................................................................................................................... 6
2.2.6. External Trigger........................................................................................................................ 6
2.2.7. SMPTE ..................................................................................................................................... 6
2.2.8. Audio....................................................................................................................................... 6
2.2.9. VGA Connection........................................................................................................................ 6
2.2.10. Power Supply and Switch......................................................................................................... 6
2.2.11. Work Light Connection ............................................................................................................ 6
3. About this Manual (Text Conventions) .........................................................................................7
4. Installation and Start Up ............................................................................................................8
4.1. Warnings !...................................................................................................................................... 8
4.2. Power On ....................................................................................................................................... 8
4.3. Console Reset ................................................................................................................................. 8
5. Getting Help ..............................................................................................................................9
5.1. Help by Functions............................................................................................................................ 9
5.2. Contacting Technical Support ........................................................................................................... 9
6. Base & Auxiliary LCD Displays / Base Screen ............................................................................. 10
6.1. Base LCD Display .......................................................................................................................... 10
6.1.1. Display Background Colors....................................................................................................... 10
6.2. Auxiliary LCD Display ..................................................................................................................... 10
6.3. Base Screen.................................................................................................................................. 11
6.3.1. Base Screen Background Color................................................................................................. 11
7. Navigation ............................................................................................................................... 12
7.1. Data Tables .................................................................................................................................. 12
7.1.1. Using Data Tables................................................................................................................... 12
7.1.2. Using Option Windows ............................................................................................................ 13
7.2. Display / Screen Symbols and Colors............................................................................................... 13
8. Operating Modes ..................................................................................................................... 14
8.1. Single Mode .................................................................................................................................. 14
8.2. Double Mode ................................................................................................................................ 14
8.3. Theatre Mode ............................................................................................................................... 14
8.4. Manual Mode ................................................................................................................................ 14
8.5. Selecting Operating Modes............................................................................................................. 14
8.5.1. Mode Change and Channel Access ........................................................................................... 15
9. Editing Channels ...................................................................................................................... 16
9.1. Grand Master / Blackout Key .......................................................................................................... 16
9.2. Using Channel Faders .................................................................................................................... 16
9.3. Using the Keypad .......................................................................................................................... 16
User Manual Rev. A / Software v1.70
i
Leviton Piccolo Scan
9.3.1. Selecting Channels.................................................................................................................. 16
9.3.2. Editing Channel Levels ............................................................................................................ 17
9.3.3. De-Selecting (Releasing) Channels ........................................................................................... 17
9.3.4. Other Editing Commands......................................................................................................... 17
9.4. Channel Editing Examples .............................................................................................................. 18
9.4.1. Using Channel Faders.............................................................................................................. 18
9.4.2. Using the Keypad.................................................................................................................... 18
9.4.3. Channel Editing Example in Theatre and Manual Modes ............................................................. 18
9.4.4. Channel Editing Example in Single Mode ................................................................................... 18
9.4.5. Channel Editing Example in Double Mode.................................................................................. 18
10. Recording and Modifying Groups.............................................................................................19
10.1. Recording Groups ........................................................................................................................ 19
10.2. Adding Attributes (Names, Times, etc.) to Groups .......................................................................... 19
10.2.1. Using the Options Key ........................................................................................................... 19
10.2.2. Timing Modes (Tm)............................................................................................................... 19
10.3. Modifying Groups ........................................................................................................................ 20
11. Recording and Modifying Cues ................................................................................................ 21
11.1. Recording Cues ........................................................................................................................... 21
11.2. Adding Attributes (Names, Times, etc.) to Cues.............................................................................. 21
11.2.1. Using the Options Key ........................................................................................................... 22
11.2.2. Timing Modes (Tm)............................................................................................................... 22
11.3. Modifying Cues............................................................................................................................ 22
12. Using Submasters (Theatre & Manual Modes) .......................................................................... 23
12.1. Loading Groups and Cues into Submasters .................................................................................... 23
12.1.1. Cue Lists in Submasters......................................................................................................... 24
12.2. Submaster Playback..................................................................................................................... 24
12.2.1. Normal, Absolute or Inhibit Modes.......................................................................................... 24
12.3. Deleting Submasters .................................................................................................................... 25
12.4. Rate and Level Submasters .......................................................................................................... 25
12.5. Effects Submasters ...................................................................................................................... 25
12.5.1. Programming Effects ............................................................................................................. 25
12.5.2. Loading Effects ..................................................................................................................... 26
12.5.3. Executing Effects .................................................................................................................. 26
12.5.4. Modifying Effects .................................................................................................................. 26
13. Using the CrossFader (Theatre, Manual & Simple Modes) ......................................................... 27
13.1. Assigning Cues to the CrossFader ................................................................................................. 27
13.1.1. Jump and Loop (Lp) Functions ............................................................................................... 27
13.2. CrossFader Playback .................................................................................................................... 28
13.2.1. Modify Fade Rate .................................................................................................................. 28
13.2.2. Modify Current Cue ............................................................................................................... 28
13.3. Deleting Cues from the CrossFader ............................................................................................... 28
14. Using Pages (Theatre & Manual Modes) ..................................................................................29
14.1. Recording Pages.......................................................................................................................... 29
14.2. Loading Pages............................................................................................................................. 29
14.2.1. Normal Mode ........................................................................................................................ 29
14.2.2. Forced Mode......................................................................................................................... 29
14.3. Deleting Pages ............................................................................................................................ 29
15. Using Fixtures ........................................................................................................................ 30
15.1. Selecting Fixtures ........................................................................................................................ 30
15.2. Editing Fixture Parameters ........................................................................................................... 30
15.2.1. Trackball Functions ............................................................................................................... 30
ii
Table of Contents
15.3. Fixture Commands....................................................................................................................... 31
15.3.1. [PARAM] .............................................................................................................................. 31
15.3.2. [HOME]................................................................................................................................ 32
15.3.3. [PALs] Palettes ..................................................................................................................... 32
Applying Palettes ......................................................................................................................... 32
15.3.4. [LIBs] Libraries ..................................................................................................................... 32
Applying Libraries......................................................................................................................... 32
Recording Libraries....................................................................................................................... 33
Modifying Library Values ............................................................................................................... 33
Modifying Library Names............................................................................................................... 33
Examining Libraries ...................................................................................................................... 34
Deleting Libraries ......................................................................................................................... 34
15.3.5. [EDIT+] ............................................................................................................................... 34
15.3.6. [BANKS], [BNK-] & [BNK+].................................................................................................... 35
15.3.7. [WHEEL] .............................................................................................................................. 35
15.4. [MENU][30]:Virtual dimmer .......................................................................................................... 35
16. Using Shapes ......................................................................................................................... 36
16.1. Shape Basics ............................................................................................................................... 36
16.1.1. Editing and Recording a New Shape ....................................................................................... 36
16.2. Other Shape Options.................................................................................................................... 36
16.2.1. Items Selection Order............................................................................................................ 36
16.2.2. Add Shape............................................................................................................................ 36
16.2.3. Using Shapes in Playbacks ..................................................................................................... 37
16.2.4. Examine Shapes List.............................................................................................................. 37
16.2.5. Examine Cues and Groups containing Shapes .......................................................................... 37
16.3. Shape Base Configuration............................................................................................................. 37
16.3.1. All Groups and Cues .............................................................................................................. 37
16.3.2. Individual Groups and Cues ................................................................................................... 38
17. Functions............................................................................................................................... 39
17.1. Exam and Modify Functions .......................................................................................................... 39
17.2. Test and Next Functions............................................................................................................... 40
17.2.1. [Test] .................................................................................................................................. 40
17.2.2. [Next] .................................................................................................................................. 40
17.3. Copy and Exchange Functions ...................................................................................................... 40
17.4. Delete Functions.......................................................................................................................... 40
17.4.1. Deleting Submaster and Crossfader Contents .......................................................................... 40
17.4.2. Deleting Cues and Groups...................................................................................................... 41
17.4.3. Deleting Effects, Pages and Macros ........................................................................................ 41
17.5. Learn Time Functions................................................................................................................... 41
17.6. Macro Functions .......................................................................................................................... 42
17.6.1. Recording Macros ................................................................................................................. 42
17.6.2. Modifying Macros .................................................................................................................. 42
17.6.3. Deleting Macros .................................................................................................................... 42
17.6.4. Executing Macros .................................................................................................................. 42
18. Patching ................................................................................................................................ 43
18.1. Patching Dimmers ....................................................................................................................... 43
18.1.1. Testing Dimmers................................................................................................................... 43
18.1.2. Pre-Programmed Curves ........................................................................................................ 44
18.1.3. House Light Dimmers ............................................................................................................ 44
18.1.4. Patch Tools .......................................................................................................................... 45
18.2. Patching Fixtures ......................................................................................................................... 45
18.2.1. Scroller Definition.................................................................................................................. 46
Dark Gel...................................................................................................................................... 46
18.3. Cache List Configuration............................................................................................................... 47
18.4. Fixture Definition ......................................................................................................................... 48
User Manual Rev. A / Software v1.70
iii
Leviton Piccolo Scan
19. Saving and Loading Show Data ...............................................................................................49
20. Console Updating ................................................................................................................... 50
20.1. USB Driver software update.......................................................................................................... 50
21. Menus ................................................................................................................................... 51
21.1. Patches ...................................................................................................................................... 51
21.1.1. Dimmers (Menu 02) & Fixtures (Menu 04)............................................................................... 51
21.1.2. Dmx In (Menu 03) ................................................................................................................ 51
21.2. Disk & Printer.............................................................................................................................. 51
21.2.1. Disk (Menu 10) ..................................................................................................................... 51
21.2.2. Printer (Menu 11) ................................................................................................................. 51
21.3. Multimedia .................................................................................................................................. 51
21.3.1. Midi (Menu 21) & Time Code (Menu 23),................................................................................. 51
21.3.2. External Triggers & Sound (Menu 22) ..................................................................................... 51
21.4. Setup ......................................................................................................................................... 52
21.4.1. Editor & Times (Menu 30)...................................................................................................... 52
21.4.2. Playbacks (Menu 31) ............................................................................................................. 52
21.4.3. System (Menu 32)................................................................................................................. 53
21.4.4. Dmx Setup (Menu 33) ........................................................................................................... 53
21.4.5. Power-Up Macro (Menu 34) ................................................................................................... 53
21.4.6. Remote and PocketPC (Menu 35) ........................................................................................... 54
21.4.7. Wireless DMX (Menu 36) ....................................................................................................... 54
21.5. Ethernet ..................................................................................................................................... 54
21.5.1. Ethernet Configuration (Menu 40) .......................................................................................... 54
21.6. Special Commands ...................................................................................................................... 54
21.6.1. Multimedia Panel (Menu 70)................................................................................................... 54
21.6.2. Status & Playbacks Zero (Menu 71) ........................................................................................ 54
21.6.3. Delete Console Show (Menu 72)............................................................................................. 55
21.6.4. Security & Defaults (Menu 77) ............................................................................................... 55
21.6.5. Tools & Software Updates (Menu 79)...................................................................................... 55
21.6.6. Tests (Menus 80 - 88) ........................................................................................................... 55
22. Using Ethernet ....................................................................................................................... 56
22.1.
22.2.
22.3.
22.4.
22.5.
Ethernet Configuration ................................................................................................................. 56
IPX Configuration ........................................................................................................................ 56
Capture / CITP Configuration........................................................................................................ 57
Coolux / ArtNet Configuration ....................................................................................................... 58
Leviton LT NPC 2D/4D Configuration ............................................................................................. 60
23. Using MIDI, Time Code, External Triggers & Sound.................................................................. 61
23.1. MIDI .......................................................................................................................................... 61
23.1.1. MIDI Configuration................................................................................................................ 61
23.2. Time Code (Events List) ............................................................................................................... 61
23.2.1. Events List Execution............................................................................................................. 62
23.3. External Triggers & Sound Inputs ................................................................................................. 63
24. Off Line Editor (OLE) .............................................................................................................. 64
24.1.
24.2.
24.3.
24.4.
24.5.
24.6.
iv
Introduction ................................................................................................................................ 64
PC Requirements ......................................................................................................................... 64
Starting the OLE.......................................................................................................................... 64
Exchanging Data with a Console ................................................................................................... 64
Using the OLE as a Backup Console .............................................................................................. 64
PC KeyBoard HotKeys .................................................................................................................. 65
Introduction
1. Introduction
The Leviton Piccolo Scan is a conventional and automated lighting console with advanced functions
normally not found on consoles of similar size. It is very simple to use, yet offers many functions for
complex procedures as demanded in the lighting entertainment field.
Piccolo is an ideal control solution for use in theatres, schools, music and corporate venues, houses of
worship and TV studios.
The console can be operated in a variety of ways depending on the user’s needs and experience; it can
function as a basic two-scene manual console, submasters can be loaded with timed cues, groups, and
effects, or sequenced cues can be executed manually or automatically via a crossfader.
The console is offered in two models:
Piccolo Scan 12: 12 Submasters / 48 Channels / 256 Parameters
Piccolo Scan 24: 24 Submasters / 96 Channels / 256 Parameters
User Manual Rev. A / Software v1.70
1
Leviton Piccolo Scan
1.1. Features
•
Four modes allow for versatile operation:
Single Mode: All console faders operate as direct access control channels.
Double Mode: Upper faders control the same channels as the lower faders, thus allowing for manual
crossfades between upper and lower fader rows.
Theatre Mode: Upper faders operate as channel faders while the lower faders operate as submaster
faders.
Manual Mode: Operates same as Theatre Mode except upper channel faders contribute to output levels on a HTP
basis.
•
Submasters accept Cues, Groups and Effects.
•
Channel and Submaster Flash keys. Submaster Flash keys can be configured in three different modes: GO, FLASH
and SOLO.
•
Modify function: For modification of memory items such as Cues, Groups and Submasters.
•
Exam function: For examining console memory items.
•
4 arrow keys for cursor placement in menus and data cells.
•
Two LCD displays, soft keys, 4 encoders, 1 trackball and direct function keys for programming of moving lights, LED
lights, scrollers, etc.
•
Numeric editor: For creating cues and groups by entering levels via the alphanumeric keypad or level encoder.
•
Any console item can be easily named with the alphanumeric keypad.
•
256 Parameters / 128 moving light fixtures.
•
Channel Patch: 512 dimmers with response curves and limit functions.
•
5 pre-programmed response curves.
•
Installation Patch: To return console to a preset password-protected status.
•
Ethernet: IPX, ArtNet and CITP capable.
•
MIDI and Time Code functions: To synchronize the console with other consoles and external devices.
•
Personalized user setup of console.
•
Operates in several user languages.
•
Operates with or without an external monitor.
•
Storage and transfer of show data to external USB memory stick.
•
Printout of show data in text format.
• OLE (Off Line Editor): A complete console simulator that allows the user to edit shows on a PC. Can also
•
2
function as a backup console.
Import/Export ASCII shows from the Off Line Editor.
Specifications
2. Specifications
Console Model:
Channel Faders
Piccolo Scan 12
48
Piccolo Scan 24
96
Total Channels (Dimmers and 304 (512 Patch)
Fixtures)
352 (512 Patch)
Submasters
12
24
Fixture Attributes
256
256
Cues
999.9 (D)
999.9 (D)
Effects
999 (S)
999 (S)
Pages
999 (S)
999 (S)
Macros
999 (S)
999 (S)
Groups
999 (D)
999 (D)
Palettes and Libraries
Yes
Yes
Crossfaders
1
1
Crossfade Sequences
999.9 (D)
999.9 (D)
Crossfade Times
T-In, T-Out, Delay & Wait T-In, T-Out, Delay & Wait
Encoders
4 + Trackball
4 + Trackball
Multifunction Fader
1
1
LCD Display
Two 240 x 64 screens
Two 240 x 64 screens
VGA Monitor Output
Yes
Yes
DMX 512 Dimmer Patch
1
1
DMX Universes Out
1
1
DMX Universes In
1
1
Dimmer Curves
5 pre-programmed
5 pre-programmed
Yes
Yes
Yes
Yes
USB Ports (1 Host & 1 Device) Yes
Yes
Midi In/Out, SMPTE, Audio,
3 Externals
Yes
Yes
3 Pin XLR for Worklight
Yes (1)
Yes (1)
Offline Editor Software (OLE)
Yes
Yes
External Power Supply
12V/1.5A
12V/1.5A
Housing
Aluminum
Aluminum
RS485 (LT-Link)
Size (mm)
Weight (kg)
720 x 400 x 50-100
950 x 400 x 50-100
5
6.25
D = Dynamic Memory (depending on available memory)
S = Static Memory (absolute)
3
Leviton Piccolo Scan
2.1. Top Panel
2.2. Rear Panel
2.2.1. DMX In / Out Connections
DMX-512 output connector (opto-isolated): XLR-5 female.
DMX-512 input connector (opto-isolated): XLR-5 male.
Pin
Pin
Pin
Pin
Pin
Pin
Out:
1: Ground.
2: Data –
3: Data +
4: No Connection
5: No Connection
5 pin XLR
5
1
2
4
3
male
5
1
2
3
4
female
Always use shielded and twisted pair cables for RS485 data with 120 ohms of characteristic
impedance and low capacitance. The Data – and Data + signals must be in the same twisted pair.
• Do not use XLR audio (microphone) cables.
• Only connect a maximum of 32 devices per DMX line.
• Do not use cables over a maximum length of 500 meters (1640 ft).
4
Specifications
• Use 120 ohm termination between pin 2 & 3 on the last DMX device.
• Use DMX splitters to connect additional DMX users or for longer cable runs.
The console transmits DMX 512 with the following parameters:
Parameter
Break Length
MAB Length
Bytes/packet
Break to break
Updates/s
Value
90 μs
48 μs
512 channels
25.000 μs
40
DMX512 (1990) NORM
Minimum 88 μs
Minimum 8μs
1-512 channels
170μs – 3.000.000μs
1-44
2.2.2. MIDI In / Out Connections
MIDI standard port: Two 5 pin DIN connectors for MIDI In & Out. Uses standard MIDI cables.
Pin Out:
MIDI-IN
MIDI-IN
MIDI-IN
MIDI-IN
MIDI-IN
–
–
–
–
–
Pin
Pin
Pin
Pin
Pin
1:
2:
3:
4:
5:
Pin Out:
MIDI-OUT
MIDI-OUT
MIDI-OUT
MIDI-OUT
MIDI-OUT
n.c.
n.c.
n.c.
Signal
Return
–
–
–
–
–
Pin
Pin
Pin
Pin
Pin
1:
2:
3:
4:
5:
n.c.
Ground
n.c.
Return
Signal
5 pin DIN
3
1
4
5
2
male
5
1
2
3
4
female
2.2.3. USB Connections
Type A (Device) - Used to connect USB memory stick:
Pin
Pin
Pin
Pin
Pin
Out:
1 – VBUS (+5VDC)
2 – DATA 3 – DATA +
4 – GROUND (0 VDC)
The console has 2 Type A USB connectors. Only connector 1 is implemented at this time.
Type B (Host) - Used to connect to a PC for software updates:
Pin
Pin
Pin
Pin
Pin
Out:
1 – VBUS (+5VDC)
2 – DATA 3 – DATA +
4 – GROUND (0 VDC)
2.2.4. Ethernet Connection
Connector: RJ45 female: Used for connection to the LT NPC 2D/4D Ethernet - DMX converter, Offline Editor
(OLE) and 3D visualizers such as Capture.
Pin
Pin
Pin
Pin
Pin
Pin
Pin
Pin
Pin
Out:
1 – TX+
2 – TX3 – RX+
4 – N.C.
5 – N.C.
6 – RX7 – N.C.
8 – N.C.
Pin 3
Pin 2
Pin 1
Pin 4
Pin 5
Pin 6
Pin 7
Pin 8
5
Leviton Piccolo Scan
2.2.5. LT-Link Connection
SUBD-9 connector, standard RS485: Connector for devices such as remote controls, expansion boxes, etc.
2.2.6. External Trigger
Input for 3 external triggers. Connector: XLR-4 female.
Pin
Pin
Pin
Pin
Pin
Out:
1 – EXT 1
2 – EXT 2
3 – EXT 3
4 – Common
4 pin XLR
4
1
3
2
male
4
1
2
3
female
Each external signal (EXT 1, EXT 2, EXT 3) is connected with the common signal. To configure,
press [Menu][22]:EXT & Sound.
2.2.7. SMPTE
Connector: Stereo jack for 1Vpp SMPTE signals. The SMPTE input responds to the formats: 24, 25, 30 & 30
drop frame without adjusts.
Pin
Pin
Pin
Pin
Out:
1 – 0 V ref. or SMPTE – (jack body)
2 – EXT 2
3 – SMPTE + (jack live point)
2.2.8. Audio
Connector: Stereo jack for 1Vpp audio signals (mono).
Pin
Pin
Pin
Pin
Out:
1 – 0 V ref. – (jack body)
2 – N.C.
3 – Signal + (jack live point)
2.2.9. VGA Connection
SUBD-15 connector, standard video (VGA compatible)
2.2.10. Power Supply and Switch
An external power supply is provided with the console:
Voltage range: 90-264 VAC
Frequency: 47-63Hz
Output voltage: 12 VDC
Output current: 1.5 A / 18W
Output connector: Standard type P1J. Centre positive (+)
The console has a built-in power switch. If the console is not used for an extended period of time,
it is recommended to disconnect the power supply as well as turn off the power switch.
2.2.11. Work Light Connection
One or two work light connections are provided (depending on model) for work lights with 12V-15V/5W
bulbs. The work light level is adjusted from [Menu][32]:LIGHT
Pin
Pin
Pin
Pin
6
Out (XLR-3):
1: 0 VREF
2: 12 VDC
3: 0 VREF
PUSH
2
1
3
About this Manual
3. About this Manual (Text Conventions)
•
Function keys appear as [KEY].
•
A numeric key appears as [#].
•
A general number is represented with the symbol “#”.
•
Encoder
•
[Encoder] indicates that the encoder wheel is to be pressed.
•
A Channel Fader appears as Fader .
•
GrandMaster and SubMaster Faders appear as GM
•
The Crossfader appears as X1/X2
•
Softkeys appear as [1_B] to [5_B] with the associated function next to it.
indicates that the encoder wheel is to be turned.
and SM .
For example, [1_B]MODE, [2_B]BLIND, etc:
Softkey functions are organized on several pages. If a function is not on the first page, press [F+]
to search for it. If a function opens a sub page, the [F+] LED will be lit. To return to the previous page,
press [F+] or make a valid selection.
7
Leviton Piccolo Scan
4. Installation and Start Up
4.1. Warnings !
! Do not operate the console if it becomes damaged in any way.
! Never operate the console with its cover removed.
! Do not remove the ground prong from the power cord. The ground prong is used to reduce the risk
of electrical shock and fire in case of an internal short.
! Do not expose the console to rain, moisture or condensation or damage may occur.
! Do not operate the console if the power cord is frayed or broken.
! Make sure that the main’s power outlet matches the required voltage for your console.
! If the console has been stored in a cold environment (below 40ºF), do not turn the power on until it
warms up or else damage may occur.
! There are no user serviceable parts inside. Do not attempt any repairs yourself, as doing so will void
the warranty. Please contact Leviton Technical Support if the console is not functioning properly.
4.2. Power On
If you observe any irregularity while unpacking the console (due to transportation damage, humidity, etc.)
do not attempt to switch on the console before contacting Leviton Technical Support.
1. Place the console on a flat surface.
2. Connect a proper DMX cable between the DMX-OUT port and the first DMX device (or splitter) in the
lighting system.
3. Connect an external monitor to the VGA connector using a standard video cable.
4. Connect the external power supply to the DC-IN connector. Connect power supply plug to the mains
supply. If needed, the console can be connected to a UPS to avoid mains problems.
5. Switch on the console (rear switch in position I).
6. Set the GM
and SM
faders to 100%. Check that their respective blackout key LED‘s are off.
7. The console is now ready for operation. Please continue reading this manual.
4.3. Console Reset
The first time the console is started, and whenever necessary, a reset should be done:
1.
2.
3.
4.
Switch console off.
Press and hold down [ ].
Switch console on.
After a few seconds, release [ ].
A reset command will return the console to the following default situation:
• Channel fader levels will be set to 0%.
• Any stored show data (cue, group, etc.) will be erased.
• Preset default data can be recovered (to enable this option, press [Menu][77]. If this option is not set,
the console will return to the manufacturer defaults).
8
Getting Help
5. Getting Help
5.1. Help by Functions
Press [HELP], then press a console key you would like information on.
For example, for information on cues, press [HELP][CUE].
Press [HELP] again to close screen.
5.2. Contacting Technical Support
If you cannot find answers in this User Manual, please contact Technical Support and we will be glad to
answer your questions.
You can also call us during regular business hours at 1-800-959-6004. Please have the console model
number and serial number available when you call.
Contact Information:
Leviton Lighting Management Systems Division
20497 SW Teton, Tualatin, OR 97062
Mailing Address:
PO Box 2210
Tualatin, OR 97062
Customer Service: (800) 736-6682
Technical Support: (800) 959-6004
Fax: (503) 404-5601
Email: [email protected]
Internet: www.leviton.com
9
Leviton Piccolo Scan
6. Base & Auxiliary LCD Displays / Base Screen
6.1. Base LCD Display
The Base LCD Display is located on the front panel beneath softkeys [1_B] to [5_B]:
Use the up/down arrow keys [ ][ ] for paging and viewing information about console status and items
(channels, fixtures, cues, groups, grandmaster, submasters, crossfaders, page #, current time, etc.)
Use the left/right arrow keys [ ][ ] to view additional information about each item.
6.1.1. Display Background Colors
The display background can be displayed in blue or dark blue.
To configure the background color, press [MENU][32] then select DISPLAY.
6.2. Auxiliary LCD Display
The Auxiliary LCD Display is located to the left of the Banks keys [B1] to [B10] and is used for
editing and programming fixtures, please see section 15 for more information.
10
Base & Auxiliary LCD Displays / Base Screen
6.3. Base Screen
Console information can also be viewed on a PC monitor.
Use the up/down arrow keys [ ][ ] for paging and viewing information about console status and items
(channels, fixtures, cues, groups, grandmaster, submasters, crossfaders, page #, current time, etc.)
Use the left/right arrow keys [ ][ ] to view additional information about each item. For example, to
view additional fixture parameters of patched fixtures.
All channels, fixtures (if patched), submasters, the events list (if On) and crossfader information is
shown. If multiple fixtures are patched, press the [ ][ ] keys to view fixture list.
6.3.1. Base Screen Background Color
The screen background can be displayed in white, dark gray or black.
To configure the background color, press [MENU][32] then select MONITOR.
11
Leviton Piccolo Scan
7. Navigation
To exit data tables and menus, press [EXIT].
To clear items in the command line, press [C].
To close options windows, make a selection or press [C].
7.1. Data Tables
Areas where data can be viewed and edited are known as “Data Tables”, for example:
To view the channel or fixture patch table, press [CHANNEL][CHANNEL] or [FIXTURE][ FIXTURE].
To view the cue list table, press [CUE][CUE].
To exit a data table, press [EXIT].
7.1.1. Using Data Tables
Arrow Keys
Each horizontal line contains data for one item (e.g. cue 1).
Press the [ ][ ] keys to move the item selection cursor (yellow line in base
screen).
Press the [ ][ ] keys to move the editing cursor (red cell in base screen).
In the OLE software, the mouse can be used to select any cell on screen.
Item Search (Index #)
Item number cells are located on the left side of the display or screen.
Use the [ ][ ] keys to search for a table item. Or, enter the item number then
press [ENTER] to jump to the item.
Edit Cell
Each cell value or text can be edited using the alphanumeric keypad.
Select the desired cell (red in base screen) with the cursor then enter relevant data.
Press [ENTER] or any arrow key to accept data.
12
Cell Option Window
When selected, some cells have an option window (see below) for selection of cell
options. Enter the index number of the desired option, or use the encoder wheel to
select the option then press the wheel to activate the option:
[DELETE] Key
Used to delete data of a selected cell. After the data is erased, some cells will be
empty while other cells will show the default data value (depending on type of cell).
[INSERT] Key
Works in different modes depending on the type of cell: Normally, it is used to edit
the order, or copy / increment data of the selected item from the previous selected
item. Useful in the fixtures patch and when editing effect steps, etc.
[OPTIONS] Key
Used to toggle between the table’s options. Also used to quickly select a single
item’s options, for example [CUE][1][OPTIONS].
[EXIT] Key
Closes the active table or menu. Remember to press [ENTER] to accept the last cell
data that was edited before closing the table.
Navigation
7.1.2. Using Option Windows
The console provides option lists or windows that are used for selectable commands. For example, pressing
[LOAD] will open the following window in which group load options can be selected:
To close options windows, make desired selection or press [C].
Numeric Selection
Select the desired option by entering the index number, for example,
[#][ENTER].
In certain cases, pressing [ENTER] is not necessary (the window will close
automatically when digit is entered).
Selection by Mouse (OLE)
In the OLE software, desired options can be selected with a mouse.
Selection by Encoder Wheel
Move the encoder wheel to select the desired option then press [Encoder] or
[ENTER] to accept.
Selection by original
function key ([LOAD] &
[SHAPE])
Only for [LOAD] and [SHAPE] option windows: Press the key again to select
the next option.
Options preceded by the “?” symbol in the LCD display are not available for selection (grayed out
in base monitor).
For [LOAD] or [SHAPE] windows: Options in yellow characters (in base monitor) are selected. Use
the encoder wheel (green cursor in base monitor) to pre-select other options.
For the [PARAM] window: Options in yellow characters (in base monitor) are special commands
for fixture ignition and control. Use the encoder wheel (green cursor in base monitor) to pre-select other
options.
7.2. Display / Screen Symbols and Colors
Source
Editing Channels
View in Base Monitor
Red (Light Red for active channels)
View in Base Display
Editing Channels in
Manual Mode
Submasters
Magenta
Ma
Yellow
Sm
Inhibited Submasters
Black
Level over inverted background.
X1 (Crossfader)
Cyan
X1
X2 (Crossfader)
Light Cyan
X2
e▪ (e■ for active channels)
13
Leviton Piccolo Scan
8. Operating Modes
The console offers four operating modes: Single, Double, Theatre and Manual.
8.1. Single Mode
All faders (C# & S# ) operate as individual channel faders. This mode is ideal for cue creation and
working with static scenes. Single mode is useful for editing because all channels are accessible using all
faders. In single mode, the crossfader is active but the submasters are not.
8.2. Double Mode
The upper and lower rows of console faders (C# & S# ) operate as identical channel faders. With
Double Mode, the console has two scenes and is ideal for improvised manual sequences. The crossfader
controls the scene change between upper and lower fader rows. Not all functions of the crossfader and
submasters are accessible in this mode.
8.3. Theatre Mode
The upper faders, C# operate as channel faders while the lower faders, S# , operate as submaster
faders. This mode is a conventional working mode for lighting consoles, where all features are available.
8.4. Manual Mode
Operates same as Theatre Mode except channel faders contribute to output levels on a HTP basis. Channel
editing is only accessible via the keypad.
8.5. Selecting Operating Modes
1. Press [1_B]MODE.
The [1_B]MODE option is located in the
first page of the softkeys. If necessary, press [F+]
to search for it.
2. Select the desired mode:
For Theatre mode, press [1_B]THEATRE. [CH.MD] LED will be off.
For Single mode, press [2_B]SINGLE. [CH.MD] LED will be on.
For Double mode, press [3_B]DOUBLE. [CH.MD] LED will be blinking.
For Manual mode, press [4_B]MANUAL. [CH.MD] LED will be off.
The operating mode can be changed at any time. No data loss will occur with a mode change,
only access to various functions will be changed.
14
Operating Modes
8.5.1. Mode Change and Channel Access
Model
Piccolo Scan 12/48
SINGLE Mode:
2 Banks
[1-24] & [25-48]
DOUBLE Mode:
THEATRE/MANUAL Mode:
4 Banks
4 Banks
[1-12], [13-24], [25-36] & [37-48]
Piccolo Scan 24/96
[1-48] & [49-96]
[1-24], [25-48], [49-72] & [73-96]
Press the [CH.MD] key to change channel banks. The active bank is marked with an LED (in example
below, the first bank is selected):
• Channel control in SINGLE mode. C (channel) LED’s (in middle of fader groups) are lit in green:
• Channel control in DOUBLE mode. C (channel) LED’s (in middle of fader groups) are lit in green:
• Channel control in THEATRE / MANUAL mode. C (channel) LED’s (in middle of the upper fader groups)
are lit in green. S (submaster) LED’s (in middle of the lower fader groups) are lit in red:
15
Leviton Piccolo Scan
9. Editing Channels
The console offers 48 or 96 control channels (depending on model) that are accessible from the channel
faders or numeric keypad.
9.1. Grand Master / Blackout Key
The grand master and its blackout key control the total scene output of all channel and fixture levels.
To obtain full channel levels, please make sure to:
1. Move the GM fader to its upper limit.
2. Deactivate the [BLK.OUT] key. LED will be off.
If necessary, edit the dimmer patch at this point. Dimmer patching should always be performed
before editing channels. See section 18 for more information on patching.
9.2. Using Channel Faders
A channel can be controlled from its associated fader. The fader is used to set the
channel’s level by moving it to any point in its travel (from 0% to 100%). A status LED
located above the fader is lit according to the level of the channel.
The placement of the channels in banks, keypad level editing and use of
channels in playbacks makes it possible that the channel output level and the physical
fader level may be different (see side graphic, channels C2 - C4). In this case, the
fader is “locked” and has no direct control over the level. To take back control, move
the fader to its current output level, it will then unlock (a “beep” is emitted).
its previous level.
Pressing the flash key above the fader will bump the channel level to 100% (FF) for as
long as the key is pressed. When the flash key is released, the channel will return to
9.3. Using the Keypad
The methods below can also be used for selecting and editing fixtures. See section 15.1.
The console has several keys dedicated for editing with the keypad:
[CHANNEL]: Used to select channels (a single channel or several channels).
[THRU]: Used to select a range of channels.
[@]: Used to enter a numeric level for selected channels.
Encoder : Used to edit a level (in continuous mode) for selected channels.
[EXCEPT]: Used to exclude channels from a selection.
[RST]: Used to deselect or “release” the channel selection.
9.3.1. Selecting Channels
Use any of the following commands to select channels:
[CHANNEL][#]: Selects a single channel.
[CHANNEL][#][CHANNEL][#]: Selects several channels.
[CHANNEL][#][THRU][#]: Selects a range of channels.
[CHANNEL][#][THRU][#][EXCEPT][#]: Selects a range, excluding a channel.
[CHANNEL][#][THRU][#][EXCEPT][#][EXCEPT][#]: Selects a range, excluding several channels.
[CHANNEL][#][THRU][#][EXCEPT][#][THRU][#]: Selects a range, excluding channels in range.
If “channel ” is displayed at the beginning the command line, it is not necessary to press the
[CHANNEL] key when selecting channels.
16
Editing Channels
9.3.2. Editing Channel Levels
Methods for editing levels of selected channels:
[CHANNEL][#][@][#][#]: Level is entered with 2 digits (00 to 99).
[CHANNEL][#][@][@]: Level at 100% (FF).
[CHANNEL][#] Encoder : Level adjusted in continuous mode.
Channel levels and parameter values are usually edited using a scale of 0-100 (%). However, the
console also provides “precision editing” using a scale of 0-255 (8 bit).
For example, to enter a level in precision mode, press [CHANNEL][1][@][OPTIONS][050] or
[CHANNEL][1][@][OPTIONS][50][ENTER]. (Precision mode requires the use of the [OPTIONS] key along
with a three-digit entry. For two digit entry, press [ENTER] at end of command.)
A value of 50 in a 0-255 (8 bit) scale equals 20 in a 0-100 scale (%). The display and monitor
always show values in %. For example, 0-255 scale values of 50, 51 & 52 are converted to 20 in a 0-100
scale.
9.3.3. De-Selecting (Releasing) Channels
A channel level at 0% is not selected. Use any of the below methods to de-select channels:
Channel by channel, moving each fader to its lowest position (0%).
For the last selected channels, press [@][0][0] (fades out immediately).
For the last selected channels, press [RST] (fades out as per default editor time, see section 21.4.1).
For all edited channels, press [RST][RST] (fades out as per default editor time, see section 21.4.1).
9.3.4. Other Editing Commands
The console has several other commands to aid in editing levels:
[ENTER]: Used to end a selection command. Can also be used as an “And” key, for example:
[CHANNEL][1][ENTER][3] (same result as [CHANNEL][1][CHANNEL][3]).
[C]: Clears command line entries and closes certain options windows.
[2.B] and [3.B] : Used to decrement or increment level values by 5% (default). Default value may be
changed in [MENU][30]:
Level
[.]: Used to repeat the last keyboard selected channels. For example, pressing [CHANNEL][.] will repeat the
last channel selected.
[@][.]: Repeats the last level entered. For example, pressing [CHANNEL][@][.] will set level to previous
channel’s level.
[THRU][THRU]: Used to select all channels over 0%. For example, pressing [CHANNEL][THRU][THRU] will
select all channels in the scene.
[NEXT]: Used to select the next channel after the last selected channel. For example, to select odd
channels 1 and 3, press: [CHANNEL][1][ENTER][NEXT][NEXT] [ENTER].
[SHAPE]: Used to edit dynamic levels of channels or fixture parameters. See section 16.
17
Leviton Piccolo Scan
9.4. Channel Editing Examples
See above channel sections before proceeding.
Edit channels 1, 2, 11 & 12 to 100% and channels 3 & 10 to 30%.
Make sure GM is at 100% and [BLK.OUT] key is off.
9.4.1. Using Channel Faders
1. Select the desired channel bank, press [CH.MD] if necessary.
2. Move the faders to desired levels.
9.4.2. Using the Keypad
1. Press [CHANNEL][1][THRU][2][ENTER][1][1][THRU][1][2][@][@].
2. Press [CHANNEL][3][CHANNEL][1][0][@][3][0].
Any combination of the above fader and keypad methods can be used.
Channels being edited appear in the monitor (in light
red & red) and display (marked as e■ & e▪) along with their
levels. To clear all levels, move down all faders to 00 or press [RST][RST].
9.4.3. Channel Editing Example in Theatre and Manual Modes
1. Edit a scene with the keypad and/or C# faders.
2. If desired, record the scene to a group or cue, or load to a submaster. See sections 10, 11 and 12.
3. Edit a new scene by starting from the previous scene or starting from zero ([RST][RST]).
9.4.4. Channel Editing Example in Single Mode
1. Edit a scene with the keypad and/or C# & S# faders.
2. If desired, record the scene to a group or cue. See sections 10 and 11.
3. Edit a new scene by starting from the previous scene or starting from zero ([RST][RST]).
9.4.5. Channel Editing Example in Double Mode
Double mode is used for executing manual sequences. Each new scene is prepared “in blind” (no output on
stage) with the lower faders, S# . The X1/X2 crossfader controls the fade of the new scene to the
current scene.
1. Move the S# faders or use the keypad to set a new scene (changing channel banks if necessary). This
entry in done “in blind”.
2. Start a manual crossfade between the new (blind) and current scenes by moving the X1 /X2 faders to
their opposite end positions. During the movement of the X1 /X2 faders, the blind scene from S#
fades from 0% to 100% while the current scene (from C# ) fades from 100% to 0%.
To start a timed crossfade, press the [GO] button. As the crossfade starts, the scene prepared in S# is
automatically recorded as the next cue and loaded in X2 . See section 13 for more information on the
crossfader.
3. Modification of any current scene channel can be made with the C#
crossfade.
faders before the new scene is
During the above process, the console automatically records cues with each new scene (from cue
800 - 999). Therefore, it is possible to execute the same show again by simply using the crossfader. If
desired, record the scene as a group (see section 10) or other cues (see section 11). You can also delete
cues 800 to 999 or copy them to a different range (see section 17.3).
18
Recording and Modifying Groups
10. Recording and Modifying Groups
A group is a combination of channel levels and fixture parameters that can be recalled for editing when
building cues. Groups can also be loaded for playback in submasters or effects, see section 12.1.
Groups cannot be used with the crossfader.
10.1. Recording Groups
To select channels (or fixtures) and record a group, please follow the example below.
1. Select and edit channels, use one of the following options:
a) With the keypad and encoder wheel: [CHANNEL][#][THRU][#] Encoder .
b) By moving desired channel faders C .
c) By selecting channels without levels (channels will be stored at FF): [CHANNEL][#][THRU][#].
2. Next, record the group as either:
a) The next group after the last group # recorded: [GRP][REC].
b) A specific group number: [GRP][#][REC].
c) The next group loaded to a submaster: [LOAD][S#] (only in THEATRE and MANUAL modes).
Groups stored directly using [LOAD] automatically start numbering from group # 500. Groups
recorded using [LOAD] and groups recorded using [GRP][REC] can be confusing sometimes. Therefore, the
default load group number (500) may be changed: press [Menu][30] then select Load Grp Num.
If “group ” is displayed at the beginning the command line, it is not necessary to press the
[GRP] key when selecting groups.
10.2. Adding Attributes (Names, Times, etc.) to Groups
In addition to fade and delay times, a name (text) can be added to each group (via the groups table by
pressing [GRP][GRP]. Other attributes such as timing modes may be selected in the groups table also.
Inside the groups table, the [OPTIONS] key is used to toggle between all groups general attributes and
the group list.
To exit the groups table, press [EXIT].
Each new group is stored with the default time set for groups (and cues). Default times can be
changed via [Menu][30] or inside the groups table [GRP][GRP] or cues table [CUE][CUE].
10.2.1. Using the Options Key
The [OPTIONS] key can be used to quickly edit or view individual attributes (such as fade times and text)
of a single group. For example, pressing [GRP][1][REC][OPTIONS] will open up an option line at the top of
the screen where attributes can be entered “on the fly”. To save or exit, press [OPTIONS] or [EXIT].
10.2.2. Timing Modes (Tm)
Times define the behavior of groups and cues in submasters and the crossfader. Each new group or cue
automatically adopts default times and timing modes (defaults can be edited in [Menu][30]). The console
has three timing modes:
• T1: All fixture parameters and channels fade with the programmed time or manual control. Only
parameters defined as NO FADE are excluded from fading. Shapes start directly with their size and rate.
• T2: All fixture parameters jump to their values suddenly, except for parameters defined as 20:Dimmer.
Shapes fade their size and rate.
• T3: Only parameters defined in library as 20:Dimmer, 0:X and 1:Y, and channels fade with times or
manually. Shapes fade their size and rate.
19
Leviton Piccolo Scan
10.3. Modifying Groups
Use the [MD.FY] key to edit previously recorded groups. Groups can be modified live or “in blind” (no
output on stage)
To modify a group in blind, press [RST][RST][2_B]BLIND [GRP][#][MD.FY].
To modify a previously recorded group:
1.
2.
3.
4.
Press [RST][RST] to clear previous channels.
Press [GRP][#][MD.FY].
Perform desired changes with channel faders or keypad.
Record changes by pressing [REC] or discard them by pressing [RST][RST].
To modify a previously recorded group loaded in a submaster:
1. Press [RST][RST] to clear previous channels.
2. Raise desired submaster to 100% (FF).
3. Perform desired changes with channel faders or keypad (if desired, outputs of other playbacks may be
added).
4. Press [MD.FY][S#].
20
Recording and Modifying Cues
11. Recording and Modifying Cues
A cue is a combination of channel levels and fixture parameters that can be recorded and used for playback
in submasters and the crossfader. For information on loading cues to submasters, see section 12.1. For
information on assigning cues to the crossfader, see section 13.1.
11.1. Recording Cues
To select channels (or fixtures) and record a cue, please follow the example below.
1. Select and edit channels using one of the following options:
a) With the keypad and encoder wheel: [CHANNEL][#][THRU][#] Encoder .
b) With the keypad: [CHANNEL][#][THRU][#][@][#][#].
c) By moving desired channel faders C .
2. Next, record the cue as either:
a) The next cue # after the last cue # stored: [REC].
b) A specific cue number: [CUE][#][REC].
If “cue ” is displayed at the beginning the command line, it is not necessary to press the [CUE]
key when selecting cues.
11.2. Adding Attributes (Names, Times, etc.) to Cues
In addition to fade and delay times, a name (text) may be added to each cue via the cues table by pressing
[CUE][CUE] (other cue attributes may be added here also, see Cue Attributes below).
Inside the cues table, the [OPTIONS] key can be used to toggle between all cues general attributes and
the cue list.
To exit the cues table, press [EXIT].
Pressing [CUE][CUE] while the cues table is open will toggle between the cue in X2 (if assigned)
and the first stored cue in the cue list.
Shown below are cue attribute default values for fade times, auto-time, crossfader time parameters and
the go-back function (default values can be changed in [Menu][30]).
Cue Attributes (see above graphic):
• Fade-times and auto-time for each cue.
• Wait-times (input and output) for each cue.
• Timing modes (Tm) (see section 11.2.2).
• Unconditional jump to a cue number (Jump) and the number of times jump will be executed (Lp).
• A flag to indicate if the cue contains channels (c), fixtures (f) and/or shapes ( )
• Mode or behavior (- or ~) in relation to active shapes (see section 16 for more information on shapes).
• Text (name) used to identify each cue. The text is also shown in the submaster and crossfader displays
(if cue is loaded or assigned).
• Command used to link a macro to a cue (see section 17.6 for more information on macros).
• A flag to indicate if the cue is programmed in an event with time code (TC) (see section 23.2).
21
Leviton Piccolo Scan
11.2.1. Using the Options Key
The [OPTIONS] key can be used to quickly edit individual attributes (such as fade times and text) of a
single cue. For example, pressing [CUE][1][REC][OPTIONS] will open up an option line at the top of the
screen where attributes can be entered “on the fly”. To save or exit, press [OPTIONS] or [EXIT].
11.2.2. Timing Modes (Tm)
Times define the behavior of groups and cues in submasters and the crossfader. Each new group or cue
automatically adopts default times and timing modes (defaults can be edited in [Menu][30]). The console
has three timing modes:
• T1: All fixture parameters and channels fade with the programmed time or manual control. Only
parameters defined as NO FADE are excluded from fading. Shapes start directly with their size and rate.
• T2: All fixture parameters jump to their values suddenly, except for parameters defined as 20:Dimmer.
Shapes fade their size and rate.
• T3: Only parameters defined in library as 20:Dimmer, 0:X and 1:Y, and channels fade with times or
manually. Shapes fade their size and rate.
11.3. Modifying Cues
Use the [MD.FY] key to edit previously recorded cues. Cues can be modified live or “in blind” (no output on
stage).
To modify a cue in blind, press [RST][RST][2_B]BLIND [CUE][#][MD.FY].
To modify a previously recorded cue:
1.
2.
3.
4.
Press [RST][RST] to clear previous channels.
Press [CUE][#][MD.FY].
Perform desired changes with channel faders or keypad.
Record changes by pressing [REC], or discard them by pressing [RST][RST].
To modify a previously recorded single cue loaded in a submaster:
1. Press [RST][RST] to clear previous channels.
2. Raise desired submaster to 100% (FF).
3. Perform desired changes with channel faders or keypad (if desired, outputs of other playbacks may be
added).
4. Press [MD.FY][S#].
To modify the current cue in the crossfader (cue in X1):
1. Make sure that X1 is at FF (otherwise command will not work).
2. Edit desired changes using the channels fader or keypad.
3. Press [MD.FY][MD.FY].
Cannot be done in blind.
22
Using Submasters
12. Using Submasters (Theatre & Manual Modes)
Submasters can be loaded with groups and cues for playback. Playback is executed manually with a
submaster fader or automatically by pressing the [S#] key located above the fader.
The output level of all submasters is controlled by the grandmaster GM and its blackout key.
Submaster output is also controlled by the SM and its blackout key (to change SM blackout key
configuration, press [Menu][31]).
Each submaster consists of:
A status LED that indicates:
Off - for submasters with no content.
On at 50% - for loaded but not active submasters.
On at 100% - for loaded and active submasters.
Blinking - for loaded and active timed submasters.
A submaster key ([S1], [S2], etc.) that can operate in GO, FLASH or SOLO modes (see section
12.2). This key is also used to load and delete submaster contents.
A fader (S1 , S2 , etc.) that is used to manually operate the submaster (with group or cue
loaded).
12.1. Loading Groups and Cues into Submasters
Use any of the following commands to load groups and cues into submasters:
To load a group # into a submaster:
Press [GRP][#][LOAD][S#].
To record a new group with the current scene and
load the group into a submaster:
Press [LOAD][S#].
To load a cue # into a submaster:
Press [CUE][#][LOAD][S#].
To load a group range into consecutive submasters:
Press [GRP][#][THRU][#][LOAD][S#].
To load a cue range into consecutive submasters:
Press [CUE][#][THRU][#][LOAD][LOAD][S#].
To load a group in Absolute or Inhibit modes:
1:Absolute or 2: Inhibit (see Normal, Absolute, or
Inhibit modes, see section 12.2.1 below.
Press [GRP][#][LOAD][LOAD][S#] or
[GRP][#][LOAD][LOAD][LOAD][S#].
To load a cue in Absolute or Inhibit modes:
4:Absolute or 5: Inhibit (see Normal, Absolute, or
Inhibit modes, see section 12.2.1 below.
Press [CUE][#][LOAD][LOAD][S#] or
[CUE][#][LOAD]]LOAD][LOAD][S#].
Load window options can also be selected by entering the index # or using the encoder.
In the below example, subs 01 to 03 are loaded with groups, while subs 04 to 10 are loaded with cues:
23
Leviton Piccolo Scan
12.1.1. Cue Lists in Submasters
A sequence of cues (cue list) can be executed in a submaster. The cues can be executed manually with the
submaster fader or automatically by pressing the [S#] key located above the fader.
For example, to load and execute a cue list in a submaster:
1. Press [CUE][#][THRU][#][LOAD][S#].
2. Move the S# fader from end to end, or press the [S#] key to automatically execute a crossfade.
To start the cue list with a blackout cue (cue 0): Press and hold [5.B]STEP then press [S#].
12.2. Submaster Playback
Press [FL.MT] to select the desired playback mode for submaster keys:
GO Mode
In GO mode, pressing [S#] starts a submaster automatically.
(LED Off)
For groups and cues:
Pressing [S#] starts an input fade from 0 to FF of a cue or group, using the input
time programmed (T ).
If the submaster is at FF: Pressing [S#] starts an output fade from FF to 0 of the cue
or group, using the output time programmed (T ).
If the submaster is not at 00 or FF: If the submaster has a time assigned pressing
[S#] will stop the current fade. If the submaster is stopped, pressing [S#] again will
restart the fade from the current level to FF.
Flash Mode
After an automatic fade, the physical fader level and the output level may be
different. To take manual control with the fader, it is necessary to move the fader up
to the output level. At this moment, the console emits a “beep” and the fader is again
controlling the output level manually.
In Flash mode, the [S#] keys behave as flash (bump) keys.
As long as a flash key is pressed, the submaster’s content level will be at FF (the
default level can be edited via [MENU 31]:Flash Level).
(LED On)
Solo Mode
(LED Blinking)
In Solo mode, when a solo-flash key is pressed, the submaster’s content level will be
at FF. At the same time, the output of all other active submasters is forced to 00.
It is also possible to influence the output of all other active submasters by
using the crossfader output. Select [MENU 31]:Solo Off X.
12.2.1. Normal, Absolute or Inhibit Modes
Submasters may operate in Normal, Absolute or Inhibit modes, depending on the group or cue that was
loaded into it:
Mode Options:
• A cue/group loaded in Normal mode: Each submaster adds its content to the scene independently.
• A cue/group loaded in Absolute mode: The submaster adds its content to the scene and forces the output
of all other submasters to zero. The result is similar to the solo-flash function but with fading.
• A cue/group loaded in Inhibit mode: The submaster does not add its content to the scene but will remove
it if content is active from any other submaster or from the crossfader.
24
Using Submasters
12.3. Deleting Submasters
To empty a single submaster, press [DELETE][S#]. The submaster’s LED turned will turn off.
To empty all submasters at the same time, press [DELETE][FL.MT].
12.4. Rate and Level Submasters
A submaster’s rate and/or level may be controlled by another submaster that has been configured as a rate
or level submaster.
For example, to configure a rate or level submaster:
1. Press [MDFY][FLMT][9] for rate or [10] for level.
2. Select the rate or level control submaster (X).
3. Select the submaster range (01-12) that the rate or level submaster will control.
12.5. Effects Submasters
The console has a maximum of 999 effects (chases) that can be loaded to submasters. An effect is ordered
in steps with each step programmed with channels, groups or cues (groups or cues must be pre-recorded).
12.5.1. Programming Effects
To program an effect, follow below:
1.
2.
3.
4.
5.
6.
7.
Press [EFFECT][#][REC] or [EFFECT][REC] (for next effect).
Press [#][ENTER] (# is the effect type: 0:CHANNELS, 1:GROUPS, 2:CUES).
Press [OPTIONS] to edit the effect’s steps.
To edit steps, use the keypad and arrow keys: [#][ ].
To insert a step or add the next step, press [#][INSERT] or [INSERT].
To delete steps, press [DELETE].
Press [OPTIONS] to edit the effect’s general options (see below).
Effects General Options:
Text: Name of effect.
T : Fade time of effect (used for automatic start and stop).
StepT: Time of how long each step is active.
Dir (>, <, or ><): Direction of effect.
Attributes: Mode of execution (hard, soft, etc.) and pattern (normal, invert, build, random, etc.).
Cue: A cue can be assigned as static effect part (cue will be activated/deactivated with the effect).
EffecT: Total effect time (automatically calculated by the system).
Steps: Total number of steps (automatically calculated by the system).
•
•
•
•
•
•
•
•
25
Leviton Piccolo Scan
12.5.2. Loading Effects
Before executing an effect, the effect must be loaded to a submaster.
Press [EFFECT][#][LOAD][S#] to load effect with speed control.
Press [EFFECT][#][LOAD][LOAD][S#] to load effect with level control.
12.5.3. Executing Effects
Press [S#] to start or stop an effect in automatic mode.
Press [#][S#] to set number of times effect will run before stopping automatically.
Press and hold [5.B]STEP and press [S#] to execute the effect in manual mode (step by step).
12.5.4. Modifying Effects
To modify the contents of an effect, press [EFFECT][#][MDFY].
To modify the general options of an effect (attributes, times, etc.) press [EFFECT][MDFY] or
[EFFECT][#][OPTIONS].
For additional submaster modifications, press [MD.FY][FL.MT]. See section 12.4 for more
information.
26
Using the CrossFader
13. Using the CrossFader (Theatre, Manual & Simple Modes)
The X1/X2 crossfader is used to execute cues in sequential order. Cues can be played back manually by
moving the X1/X2 crossfader, or automatically by pressing the [GO] button. When played back, the next
cue (X2) crossfades to the current cue (X1).
To configure the crossfader mode (dipless, split and auto-times), press [ASSIGN].
13.1. Assigning Cues to the CrossFader
In order to playback cues with the crossfader, cues must first be loaded or “assigned” to the
crossfader using one of the following methods:
Assign a closed cue list (from/to): [CUE][#][THRU][#][ASSIGN].
Assign an open cue list (from cue # to last recorded cue): [CUE][#][ASSIGN].
Assign all recorded cues: [CUE][ASSIGN].
To start a crossfade automatically, press [ASSIGN] twice.
In the below example, cues 01 to 04 are assigned to the crossfader:
13.1.1. Jump and Loop (Lp) Functions
The Jump function allows for a cue list to be played back repetitively in the crossfader (or submasters).
It can also be used to jump ahead in a cue list.
The Loop (Lp) function sets how many times the Jump will be executed. If no Lp value is set, the jump will
execute an infinite number of times.
To add jumps and/or loops to a cue list, press [CUE][CUE] or [CUE][#][OPTIONS].
27
Leviton Piccolo Scan
13.2. CrossFader Playback
Cues can be played back manually by moving the X1/X2 faders or automatically by pressing the [GO]
button.
Crossfader Playback Methods:
X1/X2
Faders
The X1/X2 faders have inverted scales and are used for manual crossfades. Each new crossfade
begins when the two faders are at the same end and finishes when the faders reach the opposite
end.
X1 controls the current cue (fading it from FF to 00) and X2 controls the next cue (fading it from 00
to FF). Once the current crossfade is executed, the next crossfade is ready to start (the next new
cue in the list is assigned to X2). The X1/X2 faders can be moved at the same time for
homogeneous crossfades.
Arrow-shaped LED’s located above the faders show the direction that the faders must be moved to
complete a manual crossfade.
With a manual crossfade, programmed times are not computed.
[GO]
Button
Pressing the [GO] button starts the next crossfade automatically using the programmed times of
the cue in X2 (next cue).
It is possible to perform multiple [GO] commands: If [GO] is pressed when a crossfade in progress,
the current crossfade will finish and the next crossfade will start.
[PS.BACK]
Button
When a crossfade is in progress, pressing [PS.BACK] will pause the crossfade.
Pressing [GO] when a crossfade is paused, will start it again.
Pressing [PS.BACK] when a crossfade is paused will restore it to the previous cue (reverse
direction).
13.2.1. Modify Fade Rate
To modify the fade rate of a crossfade, press the [1_B]RATE softkey (LED on) and use the encoder
wheel to adjust the rate.
13.2.2. Modify Current Cue
To modify the current cue in the crossfader (cue in X1):
1. Make sure that X1 is at FF (otherwise command will not work).
2. Edit desired changes using the channels fader or keyboard.
3. Press [MD.FY][MD.FY].
13.3. Deleting Cues from the CrossFader
To empty all cues from the crossfader, press [DELETE][ASSIGN].
28
Using Pages
14. Using Pages (Theatre & Manual Modes)
A page can record the content of submasters and the crossfader. For example, complete songs or acts can
be recorded on different pages. The pages can then be loaded as needed during the show.
• Before recording a page, load the page with submasters (groups, cues, cue lists or effects) and (if
desired) assign cues to the crossfader.
14.1. Recording Pages
To record a page, press [PAGE][#][REC] or [PAGE][REC] (for next page).
To name a page, press [PAGE][PAGE]. Alternatively, you can press the [OPTIONS] key immediately after
recording, for example: [PAGE][#][REC][OPTIONS].
14.2. Loading Pages
A recorded page can be loaded at any time in either “normal” or “forced” modes:
14.2.1. Normal Mode
In normal mode, loading pages does not delete the contents of submasters recorded as empty.
To load a page only to submasters, press [PAGE][#][LOAD].
To load a page only to the crossfader, press [PAGE][#][ASSIGN].
To load a page to the submasters and crossfader, press [PAGE][#][ENTER].
14.2.2. Forced Mode
In forced mode, loading pages deletes submasters recorded as empty submasters.
To load a page only to submasters, press [PAGE][#][LOAD][LOAD].
To load a page only to the crossfader, press [PAGE][#][ASSIGN][ASSIGN].
To load a page to the submasters and crossfader, press [PAGE][#][ENTER][ENTER].
Loading a page will not cause a jump in the light level on stage. If, at the moment of the loading,
there are some active submasters, the new page content will only be output when the submasters are
brought to 00 and then re-executed.
14.3. Deleting Pages
To delete a single recorded page, press [PAGE][#][DELETE].
To delete all recorded pages, press [PAGE][DELETE].
29
Leviton Piccolo Scan
15. Using Fixtures
Located on the right side of the console is the fixture editing and programming section. The section
includes dedicated fixture function keys, the banks keys, a LCD display for fixture data, three encoders and
one trackball.
The console can control 128 fixtures (moving lights, scrollers, etc.) with a maximum of 32 parameters per
fixture. Up to 256 total fixture parameters are available.
Once fixtures have been selected and their parameter values edited, the values can be recorded to groups
and cues using the same methods as with channels, see section 10 and section 11, respectively.
The first step to control fixtures is to program the fixture patch, see section 18.2. Once the patch
is programmed, the fixtures will be accessible from the keypad.
15.1. Selecting Fixtures
To select a fixture, press [FIXTURE] then use the same selection commands as explained for channels
(see section 9.3). For example, pressing [FIXTURE][#][THRU][#] will select a range of fixtures.
In the example below, Fixtures 1 and 2 have been selected and the Color1 parameter is being adjusted:
15.2. Editing Fixture Parameters
Once fixtures have been selected there are various methods for selecting and editing fixture parameters:
To select parameters of selected fixtures, press the [ ][ ] keys.
The selected parameter is indicated with a “*” symbol in the
displays.
Use the main or dedicated Encoder wheels to edit selected
parameters. The [ ][ ] keys can also be used.
When using the dedicated encoders, press the [ ][ ] keys to select
parameters then press the encoder wheel to edit the parameter.
It is also possible to access the desired parameter type (category) by
pressing one of the six category keys:[DIM], [POS], [COL], [GOB],
[BEAM] & [XTRA]. See Palettes and Libraries sections also.
15.2.1. Trackball Functions
Use the Trackball to edit Pan and Tilt parameters of selected fixtures.
The Trackball has six associated function keys ([TB], [FLIP],
[FANOUT], [FINE], [MOUSE] and [CLICK]) that are explained below.
30
Using Fixtures
[TB]: Press to select one of three modes:
Normal (LED off): Trackball controls Pan and Tilt parameters simultaneously.
Deactivate (LED on): Trackball is inactive.
Orthogonal (LED blinking): Trackball controls Pan and Tilt parameters independently (the axis with
largest movement will be the axis edited).
[FLIP]: Press to change Pan and Tilt values (inverse direction) while maintaining the same focus point on
stage, for example to ensure that a moving head fixture takes the most direct route during a change of
position.
[FANOUT]: Press for quick X/Y parameter fanning of a group of fixtures. Three modes are available:
Normal (LED off): All X/Y values of selected fixtures will increment at same ratio.
Linear (LED on): X/Y values of selected fixtures will increment in a linear fashion from the last fixture (edit
base X/Y values before fanning) to the first fixture (X/Y values remain unchanged).
“V” (LED blinking): X/Y values of selected fixtures will increment in a linear fashion from the center fixture
(note: edit base X/Y values before fanning) to the first and last fixtures (X/Y values remain unchanged).
[FINE]: Press to change sensitivity of the Trackball and Encoder Wheels:
Normal (LED off): Regular sensitivity.
Precision (LED on): Fine sensitivity.
Quick (LED blinking): Coarse sensitivity.
[MOUSE] & [CLICK]: The Trackball can also be used as a mouse. Press [MOUSE] to activate mode and
[CLICK] to select item. This mode is very useful when editing tables and in menu screens. Press [TB] to
return to Trackball mode.
15.3. Fixture Commands
15.3.1. [PARAM]
This key is used to choose a parameter of selected fixtures from the keyboard, including special control
commands such as Lamp On, Lamp Off and Reset. For example:
To edit a parameter value, press [FIXTURE][#][PARAM][#][@][#].
To execute a special control command, press [FIXTURE][#][PARAM][#][#].
To edit a parameter value using a scale of 0-255 (8 bit), press
[FIXTURE][#][PARAM][#][@][OPTIONS][#].
The command [@][OPTIONS] allows for “precision editing” using a scale of
0-255 (8 bit). Note that the display and monitor will always show values in a 0-100 scale (%). Precision
mode requires the use of the [OPTIONS] key along with a three-digit entry. For two digit entry, press
[ENTER] at end of command. For example, to enter a level in precision mode, press
[FIXTURE][1][@][OPTIONS][050] or [FIXTURE][1][@][OPTIONS][50][ENTER].
31
Leviton Piccolo Scan
15.3.2. [HOME]
This key is used to set parameters of selected fixtures to their home values. For example:
To set all parameters of selected fixtures to their home values, press [FIXTURE][#][THRU][#][HOME].
To set an individual parameter of selected fixtures to its home value, press
[FIXTURE][#][THRU][#] [PARAM][#][HOME].
Default home values can be viewed via the fixture patch (Hom column). See section 18.2 for more
information on the fixture patch.
15.3.3. [PALs] Palettes
Palettes are pre-programmed parameter values that are used for quick programming of same or different
type fixtures. Each palette belongs to its category type, for example, the color red is part of the Color [COL]
category. Palettes can be applied to any type of fixture at the same time, for example, when applying a red
palette for a MAC 500 and Studio Spot 575, both fixtures will output the same color even though their
individual color parameter values are different (of course, different type fixtures must be capable of
outputting the same color in the first place).
Palette categories include Dimmer, Position, Color, Gobo, Beam and X-tra. Different type categories can be
applied at the same time, for example [FIXTURE][1][DIM][B_8]80%[COL][B_3]Yellow-[GOB][B_1]Gobo1.
Palettes cannot be modified, deleted or referenced.
Applying Palettes
To apply a library, select fixtures and follow below.
1. Press [PALs] (LED is lit).
2. Select a parameter category, for example, [COL].
3. Press desired bank key or use the keyboard. For example, [COL] {press bank key} or [COL][@](opens a
red options window)[#][ENTER].
See also [EDIT+] and [BANKS] sections below.
15.3.4. [LIBs] Libraries
Libraries are user-programmed parameter values that are used for quick programming of same or different
type fixtures. Each library belongs to its category type, for example, the color blue is part of the Color
[COL] category. Libraries can be applied to any type of fixture at the same time, for example, when
applying a blue library for a MAC 500 and Studio Spot 575 both fixtures will output the same color even
though their individual color parameter values are different (of course, different type fixtures must be
capable of outputting the same color in the first place).
Each cue or group that is edited using a library maintains the library value as a reference. Therefore,
whenever a library is modified (updated), the cues or groups that it is used in will update also.
Ninety-nine libraries are available for storage in each category. Categories include Dimmer, Position, Color,
Gobo, Beam and X-tra (Prism, Speed, etc.). Different type categories can be applied at the same time, for
example, [FIXTURE][2][DIM][B_1]50%[COL][B_3]Act1[GOB][B_2]Trees.
Applying Libraries
To use libraries they must first be recorded (see below). There are two library types, “Generic” and
“Particular”.
DIM, COL, GOB, BEAM & XTRA are Generic libraries. These libraries are recorded by selecting and editing
the first fixture of each cache type that will be included in the library. The recorded library values can then
be extrapolated to any other fixture of the same cache type.
32
Using Fixtures
POS is a Particular or Position library. These libraries can include position parameter values of one, several,
or all fixtures. They are recorded by selecting and editing the position of each fixture that will be included
in the library. Position data is not extrapolated from one fixture to another.
To apply a library, select fixtures and follow below.
1. Press [LIBs] (LED is lit).
2. Select a parameter category, for example, [COL].
3. Press desired bank key or use the keyboard. For example, [COL] {press bank key} or [COL][@](opens a
red options window)[#][ENTER].
Parameters that have a library applied are indicated in the Base Screen with a blue
field next to their values (also indicated by an “L” next to parameter values in the Base
Display).
See also [EDIT+] and [BANKS] sections below.
Recording Libraries
To record a generic library, edit the parameters of the first fixture of each type desired.
The steps for recording Dimmer, Color, Gobo, Beam, and X-tra libraries are the same, in the
example below [COL] is used.
1. Press [LIBs] (LED is lit).
2. Press [COL][#][REC] to record the color library number.
3. Press [OPTIONS] to name the library.
4. Note that the LED of the banks key corresponding to the new recorded library is lit to
indicate that the library is accessible.
To record a position (particular) library, edit the position parameters of all fixtures that you want
included in the library.
1. Press [LIBs] (LED is lit).
2. Press [POS][#][REC] to record the position library number.
3. Press [OPTIONS] to name the library.
4. Note that the LED of the banks key corresponding to the new recorded library is lit to
indicate that the library is accessible.
Modifying Library Values
used.
1.
2.
3.
4.
5.
Cue and group data will be updated with the new library values, in the example below [POS] is
Press [RST][RST] to empty the editor.
Press [LIBs] (LED is lit).
Press [POS][#][MDFY].
Edit desired values (it is possible to include new fixtures also).
Press [REC] to store the modifications.
Modifying Library Names
In the example below [POS] is used.
1.
2.
3.
4.
Press [LIBs] (LED is lit).
Press [POS][MDFY].
Edit name of any stored library in parameter category.
Press [EXIT] to return to the main screen.
33
Leviton Piccolo Scan
Examining Libraries
Useful to see what fixtures and values are in each library. In the example below [POS] is used.
1. Press [LIBs] (LED is lit).
2. Press [POS][#][EXAM].
3. Press [EXIT] to return to the main screen.
To examine all libraries of one category, press [POS][EXAM].
Deleting Libraries
In the example below [POS] is used.
1. Press [LIBs] (LED is lit).
2. Press [POS][#][DELETE] (or [POS][#][THRU][#][DELETE] to delete a range).
3. Press [DELETE] again to confirm.
To delete all libraries of one category, press:[POS][DELETE][DELETE].
15.3.5. [EDIT+]
This key selects a special editing mode that allows for palettes and libraries to be selected by category (i.e.
Dimmer, Position, Color, Gobo, Beam, X-tra).
For example, to choose palettes or libraries by category for selected fixture types:
1. Press [PALs] or [LIBs] (LED is lit).
2. Press the [EDIT+] key.
3. Select desired category with [ ][ ] keys. Active category is indicated with a “*” symbol.
4. Select palettes or libraries using the Encoder Wheels, Keyboard, or Banks Keys.
For quick programming, select fixtures by group from the Banks Keys and fixture parameters via
the encoder wheels. See [BANKS] section below.
34
Using Fixtures
15.3.6. [BANKS], [BNK-] & [BNK+]
The console has 10 programmable Banks keys, located to the left of the Auxiliary LCD Display, that can be
used for quick access to Macros, Groups, Palettes and Libraries. The keys can be configured to operate in
“Auto” or “Fixed” modes.
When in Auto mode, the Banks will change with whatever category (Macro, Group, Color, Gobo, etc.) that
is being used.
“Auto” will be displayed at the top of the Auxiliary LCD Display while in Automatic mode.
When in Fixed mode, the Banks will always display the selected category (Macro, Group, Color,
Gobo, etc.).
To change mode/category, press the [BANKS] key and select from the Options Window.
To page the Banks’ contents, press the [BNK-] & [BNK+] keys.
If palettes are being used, the letter “P” will displayed at the top of the Auxiliary
LCD Display.
15.3.7. [WHEEL]
Pressing the [WHEEL] key allows you to:
Search for a parameter value with the encoder in a temporary “blind” mode and then pass it to “live”
mode once the Wheel key is released (hold down Wheel key during selection). For example, to select a
new color: [FIXTURE][1][WHEEL] ENCODER [WHEEL] .
Copy the parameter value of the first fixture of the selection to the rest of the fixtures in the same
selection. For example, [FIXTURE][1][THRU][5]ENCODER [WHEEL][WHEEL].
15.4. [MENU][30]:Virtual dimmer
This option allows you to use a “virtual dimmer” (only for editing) for fixtures with color mixing that have
no actual dimmer. For example, with LED RGB fixtures, all RGB levels can be set at the same time using the
virtual control (useful for adjusting the total saturation of a color).
If the Virtual dm option is enabled in [MENU][30], the console shows the Virtual control
automatically for color mixing fixtures without dimmers. Remember, Virtual is not an actual parameter, it is
only a special control used for editing.
35
Leviton Piccolo Scan
16. Using Shapes
16.1. Shape Basics
Shapes are dynamic values for use with channels and fixtures. Using the shape engine greatly decreases
programming time for simple or complex effects (for example, pan/tilt movement or CYM color changes).
Shapes are stored in groups or cues and are executed when selecting the groups or cues.
16.1.1. Editing and Recording a New Shape
1. Select channels and/or fixtures (using keypad).
2. Press [Shape].
3. Press [0] to select new shape (0: New).
4. Select a shape palette from the shape list.
5. If necessary (for Free type), select a fixture parameter to apply the shape to directly.
6. To adjust shape parameters after selecting a shape, press [Shape][2] or press [OPTIONS]. Any
parameter can now be adjusted using the keyboard or encoder wheel (palette type, effect (offset), size,
speed, etc.).
7. Record the active shape to a cue or group (or load group directly to a submaster).
Shape Parameters:
Palette
Type
Effect /Nm
Size
Rate
Game# /
Nm / Mod/Par
Pattern applied in the shape during editing.
Parameters group selected in the shape editing process.
Offset values that are applied among the items. Valid values are from 0 (all items doing the
shape at the same time), up to 10 (each item doing the shape, one by one).
Nm allows setting an item # different than the selection.
Size of the shape (amplitude).
This parameter has two parts. A: the absolute value, and B: the reference point to apply the
variations:
Variations from centre. Example: 50 over 50, to obtain values from 25-75.
Variations from up. Example: 50 over 50, to obtain values from 0-50.
Variations from down. Example: 50 over 50, to obtain values from 50-100.
Execution speed of the shape, from 0 (stop) to 99 (maximum speed).
The (+ or -) sign indicates direction of the shape.
Game is used to adjust advanced properties of the shape.
Nm is used to define the number of items, or cycles, for the associated Game. For items, if
Nm=0 (default value) the associated Game is applied over all items of the selection.
Game types:
SizeItem - Used to vary the shape size per item according to curves.
RateItem - Used to vary the shape rate per item according to curves.
SizeCy - Used to vary the shape size per cycle according to curves.
RateCy - Used to vary the shape rate per cycle according to curves.
Form - Used to change the relative size in palettes for complex types such as position or
mixed colors. For example, it is possible to make an oval from an applied circle or adjust the
“gain” of a fixed color in a CMY mix.
16.2. Other Shape Options
16.2.1. Items Selection Order
Shapes are applied over a selection of channels and/or fixtures that are ordered numerically. To change the
order, press [Shape][2][OPTIONS][1] and select desired items (channels and/or fixtures).
16.2.2. Add Shape
This option is used to add an additional shape to a selection of channels and/or fixtures: Press [Shape][1]
and follow the same steps as when selecting and adjusting a new shape (see above).
36
Using Shapes
16.2.3. Using Shapes in Playbacks
To access the list of shapes during playback execution and perform some basic functions for each playback
(Stop, Play, Pause, Call to Editor): Press [Shape][3].
16.2.4. Examine Shapes List
To view the pre-programmed shapes list, press [Shape][4].
16.2.5. Examine Cues and Groups containing Shapes
To examine shape information recorded in a group or cue:
1. Select the desired group or cue, then press [EXAM].
2. Press [Shape][5] to view the shapes stored in the group or cue.
3. Press [Shape][6] to view the items that have a shape applied.
16.3. Shape Base Configuration
16.3.1. All Groups and Cues
The behavior of groups and cues in relation to active shapes can be set via [Menu][31]:Shape Base:
• Shape Base ~(Free): Each new group or cue activated can change the shape base value and the shape
will follow its course with the new base values. In general, if you are storing colors, positions, shapes,
etc. in several submasters, and then you combine them, use this option.
• Shape Base -(Fixed): Each new group or cue activated can change the shape base value and will also
stop the shape of any shape parameter over which we take control. In general, if you are storing
complete scenes, with dimmers and parameters in the same submaster, use this option.
Follow below to understand the difference between Shape Base ~(Free) and -(Fixed) behaviors:
1. In submaster S1, load a group of several channels at 10% with a flash shape and some homed fixtures
with a circle shape.
2. In submaster S2, load a group of the same channels at 50% without a shape, and the same fixtures in a
new position, also without a shape. Observe the differences when activating and deactivating the S1 and
S2 submasters in different sequences:
Submasters
Start from blackout
Activate S1
Result ~ (Free)
Blackout scene
Channels at 10% + flash and
fixtures at Home + circle
Activate S2
Channels at 50% + flash and
fixtures in new position +
circle.
Result - (Fixed)
Blackout scene
Channels at 10% + flash and
fixtures at Home + circle
Channels at 50%, without flash, and fixtures
in new static position (without shape) scene is only from the last group.
Scene is mixture of both groups.
37
Leviton Piccolo Scan
16.3.2. Individual Groups and Cues
Shape Base ~(Free) and -(Fixed) behaviors can be defined for individual groups and cues:
For groups, press [GROUP][GROUP] or [GROUP][#][OPTIONS], then move to the last cell of the group
and select desired behavior:
For cues, press [CUE][CUE] or [CUE][#][OPTIONS], then move to the last cell of the cue and select
desired behavior:
38
Functions
17. Functions
17.1. Exam and Modify Functions
The Exam and Modify Functions allow any item (cues, groups, etc.) to be viewed or edited:
Exam Commands
Channel:
[CHANNEL][#][EXAM]
Fixture:
[FIXTURE][#][EXAM]
Group:
[GRP][#][EXAM] or
[GRP][EXAM]
Cue:
[CUE][#][EXAM] or
[CUE][EXAM]
Effect:
[EFFECT][#][EXAM] or
[EFFECT][EXAM]
Page :
[PAGE][#][EXAM] or
[PAGE][EXAM]
Macro:
[3_B]Macro [#][EXAM] or
[3_B]Macro [EXAM]
Submaster:
[EXAM][S#] or
[EXAM][FL.MT]
Modify Commands
Group:
[GRP][#][MD.FY][REC] or
[GRP][GRP]
Cue:
[CUE][#][MD.FY][REC] or
[CUE][CUE]
Effect:
[EFFECT][#][MD.FY] or
[EFFECT][EFFECT]
Page :
[PAGE][#][MD.FY] or
[PAGE][PAGE]
Macro:
[3_B]Macro [#][MD.FY] or
[3_B]Macro [MD.FY]
Submaster:
[MD.FY][S#] or
[MD.FY][FL.MT]
Crossfader:
[MD.FY][MD.FY]
Result
Opens a table containing cues and groups where channel is stored and its
level in each group or cue.
Opens a table containing cues and groups where fixture is stored and its
parameters and levels in each group or cue.
Examines the contents of a group number or the general group options in
the groups list.
Examines the contents of a cue # or the general cue options in the cues list.
Examines the contents of an effect # or the general effect options in the
effects list.
Examines the contents of a page # or the general page options in the page
list.
Examines the contents of a macro # or the general macro options in the
macro list.
Examines the contents of a submaster # or the items loaded in all the
submasters.
Result
The first command opens a group # for editing.
The second command opens the groups list to edit the general group options
(text).
The first command opens a cue # for editing.
The second command opens the cues list to edit the general cue options
(times, jumps, text and commands).
The first command opens an effect # for editing.
The second command opens the effects list to edit the general effect options
(text, type, direction, attributes, etc.).
The first command opens a page # for editing.
The second command opens the pages list to edit the general page options
(text).
The first command opens a macro # for editing.
The second command opens the macros list to edit the general macro
options (text).
The first command modifies the content of the group or cue loaded in the
selected submaster. If the submaster is loaded with an effect, it opens the
effect for editing. (Command does not work for submasters containing a
cues list.)
The second command allows editing of the loaded item for each submaster.
It is also how to set a submaster as a general level control (Level) or as a
general rate control (Rate).
Edits the cue in X1 (the crossfader has to be at either end so that the cue is
at FF).
The [OPTIONS] key can be used to quickly modify some item’s options, for example: [CUE][#]
[OPTIONS].
Use the arrow keys to view additional items. To close exam and modify functions, press [EXIT].
39
Leviton Piccolo Scan
17.2. Test and Next Functions
These functions are used for testing and selecting various items (channels, fixtures, groups and cues).
17.2.1. [Test]
[CHANNEL][#][TEST]: Used to test individual channels. The test channel will fade in and any active
channels (from channel faders or keypad entry) will be forced to zero. With each new [TEST], the next
channel (in numerical order) is verified. This function uses the default fade time set in [Menu][30].
[FIXTURE][#][TEST]: Used to test fixture dimmers (same functions as channel test).
[GRP][#][TEST]: Used to test groups (same functions as channel test).
[CUE][#][TEST]: Used to test cues (same functions as channel test).
17.2.2. [Next]
The [NEXT] function helps locate the next desired item (channel, fixture, group, cue, effect, etc.). Next
commands for each item are similar. For example, when using channels:
[CHANNEL][#][@][@]
1. Selects of the initial
channel # at FF (level
editing is optional).
[NEXT]
2. Each time that [NEXT] is pressed,
the next item (#+1, #+2, etc.)
appears in the command line.
[ENTER]
3. When [ENTER] is pressed, the
channels in the command line are
selected for editing.
For example:
Select channels 35, 37 & 39 and set their levels at FF.
1. Press [CHANNEL][3][5][ENTER] (selects channel 35).
2. Press [NEXT][NEXT][ENTER] (selects channel 37).
3. Press [NEXT][NEXT][ENTER] (selects channel 39).
4. Press [@][@] (sets all selected channels to FF).
17.3. Copy and Exchange Functions
The [4_B]COPY function allows you to copy or exchange groups, cues, effects, macros or pages,
individually or in ranges.
For example:
Copy cue 1 to cue 8: Press [CUE][1][4_B]COPY [8][ENTER].
Copy cues 800-999 to cues 100-299: Press [CUE][8][0][0][THRU][9][9][9][4_B]COPY [1][0][0][ENTER].
Exchange cue 1 with cue 8: Press [CUE][1][4_B]COPY [4_B]COPY [8][ENTER].
Channels and fixture values being edited can also be copied or exchanged, for example to copy
values from fixture 1 to fixture 2: Press [FIXTURE][1][4_B]COPY [2][ENTER].
17.4. Delete Functions
17.4.1. Deleting Submaster and Crossfader Contents
Deleting the contents of a submaster or crossfader will not delete cues or groups from the data memory,
only what is loaded in the submaster or crossfader will be deleted.
For example:
To delete the contents of an individual submaster: Press [DELETE][S#].
To delete the contents of all submasters: Press [DELETE][FL.MT].
To delete the contents of the crossfader: Press [DELETE][ASSIGN].
40
Functions
17.4.2. Deleting Cues and Groups
To delete a cue or a group from the data memory: Press [CUE][#][DELETE] or [GRP][#][DELETE].
To delete a range of cues or groups from the data memory: Press [CUE][#][THRU][#][DELETE] or
[GRP][#][THRU][#][DELETE].
To delete all cues or groups from the data memory: Press [CUE][DELETE] or [GRP][DELETE].
17.4.3. Deleting Effects, Pages and Macros
Effects, pages and macros use the same delete commands as cues and groups. For example,
To delete an individual effect from the data memory: Press [EFFECT][#][DELETE].
To delete a range of effects from the data memory: Press [EFFECT][#][THRU][#][DELETE].
To delete all the stored effects from the data memory: Press [EFFECT][DELETE].
17.5. Learn Time Functions
The learn time function allows the console to automatically learn times from manual execution of the
crossfader (cues in X1/X2). The step time of an effect can also be learned. See following examples.
To learn the step time of an effect:
1. Load the effect into a submaster.
2. Press [4_B]LN-TM (LED On).
3. Press the submaster two times to establish desired step time.
4. The effect automatically adopts the new step time ([4_B]LN-TM LED Off).
To learn auto-times ( ) for cues in X2:
1. Assign desired cues to the crossfader.
2. Press [4_B]LN-TM (LED On).
3. Press [GO].
4. Wait for the current crossfade to end. When crossfade ends, the auto-time begins to count.
5. Press [GO] again at the desired time to capture the auto-time.
6. Repeat the process for the next cue (press [GO]) as many times as desired.
7. Press [4_B]LN-TM to end the learning process (LED Off).
To learn fade-times and wait-times (
) for cues in X2:
1. Assign desired cues to the crossfader.
2. Press [4_B]LN-TM (LED On).
3. Manually move faders X1/X2 from one extreme to the other to perform the cross-fade. During this
process, the cue times are captured with linear calculation.
4. Repeat the process for the next cue (moving faders) as many times as desired.
5. Press [4_B]LN-TM to end the learning process (LED Off).
To edit a fade or wait time in the cues table (without changing the start moment of the next cross-fade):
1. Open the cues table pressing [CUE][CUE]
2. Press [4_B]LN-TM (LED On).
). Note that the absolute auto-time ( ) is changed to
3. Edit the desired time (
compensate for the start moment of the next cross-fade.
4. Press [4_B]LN-TM to end the learning process (LED Off).
41
Leviton Piccolo Scan
17.6. Macro Functions
Macros can be used to automate keystroke processes while in playback mode and repeat keystroke entries
while editing.
17.6.1. Recording Macros
To record a macro:
1. Press [3_B]MACRO [#] (if a # is not entered, macro will be recorded at next available number).
2. Press [REC]. ([3_B]MACRO LED begins to blink).
3. Press desired keys.
4. Press [3_B]MACRO [#] to end recording.
For example, to record a macro that loads an effect into a submaster:
Press [3_B]MACRO [#][REC][EFFECT][#][LOAD][S#][3_B]MACRO (to load and start the effect
immediately, press [S#] twice).
The macro table will open automatically in order to name the macro. To name the macro at later time,
press [3_B]MACRO [MD.FY] or [3_B]MACRO [#][OPTIONS].
17.6.2. Modifying Macros
To modify a macro:
1. Press [3_B]MACRO [#][MD.FY].
2. Select keystrokes to modify.
3. Press [EXIT] to save.
Sometimes it is quicker to simply delete the macro and create a new one.
17.6.3. Deleting Macros
To delete an individual macro from the data memory: Press [3_B]MACRO [#][DELETE].
To delete a range of macros from the data memory: Press [3_B]MACRO [#][THRU][#][DELETE].
To delete all the stored macros from the data memory: Press [3_B]MACRO [DELETE].
17.6.4. Executing Macros
When used to automate keystrokes in playback mode, a macro can be executed when it is associated to
a cue.
For example:
1. Press [CUE][CUE] to open the cues table and select the desired cue, then press [OPTIONS].
(or press [CUE][#][OPTIONS]).
2. Use the cursor to select the Command cell.
3. Select the MACRO command (option 1:).
4. Enter the desired macro number.
5. When the cue begins a cross-fade, the macro will be executed at the same time (e.g. a macro that can
load and activate an effect in a submaster when the cue starts).
When used for repeating keystrokes while editing, macros are executed directly from the keyboard. For
example: Press [3_B]MACRO [#][ENTER].
The console can also execute a recorded macro when power to the console is turned on. To select
a macro for power up, press [Menu][34]:Power-Up Macro.
42
Patching
18. Patching
18.1. Patching Dimmers
The console’s channels are associated (patched) to the dimmer outputs of the DMX line. Channel to
dimmer patching is performed in the dimmer patch table.
To open the dimmer patch table, press [CHANNEL][CHANNEL] or
[MENU][0][2].
The dimmer patch table displays a list with all dimmer addresses
(Dmx) in numerical order. Each dimmer has a limit value (Li), a
response curve (Cu) and an associated channel (Cha). See Dimmer
Patch Table Options below for more information.
To patch a channel to a dimmer, place cursor in Cha column, then press [#][ENTER].
A channel can control as many dimmers as needed. Note that a dimmer can only be controlled by
a single channel.
Dimmer Patch Table Options:
Dmx
List of dimmer addresses (list is not editable). The list functions as the table index and is used for locating
dimmer addresses within the table.
For example, to view dimmer 48, place cursor in Dmx column, then press [48][ENTER].
Li
Value of the limit function. The dimmer output level will never be higher than this level. If the limit is FF
(100%), the dimmer will be controlled in full range (0-100).
To edit limit level, place cursor in Li column, then press [#][ENTER].
Cu
Response curve of the dimmer.
To set curve, place cursor in Cu column and select curve type (see pre-programmed curves below).
Cha
Channel number that is patched to the dimmer address.
To edit channel to dimmer assignment, place cursor in Cha column, then press [#][ENTER].
Fxt
Indicates the number of an assigned fixture that requires an external dimmer. See “dm” in Fixture Patch
Table Options below.
SM.D
Indicates that the dimmer controls house lights. See House Light Dimmers below.
18.1.1. Testing Dimmers
To test a dimmer in the dimmer patch table, select a dimmer (Dmx) or limit cell (Li) with cursor, press
[TEST] and turn the encoder wheel.
To capture the test level as a limit value, select (Li) then press [INSERT].
To cancel the test function, press [C] or [EXIT].
43
Leviton Piccolo Scan
18.1.2. Pre-Programmed Curves
Below is a diagram of five pre-programmed response curves that are available. The vertical axis represents
the power output and the horizontal axis represents the control level:
A curve is selected in the Cu column of the dimmer patch table. See above.
Linear curve (1: LIN): Curve with linear response (default curve). For example, at a 50% control level, the
output is 50% of the total power.
Square curve (2: SQR): Curve with a fast start. For example, at a 50% control level, the output is 70% of
the total power. This curve is useful to compensate for the slow start of certain lamp types.
Invert square curve (3: INV): Curve with a slow start. For example, at a 50% control level, the output is
30% of the total power. This curve is useful to compensate for the fast start of certain lamp types.
On-Off Curve (4: O-F): A non-dim curve. For example, at a 0% control level the power output will be 0%.
When the control level is 6% and higher, the power output is raised to 100%. This curve is useful to turn
discharge type lamps on and off (HMI, MSR).
Park Curve (5: PRK): A dimmer with a park curve is always at 100% and its output is independent of any
control level. A park curve can be useful for work lights, etc. It guarantees that the channel level remains
at 100% even if the console is turned off (as most dimmers keep the last DMX value sent to them).
18.1.3. House Light Dimmers
The console can control house light dimmers (up to 512). This function will not use up any channels of the
console. Once dimmers are defined to control house lights, they are controlled via the SM master.
To define a house light dimmer, select it in the (SM.D) column. To
remove it, re-patch the dimmer to a regular control channel.
When a dimmer is used as a SM.D, the SM master will be displayed as
“SM.Dimmers” in the base display and screen. The SM function can be
changed via [MENU][31]:SM.
If the SM is changed to another function, the dimmers
patched to SM.D will not be active in any scene on stage.
dimmers.
Limit (Li) or Curve (Cu) functions can be applied house light
The patch can be locked via [MENU][77], see section 21.6.4.
44
Patching
18.1.4. Patch Tools
Patch tools allow you to copy, delete, or exchange dimmer assignments and set 1 to 1 DMX patches. To
access the patch tools, press [OPTIONS] while in the dimmer patch screen.
Dimmer number and DMX universe number are shown as #.#. For example, 24.1 = dimmer 24,
universe 1. Once data is entered, press [ENTER] to set the command. Press [EXIT] to close.
For example:
Set dimmers to default values.
Command
Default
Default
Default
Item
Dimmer
Dimmer
Dimmer
From
1.1
1.1
.1
Delete dimmer assignments.
Command
Delete
Delete
Delete
Item
Dimmer
Dimmer
Dimmer
From
1.1
1.1
.1
Copy dimmer assignments.
Command
Copy
Item
Dimmer
From
1.1
Exchange dimmer assignments.
Command
Exchange
Item
Dimmer
From
1.1
To
1.1
512.1
.1
Default value for dimmer 1, universe 1.
1 to 1 default values for universe 1 (dimmers 1-512).
1 to 1 default values universe 1 (dimmer 1-512).
To
1.1
512.1
.1
Deletes dimmer assignment for dimmer 1, universe 1.
Deletes all dimmer assignment for DMX universe 1.
Deletes all dimmer assignment for DMX universe 1.
To
10.1
Item
Dimmer
Target
201.1
210.1
Copy dimmers 1 - 10 to
dimmers 201 - 210.
To
10.1
Item
Dimmer
Target
201.1
210.1
Exchange dimmers 1 - 10
with dimmers 201 - 210.
18.2. Patching Fixtures
No fixtures (moving lights, scrollers, etc.) are patched in the console by default. Therefore, it is necessary
to patch desired fixtures in the fixtures patch table.
To open the fixtures patch table, press [FIXTURE][FIXTURE] or [MENU][0][4].
To patch a fixture, enter the cache list’s fixture number (Ty) in the (Type) area of the patch table. To
switch between the cache list and patch table, press the [OPTIONS] key. (For more information on the
cache list, see section 18.3).
Fixture Patch Table Options:
Fxt
Type
Dmx-dmx
X-Y
dm
Sc
Fixture number.
Fixture type: To add a fixture type, enter the fixture number (Ty) from the cache list (1 to 4). To view
the cache list, press [OPTIONS]. (The cache list can be edited. See Cache List Configuration below).
Fixture DMX address: Enter the desired start address. To add and patch consecutive fixtures, enter the
desired start address and place cursor on fixture number (Fxt) then press [INSERT].
Used for changing directions of X/Y parameters (Pan/Tilt): For example, when moving lights are placed
in different orientations (up/down, back/front, etc.).
External dimmer: Used for fixtures that require an external dimmer (such as scrollers). Enter the DMX
number of the required dimmer. The Fxt number will appear in the dimmer patch table, see Dimmer
Patch Table Options above.
Scroller editing: Select + then press Enter. See Scroller Definition below.
45
Leviton Piccolo Scan
18.2.1. Scroller Definition
To edit a scroller, move the cursor to the “+” cell in the fixture patch table then press [ENTER] to open
the scroller definition table:
In the scroller definition table, patched scroller types can been viewed and their color names, palette
assignments and gel positions (0-255) edited. In the example below, the Color5 (Step 5) gel position in Fxt
3 is being adjusted:
To edit a color name, select its name with the cursor. Press [ENTER] or move cursor after making
changes. Press [C] to delete name.
To choose a color palette, select palette cell with the cursor. Next, use the encoder wheel to select
palette. Press encoder wheel after making changes.
To edit a gel position, select its cell with the cursor then enter value. Move cursor to accept changes or
press [C] to discard.
To edit a gel position and view changing values on stage, select its cell and press [TEST]. Use the
encoder wheel to change values. Move cursor to accept changes or press [C] to discard (end test). If
changes are acceptable, press [TEST] again to end testing. Another cell may be edited before ending
testing.
Dark Gel
This function is used to protect saturated gels from heat and burns. For
this function to work correctly, two gels of the same dark color must be
located next to each other in the scroller string. When the dark gels are
selected during a show, they will move slowly back and forth thus
avoiding a hot spot on the gels.
To assign a dark gel, select the cell between the two desired dark
gels. Press encoder wheel after making changes.
46
Patching
18.3. Cache List Configuration
If a fixture needed is not in the cache list, it can be downloaded from www.leviton.com. The new fixture will
replace a non-used fixture in the cache.
Downloaded fixtures (FIXTURES folder) must be placed on the root drive of a USB memory stick
before transferring to console.
To add a new fixture to the cache:
1.
2.
3.
4.
5.
6.
7.
Insert USB memory stick (with new fixtures) in the USB Host 1 port at rear of console.
In the Fixtures Patch, press [OPTIONS] to activate cache.
Select fixture type to be replaced.
Select 0: Load. This will open the fixture library on the USB stick.
Select the Manuf cell to search for fixture manufacturer.
Select the desired fixture Id.
Select 0: Load.
Transferring of fixtures from the USB stick may take a few minutes.
New fixtures can be requested from [email protected].
47
Leviton Piccolo Scan
18.4. Fixture Definition
In addition to the patch table and cache list, the following information about a selected fixture is displayed
in the fixtures patch screen:
Name: Short name of fixture type.
Ch: DMX channels used by the fixture.
Comment: Long name of fixture type.
Manuf: Fixture manufacturer.
ID: Identification number - used for classification and reference.
File: File name, in standard MS-DOS format.
M: Indicates if a fixture is a moving mirror (M), moving head (H)
or has no movement (blank).
Xº & Yº: Movement angle of Pan & Tilt parameters.
Num: Parameter function. There are six categories of parameters (see adjacent chart):
POS - Beam position parameters.
DIM - Intensity parameters.
COL - Color parameters.
GOB - Gobo parameters.
BEAM - Beam parameters and blade parameters.
X-TRA - Special parameters (effects, prisms, speed, etc.).
Name: Text to identify parameter.
Ch+Fn: Parameter channel number (Ch = 8 bit parameters. Ch + Fn = 16
bit parameters).
I: Indicates if parameter is inverted. For example, if an iris that is fully
opened at 0% and fully closed at 100% is inverted, the iris will be fully
closed at 0% and fully opened at 100%.
L: Not used.
F: If marked, the parameter will fade in cues and groups. If not marked,
parameter will not fade.
Hom: Home value for the parameter (0-255).
St: Number of parameter steps from 0 to 99, where:
0 indicates parameter is not defined or in use.
1 indicates parameter is continuous (X, Y, Zoom, Iris, Dimmer, etc.).
Other values indicate the step numbers of the parameter.
Control is a special parameter that contains control commands of the fixture (LampOn, LampOff,
reset, etc.).
If you want to create your own fixtures, you can use the Leviton 8700 OLE simulator. Created
fixtures will be compatible with Piccolo. More information can be found in the 8700 user manual.
48
Saving and Loading Show Data
19. Saving and Loading Show Data
Show data files can be transferred to and from a USB memory stick (folder name - SHOWS).
1. Connect the USB stick to the USB Host 1 port of the console.
2. Press [MENU][10] to open disk table.
3. Only for OLE software - Press [OPTIONS] to select the data format:
- LT Shows (standard Piccolo format. Always use this format when possible).
- ASCII Shows (ASCII is used to export/import basic show data to/from other lighting consoles).
4. To store a new show, select the last empty line and choose F option 1:Save.
5. To record over a previously stored show, select line of stored show and choose F option 1:Save.
6. To load a stored show into the console, select desired line and choose F option 0:Load All.
7. To delete a stored show, select desired line and choose F option 3:Delete. See also section 21.6.3.
To exchange shows between the console and OLE, see section 24.4.
Transferring of show data to/from the USB stick may take a few minutes.
Important: Always store your show to a USB stick as a backup!
49
Leviton Piccolo Scan
Console Updating
20. Console Updating
Software updates can be obtained from www.leviton.com or your distributor.
Necessary requirements:
• PC 486 (minimum) with WIN95/WIN98/WIN2000, ME, WIN-NT or WIN-XP (VISTA not yet certified).
• USB cable - type AB (male)
• New software update and Piccolo USB driver (ltusb.sys, located in same folder as software update).
1. Connect USB cable between console USB Device port and PC.
2. If this is the first time connecting, Windows will recognize a new USB device. Browse to where the LT
USB driver information is located (ltusb.inf, located in same folder as software update). Important: USB
driver installation must be performed at this point or the driver will not be installed correctly. If a problem
occurs, read the document that comes with the driver (ltusb.mht) or execute CleanLtUsbDriver.exe (located
in same driver folder).
3. Execute the Piccolo Scan update program (piccoloscan170.exe from the PC) and follow the on screen
instructions (File menu / Update Console).
20.1. USB Driver software update
“Vinculum” is the hardware controller software for the USB physical port. To update it, see File menu when
running piccoloscan170.exe from PC.
slower.
50
It is recommended to format the USB memory stick using FAT16. FAT32 will work but may be
Menus
21. Menus
Press [MENU] to open the console’s menu list. Select the desired menu by entering its index number (or
select with arrow keys) then press [ENTER].
21.1. Patches
21.1.1. Dimmers (Menu 02) & Fixtures (Menu 04)
Please see section 18.
21.1.2. Dmx In (Menu 03)
Status: To use DMX input, the DMX IN port must be enabled.
Mode: With DMX input, it is possible to manipulate console channels or fixtures (Option 0 or 3) and execute
macros (Option 2) using the DMX output of a second DMX console.
It is also possible to merge the DMX input with the console output (Option 1). The DMX input and console
output at the DMX OUT port will be a sum of both lines.
SM: SM master configuration options:
0: General control of submasters.
1: General control for DMX input.
2: General control for dimmers set as SM.D (house lights).
3: Disabled.
Convert: Two conversion tables are available for reading DMX input data.
21.2. Disk & Printer
21.2.1. Disk (Menu 10)
Please see section 19.
21.2.2. Printer (Menu 11)
Data printing is only available from the OLE. To print show data from the console, it is necessary
to first store it on a USB memory stick then transfer it to the OLE. See section 24.
Press [Menu][11] in the OLE, then select any item or item list to be printed.
Press [OPTIONS] to access the Print command. To select all items, select All/None.
The printout will be saved in a text file format (.txt) that is stored in the PRINT folder located in the same
directory as the OLE program. The txt file can be opened, modified and printed from any text editor.
21.3. Multimedia
21.3.1. Midi (Menu 21) & Time Code (Menu 23),
Please see section 23.
21.3.2. External Triggers & Sound (Menu 22)
Please see section 23.
51
Leviton Piccolo Scan
21.4. Setup
21.4.1. Editor & Times (Menu 30)
In this menu, the following items can be configured:
Level: Incremental level values of softkeys [2.B]
[3.B] .
and
Editor Time: Default fade time for editor.
Cue/Group: Default fade time for cues and groups.
GObACK Time: Time associated when [PSBACK] key is pressed. Can also be set same as current cue fade
time (0: CUES).
Timing: The console has three different timing modes:
T1 - All parameters fade at designated time.
T2 - LTP parameters jump to value without time; only channels and dimmer parameters fade at designated
time.
T3 - LTP parameters jump to value without time; only pan, tilt, channels and dimmer parameters fade at
designated time.
Auto Scroll: If enabled, the base screen will automatically page to the selected channel or fixture. If
disabled, the base screen must be paged manually using the [ ][ ] keys.
Load Group Num: Used to set range of groups recording when using [LOAD].
Double Cue Num: Used to set range of cues recording in Double mode
Virtual dm: Used to enable a virtual dimmer when editing color mix fixtures without a dimmer, for example,
when using LED’s. See section 15.4.
21.4.2. Playbacks (Menu 31)
In this menu, the following items can be configured:
Flash Level: Flash button level for flash, normal, solo or absolute modes.
Solo Off X: Select Enable for solo flash mode to affect the crossfader output.
SM: SM master configuration options: Submasters, DMX In, SM.Dimmers (house lights), Disabled.
GM: Grandmaster configuration options (100%, 200%, Disabled).
BLKoUT-SM: Enables/Disables SM blackout key.
Dipless Mode:
T - The channel fades from its origin level to its target level in the input time programmed in the next
cue.
T
- The channel fades from its origin level to its target level in the input time programmed in the next
cue if the level change is increasing. The channel fades from its origin level to its target level in the output
time programmed in the next cue if the level change is decreasing.
52
Menus
Return Track:
Enabled - When a group or cue is deactivated from a submaster, its LTP parameters return to their initial
value with their corresponding fade times. In general, if you are storing colors, positions, etc. in several
submasters, and then you combine them, use this option.
Disabled - When a group or cue is deactivated from a submaster, its LTP parameters remain in scene until
the submaster reaches 0%. Also, if no other playback is controlling the group or cue, they will maintain
their values as new tracking. In general, if you are storing complete scenes, with dimmer and parameters
in the same submaster, use this option.
See example below to understand the difference between enabled and disabled return tracks. In this
example, S1 contains a red scroller group and S2 contains a green scroller group:
Submasters
1. Start from home color
2. Activate S1 (Red)
3. Deactivate S1
4. Activate S2 (Green)
5. Activate S1 (Red)
6. Deactivate S1
7. Deactivate S2
Result - Enabled
White (initial tracking)
Red
White (initial tracking)
Green
Red
Green
White (initial tracking)
Result - Disabled
White (initial tracking)
Red
Red (new tracking)
Green
Red
Green
Green (new tracking)
Shape Base: Please see section 16.3.
21.4.3. System (Menu 32)
In this menu, the following items can be configured:
Language: Select language of messages and warnings.
Beep: Enable/disable warning beep.
Light: Adjust level of the work light (0-100). Default is 0 %.
Monitor: Select color scheme of the monitor (Light, Dark, Dark+).
Date: Adjust the current date.
Time: Adjust the current time.
Numeric Pad: Swap [C] and [0] key functions on numeric keypad.
Display: Select color scheme of the LCD display (Light, Dark).
21.4.4. Dmx Setup (Menu 33)
Used to select DMX signal speed to avoid problems with older DMX receivers.
DMX:
0: FAST- DMX output updated 20 times per second (default).
1: MEDIUM - DMX output updated 10 times per second.
2: SLOW - DMX output updated 6.6 times per second.
3: CHANGE - DMX output updated only when its information changes.
21.4.5. Power-Up Macro (Menu 34)
Macro: Enter a previously recorded macro number that will execute when the console is turned on. To
deselect the power-up macro, select 0: NONE. See section 17.6.
53
Leviton Piccolo Scan
21.4.6. Remote and PocketPC (Menu 35)
Two types of remote control are available for use with the console via cable or wireless DMX, Remote &
Pocket PC:
For more information about using remote controls, please see their user manuals.
Enabled: Selects Remote or PocketPC to enable communication with remote device. Select None to
deactivate.
Remote ID: Set Remote ID # with same number for console and remote control (valid range 1-12).
21.4.7. Wireless DMX (Menu 36)
If your console provides hardware (optional) that permits the console to transmit DMX by radio
frequency (2405-2479 MHz), this menu allows you to configure the wireless DMX connection.
Command:
Select 0: LOGOUT to disconnect the RF DMX of all active receivers that were linked with the DMX of the
console (non-active receivers will remain connected).
Select 1: LOGIN to connect the RF DMX with all free and active receivers.
21.5. Ethernet
21.5.1. Ethernet Configuration (Menu 40)
Please see section 22.
21.6. Special Commands
21.6.1. Multimedia Panel (Menu 70)
Select this menu to activate/deactivate all multimedia ports (Midi, Ext, Sound & Time Code).
21.6.2. Status & Playbacks Zero (Menu 71)
Select the following commands to set certain functions of the console to a zero status (default):
Status: Sets all editing functions to default (Flash, LN.TM, etc.).
All Playbacks: Sets all playbacks (submasters and crossfader) to zero (does not modify contents).
All Submasters: Sets only submasters to zero (does not modify contents).
All Crossfaders: Empties the current cue that loaded in X1. The cue is then placed in X2 as the next cue at
0% (does not modify cue contents).
54
Menus
21.6.3. Delete Console Show (Menu 72)
Use this command to delete all stored show data in the console but maintain
setup configurations. Also see section 19.
Deletes:
All groups, cues, effects, pages and macros.
User shapes and libraries.
Channel and fixture patches.
Event list and time code configuration.
•
•
•
•
Does not delete:
• Setup data.
• Fixtures patch cache.
• Dmx-In configuration.
• MIDI chart and configuration.
• Ethernet configuration.
21.6.4. Security & Defaults (Menu 77)
The console can store a user defined channel and fixture patch as default. The patch will be loaded
automatically when the console is reset. This function is useful for lighting system installers and can be
password protected.
Security: Use to set a password to protect the user default patch. If the password is Enabled, it will not be
possible to change the patch back to factory default status unless password is disabled again.
Saved: To store a user default patch, select 0:SAVE (with password Enabled).
Load at RST: When Enabled, the saved patch will be loaded when the console is reset.
21.6.5. Tools & Software Updates (Menu 79)
See section 22.2.5
21.6.6. Tests (Menus 80 - 88)
These menus are used to test certain console functions. Note that these tests interrupt the console’s
working mode. Do not test any functions during a show! To exit from any test procedure, press [EXIT].
Inputs: Tests faders, keys and wheel functions. To test, move or press desired item.
Outputs: Tests console LED’s, display, work lights and beep functions. To test, use the arrow keys to select
desired item.
Vga & Display: Tests the external monitor and LCD display (colors, text).
Dmx In: Displays the DMX-IN signal (even if deactivated in [Menu][03]).
Dmx Out: Displays the DMX-OUT signal.
Memory: Tests the system data memory.
Midi: Tests the MIDI port. During the test, follow the on-screen procedure.
LT-Link: Test the LT-LINK port. During the test, follow the on-screen procedure.
55
Leviton Piccolo Scan
22. Using Ethernet
The console offers Ethernet capabilities for distribution of DMX data over an Ethernet network and for
connection to the OLE and 3D visualizers such as Capture. Ethernet protocols include IPX, ArtNet and CIPT.
22.1. Ethernet Configuration
Proper Ethernet cables (RJ45) must be used: cross-over type for direct connection between units
or straight type for connection to an Ethernet hub or switch.
To configure DMX output to Ethernet, select [MENU][40] and edit the following:
Ethernet (On, Off): Set this option to ON to activate the console’s Ethernet capabilities.
Net Number (0-15): Set the communication net number. Only units connected to the same net can
communicate with each other. For ArtNet, this number represents the Subnet number. Note that to
communicate by IPX with Capture, the Net Number must be between 0 – 9.
Universe protocol (IPX, ArtNet) & DMX universe number (0-15): Each net has 16 DMX universes. Set
desired protocol and universe #.
Capture: Set to allow bidirectional communication with Capture simulator. See section 22.3 below.
Local IP: Set IP address for ArtNet. Note that when using the OLE, the IP address is from the computer on
which the OLE is running.
When the console is transmitting DMX by Ethernet, a ☺ symbol, will appear in the command line
of the monitor and display:
22.2. IPX Configuration
If using IPX it is necessary to install the NWLink IPX Compatible protocol and set the frame type as
Ethernet 802.3 in your PC as shown below:
56
Using Ethernet
22.3. Capture / CITP Configuration
Use Capture with CITP protocol to:
• Simulate all DMX universes of a show in a virtual 3D environment.
• Select items (channels and fixtures) in the console and see same selections in Capture.
• Select items (channels and fixtures) in Capture and see same selections in the console.
• Edit levels and parameters in the console and receive the data in Capture.
• Edit levels and parameters in Capture and receive the data in the console.
1. In PC:
a. Set IP address in Internet Protocol (TCP/IP) properties screen.
2. In Capture:
a. Start program.
b. Create or open a project.
c. Patch all channels and fixtures in desired universe.
d. To control Capture fixtures with the console’s conventional channels, assign channel numbers to fixtures
(1 - max channel #’s of console - 24, 48, etc.). To control Capture fixtures with the console’s fixtures,
Capture channel numbers must be increased + 1 from the console’s channel numbers (25, 49, etc.).
3. In Console:
a. Edit console channel and fixture patches to match the Capture patch. The console universe must be the
same as the Capture universe.
b. Active the Ethernet port and set a Net number: press [MENU][40]. Capture will be listed in the “Others”
window (if necessary, press the [OPTIONS] key to view).
c. Set the console’s IP address in the range used by the computer. For example, 192.168.0.xxx (where xxx
is a number from 0 to 255). Note: If Capture and OLE are on the same computer, this step isn’t needed.
d. Set DMX output to be transmitted by ArtNet universe (the console’s universe will be then listed in
Capture’s list of external universes).
e. Select Capture cell and choose an available index number as shown below.
4. In Capture:
a. Check or set the Project Universe and External Universe assignment:
57
Leviton Piccolo Scan
22.4. Coolux / ArtNet Configuration
Coolux Pandoras Box Media Servers and Players are based on layers, cameras and sequences. Each layer,
camera and sequence can be controlled with the console by configuring them as fixtures. Consult chart
below or Coolux DMX tables.
Pandoras Box product
Media Server
Media Player
Devices
Video Layer
Graphic Layer
Camera
Video Layer
Graphic Layer
Camera
Console Fixtures
5400: LayrV 37
5401: LayrG 34
5402: Camer 44
5400: LayrV 22
5401: LayrG 21
5402: Camer 17
1. In PC:
a. Set IP address in Internet Protocol (TCP/IP) properties screen (range 2.xxx.xxx.xxx, submask 255.0.0.0).
2. In Console and Pandoras Box:
a. Set console IP address in same range as PC: press [MENU][40].
b. Enable console Ethernet and set Subnet and ArtNet universe numbers to same values as Pandoras Box
product:
c. Patch layers and cameras. For example, 2 video layers + 4 graphic layers + 1 camera.
- In console, press [FIXTURE][FIXTURE] and load the libraries (5400, 5401, 5402) into the Cache:
- Edit console Fixture patch to match Pandoras Box patch using same DMX universe and addresses:
58
Using Ethernet
d. To select files and folders for Media and Mesh contents in layers, and for Mesh in cameras, configure the
media contents inside the project:
e. In Pandoras Box, select Configuration menu and press Run ArtNet button:
59
Leviton Piccolo Scan
22.5. Leviton LT NPC 2D/4D Configuration
NPC 2D/4D converters allow for Ethernet data to be converted to DMX-XLR5 (the
converter outputs two physical DMX universes from one of the console’s Ethernet
universes). The DMX signal can be converted anywhere in the Ethernet network
where the consoles, dimmers or fixtures are connected.
To configure the NPC 2D/4D, press [MENU][79] and select 1:LT Ebox
Configuration.
When Ethernet is On, each Ebox shows:
NPC 2D/4D (Ebox) name: Unit name (up to 22 alphanumeric characters may be used).
Box?: Press [ENTER] to locate and to identify the NPC 2D/4D (LED’s on NPC 2D/4D will blink).
DMX1 & DMX2: Current configuration of NPC 2D/4D outputs DMX1 & DMX2.
Configuration is defined by:
Net: DMX output being read from the net (0-15).
Universe: Universe number (0-15).
Status: DMX output enabled or disabled.
For use with ArtNet, the NPC 2D/4D box must be configured from a PC (via Ethernet cable) instead of the
console. Once the unit and PC are connected, enter 192.168.0.162 in any Internet browser address
window (note that all boxes have the same IP address). A small application will open as shown below
(once configured, press Submit):
60
Using Midi. Time Code, External Triggers & Sound
23. Using MIDI, Time Code, External Triggers & Sound
23.1. MIDI
MIDI (Musical Instrument Digital Interface) is a digital protocol that was development in the musical
instrument world and is used for synchronization between digital instruments, devices and computers. The
console can communicate with any MIDI device, including other MIDI capable lighting consoles.
The console works with MIDI Notes (associated to keys pressed) and MIDI Controllers (associated to the
movement of faders).
The MIDI protocol contains 16 communication channels, with each channel allowing a maximum of 128
Notes and 128 Controllers. Some Piccolo consoles (larger models) use two MIDI channels to
transmit/receive all keys and faders. Consoles also accept MIDI "Running Status" to improve
communication speeds.
23.1.1. MIDI Configuration
To configure the console’s MIDI options, press [MENU][21] to open the MIDI table.
The MIDI table allows you to edit notes, controllers and associations and activate (marked with an *) or
deactivate each association independently. When an association is deactivated, it is excluded from MIDI
communication.
Use the [OPTIONS] key to toggle between general options and item selection.
MIDI General Options:
On/Off
Used to activate/deactivate the MIDI port. This option must be ON for MIDI communication.
(Option is also available in [Menu][70]:Multimedia Panel.)
Out/In
Used to set the direction of the communication:
OUT sets the console to send MIDI to external devices.
IN sets the console to receive MIDI from external devices (received MIDI is translated to keys
and faders).
Channel
Sets the MIDI communication channel (1 or 2, depending on model). To communicate between
two devices, both devices must have the same MIDI channel set.
1:1
Sets all MIDI associations to default values. The default MIDI table has been defined to
maintain the compatibility between all models of Piccolo consoles.
Disable/Enable
Used to activate/deactivate all keys and/or faders.
23.2. Time Code (Events List)
An event is a playback action that has a Time Code (TC) associated to it. The event is executed when the
current TC arrives at the value of TC defined for the event.
Example types of events:
• Load a recorded cue in crossfader (starts in next cross-fade).
• Execution of a recorded macro.
The console can synchronize an events list with a time code clock (TC):
From an external clock:
MTC (using MIDI port) or SMPTE (using Expansion Box)
From the internal console clock: CLOCK
From a simulated clock:
INTERNAL
61
Leviton Piccolo Scan
TC is
hh:
mm:
ss:
ff:
a time value that uses a hh:mm:ss:ff format:
Hour (0 to 23)
Minute (0 to 59)
Second (0 to 59)
Frame (parts of second, 0 to 29). Time precision is 1/30 per second.
To configure the console’s time code options, press [MENU][23] to open the Time Code table.
Use the [OPTIONS] key to toggle between general options and the events list.
Time Code General Options:
On/Off
Used to activate/deactivate the events list. Also available in [Menu][70]:Multimedia Panel.
MTC, CLOCK,
INTERNAL,
SMPTE
Selects the clock source that will control the execution of the events list. For MTC, CLOCK and
SMPTE sources, the time values depend on an external TC source or the console. They cannot
be set by the user unless there is an Offset adjustment that allows to advance or delay events
in the same proportion in relation to the incoming TC.
For the INTERNAL source, the user can manipulate the current TC (STOP, PLAY, PAUSE,
AUTOPLAY, From 00:00:00:00:, To 23:59:59:29).
STOP, PLAY,
PAUSE,
AUTOPLAY
STOP: Stops the TC counter and sets the counter to zero (or the value set in From).
PLAY: Starts the TC counter from the current value to the value programmed in To.
PAUSE: Pauses the TC counter and maintains its current value (if counter is not at zero).
AUTOPLAY: Starts the TC counter in a cycle. When the last value is reached (To), it jumps to
the first value (From) and repeats.
From
First value for the INTERNAL TC clock (default 00:00:00:00).
The value can be set in the events list: Select Internal, then option 0: SET FROM.
To
Last value for the INTERNAL TC clock (default 23:59:59:29).
The value can be set in the events list: Select Internal, then option 0: SET FROM.
The event list has one event per line. Keep in mind the following information:
• TC is the value of the clock that starts an event. The TC can be edited using the numeric keypad or
•
•
•
•
•
•
captured from the time source (press [INSERT] while in TC cell).
To capture or edit the TC, the events list can be active (On) or not (Off). If active, the events list is
executed at the same time that the TC is captured thus allowing you to view the real execution of events
in the list.
Events are ordered by the TC values.
Two events cannot have the same TC.
A CLOCK source allows for execution of events at a pre-defined time. For example, if an event must be
executed every day at the same hour.
A MTC or SMPTE source allows for synchronization with external devices.
An INTERNAL source allows for simulation of an external source as MTC for quick programming or when
testing the TC function.
23.2.1. Events List Execution
The events list must be activated (On).
The INTERNAL clock must be activated (PLAY) or an active MTC or SMPTE clock must be connected to
the console.
When the current TC arrives to the defined event TC, the event will execute.
62
Using Midi. Time Code, External Triggers & Sound
23.3. External Triggers & Sound Inputs
An Expansion Box is required which connects to the console via the LT-Link port.
Each external trigger input on the Expansion Box (Ext1, Ext2 & Ext3) can be associated to one key. When
the input is activated, its associated key is “pressed”.
The Sound input on the Expansion Box admits 1Vpp signals. The audio signal is filtered as Bass, Medium
and Treble. When the input is activated, its associated key is “pressed” or its associated fader is “moved”.
To configure external triggers and sound inputs, press [MENU][22].
To switch between the setup line and configuration, press the [OPTIONS] key.
Ext: Used to activate or deactivate the external triggers.
Sound: Used to activate or deactivate the audio input.
These options are also available from [MENU][70].
Ext1 - Ext3:
1. Select the Key cell.
2. Select 1: KEY. The system waits for you to select a key.
3. Select the desired key.
4. To delete the associated key, select 0: NONE.
Sound Bass, Sound Medium and Sound Treble:
1. Select the Key/Fader cell.
2. Select 1: KEY/FADER. The system waits for you to select a key or fader.
3. Select the desired key or fader.
4. To delete the associated key or fader, select 0: NONE.
Sensibility:
Levels can be adjusted for each sound filter. If the audio input is active (SoundOn) and
the desired filter has an associated key (or fader), a test level will be displayed to aid in adjusting the level.
63
Leviton Piccolo Scan
24. Off Line Editor (OLE)
24.1. Introduction
A PC-based console software simulator (OLE) is available at www.leviton.com. The OLE can be used to
study the console, program or modify shows, and function as a backup console.
The OLE is needed for certain functions such as show printing and reading/writing a show in
ASCII format.
24.2. PC Requirements
486 PC (minimum) with WIN95/WIN98/WIN2000, ME, WIN-NT or WIN-XP (VISTA not yet certified).
The OLE requires very little system resources or video memory. It is recommended to configure the PC
graphics system to run in a 16-bit color mode (or 256 color mode, if necessary).
24.3. Starting the OLE
Each console software version has a corresponding OLE version (only same type versions can work
together). The OLE does not require an installation process; it is only necessary to unzip the downloaded
file to a folder on your PC. Run the OLE by selecting the OLE file (for example, piccolo160wole.exe) with
your mouse (you can also make a link to your desktop, if you prefer).
24.4. Exchanging Data with a Console
To exchange show data between the console and OLE, connect a USB memory stick to the console and
save the console show (SHOWS folder). Next, copy it to the same folder in the OLE directory on the PC.
The show data can then be loaded by the OLE.
To exchange show data between the OLE and console, save the OLE show and copy it to a USB memory
stick (SHOWS folder). Next, connect the USB memory stick to the console. The console can then load the
show data.
For more information about saving and loading shows, see section 19.
24.5. Using the OLE as a Backup Console
The OLE provides DMX output to Ethernet if the OLE is connected to a console (for use as a backup).
If a console is not connected, the OLE will run in demo mode and only output DMX to Ethernet for 20
minutes.
64
Off Line Editor (OLE)
24.6. PC KeyBoard HotKeys
For a quick way to use the OLE (in addition to using a mouse), corresponding hotkey functions are
available via a PC keyboard:
65
Leviton Piccolo Scan
66
67
Copyright © 2010 Leviton Manufacturing Company Incorporated.
All Rights Reserved.
Information contained herein is subject to change without notice.
Document Release July 2010. Rev. A
Part # DI-000-PPICS-04A
Software v1.70
Leviton Lighting Management Systems Division
20497 SW Teton, Tualatin, OR 97062
Mailing Address:
PO Box 2210
Tualatin, OR 97062
Customer Service: (800) 736-6682
Technical Support: (800) 959-6004 Fax: (503) 404-5601
Email: [email protected]
Internet: www.leviton.com