1
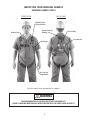
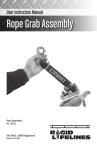
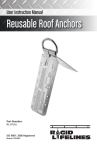
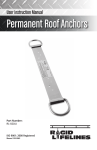
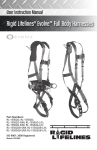
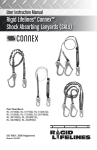
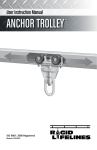
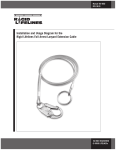
Manual 103-0050
REV. 6/14
Installation, Operation & Maintenance Manual for Rigid Lifelines
Fall Arrest & Fall Restraint Full-Body Safety Harnesses
ISO 9001 REGISTERED
© RIGID LIFELINES®
2
TABLE OF CONTENTS
Identifying Your Universal Harness.................................................................................4
Identifying Your Deluxe Harness.................................................................................... 5
Safety Precautions........................................................................................................6
The ABCD’s of Fall Protection: System Components........................................................ 7
Proper Harness Selection.............................................................................................. 8
How To Wear Your Harness Properly
Universal........................................................................................................... 9-10
Deluxe.............................................................................................................11-12
Fall Arrest System Requirements................................................................................. 13
Operating Instructions................................................................................................ 13
Buckle Adjustments................................................................................................... 14
Training..................................................................................................................... 15
Inspection............................................................................................................ 15-17
Maintenance, Storage & Cleaning................................................................................ 17
Inspection Records.....................................................................................................18
Labels....................................................................................................................... 19
Warranty.................................................................................................................... 20
OPTIONS:
There are three styles of Rigid Lifelines harnesses available:
• Universal
• Universal-XL (for workers weighing 400 lbs. or more)
! WARNING
r
• Deluxe (includes padded back support and abdominal tongue buckle)
OSHA REQUIRES MONITORING AND PROMPT RESCUE OF FALLEN WORKERS.
DUE TO POTENTIAL SERIOUS HEALTH ISSUES, HEAVIER WORKERS SHOULD BE RESCUED IMMEDIATELY
3
IDENTIFYING YOUR UNIVERSAL HARNESS
UNIVERSAL HARNESS PARTS
FRONT VIEW
BACK VIEW
Adjustable Chest
Strap and Buckle
Shoulder Strap
Durable Polyester
Webbing
Dorsal D-Ring
Load Indicator
Strap Keeper
Leg Strap and
Tongue Buckle
! WARNING
r
(Deluxe model offers padded back support.)
READ AND UNDERSTAND ALL INSTRUCTIONS BEFORE USING HARNESSES.
FAILURE TO READ AND UNDERSTAND ALL INSTRUCTIONS MAY RESULT IN SERIOUS INJURY OR FATALITY.
4
IDENTIFYING YOUR DELUXE HARNESS
DELUXE HARNESS PARTS
FRONT VIEW
BACK VIEW
Adjustable Chest
Strap and Buckle
Shoulder Strap
Durable Polyester
Webbing
Dorsal D-Ring
Load Indicator
Strap Keeper
Leg Strap and
Tongue Buckle
Abdominal Strap
and Tongue Buckle
Padded Back
Support
! WARNING
r
READ AND UNDERSTAND ALL INSTRUCTIONS BEFORE USING HARNESSES.
FAILURE TO READ AND UNDERSTAND ALL INSTRUCTIONS MAY RESULT IN SERIOUS INJURY OR FATALITY.
5
SAFETY PRECAUTIONS
ATTENTION USER:
READ AND UNDERSTAND ALL INSTRUCTIONS BEFORE USING HARNESS.
FAILURE TO READ AND UNDERSTAND ALL INSTRUCTIONS MAY RESULT IN SERIOUS INJURY OR FATALITY.
Up-to-date instructions must be made available to any user of this equipment at all times.
If these instructions are not up to date, or you are experiencing any problems with your
Rigid Lifelines harness, call Rigid Lifelines toll free at (800) 869-2080 (US and Canada).
Use your Rigid Lifelines harness only as directed. You assume complete liability if you fail to
follow these instructions and are injured. The harness purchased is designed to be used as
part of a complete OSHA compliant fall protection system. The harness should be inspected
and maintained regularly. It is the responsibility of the user’s supervisors and management
team to review these instructions periodically and to ensure compliance with every
requirement in order to maintain the integrity of the system. An Inspection Log is provided
near the end of this manual for periodic inspection. Inspections must occur at least once a
year or sooner if the environmental or usage conditions are severe. It is the responsibility of
the user’s supervisors and management team to determine frequency of inspections.
! WARNING
r
Rigid Lifelines harnesses are intended to be used with a complete fall protection or emergency rescue
system. Choosing to disregard this warning will result in the user or user’s supervisors and management
team admitting sole responsibility for the safety of the entire fall protection system. Consult the
manufacturer prior to replacing or adding components to any fall protection or emergency escape
system. All users and supervisors, including management, must read and understand all instructions.
Failure to do so could result in serious or fatal injury. No fall arrest system can 100% guarantee that,
should a fall occur, there will be no fatal or serious injuries. However, with a Rigid Lifelines fall arrest
system you can expect that serious injuries may be reduced. Chances of serious injury or even death can
escalate with a false sense of security as a result of improper use of this harness. All instructions must be
followed to achieve the maximum level of safety that this harness is capable of providing.
! WARNING
r
ALL APPLICATIONS INVOLVING WELDING, SPARKS, OR ELECTRICAL EQUIPMENT MUST BE REVIEWED BY A
COMPETENT PERSON WHO CAN RECOGNIZE AND AVOID HAZARDS. APPLICATIONS INVOLVING HARSH
ENVIRONMENTS MAY REQUIRE AN ALTERNATE CONSTRUCTION HARNESS.
6
THE ABCD’S OF FALL PROTECTION
SYSTEM COMPONENTS
Fall arrest systems are made up of four fundamental components:
The anchorage, body support, connecting devices, and deceleration device,
as described below:
A - ANCHORAGE:
The attachment point that is intended to resist forces generated during a fall arrest or fall
restraint event. According to OSHA, “Anchorages to which personal fall arrest equipment is
attached shall be capable of supporting at least 5,000 pounds per employee attached, or
under the supervision of a qualified person shall be designed, installed, and used as part of
a complete personal fall arrest system which maintains a safety factor of at least two.”
B - BODY SUPPORT (HARNESS):
A body support designed to contain the human torso and distribute fall arrest forces evenly
across the body, including the thighs, pelvis, chest, and shoulders. Rigid Lifelines uses only
full body harnesses, as only full body harnesses may be used for any fall arrest system.
The full body harness will more evenly absorb and distribute forces at various points on the
user’s torso to allow the human body to decelerate.
C - CONNECTOR:
An independent system component, like a carabiner, or an element of another system
component, such as a buckle or D-ring on a harness or lanyard.
D - DECELERATION DEVICE:
Designed to absorb energy and lessen the forces generated during a fall. A self-retracting
lanyard (SRL) or shock pack lanyard are examples. To maximize the effectiveness of a
Rigid Lifelines system, the deceleration device must be a self retracting lanyard with a
maximum arresting force (MAF) of 900 lbs.
! WARNING
r
READ AND UNDERSTAND ALL INSTRUCTIONS BEFORE USING HARNESSES.
FAILURE TO READ AND UNDERSTAND ALL INSTRUCTIONS MAY RESULT IN SERIOUS INJURY OR FATALITY.
7
PROPER HARNESS SELECTION
SELECTING THE PROPER HARNESS:
Rigid Lifelines full body harnesses are designed for workers up to 310 lbs., including tools.
All Rigid Lifelines harnesses meet or exceed applicable OSHA and ANSI requirements for
fall arrest and are designed to be used as part of a complete fall protection or emergency
rescue system.
HARNESS FEATURES:
Rigid Lifelines harnesses are made of durable polyester webbing. They are quickly adjusted
with tongue and spring tension glide bar buckles (Fig. 1), making them easy to put on and
remove. Sub pelvic straps provide support during and after a fall. The chest strap is
secured with a quick attachment buckle. The D-ring (Fig. 2) on the back of the harness is
designed to allow for attachment of a connecting device.
Fig. 2
Fig. 1
Harnesses come with tongue-buckle (Fig. 3) leg straps and a fall indicator (Fig. 4)
incorporated into the back shoulder straps. This fall indicator gives visible proof when the
harness has experienced a fall arrest by displaying the message “Replace Harness.”
See full label on Pg. 19
Fig. 3
Fig. 4
All Rigid Lifelines harnesses meet or exceed the requirements of OSHA 1910.66, Appendix
C; OSHA 1926.50, Subpart M; OSHA 1910.129, Fall Protection Equipment Requirements
for Body Support; and ANSI Z359.1-2007.
8
HOW TO WEAR YOUR UNIVERSAL HARNESS PROPERLY
NOTE: A FULL INSPECTION OF THE HARNESS MUST BE CONDUCTED PRIOR TO EVERY USE.
PLEASE SEE PAGES 15-17 OF THIS MANUAL FOR INSPECTION INSTRUCTIONS.
STEP 1 - While holding the harness by the back
D-ring, shake the harness or readjust straps to allow
the straps to fall freely into place.
STEP 2 - Unbuckle straps at this time if they are
buckled.
STEP 3 - Put on the harness as if you were putting
on a vest making sure the straps go over your
shoulders and the D-ring is located directly between
the shoulder blades in the middle of your back.
STEP 4 - Reach between your legs and pull the leg
straps through. Taking one strap at a time, pull one
strap through the left tongue buckle and adjust, then
repeat on the right. Adjust shoulder straps with the
two spring tension glide bar buckles located to the
left and right of your hip. These buckles adjust the
upper body length of the harness. Always make sure
all extra lengths of strapping are secured with the
supplied web sleeves or clips.
9
HOW TO WEAR YOUR UNIVERSAL HARNESS PROPERLY
continued...
NOTE: A FULL INSPECTION OF THE HARNESS MUST BE CONDUCTED PRIOR TO EVERY USE.
PLEASE SEE PAGES 15-17 OF THIS MANUAL FOR INSPECTION INSTRUCTIONS.
STEP 5 - Connect the quick attachment buckle
located on the chest strap. Once secure, the chest
straps should be located on the upper part of
the chest but should never be located below the
bust line.
STEP 6 - Perform a final check to ensure everything
is snug. Leg straps must fit very snug around upper
thighs. Store all excess straps in strap keeper
sleeves.
10
HOW TO WEAR YOUR DELUXE HARNESS PROPERLY
NOTE: A FULL INSPECTION OF THE HARNESS MUST BE CONDUCTED PRIOR TO EVERY USE.
PLEASE SEE PAGES 15-17 OF THIS MANUAL FOR INSPECTION INSTRUCTIONS.
STEP 1 - While holding the harness by the back
D-ring, shake the harness or readjust the straps to
allow the straps to fall freely into place.
STEP 2 - Unbuckle straps at this time if they are
buckled.
STEP 3 - Put on the harness as if you were putting
on a vest making sure the straps go over your
shoulders and the D-ring is located directly between
the shoulder blades in the middle of your back. Be
sure that the back support pad sits comfortably in
the small of your back.
STEP 4 - Reach between your legs and pull the leg
straps through. Taking one strap at a time, pull one
strap through the left tongue buckle and adjust, then
repeat on the right. Adjust shoulder straps with the
two spring tension glide bar buckles located to the
left and right of your hip. These buckles adjust the
upper body length of the harness. Always make sure
all extra lengths of strapping are secured with the
supplied web sleeves or clips.
11
HOW TO WEAR YOUR DELUXE HARNESS PROPERLY
continued...
NOTE: A FULL INSPECTION OF THE HARNESS MUST BE CONDUCTED PRIOR TO EVERY USE.
PLEASE SEE PAGES 15-17 OF THIS MANUAL FOR INSPECTION INSTRUCTIONS.
STEP 5 - Grasp the two ends of the adominal strap
and fasten the tongue buckle until it is snug against
your body. After buckling, ensure the extra strapping
is secured with the elastic strap keeper. Make sure
both ends of the strap have been threaded through
the back pad loops.
STEP 6 - Connect the quick attachment buckle
located on the chest strap. Once secure, the chest
straps should be located on the upper part of the
chest but should never be located below the bust
line.
STEP 7 - Perform a final check to ensure everything
is snug. Leg straps must fit very snug around upper
thighs. The back pad should fit securely around your
lower back. Store all excess straps in strap keeper
sleeves.
12
FALL ARREST SYSTEM REQUIREMENTS
For Use Only with Self-Retracting Lanyards and OSHA Compliant Fall Protection Systems:
The self-retracting lanyard (SRL) being used needs to be rated for 900 lbs. maximum
arresting force. The supporting structure the lanyard is attached to needs to be rated
accordingly. Remember the body harness, self-retracting lanyard, OSHA compliant
supporting structure, and the mounting to the OSHA compliant supporting structure are all
part of the entire system. You must be certain that all four parts of the system are properly
rated and maintained before attaching a lanyard to the body harness to avoid possible
injury. Once this is determined, attach the self-retracting lanyard to the dorsal (back) D-ring
on the body harness.
! WARNING
r
RIGID LIFELINES HARNESSES ARE SUPPLIED WITH A DORSAL D-RING FOR USE IN OVERHEAD FALL ARREST
AND FALL RESTRAINT SYSTEMS ONLY. DO NOT USE RIGID LIFELINES HARNESSES FOR ANY OTHER
SYSTEM OTHER THAN HORIZONTAL OVERHEAD ATTACHMENT AND FALL RESTRAINT
OPERATING INSTRUCTIONS
A full inspection of the harness must be conducted prior to every use. See the inspection
section of this manual (Pgs. 15-17) for full inspection instructions. The following
paragraphs offer more detail on how to wear your harness. The harness must fit snug
around the body, especially on the upper thighs, but allow you to move freely while working.
Properly adjust all buckles and be sure the D-ring is located between the shoulder blades.
Also make sure the chest strap is across the chest but not below the bust line.
Long hair must be kept up or permanently restrained to prevent being caught in the D-ring
during a fall event. Loose ends of web strapping must be stored with web sleeves and clips.
! WARNING
r
LONG HAIR MUST BE CONTAINED TO PREVENT ENTANGLEMENT IN D-RING DURING A FALL EVENT.
FAILURE TO DO SO CAN RESULT IN SERIOUS INJURY.
13
BUCKLE ADJUSTMENTS
SPRING TENSION GLIDE BAR BUCKLES:
Pull back spring loaded pressure plate to
allow strap to slide past knurled bar. Adjust
strap length and then pull on strap to seat
strap wrap around knurled bar. Release
spring tension plate.
Spring Loaded
Pressure
Plate
QUICK-ATTACHMENT BUCKLES:
Adjust the tightness of the strap by pushing
the webbing through the buckle. When the
desired length is achieved, push the plastic
web clips towards the loose ends to keep
them from hanging freely. Push the inner
buckle through the outer buckle plate until
it is interlocked securely in place.
TONGUE BUCKLES:
Change the length by pushing the strap
with grommets through the buckle. Make
sure leg straps are evenly adjusted.
Never twist the leg strap webbing. Extra
straps should always be tucked away
comfortably in the web keepers or loops
provided. Straps should always be kept
under tension and the excess strap stored
securely so that the tongue does not
become disengaged from the grommet hole.
Insert buckle tongue through grommet hole
and pull strap back so tongue “seats”
against buckle frame.
14
Knurled Bar
TRAINING
Hands-on training is essential for all users to completely understand the capabilities and
limitations of their fall arrest equipment. Personal training promotes safety and must be
conducted under careful and qualified supervision. An initial training session should be
conducted to familiarize all users. Annual review should be conducted as an additional
practice with the equipment.
Store this instruction manual where it is easily accessible so users can review it whenever
required. Additional copies of the instruction manual are available free online for download
under the Literature link at rigidlifelines.com.
SUGGESTED TRAINING TOPICS:
•
•
•
•
•
•
•
•
•
•
•
•
•
•
Use proper equipment selection for each specified application.
Be sure the harness properly fits and is snug.
Understand the requirements and limitations of the equipment.
Understand that the consequences of not following or understanding these instructions
could result in serious injury or death.
Determine and reduce free fall distances.
Recognize and eliminate fall hazards.
Environmental considerations and other workplace factors.
Understand and recognize the four parts of a fall arrest system: Anchorage, Body
Support (Harness), Connector, and Deceleration Device.
Avoid incompatible connections and be aware of snaphook roll-out (burst-out).
Always inspect and maintain equipment.
Always use the buddy system while using fall protection.
Have a pre-determined rescue plan.
Always read and understand all manuals and warning labels concerning all parts of the
fall arrest system.
More topics may need to be covered and training should be specific for your particular
site and use.
INSPECTION
Inspection charts must be updated on a timely basis, and dates recorded. A visual
inspection must be conducted by each user before every use and at least once a year by a
competent person. At the end of these instructions (Pg. 18) an inspection chart is provided
for your use. In caustic or corrosive environments equipment may require more frequent
formal inspection. Never store harnesses near acid, acid vapors, or battery charging
stations.
If equipment is found to have any damage, the item must be removed from service
immediately. Damaged equipment must be marked “DO NOT USE” and replaced. Call
Rigid Lifelines at (800) 869-2080 for help with replacement.
15
! WARNING
r
INSPECTION
continued...
FAILURE TO REMOVE DAMAGED EQUIPMENT OR EQUIPMENT IN QUESTIONABLE CONDITION
COULD LEAD TO SERIOUS INJURY OR FATALITY.
HOW TO INSPECT: Every inch of webbing and the assembled harness parts must be inspected
for cuts, rust corrosion, fraying, tears or any other signs of damage and wear. Sewn threads
should not be visibly damaged. All threaded connections must not be loose. Check entire
length of each strap by bending the strap into a U-shape. Check front and back of straps,
grommets, buckles, D-rings, and all parts of the entire harness. Any harness with noticeable
wear or damage must be removed from service immediately. Contact Rigid Lifelines for help
with replacement.
INSPECT FOR CONTAMINANTS
HEAT OR TEMPERATURE: Never use harness in temperatures over 135°F and never expose
harness to temperatures over 135°F. Webbing and thread will be permanently damaged and
become brittle and break easily.
ACID VAPORS AND ACID: Acid vapors from battery charging stations can catastrophically weaken
the fiber without any noticeable change in flexibility. Never store harnesses near batteries,
battery chargers, or sources of acid vapor.
DIRT AND GRIT: Dust can work in between webbing threads and lead to premature failure.
CHEMICALS: Strap will change color, possibly appearing as a brown smudge or smear.
Material becomes less elastic.
FLAME OR MOLTEN METALS: Fibers melt together and become hard, fragile, and/or shiny.
PAINTS AND SOLVENTS: Paint can seep into fibers and dry, causing the strap to become hard
and fragile. Solvents and drying agents with paint cause similiar damage to chemical
exposure.
SOLAR EXPOSURE: Solar exposure and/or exposure to UV rays weakens the fabric and will
eventually weaken the fibers, allowing the fibers to break easily.
INSPECT COMPONENTS AND CONNECTORS
FALL INDICATORS: The fall indicator should be intact. If any of the warning label wording is
showing, the harness must be replaced. Call Rigid Lifelines at (800) 869-2080 for help
with replacement.
D-RING: D-rings must not be bent, worn, or have rough or sharp edges.
16
INSPECTION
continued...
LABELS: Labels must be on, secure, and
legible.
BUCKLES: Buckles should be inspected
thoroughly. Check for broken or bent
components, or unusual wear. Moveable
components must move smoothly. Buckle
tongue must overlap with buckle frame.
Watch for signs of
wear on stitching
STITCHES: If stitching shows any signs of
wear, replace the harness immediately.
MAINTENANCE, STORAGE & CLEANING
MAINTENANCE:
Serious or fatal injury may occur if equipment is not maintained or stored properly.
Protective equipment must have regular maintenance to ensure that the equipment will
perform properly when needed.
A regular maintenance program, including keeping detailed records, should be maintained
and updated at a minimum interval of every six months, or less if the competent person
feels the equipment sees severe service. Adjustments, repairs, or substitute of any part of a
Rigid Lifelines harness with parts made by other manufacturers are prohibited. Call Rigid
Lifelines if clarification is required.
! WARNING
r
NEVER MAKE ANY ADJUSTMENTS OR REPAIR, OR SUBSTITUTE ANY PART OF A RIGID LIFELINES HARNESS.
CALL RIGID LIFELINES FOR SERVICE AT (800) 869-2080.
STORAGE:
Harnesses should be stored in a clean, dry area free from exposure to harmful fumes, acid
fumes, corrosive agents, or UV rays and sunlight. Equipment instructions should be
available for all users at all times.
CLEANING:
Regularly wash and clean the harness if it is exposed to excessive dust or dirt. A mild soap
detergent may be used to wash the harness equipment if it is exposed to excessive dust or
dirt.
Proper storage, care, and suitability of use is ultimately the responsibility of the user or the
user’s management.
17
INSPECTION RECORDS
The following Inspection Log can be used for harness inspections. Equipment must be
inspected prior to use by each user. If issues are found, the product must be removed from
service, recertified (if applicable), or destroyed if it does not pass the inspection.
A Competent Person (other than the user) must inspect the equipment at least once a year.
Use a Fall Protection Inspection Checklist every day to monitor the condition of each piece
of equipment.
Product Description
Serial #
Date in
Service
Inspection
Date
18
Employee
Name
Pass
Fail
LABELS
The labels shown below should appear on your Rigid Lifelines harness. Labels should be
legible. If labels are not legible, please contact Rigid Lifelines at (800) 869-2080.
Warning Label
Appears on the inside of backstrap
Model/Inspection Label
Located on the inside of
harness
Logo Label
Appears on the outside of backstrap
Load Indicator Label
There should be two of these labels
located on the outside of the harness
just below the D-Ring.
19
Rigid Lifelines
604 Hemlock Road
Morgantown, PA, 19543
Toll Free: (800) 869-2080
Local: (610) 286-7200
Fax: (610) 286-0085
RigidLifelines.com
TEN-YEAR EQUIPMENT WARRANTY
Rigid Lifelines warrants the engineered track equipment, wearable end truck wheels, and Anchor Trolley™ wheels and teeth to be free from
defects in material and workmanship for a period of ten (10) years commencing on the date of installation.
TWO-YEAR EQUIPMENT WARRANTY
Rigid Lifelines warrants XSPlatforms Fall Protection components to be free from defects in material and workmanship for a period of two (2)
years commencing from the date of installation.
ONE-YEAR EQUIPMENT WARRANTY
Rigid Lifelines warrants the motorized products and drive components to be free from defects in material and workmanship for a period of one
(1) year, commencing on the date of shipment to the first retail purchaser (“Purchaser”).
Rigid Lifelines warrants all Rigid Lifelines fall protection soft goods, devices, connectors, and accessories to be free from defects in material
and workmanship for a period of one (1) year, commencing on the date of shipment to the first retail purchaser (“Purchaser”).
Rigid Lifelines is dedicated to offering superior service and quality products to all of our customers. If you would like to contact a customer
service representative, please call the following number: 1 (800) 869-2080. We will be happy to assist you in any way that we can.
These warranties do not extend to equipment which has been subject to misuse, use in excess of rated capacity, negligent operation, use
beyond Rigid Lifelines published service factors, improper installation or maintenance, adverse environments, and does not apply to any
equipment which has been repaired or altered without Rigid Lifelines written authorization. This warranty is void for any product that is
designed to deform or absorb energy during a fall event and needs to be replaced after a fall event has occurred.
Written notice of any claimed defect must be given to Rigid Lifelines within thirty (30) days after such defect is discovered. Rigid Lifelines
obligation, and Purchaser’s sole remedy under this warranty is limited to, at Rigid Lifelines discretion, the replacement or repair of the
equipment at Rigid Lifelines factory or at a location approved by Rigid Lifelines. THIS WARRANTY IS EXPRESSLY IN LIEU OF ALL OTHER
WARRANTIES WHATSOEVER WHETHER EXPRESS, IMPLIED, OR STATUTORY. SELLER MAKES NO WARRANTY AS TO THE
MERCHANTABILITY OR FITNESS FOR A PARTICULAR PURPOSE OF THE EQUIPMENT AND MAKES NO OTHER WARRANTY, EITHER
EXPRESS OR IMPLIED.
Rigid Lifelines shall not be liable, under any circumstances, for any indirect, special, or consequential damages including (but not limited to):
lost profits, increased operating costs, or loss of production. This warranty shall not extend to damages including (but not limited to): lost
profits, increased operating costs, or loss of production. This warranty shall not extend to any components or accessories not manufactured by
Rigid Lifelines (example: casters), with the exception of the components, systems, or accessories involved with XSPlatforms, and purchaser’s
remedy for such components and accessories shall be determined by the terms and conditions of any warranty provided by the manufacturer
of such components and accessories.
SERVICE POLICY
1.
Obtain as much information as possible concerning the problem through personal observation by yourself or other authorized personnel
familiar with the job and equipment: include model, serial and/or part numbers, voltages, speeds and any other special identifying
features. Be prepared to discuss the situation in detail.
2.
All authorized labor charges will be based on straight time. Hourly rates, estimated man hours, and not to exceed total dollar amount
required for corrections are to be agreed upon before authorization is given. There will be no allowances for overtime except in dire
emergencies and then only with prior approval.
3.
A verbal agreement may be reached immediately on both the method of correction and the approximate cost. A warranty authorization
number will be assigned for the specific incident. A confirming written authorization will be forwarded to the distributor.
4.
The distributor must send an itemized invoice, showing our release number or invoice number and warranty authorization number after
authorized corrections have been made. A credit memo will be issued by accounting after the invoice has been received and approved.
Warranty charges ARE NOT to be deducted from outstanding open account invoices under any circumstances.
5.
Any field corrections made prior to an authorization by Rigid Lifelines will not be accepted as a warranty charge or the responsibility
of Rigid Lifelines. Any modification to the equipment made without the prior approval of the seller will void all warranties. A verbal
authorization for modification may be obtained, in which event a warranty authorization number will be assigned for the specific
modification. A confirming written authorization will be forwarded to the distributor.
20