1
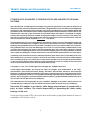
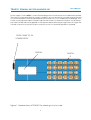
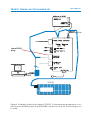
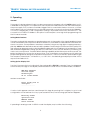
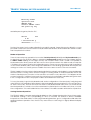
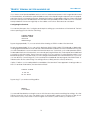
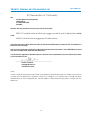
TERMINAL UNIT FOR HANDHELD USE IN INDUSTRY
TEAK30
TERMINAL UNIT FOR HANDHELD USE IN INDUSTRY
User's Manual for
Model TEA
Rev K30
PART #700186
2015-09
Made in Finland
Manual printed in
Finland
Visilab Signal Technologies Oy
Address:
Tel.:
Keskustie 15
+358-45-635 4885
FI-07560 PUKKILA, FINLAND
1
Copyright (c) 2015 Visilab
Signal Technologies Oy
TEAK30 TERMINAL UNIT FOR HANDHELD USE
User's Manual
CONDITIONS OF GUARANTEE, COPYRIGHT NOTICE AND LIABILITIES OF THE MANUFACTURER
The manufacturer (Visilab Signal Technologies Oy) grants a guarantee of two years for the buyer of
TEAK30 moisture meter from the date of purchase. The guarantee covers all faults and misalignment
which are in the equipment at the moment of purchase including those which appear during the
guarantee period. The manufacturer is liable of repairing the instrument without cost to the buyer. The
manufacturer can ship a new instrument of equivalent value and status if considered as a better
solution than repairing. The buyer is liable of paying the freight costs to the factory of the faulty unit.
The unit must not be sent to the manufacturer without a permission from the manufacturer. Units sent
without a permission will be repaired at the cost of the buyer.
The guarantee does not cover wearing parts, like batteries, lamps or motors. The guarantee does not
cover faults caused by errors or neglects of the user nor those faults which are caused by deliberate
breaking. The guarantee does not cover faults caused by incorrectly installed cables or conductors.
The guarantee does not cover any damages to the user or to any third party independently of the
way how the instrument has been used. The guarantee does not cover faults caused by natural
phenomena like lightnings or floods, nor user errors like dropping the unit. The guarantee is void if the
unit is sold to any third party. All faults which are not covered will be repaired at the cost of the buyer.
If opening of the instrument has been attempted at those parts which are not intended for the user,
the manufacturer can refuse to repair or service the instrument. Then the instrument will be shipped
back to the buyer at the cost of the buyer. Such parts are the light source, the optical head and parts
on the electronics board. The instrument can be opened only strictly according to the instructions
in this manual and should not be disassembled unnecessarily.
Copyright (c) 1994 - 2015 Visilab Signal Technologies Oy, All Rights Reserved
Visilab Signal Technologies Oy reserves all rights to changes and modifications in the looks,
specifications, optical and electronic design, electronic and software interfaces and computer
programs, and also the right to change the retail prices of the instrument or its parts without any notice
to present or potential customers. All copyrights and design rights belong to Visilab Signal Technologies Oy. The PC programs, which have been sold to the buyer, can be used and copied freely for his
own use but can not be sold to any third party.
The manufacturer is not responsible for any casualties, damages or accidents which the user has
caused directly or indirectly with this TEAK30 instrument, either to himself or to any third party.
Especially this applies to accidents while doing measurements in paper mills in
press or dryer sections. The whole responsibility of operating this meter safely
belongs to the user.
Note that the model -TEB is discontinued and battery supported terminals are not
available until further notice.
2
TEAK30 TERMINAL UNIT FOR HANDHELD USE
User's Manual
Contents
1. Introduction and Taking into Use
General
4
Installation
4
Connecting the Cables
2. Operating
4
4
9
General
9
Setting Meter Features
9
Setting Up the Display Unit
9
Modes of Operation
10
Analog Interface Operation
10
11
11
The moisture reading is now given in percent according to the original calibration passing to TEAK30 via the voltage message. The two lower lines indicate present time and
date. TEAK30 has an internal clock which can be configured correctly. The time setting
will be cleared if the PS is turned off.
11
11
The moisture reading has an optional low-pass filter. It can be turned on/off in the
configuration menus. Normally, measurement continues forever until interrupted by the
user. No data values are saved, just the reading is displayed.
11
11
Making Measurements
11
12
Configuring the Terminal
12
Appendix 1. Schematics of the TEAK30 connections.
Index 17
3
14
TEAK30 TERMINAL UNIT FOR HANDHELD USE
User's Manual
1. Introduction and Taking into Use
This document instructs you on how to use the display unit model TEA for AK50 moisture meter family.
Refer first to your existing AK50 operating manuals for other instrument features not mentioned in this
document. The current product revision is K30 which supersedes the earlier versions.
General
Model TEA is a handheld terminal for managing your AK50 moisture meters and its derivatives as also
for many other products made by Visilab Signal Technologies. It can be used with many other
products requiring a simple ANSI terminal. It is designed for handheld measurements operating with
external power. TEAK30 can be used either as an analog interface, connected to a DC analog signal
0..10V, or as a digital terminal connected to the serial port RS232.
The moisture meter operates in Keyboard mode all the time when this terminal is used as a digital
terminal. When used as an analog interface, it does not matter since it is not connected to the serial
port at all. When acting as a terminal, all equipment settings can be done with it, the autotimer can
be started manually, the resulting data series can be analyzed statistically and edited in the menu
system as described in the model D manuals. In these operations, the display unit works as a plain
terminal with no intelligence of its own; most of the work is done by the moisture meter itself. The display
unit can be used connected to either RS232 with a standard D9 male connector and a three-wire
cable. The terminal unit can be used for other simple terminal (ANSI) applications where plain text
information is to be received and some key presses are to be sent to the device. Note then the pin
ordering of the RS232 connector which depends on it being a DTE or a DCE equipment (receive and
transmit lines interchanged). If your system requires a switched pin ordering, open the cable
connector box and swap the wires with a soldering iron.
By default, the cables are preset at factory and connected to the power supply unit -PS. No
modifications are necessary. The terminal is powered as soon as the -PS is turned on. It can start
operation as an analog interface right away. If operation as a terminal is required, connect the loose
RS232 plug to the RS232/485 connector in the -PS.
When operating handheld in paper mills near paper machines or like, there is always the risk of losing
the instrumentation. That risk exists when measuring near fast rotating rollers in difficult conditions. The
moisture meter, parts of it or the terminal unit may be dropped to the web or it may become
entangled into the web or machinery. Visilab Signal Technologies takes no responsibility of lost
equipment or damaged paper machines. The responsibility of working at such positions is fully on the
user's side. One should have proper insurances before operating any handheld instruments there and
should always have extra caution. An assistant is recommended for increased safety.
Installation
For installing and configuring the TEAK30 successfully, the following items should be available:
1. User's manual (this) and other manuals enclosed with the moisture meter model D
2. The TEAK30 unit itself
3. Serial connection cable for RS232 (usually integral with the system/cabling).
4. Other accessories of the moisture meter AK50
Connecting the Cables
The cabling is the same as in a standard model D without a PC. Do not apply power yet! Connect
the cables as shown in Figure 2, for portable or for fixed use. Connect first the cable from the meter's
4
TEAK30 TERMINAL UNIT FOR HANDHELD USE
User's Manual
power supply -PS to the AK50. Connect the air tubing to the moisture meter. It is not advised to operate
without the cooling air in difficult or warm conditions, else you put at risk your measuring results and
your instrumentation. If the external temperature exceeds +35C you should always use air purge. Also,
if there is a strong water vapor flying around the web where you intend to measure, use air always.
Else water condensation may appear on the optical surfaces affecting strongly the results. Plug in the
D9 male connector to the RS232/485 connector on the -PS if terminal operation is required.
12-PIN CABLE TO -PS
POWER SUPPLY
DISPLAY
24 KEYS
123456789012345678901234567890121234567890123456789012345678901212345678901234567890123456789012123456789012345678901234567890121234
123456789012345678901234567890121234567890123456789012345678901212345678901234567890123456789012123456789012345678901234567890121234
123456789012345678901234567890121234567890123456789012345678901212345678901234567890123456789012123456789012345678901234567890121234
123456789012345678901234567890121234567890123456789012345678901212345678901234567890123456789012123456789012345678901234567890121234
123456789012345678901234567890121234567890123456789012345678901212345678901234567890123456789012123456789012345678901234567890121234
12345678
12345678
123456789
12345678
12345678
123456789
123456789012345678901234567890121234567890123456789012345678901212345678901234567890123456789012123456789012345678901234567890121234
123456789012345678901234567890121234567890123456789012345678901212345678901234567890123456789012123456789012345678901234567890121234
12345678
12345678
123456789
12345678
12345678
123456789
123456789012345678901234567890121234567890123456789012345678901212345678901234567890123456789012123456789012345678901234567890121234
12345678
12345678
123456789
12345678
12345678
123456789
123456789012345678901234567890121234567890123456789012345678901212345678901234567890123456789012123456789012345678901234567890121234
12345678
12345678
123456789
12345678
12345678
123456789
123456789012345678901234567890121234567890123456789012345678901212345678901234567890123456789012123456789012345678901234567890121234
12345678
12345678
123456789
12345678
12345678
123456789
123456789012345678901234567890121234567890123456789012345678901212345678901234567890123456789012123456789012345678901234567890121234
12345678
12345678
123456789
12345678
12345678
123456789012345678901234567890121234567890123456789012345678901212345678901234567890123456789012123456789012345678901234567890121234
12345678 12345678 123456789 12345678 12345678 123456789
123456789
123456789012345678901234567890121234567890123456789012345678901212345678901234567890123456789012123456789012345678901234567890121234
123456789012345678901234567890121234567890123456789012345678901212345678901234567890123456789012123456789012345678901234567890121234
123456789012345678901234567890121234567890123456789012345678901212345678901234567890123456789012123456789012345678901234567890121234
123456789012345678901234567890121234567890123456789012345678901212345678901234567890123456789012123456789012345678901234567890121234
12345678
12345678
123456789
12345678
12345678
123456789
123456789012345678901234567890121234567890123456789012345678901212345678901234567890123456789012123456789012345678901234567890121234
12345678
12345678
123456789
12345678
12345678
123456789
123456789012345678901234567890121234567890123456789012345678901212345678901234567890123456789012123456789012345678901234567890121234
12345678
12345678
123456789
12345678
12345678
123456789
123456789012345678901234567890121234567890123456789012345678901212345678901234567890123456789012123456789012345678901234567890121234
12345678
12345678
123456789
12345678
12345678
123456789
123456789012345678901234567890121234567890123456789012345678901212345678901234567890123456789012123456789012345678901234567890121234
12345678
12345678
123456789
12345678
12345678
123456789
123456789012345678901234567890121234567890123456789012345678901212345678901234567890123456789012123456789012345678901234567890121234
12345678
12345678
123456789
12345678
12345678
123456789
123456789012345678901234567890121234567890123456789012345678901212345678901234567890123456789012123456789012345678901234567890121234
123456789012345678901234567890121234567890123456789012345678901212345678901234567890123456789012123456789012345678901234567890121234
12345678
12345678
123456789
12345678
12345678
123456789
123456789012345678901234567890121234567890123456789012345678901212345678901234567890123456789012123456789012345678901234567890121234
123456789012345678901234567890121234567890123456789012345678901212345678901234567890123456789012123456789012345678901234567890121234
12345678
12345678
12345678
12345678
12345678
12345678
123456789012345678901234567890121234567890123456789012345678901212345678901234567890123456789012123456789012345678901234567890121234
12345678
12345678
12345678
12345678
12345678
12345678
123456789012345678901234567890121234567890123456789012345678901212345678901234567890123456789012123456789012345678901234567890121234
12345678
12345678
12345678
12345678
12345678
12345678
123456789012345678901234567890121234567890123456789012345678901212345678901234567890123456789012123456789012345678901234567890121234
12345678
12345678
12345678
12345678
12345678
12345678
123456789012345678901234567890121234567890123456789012345678901212345678901234567890123456789012123456789012345678901234567890121234
12345678
12345678
12345678
12345678
12345678
12345678
123456789012345678901234567890121234567890123456789012345678901212345678901234567890123456789012123456789012345678901234567890121234
123456789012345678901234567890121234567890123456789012345678901212345678901234567890123456789012123456789012345678901234567890121234
12345678
12345678
12345678
12345678
12345678
12345678
123456789012345678901234567890121234567890123456789012345678901212345678901234567890123456789012123456789012345678901234567890121234
12345678
12345678
12345678
12345678
12345678
12345678
123456789012345678901234567890121234567890123456789012345678901212345678901234567890123456789012123456789012345678901234567890121234
12345678
12345678
12345678
12345678
12345678
12345678
123456789012345678901234567890121234567890123456789012345678901212345678901234567890123456789012123456789012345678901234567890121234
123456789012345678901234567890121234567890123456789012345678901212345678901234567890123456789012123456789012345678901234567890121234
12345678
12345678
123456789
12345678
12345678
123456789
123456789012345678901234567890121234567890123456789012345678901212345678901234567890123456789012123456789012345678901234567890121234
12345678
12345678
123456789
12345678
12345678
123456789
123456789012345678901234567890121234567890123456789012345678901212345678901234567890123456789012123456789012345678901234567890121234
12345678
12345678
123456789
12345678
12345678
123456789
123456789012345678901234567890121234567890123456789012345678901212345678901234567890123456789012123456789012345678901234567890121234
123456789012345678901234567890121234567890123456789012345678901212345678901234567890123456789012123456789012345678901234567890121234
12345678
12345678
123456789
12345678
12345678
123456789
123456789012345678901234567890121234567890123456789012345678901212345678901234567890123456789012123456789012345678901234567890121234
12345678
12345678
123456789
12345678
12345678
123456789
123456789012345678901234567890121234567890123456789012345678901212345678901234567890123456789012123456789012345678901234567890121234
12345678
12345678
123456789
12345678
12345678
123456789
123456789012345678901234567890121234567890123456789012345678901212345678901234567890123456789012123456789012345678901234567890121234
12345678
12345678
123456789
12345678
12345678
123456789
123456789012345678901234567890121234567890123456789012345678901212345678901234567890123456789012123456789012345678901234567890121234
12345678 12345678 123456789 12345678 12345678 123456789
123456789012345678901234567890121234567890123456789012345678901212345678901234567890123456789012123456789012345678901234567890121234
123456789012345678901234567890121234567890123456789012345678901212345678901234567890123456789012123456789012345678901234567890121234
123456789012345678901234567890121234567890123456789012345678901212345678901234567890123456789012123456789012345678901234567890121234
123456789012345678901234567890121234567890123456789012345678901212345678901234567890123456789012123456789012345678901234567890121234
Figure 1. General view of TEAK30. The drawing is not to scale.
5
TEAK30 TERMINAL UNIT FOR HANDHELD USE
7 8 9
4 5 6
1 2 3
.
0
*
Config
BATCH/
BATCH/
NORMAL
TAB
+
AUTO ON
NORMAL/EX
BANK
SELECT
STAT'S
-
AUTO OFF
User's Manual
Menu
ESC
BAR
SCALE
BAR
SCALE
Low
Power
Enter
SELECT
MATERIAL
SELECT
MATERIAL
Figure 2. View of TEAK30's keyboard. The drawing is not to scale.
6
TEAK30 TERMINAL UNIT FOR HANDHELD USE
User's Manual
Loose RS232
plug
TEAK30
12345678901234567890123456789012123456789012345678901234567
12345678901234567890123456789012123456789012345678901234567
12345678901234567890123456789012123456789012345678901234567
12345678901234567890123456789012123456789012345678901234567
12345678901234567890123456789012123456789012345678901234567
12345678901234567890123456789012123456789012345678901234567
12345678901234567890123456789012123456789012345678901234567
12345678901234567890123456789012123456789012345678901234567
12345678901234567890123456789012123456789012345678901234567
12345678901234567890123456789012123456789012345678901234567
12345678901234567890123456789012123456789012345678901234567
12345678901234567890123456789012123456789012345678901234567
12345678901234567890123456789012123456789012345678901234567
12345678901234567890123456789012123456789012345678901234567
12345678901234567890123456789012123456789012345678901234567
12345678901234567890123456789012123456789012345678901234567
12345678901234567890123456789012123456789012345678901234567
12345678901234567890123456789012123456789012345678901234567
12345678901234567890123456789012123456789012345678901234567
12345678901234567890123456789012123456789012345678901234567
Figure 3. Assembly of electrical cables in TEAK30. For terminal mode operation, connect the loose RS232 plug to the RS232/485 connector in the -PS. The drawing is not
to scale.
7
TEAK30 TERMINAL UNIT FOR HANDHELD USE
Figure 4. A typical assembly for a moisture meter and TEA-K30
8
User's Manual
TEAK30 TERMINAL UNIT FOR HANDHELD USE
User's Manual
2. Operating
General
This product is designed specifically to make measurements at paper mills with AK50 easier if no PC
is available or carrying a PC is not practical. One can perform measurements with the meter itself plus
the power supply -PS if you have some kind of trigger switch connected to the box. However, you have
then no direct way of confirming a successful measurement as you can not see the results immediately.
Of course, changing any of the configuration settings is impossible without any terminal or PC. The
connection to Profibus DP fieldbus is an option too but requires some high-level programming with
the DP master module.
Setting Meter Features
The web running at high speed poses great requirements to the quality of the signal handling to keep
out all unwanted noise components and simultaneously to be able to make transient-like measurements of moisture. These problems have been solved by using a very high light chopping frequency
(400 Hz). AK50 and its derivatives are actually capable of measuring moisture even at this speed. This
high speed can be employed in collecting data to data series for recording moisture transients. There
are six different digital filter settings (NONE, FAST, MEDIUM, SLOW, SPECIAL and BOX) for filtering out
various noise components. The filters differ in filtering capability and in their response times as well: The
better the filtering, the slower the response time. One should gain some experience with selecting
proper filtering before doing any important measurements. Use as slow filter as is practicable to get
the frequency band that is of interest to you. SPECIAL is the default general-purpose filter with a
response time about 0.5s.
Setting Up the Display Unit
Turn the -PS power switch on to allow both the meter and the TEAK30 to operate. There should appear
a momentary message on the display and thereafter the main menu should be visible, see below.
TEA-K30 Terminal
Visilab Signal
Technologies
V3.01 115200 bauds
and a moment later:
Press Config now to
configure..
...............
A series of dots appears and one can interrupt this stage by pressing the Config key to go to local
configuration of the terminal. If no key is pressed at this time, the following optional text appears.
Entering normal
operation with
ANALOG INPUT
Scale:10V=100%
if operating in analog mode. In SERIAL mode the display may look like the following.
9
TEAK30 TERMINAL UNIT FOR HANDHELD USE
User's Manual
Entering normal
operation with
SERIAL PORT
Connect SERIAL cable
and press any key
and after pressing a key like the ESC:
Series
23C
4.8%
1 Uncoated 200 g
333333333-----------
Perform the same checks as described in the model D manual. If everything works all right, you can
proceed. Leave the moisture meter into Keyboard mode and the TEAK30 terminal in SERIAL mode if
that is required in the future.
Modes of Operation
The moisture meter can operate in two modes: Packet protocol (default) and Keyboard mode (only
for terminal use). The TEAK30 is able to operate in Analog mode reading only the voltage signal or
in SERIAL mode reading in messages sent by the moisture meter which should now operate in
Keyboard mode. All key presses are also sent to the moisture meter in the latter mode, except the
Config key which opens up a local configuration menu. There one can select the mode of operation
of the TEAK30 and do many other things, like calibration of the analog signal and save the present
settings for future use. The key presses made in the menus are not sent to the moisture meter.
TEAK30 is able to turn the meter to Keyboard mode itself assuming its serial cable is connected already
and the meter is running. When TEAK30 changes to Analog mode, it will automatically restore the
meter to Packet protocol mode. So the user does not have to worry about this. This happens at the
moment when the Config key is pressed or the user returns to the selected mode after doing other tasks
in the Configuration menu. The proper mode is activated when necessary.
To force the meter to go into Keyboard mode, enter configuration of the terminal (Config key) and
select SERIAL PORT operation. Return back to terminal operation by pressing the ESC key as many times
as seems necessary. TEAK30 will force the meter to Keyboard mode every time you enter actual
terminal operation. It will also force the meter back to packet protocol mode every time you enter
the configuration. This method diminishes the number of trouble caused in all instances in practice.
Analog Interface Operation
The TEAK30 is able to acquire analog signal data from the voltage signal sent by the moisture meter.
The default scaling is 10V corresponding to 100% of moisture. This feature is always available
irrespective of the serial cable. To start using the analog interface, go to Configuration and select the
analog interface operation. Press the ESC key a few times to start using it. A slightly different display
appears.
10
TEAK30 TERMINAL UNIT FOR HANDHELD USE
User's Manual
20.7%
3:39:24
01-01-2009
The moisture reading is now given in percent according to the original calibration passing to TEAK30
via the voltage message. The two lower lines indicate present time and date. TEAK30 has an internal
clock which can be configured correctly. The time setting will be cleared if the PS is turned off.
The moisture reading has an optional low-pass filter. It can be turned on/off in the configuration
menus. Normally, measurement continues forever until interrupted by the user. No data values are
saved, just the reading is displayed.
Making Measurements
Connect the cables, turn the power switches on for the AK50 and TEAK30. There should appear
momentary messages on the display as described earlier. The text messages familiar in model D
measuring state (moisture values, temperature etc.) should be visible when the terminal is allowed to
operate in SERIAL mode. If no messages are visible, then the meter is either off or it is still in Packet
protocol mode. To clear this, press the Config button and return back to terminal operation by
pressing the ESC key a few times. Now you should see some messages. If the display is cluttered, press
'9' to restore it. If you wish to make any changes in meter settings or other configurations (like to the
autotimer), press the Menu key. The main menu should appear. You can return back from any menu
by pressing the ESC key repeatedly. Make sure your autotimer settings are correct (Batch/Normal
modes, interval, Batch size, memory bank, materials selection etc.). Then you can return to the
measuring state and prepare for placing the optical head close to the web. You can also prepare
and set the BURST mode of the meter.
For best accuracy, turn the meter on for 10 minutes before you actually start measuring. That is
especially important if your meter has been transported in cold weather and it takes some time for
its internal temperature differences to settle.
Place the AK50 so that the optical head is pointing at the web at the position you want to measure.
It is preferred that you fix it there with some temporary holder. The distance to the web should be set
according to the meter specifications (200 to 250 mm typically) and the working angles (both typically
zero degrees longitudinal and latitudinal) as expressed in documentation about calibrations. Other
angles may be used if glossy materials are to be measured. There should be some whining noise at
the optical head when the light source chopper starts operating (unless it is in low-power mode). A
visible but dim white light should be observed at the web surface.
When done, you may start the autotimer by pressing '+' or by using the trigger input line (close it
momentarily to the isolated ground). The duration of the autotimer operation is dictated by the Batch
size (Batch mode) or manually by you (Normal mode). The sample counter is increasing while
sampling. When done, the text Auto or Batch disappears from the display. You can now calculate
statistics by pressing '*'. If you press twice '1' the data will be cleared, else it will be kept. You can later
download the data to a PC. Use the memory banks for separating smaller sampled series. The
frequency analysis features are fully available in the PC programs and in latest model D meters as a
limited version.
You can switch to another material table by pressing the arrow keys UP or DOWN. The arrow keys to
the left and right can be used for scaling the bar display on the fourth line as usual. Refer to PC Program
User's Guide for more details of the available commands in the measuring state.
11
TEAK30 TERMINAL UNIT FOR HANDHELD USE
User's Manual
If you have some tripod available and you wish to make measurements with longer duration and
increased safety, assemble the optical head securely to the tripod. Bring the tripod close to the paper
machine where you intend to measure. Prepare the meter to make data collection. Place the head
into the correct position and distance with the aid of the tripod adjustments and lock it. Do not leave
the tripod alone! Someone might trip on the cables on the floor and cause an accident.
Configuring the Terminal
You can anytime press the Config key and step into setting up some feature of the terminal. The text
menu opening up looks like the following.
1=Mode:ANALOG
2=Bauds:38400
3=Clock
4=Settings
By pressing repeatedly "1" you can select either Analog or SERIAL mode of the terminal.
By pressing repeatedly "2" you can switch between 9600/19200/38400/115200 bauds of data rate.
Changing the baud rate assumes that the same baud rate has been set in the meter before this, else
you will not be able to communicate with the meter anymore. To do that, you should operate in SERIAL
mode and enter the moisture meter's own menu by pressing the Menu key. That requires an established
connection with the meter. There, the menu option "8" shows options for selecting the meter's own
baud rate properly. Only after that you can change the baud rate of the terminal TEAK30. Of course,
you can do it by connecting a PC to the serial port instead and start a program, like IRMA7Basic or
Advanced to do the same thing. The settings are most likely preset correctly at factory.
Option "3" allows you to manipulate the and date of the terminal. These appear in Analog mode on
the LCD and are maintain by the terminal unit itself.
1=Date 2=Time
0:39:12
01:01:2010
By pressing "1" you enter a setting editor.
mmddyy
1-01-2010
You can edit the date by moving the cursor with the arrow keys and overwriting the settings. Also the
TAB key jumps the cursor from one field to next. A similar editor opens up for the time of day clock.
Press the ESC a key a few times to return higher in the menu system where you came from.
12
TEAK30 TERMINAL UNIT FOR HANDHELD USE
User's Manual
Pressing "4" allows you to enter the section of settings.
1=SaveCFG 2=Factory
4=Erase 9=Test
5=LPF:Y 6=CalibVin
8=Bauds:38400
There you can save practically all the settings you have touched to a nonvolatile memory which is
read next time the TEAK30 starts running. If the terminal seems corrupt in some way, you can restore
factory settings by pressing "2". That will clear all settings including analog signal calibrations and
some defaults are used instead. You need to check all the most important settings after this and then
Save the configuration. Option Erase "4" is not for an ordinary user and also the Test section should be
left out of scope. Option "5" allows you to turn on/off the low-pass filter of the Analog signal interface.
The use of the LPF makes response times to signal variations a bit slow but usually do not interfere much
in handheld use.
Option "6" allows you to enter calibration of the Analog interface. A menu opens up.
Analog in:
3=Low 4=High
5=Calc 6=Test
7=Slope 8=Offset
In "3" you manage to get a known moisture value in the meter producing an analog voltage in the
ratio of 10V/100% of moisture. A low value is required for this, typically below 10% of moisture or voltage
under 1.0 Volts. Check the current value and then press "3" to feed that reading in. In "4" you do the
same for some higher voltage or moisture reading. The optimal value would be higher than 60% or
6.0 V. After finishing these two tasks, press "5" to calculate new coefficients for the calibration. They
can be checked in "7" for slope and in "8" for the offset. You can also manually edit them at this point.
In "6" you can check the new calibration offering Volts to display, not percent. When you are satisfied
with the calibration, return to higher level with ESC and Save the settings for the future.
The TEAK30 terminal can be used for reading any other analog voltage but moisture if needed. The
calibration above takes care of scaling it correctly. However, the input voltage range is always 0 to
10 Volts.
13
TEAK30 TERMINAL UNIT FOR HANDHELD USE
14
User's Manual
Appendix 1.
Schematics of
the TEAK30
connections.
TEAK30 TERMINAL UNIT FOR HANDHELD USE
User's Manual
EC Declaration of Conformity
We
Visilab Signal Technologies Oy
Lahdentie 58
FI-04600 Mäntsälä
FINLAND
declare that the
AK50 Process Moisture Logger
meets the intent of the EMC directive 89/336/EEC. Compliance is based on the following harmonized
standards:
Emissions:
EN 50 081 part 2 (industrial environment):1993 referring to :
EN 55 011 radiated, Class A, Group 1
EN 55 011 conducted, Class A, Group 1
Immunity:
EN 50 082 part 2 (industrial environment):1992 referring to (both radiated and
conducted fields):
EN 61000-4
IEC 1000-4
ENV 50140
ENV 50141
ENV 50204
I certify that the apparatus identified above conforms to the requirements of Council Directive 89/
336/EEC.
--------------------------------------------------------Henrik Stenlund
managing director
5th May 1997
Note for users:
When the apparatus identified above is connected by someone to become a part of an industrial
control system, he is also responsible for the EMC compatibility of the resulting system. He is also liable
of providing the necessary optical or galvanic isolations for signals and transient absorbers for other
lines to conform to the EMC directives. This declaration covers also models DL, Di and WAND as they
are identical in all electrical respects to the model D. The expansion modules to be attached to the
meter electrically and mechanically are designed and implemented in the same fashion and are
claimed to be compatible with the EMC directive without individual testing.
The meters and the power source apparatus have been individually tested according to DIN
VDE0701 and DIN VDE0702 for electrical safety.
15
TEAK30 TERMINAL UNIT FOR HANDHELD USE
User's Manual
EC Declaration of Conformity
We
Visilab Signal Technologies Oy
Lahdentie 58
FI-04600 Mäntsälä
FINLAND
declare that the products which are put on the EU market:
IRMA-7 Portable Surface Moisture Logger, model A and its derivatives, AK30/
AK40
AK50 On-line Moisture Logger and its derivatives
meet the intent of the RoHS directive 2002/95/EC and the WEEE directive 2002/96/EC. Compliance is
based on the following.
The instruments belong to Category 9 "Monitoring and Control Instruments" of the WEEE directive and
thus are not required to fulfill the said directives.
I certify that the apparatus identified above conforms to the requirements of Council Directives 2002/
95/EC and 2002/96/EC.
--------------------------------------------------------Henrik Stenlund
managing director
3rd February 2006
Note:
In spite of the fact that the products are not required to fulfill the directives, we make every effort to
comply with the directives in practice. When the Category 9 is moved to be covered the same
requirements as other categories do, we are ready to certify that these products comply with the
directives.
16
TEAK30 TERMINAL UNIT FOR HANDHELD USE
Index
A
Analog 12
ANSI 4
C
calibration 13
Connecting the Cables
4
D
date 12
E
EC Declaration of Conformity 15, 16
I
Installation 4
M
Making Measurements 11
S
Setting Meter Features 9
Setting Up the Display Unit 9
17
User's Manual