Transcript
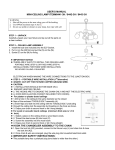
USER’S MANUAL
CHANDELIER ITEM# 6735-4H
WARNING
1. Shut off the power to the area where you will be working.
2. Use 60 watt maximum type A bulb.
3. Do not use polish or cleaner on your lamp, just wipe with soft cloth.
STEP 1 -- UNPACK
1. Carefully unpack your new fixture and lay out all the parts on a clear surface.
2. The bag includes a mounting pack.
STEP 2 -- CHANDELIER ASSEMBLY
1. Thread the PIPE(15) to the NIPPLE(19) until tight.
2. Put the ARM(16) into the NIPPLE(17) and lock with the BALL NUT(18),then place the other side
of the ARM(16) into the NIPPLE(13), then lock with the BALL NUT(14).
3. Put the CANDLE COVER(21) onto the SOCKET(20), then clip the Shade(22) to the bulb.
STEP 3 --- FIX WIRE INSTALLATION
※We advise contacting a q20ualified electrician for this
step.
1. Make wire connections:
---RIBBED WIRE(w/o marking) from light to
WHITE WIRE(2) from power source.
---SMOOTH WIRE(w/ marking) from light to
BLACK WIRE(3) from power source.
---Loop the GROUND WIRE(4) to CROSS BAR(6)
with a GREEN SCREW(11).
2. Attach the CROSS BAR(6) to the OUTLET
BOX(1) by the 2 MOUNTING SCREWS(7).
3. Place the CEILING PAN over the OUTLET BOX(1)
by screwing NIPPLE(8) through KEY WASHER(9)
and HEX NUT(10) and fix with BALL NUT(12).
※ WIRE CONNECTION
FOR WIRE CONNECTION, BE SURE TO CONNECT,
FIXTURE SMOOTH WIRE TO THE BLACK HOUSE
WIRE, RIBBED WIRE TO THE WHITE HOUSE WIRE
AND FIXTURE GROUND WIRE TO SUPPLY GROUND
WIRE WITH WIRE CONNECTORS OR THE FIXTURE
GROUND WIRE FROM THE FIXTURE TO THE GREEN
GROUND SCREW ON THE MOUNTING BRACKET.
※
Your installation is now complete. Turn power
on.
3
4
10
11
1
2
6
7
5
9
8
12
13
22
14
15
16
18
21
20
17
19