1
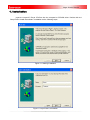
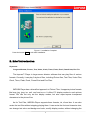
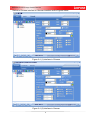
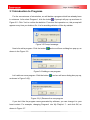
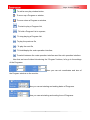
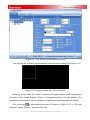
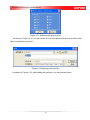
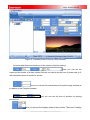
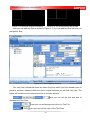
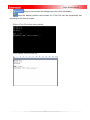
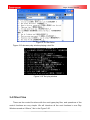
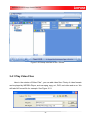
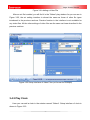
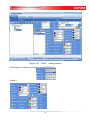
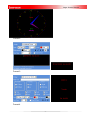
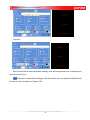
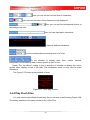
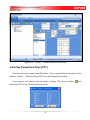
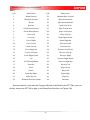
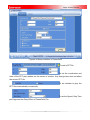
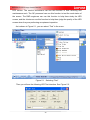
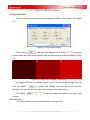
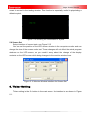
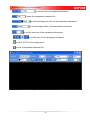
USER’S MANUAL
OF
IMPOSA PLAYER
Version:1.47
Large Screen Director
Copyright Statement
All rights reserved. If not authorized by written permission of IMPOSA™, any person, unit,
organization or group shall not copy any part of this manual by any means including fax,
manuscript, copying, recording, etc.
IMPOSA™ reserves the rights that it can revise any part of this manual without informing any person,
unit, organization or group in advance. No parts in this manual regarding technology should be licensed by
government or its branches.
CONFIGUREURATION OF SYSTEM PLATFORM:
◆ System:
WINDOWS2000/XP or higher versions
◆ Frequency:
60Hz or better
◆ Memory:
256M or better
◆ CPU:
1G Hz or better
1
IMPOSA PLAYER-Large Screen Director
Contents
1. Installation ............................................................................................................................................. 1 2. Brief Introduction................................................................................................................................. 4 3. Display Programs ................................................................................................................................. 6 3.1 Introduction to Programs .................................................................................................................... 9 3.2 Picture Files ..................................................................................................................................... 12 3.3 Text Files .......................................................................................................................................... 19 3.4 Other Files........................................................................................................................................ 23 3.4.1 Play Video Files ..................................................................................................................... 24 3.4.2 Play Clock .............................................................................................................................. 25 3.4.3 Play Timer .............................................................................................................................. 29 3.4.4 Play Flash Files ...................................................................................................................... 30 3.4.5 Play Excel Files ...................................................................................................................... 31 3.4.6 Play PowerPoint Files (PPT) .................................................................................................. 32 3.4.7 Play EXE Files ....................................................................................................................... 36 3.4.8 Play All Files ........................................................................................................................... 37 4. Default Setting .................................................................................................................................... 38 5. Testing ................................................................................................................................................... 39 5.1 Gray Scale Test ................................................................................................................................ 41 5.2 Color Test ......................................................................................................................................... 41 5.3 Scanning Test ................................................................................................................................... 42 5.4 Gray Evolution Test .......................................................................................................................... 43 5.5 Ticker Test ........................................................................................................................................ 44 5.6 Screen Set ....................................................................................................................................... 45 6. Ticker Setting ...................................................................................................................................... 45 7. Help ........................................................................................................................................................ 47 7.1 Menu ................................................................................................................................................ 47 7.2 Transparent Characters.................................................................................................................... 49 7.3 Help .................................................................................................................................................. 52 8. Network Management ...................................................................................................................... 53 8.1 Create Servers ................................................................................................................................. 54 8.1.1 User Management.................................................................................................................. 55 8.2 Create Clients .......................................................................................................................................... 55 8.2.1 Add Server ............................................................................................................................. 55 8.2.2 Delete Server ......................................................................................................................... 57 8.2.3 Edit Server ............................................................................................................................. 57 8.2.4 Remote Control ...................................................................................................................... 57 8.2.5 Read Back Programs ............................................................................................................. 59 8.2.6 Send Files to Server ............................................................................................................... 59 8.2.7 Send Programs ...................................................................................................................... 60 2
Large Screen Director
1. Installation
Insert the Imposa™ Player CD-Rom into the computer’s CD-ROM driver. Double click the
Setup.EXE to install the software. Installation as the following steps:
Figure 1.1 Starting Installation
Figure 1.2 Input User’s Information
1
IMPOSA PLAYER-Large Screen Director
Figure 1.3 Change Destination Directory of Software
Figure 1.4 Select a program installation folder
2
Large Screen Director
Figure 1.5 Start Copying Files
Figure 1.6 Installing
3
IMPOSA PLAYER-Large Screen Director
Figure 1.7 Installation Complete
Press the button Finish to exit after installation.
2. Brief Introduction
Keywords:
Program Window; Picture; Text; Video; Clock; Timer; Flash; Excel; PowerPoint; Exe File
The Imposa™ Player is large-screen director software that can play files of various
formats. Currently, it can play 9 styles of files, including Picture files, Text Files, Video Files,
Clock, Timer, Flash, Excel, PowerPoint and Exe Files.
IMPOSA Player has a diversified approach to Picture Files. It supports picture formats
like bmp, jpg, jpeg, ico, emf, wmf and so on. It offers 172 display modes to each picture
format. You can not only set the display modes, but also super-impose transparent
characters to the picture files.
As for Text Files, IMPOSA Player supports three formats, txt, rtf and doc. It can also
revise the text files without stopping playing them. It can revise the font and character size;
can change text color and background color; modify display modes, without changing the
4
Large Screen Director
source text file.
For video files, it supports the formats as following,
*.AVI;*.MPEG;*.MPG;*.WMV;*.MLV;*.DVR;*.DAT;*.MPE;*.MP2;*.MPA;*.WMA;*.WMD;
*.MID;*.RMI;*.MIDI;*.WAV;*.SND;*.AU;*.AIF;*.AIFC;*.AIFF;*.MP4;*.ASX;*.MOV;*.MPGA;
*.OGG;*.AAC;*.VP6,etc. It can also set the time and duration of video files.
Clock File means to edit a Simulation Clock on LED screen. You can add background
color to the clock, change the color of clock and add fixed text to display.
The Timer function can count and display time in two ways: either to count down to
one day in the future to tell people how many days remain till that date, or to count down to
one day in the past to remind people how many days have passed ever since.
Flash File supports Flash Animation of formats swf and fla. With this function, you can
also set the time and duration of Flash Files.
With Excel, Excel Files of formats like xls, xlsx, xlsb, and xlsm can be played on
screen. Three display modes are for choices: Stretch, Center, and Zoom.
PowerPoint is to play slide show files generated by PowerPoint software. PowerPoint
function can support the formats of pptm, pptx, potm and potx. PowerPoint Files can be
played in either of the two ways: 1) to add a ppt file in the program window; or 2) to play a
ppt file in the PowerPoint play interface.
As for Exe Files, a special window can be opened for viewing the status of the file
being executed.
Finally, if you choose to add all files, there is no restriction on file type among the
above file types. That is to say, you can play all files in the same one window, or you can
add several windows to a file list so that the software can play from one window to the next
in order.
In order for convenient test of screen, the Imposa™ Player is equipped with the tool
named “Test”. With this tool, you can test the status of screen and find out if there are dead
pixels, tearing, flash or shake in it. This is a very convenient tool for maintenance and
servicing of the LED screen.
5
IMPOSA PLAYER-Large Screen Director
3. Display Programs
Click Start Æ ProgramsÆ Imposa Player Æ Imposa Player.exe to start running the
newly installed software Imposa™ Player. As in the following Figure 3.1, you can see
something being played when you run the software Imposa™ Player.
Figure 3.1 (1) Window of operation
Figure 3.1 (2) Control Bar
The button
at top right corner of the Control Bar is a System Menu; click it and
three options will pop up.
Open list ---Click it and directory of the current program and play list will appear
Play log --- To list the location and time of programs
About ---- To illustrate the version of software
The following Figure 3.2 shows a play file list window.
6
Large Screen Director
Figure 3.2 Play file list
After installation, the default operation interface is in English. You can change the
language to Chinese according to the following operation, or change to German.
Click the menu button
on the upper right corner. Select between English, German
and Chinese in Language of the pop-up menu, as shown in Figure 3.3.
Figure 3.3 Shift between languages
7
IMPOSA PLAYER-Large Screen Director
Switch to Chinese interface or German interface as the Figures below.
Figure 3.4 (1) Interface in Chinese
Figure 3.4 (2) Interface in German
8
Large Screen Director
3.1 Introduction to Programs
For the convenience of introduction, we will delete a program which has already been
in existence. Let’s select Program1, click the button
. A prompt will pop up as shown in
Figure 3.5. Click ‘Yes’ to confirm the deletion. From this first operation on, this prompt will
appear every time you delete a file. It is for avoiding deletion of files by mistake.
Figure 3.5 Prompt message
Now let’s add a program. Click the button
and we will see a dialog box pop up, as
shown in the Figure 3.6.
Figure 3.6 Adding a new program
Let’s add one more program. Click the button
and we will see a dialog box pop up,
as shown in Figure 3.6(2).
Figure 3.6(1) Rename the new program
If you don’t like the program name generated by software, you can change it to your
heart content. For example, changing Program1 into ‘My PlayList 1’,and click OK, as
shown in Figure 3.7.
9
IMPOSA PLAYER-Large Screen Director
Figure 3.7 Adding New Program
When there are many Program Lists, and you only want to play some of them, you
can use the Play Forbidden function. Selecting the programs not to be played, ticking
the
, the selected programs will be forbidden.
In order to familiarize you with the following operations, it is imperative to know first
the buttons’ function and operation with programs.
:To creating a new Program List;
:To open a Program List;
:To save a Program List;
:To save as…;
:To delete a Program List or a play window list;
:To add a Program List;
10
Large Screen Director
:To add a new play window button;
:To move up a Program or window;
:To move down a Program or window;
:To start to play a Program List;
:To hold a Program List to a pause;
:To stop playing a Program List;
:To play the previous file;
:To play the next file;
:To hide/display the main operation interface;
:To switch between the main operation interface and the mini operation interface.
Now that we have finished introducing the “Program” buttons, let’s go to the settings
of the Programs.
Here you can set coordinates and size of
the Program window on the monitor.
Here you can set starting and ending dates of Programs.
Here you can set starting and ending time of Programs.
11
IMPOSA PLAYER-Large Screen Director
Here you can decide on which day of week the program will be
played.
Here you can change the name of
program.
Function of Play Forbidden
Here you can set play time to be 50 seconds or
continuous play without stop.
Here you can set background color.
Here you can set a wall paper. You
can do so simply by clicking the button
.
Here you can set the display mode of the background picture.
3.2 Picture Files
Click the button
to add a window and then name it “Picture”. See Figure 3.8
Figure 3.8 Adding a new window
Now we have a program called “Picture” in “My Play List”. The setting interface is
automatically switched to”Picture”.
See Figure 3.9.
12
Large Screen Director
Figure 3.9 The “Picture” window setup interface
You will also see a smaller window appear inside the large window. See Figure 3.10.
Figure 3.10 Program window and “Picture window”
Place the cursor inside the “Picture” window or Program window. While pressing the
left button of the mouse, drag the “Picture” or Program window to the right position. The
operation of positioning of the two windows can also be achieved by parameter setting.
Click the button
to start adding pictures as is shown in Figure 3.11. In “File stile
selection”, select “Picture” , and then click “OK”
13
IMPOSA PLAYER-Large Screen Director
Figure 3.11 Selecting the style of a file
As shown in Figure 3.12, you can select one or more pictures at a time and then click
Open to add them to the list.
Figure 3.12 Opening a Picture File
As shown in Figure 3.13, after adding the pictures, you can preview them.
14
Large Screen Director
Figure 3.13 Adding Picture Files to a Play Window
Let’s see what functions there are in the window of picture setting.
Here you can set the
name and the border of a play window. Border line can be set as from 4 pixels wide to 0,
with abundant colors of border for choice.
Here you can set the coordinates of the picture play window as
in relative to the Program window.
Here you can set the size of window for playing
picture files.
Here you can set the display mode of the pictures. There are 3 display
15
IMPOSA PLAYER-Large Screen Director
modes available, Center, Zoom, and Stretch.
Here you can set the speed of playing the pictures. There are 5 speeds
available, Fastest, Fast, Medium, Slow and Slowest.
Here you can set the pause time of a picture to stay on screen. Unit of
pause time is Second.
Here you can set the display modes. There are 172 modes
available. See Table 1.
Here you can add a folder. Files in the folder will
be played automatically.
Here you can super-impose transparent characters to screen.
The icon in this color means that no transparent characters are super-imposed.
The icon in this color means that transparent characters are
super-imposed and can be displayed on screen. If not ticked, it will not be displayed.
¾ For the method of use of the transparent characters, please refer to the Help in
chapter 5.2.
Table 1:
SN MODE SN
MODE 1 Random 88
Criss Cross reveal from top right 2 Expand from left 89
Criss Cross reveal from bottom left 3 Expand from right 90
Criss Cross reveal from top left 4 Slide in from right 91
Criss Cross reveal bounce from top left 5 Slide in from left 92
Criss Cross reveal bounce from bottom left 6 Reveal from left 93
Criss Cross reveal bounce from top right 7 Reveal from right 94
Criss Cross reveal bounce from bottom right 16
Large Screen Director
8 Expand in from right 95
Criss Cross reveal from right top and bottom 9 Expand in from left 96
Criss Cross reveal from left top and bottom 10 Expand in to middle 97
Criss Cross reveal from left right and bottom 11 Expand out from middle 98
12 Reveal out from middle 99
Criss Cross reveal from left right and top Criss Cross reveal from top left right and bottom 13 Reveal in from sides 100 Criss Cross reveal from bottom left top right 14 Expand in from sides 101 Uneven shred from bottom and right 15 Unroll from left 102 Uneven shred from top and right 16 Unroll from right 103 Uneven shred from bottom and left 17 Build up from right 104 Uneven shred from top and left 18 Build up from left 105 Uneven shred from horiz and right 19 Expand from bottom 106 Uneven shred from horiz and left 20 Expand from top 107 Uneven shred from bottom and vert middle 21 Slide in from bottom 108 Uneven shred from top and vert middle 22 Slide in from top 109 Uneven shred from centre 23 Reveal from top 110 Uneven shred to centre 24 Reveal from bottom 111 Reveal diagonal from top left 25 Expand in from bottom 112 Reveal diagonal from top right 26 Expand in from top 113 Reveal diagonal from bottom left 27 Expand in to middle (horiz) 29 Reveal from middle (horiz) 114 Reveal diagonal from bottom right Diagonal sweep from top left bottom right 115 anticlockwise Diagonal sweep from top left bottom right 116 clockwise 30 Slide in from top/bottom 117 Starburst clockwise from center 31 Expand in from top/bottom 118 Triangular shred 32 Unroll from top 119 Fade 33 Unroll from bottom 120 Pivot from top left 34 Expand from bottom 121 Pivot from bottom left 35 Expand from top 122 Pivot from top right 36 Expand from bottom right 123 Pivot from bottom right 37 Expand from top right 124 Speckle appear from right 38 Expand from to left 125 Speckle appear from left 39 Expand from bottom left 126 Speckle appear from bottom 40 Expand from bottom right 127 Speckle appear from top 28 Expand out from middle (horiz) 17
IMPOSA PLAYER-Large Screen Director
41 Slide in from top right 128 Random squares appear 42 Slide in from top left 129 Push right 43 Slide in from bottom left 130 Push left 44 Reveal from top left 131 Push and squeeze right 45 Reveal from bottom left 132 Push and squeeze left 46 Reveal from bottom right 133 Push down 47 Reveal from top right 134 Push up 48 Appear and Contract to top left 135 Push and sqeeze down 49 Appear and Contract to bottom left 136 Push and sqeeze up 50 Appear and Contract to bottom right
137 Blind vertically 51 Appear and Contract to top right 138 Blind horizontally 52 Appear and Contract to center 139 Uneven blind from left 53 Expand out from centre 140 Uneven blind from right 54 Reveal out from center 141 Uneven blind from top 55 Reveal in to centre 142 Uneven blind from bottom 56 Quarters Reveal in to middle 143 Rectangular shred 57 Quarters Expand to middle 144 Sweep clockwise 58 Quarters Slide in to middle 145 Sweep anticlockwise 59 Curved Reveal from left 146 Rectangles appear from left 60 Curved Reveal from right 147 Rectangles appear from right 61 Bars in from right 148 Rectangles appear from top 62 Bars in from left 149 Rectangles appear from bottom 63 Bars left then right 150 Rotation rectangle in centre 64 Bars right then left 151 Rotation star in centre 65 Bars from both sides 152 Spiral rectangle 66 Uneven shred from right 153 Circular shred 67 Uneven shred from left Uneven shred out from middle 68 (horiz) 154 Reveal V from left 155 Reveal V from right 69 Uneven shred in to middle (horiz) 156 Reveal V from top 70 Curved Reveal from top 157 Reveal V from bottom 71 Curved Reveal from bottom 158 Bow Tie Vertical 72 Bars from bottom 159 Bow Tie Horizontal 73 Bars from top 160 Diagonal Cross In 74 Bars top then bottom 161 Diagonal Cross Out 75 Bars bottom then top 162 Starburst anticlockwise 18
Large Screen Director
76 Bars from top and bottom 163 Zigzag horizontal 77 Uneven shred from bottom 164 Zigzag Vertical 78 Uneven shred from top 165 Diamond shred 79 Uneven shred from horizon 166 Reveal diamond out from centre 80 Uneven shred in to horizon 167 Reveal diamond in to centre 81 Curved reveal from top left 168 Diagonal Box Out 82 Curved reveal from top right 169 Pixelate 83 Curved reveal from bottom left 170 Dissolve 84 Curved reveal from bottom right 171 Random Bars Horizontal 85 Elliptic reveal out from center 172 Random Bars Vertical 86 Elliptic reveal in to center 173 Jump Out 87 Criss Cross reveal from bottom right 174 The Figure 3.14 shows the effect of transparent characters “Welcome” being added
to a picture
Figure 3.14 Playing a picture file
3.3 Text Files
Note: Some operations introduced before will not be repeated in the following
chapters.
Now, let’s add a window special for Text Files to the program. Shown in Figure 3.15,
the Text File window overlaps the Picture File window. We can drag the Text File window
with mouse to place it next to the Picture File window. And you can see the two windows
by simply clicking the program list, as in the Figure 3.16.
19
IMPOSA PLAYER-Large Screen Director
Figure 3.15 Two small windows overlapping
Figure 3.16 Two small windows side by side
Now you can add text files as shown in Figure 3.17.You can add text files like how you
add picture files,
Figure 3.17 Text File play window
You may have noticed that there are some functions which you have already seen in
previous sections. However there are some unique functions you will find only here. The
below will be about some unique functions in this play window.
Here you can set the font and size of
characters of Text Files.
Here you can set background color of a Text File.
Here you can set the color of the Text Files
20
Large Screen Director
Here you can reverse the background color when necessary.
Here the display position and content of a Text File can be dynamically set
according to the size of screen.
Effect of Text File before being edited:
Once edited, save the text file:
21
IMPOSA PLAYER-Large Screen Director
Effect of Text File after editing:
Here you can set the display effect of text.
Click right mouse button at the Preview window, and you will see the Text Editor pop
up, as shown in Figure 3.18. Settings of Text File in the Text Editor are identical to that of
in the play Window. While settings of Text File in the preview are different from that of in
the play window (mainly different in newlines, and the rest settings are identical).
22
Large Screen Director
Figure 3.18 Text Editor
Figure 3.19 shows a play window playing a text file.
Figure 3.19 Text play window
3.4 Other Files
There are few control functions with the next types play files, and operations of the
control functions are very simple. We will introduce all the next functions in one Play
Window named as “Others”, like in the Figure 3.20.
23
IMPOSA PLAYER-Large Screen Director
Figure 3.20 Setup interface of the “Others”
3.4.1 Play Video Files
Here in the window of“Other Files”, you can add video files. Plenty of video formats
can be played by IMPOSA Player, such as mpeg, mpg, avi, DVD, real video and so on. We
will take AVI format file for example. See Figure 3.21.
24
Large Screen Director
Figure 3.21 Adding a Video File
After an avi file is added, you will find it in the “Others” play window. As you can see in
Figure 3.22, the avi setting interface is almost the same as those of other file types
introduced in the previous sections. Preview function in the interface is not available for
any video files. All the other settings of video files are the same as those described in the
previous sections.
Figure 3.22 Setup Interface of Video Files (avi format for example)
3.4.2 Play Clock
Here you can add a clock in the window named “Others”. Setup interface of clock is
shown in Figure 3.23
25
IMPOSA PLAYER-Large Screen Director
.
Figure 3.23 “Clock” setting interface
Five formats of clock are provided by the IMPOSA Player:
Format 1
26
Large Screen Director
Format 2
Format 3
Format 4
27
IMPOSA PLAYER-Large Screen Director
Format 5
Each format has its own parameter settings, such as background color, character size
and colors and so on.
This button means More Settings. With this button, you can switch to BackGround
Picture of clock, as shown in Figure 3.24.
28
Large Screen Director
Figure 3.24 Adding wall paper to the clock
Figure 3.25 Playing the clock
The Figure 3.25 shows a simulation clock being displayed.
3.4.3 Play Timer
You can add a Timer to the window“Others”. Figure 3.26 shows the setup interface for
the Timer.
29
IMPOSA PLAYER-Large Screen Director
Figure 3.26 Setup Interface for Timer
Here you can set the font and size of characters.
Here you can set color of the characters to be displayed.
Here you can set the background picture or
the background color.
Here you can input static characters.
Customer defined characters.
To set the ending date and ending time of a Timer.
To set whether to display date, hour, minute, second,
transparent, and whether to add a minus symbol in front of time.
Notes: The “No Minus” setting is just a selection of whether to display the minus
symbol when display a time in the past. The transparent mode is only valid for static
characters.
The Figure 2.27 shows a play window of timer.
Figure 3.27 Timer play window
3.4.4 Play Flash Files
You only need to add a flash file and play. As you can see in the following Figure 3.28.
The setting interface is the same as that of the Video Files
30
Large Screen Director
Figure 3.28
Flash play setting interface
Double click Flash Play.swf, and it will start playing. See Figure 3.29.
Figure 3.29 Playing a Flash File
3.4.5 Play Excel Files
The Excel files can also be played by Imposa™ Player in a fixed window. You simply
need to add the Excel file to the window “Others”. See Figure 3.30 and Figure 3.31.
Figure 3.30 Playing an Excel file
Settings of Excel files are the same as those of the previous ones and will not be
31
IMPOSA PLAYER-Large Screen Director
repeated here.
Figure 3.31 “Excel” Setup Interface of Excel files
3.4.6 Play PowerPoint Files (PPT)
There are two ways to play PowerPoint files:First, to add the file to the play list in the
window“Others”;Second, playing PPT file in the PowerPoint interface.
If you use the first method, such as shown in Figure 3.32, click the button
then select PPT in the File style selection menu.
32
and
Large Screen Director
Figure 3.32 Selecting PowerPoint
This is the path of PPT that has just been
added just now.
To set the speed of playing the PowerPoint files.
To set the duration time per page in a PowerPoint file
To set the special Entry Effect of a PowerPoint
file. There are 44 special effects available. Please see Table 2 for details.
Figure 3.33 shows how to add a PPT file in the window “Others”.
Figure 3.33 Playing PPT files in the window“Others”
33
IMPOSA PLAYER-Large Screen Director
Table 2
S/N Entry effect S/N
Entry effect 1 Blinds Vertical 23 Random Bars Vertical 2 Blinds Horizontal 24 Split Horizontal In 3 Box In 25 Split Horizontal Out 4 Box Out 26 Split Vertical In 5 Check Board Across 27 Split Vertical Out 6 Check Board Down 28 Strips Left Down 7 Cover Left 29 Strips Left Up 8 Cover Up 30 Strips Right Down 9 Cover Right 31 Strips Right Up 10 Cover Down 32 Uncover Down 11 Cover Left Up 33 Uncover Left 12 Cover Right Up 34 Uncover Left Down 13 Cover Left Down 35 Uncover Left Up 14 Cover Right Down 36 Uncover Right 15 Cut 37 Uncover Right Down 16 Cut Through Black 38 Uncover Right Up 17 Dissolve 39 Uncover Up 18 Fade 40 Wipe Down 19 Swivel 41 Wipe Left 20 Strips Up Right 42 Wipe Right 21 Strips Up Left 43 Wipe Up 22 Random Bars Horizontal 44 Random Second method, if you want the Program Window to be filled by the PTT files, you can
directly choose the PPT file to play in the PowerPoint interface, as Figure 3.34.
34
Large Screen Director
Figure3.34 Setup interface of PowerPoint
To add a PPT file
To set the coordinates and
sizes of the PPT play window on the screen of monitor. Any change here does not affect
the source PPT file.
To set whether to play the
PPT files automatically or manually.
To set the Speed, Stay Time
per Page and the Entry Effect of PowerPoint File
35
IMPOSA PLAYER-Large Screen Director
To set whether to play the
power point file Still to End, or cycle play, or just to play it for a while.
Click this button to start to play PPT files as in Figure 3.35
Figure 3.35 Playing PPT files in PowerPoint interface
3.4.7 Play EXE Files
As in Figure 3.36, you can add an EXE file in the “Others”.
36
Large Screen Director
Figure3.36 Adding Executable files
The operation of playing an EXE file is almost the same as the one of playing a PPT
file. The only difference is that during playing an EXE file, we can click buttons in the EXE
file and run the EXE file in the fixed play window as Figure 3.37.
Figure 3.37 Playing an Exe File
3.4.8 Play All Files
In fact, you can add any style of files in any play window. Select “All” files In the
window “File style selection” and then you can add any style of files as Figure 3.38.
Figure 3.38 Selecting “All” files
Click button OK, and the “Open” window appears. You can open all files and add them
to the Play list as following Figure 3.39.
37
IMPOSA PLAYER-Large Screen Director
Figure 3.39 Open All Files available with IMPOSA Player
4. Default Setting
Click the menu button
on the upper right corner. Select Default Setting in the
pop-up menu, as in Figure 4.
38
Large Screen Director
Figure 4 Opening “Default Setting”
After selecting Default Setting, the interface will pop up as in Figure 4.1
Figure4.1
Here, you can change display mode of all file styles once for all.
5. Testing
This feature is provided for the convenience of QC personnel and R&D engineers
as well as the users. They can use this function to test the reliability and stability of the
39
IMPOSA PLAYER-Large Screen Director
LED screen. The service technicians can use this function in their servicing and
maintenance work. The QC personnel can use this function to test the work status of
the screen. The R&D engineers can use this function to help them study the LED
screen, and the clients can use this function to help them judge the quality of the LED
screen when they are performing acceptance inspection.
As is shown in Figure 5.1, you can select “Test” in the menu.
Figure 5.1
Selecting “Test”
Then you will see the following LED Test interface. See Figure 5.2.
40
Large Screen Director
Figure 5.2 LED Test interface
5.1 Gray Scale Test
First let’s see what functions are there behind the button “Gray Scale”. See Figure
5.3.
Figure 5.3 Color scale testing
Click button
,and select 64 degrees as in Figure 5.3. The following
Figures show the color scale changes after the 64-level gray scale is selected, Figure
5.4.
Figure 5.4 Gray scale changes on red color
On upper left corner, we see the current value of the color scale change. You can
click the button
to pause the change any time during the process.
Similarly, you can also test the gray scale change on the other colors.
The button
is used to adjust the speed of the gray scale
change.
5.2 Color Test
Now let us switch to color testing interface, as Figure 5.5.
41
IMPOSA PLAYER-Large Screen Director
Figure 5.5 Color test
, and the whole screen shows red. Same operation can
Click the button
be done to test the other colors. This operation is used to test single colors.
5.3 Scanning Test
We can now switch to the interface of scanning. See Figure 5.6.
Figure5.6 Scan Test
, and the LED screen will start scanning vertically. See
Click the button
Figure 5.7.
Figure 5.7 Vertical Lines Scanning Test
Click the button
, and the screen will start scanning in the vertical
direction. See Figure 5.8.
42
Large Screen Director
Figure 5.8 Horizontal Lines Scanning Test
Click the button
, and the LED screen will start scanning in a diagonal
direction with oblique lines. See Figure 5.9.
Figure 5.9 Diagonal Scanning test with oblique lines
The remaining red, green, blue, white and yellow buttons are for selecting the color
of the scanning lines.
5.4 Gray Evolution Test
Now we switch to Gray Evolution test as in Figure 5.10.
Figure 5.10 Gray Evolution test
This function is used to test the gradual change of color gray levels. The following
Figure 5.11 shows the gray scale gradual change testing performed on the red color of
43
IMPOSA PLAYER-Large Screen Director
64 gray levels.
Figure 5.11 Gray Evolution testing of red color of 64 degrees
Similarly, you can select the other colors to do the same kind of tests.
5.5 Ticker Test
Ticker Testing interface as Figure 5.12.
The Ticker function is to have the LED screen display a string of continuous text
messages without stop. This function can be used to check whether the LED screen
has blinking pixels. Click the button “Show Text”, and the screen will start displaying a
line of text characters moving from right to left. See Figure 5.13.
Figure 5.12 Ticker test
Figure 5.13 Test of display file
Click the button
, and you can see the coordinate of each pixel when the
44
Large Screen Director
cursor is moved in the testing window. This function is especially useful in pinpointing a
defective pixel.
Figure 5.14 Showing the coordinates of a pixel
5.6 Screen Set
Setup interface of screen tests, see Figure 5.15
You can set the position of the LED screen window in the computer monitor and can
change the size of the screen under test. These changes will not affect the actual program
windows on the LED screen, so you needn’t worry about the change of the display
contents on the LED screen while doing changes to the monitor window here.
Figure 5.15 Monitor Window interface for Screen Set
6. Ticker Setting
Ticker setting is the 5th button in the main menu. Its interface is as shown in Figure
6.1.
45
IMPOSA PLAYER-Large Screen Director
Figure 6.1
To set location and size of the LED screen here
To select the play list here. There must be TXT
and BMP files in the play list
To set the number of pixels at each interval between every two
adjacent frames
To set the background color in LED screen.
To set the play speed of ticker
To set the font used in the play.
To set the movement direction of ticker
Play effect as in the Figure below
46
Large Screen Director
7. Help
7.1 Menu
On the upper right corner, there is this button
. This is the main menu button. There
are 13 submenus in it. See Figure 7.1.
Figure 7.1 Main Menu
Among the menus, the submenu “Test” has already been explained in the previous
section. Now we will explain the functions of the other menus.
“Language” is used to switch between languages.
“Tool” is used to open .exe files. See Figure 7.2.
“Play Log” is used to record the time and counts of all play files. File paths are also
recorded for easy reference. See Figure 7.3. This function, however, will not be activated
until the button
is pressed.
47
IMPOSA PLAYER-Large Screen Director
Figure7.3 Play log
When clicking the play button
, the main operation interface of the Imposa PlayerTM
will change to a mini IMPOSA Player. See Figure 7.4. It can be returned to the original
interface by clicking the button
. At this moment, however, all play windows will be
suspended.
Figure7.4 Mini IMPOSA Player
Click the right mouse button upon the play list. There is a right button controlled menu,
as shown in Figure 7.5. This menu is used to perform such operations as play, pause,
stop, copy, paste, refresh, rename and delete, etc.. If you want to copy a play program,
you can pause upon that program, and all play windows and play files will be copied.
Figure7.5 Right mouse button-controlled menu
If you click the right mouse button in the play window, you can get the above menu, too.
The operation of the menus is exactly the same as shown above.
Display immediately: You can double-click the file which is added to the play list to
48
Large Screen Director
display it immediately.
7.2 Transparent Characters
Click the button
and a list box named “Text For Picture” will pop up.
See Figure 7.6.
Figure7.6 List Box named Text For Picture
Click the button
, and a dialog box will pop up. You can give a name to the
new transparent character file. See Figure 7.7.
Figure 7.7 inputting a name for a new file
Click OK, and you will see the Text Editor For Picture as shown in Figure 7.8. You will
see both the picture play window and the play window of transparent characters. See
Figure 7.9. The blue frame in the picture is the area for playing the characters. You can
use the mouse to drag the borders of the frame to change its size and location.
to set the font style of transparent characters;
to set the size of the transparent characters;
49
IMPOSA PLAYER-Large Screen Director
to set the color of transparent characters;
to name the transparent character file;
to set the background color for the transparent characters;
to set the display effect of the transparent characters.;
to set the stay time of the transparent characters;
to set the style of the transparent characters;
to add a TXT file to the editing area;
to save a transparent character file。
Figure 7.8 Text Editor For Picture
50
Large Screen Director
Figure7.9 The window for transparent characters
After keying in characters in the editing area of the transparent character editor, such
as seen in Figure 7.10, we can simply close the editor and then play the picture. The
transparent characters will be displayed automatically.
The transparent character display effect is illustrated in Figure 7.11.
Figure 7.10 Editing Transparent characters
Figure 7.11 Play effects of transparent characters
51
IMPOSA PLAYER-Large Screen Director
7.3 Help
There are two submenus in the Help, ‘About’ and ‘User’s Manual’
Figure 7.12 About IMPOSA Player-Large Screen Director
Table 3 lists all buttons and their functions.
Table 3:
Buttons
Shortcuts
Functions
Ctrl+P
Play a program
Ctrl+Z
Stop playing a program
Play the previous file
Play the next file
Hide/display the program window
Switch between the main interface and the mini IMPOSA Player
New play list
Open a play list
Save a play list
Save a play list as
Delete a program or play window
52
Large Screen Director
Add a program
Add a play window
Move up a program or play window
Move down a program or play window
Add a play file
Delete a play file
Move down a play file
Move up a play file
8. Network Management
Imposa Player (with Network) entails a new function, Network Management. Please
see Figure 8.
Figure 8 Network Management Interface
53
IMPOSA PLAYER-Large Screen Director
Mechanism of Network Management is as following: defining one computer
connected to screen as Server, another computers connected to this server is performed
as Client. A Client can be connected to many Servers and vice versa. The Client can
monitor the server and send documents and programs to it through the network, etc. While
sending programs, clocks and down-counters, their background pictures will be sent to the
server as well. Programs and files can also be sent from different time zones, thanks
time-zone synchronization between the Server and the Client.
8.1 Create Servers
Run Imposa Player (with Network) in one computer, and you will see a server column
in the NM interface. Tick the button
as shown in Figure 8.10. The interface
of Figure 8.11 will turn up immediately, and then minimize to the taskbar in one second.
See Figure 8.12. A Server is thus created.
Figure 8.10
Figure 8.11
Figure 8.12
54
Large Screen Director
8.1.1 User Management
Click the User Manage
in the server column, and the dialog box as
shown in Figure 8.1.10 will pop up. Input “administrator” in ‘Admin Name’, and
“123456789” in “Password”. Click “OK” to enter the User Management Interface, where
you can enjoy the operations like “Add User”, “Change Privilege”, “Change Password” and
“Delete Users”. See Figure 8.1.11.
Figure 8.1.10
Figure 8.1.11
8.2 Create Clients
Run Imposa Player (with Network) in another computer, which hence becomes a
Client. Programs can be pre-edited on the Client, and then sent to the Server via network.
8.2.1 Add Server
The Server and the Client should be connected before sending any programs to the
55
IMPOSA PLAYER-Large Screen Director
Server. Method is, click “Add Server” at the right of Client’s Column in the Network
interface. A dialog box as shown in Figure 8.2.10 then pops up.
Figure 8.2.10
Input the parameters of Server one by one. For Server Name, you may input whatever
you like. IP Address is the address of Server that you are connecting to. And Port means
the port number of the server. User Name and Password, can either be the default
“administrator” and”123456789”, or those added with User Manage in the Server. Click
“OK”, and the following window will pop up.
Figure 8.2.11
When the Status column reads “Connect successfully”, it means the Server and the
Client have been connected to each other successfully.
56
Large Screen Director
8.2.2 Delete Server
You can delete some extra servers and those out of use. Steps are: select a Sever to
delete, and then click “Delete Server” at the right of Client’s Column. Click “OK” to confirm
the deletion.
8.2.3 Edit Server
The Server may be disconnected from the Client once some parameters of the Server
are changed. You can modify the parameters to have the Server reconnected. The method
is: ticking a server to be modified in the Client, clicking the Edit Server at the right of the
Network interface, and the parameters of Server can be modified.
8.2.4 Remote Control
The Client can monitor the Server over a long range, and get to know its real-time display
status. Click “Remote Control” at the right of Client’s Column. The window as shown in
Figure 8.2.40 will appear.
Figure 8.2.40 Remote control of LED Display
Figure 8.2.41
This is the window for remote control. With this window, you can monitor the status of the
Server. Select ViewÆComplete Refresh in its menu bar, or press keys Ctrl+F5 to start
57
IMPOSA PLAYER-Large Screen Director
monitoring. See Figure 8.2.42.
While monitoring, you can select ViewÆ Refresh, or press F5 to renew the monitor. You
can also select ViewÆAuto Refresh to renew and monitor real-time status of the Server,
see Figure 8.2.43.
Figure8.2.42
Figure8.2.43
Figure 8.2.44
You can click End to stop real-time monitoring, as in Figure 8.2.45, or select
FileÆExit to close the window of LED Display Control
58
Large Screen Director
Figure 8.2.45 End Auto Refresh
8.2.5 Read Back Programs
Sometimes programs in the server need to be re-edited at the Client. To do so, the
function of “Read Back” function will be used. Tick the servers with programs to be edited
in Client’s Column. As shown in Figure 8.2.50, click “Read Back” at the right of Client’s
Column to start reading back programs. If successful, a file named “Readback” will be
automatically generated in the software’s root directory, where programs from the Server
are saved. Programs will be played in the Client soon after they are read back from the
Server successfully.
Figure8.2.50
8.2.6 Send Files to Server
You can also send files from the Client to the Server, clicking “Send File” on the
bottom right corner of the Network interface. The dialog box as shown in Figure 8.2.60 will
pop up.
59
IMPOSA PLAYER-Large Screen Director
Figure8.2.60
Click
to add files to be sent, whose directory will then be shown in the
“Source File”. “Target DIR” means the destination directory where the sent file will be
saved. Name of destination directory can be changed, while the default name is “File List”.
At the bottom of Send File box are operation options, Same File and Send Mode. You
can choose overwrite or skip when the source file has the same name as in the target
directory. After setting all correct, click
to start sending files. The sending
process will be shown in Status column in the Client interface. See Figure 8.2.50. When it
reads “Send finished”, a folder will be created in the root directory of the software of the
server sent to, which is named either as “File List” or any other name reset for the “Target
File” before the files are sent. Files that have been sent are saved in this file hence.
8.2.7 Send Programs
Send Program means to send programs from the Client to the Server. Click ‘Send
Program’, and the dialogue box as Figure 8.2.70 will appear.
60
Large Screen Director
Figure8.2.70
Click
to add programs to be sent. Input a directory name in ‘Target DIR’, such
as Program. In this directory, the sent programs will be saved. Then tick the play mode you
like below. Click
to start sending. The sending process will be shown in Status
column in the Client interface. See Figure 8.2.50. When it reads “Send finished”, a
directory will be created in the Server, name of the directory being “Program” or any other
name reset in the “Target DIR” before sending. Programs that have been sent are saved in
this folder.
When a Server is ticked, on the upper right corner of the Network interface will appear
a form named “Send Fast”. Input a name for the target directory, and click
directly. The programs being played in the Client computer will then be sent to the Server
at the Target DIR, as shown in Figure 8.2.71.
Figure8.2.71
61