1
Card Access Report
Management Application
(CARMA) 4.5 for Picture
Perfect Administration Guide
P/N 460516002C • ISS 15NOV10
Copyright
© 2010 UTC Fire & Security. All Rights Reserved.
This document may not be copied in whole or in part or otherwise reproduced without prior
written consent from UTC Fire & Security, except where specifically permitted under US
and international copyright law.
Disclaimer
The information in this document is subject to change without notice. UTC Fire & Security
assumes no responsibility for inaccuracies or omissions and specifically disclaims any
liabilities, losses, or risks, personal or otherwise, incurred as a consequence, directly or
indirectly, of the use or application of any of the contents of this document. For the latest
documentation, contact your local supplier or visit us online at utcfireandsecurity.com.
This publication may contain examples of screen captures and reports used in daily
operations. Examples may include fictitious names of individuals and companies. Any
similarity to names and addresses of actual businesses or persons is entirely coincidental.
Trademarks and patents
CARMA and Picture Perfect are trademarks of UTC Fire & Security.
Other trade names used in this document may be trademarks or registered trademarks of
the manufacturers or vendors of the respective products.
Intended use
FCC compliance
Use this product only for the purpose it was designed for; refer to the data sheet and user
documentation for details. For the latest product information, contact your local supplier or
visit us online at www.utcfireandsecurity.com.
This equipment has been tested and found to comply with the limits for a Class A digital
device, pursuant to part 15 of the FCC Rules. These limits are designed to provide
reasonable protection against harmful interference when the equipment is operated in a
commercial environment. This equipment generates, uses, and can radiate radio frequency
energy and, if not installed and used in accordance with the instruction manual, may cause
harmful interference to radio communications.
You are cautioned that any changes or modifications not expressly approved by the party
responsible for compliance could void the user's authority to operate the equipment.
Certification and compliance
2002/96/EC (WEEE directive): Products marked with this symbol cannot be disposed of as
unsorted municipal waste in the European Union. For proper recycling, return this product
to your local supplier upon the purchase of equivalent new equipment, or dispose of it at
designated collection points. For more information see: www.recyclethis.info.
Manufacturer
UTC Fire & Security
HQ and regulatory responsibility:
UTC Fire & Security, 9 Farm Springs Road, Farmington, CT 06034-4065, USA
Contact information
For contact information, see our Web site: www.utcfireandsecurity.com.
Content
Chapter 1 Using this manual 1
Purpose 2
Who should read this manual 2
Related documentation 2
Terminology 3
Notational and typographical conventions 4
Chapter 2 System overview 5
Introduction 6
System requirements 7
Server requirements 7
Firewalls 8
Chapter 3 Installation and removal 9
Introduction 10
Installing Red Hat Linux 4, Upgrade 7 10
Installing Red Hat Linux 5.3 20
Installing CARMA 27
Removing CARMA 58
Chapter 4 Upgrading CARMA from a previous version 59
Introduction 60
Back up your existing CARMA 4.0 database 60
Install RedHat Enterprise Linux on your CARMA server 61
Install CARMA 4.5 61
Restore your CARMA 4.0 database 61
Run the CARMA Database Upgrade Utility 62
Chapter 5 Getting started 67
Logging on 68
Logging off 69
Main menus and submenus 69
Badge event history 73
Alarm event history 81
Personnel records 89
Operator history 96
Monitor hosts and micros 102
System administration 104
Card Access Report Management Application (CARMA) 4.5 for Picture Perfect Administration Guide
i
Chapter 6 Secure socket layer 111
Introduction 112
Obtaining a certificate for the CARMA server 112
Generating the CSR and installing the certificate 114
Appendix A Advanced configuration 117
Introduction 119
Shutting down and rebooting the CARMA server 119
Verifying that mySQL is running 119
Resetting the CARMA database 120
Manually running the Sweeper program 120
If you are unable to connect to the Picture Perfect database 121
Configuring CARMA for a Picture Perfect redundant system 122
Turning on verbose mode 122
Turning on error logging 122
Changing the sweeper schedule 123
Changing the parameters supplied during installation 124
Backing up the database 126
Restoring the database 126
Verifying the daily import 127
Viewing system information 128
Access Search Feature 129
SYNC DATA Feature 134
Technical Support 136
Appendix B Useful Web resources 137
Red Hat, Inc. 138
PHP Website 138
Apache Website 138
Apache SSL Website 138
O’Reilly Website 138
MySQL website 138
Appendix C Using the VI editor 139
Overview 140
Editing the /etc/hosts file 141
Glossary 143
ii
Card Access Report Management Application (CARMA) 4.5 for Picture Perfect Administration Guide
Chapter 1
Using this manual
Summary
This chapter covers the following topics:
•
Who Should Read This Manual
•
Related Documentation
•
Terminology
•
Notational and Typographical Conventions
Content
Purpose 2
Who should read this manual 2
Related documentation 2
Terminology 3
Click 3
Select 3
Press 3
Command 3
Notational and typographical conventions 4
Card Access Report Management Application (CARMA) 4.5 for Picture Perfect Administration Guide
1
Chapter 1: Using this manual
Purpose
This manual provides instructions for installation of the Card Access Report
Management Application (CARMA), initial setup, and configuration. It also
contains information for operating the system once it is installed.
Note: If you have a previous version of this manual, you may notice changes
since the last publication marked by a change bar, which is a vertical line in the
margin that visually identifies significant new or revised information.
Who should read this manual
This manual is intended for system administrators who are responsible for the
planning and implementation of the system design, and who perform system
configuration and setup using Picture Perfect forms that are accessible only to
the master-level operator.
This manual is also intended for operators of CARMA, and covers the features
that are likely to be used on a daily basis.
Operators using the system should read the chapters, which relate to their duties.
The material in this manual has been prepared for persons responsible for, and
familiar with the security needs of the customer facility.
Related documentation
Picture Perfect 4.5 User Manual: This manual provides information for the
system administrator to set up, configure, and manage the Picture Perfect
database for the customer’s facility.
Picture Perfect 4.5 Installation Manual: This manual is a step-by-step guide to
help the system administrator connect hardware, boot, install, and configure the
operating system, and install the Picture Perfect 4.5 software.
2
Card Access Report Management Application (CARMA) 4.5 for Picture Perfect Administration Guide
Chapter 1: Using this manual
Terminology
Click
To “click” means to press and release a mouse button while the pointer is on a
designated area of the screen in order to display a window or select an option.
The press-and-release makes a clicking sound.
The term “double-click” means to press and release a mouse button twice in
rapid succession. “Left-click” and “right-click” mean to click the button on the left
or right side of the mouse.
Select
The word “select” indicates that you choose an item from the current menu,
submenu, form, or list box displayed on the screen. Use the mouse or the cursor
keys to select the item. For example:
Select Devices, then Terminals.
The statement above tells you to select a certain submenu (Devices) and then to
select a certain form (Terminals) from that submenu. If you make the selections
with a mouse, you will point to the Devices icon and click the left mouse button.
When the submenu icons appear, you will point and double-click the Terminals
icon to select this form.
If you make the selections with a keyboard, you will use the cursor keys instead
of a mouse pointer, and the Enter key instead of the left mouse button.
Press
The phrase “press the _____ button” means to use the mouse (or the keyboard)
to “press” a designated button on the screen. To press a button with the mouse,
point then click the left button. To press a button with the keyboard, use the TAB
key and press Enter or Spacebar.
Command
The word “command” indicates a command, which would be typed as specified.
Card Access Report Management Application (CARMA) 4.5 for Picture Perfect Administration Guide
3
Chapter 1: Using this manual
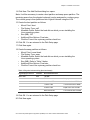
Notational and typographical conventions
This manual uses certain notational and typographical conventions to make it
easier for you to identify important information.
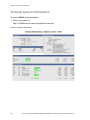
Table 1: Notational and typographical conventions
Item
Example
GUI labels
Administration Menu
Keys
Enter
Buttons
OK
Text you enter
Micro 1
To reduce the confusion between similar numbers and letters, namely
the number 1 and the lowercase letter l along with the number 0 and
the letter O, refer to the following list:
1234567890
ABCDEFGHIJKLMNOPQRSTUVWXYZ
abcdefghijklmnopqrstuvwxyz
Notes
Notes convey information that emphasizes or supplements important
points.
Cautions
Cautions advise you of actions to take or to avoid in order to prevent
the loss of data or damage to equipment.
Warnings
Warnings alert you to precautions you should take or actions you
should avoid in order to prevent physical injury or loss of life.
Operating system
Linux: Information for a Linux system.
4
Card Access Report Management Application (CARMA) 4.5 for Picture Perfect Administration Guide
Chapter 2
System overview
Summary
This chapter covers the following topics:
•
•
•
System Requirements
Server Requirements
Firewalls
Content
Introduction 6
System requirements 7
Server requirements 7
Firewalls 8
Card Access Report Management Application (CARMA) 4.5 for Picture Perfect Administration Guide
5
Chapter 2: System overview
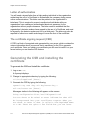
Introduction
The Card Access Report Management Application (CARMA) is an HTML-based
report administration tool designed to allow department managers or other
individuals to generate their own card access system reports.
CARMA was designed for speed and ease of use. Several new technologies are
introduced to improve report performance and accuracy.
Designed for the UTC Fire & Security Picture Perfect card access system,
CARMA lets you search through your cardholder and system database
information easier and in ways never before possible with Picture Perfect.
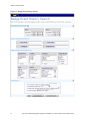
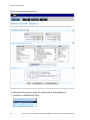
A configuration overview is shown in Figure 1 below.
Figure 1: System Overview
6
Card Access Report Management Application (CARMA) 4.5 for Picture Perfect Administration Guide
Chapter 2: System overview
Using a secure login over an encrypted browser session, you can generate
reports including people, badge activity, alarm activity, operator activity, check
system status, and more. All database information is replicated from the Picture
Perfect host and stored on the reporting server. All features can be accessed
using menus, list boxes, and text boxes.
The details of the badge holders and their access history are stored in the Picture
Perfect database.
The CARMA Server connects to the Picture Perfect database once a day or as
configured and imports a replicated copy of the database via TCP/IP. This import
can be forcibly called at any time using the web interface or command line
instructions. The duration between two imports must be configured.
The replicated copy of the database is stored in the MySQL database. The
CARMA application accesses the MySql database, and then creates the reports.
System requirements
•
•
•
CARMA 4.5 is compatible with Picture Perfect 4.0, Service Pack 3 or higher
RedHat Enterprise Linux 4 Upgrade 7 – (Picture Perfect 4.0, SP3)
RedHat Enterprise Linux 5.3 – (Picture Perfect 4.5)
Server requirements
Since the CARMA server storage requirements are unique to each customer,
please contact UTC Fire & Security Sales Engineering for CARMA server
requirements.
Card Access Report Management Application (CARMA) 4.5 for Picture Perfect Administration Guide
7
Chapter 2: System overview
Firewalls
We recommend that Secure Socket Layer (SSL) be used when firewall traversal
is required. In this case, only ports 9088, 1960, and 514 should be configured for
Transmission Control Protocol (TCP) between the CARMA and the Picture
Perfect hosts. For more information on setting up SSL for use with your CARMA
server, please see Chapter 6 “Secure socket layer” on page 111.
8
Card Access Report Management Application (CARMA) 4.5 for Picture Perfect Administration Guide
Chapter 3
Installation and removal
Summary
This chapter covers the following topics:
•
•
•
Installing Red Hat Linux
Installing CARMA
Removing CARMA
Content
Introduction 10
Installing Red Hat Linux 4, Upgrade 7 10
Installing Red Hat Linux 5.3 20
Installing CARMA 27
Configuring the network 27
Installing the CARMA software on Red Hat Linux 4, Update 7 31
Installing the CARMA software on Red Hat Linux 5.3 40
Enabling remote access 52
Configuring your system for Sendmail: 52
Importing the Picture Perfect database 53
Creating accounts 55
Removing CARMA 58
Card Access Report Management Application (CARMA) 4.5 for Picture Perfect Administration Guide
9
Chapter 3: Installation and removal
Introduction
Note: If you are upgrading from a previous version of CARMA, you will need to
convert and backup your database prior to installing RedHat Linux. Begin with
Chapter 4 “Upgrading CARMA from a previous version” on page 59 and when
instructed, return to this chapter.
This section guides you through the installation of RedHat Linux 4, Upgrade 7
and RedHat Linux 5.3 on your CARMA server.
CARMA is compatible with Picture Perfect 4.0 SP3 and Picture Perfect 4.5. If you
plan to run Picture Perfect 4.0 SP3, then Red Hat Linux 4, Upgrade 7 is required.
If you plan to run Picture Perfect 4.5, then Red Hat Linux 5.3 is required.
If you purchased the server from UTC Fire & Security, it came preloaded.
Otherwise, start below and follow the instructions for installing RedHat Linux, and
then continue with installing CARMA.
Installing Red Hat Linux 4, Upgrade 7
Note: These instructions assume you are using an official copy of Red Hat Linux
Enterprise 4 Upgrade 7 that was obtained from Red Hat, Inc.
To install Red Hat Enterprise Linux 4, Upgrade 7:
1. Insert the Red Hat Enterprise Linux 4, Upgrade 7 Operating System DVD,
and then boot the computer.
2. When asked if you want to install Red Hat Linux in graphical or text mode,
press Enter to select graphical mode.
The system performs various tests, probes for devices such as the monitor
and mouse, and when finished, displays a Welcome screen.
3. Click Next. The Language Selection screen displays.
4. Choose your Language, and then click Next.
The Keyboard Configuration dialog box displays.
5. Choose the appropriate keyboard configuration for your system and click
Next.
Note: For most U.S. systems, the default U.S. English can be used.
If a previous version of Red Hat Linux is detected, a screen displays where
you can choose to upgrade or perform a new installation.
If no previous version of Red Hat Linux is detected, skip to step 7.
10
Card Access Report Management Application (CARMA) 4.5 for Picture Perfect Administration Guide
Chapter 3: Installation and removal
6. Select Perform a new Red Hat Linux installation to perform a full installation
of the server, and then click Next.
The Disk Partitioning Setup dialog box displays.
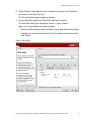
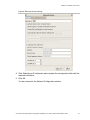
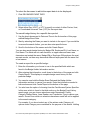
7. Choose Manually partition with Disk Druid, and then click Next.
The Disk Setup dialog box displays as shown in Figure 2 below.
Note: If you are reinstalling an existing system:
•
Remove LVM volume groups by selecting rootvg, and then clicking Delete.
•
Highlight any existing hard disk partitions, for example /dev/sda, and then
click Delete.
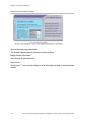
Figure 2: Disk Setup
Card Access Report Management Application (CARMA) 4.5 for Picture Perfect Administration Guide
11
Chapter 3: Installation and removal
8. It is necessary to configure logical volumes on the hard drive that you are
using for the Linux installation. Select the hard drive displayed in the list, and
then click New.
The Add Partition dialog box displays.
9. Complete the form as follows:
•
Mount Point: /boot
•
File System Type: ext3
•
Allowable Drives: The hard disk on which you are installing the Linux
Operating System (OS).
•
Size (MB): 100
•
Additional Size Options: Fixed size
10. Click OK. You are returned to the Disk Setup screen.
11. Click New again.
12. Complete the form as follows:
•
Mount Point: Leave blank
•
File System Type: swap
•
Allowable Drives: The hard disk on which you are installing the Linux OS.
•
Size (MB): The amount of swap space should be twice the amount of
RAM in your system. For example, if you have 512 MB of RAM, you
should allocate 1024 MB of swap space.
•
Additional Size Options: Fixed size
13. Click OK. You are returned to the Disk Setup screen.
14. Click New again.
15. Complete the form as follows:
•
Mount Point: Leave blank.
•
File System Type: Physical Volume
•
Allowable Drives: The hard disk on which you are installing the Linux OS.
•
Size (MB): Leave blank.
Note: If a value of 1 displays, this is acceptable. Ignore it and proceed.
•
Additional Size Options: Fill to maximum allowable size
16. Click OK. You are returned to the Disk Setup screen.
17. Highlight the physical volume created in step 15.
12
Card Access Report Management Application (CARMA) 4.5 for Picture Perfect Administration Guide
Chapter 3: Installation and removal
18. Click LVM to create a physical volume group.
Note: LVM is a method of allocating hard drive space into logical volumes
that can be easily resized instead of partitions. With LVM, the hard drive or
set of hard drives is allocated to one or more physical volumes. Since a
physical volume can not span over more than one drive, to span over more
than one drive, create one or more physical volumes per drive. The logical
volume group is divided into logical volumes, which are assigned mount
points such as /home and / and file system types such as ext3. When
“partitions” reach their full capacity, free space from the logical volume group
can be added to the logical volume to increase the size of the partition. When
a new hard drive is added to the system, it can be added to the logical volume
group, and the logical volumes that are the partitions can be expanded.
The Make LVM Volume Group dialog box is displayed.
19. Complete the form as follows:
•
Volume Group Name: rootvg (must be spelled exactly as shown in lower
case)
•
Physical Extent: 4MB
•
Physical Volumes to Use: The name of the physical volume created in
step 15.
20. Click Add. The Make Logical Volume dialog box displays.
21. Create logical volumes, using the values shown in Table 2 below. After
entering each logical volume, click OK.
22. You will be returned to the Make LVM Volume Group dialog box.
23. Repeat step 21 through step 23 for each logical volume entry.
Note: For ease of use, as well as avoiding typographical errors when defining
your mount points, we suggest that you select the desired mount point names
from the list provided. To choose from the list, click the down arrow to the
right of the mount point definition field.
Table 2: Minimum file system sizes
Mount point
File system type Logical volume name 18 GB drive
36 GB drive
/
ext3
LogVol00
1024
2048
/home
ext3
LogVol01
1024
2048
/tmp
ext3
LogVol02
1536
2048
/usr
ext3
LogVol03
6000
6000
/var
ext3
LogVol04
8000
23,856 (remaining
space on disk)
Card Access Report Management Application (CARMA) 4.5 for Picture Perfect Administration Guide
13
Chapter 3: Installation and removal
24. When you are done defining your partitions, click OK to accept your Make
LVM Volume Group settings.
You are returned to the Disk Setup screen.
25. Click Next to continue. The Boot Loader Configuration dialog box will be
displayed.
26. Accept the default settings, and then click Next to continue.
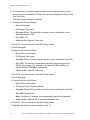
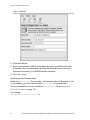
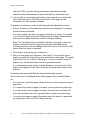
The Network Configuration dialog box is displayed.
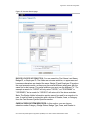
Figure 3: Network Configuration
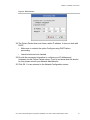
27. Click Edit to set parameters for the network interface.
The Edit Interface dialog box displays.
Note: Make sure the Configure using DHCP checkbox is unchecked and the
Activate on boot box is checked before proceeding.
14
Card Access Report Management Application (CARMA) 4.5 for Picture Perfect Administration Guide
Chapter 3: Installation and removal
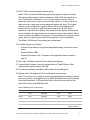
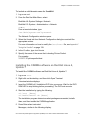
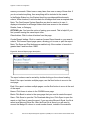
Figure 4: Edit Interface
28. The Picture Perfect host must have a static IP address. It does not work with
DHCP.
•
Make sure to uncheck the option Configure using DHCP before
proceeding.
•
Leave Activate on boot checked.
29. Provide the necessary information to configure your IP Address and
Hostname for this Picture Perfect server. If you do not know what this should
be, then please consult your Network Administrator.
30. Click OK. You are returned to the Network Configuration screen.
Card Access Report Management Application (CARMA) 4.5 for Picture Perfect Administration Guide
15
Chapter 3: Installation and removal
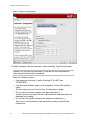
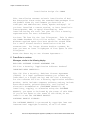
Figure 5: Network Configuration
31. Under Hostname, Set the hostname:, select manually. Type the host name.
Caution: Do not leave this field blank. It must be set to an alphanumeric
value before Picture Perfect is installed!
Keep the following in mind:
•
•
•
•
•
16
Use lowercase a through z, and/or 0 through 9. Do NOT use
UPPERCASE.
Use the simple machine name, such as pphost1, not the fully qualified
name.
The host name may not be more than 16 characters in length.
Do not use host names containing the dash character (-).
Informix does not recognize this as a valid character and will prevent the
database from starting.
Do not use host names containing the underscore character (_).
This is not a valid character in the web server running on the Picture
Perfect host.
Card Access Report Management Application (CARMA) 4.5 for Picture Perfect Administration Guide
Chapter 3: Installation and removal
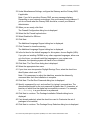
32. Under Miscellaneous Settings, configure the Gateway and the Primary DNS,
if applicable.
Note: If you fail to provide a Primary DNS, an error message displays.
Depending on your network environment, this could cause future problems. If
you do not know what the Primary DNS should be, consult your Network
Administrator.
33. When you are ready, click Next.
The Firewall Configuration dialog box is displayed.
34. Select the No Firewall option button.
35. Select Disabled for SELinux.
36. Click Next.
The Additional Language Support dialog box is displayed.
37. Click Proceed to close the warning.
The Additional Language Support dialog box is displayed.
38. In the list box for the default language for this system, choose English (USA).
If you plan on installing CARMA in any other supported languages, either now
or in the future, you should install the languages on your system now.
Otherwise, the operating system will have to be re-installed.
39. Click Next. The Time Zone dialog box is displayed.
40. Select the appropriate time zone.
41. If your time zone incorporates Daylight Savings Time, select the check box
titled System clock uses UTC.
Note: If it is necessary to adjust the date/time, execute the dateconfig
command after the Linux installation is complete.
42. Click Next. The Set Root Password dialog box is displayed.
43. Specify a password for root, and confirm it by typing it a second time. The
recommended length for the root password is greater than 12 characters, at
least two of which must be alpha and one special or numeric. For example,
2b||~2bistheQ is a good choice for a password.
44. Click Next to continue. The Package Installation Defaults dialog box is
displayed.
45. If not already selected, select the check box next to Customize the set of
packages to be installed.
46. Click Next to continue. The Package Group Selection dialog box is displayed.
Card Access Report Management Application (CARMA) 4.5 for Picture Perfect Administration Guide
17
Chapter 3: Installation and removal
47. Select the following packages:
•
Desktops: X Window System, GNOME Desktop Environment
•
Applications: Editors
•
Servers: Legacy Network Server (Click Details, select Telnet-Server.)
•
Development: Development Tools, X Software Development, Legacy
Software Development
•
System: Administration Tools, Printing Support
48. Click Next to accept the Package Group Selections.
The About to Install dialog box displays including a list of the media required
for installation of the selected packages.
Note: If, for some reason, you would rather not continue with the installation
process, this is your last opportunity to safely cancel the process and reboot
your machine. Once you press the Next button, partitions will be written and
packages will be installed. If you wish to abort the installation, you should
reboot now before any existing information on any hard drive is rewritten. To
cancel this installation process, press your computer's Reset button or use
the [Control]-[Alt]-[Delete] key combination to restart your machine.
49. Click Continue to proceed.
The installation wizard proceeds to install your system. This may take a while.
You should now see a screen preparing you for the installation of Red Hat
Linux. For your reference, a complete log of your installation can be found in
/root/install.log once you reboot your system.
When you are done, the Congratulations dialog box displays.
50. Click Reboot and allow the system to reboot.
Note: If, during the reboot process, you are prompted to change system
permissions, tab to the entry labeled DO IT and press Enter.
When the reboot is complete, the Welcome dialog box displays.
51. Click Next to continue. The License Agreement dialog box displays.
52. Select Yes, I agree to the License Agreement. Click Next to continue.
The Date and Time dialog box displays.
53. Select the current date and time.
Optional: If you want the host to synchronize its clock with a remote time
server, check the Network Time Protocol tab.
18
Card Access Report Management Application (CARMA) 4.5 for Picture Perfect Administration Guide
Chapter 3: Installation and removal
54. Check the Enable Network Time Protocol checkbox and use the drop-down
menu to select a time server. Click Next to continue.
Note: If it is necessary to adjust the date/time, execute the dateconfig
command after the Linux installation is complete.
The Display dialog box displays.
55. Red Hat Enterprise Linux auto-detects your monitor and loads the correct
driver. If you would like to choose another driver, click Configure... and
browse the list of available drivers. Select the resolution of your screen and
click Next to continue.
Note: The recommended resolution is: 1024 × 768.
The Red Hat Login dialog box displays.
56. To register with Red Hat and provide a Red Hat login:
•
If you have already registered with Red Hat Network, enter your account
information in the appropriate field. Click Next to continue.
•
If you have never registered, choose Tell me why I need to register and
provide a Red Hat login. A dialog box displays, which allows you the
option of registering at a later time.
If you provided your Red Hat login account information, the Activate dialog
box displays.
57. Enter the subscription number in the appropriate field. Otherwise, select I do
not have a subscription number. Click Next to continue.
The Additional CDs dialog box displays.
58. There are no required add-ons for CARMA 4.x. Click Next to continue.
The Finish Setup dialog box displays.
59. The set up for Red Hat Linux is now complete and you may proceed to
“Installing CARMA” on page 27. Click Next to continue.
The Red Hat Login screen displays.
Card Access Report Management Application (CARMA) 4.5 for Picture Perfect Administration Guide
19
Chapter 3: Installation and removal
Installing Red Hat Linux 5.3
Note: These instructions assume you are using an official copy of Red Hat Linux
Enterprise 5.3 that was obtained from Red Hat, Inc.
To install Red Hat Enterprise Linux 5.3, follow these steps:
1. Insert the Red Hat Enterprise Linux 5.3 Operating System DVD, and then
boot the computer. The boot prompt displays.
2. At the boot prompt, click Enter to proceed and wait for the process to load the
basic operating system drivers.
3. The CD Found dialog box opens, press tab or use the right arrow key to
select SKIP. Press enter or the spacebar to start the installation.
4. The Red Hat Welcome page opens. Click Next.
5. The Language Selection page opens. Choose the appropriate language, and
then click Next.
6. The Keyboard Configuration page opens. Choose the appropriate keyboard
configuration, and then click Next.
7. The Installation Number dialog box opens. Click Skip entering Installation
Number, and then click OK.
8. The Skip dialog box opens, click Skip.
9. The installation type page opens. Click Install Red Hat Enterprise Linux
Server, and then click Next.
10. The hard drive partition page opens. Select all disk drives available in your
system, and then click Review and modify partitioning layout. Click Next.
11. A warning dialog box opens asking you to confirm your selections. Click Yes.
12. The Disk Setup page opens. If you are reinstalling an existing system, the
existing LVM volume groups must be deleted. To do this, select a LVM
volume group from the list on the Disk Setup page, and then click Delete.
The Confirm Delete dialog box opens. Click Delete. The LVM volume group is
removed from the list.
Repeat the above procedure for all remaining LVM volume groups.
13. On the Disk Setup page, delete each partition on a specific drive until all disk
space is shown as free space. To do this, select a partition displayed in the
list, and then click Delete.
The Confirm Delete dialog box opens. Click Delete. The partition is removed
from the list.
20
Card Access Report Management Application (CARMA) 4.5 for Picture Perfect Administration Guide
Chapter 3: Installation and removal
14. Click New. The Add Partition dialog box opens.
Note: It will be necessary to create a boot partition and swap space partition. The
remaining space from the physical volume(s) can be assigned to a volume group.
The volume group is then partitioned into Logical Volumes using the LVM.
15. Create the boot partition as follows:
•
•
•
•
•
•
Mount Point: /boot
File System Type: ext3
Allowable Drives: Select the hard disk on which you are installing the
Linux operating system.
Size (MB): 100
Additional Size Options: Fixed size
Click the Force to be a primary partition check box.
16. Click OK. You are returned to the Disk Setup page.
17. Click New again.
18. Create the swap partition as follows:
•
•
•
•
•
•
Mount Point: Leave blank.
File System Type: swap
Allowable Drives: Select the hard disk on which you are installing the
Linux operating system.
Size (MB): Refer to Table 3 below.
Additional Size Options: Fixed size
Click the Force to be a primary partition check box
Table 3: Physical volume sizing (boot and swap)
Logical/physical drive
Partition
Recommended size
sda or had
boot
100 MB
swap
RAM
Swap space
Less than 1 GB
2 times the size of RAM
1 GB to 2 GB
1.5 times the size of RAM
2 GB to 8 GB
Equal to the size of RAM
More than 8 GB
0.75 times the size of RAM
19. Click OK. You are returned to the Disk Setup page.
20. Click New again.
Card Access Report Management Application (CARMA) 4.5 for Picture Perfect Administration Guide
21
Chapter 3: Installation and removal
21. Create the rootvg volume group as follows:
•
Mount Point: Leave blank.
•
File System Type: physical volume (LVM)
•
Allowable Drives: The hard disk on which you are installing the Linux
operating system.
•
Size (MB): Leave the default value.
•
Additional Size Options: Fill to maximum allowable size
22. Click OK. You are returned to the Disk Setup page.
23. Click LVM. The Make LVM Volume Group page opens. Create the rootvg
volume group as follows:
•
Volume Group Name: Rename it to rootvg (must be spelled exactly as
shown in lower case).
•
Physical Extent: 32 MB.
•
Physical Volumes to Use: Select the hard disk on which you are installing
the Linux operating system.
Note: LVM is a method of allocating hard drive space into logical volumes
that can be easily resized instead of partitions. With LVM, the hard drive or
set of hard drives is allocated to one or more physical volumes. Since a
physical volume can not span over more than one drive, to span over more
than one drive, create one or more physical volumes per drive. The logical
volume group is divided into logical volumes, which are assigned mount
points such as /home and / and file system types such as ext3. When
“partitions” reach their full capacity, free space from the logical volume group
can be added to the logical volume to increase the size of the partition. When
a new hard drive is added to the system, it can be added to the logical volume
group, and the logical volumes that are the partitions can be expanded.
24. Click Add to create necessary logical volumes.
22
Card Access Report Management Application (CARMA) 4.5 for Picture Perfect Administration Guide
Chapter 3: Installation and removal
25. The Make Logical Volume dialog box opens. Create Logical Volumes
LogVol00 through LogVol04 using the values listed in Table 4 below.
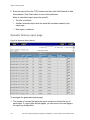
Table 4: Logical volume sizing
Volume group Logical volume Enter mount point
Size to enter (MB) for a 73 GB drive
rootvg
LogVol00
/
5,000
LogVol01
/home
2,400
LogVol02
/tmp
2,400
LogVol03
/usr
7,000
LogVol04
/var
56,200 (remaining space on disk)
26. When you have finished defining your partitions, click OK on the Make LVM
Volume Group page to accept your settings. You are returned to the Disk
Setup page. Click Next to continue.
27. The GRUB Boot Loader Configuration page opens. Accept the default
settings, and then click Next.
28. The Network Configuration page opens. Under Network Devices, click Edit to
set parameters for the network interface. The Edit Interface dialog box opens.
Configure the Edit Interface dialog as follows:
Note: The CARMA host must have a static IP address. It does not work with
DHCP.
•
•
Select Enable IPv4 support check box. Click Manual configuration, and
then enter the IP address and Prefix (Netmask).
Deselect Enable IPv6 check box.
29. Click OK. You are returned to the Network Configuration page. Under
Hostname, Set the hostname, click manually, and then enter the hostname.
See Figure 6 on page 24.
Caution: Do not leave this field blank. It must be set to an alphanumeric
value before CARMA is installed!
Keep the following in mind:
•
•
•
•
Use lowercase a through z, and/or 0 through 9. Do NOT use
UPPERCASE.
Use the simple machine name, such as carmahost, not the fully qualified
name.
The host name may not be more than 16 characters in length.
Do not use host names containing the dash character (-).
Card Access Report Management Application (CARMA) 4.5 for Picture Perfect Administration Guide
23
Chapter 3: Installation and removal
•
Do not use host names containing the underscore character (_).
This is not a valid character in the web server running on the CARMA
host.
Figure 6: Hostname
Under Miscellaneous Settings, configure the Gateway and Primary DNS, if
applicable, and then click Next.
Note: If you fail to provide a Primary DNS, an error message dialog box
opens. Depending on your network environment, this could cause future
problems. If you do not know what this should be, consult your Network
Administrator. Click Continue on the error message dialog box.
30. The Region Selection page opens. Select the region corresponding to the
server location from the drop-down menu. Click the System clock uses UTC
check box, and then click Next.
Note: Selecting three-letter time zone designators ("EST", "PST", "CST", etc.)
cause a problem with daylight savings time. Instead of using these
designators, the full “America/New York", “America/San Francisco", etc
should be used.
24
Card Access Report Management Application (CARMA) 4.5 for Picture Perfect Administration Guide
Chapter 3: Installation and removal
If it is necessary to adjust the date and/or time, use the dateconfig
command when the Linux installation is complete.
31. The Set Root Password page opens. In the Root Password field, enter a
password (minimum six characters) for root. In the Confirm field, enter the
password again, and then click Next.
32. The Package Group Selection window opens. Click Customize now to open
the Package Selection page.
Select the following packages, and then click Next.
Desktop Environments:
•
GNOME Desktop Environment
Applications:
•
Editors
Development:
• Development Tools
• Legacy Software Development
• X Software Development
Servers:
•
•
Legacy Network Server (click on Option packages and select all
options)
Printing Support
Base System:
•
•
•
•
Administration Tools
Base
Dialup Networking Support
X Windows System
Languages:
•
Choose English (USA).
Note: If you plan on installing CARMA in any other supported languages,
either now or in the future, you should install the languages on your system
now. Otherwise, the operating system will have to be re-installed.
33. After a check of dependencies in packages is performed, the About to Install
Red Hat Enterprise Linux Server page opens. Click Next to begin the
installation of Red Hat Enterprise Linux 5.3.
Note: If, for some reason, you do not wish to continue with the installation
process, this is your last opportunity to safely cancel the process and reboot
your machine. Once you press the Next button, partitions will be written and
Card Access Report Management Application (CARMA) 4.5 for Picture Perfect Administration Guide
25
Chapter 3: Installation and removal
packages will be installed. If you wish to abort the installation, you should
reboot now before any existing information on any hard drive is rewritten.
To cancel this installation process, press your computer's Reset button or use
the [Control]-[Alt]-[Delete] key combination to restart your machine.
34. After installation, the Congratulations, the installation is complete page opens.
Remove any media used during the installation process, and then click
Reboot.
35. When the reboot is complete, the Welcome page opens. Click Forward to
continue.
36. The License Agreement page opens. Click Yes, I agree to the License
Agreement, and then click Forward.
37. The Firewall page opens. Select Firewall: Disabled, and then click Forward. A
confirmation dialog box opens. Click Yes to continue.
38. The SELinux Setting page opens. Select SELinux: Disabled, and then click
Forward. A confirmation dialog box opens. Click Yes to continue.
39. The Kdump page opens. Accept the default settings, and then click Forward.
40. The Date and Time page opens. Set the current date and time, and then click
Forward.
Optional: If you want the host to synchronize its clock with a remote time
server, click the Network Time Protocol tab.
•
Check the Enable Network Time Protocol check box and use the dropdown menu to select a time server.
41. The Set Up Software Updates page opens. Select No, I prefer to register at a
later time, and then click Forward. A confirmation dialog box opens, click No
thanks, I’ll connect later. The Finish Updates page opens, Click Forward.
Optional: To register with Red Hat and provide a Red Hat login:
•
If you have already registered with Red Hat Network, click Yes, I’d like to
register now. Click Forward. The Choose Server page opens. Select your
server, and then click Forward to continue.
•
•
•
If you provided your Red Hat login account information, the Activate
dialog opens.
Enter the subscription number in the appropriate field. Otherwise,
select I do not have a subscription number. Click Forward to continue.
If you have never registered, choose Why Should I Connect to RHN? The
Why Register dialog box opens, providing registration information.
42. The Create User page opens. Click Forward to continue. A confirmation
dialog box opens. Click continue.
26
Card Access Report Management Application (CARMA) 4.5 for Picture Perfect Administration Guide
Chapter 3: Installation and removal
43. The Sound Card page opens. Click Forward to continue.
44. The Additional CDs page opens, There are no required add-ons for CARMA.
Click Finish to continue.
45. The Finish Setup dialog box opens. Click OK to reboot the server.
46. The set up for Red Hat Enterprise Linux 5.3 is now complete and you may
proceed “Installing CARMA” below.
Installing CARMA
Configuring the network
Before installing the CARMA software, you need to configure a static IP address.
To configure the network:
1. Log on as root.
Note: The default password is “carma1”. We strongly recommend that you
change the password, using the passwd command.
The Linux desktop displays.
2. From the Red Hat Main Menu, select:
Red Hat 4.7: System Settings > Network
Red Hat 5.3: System > Administration > Network
— or —
From a terminal window, type:
/usr/sbin/system-config-network
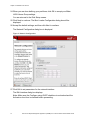
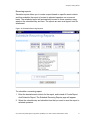
The Network Configuration window displays.
Card Access Report Management Application (CARMA) 4.5 for Picture Perfect Administration Guide
27
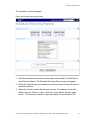
Chapter 3: Installation and removal
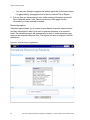
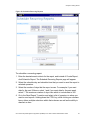
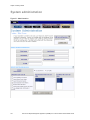
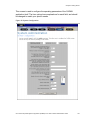
Figure 7: Network Configuration Window
3. If you have only one network card, only one option is listed. Double-click that
option. If you have multiple network cards (wireless and wired), choose the
wired device to configure first. Under Type, the display will show Ethernet.
The Ethernet Device window displays.
28
Card Access Report Management Application (CARMA) 4.5 for Picture Perfect Administration Guide
Chapter 3: Installation and removal
Figure 8: Ethernet Device Settings
4. Click Statically set IP addresses and complete the configuration fields with the
required information.
5. Click OK.
You are returned to the Network Configuration window.
Card Access Report Management Application (CARMA) 4.5 for Picture Perfect Administration Guide
29
Chapter 3: Installation and removal
Figure 9: DNS Tab
6. Click the DNS tab.
7. Enter your hostname, DNS (Domain Name Servers), and DNS search path
information. Be very careful when entering this information as an incorrect
hostname can render your GNOME desktop unusable.
8. Click File > Save.
Including a valid domain name
Modify the /etc/hosts file to include a valid domain name for Sendmail. If one
is not available, you may insert the name local.com as a placeholder.
For more information on how to modify the /etc/hosts file, see Appendix C
“Using the VI editor” on page 139.
For example:
192.9.200.11 carma local.com
30
Card Access Report Management Application (CARMA) 4.5 for Picture Perfect Administration Guide
Chapter 3: Installation and removal
To include a valid domain name for SendMail:
1. Log on as root.
2. From the Red Hat Main Menu, select:
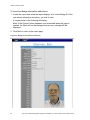
Red Hat 4.0: System Settings > Network
Red Hat 5.3: System > Administration > Network
— or —
From a terminal window, type:
/usr/sbin/system-config-network
The Network Configuration window opens.
3. Select the Hosts tab from Network Configuration dialog box and add the
appropriate entries.
For more information on how to modify the /etc/hosts file, see Appendix C
“Using the VI editor” on page 139.
4. In the VI editor, type /root/.rhosts
5. Specify the name of the server that is hosting Picture Perfect.
For example:
3.112.71.47 pictureperfecthost
Installing the CARMA software on Red Hat Linux 4,
Update 7
To install the CARMA software on Red Hat Linux 4, Update 7:
1. Log on as root.
2. Right click on the desktop, and then click Open Terminal.
A terminal window displays.
3. Insert the CARMA v4.5 Installation DVD into your server. Wait for the DVD
ROM LED to stop blinking before proceeding. The DVD auto mounts.
4. Start the installation by typing the following:
cd /root [Enter]
cd /media/install.sh [Enter]
The installation program determines what packages are needed, installs
them, and then installs the CARMA application.
5. Press Enter when instructed.
Messages, similar to the following display:
Card Access Report Management Application (CARMA) 4.5 for Picture Perfect Administration Guide
31
Chapter 3: Installation and removal
Installation Script for CARMA
This installation assumes as basic installation of Red
Hat Enterprise Linux using the standard RPM packages from
the RedHat Linux CD, and assumes you know how to
configure and administrate Linux, Apache and Mysql. If
you have installed a custom version, or have installed a
custom Apache, PHP, or Mysql distribution, this
installation may not work. See your UTC Fire & Security
representative for more information.
You have 79G free for the /var filesystem. This is where
the CARMA database files will be stored. The absolute
minimum required space free here should be around 200M
for a small Picture Perfect installation with few
transactions. For larger Picture Perfect systems, be
sure you have at least 4 Gigabytes of free space in this
filesystem.
Press the Enter key to see License Agreement...
6. Press Enter to continue.
Messages, similar to the following display:
END-USER SOFTWARE LICENSE AGREEMENT FOR
UTC Fire & Security. "Application Software Product"
IMPORTANT-READ CAREFULLY:
This UTC Fire & Security, End-User License Agreement
("EULA") is a legal agreement between you (either an
individual or a single entity) and UTC Fire & Security,
for the referent UTC Fire & Security application software
product, which includes computer software and may include
associated media, printed materials, and "online" or
electronic documentation ("SOFTWARE PRODUCT"). By
installing, copying, or otherwise using the SOFTWARE
PRODUCT, you agree to be bound by the terms of this EULA.
If you do not agree to the terms of this EULA, do not
install or use the SOFTWARE PRODUCT.
SOFTWARE PRODUCT LICENSE:
The SOFTWARE PRODUCT is protected by copyright laws and
international copyright treaties, as well as other
32
Card Access Report Management Application (CARMA) 4.5 for Picture Perfect Administration Guide
Chapter 3: Installation and removal
intellectual property laws and treaties. The SOFTWARE
PRODUCT is licensed, not sold.
1
GRANT OF LICENSE.
This EULA grants you the following rights:
Applications Software.
You may install and use one copy of the SOFTWARE PRODUCT,
or any prior version for the same operating system, on a
single computer.
Enter '1' to continue viewing the license agreement, or,
Enter '2' to accept the agreement, '3' to decline it.
7. Enter 2, and then press Enter to continue.
Messages, similar to the following display:
Installation starting for Red Hat Enterprise Linux ES
release 4 (Update 7).
(NOTE : CARMA requires certain packages to be installed
from Linux Media)
1) Install required packages from Red Hat Enterprise
Linux ES release 4 (Update 7) media
2) Prerequisites already installed, start CARMA
installation
3) Cancel installation
Please Select one choice (1, 2, 3):
8. Enter 1, and then press Enter to continue.
Open another terminal and unmount CARMA media.
Insert Red Hat Enterprise Linux ES release 4 (Update 7)
media and mount it.
Select y after inserting the media. Select n for cancel
(y/n)?
9. Open another terminal window, and then unmount the CARMA media by
typing the following command:
umount /media/cdrom [Enter]
10. Remove the CARMA media, and then insert the Red Hat Linux ES release 4
(Update 7) media. The media auto mounts.
Card Access Report Management Application (CARMA) 4.5 for Picture Perfect Administration Guide
33
Chapter 3: Installation and removal
11. Go back to the original terminal window to continue. After inserting the Red
Hat Linux ES release 4 (Update 7) media, select y to continue, and then
press Enter.
12. Enter the Red Hat Linux ES release 4 (Update 7) media path by typing the
following command:
/media/cdrom [Enter]
Messages, similar to the following display:
Copying required packages
Verifying or Installing Required Packages...
curl installed. Running version is curl-7.12.1-11.el4
apr installed. Running version is apr-0.9.4-24.9
apr-util installed. Running version is apr-util-0.9.422.el4
httpd installed. Running version is httpd-2.0.52-41.ent
php installed. Running version is php-4.3.9-3.22.9
libc-client-2002e-14 installed. Running version is libcclient-2002e-14
php-imap installed. Running version is php-imap-4.3.93.22.9
php-ldap installed. Running version is php-ldap-4.3.93.22.9
perl-DBI installed. Running version is perl-DBI-1.40-9
mysql installed. Running version is mysql-4.1.22-2.el4
mysql-devel installed. Running version is mysql-devel4.1.22-2.el4
mysqlclient10 installed. Running version is
mysqlclient10-3.23.58-4.RHEL4.1
mysqlclient10-devel installed. Running version is
mysqlclient10-devel-3.23.58-4.RHEL4.1
mysql-bench installed. Running version is mysql-bench4.1.22-2.el4
mysql-server installed. Running version is mysql-server4.1.22-2.el4
34
Card Access Report Management Application (CARMA) 4.5 for Picture Perfect Administration Guide
Chapter 3: Installation and removal
php-mysql installed. Running version is php-mysql-4.3.93.22.9
gd installed. Running version is gd-2.0.28-5.4E.el4_6.1
php-gd installed. Running version is php-gd-4.3.9-3.22.9
Press Ctrl-c to exit, or Press the Enter key to
continue...
Installing Informix Client SDK
Please follow the instructions from the manual
(Extracting files, this may take some time.)
Is ClientSDK being installed along with Informix database
server version 9.x (required to be run as user
"informix")? (yes or no) no
13. Enter no, and then press Enter to continue.
Messages, similar to the following display:
Installation Script
Installation Script Requirements:
- A user “informix” and a group “informix” must be known
to the system.
- The product source files must have been loaded by user
root
- This installation procedure must be run by user root.
- You must also set INFORMIXDIR to where you would like
to install the product on and make INFORMIXDIR as your
current working directory.
This script will change the owner, group, and mode of
many of the files of this package in this directory.
IBM/Informix-Client SDK Version 2.81.UC3 Copyright (C)
1991-2003 IBM
WARNING!
This software, and its authorized use and number of
users, are subject to the applicable license agreement
with IBM. If the number of users exceeds the licensed
Card Access Report Management Application (CARMA) 4.5 for Picture Perfect Administration Guide
35
Chapter 3: Installation and removal
number, the excess users may be prevented from using the
software. UNAUTHORIZED USE OR COPYING MAY SUBJECT YOU AND
YOUR COMPANY TO SEVERE CIVIL AND CRIMINAL LIABILITIES.
Extracting the message files to /tmp/install
771 blocks
Installing Messages...\n
Installing directory /opt/informix//etc
Installing directory /opt/informix//msg
Installing directory /opt/informix//msg/en_us
Installing directory /opt/informix//msg/en_us/0333
...done installing messages
Extracting the GLS files to /tmp/install
7137 blocks
Installing directory /opt/informix//gls/lc11/en_au
Installing directory /opt/informix//gls/lc11/en_gb
Installing directory /opt/informix//gls/lc11/en_us
Installing directory /opt/informix//gls/lc11/es_es
Installing directory /opt/informix//gls/lc11/fi_fi
Installing directory /opt/informix//gls/lc11/fr_be
Installing directory /opt/informix//gls/lc11/fr_ca
Installing directory /opt/informix//gls/lc11/fr_ch
Installing directory /opt/informix//gls/lc11/fr_fr
Installing directory /opt/informix//gls/lc11/is_is
Installing directory /opt/informix//gls/lc11/it_it
Installing directory /opt/informix//gls/lc11/ja_jp
Installing directory /opt/informix//gls/lc11/ko_kr
Installing directory /opt/informix//gls/lc11/nl_be
Installing directory /opt/informix//gls/lc11/nl_nl
Installing directory /opt/informix//gls/lc11/no_no
Installing directory /opt/informix//gls/lc11/os
Installing directory /opt/informix//gls/lc11/pl_pl
36
Card Access Report Management Application (CARMA) 4.5 for Picture Perfect Administration Guide
Chapter 3: Installation and removal
Installing directory /opt/informix//gls/lc11/pt_br
Installing directory /opt/informix//gls/lc11/pt_pt
Installing directory /opt/informix//gls/lc11/ru_ru
Installing directory /opt/informix//gls/lc11/sk_sk
Installing directory /opt/informix//gls/lc11/sv_se
Installing directory /opt/informix//gls/lc11/th_th
Installing directory /opt/informix//gls/lc11/zh_cn
Installing directory /opt/informix//gls/lc11/zh_tw
...done installing GLS files
Extracting files from clientsdkcontent file...
5514 blocks
Installing ClientSDK as user root...
Installing directory.
Installing directory bin
Installing directory lib
Installing directory lib/client
Installing directory lib/client/csm
Installing directory lib/esql
Installing directory lib/dmi
Installing directory lib/c++
Installing directory demo/cli
Installing directory doc
Installing directory doc/gls_api
Installing directory doc/gls_api/en_us
Installing directory doc/gls_api/en_us/0333
IBM Informix Product: IBM INFORMIX-Client SDK
Installation Directory: /opt/informix/
Performing root portion of installation of IBM
INFORMIXClient SDK...
Installation of IBM INFORMIX-Client SDK complete.
Card Access Report Management Application (CARMA) 4.5 for Picture Perfect Administration Guide
37
Chapter 3: Installation and removal
Stoping and starting httpd services:
Stopping httpd:
[
OK
]
Starting httpd:
[
OK
]
Installing CARMA rpm ...
Please wait
Please READ the installation documentation carefully
14. Enter Picture Perfect Hostname (shortname, not fqdn):
pphost. Press Enter.
Note: If you are installing CARMA to use with a Picture Perfect Enterprise
Edition system, enter the host name of the Picture Perfect Network Host.
CARMA retrieves data from the subhosts listed in the host table of the
network host.
For example, if the Picture Perfect host was called pphost and resided on
the UTC Fire & Security network, you would enter:
pphost [Enter],
— not —
pphost.utcfireandsecurity.com [Enter]
15. Enter IP of the Picture Perfect Host: 3.212.217.117. Press
Enter.
Picture Perfect 4.0:
16. Enter a valid Picture Perfect database username
[ppadmin]: Informix. Press Enter.
17. Enter the Picture Perfect database username's password
[ppadmin]: <password>. Press Enter.
18. Enter the Picture Perfect database port [1960]: 1960. Press Enter.
Picture Perfect Hostname: pphost
Picture Perfect IP: 3.212.217.117
Picture Perfect Database Username: informix
Picture Perfect Database Password: <password>
Picture Perfect Database Port: 1960
Are these correct (y/n)? [n]
19. The default selection is n.Enter y, and then press Enter to continue.
38
Card Access Report Management Application (CARMA) 4.5 for Picture Perfect Administration Guide
Chapter 3: Installation and removal
Picture Perfect 4.5:
20. Enter a valid Picture Perfect database username
[ppadmin]: ppadmin. Press Enter.
21. Enter the Picture Perfect database username's password
[ppadmin]: ppadmin. Press Enter..
22. Enter the Picture Perfect database port [9088]: 9088.
Press Enter.
Picture Perfect Hostname: pphost
Picture Perfect IP: 3.212.217.117
Picture Perfect Database Username: ppadmin
Picture Perfect Database Password: <password>
Picture Perfect Database Port: 9088
Are these correct (y/n)? [n]
23. The default selection is n.Enter y, and then press Enter to continue.
Messages, similar to the following display:
Updating /etc/carma.conf with new data.
Alias /carma /var/www/html/carma
Adding startup flags for httpd and mysql
re-starting MySQL services:
Shutting down MySQL.....
[
OK
]
Starting MySQL......
[
OK
]
INSTALLATION COMPLETE!
NOTES:
You will need to run a manual database import before
using CARMA,which can be done from the CARMA
administration page, or by typing
"/etc/cron.daily/carma.cron" in Linux (as root).
The import may take some time, depending on the size of
thePicture Perfect installation and number of Picture
Perfect hosts.
Finally, edit the Configure System fields under System
Administration for your specific configuration. This
should be done for CARMA to understand certain Picture
Perfect database fields to run properly.
Card Access Report Management Application (CARMA) 4.5 for Picture Perfect Administration Guide
39
Chapter 3: Installation and removal
Point your browser to
"http://localhost.localdomain/carma" and login with
"admin" and "admin" to setup users and configure.
Installing the CARMA software on Red Hat Linux 5.3
To install the CARMA software on Red Hat Linux 5.3:
1. Log on as root.
2. Right click on the desktop, and then click Open Terminal.
A terminal window displays.
3. Insert the CARMA v4.5 Installation DVD into your server. Wait for the DVD
ROM LED to stop blinking before proceeding. The DVD auto mounts.
4. Unmount the DVD by typing the following:
umount /media/CDROM [Enter]
5. Mount the DVD by typing the following:
mount /dev/dvd /media [Enter]
6. Start the installation by typing the following:
cd /root [Enter]
cd /media/install.sh [Enter]
The installation program determines what packages are needed, installs
them, and then installs the CARMA application.
7. Press Enter when instructed.
Messages, similar to the following display:
Installation Script for CARMA
This installation assumes as basic installation of Red
Hat Enterprise Linux using the standard RPM packages from
the RedHat Linux CD, and assumes you know how to
configure and administrate Linux, Apache and Mysql. If
you have installed a custom version, or have installed a
custom Apache, PHP, or Mysql distribution, this
installation may not work. See your UTC Fire & Security
representative for more information.
You have 78G free for the /var filesystem. This is where
the CARMA database files will be stored. The absolute
minimum required space free here should be around 200M
for a small Picture Perfect installation with few
40
Card Access Report Management Application (CARMA) 4.5 for Picture Perfect Administration Guide
Chapter 3: Installation and removal
transactions. For larger Picture Perfect systems, be
sure you have at least 4 Gigabytes of free space in this
filesystem.
Press the Enter key to see License Agreement
8. Press Enter to continue.
Messages, similar to the following display:
END-USER SOFTWARE LICENSE AGREEMENT FOR
UTC Fire & Security. "Application Software Product"
IMPORTANT-READ CAREFULLY:
This UTC Fire & Security, End-User License Agreement
("EULA") is a legal agreement between you (either an
individual or a single entity) and UTC Fire & Security,
for the referent UTC Fire & Security application software
product, which includes computer software and may include
associated media, printed materials, and "online" or
electronic documentation ("SOFTWARE PRODUCT"). By
installing, copying, or otherwise using the SOFTWARE
PRODUCT, you agree to be bound by the terms of this EULA.
If you do not agree to the terms of this EULA, do not
install or use the SOFTWARE PRODUCT.
SOFTWARE PRODUCT LICENSE:
The SOFTWARE PRODUCT is protected by copyright laws and
international copyright treaties, as well as other
intellectual property laws and treaties. The SOFTWARE
PRODUCT is licensed, not sold.
1
GRANT OF LICENSE.
This EULA grants you the following rights:
Applications Software.
You may install and use one copy of the SOFTWARE PRODUCT,
or any prior version for the same operating system, on a
single computer.
Enter '1' to continue viewing the license agreement, or,
Enter '2' to accept the agreement, '3' to decline it.
9. Enter 2, and then press Enter to continue.
Messages, similar to the following display:
Card Access Report Management Application (CARMA) 4.5 for Picture Perfect Administration Guide
41
Chapter 3: Installation and removal
Installation starting for Red Hat Enterprise Linux Server
release 5.3.
(NOTE : CARMA requires certain packages to be installed
from Linux Media)
1) Install required packages from Red Hat Enterprise
Linux Server release 5.3 media
2) Prerequisites already installed, start CARMA
installation
3) Cancel installation
Please Select one choice (1, 2, 3):
10. Enter 1, and then press Enter to continue.
Messages, similar to the following display:
Open another terminal and unmount CARMA media.
Insert Red Hat Enterprise Linux Server release 5.3 media
and mount it.
Select y after inserting the media. Select n for cancel
(y/n)? [y]
11. Open another terminal window, and then unmount the CARMA media by
typing the following command:
umount /media/
[Enter]
12. Remove the CARMA media, and then insert the Red Hat Enterprise Linux
Server release 5.3 media. The media auto mounts. Unmount, and then
remount the media by typing the following commands:
umount /media/RHEL_5.3\ i386\DVD
mount /dev/dvd /media
[Enter]
[Enter]
13. Go back to the original terminal window to continue. After inserting the Red
Hat Enterprise Linux Server release 5.3 media, select y to continue, and then
press Enter.
14. Enter the Red Hat Enterprise Linux Server release 5.3 media path by typing
the following command:
/media [Enter]
Messages, similar to the following display:
Copying required packages
Verifying or Installing Required Packages...
42
Card Access Report Management Application (CARMA) 4.5 for Picture Perfect Administration Guide
Chapter 3: Installation and removal
curl installed. Running version is curl-7.15.5-2.el5
postgresql-libs installed. Running version is postgresqllibs-8.1.11-1.el5_1.1
apr installed. Running version is apr-1.2.7-11
apr-util installed. Running version is apr-util-1.2.77.el5
httpd installed. Running version is httpd-2.2.3-23.el5
gmp installed. Running version is gmp-4.1.4-10.el5
php-common installed. Running version is php-common5.1.6-23.el5
php-cli installed. Running version is php-cli-5.1.623.el5
php installed. Running version is php-5.1.6-23.el5
libc-client installed. Running version is libc-client2004g-2.2.1
php-imap installed. Running version is php-imap-5.1.623.el5
php-ldap installed. Running version is php-ldap-5.1.623.el5
perl-DBI installed. Running version is perl-DBI-1.522.el5
MySQL-client-enterprise installed. Running version is
MySQL-client-enterprise-5.1.45-1.rhel5
MySQL-shared-compat-enterprise installed. Running version
is MySQL-shared-compat-enterprise-5.1.45-1.rhel5
perl-DBD-MySQL installed. Running version is perl-DBDMySQL-3.0007-2.el5
MySQL-devel-enterprise installed. Running version is
MySQL-devel-enterprise-5.1.45-1.rhel5
MySQL-server-enterprise installed. Running version is
MySQL-server-enterprise-5.1.45-1.rhel5
php-pdo installed. Running version is php-pdo-5.1.623.el5
php-mysql installed. Running version is php-mysql-5.1.623.el5
Card Access Report Management Application (CARMA) 4.5 for Picture Perfect Administration Guide
43
Chapter 3: Installation and removal
gd installed. Running version is gd-2.0.33-9.4.el5_1.1
php-gd installed. Running version is php-gd-5.1.6-23.el5
Press Ctrl-c to exit, or Press the Enter key to
continue...
15. Press Enter to continue.
Messages, similar to the following display:
Installing Informix Client SDK
Please follow the instructions from the manual
(Extracting files, this may take some time.)
Initializing InstallShield Wizard........
Launching InstallShield Wizard........
Welcome to the InstallShield Wizard for IBM Informix
Client-SDK Version 3.50
The InstallShield Wizard will install IBM Informix
Client-SDK Version 3.50 on your computer.
To continue, choose Next.
IBM Informix Client-SDK Version 3.50
IBM Corporation
http://www.ibm.com
Press 1 for Next, 3 to Cancel or 4 to Redisplay [1] 1
16. The default selection is 1.Press Enter to continue.
Messages, similar to the following display:
------------------------------------------------------International License Agreement for Non-Warranted
Programs
Part 1 - General Terms
BY DOWNLOADING, INSTALLING, COPYING, ACCESSING, OR
USING THE PROGRAM YOU AGREE TO THE TERMS OF THIS
AGREEMENT. IF YOU ARE ACCEPTING THESE TERMS ON BEHALF OF
ANOTHER PERSON OR A COMPANY OR OTHER LEGAL ENTITY, YOU
REPRESENT AND WARRANT THAT YOU HAVE FULL AUTHORITY TO
BIND THAT PERSON, COMPANY, OR LEGAL ENTITY TO THESE
TERMS. IF YOU DO NOT AGREE TO THESE TERMS,
44
Card Access Report Management Application (CARMA) 4.5 for Picture Perfect Administration Guide
Chapter 3: Installation and removal
- DO NOT DOWNLOAD, INSTALL, COPY, ACCESS, OR USE THE
PROGRAM; AND
- PROMPTLY RETURN THE PROGRAM AND PROOF OF ENTITLEMENT TO
THE PARTY
Press Enter to continue viewing the license agreement,
or, Enter "1" to accept the agreement, "2" to decline it
or "99" to go back to the previous screen, "3" Print.
17. Enter 1 to accept the agreement, and then press Enter.
Messages, similar to the following display:
Press 1 for Next, 2 for Previous, 3 to Cancel or 4 to Redisplay [1] 1
18. The default selection is 1.Press Enter to continue.
Messages, similar to the following display:
IBM Informix Client-SDK Version 3.50 Install Location
Please specify a directory or press Enter to accept the
default directory.
Directory Name: [/opt/informix/]
[ENTER]
19. Press Enter to accept the default.
Messages, similar to the following display:
Press 1 for Next, 2 for Previous, 3 to Cancel or 4 to
Redisplay [1] 1
20. The default selection is 1.Press Enter to continue.
Messages, similar to the following display:
------------------------------------------------------Choose the setup type that best suits your needs.
[X] 1 - Typical
The program will be installed with the suggested
configuration.
Recommended for most users.
[ ] 2 - Custom
The program will be installed with the features
you choose.
Recommended for advanced users.
Card Access Report Management Application (CARMA) 4.5 for Picture Perfect Administration Guide
45
Chapter 3: Installation and removal
To select an item enter its number, or 0 when you are
finished: [0] 0 [ENTER]
21. The default selection is 0.Press Enter to continue..
Press 1 for Next, 2 for Previous, 3 to Cancel or 4 to
Redisplay [1] 1
[ENTER]
22. The default selection is 1.Press Enter to continue..
Messages, similar to the following display:
--------------------------------------------------------IBM Informix Client-SDK Version 3.50 will be installed in
the following location:
/opt/informix/
with the following features:
Client
Messages
Global Language Support (GLS)
for a total size:
84.7 MB
Press 1 for Next, 2 for Previous, 3 to Cancel or 4 to
Redisplay [1] 1
[ENTER]
23. The default selection is 1.Press Enter to continue..
Messages, similar to the following display:
Installing IBM Informix Client-SDK Version 3.50. Please
wait...
|-----------|-----------|-----------|------------|
0%
25%
50%
75%
100%
||||||||||||||||||||||||||||||||||||||||||||||||||
Creating uninstaller...
Performing GSKit installation for Linux ...
Branding Files ...
Installing directory .
Installing directory etc
Installing directory bin
46
Card Access Report Management Application (CARMA) 4.5 for Picture Perfect Administration Guide
Chapter 3: Installation and removal
Installing directory lib
Installing directory lib/client
Installing directory lib/client/csm
Installing directory lib/esql
Installing directory lib/dmi
Installing directory lib/c++
Installing directory lib/cli
Installing directory release
Installing directory release/en_us
Installing directory release/en_us/0333
Installing directory incl
Installing directory incl/esql
Installing directory incl/dmi
Installing directory incl/c++
Installing directory incl/cli
Installing directory demo
Installing directory demo/esqlc
Installing directory demo/c++
Installing directory demo/cli
Installing directory doc
Installing directory doc/gls_api
Installing directory doc/gls_api/en_us
Installing directory doc/gls_api/en_us/0333
Installing directory tmp
Installing directory gsk
Installing directory gsk/client
Installing directory gskit
Installing directory gsk
Installing directory gsk/client
IBM Informix Product:
IBM INFORMIX-Client SDK
Installation Directory: /opt/informix
Card Access Report Management Application (CARMA) 4.5 for Picture Perfect Administration Guide
47
Chapter 3: Installation and removal
Performing root portion of installation of IBM INFORMIXClient SDK...
Installation of IBM INFORMIX-Client SDK complete.
Installing directory etc
Installing directory gls
Installing directory gls/cm3
Installing directory gls/cv9
Installing directory gls/dll
Installing directory gls/etc
Installing directory gls/lc11
Installing directory gls/lc11/cs_cz
Installing directory gls/lc11/da_dk
Installing directory gls/lc11/de_at
Installing directory gls/lc11/de_ch
Installing directory gls/lc11/de_de
Installing directory gls/lc11/en_au
Installing directory gls/lc11/en_gb
Installing directory gls/lc11/en_us
Installing directory gls/lc11/es_es
Installing directory gls/lc11/fi_fi
Installing directory gls/lc11/fr_be
Installing directory gls/lc11/fr_ca
Installing directory gls/lc11/fr_ch
Installing directory gls/lc11/fr_fr
Installing directory gls/lc11/is_is
Installing directory gls/lc11/it_it
Installing directory gls/lc11/ja_jp
Installing directory gls/lc11/ko_kr
Installing directory gls/lc11/nl_be
Installing directory gls/lc11/nl_nl
Installing directory gls/lc11/no_no
48
Card Access Report Management Application (CARMA) 4.5 for Picture Perfect Administration Guide
Chapter 3: Installation and removal
Installing directory gls/lc11/os
Installing directory gls/lc11/pl_pl
Installing directory gls/lc11/pt_br
Installing directory gls/lc11/pt_pt
Installing directory gls/lc11/ru_ru
Installing directory gls/lc11/sk_sk
Installing directory gls/lc11/sv_se
Installing directory gls/lc11/th_th
Installing directory gls/lc11/zh_cn
Installing directory gls/lc11/zh_tw
IBM Informix Product:
Gls
Installation Directory: /opt/informix
Performing root portion of installation of Gls...
Installation of Gls complete.
Installing directory etc
Installing directory msg
Installing directory msg/en_us
Installing directory msg/en_us/0333
IBM Informix Product:
messages
Installation Directory: /opt/informix
Performing root portion of installation of messages...
Installation of messages complete.
-------------------------------------------------------The InstallShield Wizard has successfully installed IBM
Informix Client-SDK
Version 3.50. Choose Finish to exit the wizard.
Press 3 to Finish or 4 to Redisplay [3] 3
24. The default selection is 3.Press Enter to continue.
Messages, similar to the following display:
Stopping and starting httpd services:
Stopping httpd:
Card Access Report Management Application (CARMA) 4.5 for Picture Perfect Administration Guide
[
OK
]
49
Chapter 3: Installation and removal
Starting httpd:
Installing CARMA rpm ...
[
OK
]
Please wait
Please READ the installation documentation carefully
25. Enter Picture Perfect Hostname (shortname, not fqdn):
pphost. Press Enter.
Note: If you are installing CARMA to use with a Picture Perfect Enterprise
Edition system, enter the host name of the Picture Perfect Network Host.
CARMA retrieves data from the subhosts listed in the host table of the
network host.
For example, if the Picture Perfect host was called pphost and resided on
the UTC Fire & Security network, you would enter:
pphost [Enter],
— not —
pphost.utcfireandsecurity.com [Enter]
26. Enter IP of the Picture Perfect Host: 3.212.217.167. Press
Enter.
Picture Perfect 4.0:
27. Enter a valid Picture Perfect database username
[ppadmin]: Informix. Press Enter.
28. Enter the Picture Perfect database username's password
[ppadmin]: <password>. Press Enter.
29. Enter the Picture Perfect database port [1960]: 1960.
Press Enter.
Picture Perfect Hostname: pphost
Picture Perfect IP: 3.212.217.167
Picture Perfect Database Username: informix
Picture Perfect Database Password: <password>
Picture Perfect Database Port: 1960
Are these correct (y/n)? [n]
30. The default selection is n.Enter y, and then press Enter to continue.
Picture Perfect 4.5:
31. Enter a valid Picture Perfect database username
[ppadmin]: ppadmin. Press Enter.
50
Card Access Report Management Application (CARMA) 4.5 for Picture Perfect Administration Guide
Chapter 3: Installation and removal
32. Enter the Picture Perfect database username's password
[ppadmin]: ppadmin. Press Enter..
33. Enter the Picture Perfect database port [9088]: 9088.
Press Enter.
Picture Perfect Hostname: pphost
Picture Perfect IP: 3.212.217.167
Picture Perfect Database Username: ppadmin
Picture Perfect Database Password: <password>
Picture Perfect Database Port: 9088
Are these correct (y/n)? [n]
34. The default selection is n. Enter y, and then press Enter to continue.
Messages, similar to the following display:
Updating /etc/carma.conf with new data.
Alias /carma /var/www/html/carma
Adding startup flags for httpd and mysql
re-starting MySQL services:
Shutting down MySQL.....
[
OK
]
Starting MySQL......
[
OK
]
INSTALLATION COMPLETE!
NOTES:
You will need to run a manual database import before
using CARMA, which can be done from the CARMA
administration page, or by typing
"/etc/cron.daily/carma.cron" in Linux (as root).
The import may take some time, depending on the size of
thePicture Perfect installation and number of Picture
Perfect hosts.
Finally, edit the Configure System fields under System
Administration for your specific configuration. This
should be done for CARMA to understand certain Picture
Perfect database fields to run properly.
Point your browser to
"http://localhost.localdomain/carma" and login with
"admin" and "admin" to setup users and configure.
Card Access Report Management Application (CARMA) 4.5 for Picture Perfect Administration Guide
51
Chapter 3: Installation and removal
Enabling remote access
You will need to add the IP name and address of your CARMA host to your client
workstation’s hosts file, which are located in the following directories:
On Windows XP and Vista:
C:\windows\hosts
On Windows NT or Windows 2000:
C:\winnt\system32\drivers\etc\hosts
You need to edit the .conf file to include the IP address for the mail server and
set the domain name.
Configuring your system for Sendmail:
1. Log on to the CARMA server as root.
2. Using the VI editor, edit the file as follows:
nameserver <ipaddress>
domain <domainname>
search <carmahostname>
For information on how to modify the /etc/resolv.conf file, see Appendix C
“Using the VI editor” on page 139.
52
Card Access Report Management Application (CARMA) 4.5 for Picture Perfect Administration Guide
Chapter 3: Installation and removal
Importing the Picture Perfect database
The database import utility runs automatically once a day. However, upon
installation, you may want to manually run the import so that you can immediately
begin using your CARMA server to generate reports.
To import the Picture Perfect database:
1. Determine the size for your CARMA database, keeping in mind the current
Picture Perfect database size as well as future requirements. To determine
the current size of your Picture Perfect database, open a new terminal
window on the Picture Perfect host and type:
currdates [Enter]
A screen similar to the following will display the various history tables along
with the start and end dates.
Figure 10: Example: currdates
2. The amount of data to keep is set by default in the carma.conf file at 4
months. Use the VI editor to edit the carma.conf file to reflect the amount
Card Access Report Management Application (CARMA) 4.5 for Picture Perfect Administration Guide
53
Chapter 3: Installation and removal
of data you wish to store, as determined in step 1. For information on editing
this file, see Appendix C “Using the VI editor” on page 139” on page 139.
3. To manually run the import, log on to the CARMA server as root and type
the following command:
/etc/cron.daily/carma.cron [Enter]
Depending on the size of your Picture Perfect database, the amount of time it
takes to complete the import will vary. Do NOT interrupt the import mid-way
and do NOT run multiple instances of the import program simultaneously. To
avoid running multiple instances of Import by mistake, change the value of the
parameter EXECUTE_IMPORT_CRON to 1.
If you receive the following message, it means you have a Picture Perfect
Host, which is not a redundant system:
Not redundant
Note: If the import process is interrupted, you must remove the following file
prior to trying again: /var/tmp/carma.lock
54
Card Access Report Management Application (CARMA) 4.5 for Picture Perfect Administration Guide
Chapter 3: Installation and removal
Creating accounts
Note: A database must have been imported prior to attempting to add an
operator.
Figure 11: System Configuration Window
Card Access Report Management Application (CARMA) 4.5 for Picture Perfect Administration Guide
55
Chapter 3: Installation and removal
To log in and set up your administrator and any operator account
(required):
1. Point your browser to the CARMA server:
http://carma.utcfireandsecurity.com/carma/
Where carma.utcfireandsecurity.com is the name of the CARMA server you
just configured.
2. Log on using the following authentication information:
Username: admin
Password: admin
3. Once logged in, click System Administration.
4. Under Advanced Settings, select Configure.
5. Use this form to specify the following information:
•
Administrator’s phone number
•
Administrator’s e-mail
•
Picture Perfect version
•
Picture Perfect host name
•
Picture Perfect user name
•
Picture Perfect password
When complete, click Commit Changes.
6. Click Home, then click Change Your Password and specify a new password
for Admin.
7. Once you have changed the password, you will have to log on again using
the new password. You may add additional users by returning to the System
Administration menu. Remember that you must select the departments or
facilities that each user has permission to view. If you omit this step and
generate a report, you will not see any departments in the list box and no
reports will run properly.
Note: To verify the version of CARMA that you are running, type: rpm -q
carma [Enter]
56
Card Access Report Management Application (CARMA) 4.5 for Picture Perfect Administration Guide
Chapter 3: Installation and removal
Logging on from a remote system
If you want to log onto CARMA from a remote system, for example the Picture
Perfect host, you will need to add the user login and password to the CARMA
host.
To log on to CARMA from a remote system:
1. On the CARMA host, type:
adduser <login> [Enter]
passwd <login> [Enter]
2. From the remote system, type:
telnet <login> [Enter]
Card Access Report Management Application (CARMA) 4.5 for Picture Perfect Administration Guide
57
Chapter 3: Installation and removal
Removing CARMA
To remove the CARMA software:
1. Log on as root.
A # prompt displays.
2. To remove the CARMA software, type:
rpm -e carma [Enter]
Note: By default, this uninstall does not remove the CARMA database. If you
reply Yes when asked if you want to delete the database, the entire CARMA
database will be removed and any history no longer available on the Picture
Perfect host will be permanently lost. If you reply No, the CARMA application
will be removed, however, the database, which contains your Picture Perfect
history, will still exist on the CARMA server.
Messages similar to the following will appear on the screen:
By default, Upgrade/Uninstall does NOT remove the CARMA
database.
Unless your upgrade instructions tell you to do this,
choose "n".
Do you wish to delete the CARMA database? (y/n)y.
3. Press Enter to accept the default “y.” The CARMA software is now removed.
If you chose not to remove the CARMA database and decide to remove it at a
later time, you can do so by typing the following command.
mysqladmin drop carma [Enter]
58
Card Access Report Management Application (CARMA) 4.5 for Picture Perfect Administration Guide
Chapter 4
Upgrading CARMA from a
previous version
Summary
The following steps required to upgrade from CARMA 4.0 to CARMA 4.5 are
included in this chapter:
1. Back up your existing CARMA 4.0 database.
2. Install RedHat Enterprise Linux on your CARMA server.
3. Install CARMA 4.5.
4. Restore your CARMA 4.0 database.
5. Run the CARMA Database Upgrade Utility.
Content
Introduction 60
Back up your existing CARMA 4.0 database 60
Install RedHat Enterprise Linux on your CARMA server 61
Install CARMA 4.5 61
Restore your CARMA 4.0 database 61
Run the CARMA Database Upgrade Utility 62
Card Access Report Management Application (CARMA) 4.5 for Picture Perfect Administration Guide
59
Chapter 4: Upgrading CARMA from a previous version
Introduction
If you are installing CARMA for the first time, skip this chapter. This new version
of CARMA, for Picture Perfect 4.5, supports filtering history data based on Time
Zone context. It also supports database partitioning by Facility. In order to do so,
the system must have the same three date/time contexts (UTC, Device and Host)
for each history record, and it must be able to associate each history record with
a Facility. During the upgrade process, the system will add a Facility to all
existing badge history records. The Facility used will be the Facility of the Badge
associated with the transaction. Database partitioning by Department is still
supported as it was in previous releases, so the new Facility field need not be
used for permission purposes unless you choose to do so.
You will need two blank tapes to perform the upgrade.
During the following procedures, when prompted for the CARMA password, type:
carma [Enter].
Back up your existing CARMA 4.0 database
To back up your CARMA database:
1. Log on as root.
2. To create a disk file for your existing database backup, type:
Linux v4.0
mysqldump --opt carma > /var/<filename> [Enter]
where <filename> is the name of the backup file. For example:
carmabk101003.
3. When prompted, enter the root password, and then press Enter. The default
root password is empty and does not require you to enter anything.
4. If backing up to a tape drive, insert a tape and type:
tar -cvf/dev/st0 /var/<filename> [Enter]
5. If backing up to an external device such as a USB drive, create a folder called
var, and then copy the backup file to this folder.
60
Card Access Report Management Application (CARMA) 4.5 for Picture Perfect Administration Guide
Chapter 4: Upgrading CARMA from a previous version
Install RedHat Enterprise Linux on your
CARMA server
Refer to “Installing Red Hat Linux 4, Upgrade 7” on page 10 or “Installing Red
Hat Linux 5.3” on page 20.
Install CARMA 4.5
Refer to “Installing CARMA” on page 27.
Restore your CARMA 4.0 database
Caution: Before restoring your database, you need to increase value of "Months
to keep in carma.conf" or the import will drop data older than 4 months.
To increase the "Months to keep" value:
1. Start the VI editor, and type:
vi /etc/carma.conf
2. Adjust the value as necessary and exit the VI editor.
Once you have successfully completed the installation of RedHat Linux and
CARMA, and adjusted the number of months of data to import, restore the
database.
To restore the CARMA database:
1. Type the following:
cd /var [Enter]
tar -xvf /dev/st0 [Enter]
2. Start the restore procedure by typing the following:
mysql [Enter]
Messages similar to the following display:
Welcome to the MySQL monitor. Commands end with ; or \g.
Your MySQL connection id is 2454 to server version:
4.1.7-Max
Card Access Report Management Application (CARMA) 4.5 for Picture Perfect Administration Guide
61
Chapter 4: Upgrading CARMA from a previous version
Type ‘help;’ or ‘\h’ for help. Type ‘\c’ to clear the
buffer.
mysql>
3. Type the following:
use carma; [Enter]
Messages similar to the following display:
Reading table information for completion of table and
column names. You can turn off this feature to get a
quicker startup with -A
Database changed
mysql>
4. Type: source<filename>
Where filename is the absolute path of the converted file.
For example:
source /var/carmaconv101003;
5. Database files are restored. When returned to the mysql> prompt, type:
quit [Enter]
Run the CARMA Database Upgrade Utility
To upgrade your old database to CARMA 4.5:
1. Log on as root and type:
/usr/local/carma/carma_db_upgrade.sh
The CARMA Database Upgrade Utility displays.
CARMA DATABASE UPGRADE UTILITY
NOTES:
This script will upgrade the old CARMA database to
support new PP versions. Normally, it will update the
database schema. The upgrade may take some time,
depending on the size of the existing database. Please
make sure to take database backup before opting for
upgrade options. You will not be able to revert database
back to its original state after upgrade.
62
Card Access Report Management Application (CARMA) 4.5 for Picture Perfect Administration Guide
Chapter 4: Upgrading CARMA from a previous version
Used space in /var file system is 404MB
Free space in /var file system is 115205MB
Minimum free space required in /var for DB upgrade is
5796 KB
M E N U
(NOTE : CARMA version should be same as that of Picture
Perfect else import would not happen properly!!)
1) Upgrade CARMA Database to CARMA 4.x
2) Upgrade CARMA Database to InnoDB
3) Cancel
Please Select one choice (1, 2, 3):
2. Type 1 to upgrade to CARMA 4.5.
You will be asked to confirm:
You would not be able to revert back changes. Do you
really want to upgrade. (y/n)? [n]
3. Type y to continue.
Messages similar to the following display:
carma_user table is up-to-date. Upgrade not required
carma_facility_permissions table is up-to-date. Upgrade
not required
Upgrading carma_schedule table to support CARMA 4.5
database schema
carma_schedule table is now up-to-date
carma_schedule_operator table is up-to-date. Upgrade not
required
Upgrading carma_saved_queries table to support CARMA 4.5
database schema
carma_saved_queries table is now up-to-date
Upgrading carma_sys_config table & meaning tables to
support CARMA 4.x database schema
Card Access Report Management Application (CARMA) 4.5 for Picture Perfect Administration Guide
63
Chapter 4: Upgrading CARMA from a previous version
carma_sys_config table & meaning tables are now up-todate
Upgrading alarm_history table to support CARMA 4.5
database schema
alarm_history table is now up-to-date
Upgrading alarm_historytmp table to support CARMA 4.5
database schema
alarm_historytmp table is now up-to-date
Upgrading alarm_history_resolved table to support CARMA
4.0 database schema
alarm_history_resolved table is now up-to-date
Upgrading badge_history table to support CARMA 4.5
database schema
badge_history table is now up-to-date
Upgrading badge_historytmp table to support CARMA 4.5
database schema
badge_historytmp table is now up-to-date
Upgrading badge_history_resolved table to support CARMA
4.5 database schema
badge_history_resolved table is now up-to-date
Upgrading operator_his table to support CARMA 4.5
database schema
operator_his table is now up-to-date
Upgrading operator_histmp table to support CARMA 4.5
database schema
Operator Historytmp Table is now up-to-date
4. To change the existing CARMA database to InnoDb, run the following
command.
/usr/local/carma/carma_db_upgrade.sh
Text similar to the following displays:
CARMA DATABASE UPGRADE UTILITY
NOTES:
This script will upgrade the old CARMA database to
support new PP versions. Normally, it will update the
64
Card Access Report Management Application (CARMA) 4.5 for Picture Perfect Administration Guide
Chapter 4: Upgrading CARMA from a previous version
database schema. The upgrade may take some time,
depending on the size of the existing database. Please
make sure to take database backup before opting for
upgrade options. You will not be able to revert database
back to its original state after upgrade.
Used space in /var file system is 5622MB
Free space in /var file system is 47058MB
Minimum free space required in /var for DB upgrade is
2653 MB
M E N U
(NOTE : CARMA version should be same as that of Picture
Perfect else import would not happen properly!!)
1) Upgrade CARMA Database to CARMA 4.x
2) Upgrade CARMA Database to InnoDB
3) Cancel
Please Select one choice (1, 2, 3):2
5. Type 2 to upgrade the CARMA database to InnoDB.
You will be asked to confirm:
You would not be able to revert back changes. Do you
really want to upgrade. (y/n)? [n] y
6. Type y to continue.
Messages similar to the following display:
host is not a MyISAM table - doing nothing.
Converting alarm to InnoDB
Converting alarm_history to InnoDB
Converting alarm_history_archive to InnoDB
Converting alarm_history_resolved to InnoDB
Converting alarm_historytmp to InnoDB
Converting area to InnoDB
Converting area_category to InnoDB
Converting badge to InnoDB
Converting badge_history to InnoDB
Card Access Report Management Application (CARMA) 4.5 for Picture Perfect Administration Guide
65
Chapter 4: Upgrading CARMA from a previous version
Converting badge_historySYNC to InnoDB
Converting badge_history_archive to InnoDB
Converting badge_history_archive_t to InnoDB
Converting badge_history_resolved to InnoDB
----------------------------------------------Note: Depending on your database size, the following step may take a few
hours to a few days to complete.
7. Return to step 4, if the following message displays:
One or more tables have failed to convert to InnoDB,
please run the utility once again.
To import Picture Perfect database information, run the import utility by
typing:
/etc/cron.daily/carma.cron
If you have verbose mode enabled, messages similar to the following display.
See “Turning on verbose mode” on page 122 for information on enabling
verbose mode.
We're = 4.5 (for plevel)
Not redundant!
Installation and restore is now complete. Proceed to Chapter 5.
66
Card Access Report Management Application (CARMA) 4.5 for Picture Perfect Administration Guide
Chapter 5
Getting started
Summary
This chapter covers the following topics:
•
•
•
•
•
•
•
Logging in and out of CARMA
Main Menus and Submenus
Badge and Alarm Event History and Generated Reports
Personnel Records and Generated Reports
Operator History and Generated Reports
Monitor Hosts and Micros
System Administration
Content
Logging on 68
Logging off 69
Main menus and submenus 69
Changing your password 70
Deleting queries 71
Deleting schedules 72
Customizing your window colors 73
Badge event history 73
Badge event report page 78
Alarm event history 81
Alarm event history report page 87
Personnel records 89
Personnel report page 94
Operator history 96
Operator history report page 100
Monitor hosts and micros 102
System administration 104
Card Access Report Management Application (CARMA) 4.5 for Picture Perfect Administration Guide
67
Chapter 5: Getting started
Logging on
The login procedure for CARMA is similar to any other Web site login. Start up
Internet Explorer and enter the URL of the CARMA host.
For example: http://carmahost/carma/
The first parameter is the name of the CARMA host and the second is the name
of the CARMA software.
Enter your Username and Password assigned by the system administrator, and
then click Continue.
Figure 12: CARMA Login Screen
At the bottom of the Login screen, the version of CARMA that you are running is
displayed.
Note: Your password expires periodically and must be changed. You are
prompted to change your password before it expires. Additionally, an e-mail
message is sent when your password is within 10 days of expiration. If you do
not change the password, you are locked out of the system until the administrator
resets your password. See "Changing your password" on page 70.
68
Card Access Report Management Application (CARMA) 4.5 for Picture Perfect Administration Guide
Chapter 5: Getting started
Logging off
Logging off is not required by CARMA, but is a good idea for security reasons.
Click the Logout button at the top of the main page to exit CARMA whenever you
need to exit the program. The system automatically logs off an inactive user after
a predetermined time (set by the system administrator).
Main menus and submenus
The main menu is a horizontal window frame entitled Card Access Report
Management Application.
When you log on, the CARMA (Card Access Report Management Application)
displays at the top of the window (see Figure 13 on page 70). Menu choices
(search options) appear on the right side. Additionally you can:
•
Change your password
•
Delete Saved Queries
•
Customize
The submenus appear on the right side. To display a menu, click the line of text
representing the submenu. Note that menu items are dynamic based upon the
operator’s permissions. So, not all of the menu features displayed here may be
present for another operator, if their assigned permissions do not allow access to
that specific menu item.
For example, most user level operators such as a department manager would
not normally be permitted to access the system administration menus or the
operator history menus, since those functions would not generally apply to their
needs.
Card Access Report Management Application (CARMA) 4.5 for Picture Perfect Administration Guide
69
Chapter 5: Getting started
Figure 13: CARMA Main Screen
Changing your password
At the bottom of the main login window, your login name is listed. The number of
days until your password expires is also listed as well as the version of CARMA
that you are running. Additionally you can:
•
Change your password
•
Delete Saved Queries
•
Customize
To change your password:
1. Click Change Your Password, and a new page appears prompting for a new
password.
2. When finished, click Commit Change. The system records the changes and
returns you to the Main Menu.
70
Card Access Report Management Application (CARMA) 4.5 for Picture Perfect Administration Guide
Chapter 5: Getting started
Figure 14: Change Your Password
Deleting queries
You can also delete previously saved queries. Previously saved queries are
reports that are saved for later use.
To delete a saved query:
1. At the bottom of the main menu page, click Delete Saved Queries. A new
menu appears. Using a list box, you can view all previously saved queries.
2. If you would like to delete a query, choose the name of that query and then
click Delete This Saved Query.
Card Access Report Management Application (CARMA) 4.5 for Picture Perfect Administration Guide
71
Chapter 5: Getting started
Figure 15: Delete Your Saved Queries
Another page displays and asks if you are sure you want to delete this query.
•
If you are sure click Yes.
•
If not click No.
If you click Yes, you are returned to the prior page to confirm that you have
successfully deleted that query. If you click No, you are returned to the prior
page, but no reports will have been deleted.
You can also delete previously saved schedules. Previously saved schedules are
those reports that have been scheduled to be sent at recurring intervals to
selected operators.
Deleting schedules
You can also delete previously saved schedules. Previously saved schedules are
reports that are schedules to be run at specified times.
To delete a saved schedule:
1. At the bottom of the main menu page, click Delete Saved Queries to display
the Delete Your Saved Queries page. A list box at the bottom of the page
contains all previously saved schedules.
2. Choose the name of the schedule you wish to delete and then click Delete
This Saved Schedule. Another page will display and ask if you are sure you
want to delete this schedule.
72
Card Access Report Management Application (CARMA) 4.5 for Picture Perfect Administration Guide
Chapter 5: Getting started
3. If you are sure click Yes; if not, click No. If you click Yes, you are returned to
the prior page to confirm that you have successfully deleted that schedule. If
you click No, you are returned to the prior page, but no schedules will have
been deleted.
Customizing your window colors
You can customize your window colors in CARMA by clicking on Customize at
the bottom of the screen on the Main Menu. A new page appears, containing a
list box of available color schemes. Choose the preferred scheme and then click
Select. Your screen color will change accordingly. CARMA uses cascading style
sheets for color schemes, which may be customized with corporate color
schemes and logos if desired. See your system administrator for additional color
schemes that might be available.
Figure 16: Choose a Color Style
Badge event history
The Badge Event History Search allows you to obtain information regarding
which doors a specific badge has opened within a certain time period. For
example, you could use this feature to generate a report of the doors, on which
an employee’s badge was used, from January 1, 2000 through March 12, 2000.
This function can be accessed by choosing Badge Event History from the main
page of CARMA.
Card Access Report Management Application (CARMA) 4.5 for Picture Perfect Administration Guide
73
Chapter 5: Getting started
Figure 17: Badge Event History Search
74
Card Access Report Management Application (CARMA) 4.5 for Picture Perfect Administration Guide
Chapter 5: Getting started
To select the time zone in which the report data is to be displayed:
1. Click DEV BADGE EVENT DATE.
2. Select either Dev, HOST, or UTC to specify a context of either Device, Host,
or Coordinated Universal Time (UTC) for the report data.
To search badge history for a specific time period:
1. Use the check boxes next to Date and Time in the first section of this page
entitled Badge Event Date.
2. Start by selecting the Dates you want to include in the report. If you would like
to narrow the search further, you can also enter specific times.
3. Scroll to the bottom of the screen and click Create Report.
You can also search badge history by Badge ID#, Employee ID #, Last Name, or
First Name. The fields are not case-sensitive, so upper case and lower case
characters are treated the same. Badge ID# or Employee ID# produces the most
accurate results, as there may be several different employees with the same first
or last names.
To create a report for a specific badge:
1. Enter the information you choose to use in the specified fields which are
found in the Badge Holder Information section.
2. After entering the information, scroll down to the bottom of the page and click
Create Report. This displays a complete badge event history for that
particular badge.
3. You can also use both the Badge Event Date and the Badge Holder
Information sections to narrow your search. Enter the information needed in
both sections and click Create Report at the bottom of the page.
4. You also have the option of choosing from the Card Access System Specifics.
In this area, which is found in the third section on the Badge Event History
search page, you can choose selections under Department, Facility,
Category, Badge Status, Area, Reader, and Transaction Type to narrow your
search. A menu from which no selections have been made will not be applied
to the search category.
For example, if you do not select any of the entries under Category, all
options under Category are considered for the purpose of the search. Holding
Card Access Report Management Application (CARMA) 4.5 for Picture Perfect Administration Guide
75
Chapter 5: Getting started
down the CTRL key while clicking on submenu items allows multiple
selections within that submenu as well as the ability to deselect an item.
5. If at any time you are entering information, have made an error, and would
like to clear the screen, click Clear at the bottom of the page and the
information you have entered is cleared.
To graph your selections in the Card Access System Specifics section:
1. Choose at least two of the selections under the same heading. For example,
choose Active and Deleted.
You cannot graph more than one group of selections at a time. For example,
if you choose to graph Active and Deleted under the Badge Status heading,
you cannot also graph selections under the Category heading.
Note: The Card Access System Specifics should not be used on their own.
Instead, it should be used in conjunction with either the Badge Holder
Information section and/or the Badge Event Date section. It is used to further
narrow these two types of searches.
2. Click Graph? under that group of selections.
3. After you have made your selections, click Graph?. Choose which type of
graph you would like in the Options box at the bottom of the page. Your graph
options are Pie, Line, Column or Bar graph. If you do not choose a type of
graph to use, the standard report format is generated instead.
If you have inadvertently chosen to graph selections, you must scroll to the
bottom of the page and click Clear to remove the graph button that you had
selected.
To choose how you would like the report to list badge events:
Note at the bottom of the Badge Event History page is a box entitled Options,
etc.
•
You may elect to give the report a name so that you can run the same report
again later.
•
If you previously chose to graph your report, you may select the graph type.
•
If you previously chose to graph your report, you may elect to include only
those records where the count is greater than a number of your choosing.
•
You may also change or append the default report title when it is generated
by changing the text in the Title of Report text box.
76
Card Access Report Management Application (CARMA) 4.5 for Picture Perfect Administration Guide
Chapter 5: Getting started
Recurring reports
Schedule reports allows you to create a report based on specific search criteria
and then schedule the report to be sent to selected operators on a recurrent
basis. The scheduled report will automatically be sent to those operators every
week on the scheduled day and time. The reports are sent as a zipped .html file
attachment.
Figure 18: Schedule Recurring Reports
To schedule a recurring report:
1. Enter the desired search criteria for the report, and instead of Create Report,
click Schedule Report. The Schedule Recurring Reports page will appear.
2. Select the schedule day and schedule time that you want to send the report to
selected operators.
Card Access Report Management Application (CARMA) 4.5 for Picture Perfect Administration Guide
77
Chapter 5: Getting started
3. Select the number of days that the report covers. For example, if you want
data for the past 24 hours, select 1 and if you want data for the past week,
select 7. The maximum number of days from which to include data is 365.
4. Go to the Send Report To section and select a list of operators to whom you
want to send reports. Holding down the CTRL key, while clicking on submenu
items, allows multiple selections within that submenu as well as the ability to
deselect an item.
5. Enter the report title in the TITLE section and then click Add Schedule to add
this schedule. Click Clear button to remove the selections.
Note: A scheduled report cannot be saved if:
•
Any graph options are selected.
•
The title is left blank.
•
Another scheduled report with the same title has been created by the same
login.
•
The Date option is selected.
Badge event report page
Figure 19: Badge Event Report
78
Card Access Report Management Application (CARMA) 4.5 for Picture Perfect Administration Guide
Chapter 5: Getting started
To navigate the generated report page:
1. The number of records that particular report contains is listed at the top of that
report. If a report has multiple pages, you can move to the next page in the
report by clicking Next.
2. Click End to move to the last page of the report.
3. Click Back to return to the query page that you used to create the report.
4. Click Home to return to the CARMA main page.
To print any of the above reports:
Note: The Print button is enabled only if the number of records is greater than 0
and less than 10000.
1. Create the report and, when the report displays, go to the top of the page on
the right side and click Print.
The report is formatted so that all returned rows from the query appear on a
single page. You may then sort the report by column headers as explained
below.
2. Click Print to send the report to your local printer.
3. Click Back to return to the report page.
To save the reports:
Note: The Save button is enabled only if the number of records is greater than 0
and less than 10000.
1. Create the report and, when the report displays, go to the top of the page on
the right side and click Save.
The report is saved as a text file and may be imported into a desktop
application. If you are using Microsoft Excel, the file is imported as a Microsoft
Excel spreadsheet. Please note that you will have to convert the BID (Badge
ID) column to a real number format, instead of the scientific number format to
which it defaults.
2. On the report page, you can sort the report by clicking the column headers.
Click twice on a column header in the report to change the sort order.
For example, if the report is sorted with the latest events first, click Date and it
will be sorted with the earliest events first.
3. Click Date again and the report displays the latest events first.
4. If you would like the report to be sorted in alphabetical order by name, instead
of sorting by date, click the Name column. Click Date to sort the report by
date order.
Card Access Report Management Application (CARMA) 4.5 for Picture Perfect Administration Guide
79
Chapter 5: Getting started
To view User Badge information and photos:
1. Create the report and, when the report displays, click on the Badge ID of the
user whose information and photo, you wish to view.
A screen similar to the following will display.
Note: If the Picture Perfect database is not accessible when this page is
opened, the Photo will not be displayed and an error message will be
displayed.
2. Click Back to return to the report page.
Figure 20: Badge ID Information and Photo
80
Card Access Report Management Application (CARMA) 4.5 for Picture Perfect Administration Guide
Chapter 5: Getting started
To e-mail any of the above reports:
1. Create the report. When the report is on the screen, go to the top of the page
on the right side and enter an e-mail address in the E-mail this to box.
2. Select the HTML option to send e-mail in HTML format or select TEXT to
send in pipe delimited format. The file will be sent as a zipped attachment.
3. Click Go. A report will be sent to the specified e-mail address.
To obtain help with selected sections:
1. Along the right side of the Badge Event History page, the ?s (question marks)
appear next to each section.
2. Click the ? and a window displays information pertaining to the selected
section.
3. Click Close to close this window.
Alarm event history
The Alarm Event History search allows you to retrieve information about all
alarms that have occurred in a specific date range and/or time frame. You access
this feature by clicking on Alarm Event History on the main page of CARMA.
Card Access Report Management Application (CARMA) 4.5 for Picture Perfect Administration Guide
81
Chapter 5: Getting started
Figure 21: Alarm Event History Search
To select the time zone in which the report data is to be displayed:
1. Click DEV ALARM EVENT DATE.
82
Card Access Report Management Application (CARMA) 4.5 for Picture Perfect Administration Guide
Chapter 5: Getting started
2. Select either Dev, HOST, or UTC to specify a context of either Device, Host,
or Coordinated Universal Time for the report data.
To retrieve alarm information:
1. Choose the specific dates and/or times for which you would like to generate a
report, from the first section of this page entitled Alarm Event Date.
2. Use the list boxes in this section. Scroll down to the bottom of the page and
click Create Report.
To narrow the search further:
1. Note the second section entitled Card Access System Specifics, where you
will find the headings Input Group, Alarm, Input, and Logical State. Then:
2. Make selections under the Input Group, Alarm, Input, and Logical State
sections to limit your search to include those specific options.
3. Choose your selections from these headings by clicking on the selection.
Then, scroll to the bottom of the page and click Create Report.
4. Holding down the CTRL key while selecting submenu items allows for
multiple selections within that submenu.
A menu from which no selections have been made will not be applied to the
search category. For example, if you do not select any of the entries under
Alarm, all options under Alarm, are considered in the search.
To generate the reports by facility:
1. At the top of the page, under Search by Facility, select Inputs, Input Groups,
or Alarms. When you choose one of these options, a new screen displays.
2. Under Card Access Systems Specifics there is a Facility heading next to the
heading of either Alarm, Input or Input Groups, depending on which option
you chose. Select the desired options under these new headings.
3. Select the logical state of the alarm: Alarm, Reset, or Tamper.
4. Click Create Report.
To choose how you would like the report to list badge events:
Note at the very bottom of the Alarm Event History page is a box entitled
Options, etc.
•
You may elect to give the report a name so that you can run the same report
again later.
•
If you previously chose to graph your report, you may select the graph type.
Card Access Report Management Application (CARMA) 4.5 for Picture Perfect Administration Guide
83
Chapter 5: Getting started
•
If you previously chose to graph your report, you may elect to include only
those records where the count is greater than a number of your choosing.
•
You may also change or append the default report title when it is generated
by changing the text in the Title of Report text box.
To graph your selections in the Card Access System Specifics section:
1. Choose at least two of the selections under the same heading. For example,
choose Door Forced Open and Door Held Open.
You cannot graph more than one group of selections at a time. For example,
if you choose to graph Door Forced Open, Door Held Open and Invalid Badge
under the Alarm heading, you cannot also graph selections under the Input
heading.
2. Click Graph? under that group of selections.
3. After you have made your selections, click Graph?. Choose which type of
graph you would like in the Options, etc box at the bottom of the page. Your
graph options are Pie, Line, Column or Bar graph. If you do not choose a type
of graph to use, the standard report format is generated instead.
If you have inadvertently chosen to graph selections, you must scroll to the
bottom of the page and click Clear to remove the graph button that you had
selected.
Recurring reports
Schedule reports allows you to create a report based on specific search criteria
and then send the report to selected operators on a recurrent basis. The
scheduled report will automatically be sent to those operators every week on the
scheduled day and time. The reports are sent as a zipped .html file attachment
84
Card Access Report Management Application (CARMA) 4.5 for Picture Perfect Administration Guide
Chapter 5: Getting started
To schedule a recurring report:
Figure 22: Schedule Recurring Reports
1. Enter the desired search criteria for the report, and instead of Create Report,
click Schedule Report. The Schedule Recurring Reports page will appear.
2. Select the schedule day and schedule time that you want to send the report to
selected operators.
3. Select the number of days that the report covers. For example, if you want
data for the past 24 hours, select 1 and if you want data for the past week,
select 7. The maximum number of days from which to include data is 365.
Card Access Report Management Application (CARMA) 4.5 for Picture Perfect Administration Guide
85
Chapter 5: Getting started
4. Go to the Send Report To section and select a list of operators to whom you
want to send reports. Holding down the CTRL key while clicking on submenu
items allows multiple selections within that submenu as well as the ability to
deselect an item.
5. Enter the report title in the TITLE section and then click Add Schedule to add
this schedule. Click Clear button to remove the selections.
Note: A scheduled report cannot be saved if:
86
•
Any graph options are selected
•
The title is left blank
•
Another scheduled report with the same title has been created by the
same login.
•
Date option is selected
Card Access Report Management Application (CARMA) 4.5 for Picture Perfect Administration Guide
Chapter 5: Getting started
Alarm event history report page
Figure 23: Alarm Event History Report
To navigate the generated report page:
1. The number of records that particular report contains is listed at the top of that
report. If a report has multiple pages, you can move to the next page in the
report by clicking Next.
2. Click End to move to the last page of the report.
Card Access Report Management Application (CARMA) 4.5 for Picture Perfect Administration Guide
87
Chapter 5: Getting started
3. Click Back to return to the query page that you used to create the report.
4. Click Home to return to the CARMA main page.
To print any of the above reports:
Note: The Print button is enabled only if the number of records is greater than 0
and less than 10000.
1. Create the report and, when the report displays, go to the top of the page on
the right side and click Print.
The report is formatted so that all returned rows from the query appear on a
single page. You may then sort the report by column headers as explained
below.
2. Click Print to send the report to your local printer.
3. Click Back to return to the report page.
To save the reports:
Note: The Save button is enabled only if the number of records is greater than 0
and less than 10000.
1. Create the report and, when the report displays, go to the top of the page on
the right side and click Save.
The report is saved as a text file and may be imported into a desktop
application. If you are using Microsoft Excel, the file is imported as a Microsoft
Excel spreadsheet.
2. On the report page, you can sort the report by clicking the column headers.
Click twice on a column header in the report to change the sort order.
For example, if the report is sorted with the latest events first, click Happened
and it will be sorted with the earliest events first.
3. Click Happened again and the report displays the latest events first.
4. If you would like the report to be sorted in alphabetical order by name, instead
of sorting by date, click the Alarm column. Click Happened to sort the report
by date order.
To e-mail any of above reports:
1. Create the report. When the report is on the screen, go to the top of the page
on the right side and enter an e-mail address in the E-mail this to box.
2. Select the HTML option to send e-mail in HTML format or select TEXT to
send in pipe delimited format. The file will be sent as a zipped attachment.
3. Click Go. A report will be sent to the specified e-mail address.
88
Card Access Report Management Application (CARMA) 4.5 for Picture Perfect Administration Guide
Chapter 5: Getting started
To obtain help with selected sections:
1. Along the right side of the Alarm Event History page, the ?s (question marks)
appear next to each section.
2. Click the ? and a window displays information pertaining to the selected
section.
3. Click Close to close this window.
Personnel records
The Personnel Records Search allows you to retrieve specific information about
an employee’s badge status, type and usage. To access this feature, click
Personnel Records on the main page of CARMA.
Card Access Report Management Application (CARMA) 4.5 for Picture Perfect Administration Guide
89
Chapter 5: Getting started
Figure 24: Personnel Search
To search personnel records for a specific time period:
1. Use the check box next to Date and Time in the first section of this page to
determine selection criteria (such as Last Access Date).
2. Start by selecting the dates you want to include in the report by using the list
box. If you would like to narrow the search further, you can also enter in
specific times by using the list box.
3. Scroll to the bottom of the screen and click Create Report.
90
Card Access Report Management Application (CARMA) 4.5 for Picture Perfect Administration Guide
Chapter 5: Getting started
Specific searches
You can search personnel records by Badge ID#, Employee ID #, Last Name of
Employee or First Name of Employee if you need to generate a report on a
certain employee’s badge.
To search by specific information:
1. Enter the information you choose to use in the specified field, which is found
in the second section of this page entitled Badge Holder Information.
Badge ID# or Employee ID# produces the most accurate results, as there
may be several different employees with the same first or last names.
2. Scroll down to the bottom of the page and click Create Report. This displays
personnel information.
3. Narrow your search by using both of the above-mentioned searches together.
Enter the needed information under Date/Time and Badge Holder Information
and then scroll to the bottom of the page and click Create Report.
4. You also have the option of choosing from the Card Access System Specifics.
In this area, found in the third box on the Personnel Records page, you can
choose selections under Department, Facility, Badge Type, and Badge Status
to narrow your search. A menu from which no selections have been made will
not be applied to the search category.
For example, if you do not select any of the entries under Department, all
options under Department are considered for the purpose of the search.
5. Press the CTRL key while clicking on submenu items to allow for multiple
selections within that submenu.
Note: The Card Access System Specifics should not be used alone but, instead,
should be used in conjunction with the Date/Time section and/or the Badge
Holder Information section. It is used to narrow these two types of searches
down further.
To choose a certain number of days worth of badge inactivity for the
report:
1. Note at the very bottom of the Personnel Records page is a box entitled
Options, etc.
•
You may elect to give the report a name so that you can run the same
report again later.
•
For example, to see how many badges have not been used for the last
180 days, enter 180 in the field. You may further narrow this search by
selecting items from Badge Status and/or Badge Type.
Card Access Report Management Application (CARMA) 4.5 for Picture Perfect Administration Guide
91
Chapter 5: Getting started
•
You may also change or append the default report title for the report when
it is generated by changing the text in the box marked Title of Report.
2. If at any time you have made an error while entering information and would
like to clear the screen, click Clear at the bottom of the page and the
information you have entered is cleared.
Recurring reports
Schedule reports allows you to create a report based on specific search criteria
and then schedule the report to be sent to selected operators on a recurrent
basis. The scheduled report will automatically be sent to those operators every
week on the scheduled day and time. The reports are sent as a zipped .html file
attachment
Figure 25: Schedule Recurring Reports
92
Card Access Report Management Application (CARMA) 4.5 for Picture Perfect Administration Guide
Chapter 5: Getting started
To schedule a recurring report:
1. Enter the desired search criteria for the report, and instead of Create Report,
click Schedule Report. The Schedule Recurring Reports page will appear.
2. Select the schedule day and schedule time that you want to send the report to
selected operators.
3. Select the number of days that the report covers. For example, if you want
data for the past 24 hours, select 1 and if you want data for the past week,
select 7. The maximum number of days from which to include data is 365.
Note: Only those records with a date/time that falls in the date/time span
requested (Number of Days) will be included on a scheduled report. For
example, if a badge has never been used (has Most Recent Access empty), it
will never appear on a scheduled Personnel report that uses Last Access
Date as date criteria.
4. Go to the Send Report To section and select a list of operators to whom you
want to send reports. Holding down the CTRL key, while clicking on submenu
items, allows multiple selections within that submenu as well as the ability to
deselect an item.
5. Enter the report title in the TITLE section and then click Add Schedule to add
this schedule. Click Clear button to remove the selections.
Note: A scheduled report cannot be saved if:
•
The title is left blank
•
Another scheduled report with the same title has been created by the same
login.
•
Date option is selected
Card Access Report Management Application (CARMA) 4.5 for Picture Perfect Administration Guide
93
Chapter 5: Getting started
Personnel report page
Figure 26: Personnel Report
To navigate the generated report page:
1. The number of records that particular report contains is listed at the top of that
report. If a report has multiple pages, you can move to the next page in the
report by clicking Next.
2. Click End to move to the last page of the report.
3. Click Back to return to the query page that you used to create the report.
4. Click Home to return to the CARMA main page.
To print any of the above reports:
Note: The Print button is enabled only if the number of records is greater than 0
and less than 10000.
1. Create the report and, when the report displays, go to the top of the page on
the right side and click Print.
The report is formatted so that all returned rows from the query appear on a
single page. You may then sort the report by column headers as explained
below.
2. Click Print to send the report to your local printer.
3. Click Back to return to the report page.
94
Card Access Report Management Application (CARMA) 4.5 for Picture Perfect Administration Guide
Chapter 5: Getting started
To save the reports:
Note: The Save button is enabled only if the number of records is greater than 0
and less than 10000.
1. Create the report and, when the report displays, go to the top of the page on
the right side and click Save.
The report is saved as a text file and may be imported into a desktop
application. If you are using Microsoft Excel, the file is imported as a Microsoft
Excel spreadsheet. Please note that you will have to convert the BID (Badge
ID) column to a real number format, instead of the scientific number format to
which it defaults.
2. On the report page, you can sort the report by clicking the column headers.
Click twice on a column header in the report to change the sort order.
For example, if the report is sorted with the latest events first, click Date and it
will be sorted with the earliest events first.
3. Click Date again and the report displays the latest events first.
4. If you would like the report to be sorted in alphabetical order by name, instead
of sorting by date, click the Name column. Click Date to sort the report by
date order.
To e-mail any of above reports:
1. Create the report. When the report is on the screen, go to the top of the page
on the right side and enter an e-mail address in the E-mail this to box.
2. Select the HTML option to send e-mail in HTML format or select TEXT to
send in pipe delimited format. The file will be sent as a zipped attachment.
3. Click Go. A report will be sent to the specified e-mail address.
To obtain help with selected sections:
1. Along the right side of the Personnel Search page, the ?s (question marks)
appear next to each section.
2. Click the ? and a window displays information pertaining to the selected
section.
3. Click Close to close this window.
Card Access Report Management Application (CARMA) 4.5 for Picture Perfect Administration Guide
95
Chapter 5: Getting started
Operator history
The Operator History Search allows you to display specific information about
changes a Picture Perfect operator has made in the system and when they were
made. To access this feature click, Operator History on the main page of
CARMA.
Figure 27: Operator History Search
To select the time zone in which the report data is to be displayed:
1. Click ACTIVITY DATE.
96
Card Access Report Management Application (CARMA) 4.5 for Picture Perfect Administration Guide
Chapter 5: Getting started
2. Select either HOST, OPR, or UTC to specify a context of either Host,
Operator, or Coordinated Universal Time for the report data.
To search operator history for a specific time period:
1. Use the list boxes next to Date and Time in the first section of this page
entitled Activity Date.
2. Start by selecting the dates on which you want to generate the report by using
the list box.
3. If you would like to narrow the search further, enter specific times by using the
list box. You may then scroll to the bottom of the screen and click Create
Report.
To search operator history by Employee ID # or Login ID # if you need a
report on a certain operator:
1. Enter the information you choose to use in the specified fields, which is found
in the second section of this page entitled Operator Information.
2. Scroll down to the bottom of the page and click Create Report. This displays a
complete operator history for that particular operator.
3. Narrow your search by using both of the above-mentioned searches together.
To do this, enter in the needed information under Activity Date and Operator
Information and then scroll to the bottom of the page and click Create Report.
4. You may also choose from the Card Access System Specifics. In this area,
which is found in the third section of the Operator History page, you can
choose selections under Record Description, Transaction, and Terminal to
narrow your search. A menu from which no selections have been made will
not be applied to the search category.
For example, if you do not select any of the entries under Transaction, all
options under Transaction are considered for the purpose of the search.
5. In this case the Card Access System Specifics can be used alone, without
having to choose any information from the Activity Date or Operator
Information sections.
For example, if you would like to generate a report on all logins, choose Login
under Transaction and click Create Report. The resulting report shows all
operator logins.
Card Access Report Management Application (CARMA) 4.5 for Picture Perfect Administration Guide
97
Chapter 5: Getting started
To choose how you would like the report to list badge events:
Note at the very bottom of the Operator History page is a box entitled Options,
etc.
•
You may elect to give the report a name so that you can run the same report
again later.
•
You may also change or append the default report title when it is generated
by changing the text in the Title of Report text box.
To save your query by giving it a name:
1. Type a name in the provided box in Options, etc. Once the report is created,
its name is displayed next to Saved Queries.
2. Use the list box next to Saved Queries to retrieve saved reports, and choose
the report you would like to see.
3. If at any time you have made an error while entering information and would
like to clear the screen, click Clear at the bottom of the page and the
information you have entered is cleared.
Recurring reports
Schedule reports allows you to create a report based on specific search criteria
and then schedule the report to be sent to selected operators on a recurrent
basis. The scheduled report will automatically be sent to those operators every
week on the scheduled day and time. The reports are sent as a zipped .html file
attachment.
98
Card Access Report Management Application (CARMA) 4.5 for Picture Perfect Administration Guide
Chapter 5: Getting started
Figure 28: Schedule Recurring Reports
To schedule a recurring report:
1. Enter the desired search criteria for the report, and instead of Create Report,
click Schedule Report. The Schedule Recurring Reports page will appear.
2. Select the schedule day and schedule time that you want to send the report to
selected operators.
3. Select the number of days that the report covers. For example, if you want
data for the past 24 hours, select 1 and if you want data for the past week,
select 7. The maximum number of days from which to include data is 365.
4. Go to the Send Report To section and select a list of operators to whom you
want to send reports. Holding down the CTRL key, while clicking on submenu
items, allows multiple selections within that submenu as well as the ability to
deselect an item.
Card Access Report Management Application (CARMA) 4.5 for Picture Perfect Administration Guide
99
Chapter 5: Getting started
5. Enter the report title in the TITLE section and then click Add Schedule to add
this schedule. Click Clear button to remove the selections.
Note: A scheduled report cannot be saved if:
•
The title is left blank
•
Another scheduled report with the same title has been created by the
same login.
•
Date option is selected
Operator history report page
Figure 29: Operator History Report
To navigate the generated report page:
1. The number of records that particular report contains is listed at the top of
each report. If a report has multiple pages, you can move to the next page in
the report by clicking Next.
100
Card Access Report Management Application (CARMA) 4.5 for Picture Perfect Administration Guide
Chapter 5: Getting started
2. Click End to move to the last page of the report.
3. Click Back to return to the query page that you used to create the report.
4. Click Home to return to the CARMA main page.
To print any of the above reports:
Note: The Print button is enabled only if the number of records is greater than 0
and less than 10000.
1. Create the report and, when the report displays, go to the top of the page on
the right side and click Print.
2. Click Print to send the report to your local printer.
3. Click Back to return to the report page.
To save the reports:
Note: The Save button is enabled only if the number of records is greater than 0
and less than 10000.
1. Create the report and then when the report displays, go to the top of the page
on the right side and click Save.
The report is saved as a text file and may be imported into a desktop
application. If you are using Microsoft Excel, the file is imported as a Microsoft
Excel spreadsheet.
To e-mail any of above reports:
1. Create the report. When the report is on the screen, go to the top of the page
on the right side and enter an e-mail address in the E-mail this to box.
2. Select the HTML option to send e-mail in HTML format or select TEXT to
send in pipe delimited format. The file will be sent as a zipped attachment.
3. Click Go. A report will be sent to the specified e-mail address.
To obtain help with selected sections:
1. Along the right side of the Operator History page, the ?s (question marks)
appear next to each section.
2. Click the ? and a window displays information pertaining to the selected
section.
3. Click Close to close this window.
Card Access Report Management Application (CARMA) 4.5 for Picture Perfect Administration Guide
101
Chapter 5: Getting started
Monitor hosts and micros
Figure 30: Monitoring of Hosts and Micros
To access the Monitor Hosts and Micros page:
1. Click Monitor Hosts and Micros on the main page of CARMA. This page
displays explicit information about the hosts and micros running your card
access system.
After choosing Hosts and Monitors, a page is displayed that gives Selected
Host and Monitor Information. Selected Host tells you the name of the host. If
more than one host appears, select which host you would like to query
against. Next to Monitor is a list box from which to choose.
2. Select the item (as described below) under the list box that you would like to
see and click Go.
102
•
Host status. Select Host Status to retrieve the time of day, how many days
the host has been up, how many users the host has, and the load
average.
•
Host TCP Services. This tells you which services on the selected host are
running and which are not. Some services, like SSH (Secure Socket
Shell), may not be installed and should not be of concern if shown as not
running.
•
Micro Status. This function provides the Micro status information for all of
the micros on the current host/subhost. This is the same command as if
running mstate -qma on the Picture Perfect host, except all information
is kept on one scrolling screen.
•
Database Status. Select this to retrieve: the Informix database name,
computer name, time of day, Informix version, Picture Perfect version,
CPU utilization, ratio information, log information and checkpoint
information.
Card Access Report Management Application (CARMA) 4.5 for Picture Perfect Administration Guide
Chapter 5: Getting started
•
Filesystem Statistics. This displays information about the disk usage of the
computer.
•
Memory and System Info. Selecting Memory and System Info reports the
computer’s system attributes. Specifically it reports the model name of the
computer, the amount of usable memory, used memory, and unused
memory (for AIX). This function operates slightly differently on the
Unixware platform, only showing the shared memory statistics for Picture
Perfect.
•
Micro Firmware Versions. This displays the Rev # and Micro # of the
computer host. This checks all online and communicating micros for the
current firmware version in the micro. This report may take some time to
complete, depending on the number of micros loaded on the host. This
function is not currently supported for Unixware Picture Perfect hosts, but
may be generated manually on the host itself using a shell prompt, if
desired. Run /cas/bin/checkmicros.sh while logged in as root.
To obtain help with selected sections:
1. At the top of the right side of the Monitor Hosts and Micros page, the ?s
(question marks) appear next to each section.
2. Click the ? and a window displays information pertaining to the selected
section.
3. Click Close to close this window.
Card Access Report Management Application (CARMA) 4.5 for Picture Perfect Administration Guide
103
Chapter 5: Getting started
System administration
Figure 31: Administration
104
Card Access Report Management Application (CARMA) 4.5 for Picture Perfect Administration Guide
Chapter 5: Getting started
To access the System Administration page:
1. Click System Administration on the CARMA Main Menu.
This page allows for the administration of CARMA in several different ways.
Different CARMA administration options can be found at the top of this page.
These options are: USERS: create/edit, USER HISTORY: reports and logins,
ADVANCED SETTINGS: delete users and configure, and DATABASE: force
import.
2. Select the item (as described following) under the list box that you’d like to
see.
To access the Create/Edit Users screen:
1. When you click System Administration on the CARMA main menu, the
Create/Edit Users screen is automatically displayed without having to actually
select it from the options listed at the top of the page.
2. In the box to the right of the heading Create/Edit Users, you will find a place
to Edit an Existing User. Use the list box to pick the user that you would like to
edit.
3. After you select the user, click Select User under the list box. This displays
that particular user’s file. You can then make changes to the file. Type
information in the Badge Holder Information section, or click or clear
selections in the Report System Privileges section.
4. After you have made the appropriate changes, click Commit Changes at the
bottom of the page. The next window confirms that the user file has been
updated. From here you can edit another existing user by following the same
steps.
5. You can also enter information for a new user on the Create/Edit Users page.
Rather than displaying an existing user with the list box, start entering the
new user’s information under Badge Holder Information and Report System
Privileges. The password entered in under the Badge Holder Information
section must be eight characters long.
6. You can limit the records an operator can view by either department or
facility. To view more than one department or facility, you must hold down the
SHIFT key when making additional selections. After you are done entering in
all appropriate information, click Commit Changes at the bottom of the page.
The next screen confirms that you have entered in the information correctly.
7. If at any time you have made an error while entering information, and would
like to clear the screen, click Clear at the bottom of the page and the
information you have entered is cleared.
Card Access Report Management Application (CARMA) 4.5 for Picture Perfect Administration Guide
105
Chapter 5: Getting started
To obtain help with selected sections:
1. Note at the top of the right side of the Create/Edit Users page the ?s
(question marks) next to each section.
2. Click the ? and a window displays information pertaining to the selected
section.
3. Click Close to close this window at the bottom of the window or the x in the
upper right side of the window.
To access the Search User Queries screen:
1. Note the next button at the top of the System Administration page is User
History: reports.
2. Click this button to display a window entitled Search User Queries. This report
lists specific queries a user has requested during a certain time frame. All
SQL queries generated by users on the CARMA system are saved for at least
90 days, and you can review those SQL queries using this report.
3. Choose the specific dates you want in the Date Query Was Run section. You
can also choose specific times in this same section if you would like to narrow
the search down further. In the second section on this page entitled User Who
Ran the Query, pick the CARMA user on which you would like to generate the
report.
4. At the very bottom of the Search User Queries page is a box entitled Options,
etc. Here you can choose whether you would like the report to list the badge
events with the latest events first (default) or the earliest events first.
However, if you would like the report to list the earliest events first click the
arrow of the list box and choose Earliest.
5. Also found in this Options, etc. box is the option to delete logs older than 90
days. To do this, click Clicking Here. A new page lists the number of logs
found in the SQL Log History and the number of outdated rows that were
found and deleted. Click Back to return to the Search User Queries page.
6. If at any time you have made an error while entering information and would
like to clear the screen, click Clear at the bottom of the page and the
information you have entered is cleared. Click Create Report when the
information you have entered is correct.
7. At the top of this report the number of records shown is listed. You move
through this report by clicking Next for the next page, End for the end of the
report, Back for the previous page and Start for the beginning of the report.
8. Click the column header in the report to sort opposite of how the report is
already sorted.
106
Card Access Report Management Application (CARMA) 4.5 for Picture Perfect Administration Guide
Chapter 5: Getting started
For example, if the report is sorted latest events first, click Date and it will be
resorted with the earliest events first.
Another example: if you would like the report to be sorted in alphabetical
order by name, instead of sorting by date, click the Name column.
To obtain help with selected sections:
1. Note along the right side of the Search User Queries page the ?s (question
marks) next to each section.
2. Click the ? and a window displays information pertaining to the selected
section.
3. Click Close to close this window at the bottom of the window or the x in the
upper right side of the window.
To access the Search System Logins screen:
1. Note the next button at the top of the System Administration screen is USER
HISTORY: logins.
2. Click this button to display a page entitled Search System Logins. You can
review both successful and unsuccessful logins here. All logins made to the
CARMA system are logged for at least 90 days.
3. Choose a date and/or time by using the list boxes in the first section of this
page entitled Date Login Was Made Or Attempted. Then click Create Report.
4. If you would also like to choose a specific CARMA User along with a date
and/or time on which to generate the report, do this in the section entitled
User Who Logged In. You can also choose only successful or unsuccessful
logins in this same section by clicking on one or the other in the box entitled
Limit Search To. If you do not choose either of these, all logins, successful
and unsuccessful, will show on the report.
5. At the very bottom of the Search System Logins page is a box entitled
Options, etc. Here you can choose whether you would like the report to list
the badge events with the latest events first (default) or the earliest events
first. However, if you would like the report to list the earliest events first, click
the arrow of the list box and choose Earliest.
Also found in the Options, etc. box is the option to delete logs older than 90
days. To do this, click Clicking Here. A new page lists the number of logs
found in the SQL Log History and the number of outdated rows that were
found and deleted. Click Back to get to the Search System Logins page.
6. If at any time you have made an error while entering information and would
like to clear the screen, click Clear at the bottom of the page and the
Card Access Report Management Application (CARMA) 4.5 for Picture Perfect Administration Guide
107
Chapter 5: Getting started
information you have entered is cleared. Click Create Report when the
information you have entered is correct.
7. At the top of this report, the number of records shown is listed. You move
through this report by clicking Next for the next page, End for the end of the
report, Back for the previous page, and Start for the beginning of the report.
8. Click the column header in the report to sort opposite of how the report is
already sorted. For example, if the report is sorted latest events first, click
Date and it will be resorted with the earliest events first.
Another example: if you would like for the report to be sorted in alphabetical
order by name, instead of sorting by date, click the Name column.
9. On the report page, you can sort the report by clicking the column headers.
Click a column header in the report to sort opposite of how the report is
already sorted.
For example, if the report is sorted latest events first, click Date and it will be
resorted with the earliest events first. Click Date again and the report returns
to being sorted with the latest events first.
Another example: if you would like the report to be sorted in alphabetical
order by name, instead of sorting by date, click the Name column and this will
happen. Click Date and the report returns to sorting by date.
To obtain help with selected sections:
1. Note at the top of the right side of the Search System Logins page the ?s
(question marks) next to each section.
2. Click the ? and a window displays information pertaining to the selected
section.
3. Click Close to close this window at the bottom of the window or the x in the
upper right side of the window.
To access the Delete Users screen:
The next button at the top of the System Administration screen is ADVANCED
SETTINGS: delete users. Click this to display a page entitled Delete Users. This
function allows you to permanently delete a CARMA user from the system.
Choose the user to be deleted, and click Delete this User. If a user is deleted
after a schedule is created, the schedule is updated so that no mail is generated
to the deleted user.
To access the System Configuration screen:
The next button at the top of the System Administration screen is ADVANCED
SETTINGS: configure. Click this to display a page entitled System Configuration.
108
Card Access Report Management Application (CARMA) 4.5 for Picture Perfect Administration Guide
Chapter 5: Getting started
This screen is used to configure the operating parameters of the CARMA
application itself. The item options have explanations for each field, and should
be changed to match your specific needs.
Figure 32: System Configuration
Card Access Report Management Application (CARMA) 4.5 for Picture Perfect Administration Guide
109
Chapter 5: Getting started
To access the DATABASE: force import option:
1. The next function at the top of the System Administration screen is
DATABASE: force import. Click this and a warning statement is displayed.
Caution: The database import operation is intended for manual import
operations when the normal scheduled database import did not work, or you
need to generate it manually for some reason.
The preferred method for the Picture Perfect database import is using the
CRON scheduler, which is set by default upon installation. If you still need to
run this database import operation, be aware that on large systems this could
take several hours. On smaller systems it should take less than 30 minutes.
Do not run multiple instances of this import, as you can severely slow down
the system performance.
2. Click Import at the bottom of the screen to generate this database import
operation.
110
Card Access Report Management Application (CARMA) 4.5 for Picture Perfect Administration Guide
Chapter 6
Secure socket layer
Summary
This chapter covers the following topics:
•
•
Obtaining a Certificate for the CARMA Server
Generating and Installing the Certificate
Content
Introduction 112
Obtaining a certificate for the CARMA server 112
Proof of organization name 113
Proof of right to use domain name 113
Letter of authorization 114
The certificate signing request (CSR) 114
Generating the CSR and installing the certificate 114
Card Access Report Management Application (CARMA) 4.5 for Picture Perfect Administration Guide
111
Chapter 6: Secure socket layer
Introduction
In various personal and business situations we are often asked to identify
ourselves by using a trusted certificate such as a passport, ID card, or driver’s
license. The same is true in the world of data communications.
The emergence of Certificate Technologies and Certificate Authorities (CAs)
addresses concerns in this area. A certificate is an electronic form of ID used to
identify the holder. Certificates are issued by CAs, whose role is to issue and
manage certificates and vouch for the certificate holder.
The type of certificate used in CARMA is an X.509 Server Certificate. A Server
Certificate is issued by a CA for a particular server (Distinguished Name) and
contains the server’s Public Key, the owner’s organization name, expiry
information, and the signature of the issuing body (the CA). When presented to
an application, the digital signature is verified by examining the CA signature
using the Public Key of the CA, which is built in to the requesting client
application. Clients can then check that they are connecting to the expected
server, and not to an impostor inserting itself in the communication stream.
The Secure Sockets Layer (SSL) is a protocol, developed by Netscape
Communications Corporation, which establishes a secure connection between a
client and server using the technologies described above. The actual encryption
algorithm used is developed and licensed by RSA (named after its inventors, Ron
Rivest, Adi Shamir and Leonard Adleman). RSA is the only universally accepted
Cryptosystem.
Obtaining a certificate for the CARMA server
In order to obtain a certificate from a trusted Certificate Authority (CA) you will
need to generate a Certificate Signing Request (CSR) that uniquely identifies
your server to the CA.
There are a number of certificate authorities that will issue a certificate for your
server. The most well known and trusted ones are:
•
Verisign (http://www.verisign.com) and
•
Thawte Consulting (http://www.thawte.com)
Many organizations generate their own certificates for servers such as this, which
are only used for internal use and do not require the recognized and trusted
name of a CA. If your organization generates its own certificates, then you must
still follow the same steps to set up SSL, only you will present your CSR to your
internal organization instead of one of the above mentioned CAs.
112
Card Access Report Management Application (CARMA) 4.5 for Picture Perfect Administration Guide
Chapter 6: Secure socket layer
In order to obtain a Certificate from a CA, you will need to provide the CA with
the following:
•
Proof of organization name
•
Proof of right to use domain name
•
Letter of Authorization
•
The Certificate Signing Request (CSR)
Proof of organization name
Companies, Corporations, Incorporations
You will need a copy of your official company registration documents or
certificate of incorporation in your state or country. CAs are generally very strict
about this, and will not waive these requirements.
Partnerships
You should be registered with national, state, or local authorities. You will need to
provide a copy of some form of verifiable proof of the partnership name.
Proprietorships and DBAs
If you are a sole proprietor or DBA (Doing Business As), you will need a copy of
your DBA registration papers for local levies and taxes. Any official
correspondence indicating your right to use the name given on your request will
generally be sufficient, as long as the CA can verify it with the relevant authority.
Proof of right to use domain name
Generally you will not need proof if your domain is registered to your company
exactly as it is in your CSR. If you will not be using the CARMA server on the
Internet, you probably will not need this.
If your domain is registered to a person, the CA will generally require a letter
authorizing your organization to use the domain for business purposes from the
person to whom the domain is registered.
If you are a subdivision of the company who owns the domain, the CA will require
a letter proving this.
If your domain is registered to a company and you have subsequently changed
the organization name in any way, the CA will need supporting documentation.
Card Access Report Management Application (CARMA) 4.5 for Picture Perfect Administration Guide
113
Chapter 6: Secure socket layer
Letter of authorization
You will need a signed letter from a high-ranking individual in the organization
authorizing the use of a Certificate to authenticate the company during secure
online communications. This letter must be printed on the organization's
letterhead. This is required to prevent unauthorized individuals within an
organization from creating an authenticated electronic presence for the
organization without proper clearance. The letter needs to establish that the
organization’s decision-makers have agreed to the use of a Certificate, and must
be signed by the decision-maker and not by a third party. The letter may also be
required to authorize a credit card charge to cover the cost of the certificate.
The certificate signing request (CSR)
A CSR is a block of encrypted code generated by your server, which contains the
unique information about your server that is necessary for the CA to generate
your certificate. Once you obtain your certificate you will need to install it on your
server before you can use the SSL feature.
Generating the CSR and installing the
certificate
To generate the CSR and install the certificate:
1. Log on as root.
A # prompt displays.
2. Change to appropriate directory by typing the following:
cd /etc/httpd/conf [Enter]
3. Generate the CSR by typing the following:
openssl req -new -key ssl.key/server.key >
ssl.csr/server.csr [Enter]
Messages similar to the following will appear on the screen:
Using configuration from /usr/lib/openssl.cnf
You are about to be asked to enter information that will
be incorporated into your certificate request. What you
are about to enter is what is called a Distinguished Name
or a DN. There are quite a few fields but you can leave
114
Card Access Report Management Application (CARMA) 4.5 for Picture Perfect Administration Guide
Chapter 6: Secure socket layer
some blank. For some fields there will be a default
value. If you enter '.', the field will be left blank.
----Country Name (2 letter code) [US]:
State or Province Name []:FL
City (Locality) Name []:Boca Raton
Company (Organization) Name
[]:UTC
Department Name []:Marketing
Server Host Name []:carma.utcfireandsecurity.com
Server Administrators Email Address
[]:[email protected]
Please enter the following 'extra' attributes to be sent
with your certificate request
A challenge password []:xxxxxxxx
An optional company name []:
NOTE: Be sure that you enter in the “Server Host Name”
field the exact name of your CARMA server. If you will be
accessing your server using the Fully Qualified Domain
Name then it must be entered this way in the CSR. For
example if your server name is “carma” and you will be
accessing it using a URL such as
carma.utcfireandsecurity.com then you must enter
carma.utcfireandsecurity.com in the Server Host Name
field. If this information is entered incorrectly, SSL
will not function properly and this information can NOT
be changed once you get your Certificate.
4. Change directories by typing the following:
cd /etc/httpd/conf/ssl.csr [Enter]
There will be a file in this directory called server.csr. This is your CSR.
5. Present your CSR to a CA along with the other relevant information to receive
your Certificate.
6. Once you receive your Certificate copy it to the following location:
/etc/httpd/conf/ssl.crt/server.crt
7. Restart your CARMA Web server by typing the following:
Card Access Report Management Application (CARMA) 4.5 for Picture Perfect Administration Guide
115
Chapter 6: Secure socket layer
/etc/init.d/httpd restart [Enter]
Messages similar to the following will appear on your screen:
Shutting down http:
Starting httpd:
[OK]
[OK]
You are now ready to begin using SSL with your CARMA Web server. To access
the server using SSL, simply prefix your URL with https instead of the standard
http.
116
Card Access Report Management Application (CARMA) 4.5 for Picture Perfect Administration Guide
Appendix A
Advanced configuration
Summary
This appendix covers the following topics:
•
•
•
•
•
•
•
•
•
•
•
•
•
•
Shutting Down and Rebooting the CARMA server
Verifying that mySQL is Running
Resetting the CARMA Database
Manually Running the Sweeper Program
If You are Unable to Connect to the Picture Perfect Database
Turning on Verbose Mode
Turning on Error Logging
Changing the Sweeper Schedule
Changing Parameters Supplied During Installation
Backing up the Database
Restoring the Database
Verifying the Daily Import
Viewing System Information
Enabling Access Search Feature
Content
Introduction 119
Shutting down and rebooting the CARMA server 119
Verifying that mySQL is running 119
Resetting the CARMA database 120
Manually running the Sweeper program 120
If you are unable to connect to the Picture Perfect database 121
Configuring CARMA for a Picture Perfect redundant system 122
Turning on verbose mode 122
Turning on error logging 122
Changing the sweeper schedule 123
Changing the parameters supplied during installation 124
Card Access Report Management Application (CARMA) 4.5 for Picture Perfect Administration Guide
117
Appendix A: Advanced configuration
Backing up the database 126
Restoring the database 126
Verifying the daily import 127
Viewing system information 128
Access Search Feature 129
Description of Access Search features 129
SYNC DATA Feature 134
Logic of Data Import 134
SYNC DATA feature 135
Technical Support 136
Contacting technical support 136
118
Card Access Report Management Application (CARMA) 4.5 for Picture Perfect Administration Guide
Appendix A: Advanced configuration
Introduction
This appendix contains a collection of application notes outlining various
procedures that may be useful to the CARMA system administrator in
troubleshooting and/or making advanced configuration changes. It is intended for
individuals who have prior UNIX Systems Administration experience. All others
should call UTC Fire & Security technical support for assistance.
Shutting down and rebooting the CARMA
server
To shut down and reboot the CARMA server:
1. Log on as root, and then type:
reboot [Enter]
To shut down the computer so it can be powered off:
1. Log on as root, and then type:
halt [Enter]
Verifying that mySQL is running
To verify that mySQL is running.
1. Log on as root, and then type:
mysyqladmin proc status [Enter]
Messages similar to the following will be displayed on your screen:
mysqladmin proc status
Id
|
User
Host
73
root
localhost
showprocesslist
db
Command
Time
Query
0
Uptime: 143331 Threads: 1 Questions: 72715
Opens: 352 Flush tables: 5 Open tables:
3 Queries per second avg: 0.507
State
Info
Slow queries: 12
Card Access Report Management Application (CARMA) 4.5 for Picture Perfect Administration Guide
119
Appendix A: Advanced configuration
Note that the uptime reported is the number of seconds the server has been
running since the last reboot.
Resetting the CARMA database
To reset the CARMA database:
1. Type:
/usr/local/carma/resetdb.sh [Enter]
This resets the CARMA database to its default settings. The next time the
Sweeper runs it will rebuild the database from the Picture Perfect database.
However, any history no longer on the Picture Perfect host will no longer be
available through CARMA. Additionally, any CARMA operators you have defined
will need to be recreated.
Manually running the Sweeper program
To manually run the Sweeper program:
1. Type:
/etc/cron.daily/carma.cron [Enter]
Executing this command will run the Sweeper. It is automatically run every night
with the cron schedule, but you may run it manually. Depending on your
database size, this could take a while to complete.
Note: A database with less than a 100,000 records will generally transfer in
about 30 minutes. A database with two million records will generally transfer in
about five hours. Network configuration and traffic will also affect transfer time,
therefore, individual results may vary.
During this time you will not see any activity on the screen, although the transfer
is taking place.
Caution: Do NOT interrupt the Sweeper while in progress, and do NOT run
multiple instances simultaneously.
You may also manually run the Sweeper by logging in over the browser as the
system administrator and clicking on System Administration and then on the
Database Import tab on the top of the screen.
120
Card Access Report Management Application (CARMA) 4.5 for Picture Perfect Administration Guide
Appendix A: Advanced configuration
If you are unable to connect to the Picture
Perfect database
If you are unable to connect to the Picture Perfect Database:
1. Type:
ping pphost [Enter]
Where pphost is the name of the Picture Perfect host. If you receive no
answer from the host, check your /etc/hosts file for an entry for the
Picture Perfect host and make sure it is correct. Also, check to ensure that
your network is properly configured and connected.
If you are able to ping the Picture Perfect host, and the import program takes
an unusually long period of time to respond with an error message, it is
probably timing out waiting for a response from the Informix database. The
most likely cause for this is that the database is not running. If Picture Perfect
is not running, start Picture Perfect to bring up the database. For more
information on starting and stopping Picture Perfect and Informix please see
the Picture Perfect Administration Guide.
2. For troubleshooting purposes, you may find it necessary to turn on verbose
so you can see activity of the import as it happens. To do so please see
"Turning on verbose mode" on page 122. Once this is enabled, manually run
the import program again (see "Manually running the Sweeper program" on
page 120).
3. You may also want to enable error logging. To do so, please "Turning on error
logging" on page 122. Once this is enabled, manually run the import program
again ("Manually running the Sweeper program" on page 120), and then
check the error log.
4. If you receive Informix error messages (these usually consist of a dash (-)
followed by a number) when trying to connect, it may help to refer to the
Informix error descriptions which can be found at:
http://www.informix.com/answers/english/ierrors.htm
5. Another tool you can use to test the connection to the Picture Perfect system
is:
/usr/local/carma/test [Enter]
Using this will prompt you for a Picture Perfect hostname, a username,
password, and database name. When prompted for the database name,
enter, proteus. Supply the parameters you wish to use for the connection to
Picture Perfect. The test program will then attempt to connect to the server
Card Access Report Management Application (CARMA) 4.5 for Picture Perfect Administration Guide
121
Appendix A: Advanced configuration
and the database. The results will be displayed on the screen and logged in
your CARMA error log file.
Configuring CARMA for a Picture Perfect
redundant system
To configure CARMA for a Picture Perfect Redundant system:
1. Edit the /etc/carma.conf file as follows:
Locate the following line:
REDUNDANT=0
Change it to:
REDUNDANT=1
Turning on verbose mode
To enable verbose mode:
1. Edit the /etc/carma.conf file as follows:
Locate the following line:
SHOW_PROGRESS=0
Change it to:
SHOW_PROGRESS=1
Turning on error logging
To enable error logging:
1. Open the /etc/carma.conf file.
2. Locate the following line:
CARMA_LOGFILE=/tmp/carma.log
This shows the location of the log file. It is set by default to
/tmp/carma.log.
122
Card Access Report Management Application (CARMA) 4.5 for Picture Perfect Administration Guide
Appendix A: Advanced configuration
3. Open the log file and edit it as follows:
Locate the following line:
KEEP_ERRORLOG=0
Change it to:
KEEP_ERRORLOG=1
Changing the sweeper schedule
The Sweeper is scheduled using Cron, the built-in schedule mechanism of the
Linux Operating System. In Red Hat Linux, it is somewhat easier to set up Cron
jobs than in other distributions of UNIX. The Cron utility automatically executes
items in several subdirectories at regular periods as follows:
•
/etc/cron.hourly/
•
/etc/cron.daily/
•
/etc/cron.weekly/
•
/etc/cron.monthly/
In the daily cron directory (/etc/cron.daily/) there is a symbolic link to a
script called carma.cron. This is the script that does the import. By default, the
import runs once a day at 4:02 A.M., local time. If you move this link from this
location, it will no longer run on a daily basis. If for example you placed it in the
/etc/cron.weekly/ directory, then it would run on a weekly schedule.
Alternatively, you can move the link outside of the automatic execution
directories and schedule its execution using the traditional user-level crontab
utility. For more information on using crontab please see the Red Hat online
documentation at:
http://www.redhat.com/support/docs/tips/cron/cron.html
Note: The actual location of the script is:
/usr/local/carma/carma.cron
Card Access Report Management Application (CARMA) 4.5 for Picture Perfect Administration Guide
123
Appendix A: Advanced configuration
Changing the parameters supplied during
installation
The easiest way to change the parameters during installation is to remove the
CARMA application and reinstall it. This can be done without removing the
mySQL database and therefore your accumulated Picture Perfect data will not be
lost. To remove the CARMA application, please refer “Removing CARMA” on
page 58.
To change the name of the Picture Perfect Host without reinstalling
CARMA:
1. Edit the /etc/hosts file to reflect the new name and/or address of the
Picture Perfect host.
Edit the following files to reflect the new Picture Perfect hostname.
Example 1 as shown in Figure 33 on page 125:
/etc/carma.conf
Example 2 as shown in Figure 34 on page 125:
/opt/informix/etc/sqlhosts
2. Log on to CARMA as the System Administrator. Click System Administration,
then Configure, and supply the updated information.
To change the Picture Perfect user that CARMA should use to connect to
the Picture Perfect database, without reinstalling CARMA:
1. Edit the following files to reflect the Informix user identification
(informix_username) and password (informix_password) that you
wish to use:
/etc/carma.conf
(see Example 1)
/opt/informix/etc/sqlhosts
(see Example 2)
2. You will now need to change the user name that CARMA should use when
authenticating real time status information:
3. Log on to CARMA as the System Administrator. Click System Administration,
then Configure, and supply the updated information.
4. Rerun the Picture Perfect host installation script, as described in “Installing
CARMA” on page 3.21, supplying the new user information when prompted.
124
Card Access Report Management Application (CARMA) 4.5 for Picture Perfect Administration Guide
Appendix A: Advanced configuration
Example 1
/etc/carma.conf
Figure 33: Example: carma.conf
Example 2
/opt/informix/etc/sqlhosts
Figure 34: Example /opt/informix/etc/sqlhosts
Card Access Report Management Application (CARMA) 4.5 for Picture Perfect Administration Guide
125
Appendix A: Advanced configuration
Backing up the database
All of the mySQL database tables are stored in the /var filesystem.
To back up the database to tape:
1. Log on as root.
2. Create a disk file for your database backup. Type:
Linux V ES
mysqldump --opt carma > /var/<filename> [Enter]
Linux V7.1 Enterprise 3
mysqldump -u carma -p --opt carma > /var/<filename>
[Enter]
Where <filename> is the name of the backup file. For example:
carmabk101003.
3. Insert a tape and type:
tar -cvf/dev/st0 /var/<filename> [Enter]
Restoring the database
Caution: Restoring your database overwrites the current database.
Should the need arise to rebuild your CARMA server (for example: disk
failure):
1. Follow the instructions for loading Linux and the CARMA software in this
manual.
2. To restore your database, insert your /var backup tape.
3. Log on as root.
4. Type:
cd /var [Enter]
tar -xvf /dev/st0 [Enter]
Linux V7.3
mysql -u carma -p -e
"source /var/<filename>" carma [Enter]
Where <filename> is the name of the backup file. For example:
carmabk101003.
126
Card Access Report Management Application (CARMA) 4.5 for Picture Perfect Administration Guide
Appendix A: Advanced configuration
Verifying the daily import
To check that the daily import was successful:
1. Type:
cd /tmp
cat carma.log
Messages similar to the following will be displayed:
[root@carma tmp]# cat carma.log
We're > 1.52 (for plevel)
Start time was Thu Mar 7 04:02:02 2002
Data Transfer took 8.73333 minutes!
That's 67 records / second!
Indexing Took 3.3 minutes!
Total Time 12.0333 minutes!
Card Access Report Management Application (CARMA) 4.5 for Picture Perfect Administration Guide
127
Appendix A: Advanced configuration
Viewing system information
To view CARMA server statistics:
1. Point your browser to:
http://<CARMA server name>/phpSysInfo/index.php
Figure 35: System Information
128
Card Access Report Management Application (CARMA) 4.5 for Picture Perfect Administration Guide
Appendix A: Advanced configuration
Access Search Feature
The Access Search feature allows you to obtain information regarding which card
access system badge holder has access to which doors. For example, you can
use this feature to generate a report of the employee badges that have access to
specific readers, areas, or categories. The report can be saved, and then printed
or e-mailed.
Caution: The Access Search feature involves the process of joining tables,
which is memory and time intensive. Enabling the Access Search feature can
lead to performance issues.
The Access Search feature is not enabled by default, so you must manually
enable it on your CARMA server. Once enabled, the Access Search feature
displays as an option on the CARMA client computer home page.
To enable the Access Search feature:
1. On the CARMA server operating system command line, type the following
command (if not using the VI editor, enter the appropriate command):
vi /etc/carma.conf
2. Find the statement IGNORE_CARMA_ACCESS = 1 and reset it to
IGNORE_CARMA_ACCESS = 0 using the editor.
3. Save the new changes, and then exit the editor.
The Access Search feature is now available on the home page.
Description of Access Search features
To open the Access Search feature:
1. On the CARMA server operating system command line, type the following
command (if not using the VI editor, enter the appropriate command):
2. On the CARMA server operating system command line, type the following
command (if not using the VI editor, enter the appropriate command):
3. Log on to CARMA.
4. On the home page, click ACCESS SEARCH to open the Access Search
page.
Card Access Report Management Application (CARMA) 4.5 for Picture Perfect Administration Guide
129
Appendix A: Advanced configuration
Figure 36: Access Search Feature
Access Search page description
The Access Search page is comprised of three sections:
Badge Holder Information
Card Access System Specifics
Options, etc.
Clicking the “?” opens a help dialog box with information related to the associated
section.
130
Card Access Report Management Application (CARMA) 4.5 for Picture Perfect Administration Guide
Appendix A: Advanced configuration
Figure 37: Access Search page
BADGE HOLDER INFORMATION: You can search by First Name, Last Name,
Badge ID, or Employee ID. The fields are not case-sensitive, so uppercase and
lowercase characters are treated the same. Badge ID and Employee ID produce
the most accurate results, as there may be several different employees with the
same first or last names. For partial matches you must use the wildcard "%." For
example a search for "GOOD" will only return "GOOD," not "GOODMAN" or
"GOODNER," but a search for "GOOD%" will return all of the above matches.
Note: The Badge Holder Information section cannot be used for a search on its
own. It must be used in conjunction with a choice of Reader, Area, or Category
from the Card Access System Specifics section.
CARD ACCESS SYSTEM SPECIFICS: In this section, you can choose
selections under Category, Badge Status, Badge Type, Area, and Reader to
Card Access Report Management Application (CARMA) 4.5 for Picture Perfect Administration Guide
131
Appendix A: Advanced configuration
narrow your search. Select one or many items from one or many of these lists. If
you do not select anything, then everything will be included in the search.
In the Badge Status box, the Expired check box provides additional search
criteria. When checked, it retrieves data for all badges that have an expired date.
Note: The Card Access System Specifics can also be used on its own. It
displays information for all badge holders that have access to the selected
Reader, Area, or Category.
OPTIONS, etc. You have the option of saving your search. This is helpful if you
find yourself running the same report often.
Clear button: Click to clear all entries from the page.
Create Report button: Click to create an Access Report based on your search
criteria. The Access Report page opens, allowing you to save or print the report.
Note: The Save and Print buttons are enabled only if the number of records is
greater than 0 and less than 10000.
Figure 38: Access Report page description
The report columns can be sorted by double-clicking on the column heading.
Next: If the report contains multiple pages, use the Next button to move to the
next page.
End: If the report contains multiple pages, use the End button to move to the end
of the report.
Home: Click Home to return to the CARMA home page.
Back: Click Back to return to the query page that you used to create the report.
Save: Click Save to open the File Download dialog box. Click Open to open the
report or click Save to save the report. If you are using Microsoft Excel, the file is
saved as a Microsoft Excel file. After the Excel file is saved, you will need to
convert the Badge ID column to a real number format, instead of the scientific
132
Card Access Report Management Application (CARMA) 4.5 for Picture Perfect Administration Guide
Appendix A: Advanced configuration
number format to which it defaults. This is pipe delimited text and to save it into
.txt file format, enter “abc.txt” as the filename after clicking on Save.
Print: Click Print to open the Access Report print dialog box. Click Print to print
the report. The report is formatted so that all returned rows from the query
appear on a single page.
Note: The Print button is enabled only if the number of records is greater than 0
and less than 10000.
E-mail this to: Enter an e-mail address in the space provided, and then click Go
to send the report. The file is sent as a zipped attachment.
Card Access Report Management Application (CARMA) 4.5 for Picture Perfect Administration Guide
133
Appendix A: Advanced configuration
SYNC DATA Feature
Logic of Data Import
CARMA drops data for TOP_LEVEL_TABLES on every import, and then imports
it from the INFORMIX_SERVER listed in the carma.conf file.
CARMA drops data for SUB_HOST_TABLES on every import, and imports it
from the INFORMIX_SERVER listed in carma.conf. CARMA also imports data for
SUB_HOST_TABLES from all the sub hosts listed in the host table of the
INFORMIX_SERVER listed in the carma.conf file.
CARMA does not import complete data for SPECIAL_TABLES on every import,
but imports the new data from the INFORMIX_SERVER listed in the
carma.conf.file. CARMA also imports freshly created data for SPECIAL_TABLES
from all the sub hosts listed in the host table of the INFORMIX_SERVER listed in
carma.conf.
TOP_LEVEL_TABLES:
person_user, person_category, person_type, badge_user, badge_category,
badge_type, category, department, facility, facility_operator, facility_profile, host,
operator, badgests, xact_desc, meaning, field_desc, table_desc, fac_profile
SUB_HOST_TABLES:
Person, badge, micro, area, reader, door, alarm, inputs, input_group, terminal,
area_category
SPECIAL_TABLES:
alarm_history, alarm_historytmp, operator_his, operator_histmp, badge_history,
badge_historytmp
Note: For redundant configurations, the flag REDUNDANT should always be 1.
Otherwise, data will be imported from both Primary and Backup Servers.
As of CARMA version 4.5, a message similar to the following is displayed to
indicate completion of the sync process:
++++++++++++++++++++++
Updating history_counter table
Updated history_counter table
Sync Start time was Sat Nov 20 16:14:41 2010
Data Sync took 0.0666667 minutes!
Updating history counter took 0.0166667 minutes!
Total Sync Time 0.0833333 minutes!
134
Card Access Report Management Application (CARMA) 4.5 for Picture Perfect Administration Guide
Appendix A: Advanced configuration
SYNC DATA feature
The following flags in carma.conf are related to the import or SYNC features in
CARMA.
• IMPORT_DATA=1: If flag IMPORT_DATA is 1, the data will be imported from
Picture Perfect using existing logic. If the flag is 0, then the data will not be
imported
• SYNC_HISTORY=1: If flag SYNC_HISTORY is 1, CARMA will compare records
of last “n” days configured by the DAYS_TO_SYNC parameter with Picture
Perfect to find and insert missing records.
• DAYS_TO_SYNC=200: If flag DAYS_TO_SYNC is 200, CARMA will check the
history imported in the last 200 days if the flag IMPORT_DATA is set to 1.
For comparison, CARMA checks the counts of records for that date. If a
discrepancy is found, it checks the records that are missing in CARMA as
compared to Picture Perfect, and then retrieves those records.
The IMPORT_DATA and SYNC_HISTORY flags can be 1 at same time to import
and check data daily.
The IMPORT_DATA and SYNC_HISTORY flags can be 1 at same time to import
and check data daily. In this configuration it is advisable to keep
DAYS_TO_SYNC as a small number, such as 1-5, to avoid processing overhead
on a daily basis. In case the transaction per day is huge, DAYS_TO_SYNC
should be made even smaller.
For doing sync on a large number of dates or high transaction systems, the
SYNC_HISTORY flag can also be set to 1 on a periodic basis to compare the
data between CARMA and Picture Perfect and to avoid daily processing
overhead. The IMPORT_DATA flag can be set to 0 to avoid any import during
such huge SYNC operations.
Card Access Report Management Application (CARMA) 4.5 for Picture Perfect Administration Guide
135
Appendix A: Advanced configuration
Technical Support
Contacting technical support
For assistance installing, operating, maintaining, and troubleshooting this
product, refer to this document and any other documentation provided. If you still
have questions, you may contact presales and technical support.
Note: Be ready at the equipment before calling for technical support.
You can reach technical support by phone 8 a.m. to 7 pm. EST, Monday through
Friday.
North America:
888-437-3287
Asia
T 852-2907-8108
F 852-2142-5063
Australia
T 61-3-9239-1200
F 61-3-9239-1299
Canada
T 800-267-6317
F 613-737-5517
Europe
T 32-2-725-11-20
F 32-2-721-40-47
Latin America
T 561-998-6100
F 561-994-6572
utcfireandsecurity.com
UTC Fire & Security, 9 Farm Springs Road, Farmington, CT 06034-4065.
136
Card Access Report Management Application (CARMA) 4.5 for Picture Perfect Administration Guide
Appendix B
Useful Web resources
Summary
This chapter provides information on using the VI editor, a standard full-screen
editor used with UNIX systems.
Content
Red Hat, Inc. 138
PHP Website 138
Apache Website 138
Apache SSL Website 138
O’Reilly Website 138
MySQL website 138
Card Access Report Management Application (CARMA) 4.5 for Picture Perfect Administration Guide
137
Appendix B: Useful Web resources
Red Hat, Inc.
http://www.redhat.com
Official Red Hat Linux website. General information, downloads, support, and
documentation of Red Hat Linux.
PHP Website
http://www.php.net
Official PHP website. General information, downloads, documentation, and
developer information.
Apache Website
http://www.apache.org
The Apache project website.
Apache SSL Website
http://www.apache-ssl.org
Secure Socket Layer version of Apache website.
O’Reilly Website
http://www.oreilly.com
The leading publishers of books on various including PHP, Apache, Linux,
MySQL, etc.
MySQL website
http://www.mysql.com
138
Card Access Report Management Application (CARMA) 4.5 for Picture Perfect Administration Guide
Appendix C
Using the VI editor
Summary
This chapter provides information on using the VI editor.
Content
Overview 140
Modes 140
Changing modes 140
Command mode functions 140
Ex mode functions 141
Editing the /etc/hosts file 141
Card Access Report Management Application (CARMA) 4.5 for Picture Perfect Administration Guide
139
Appendix C: Using the VI editor
Overview
The VI editor is a full-screen editor. While there are several editors available in a
UNIX environment; VI is a standard editor available on every UNIX system.
Modes
The VI editor has 3 modes: Command, Insert, and Ex.
•
Command. When you enter the VI editor you are in Command mode.
Command mode allows you to move around the document.
•
Insert. Allows you to insert text.
•
Ex. Used for special operations, such as saving a file and exiting.
Changing modes
The following table provides a quick reference to the key strokes required to
change from one mode to another.
Table 5: Mode Change Key Strokes
FROM Mode
Key Stroke
TO Mode
Explanation
Command
i
Insert
Allows you to enter text at the cursor
Command
a
Insert
Allows you to enter text after the cursor
Command
o
Insert
Adds a blank line below the current line
Command
O
Insert
Adds a blank line above the current line
Insert
ESC
Command
Allows you to enter command mode
Command
:
Ex
Allows you to enter an Ex command.
Command mode functions
The following table lists some of the functions available when in Command
mode.
Table 6: Command Mode Functions
Function
Keystroke
Insert text in front of cursor
i
Append text after cursor
a
Move down one cursor position
j
140
Card Access Report Management Application (CARMA) 4.5 for Picture Perfect Administration Guide
Appendix C: Using the VI editor
Move up one cursor position
k
Move left one cursor position
h
Move right one cursor position
l
Undo last change
u
Undo all changes to current line
U
Save file and exit
ZZ
Go to beginning of next line
+
Go to beginning of current line
0
Go to beginning of file
1G
Go to end of file
G
Scroll Forward one page
Ctrl-f
Scroll back one page
Ctrl-b
Delete current line
dd
Ex mode functions
The following table lists some of the functions available when in Ex mode.
Table 7: Ex Mode Functions
Function
Keystroke
Quit without saving
q!
Save and Quit
wq
Editing the /etc/hosts file
Follow the steps below to add the internet addresses of the Host machine and
one for the Workstation.
1. At the system console, log on as root.
2. To open the /etc/hosts file using vi, type: vi /etc/hosts
The beginning of the file will display. You can enter the address anywhere in
the file but to make the file understandable, add the address in order.
3. To move forward one screen at a time, press Ctrl and F. Continue pressing
Ctrl+F until you have reached the correct section.
4. Move to the line where you would like to enter the address. You can enter the
address above or below this line.
Card Access Report Management Application (CARMA) 4.5 for Picture Perfect Administration Guide
141
Appendix C: Using the VI editor
5. To insert a blank line …
ABOVE, press Shift+0
BELOW, press 0
6. At the blank line enter the name and address (or address and name
depending on the current format of your file).
7. Press the Esc key to move from Insert mode to Command mode.
8. Repeat steps 4 to 9 for each address you need to enter. Remember: you
need one address for the Host and one for each Workstation.
9. When you have completed entering all addresses, type: ZZ Enter
This will save the changes to the file and exit the VI editor.
142
Card Access Report Management Application (CARMA) 4.5 for Picture Perfect Administration Guide
Glossary
This glossary provides extended definitions of terms, which have appeared
throughout the manual. Sources used include on-line computer/technology
dictionary and encyclopedia references. Many such resources are available to
learn more about these terms. The ones consulted here include:
www.whatis.com
www.webopedia.com
AIX. AIX is an open operating system from IBM that is based on a version of
UNIX. AIX/ESA was designed for the IBM System/390 or large server hardware
platform. AIX/6000 is an operating system that runs on the IBM workstation
platform, the RISC System/6000.
Apache. Apache is a freely available Web server that is distributed under an
“open source” license. According to the Netcraft (www.netcraft.com) Web server
survey in February, 2001, 60% of all Web sites on the Internet are using Apache
(62% including Apache derivatives), making Apache more widely used than all
other Web servers combined. Apache complies with the newest level of the
Hypertext Transport Protocol, HTTP 1.1. Free support is provided through a bug
reporting system and several Usenet newsgroups.
Cron. A Cron script is a list of one or more commands to a computer operating
system or application server that are to be executed at a specified time. Each
command is executed when its triggering time arrives. In UNIX-based operating
systems, the crontab command is a user interface command that creates or
changes a file (called a crontab file). This file contains a list of UNIX shell
commands, each with a specified time of execution.
Domain. A group of computers and devices on a network that is administered as
a unit with common rules and procedures. Within the Internet, domains are
defined by the IP address. All devices sharing a common part of the IP address
are said to be in the same domain.
Firewall. A firewall is a set of related programs, located at a network gateway
server, which protects the resources of a private network from users from other
networks. (The term also implies the security policy that is used with the
Card Access Report Management Application (CARMA) 4.5 for Picture Perfect Administration Guide
143
programs.) An enterprise with an intranet that allows its workers access to the
wider Internet installs a firewall to prevent outsiders from accessing its own
private data resources and for controlling what outside resources its own users
have access to.
GPL. Stands for General Public License. The most widespread such license is
the GNU General Public License, or GNU GPL for short. This can be further
shortened to GPL, when it is understood that the GNU GPL is the one intended.
Host. In Internet protocol specifications, the term “host” means any computer
that has full two-way access to other computers on the Internet. A host has a
specific “local or host number” that, together with the network number, forms its
unique IP address. If you use Point-to-Point Protocol to get access to your
access provider, you have a unique IP address for the duration of any connection
you make to the Internet and your computer is a host for that period. In this
context, a “host” is a node in a network.
HTML. HTML (Hypertext Markup Language) is the set of markup symbols or
codes inserted in a file intended for display on a World Wide Web browser page.
The markup tells the Web browser how to display a Web page’s words and
images for the user.
IP Address. An identifier for a computer or device on a TCP/IP (Transmission
Control Protocol/Internet Protocol) network. Networks using the TCP/IP protocol
route messages based on the IP address of the destination. The format of an IP
address is a 32-bit numeric address written as four numbers separated by
periods. Each number can be zero to 255. For example, 1.160.10.240 could be
an IP address. Within an isolated network, you can assign IP addresses at
random as long as each one is unique. However, connecting a private network to
the Internet requires using registered IP addresses (called Internet addresses) to
avoid duplicates.
Linux. Linux (often pronounced LIH-nuhks with a short “i”) is a UNIX-like
operating system that was designed to provide personal computer users a free or
very low-cost operating system comparable to traditional and usually more
expensive UNIX systems. Linux has a reputation as a very efficient and fastperforming system. Linux is a remarkably complete operating system, including a
graphical user interface, an X Window System, TCP/IP, the Emacs editor, and
other components usually found in a comprehensive UNIX system. Linux is
publicly open and extendible by contributors. Because it conforms to the Portable
Operating System Interface standard user and programming interfaces,
developers can write programs that can be ported to other operating systems.
RAID Server. Redundant array of independent disks; originally redundant array
of inexpensive disks) is a way of storing the same data in different places (thus,
redundantly) on multiple hard disks. By placing data on multiple disks, I/O
144
Card Access Report Management Application (CARMA) 4.5 for Picture Perfect Administration Guide
operations can overlap in a balanced way, improving performance. Since multiple
disks increases the mean time between failure (MTBF), storing data redundantly
also increases fault-tolerance.
SQL. SQL (Structured Query Language) is a standard interactive and
programming language for getting information from and updating a database.
Although SQL is both an ANSI and an ISO standard, many database products
support SQL with proprietary extensions to the standard language. Queries take
the form of a command language that lets you select, insert, update, find out the
location of data, and so forth. There is also a programming interface.
Secure Socket Layer (SSL). A protocol developed by Netscape for transmitting
private documents via the Internet. SSL works by using a public key to encrypt
data that’s transferred over the SSL connection. Both Netscape Navigator and
Internet Explorer support SSL, and many Web sites use the protocol to obtain
confidential user information, such as credit card numbers. By convention, Web
pages that require an SSL connection start with https: instead of http:.
Sendmail. On the Internet, sendmail is the most popular UNIX-based
implementation of the Simple Mail Transfer Protocol (SMTP) for transmitting email. When a sendmail server receives e-mail, it attempts to deliver the mail to
the intended recipient immediately and, if the recipient is not present, it queues
messages for later delivery.
UNIX. UNIX (sometimes spelled “Unix”) is an operating system that originated at
Bell Labs in 1969 as an interactive time-sharing system. In 1974, UNIX became
the first operating system written in the C language. UNIX has evolved as a kind
of large freeware product, with many extensions and new ideas provided in a
variety of versions of UNIX by different companies, universities, and individuals.
Partly because it was not a proprietary operating system owned by any one of
the leading computer companies and partly because it is written in a standard
language and embraced many popular ideas, UNIX became the first open or
standard operating system that could be improved or enhanced by anyone.
Web Server. A Web server is a program that, using the client/server model and
the World Wide Web's Hypertext Transfer Protocol (HTTP), serves the files that
form Web pages to Web users (whose computers contain HTTP clients that
forward their requests). Every computer on the Internet that contains a Web site
must have a Web server program.
X.509. The X.509 standard defines what information can go into a Certificate
Authorities (CA), and describes how to write it down (the data format). All X.509
certificates contain: version, serial number, signature algorithm identifier, issuer
name, validity period, and subject name.
XML. XML (Extensible Markup Language) is a flexible way to create common
information formats and share both the format and the data on the World Wide
Card Access Report Management Application (CARMA) 4.5 for Picture Perfect Administration Guide
145
Web, intranets, and elsewhere. For example, computer makers might agree on a
standard or common way to describe the information about a computer Card
Access Report Management Application E.7 E product (processor speed,
memory size, and so forth) and then describe the product information format with
XML. Such a standard way of describing data would enable a user to send an
intelligent agent (a program) to each computer maker’s Web site, gather data,
and then make a valid comparison.
XML can be used by any individual or group of individuals or companies that
wants to share information in a consistent way.
146
Card Access Report Management Application (CARMA) 4.5 for Picture Perfect Administration Guide