1
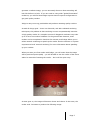
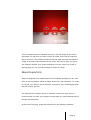
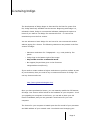
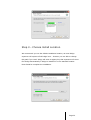
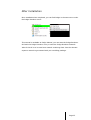
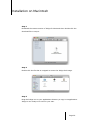
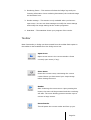
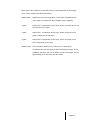
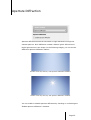
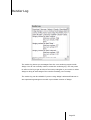
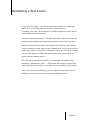
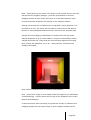
Indigo Renderer User Manual Contents 3 Overview 4 About Indigo Renderer 8 Licensing Indigo 10 System Requirements 12 About Installation 13 Installation on Windows 16 Installation on Macintosh 17 Installation on Linux 18 Installing exporters for your modelling package 19 Getting to know Indigo 25 Resolution 26 Tone Mapping 31 White balance 32 Light Layers 34 Aperture Diffraction 36 Network Rendering 37 Render Log 38 Rendering a Test Scene 41 Saving and resuming a render using an IGI 43 Network Rendering 46 Going further with Indigo Page 2 Overview This manual covers the installation and usage of Indigo Renderer. This manual doesn't cover modelling-package specific details - see the Exporter manual for your modelling package for more information. Page 3 About Indigo Renderer Indigo Renderer is a stand-alone unbiased renderer. It takes 3D scenes generated in a modelling package and creates a photorealistic visualization of the scene. About unbiased rendering: Indigo uses unbiased rendering technologies to create the most absolutely realistic visualization possible with current technology. Unbiased rendering means that Indigo uses the equations that model the behaviour of light, with no approximations or guesses taken. By accurately modelling all the interactions of light, Indigo can produce effects such as: Depth of Field – as when a camera is focussed on one object and the background is blurred Spectral effects – as when a beam of light goes through a prism and a rainbow of colours is produced Refraction – as when light enters a pool of water and the objects in the pool seem to be “bent” Reflections – from subtle reflections on a polished concrete floor, to the pure reflection of a silvered mirror Caustics – as in light that has been focussed through a magnifying glass and has made a pattern of brightness on the floor As the unbiased technique requires no approximations or user preferences to Page 4 generate a realistic image, you can accurately discover what something will look like before it is built. If you are used to using older “global illumination” renderers, you will find that Indigo requires less set up and configuration to get good quality renders. Indigo is easy to set up, predictable and produces amazing quality renders. As with all things good – there is a downside, and with unbiased rendering techniques, the problem is that rendering is more computationally intensive. A high-quality render of a complex scene at 2 Megapixel resolution may take up to 5 hours on modern hardware. In the general case however, most renders can be completed in less than 30 minutes, and Indigo allows you to utilize network rendering to speed up the render. See the sections on 'system requirements' and 'network rendering' for more information about speeding up your renders. When you start your first render with Indigo, you will notice that the image will be produced quite rapidly - you will be able to see the outline of the scene within 20 seconds of starting the render – but it will be quite noisy. As time goes on, the image will become clearer and clearer. In this case, the render took 3 minutes to produce the following image: Page 5 This is a characteristic of unbiased rendering. The first image is akin to the graininess you get when you take a photo of a dark room with an exposure that is too short. The problem is that not enough light has been simulated to create an accurate representation of the scene. On the plus side, you get to see instantly whether your render settings are correct, and if the render is looking good you can just leave Indigo to render for longer. About Exporters: Indigo is designed to be independent of the modelling package you use, and uses its own file format, called an Indigo Scene File (.igs extension). To create an .igs file, you need to use an Exporter, a plugin for your modelling package that can output .igs files. The exporters are complex pieces of software in their own right and it is recommended you read your exporter manual after you have finished looking through this document. At the time of printing, Indigo has exporters for the following software: Page 6 • 3ds Max • Blender • Cinema 4D • Google Sketchup If your modelling package of choice is not listed, it is often possible to export your scene or 3D model into a format that can be loaded by one of the above packages and then exported to Indigo. Blender is often a popular choice for doing this – since it is a powerful and free modelling package. Page 7 Licensing Indigo The development of Indigo began in 2004 and for the first five years of its life, Indigo was freely available via the internet. Beginning with Indigo 2.0, released in 2009, Indigo is a commercial software package and requires a licence if you want to use Indigo for commercial work – or remove the restrictions put on the free version. You are welcome to learn Indigo 2.0 and use it for non-commercial renders without paying for a licence. The following restrictions are present in the free version of Indigo: • Maximum resolution of 0.7 Megapixels – e.g. 1000 pixels by 700 pixels. • Indigo logo in the bottom right of the image • May not be used for commercial work. • No support (beyond that given in the forums at indigorenderer.com/forum/) If you need to create renders at higher resolutions or produce renders as part of your business, then you need to buy a commercial licence for Indigo. You can buy licences online at: http://store.glaretechnologies.com/ Once you have purchased a licence, you can instantly enable the full features of Indigo. Your licence will be locked to the hardware of your computer - but if you upgrade your computer in the future, you can ask to have your old licence invalidated, and you can generate a new licence for your new computer. The licence for your computer is based upon the CPU model of your processor and MAC address of your network card. You should avoid changing your Page 8 network card regularly when using Indigo – for example avoid enabling and disabling your network card, as this may confuse the licensing software that Indigo uses. If you have any problem with your Indigo licence, you can always contact us at [email protected] and we'll get you up and running as soon as possible! There are two different kinds of Indigo licences: • GUI Licence – for use on your desktop computer • Node Licence – for use on networked render slaves Having a GUI Licence does not mean that you can use unlicensed render slaves to generate a high resolution image, you will need a node licence for each computer that will be used to help you render your image. Page 9 System Requirements Indigo will run on most modern computers. Minimum system requirements: Windows: Pentium class CPU with SSE2 – anything purchased in the last 5 years should satisfy this requirement. 1GB of RAM 100MB of Hard drive space Windows 98 or above Intel Macintosh – PowerPC based macs (G4/G5) are not Mac: supported 1GB of RAM 100MB of Hard drive space OSX 10.5 Leopard CPU with SSE2 1GB of RAM 100MB of Hard drive space Linux: Page 10 Recommended systems To get the best results from Indigo when rendering large scenes, you should look at getting a computer with multiple cores (e.g. the Intel Core 2 Quad or Core i7 CPU) and at least 2GB of RAM. If you are rendering exceptionally large scenes you may require 4GB or more of memory – in this case you should use a 64-bit build of Indigo and a 64-bit operating system so that Indigo can access all of your memory. See the notes on 32-bit versus 64-bit in the next section. Page 11 About Installation To download Indigo, go to http://www.indigorenderer.com/download/ and select the appropriate version of Indigo for your platform (Windows, Macintosh or Linux). You should download the latest available version of Indigo which will be listed at the top of the page. 32 bit versus 64 bit Indigo is available for each platform in 32-bit and 64-bit versions. If you have a 32-bit CPU or 32-bit operating system you can only use the 32-bit version of Indigo. If you have a 64-bit CPU and operating system (e.g. Windows XP 64 bit, Windows Vista or OS X Leopard) then you can use the 64-bit version of Indigo. The 64-bit version of Indigo has the following benefits: • Ability to access more than 2GB of memory • Slight performance increase on 64-bit CPUs The 64-bit version of Indigo for your platform is available under the 64-bit builds section on the Indigo download page: http://indigorenderer.com/download/ It is free to upgrade to the 64-bit version of Indigo. Page 12 Installation on Windows Download the newest version of Indigo for windows, then double click the installer file. Step 1 – Agree to the licence You will be presented with the Indigo End User Licence Agreement. You should read through it and click 'I Agree' if you agree with the terms. Step 2 – Choose Components We recommend you leave the checkboxes selected but you are able to disable each component if you have special needs on your system. Press Next to continue. Page 13 Step 3 – Choose Install Location We recommend you use the default installation location, as most Indigo exporters will expect to find Indigo here – however you are able to change this path if you need. Indigo will write a registry key that exporters will use to find Indigo automatically if Indigo is installed in a non-standard location. Press Install to complete the installation. Page 14 After Installation Once installation has completed, you can find Indigo in the start menu under the Indigo Renderer menu.. This manual is available as Indigo Manual, you can start the Indigo Renderer GUI with the Indigo Renderer entry or start the Indigo Renderer Network Slave if this PC is to be used as a network rendering slave. See the relevant exporter manual to get started with your modelling package. Page 15 Installation on Macintosh Step 1 Download the newest version of Indigo for Macintosh then double click the download file to unzip it. Step 2 Double click the file that is unzipped to mount the Indigo disk image. Step 3 Drag the Indigo icon to your applications directory to copy it to applications. Indigo is now ready to be used on your mac. Page 16 Installation on Linux Step 1 Ensure you have correct prerequisites. Indigo on Linux requires that you have qt-4.5 installed for the GUI. This library is available for most modern distributions and can usually be installed with rpm or aptitude. Step 2 Download the latest indigo .tar.gz file from indigorenderer.com/downloads/ Step 3 Create a folder in your home directory and unzip the .tar.gz into that directory. Indigo is statically linked as far as possible and should be ready to be used. Run ./indigoconsole -h to see if Indigo installed correctly. You are now ready to run Indigo. Page 17 Installing exporters for your modelling package As described in the About Indigo section, Indigo requires an 'exporter' to work with each modelling package. You can download these exporters at: http://www.indigorenderer.com/downloads/ In the Download Exporters section. Each exporter will come with its own installer and should automatically detect the location of Indigo. Notes about exporters: You need to install Indigo before you install the exporter for your modelling package. If are are getting strange errors with Indigo complaining about not being able to render your scene file, ensure that you have the same version of Indigo (e.g. 2.0.7) as your version of the exporter (e.g. Blendigo 2.0.7). Further information about using the Indigo exporters you should see the relevant Exporter Manual. Page 18 Getting to know Indigo Note: The screenshots in this section of the Indigo manual are taken from the Windows XP version of Indigo – the GUI may look different on your system but should act identically. A first look at Indigo To get started. click Open Scene and browse to the testscenes directory in your Indigo Renderer directory. Open the scene cornellbox_jotero.igs. This will let you see all of the Indigo user interface elements. The Indigo window is divided into four sections: 1 2 3 4 1. Toolbar – Open and close scenes, start and pause rendering, save rendered image and more. Page 19 2. Rendering frame – This section will show the Indigo logo and your licensing information. Once rendering has started, the rendered image will be shown here. 3. Render settings – This section is only available when you have an open scene. You can use these settings to modify the scene settings and modify the image settings as the render progresses. 4. Statusbar – The statusbar shows your progress of the render. Toolbar Most functionality in Indigo can be accessed from the toolbar. Each option in the toolbar is also available from the Indigo menu bar. Open Scene Opens a new scene in the current window. Closes currently open scene (if any). Close Scene Closes the current scene, terminating the current render. Ensure you have saved your output image before closing the scene. Render Start rendering the current scene. Upon pressing this button, the scene will be processed and then rendering will start. The scene building process can take up to a minute on large scenes. Pause Render This will pause the current render and free up your Page 20 computers CPU. You can resume the render at any stage. You may need to do this if Indigo is causing your system to slow down while rendering. Stop Render This stops the current render and frees your computer's CPU and memory. You can still tone-map and save the rendered image after the render has been stopped – but you cannot easily restart the render (see more information about .igi files if you need to stop and start renders). Network Rendering Enables network rendering. This button must be pressed before Render is pressed to start a network rendering job. See the section on Network Rendering for more information. Save Image Once an Image is rendering, you can click Save Image to save the image that is currently being displayed in Indigo. Update Image Indigo only updates the image on the screen every minute (by default), to speed up your rendering time. If you want to see the progress that has been made since the screen was last updated, you can press Update Image to force a screen update. Licensing Use this button to open the licensing window. You can use this to instantly buy a licence for Indigo and Page 21 remove the restrictions of the free version. Rendering frame The render frame shows the progress of your rendering. It will resize to the size of the render you are rendering currently. To zoom in or out on the image, click on the rendering frame and press + to zoom in, - to zoom out and press 0 to reset to the 1:1 zoom level. Statusbar The statusbar shows render progress. It displays samples per pixel, time elapsed and the total number of samples. About samples per pixel Indigo measures its render progress as the number of samples that have been calculated. You can imagine these as being the number of “light particles” that have bounced around the scene and hit the sensor in your camera. Depending on the complexity of your scene, it may take up to 1000 samples per pixel before the image starts to become clear enough for your purpose. Many scenes will start to resolve at around 100 samples per pixel, and some scenes look good after 10 samples. How long do I render for? Unbiased renderers (like Indigo) are never truly “finished” rendering. You will get your first image from Indigo within 30 seconds of starting your render, but this image will be very noisy (lots of “grain” or “static” in the image). As the render progresses, the noise in the image will go down according to the following graph: Page 22 So, at the start of the render, the amount of noise in the image will decrease very fast – if you watch the render you'll notice it gets visibly clearer in the first 5 minutes. However, over time - the quality of the render improves more slowly, until eventually you will not get any noticeable difference from rendering any further. In general, most people will just leave their scene rendering until it looks clear enough for their purposes. Render settings The render settings are only visible when a scene is open. There are several pages of render settings – you can access the different pages via the drop down control: The pages of render settings are described in the following sections. Page 23 Resolution The resolution page controls the size of the image you will create. You can specify the resolution from one of the presets, or enter it manually in the width and height controls. The resolution will be calculated and displayed in Megapixels (the same measurement used for digital cameras description). Higher resolutions will take longer to render to a good quality. Thread priority is an option that is only available on windows. It specifies how much of your CPU that Indigo is allowed to use. Setting the thread priority to 'below normal' will make your computer more responsive for normal usage, while Indigo will continue running (slightly slower) in the background. This is useful if you need to use your computer for other tasks while Indigo is running. Page 24 Tone Mapping Tone mapping changes the brightness and contrast of your image. It can be done at any stage during the render process. Changes to tone mapping will be applied immediately to the rendered image. Tone mapping is nondestructive, so you can play around with the different tone mapping settings without permanently effecting the rendered image. You may want to tone map your image using different settings, and press Save Image to save out several different images. Some background: Indigo creates a high dynamic range (HDR) image as it renders, and this must be converted to a standard low dynamic range red, green and blue image that can be displayed on your computer monitor or saved as an image. Tone mapping can be a slow process on high resolution images (especially if aperture diffraction is turned on) and so tone mapping is only done periodically to ensure that Indigo can dedicate most of it's time to tracing the light paths inside your scene. Indigo has three different tone mapping techniques that you can choose from: Reinhard, Linear and Camera. Reinhard is the simplest to use as it automatically scales to the brightness of your render. Once mastered however, camera tone mapping can give a nice artistic feel to the renders. Page 25 Reinhard tone mapping Reinhard is a method based on a paper by Reinhard, Stark, Shirley and Ferwerda from the University of Utah. It is often the best tone mapping technique because it automatically adjusts to the amount of light in the scene. It can be tricky to get linear or camera tone mapping to work correctly in scenes where there is an extremely bright light source – the Reinhard method is a good choice for scenes like this. The parameters of Reinhard are hard to explain, as they represent parameters for this formula: Luckily, the default Reinhard settings of prescale=6, postscale=1, burn=2 will result in great results for all Renders. If you do want to adjust the Reinhard method – here is an approximate description of each parameter. Page 26 Prescale Similair to a contrast control, works by increasing the amount of light in the HDR buffer. Postscale Works like a brightness control, increases the absolute brightness of the image after it has been tone mapped. Burn Specifies the brightness that will be mapped to full white in the final image. Can be thought of as gamma control. We recommend that most people use Reinhard with it's default settings. Linear tone mapping The simplest tone mapping method, linear depends on just a single number. Every pixel in the HDR image will be multiplied by this number. Scale = 1.0 Scale = 0.1 Scale = 0.01 Linear is easy to understand, but doesn't give the best results – the Reinhard Page 27 and Camera methods tend to give a nicer feel to the image. For example – linear will be hard to configure when there is a bright light source visible (such as the sun) while the rest of the scene is dimmer. Camera tone mapping Camera tone mapping simulates the working of a photographer's camera. You adjust the exposure and ISO settings as you would in a real camera to modify the tone mapping. The parameters you modify are: ISO The ISO number represents the speed of film that is used. The higher the ISO number, the more light will be collected in the HDR Image. In low light situations, a fast film should be used, such as ISO 1600, and in bright lighting situations, a slow film can be used, such as ISO 100. EV The exposure value can range from -6 to +16 and represents a correction factor that is applied to the collected light. The higher the EV, the brighter the final image will be. Increasing the EV by one will make the image twice as bright. The final parameter is the response function. This specifies the type of film or digital camera to emulate. Different films and cameras emphasise different Page 28 colours. The response functions are taken from real cameras – for example the images below use Ektachrome 100CD film which is famous for being used by National Geographic in their older photos. A good default for sunny well-lit scenes is an ISO of 200 and an EV of -5.0. Camera tone mapping using Ektachrome 100CD film, and an EV of -6.0: ISO = 100 ISO = 200 ISO = 400 Camera tone mapping using ISO 200, EV of -6.0 and different response functions: Ektachrome 100CD Advantix 100CD DSCS315_6 To see the effect of all the response functions, please refer to the chart available at: http://indigorenderer.com/documentation/ Page 29 White balance White balance is used for the same reason as in traditional photography. The human eye and brain adjust to the light in a situation to make the whitest colours look true white. For example, a sheet of white paper will appear white outdoors, where there is a lot of blue light, as well as appear white indoors under incandescent bulb lighting, where there is a lot more orange and red light. When rendering, you can adjust the whitepoint so that the scene doesn't have a blue or yellow tinge. The white balance is specified using x and y chromaticity coordinates. These should be matched to the chromaticity of the scene lighting as closely as possible. You can also set the whitepoint coordinates indirectly, by selecting a whitepoint preset from the 'Preset' drop-down box. The list contains the whitepoint coordinates for various different standard illuminants. For example, if you are lighting your scene with a 'perfectly white' light (e.g. a flat spectral power distribution), you will want to select the 'E' preset. If your scene uses the sun+sky model, then the 'D65' preset is a good choice, as it corresponds to a noon daylight illuminant. Page 30 Light Layers Light layers allow you to separate contributions from different lights onto different 'layers'. Each layer can then be manipulated separately, even after the render has completed. You can change the brightness of each layer, or change the overall colour of each layer, or even turn each layer off completely. Enabling Light Layers By default, all lights in an Indigo scene are assigned to layer 0. This means that the HDR image will have only one layer – layer 0. However, in the exporter for your 3D modelling program, you can change the layer that a light is assigned to. All contributions from that light will then be rendered onto that layer. Page 31 Each layer has a number of controls that you can manipulate in the Indigo GUI. These controls are described below: Master Gain Applies an overall scaling factor to the layer. Increasing this value past one makes the layer brighter than originally. X gain Scales the X component of the layer, which is similar to the red component of the layer. Y gain Scales the Y component of the layer, which is similar to the green component of the layer. Z gain Scales the Z component of the layer, which is similar to the blue component of the layer. Enable Layer This checkbox allows you to easily turn on and off all contributions from this layer to the final blended image. If it is disabled, this layer will not be added to the final image, and no lights assigned to this layer will be visible. Page 32 Aperture Diffraction Aperture diffraction allows the simulation of light diffraction through the camera aperture. Such diffraction creates a distinct 'glare' effect around bright light sources in the image. In the following images, you can see the difference aperture diffraction makes: Render of the sky and sun, with aperture diffraction disabled Render of the sky and sun, with aperture diffraction enabled You can enable or disable aperture diffraction by checking or unchecking the 'Enable aperture diffraction' checkbox. Page 33 Network Rendering Indigo can be made to render much faster by using several computers at once. This tab shows the current 'render nodes' that are connected to your computer and are helping Indigo render the image faster. The 'Working master' button specifies whether or not this computer should use its own processor to render the scene – or if the computer should purely manage the render nodes that will do the rendering for you. See the section on 'Using Network Rendering with Indigo' for more information on this section. Page 34 Render Log The render log shows you messages from the core rendering engine inside Indigo. You do not normally need to access the rendering log. You may want to refer to the log to get an idea of how many triangles in your scene or what Indigo is doing at each stage of the render to satisfy your curiosity. The render log can be valuable if you are using Indigo's advanced features or are experiencing strange errors with a pre-release version of Indigo. Page 35 Rendering a Test Scene To get a feel for Indigo – click Open Scene and browse to the testscenes directory in your Indigo Renderer directory. Open the scene cornellbox_jotero.igs. The Cornell box is a famous rendering scene used to demonstrate indirect illumination. Using the resolutions settings on the right hand side of the window, set the resolution to 800x800 and then press the Render button on the tool bar. Indigo will now 'build' the scene and prepare it for rendering. For a simple scene, building the scene will be nearly instantaneous, but for larger scenes (with many millions of polygons), building the scene can take up to a minute. You can tell if Indigo is building the scene because the status bar at the bottom will say 'Building Scene...'. Once the scene has started rendering, the status bar will update to say 'Rendering | Samples per pixel:...'. This means that Indigo is tracing light rays around your scene and you can start to see the results of your render. After a few seconds of rendering, press the Update Image button on the toolbar. You should see the render looking something like this: Page 36 Cornell box after a short period of rendering The image will be noisy for the first few minutes of rendering, then will be much clearer. The image displayed will update automatically every 20 seconds – but you can force the image to update at any stage by pressing Update Image on the toolbar. Next you should use the render settings dropdown to change to Tone mapping. The default setting for this scene is reinhard 6, 1, 6. Click on the postscale box and change the postscale value to 3.00, you should see the scene instantly become brighter. Page 37 Next – press pause on the render. The render is now paused, but you can still change the tone mapping settings – press the reset button on the tone mapping controls and the image will return to its normal brightness. Now click the 'Reinhard' dropdown and change to the 'Camera' method. Change the camera func to “Ektachome-100-plusCD”, the EV adjust to -5.0 and Film iso to 100. The scene will now look as it would if you had taken a photo of it using tradtional Ektachrome film, with more of a greenish tinge. Change the tone mapping method back to reinhard then use the render settings dropdown to go to 'white balance'. Using the white balance preset, change the preset to E, notice that the room becomes slightly blue-tinged. Next, change the whitepoint x to 0.20 – notice that the scene becomes notably pink-tinged. Press reset to reset the scene to a default white balance. Now – press 'Save Image' on the toolbar. Save the image to your desktop as cornellrender.jpg – specify JPG as the file type in the dropdown menu at the bottom of the dialogue. A useful technique when rendering is to pause the render, try different tone mapping settings and use 'Save Image' to save multiple variations of the Page 38 render. Page 39 Saving and resuming a render using an IGI While Indigo is rendering a scene, you can save the HDR buffer into an Indigo Image (IGI, extension .igi) file. Along with the original scene file, the IGI file contains all the information needed to resume rendering the scene, from the point where the IGI was saved. You can resume rendering the scene even after closing Indigo and opening it again later. To resume rendering an image saved to an IGI, follow these steps: 1. Start rendering the scene. When you wish to save the IGI: 2. Click the 'Save Image' button. 3. Select the Indigo Image file type in the Save File dialog. 4. Choose a filename for your IGI file, for example 'test.igi', and click Save. 5. You can now close Indigo. 6. When you wish to resume your render, open Indigo, and select Resume Render from IGI from the File menu: 7. You will then be prompted to locate the scene file. This is because Indigo needs to know both the location of the scene file, plus that of the IGI, in order to resume the render. You must open the same scene that you were rendering when you saved the IGI. 8. After selected the scene file, you will be prompted to locate the IGI file. Navigate to where you saved the IGI file, and press the 'Open' button after selecting it. Page 40 9. You can confirm that the render resumed successfully by looking at the status bar – the time elapsed value should include all the time spent rendering, before the IGI was saved. Page 41 Network Rendering Indigo has built-in support for network rendering, which allows all the computers on a network to work together to render a single Indigo scene more rapidly. You will need one master computer, that will coordinate the rendering process. You will also need one or more slave computers, that will be helping to render the scene. For the purposes of this tutorial, the slave computers must be on the same local area network (LAN), and able to communicate with each other. On the master computer: Step 1: Start Indigo Renderer (indigo.exe). Step 2: Open the scene that you want to render in the Indigo Renderer GUI using the "Open Scene" button. Step 3: Press the 'Network Rendering' button to enable network rendering mode. Step 4: Press the start render button On the slave computer(s): Step 1: Execute the "Indigo Network Render Slave" shortcut. Providing the network slave can find the master and connect to it on the network, it should then download the scene from the master and start rendering it. Page 42 Viewing connected slaves on the master GUI You can view all network slaves that are helping with the current render by selecting "Network Rendering" from the combo box on the right hand edge of the Master GUI: Page 43 Going further with Indigo To learn more about Indigo, we recommend you view the following resources: • Indigo Renderer website: http://indigorenderer.com/ • Our forum for asking questions and learning from the community: http://indigorenderer.com/forums/ • The Indigo Technical Reference (a PDF file that comes with your Indigo install) contains an in-depth description of the Indigo file format if you need to edit the XML directly. • Our free materials database for finding great materials to use in your renders: http://indigorenderer.com/materials/ • Our online documentation: http://indigorenderer.com/documentation/ We hope you enjoy using Indigo Renderer and look forward to seeing the images that you create! Page 44