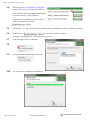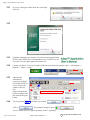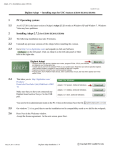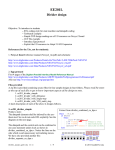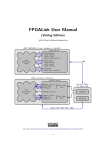
1
Adept_2.10_Installation_steps_USC.fm
Gandhi Puvvada
Digilent Adept -- Installing steps for USC Students (EE101/EE201L/EE560)
1
PC Operating system:
1.1
As of 8/19/2012, the latest version of Adept is Adept 2.10.2 It works on Windows XP and Window 7 .
Windows Vista may have problems.
2
Installing Adept 2.8.1 (for EE101/EE201L/EE560)
2.1
The following installation may take 30 minutes.
2.2
Uninstall any previous versions of the Adept, before installing this version. Go
to Start => All programs => scroll to Digilent folder => Tools folder =>
Exapand it. Click on Uninstall.
2.3
Go to http://www.digilentinc.com/ and expand (or click on) Software
Adept 2 on the left-side panel or More Info on the right-side.
August 19, 2012 9:40 pm
Digilent Adept Installation 1 / 4
on the left panel. Click on
C Copyright 2011 Gandhi Puvvada
Adept_2.10_Installation_steps_USC.fm
2.4
That takes you to http://digilentinc.com/Products/
Detail.cfm?NavPath=2,66,828&Prod=ADEPT2
Make sure that you have not connected any Digilent
board such as Nexys-2 to the USB port.
You need to be in administrator mode on the PC.
Click on Download. Save the file
2.5
On windows 7, it is a good idea to run the installation tool in compatibility mode as we did for the webpack.
2.6
Double-click on
.Press Next in the Welcome window.
Accept the license agreement. In the next screen, press Next.
2.7
Press Next in the Choose Components.
2.8
2.9
Accept the destination folder by pressing Install.
2.10
In a few seconds, it completes the installation.
August 19, 2012 9:40 pm
Digilent Adept Installation 2 / 4
C Copyright 2011 Gandhi Puvvada
Adept_2.10_Installation_steps_USC.fm
2.11
If you see a dialog box similar to the one on the right
select Yes.
2.12
2.13
It finishes and displays user manual. You can browse through this but in
EE201L and in EE560, the TA will introduce you to Virtual I/O, etc. So
close this. Close the Adept application window also.
2.14
Connect your Nexys-2 or Nexys-3 board to USB and restart the tool by going to Start => All Programs =>
Digilent => Adept => Adept.
2.15
Adept should
automatically
recognize your board.
For example for EE101
course, it shows the
product as Nexys2 500.
Browse and locate the
bit file to configure and
then click the Program
button.
2.16
You can go to the
Click on
tab and test your board.
. The red button changes to green
.
You see "PASS" and "128" appear alternately on the 7-seg display.
August 19, 2012 9:40 pm
Digilent Adept Installation 3 / 4
C Copyright 2011 Gandhi Puvvada
Adept_2.10_Installation_steps_USC.fm
Play with the 8 switches and notice that the 8 singular LEDs on the board and the 8 virtual displays on the PC
GUI follow the switches. Also you see that the 7-seg display changes to a singular-8 on one of the 4 SSDs
(Seven Segment Displays). Now play with the four push buttons and notice that the "snake" display crawls on
the 4 SSDs towards the button pressed.
2.16.1
Now, you can test RAM on your board.
You can finally stop the test by pressing
2.17
We intend to use
.
EE201L and EE560 students use these tabs to communicate
between the PC and the Nexys-3 board using Epp protocol.
2.18
If your instructor or the TA has given you a sample project to test the board, you can test the board as well as
the Adept software with that. If he has not provided you the .bit file, produce it using the ISE WebPack. If he
has provided you the .bit file, (say, test_nexys2_500.bit), then you can download it using the following steps.
2.18.1
Invoke adept. Select
Config tab.
Browse and locate the
bit file (say,
test_nexys2_500.bit).
Click the Program
button. You should see
the walking LEDs
patter.
2.19
Celebrate your success in installing and testing the Adept Software tool.
August 19, 2012 9:40 pm
Digilent Adept Installation 4 / 4
C Copyright 2011 Gandhi Puvvada