1
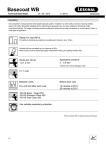
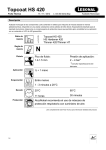
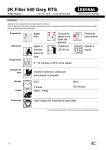
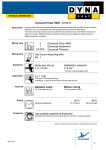
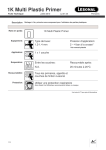
Basecoat WB
Three Stage System
Technical Data Sheet
September 2010
L1.09.01a.
Basecoats
Description
A Basecoat WB three stage systems consists of three separate applied layers creating a special colour effect.
st
1 stage: Application of the solid or metallic Basecoat WB foundation colour.
2nd stage: Application of the Basecoat WB transparent, solid or pearl effect colour (Final / Mid coat).
rd
3 stage: Application of the Clearcoat to provide gloss and protection.
Ready For Use (RFU)
To avoid overspray when painting large objects, and in warm conditions, Activator WB can be added up to a
maximum of 10%.
Spray gun set-up:
1.2 - 1.4 mm
Application pressure:
2 – 2.5 bar*
*Advise user manual spraygun used
2 x 1 coat
A final mist coat may be applied for
metallic colours
Between coats
Before clearcoat
Dry until matt after each coat
20 minutes at 20°C
2K HS Fast Clear 420
2K HS Premium Clear 420
2K HS Extra Clear RTS
Use suitable respiratory protection
Read complete TDS for detailed information
1/5
Basecoat WB
Three Stage System
September 2010
Technical Data Sheet
L1.09.01a.
Basecoats
Product & ancillary items
Product Lesonal Basecoat WB Three Stage System. Foundation coat and Effect coat
Mixed to formulae (by weight) using Lesonal Basecoat WB Tinters.
Thinners Basecoat WB is ready for use.
To avoid overspray when painting larger objects, and in warm conditions,
Activator WB can be added up to a maximum of 10%.
Note: Avoid contact with organic solvents
Chemical Basis Basecoat WB
- Physical drying binders
Method of use
Substrates Sound original finishes, including thermoplastic acrylic
Lesonal 2K Universal Plastic Primer
Lesonal 1K Multi Plastic Primer
Lesonal 1K Multi Plastic Primer RTS
Lesonal 1K Primer Filler RTS
Lesonal 2K Filler 540
Lesonal 2K Filler 540 RTS
Lesonal 2K High Build Filler
Lesonal 2K Epoxy Primer
Note: Do not apply directly over etch primers
Colour check by sprayout Correct colour match needs to be determined by producing a number of colour
samples sprayout samples. The colour changes depending on the number of coats of the
effect colour applied. Proceed as follows :o
o
o
o
o
o
Apply the foundation colour until opacity is achieved on 5 different
sprayout panels.
Next, apply a single coat of the effect colour to all panels.
Allow sufficient flash-off time and remove one panel before continuing
this application process, resulting in sprayout panels ranging with 1-5
coats of the effect coat.
Allow a 10-15 minutes flash-off time at 25°C prior to clearcoat application.
For optimum flash-off, dry the panels for several minutes in an oven or
during a drying cycle in the spraybooth.
Apply two single layers of clearcoat to all colour spray-out panels to obtain
optimum brightness and colour depth.
- Number each panel, indicating the number of effect coats on the panel.
- Personal application differences make it advisable for each painter to create their
own sprayouts.
- To obtain an accurate colour match, spray the panels as if applying to a vehicle,
i.e. place all the spray-outs on one larger panel and spray them all together for
each coat. DO NOT SPRAY EACH PANEL SEPARATELY.
2/5
Basecoat WB
Three Stage System
September 2010
Technical Data Sheet
L1.09.01a.
Basecoats
Prior to painting Follow the step by step guidelines listed below.
Preparation Although the aim is to keep a repair as small as possible, it is almost inevitable with
any three stage pearl application to blend the colour into an adjacent panel. This is
caused mainly due to the multiple layers applied to ensure an OEM colour match
Prior to preparation the decision has to be made on the number of panels (area
required) to prepare.
Application of foundation coat Decide on the maximum distance for the foundation coat (consider sufficient
additional space for blending the effect colour) and apply until full coverage is
achieved. The third and optional coat will be applied according to the described
methods, depending on the type of foundation coat applied. When a metallic
foundation coat is used then a drop coat should be applied for metallic orientation.
Apply the colour blend of the foundation coat in such a way that a smooth transition
is created from foundation colour to the OEM colour before proceeding with the
application of the effect colour.
Application of effect colour Decide on the maximum distance for the effect colour to be applied. Use the
available area and do not keep the colour blend unnecessarily small. Then step
back each subsequent coat until the correct colour is achieved.
If additional coats are required to obtain a colour match, alternate the application
with each layer of the effect colour, to avoid overlapping in the same area.
Spraying Pressure Spraygun
HVLP Gravity Feed
LVLP (HR) Gravity Feed
Conventional Gravity Feed
Fluid Opening
Spraying Pressure
1.3 – 1.4 mm
1.3 – 1.4 mm
1.3 – 1.4 mm
0.7 bar (at air cap)
2 – 2.5 bar (at air inlet)
3 – 4 bar (at air inlet)
Application Technique
Foundation coat Apply 2 single coats to the primer area or until opacity is achieved.
Extend the second coat over the edge of the previous coat.
Flash-off Flash-off between coats by increasing airflow and or heat until the basecoat dries
completely to a matt finish. If necessary allow the surface to cool.
Blending \ Mixing Blending the foundation colour: mix the RFU (ready for use) Basecoat WB solid
foundation colour 1:1 with the RFU pearl or solid effect colour.
Application Apply one thin coat, gradually fading out this coat, facilitating a more uniform blend
of the foundation colour, and a smoother transition from the repair area to the OEM
colour.
In case of insufficient transparency add again 100 parts RFU pearl or solid effect
colour into the Basecoat WB solid foundation RFU mixture, gradually fading out
once more, extending beyond the previous applied coat.
3/5
Basecoat WB
Three Stage System
Technical Data Sheet
September 2010
L1.09.01a.
Basecoats
Flash-off Allow for a minimum flash-off time of 15 minutes at 25°C.
Increase the airflow and or heat until the basecoat dries completely to a matt finish.
If necessary allow the surface to cool.
Effect coat Apply the first coat of the effect colour as far as possible from the repair area,
within the maximum panel area (not the complete panel). Next apply the predetermined sequential numbers of coats, keeping each layer within the previous
applied coat. Start by applying a thin coat, as if fading in, then building up the layer
thickness as it comes closer to the repair area. Repeat this with each applied coat
of the effect colour.
o
o
o
o
Apply the number of coats according to the sprayout sample selected.
Do not lower the air pressure during application when applying the pearl
or solid effect colour.
Alternate the application with each layer of the effect colour. Do not
overlap in the same area.
Application of the effect colour must be executed similarly to the spray-out
samples, ensuring similar layer thickness and colour effect.
Apply the indicated number of layers of the effect colour until an even colour
appearance is achieved.
Flash-off Flash-off between coats by increasing airflow and or heat until the basecoat dries
completely to a matt finish. If necessary allow the surface to cool.
Flash-off prior to Clearcoat Options for minimum final flash off time:
application
o 20 – 30 minutes at 25°C
o 10 -15 minutes at 40°C
o 5 - 10 minutes at 60°C.
o When heat is used for drying, allow object to cool down to application
temperature before clearcoat application.
Humidity and airflow will influence the Basecoat WB flash-off and drying times.
These times can be reduced by increasing the airflow over the object.
AkzoNobel Coatings LTD, Car Refinishes
Address: 136 Milton Park, Abingdon
Oxfordshire OX14 4SB
AkzoNobel CR Ireland
Address: Avonbeg Industrial Estate
Long Mile Road, Dublin 12
Tel: 44 (0)1235 862226
Tel: 00 353 (0)1450 1344
PROFESSIONAL USE ONLY
IMPORTANT NOTE The information in this data sheet is not intended to be exhaustive and is based on the present state of our knowledge and on current laws:
any person using the product for any purpose other than that specifically recommended in the technical data sheet without first obtaining written confirmation from
us as to the suitability of the product for the intended purpose does so at his own risk. It is always the responsibility of the user to take all necessary steps to fulfill
the demands set out in the local rules and legislation. Always read the Material Data Sheet and the Technical Data Sheet for this product if available. All advice
we give or any statement made about the product by us (whether in this data sheet or otherwise) is correct to the best of our knowledge but we have no control
over the quality or the condition of the substrate or the many factors affecting the use and application of the product. Therefore, unless we specifically agree in
writing otherwise, we do not accept any liability whatsoever for the performance of the product or for any loss or damage arising out of the use of the product. All
products supplied and technical advices given are subject to our standard terms and conditions of sale. You should request a copy of this document and review it
carefully. The information contained in this data sheet is subject to modification from time to time in the light of experience and our policy of continuous
development. It is the user's responsibility to verify that this data sheet is current prior to using the product.
Brand names mentioned in this data sheet are trademarks of or are licensed to AkzoNobel.
Head Office: AkzoNobel Car Refinishes B.V., PO Box 3 2170 BA Sassenheim, The Netherlands. www.Lesonal.com
4/5