1
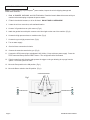
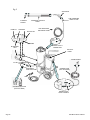
INTRODUCTION AND MACHINE SPECIFICATIONS
Heater Coil
Water Outlet
Stainless
Steel Wrap
Control
Panel
Detergent Tray
Water Inlet
Detergent Injector
Hose w/ Filter
Automatic
Ignition Burner
Stainless Steel
Fuel Tank
Rugged Steel
Frame
35’ Cord w/ GFCI
Flow GPM
Pressure (psi)
Amps
Min. Circuit Amp.
Fuel
Mini-Brute Owner’s Manual
Pneumatic Wheels
MB1700
1.8
1700
13 Max
15 / 20 Dedicated
BTU H Input
Temperature Rise (°F)
Motor
Pump
#1 or #2 Diesel
189,000
100° F
120V, 60Hz, 3450 rpm
Axial Cam
Heat Exchanger
Coil
Power Cord
Spray Control
7/8" O.D.
Schedule 80 tubing
35' with GFCI
Trigger gun
Hose
5/16 x 25' steel braided
Wheels
12" pneumatic
Dimensions (in.)
Weight (lbs)
42 x 33 x 25
200
Page 7
OPERATING INSTRUCTIONS
NOTE: Following delivery of your Simpson® power washer, inspect the unit for shipping damage and
follow these directions:
1. Read all DANGER, WARNING, and CAUTION labels. Read the Owner's Manual that came with your
machine before attempting to operate the power washer.
2. Fill the fuel tank with kerosene, or #1 or #2 diesel. DO NOT USE K-1 KEROSENE.
3. Locate the unit in a convenient, well-ventilated location.
4. Connect 3/4” garden hose to quick connect. (Fig.2)
5. Attach the garden hose with quick connect to the inlet nipple on the rear of the machine. (Fig.2)
6. Connect the high pressure hose to machine outlet. (Fig.2)
7. Connect the gun to high pressure hose. (Fig.2)
8. Turn on water supply.
9. Check all hose connections for leaks.
10. Connect the extension wand to the gun. (Fig.2)
11. Connect the GFCI power plug to a dedicated 120V, 60Hz, 15 Amp minimum power supply. Press the
TEST button and then press the RESET button. The red light should be illuminated.
12. Point the wand in a safe direction and squeeze the trigger on the gun allowing air to purge from the
system. Check the system for leaks.
13. Move the Pump switch to the ON position. (Fig.1)
14. Move the Burner switch to the ON position. (Fig.1)
CLEANING NOZZLES
Fig. 1
ON
ON
PUMP SWITCH
OFF
Page 8
BURNER SWITCH
OFF
Mini-Brute Owner’s Manual
OPERATING INSTRUCTIONS - Cont'd
15. For high pressure cleaning, install the 15°, 25°, or 40° nozzle to the gun wand.
16. Point the wand towards the object to be cleaned and squeeze the trigger to start the motor
and begin cleaning.
NOTE: This power washer is equipped with Automatic Total Stop®, a stop device which will
sense when the trigger on the gun is released. It will open the power circuit to the motor and
cause the power washer to stop.
DANGER: If Automatic Total Stop® fails to operate, DO NOT USE THE MACHINE. Contact
our Customer Service department. Further use will damage the machine and/or
cause personal injury.
DANGER: Operating a power washer that doesn't have proper water flow could result in an
explosion. If water should stop flowing from the gun, turn unit off immediately and
contact our Customer Service department.
DANGER: This power washer is equipped with a main power ON/OFF switch located on the
unit. It should always be moved to the OFF position when the power washer
is not being used to prevent possible injury or damage.
17. For chemical application,
1.
Place the chemical suction tube into a container of power washer cleaning solution.
USE ONLY APPROVED POWER WASHER CLEANERS. DO NOT USE BLEACH,
CHLORINE, OR ANY CLEANERS CONTAINING ACIDS.
2.
Connect the black low pressure nozzle to the gun wand quick connect.
3.
Point the wand towards the object to be cleaned and squeeze the trigger to start the motor
and begin cleaning.
DANGER: Allowing the detergent level to fall below the chemical feed line opening feeds air
into the system which could cause a steam explosion. Air introduced into the
system will cause pump damage and create steam space if the burner is on. The
detergent level should never fall below the chemical feed line opening.
Mini-Brute Owner’s Manual
Page 9
Fig. 2
SPRAYGUN
CLEANING
NOZZLE
HEXBOLT
HIGH PRESSURE
HOSE FITTING
PRESSURE CONTROL
WAND
WASHERS
NYLOCK NUT
HIGH PRESSURE
DISCHARGE HOSE
FRAME
WATER OUTLET
CONNECTION
DETERGENT
TRAY
CONTROL
PANEL
WATER SUPPLY
FILTER
DETERGENT
INJECTOR HOSE
GARDEN HOSE
(NOT INCLUDED)
GFCI
2.
1.
CLEANING SOLUTION
(NOT INCLUDED)
3.
GARDEN HOSE
QUICK CONNECT
Page 10
Mini-Brute Owner’s Manual
SHUT DOWN / STORAGE INSTRUCTIONS
1.
Move the Burner switch to the OFF position.
2.
Pull trigger allowing motor to run for 3 minutes and then move the Pump switch to the OFF position.
3.
Unplug the GFCI and turn off the water supply.
4.
Remove the pressure nozzle and pull trigger to release pressure in system.
5.
Disconnect and drain all hoses.
6.
Wipe down the unit and store the machine, hoses, and any accessories in a dry place where the
temperature will not fall below 40°F.
DANGER: All fuel must be empty before storage in heated building.
To prevent freeze-up follow these instructions:
1. Attach the garden hose with quick connect to the machine inlet on the rear of the machine.
2. Remove the spray nozzle from the wand.
3. Pour RV antifreeze into a large container.
4
Put the end of the chemical line in the antifreeze mixture.
5. Move the Pump switch to the ON position but leave the Burner switch in the OFF position.
6. Let the pump run until the antifreeze moves through the pump, coils, and pressure hose.
NOTE: The trigger on the gun must be pulled to allow antifreeze to pass through the coils, and then the
trigger must be released to allow the antifreeze to pass through the bypass line.
7. Move the Pump switch to the OFF position.
8. Disconnect the garden hose from the machine inlet.
9. Move the Pump switch to the ON position and run for several seconds to clear out any water that
may be remaining in the pump. Then move the Pump switch back to the OFF position.
10. Unplug the cord and store the machine, hoses, and any accessories in a dry building where the
temperature will not fall below 40°F.
DANGER: All fuel must be empty before storage in heated building.
Mini-Brute Owner’s Manual
Page 11