1
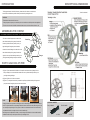
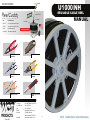
U1000/NH
REUSABLE CABLE REEL
ACCESSORIES
Model RC01S
MANUAL
RCB1
P/N
DESCRIPTION
U1000/NH
RC01S
24” Single Rod Spool Caddy
RC01L
36” Single Rod Spool Caddy
RCB1
Optional Brake Kit
U1000/NH
Reusable Cable Reel
PATENT PENDING
FIBER OPTIC 3-WAY
STRIPPER
CABLE STRIPPER
SHEARS FOR COPPER
CABLE
WIRE CUTTER &
STRIPPER
WIRE CUTTERS
HEAVEY-DUTY UTILITY
KNIVES
Toll-Free:
Local Phone:
Fax:
Email:
Address:
Website:
800-WCT-PROD (928-7763)
310-822-5212
310-306-9343
[email protected]
13309 Beach Ave.
Marina del Rey, CA 90292
www.wctproducts.com
A-15951
INTRODUCTION
DESCRIPTION & DIMENSIONS
To fully appreciate the U1000/NH’s features, please take a few minutes to review these
* Wire Not Included
instructions and familiarize yourself with the procedures for operating this tool.
CAUTION:
• Retain these instructions for future use.
• Always inspect and protect your worksite prior to use and observe all safety rules and regulations.
• Do not use or store the U1000/NH near intense heat sources, such as radiators, furnaces, etc.
ASSEMBLING THE U1000/NH
* The U1000/NH should already come assembled. If not, please follow the steps below.
1. Screw one of the flanges onto one side of the
hub with the black key facing away from the hub.
Black Key
Be sure to pull the black key toward you as you
begin twisting the flange into place clockwise.
2. Attach the second flange to the other side of the
Hub
hub with the black key facing away from the hub.
Again, be sure to pull the black key toward you as
Flanges
you begin twisting the flange into place clockwise.
HOW TO LOAD COIL OF WIRE
1. (Figure 1) Place assembled U1000/NH on a flat surface and remove the top flange from the
hub by twisting it in a counter-clockwise rotation. Be sure to pull the black key toward you as
you begin twisting the flange.
2. (Figure 2) Slide a coil of wire over the hub.
3. (Figure 3) To complete the assembly, re-attach the top flange (with the black key facing toward
you) and twist the flange into place onto the hub clockwise.
NOTE:
Figure 1
Figure 2
Figure 3
Capacity indicators are imprinted on the flanges to aid in estimating the amount of wire on a reel at all
OPTIONAL HANDLES:
times. The printed numbers are percentage indicators because the houses many different types of wire.
Snap-In Handle
Bolt-On Handle
You can slip tie-wraps through the four grooves in the hub to bundle and remove wire from the hub if
you determine there isn’t enough wire on the reel to handle a job.
Both flanges can be adjusted out should you require a larger hub dimension. A removeable handle is
included that fits into any wire keeper hole for easy rewinding of wire.
A-13836
A-13700